More Single Tooth Isolation
Anterior Composites
A Townie offers colleagues a collection of impressive single tooth isolation anterior composite cases.
Fig. 1: Nineteen-year-old with leaky resin done by her pediatric dentist after ortho. Surpass, supreme and seam-free.
Fig. 2: From the lingual.
Fig. 3: Closer.
Fig. 4: Showing her the decay.
Fig. 5: Perfect isolation.
Fig. 6: Buildup prior to any trimming. This was bonded with Surpass, layers of different supreme. C-1 B as the base, A-1 E next with the incisal GT for the translucency. Then GT translucent over the A1E as enamel layer.
Fig. 8: I did take off more from the incisal after this photo. I think it came out pretty good for a hack like me.
[Posted: 1/25/2012]
Figs. 9-16: She is getting married next month in Key West. I told her to replace this a few years ago at her initial exam. I whitened her last month and now we are ready to bond.
satchdds Member Since: 04/19/02 Post: 1 & 2 of 68
»
Dentaltown Message Board > Cosmetic Dentistry > Cosmetic Dentistry > More Single Tooth Isolation Anterior Composites ▼F ig. 1 F ig. 2 F ig. 3
F ig. 4 F ig. 5 F ig. 6
F ig. 9 F ig. 10 F ig. 11
F ig. 7
F ig. 8
continued on page 38
Interested in other discussions regarding similar techniques? Check out the following message boards:
My Single Tooth Isolation Technique
Search: Tooth Isolation
Composite Mock Up of Anterior Wear Case
Search: Anterior Composite ▼
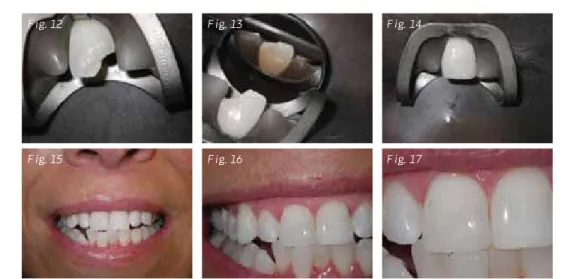
Fig. 17: Surpass, seam-free, Filtex WB, WE and some YT… how much do you all charge for this service? ■
Satch, I love the technique and use it all the time. Thanks for teaching. ■ Tom
F ig. 12 F ig. 13 F ig. 14
F ig. 15 F ig. 16 F ig. 17
JAN 12 2012 JAN 25 2012 twmdds Member Since: 02/16/04 Post: 3 of 68 continued on page 40
INCREASE YOUR PRODUCTION IMMEDIATELY
The Absolute Best Value in Dental CE Offered Anywhere!
SIGN UP
Presented by: Louis Malcmacher DDS MAGD
Course objective:
Learn HANDS-ON about the most trusted and cutting edge advances in general dentistry including operative dentistry, prosthodontics, CAD-CAM, lasers, Botox and dermal fillers, esthetic dentistry, oral medicine, lowering overhead control, total case acceptance and much more!
Tuition only
$97 per doctor, $47 per team member,
or $197
per office (doctor plus up to 4 team members)
7 AGD PACE Participation CE credits.
"Dr. Louis Malcmacher is a combination of the genius of Dr. Gordon
Christensen and the entertainment of the Madow Brothers. We loved
the Hottest Hands-On Topics course!"
– Dr. Robert Fields, Van Nuys, CABefore October 1, 2012. Limited Attendance
UP
C
O
M
IN
G
COU
RSES
October 24 – Houston, TX October 31 – Orange County, CA November 2 – Los Angeles, CA November 7 – Phoenix, AZ November 14 – Chicago, ILCall Today!
1-800-952-0521
or visit:
CommonSenseDentistry.com
THE HOTTEST TOPICS IN DENTISTRY!
Figs. 18-19: # 9 and 10 from today. I coded these. MFL, F. I charged for the facial twice.
Fig. 20: #9 isolated.
Fig. 22: #10 isolated. [Posted: 2/7/2012]
Fig. 26: Today’s rubber fun.
Met this kid last week. Pepsi addiction. Since our conversation he has only had four cans (with meals).
Figs. 27-28: Prior to trimming.
Fig. 29: 2, 3, 5 and 7. 8 is next.
Fig. 30: Prepping #8. Still loaded with dk.
Fig. 34: And his #1 with b dk... this one is for Murph... full quadrant except 4 and 6.■
satchdds Member Since: 04/19/02
Posts: 4 & 5 of 68
continued on page 42
F ig. 18 F ig. 19 F ig. 20
F ig. 21 F ig. 22 F ig. 23
F ig. 24 F ig. 25
F ig. 26 F ig. 27 F ig. 28
F ig. 29 F ig. 30 F ig. 31
F ig. 32 F ig. 33 F ig. 34
Satch, beautiful work as usual. I recently started using rd for composites after years of using it only for endo. It makes life easy! Are you allowed to bill out the same sur-face twice like you did on numbers 9 and 10? Thanks for posting. ■
Great work… and really great showcase. Certainly a great technique for longevity. ■
Good work, Satch. Usually when I use the 212 retainer it won’t stay firm. How do you stabilize the retainer? Do you put some flowable on the lingual? ■
Fig. 35: Emergency patient… lucky I have six chairs. Her son wanted mommy to try his cookie… that’s her story.
Raj D Member Since: 06/03/03 Post: 6 of 68 FEB 7 2012 skuzma2dds Member Since: 08/06/07 Post: 7 of 68 FEB 7 2012 deserteagle Member Since: 09/20/06 Post: 12 of 68 FEB 7 2012 satchdds Member Since: 04/19/02 Post: 13 of 68
F ig. 35 F ig. 36 F ig. 37
continued on page 44
Fig. 38: I had to lock the clamp with composite buttons. ■
Nice work, Satch. Are you using a mylar matrix and wedge for the interprox at all? ■Gary
Not usually a wedge but occasionally the gingival interproximal area needs a mylar. I take it out as soon as I cure the composite to build up the contact and contours.
[Posted: 2/8/2012]
Here is an older guy with some decay on the facial of #10, with a 30-year-old crown. Since I have a rubber dam on I can now etch the porcelain with Ultradent Porcelain Etch. I hate sandblasting in the mouth... yuck. The porcelain is then treated with Apex Interface fol-lowed by surpass 2 and 3. The filling was done with Injectafil from a Centrix needle tip. Almost zero finishing was needed.
ponderosa Member Since: 08/30/07 Post: 14 of 68 satchdds Member Since: 04/19/02 Posts: 15, 17, 20 & 21 of 68
F ig. 38 F ig. 39 F ig. 40
FEB 7 2012
FEB 7 2012
Fig. 41: Porcelain etch on the crown. [Posted: 2/15/2012]
Fig. 44: This is #7 on a case that we are doing implants on an accident to his centrals that I just posted. Someone asked if I ever needed a mylar. Deep decay like this for the gin-gival area. Then remove the mylar as in the picture after the mylar one.
Fig. 45: Mylar in place.
Fig. 46: Mylar removed.
Figs. 47-48: Lingual view before trimming.
Fig. 49: The tissue between 7 and 8 is bad because we just pulled #8 and grafted him last week. Cantilever pontic off of a fractured # 9. See my other thread about the trampoline.
[Posted: 2/20/2012]
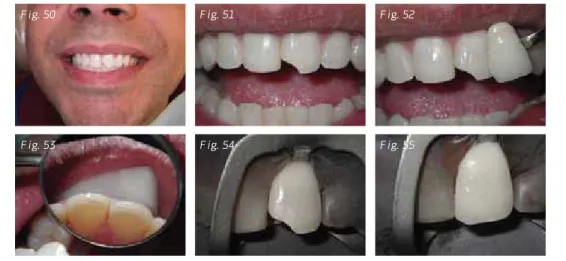
Figs. 50-54: This guy is a contractor. He lost his balance while installing a toilet and kissed it. Not kidding. That’s his story.
F ig. 41 F ig. 42 F ig. 43
F ig. 44 F ig. 45 F ig. 46
F ig. 47 F ig. 48 F ig. 49
F ig. 50 F ig. 51 F ig. 52
F ig. 53 F ig. 54 F ig. 55
Fig. 55: Prior to bonding with surpass. ■
What’s your technique for getting such nice contacts? ■
I just build the composite against the thin and stretched r.d. The contact is as long as I make it. Very different than a contact made with a mylar. It’s more like the contact you get with plumbers tape. ■
So you stretch the dam thin, place your composite, shape it and cure it, all while hold-ing the dam tight? ■
Sorry, no. I don’t need to hold the dam after it is stretched over the tooth. It is very thin. You just need to practice free-hand sculpting.
[Posted: 2/28/2012]
Crazy I keep getting these wrap around lesions…
Fig. 59: Another Pepsi please.
Fig. 60: This shot is for Dino…
Fig. 61: This is #7 as you can see #6 and 8 are prepped.
Fig. 62: #7 finished not trimmed.
Fig. 63: Building the contact for #8. As usual surpass, seam-free and Filtek Ultra.
Fig. 64: #6 isolated. Out the door a happy girl!
F ig. 59 F ig. 60 F ig. 61
F ig. 62 F ig. 63 F ig. 64
F ig. 56 F ig. 57 F ig. 58
FEB 20 2012 mling Member Since: 11/20/08 Post: 22 of 68 FEB 20 2012 satchdds Member Since: 04/19/02 Post: 23 of 68 FEB 21 2012 FEB 21 2012 mling Member Since: 11/20/08 Post: 24 of 68 satchdds Member Since: 04/19/02 Posts: 25, 28 & 31 of 68 continued on page 50
[Posted: 2/29/2012]
Figs. 65-66: I did this kid’s right side a couple of weeks ago… decay on 9, 10, 11, 12, 14 and a rotted wizzy.
Fig. 67: # 9 with a 9 clamp.
Fig. 68: 9 unfinished.
Fig. 69: #7 with a 212.
Fig. 71: #11 loaded with sub g decay.
Fig. 72: #11 with a 9 clamp.
Fig. 73: And #16 with its goober. ■
Nice! Are you placing the rubber dam after you prep? Thanks. ■
Yes, otherwise I would tear the dam. I prep with a split dam in the posterior. ■
Find it online at: www.dentaltown.com
▼
search
Single Tooth Isolation
»
F ig. 65 F ig. 66 F ig. 67
F ig. 68 F ig. 69 F ig. 70
F ig. 71 F ig. 72 F ig. 73
FEB 29 2012 FEB 29 2012 FEB 29 2012 newdoc7 Member Since: 09/03/06 Post: 32 of 68 satchdds Member Since: 04/19/02 Post: 33 of 68