Home
Menu
Inde
x
Click! You can directly jump
Troubleshooting
Transferring Videos/Photos/Podcasts
Transferring Music
ModelName: Falcon_E PartNumber: 4-164-613-11
Table of
Cont
ents
Home
Menu
Inde
x
Note Depending on the country/region in which you have purchased the player, some models may not be available.
Browsing the Operation Guide
To use the buttons in the Operation Guide
Click the buttons located in the upper right of the pages of this manual to jump
to “Table of Contents,” “About the Home Menu” or “Index.”
Hint
You can jump to the indicated page by clicking a page number in the table of contents or in the index.
You can jump to the indicated page by clicking a page reference indication (e.g., p. 6) on each page.
To search for a reference page by keyword, enter the keyword into the find text field on the Adobe Reader window.
Operation procedures may differ, depending on your Adobe Reader version.
To change the page layout
The buttons on the Adobe Reader window enable you to select how pages are
displayed.
Continuous
Pages are displayed as a continuous
roll of pages, fitting the page width
inside the window. When you scroll,
the previous or next pages scroll up
or down continuously.
Single Page
Pages are displayed one at a time,
fitting the page into the window.
When you scroll, the display changes
to the previous or next page.
Jumps to the table of contents
Find what you are looking for from a list of topics in the manual.
Jumps to the Home menu list
Find what you are looking for from a list of the option items in the player’s menu.
Jumps to the index
Find what you are looking for from a list of key words mentioned in the manual.
Table of
Cont
ents
Home
Menu
Inde
x
Table of Contents
Basic Operations and ScreensParts and Controls ...6
Turning the Player On and Off ...9
About the Home Menu ...10
How to Use the Home Menu ...13
How to Use the Option Menu ...16
About the Software ...18
Bundled Software ...18
Compatible Software ...18
Prepairing the Player Charging the Battery ...19
Selecting the Display Language ...21
Setting the Date and Time ...22
Transferring Music Selecting the Way to Transfer Music ...23
Transferring Music Using Windows Media Player 11 ...25
Importing music from CDs ...25
Transferring Music ...27
Transferring Music Using Content Transfer ...29
Transferring Music Using Windows Explorer ...31
Transferring Videos/Photos/Podcasts Selecting the Way to Transfer Videos/ Photos/Podcasts ...33
Transferring Videos/Photos/Podcasts Using Content Transfer ...34
Transferring Videos/Photos/Podcasts Using Windows Explorer ...36
Playing Music Playing Music [Music] ...39
Music playback screen ...40
Music list screen ...41
Searching for Songs ...42
Browsing cover arts to select an album (Album Scroll) ...43
Enjoying Music Playback on a Television ...45
Outputting the music playback screen and audio to a television [TV Output(Music)] ...45
Switching the television signal format [NTSC/PAL settings] ...46
Deleting Songs ...47
Using the Music Option Menu ...48
Displaying the detailed information screen [Detailed Information] ...49
Changing the Music Settings ...50
Setting the play mode [Play Mode] ...50
Setting the playback range [Playback Range]...51
Setting the sound quality [Equalizer] ...51
Customizing the surround sound [VPT(Surround)] ...53
Listening with DSEE (Sound Enhance) [DSEE(Sound Enhance)] ...54
Listening with Clear Stereo [Clear Stereo] ...54
Adjusting the volume level [Dynamic Normalizer] ...55
Selecting the album display format [Album Display Format] ...55
Using the Language Learning Function Using the Language Learning Function ...56
Activating the language learning function ...56
Rewinding slightly [Quick Replay] ...57
Playing back a specified section repeatedly (A-B Repeat) ...57
Adjusting the playback speed (DPC) ...58
ModelName: Canary_E PartNumber: x-xxx-xxx-11(1)
Table of
Cont
ents
Home
Menu
Inde
x
Watching VideosPlaying a Video [Videos] ...59
Video playback screen ...60
Video list screen ...61
Searching for Videos ...62
Browsing scenes (Scene Scroll) ...62
Enjoying Videos on a Television ...64
Outputting videos to a television [TV Output(Video)] ...64
Selecting the television aspect ratio [TV Output Size] ...65
Switching the television signal format [NTSC/PAL settings] ...65
Deleting Videos ...66
Deleting currently playing video ...66
Deleting videos by selecting from a list ...66
Using the Video Option Menu ...67
Changing the Video Settings ...68
Setting the zoom function [Zoom Settings] ....68
Playing only video sound [On-Hold Display] ...71
Arranging the video list [Order of Video List] ...71
Enjoying Podcast Playing Podcast [Podcasts] ...72
What is a podcast? ...72
Playing podcast ...72
Podcast playback screen ...73
Episode list screen ...75
Podcast list screen ...76
Deleting Podcasts ...77
Deleting the currently playing episode ...77
Deleting an episode in the episode list ...77
Deleting a podcast ...77
Deleting all podcasts ...78
Using the Podcast Option Menu ...79
Viewing Photos Viewing Photos [Photos] ...81
Photo display screen ...82
Photo list screen ...83
Deleting Photos ...84
Using the Photo Option Menu ...85
Changing the Photo Settings ...86
Setting the photo list display format [Photo List Format] ...86
Listening to FM Radio Listening to FM Radio [FM Radio] ...87
FM Radio screen ...88
Presetting broadcast stations automatically [Auto Preset]...89
Presetting broadcast stations manually [Save to Preset] ...90
Deleting preset broadcast stations ...90
Using the FM Radio Option Menu ...91
Changing the FM Radio Settings ...92
Setting the reception [Scan Sensitivity] ...92
Setting monaural/stereo [Mono/Auto] ...92
Using the Noise Canceling Function About Noise Canceling ...93
Playing Back with the Noise Canceling Function [Noise Canceling] ...95
Listening to External Audio Sources [External Input Mode] ...96
Reducing Ambient Noise without Playing Back Music [Quiet Mode] ...98
Changing the Noise Canceling Settings ...99
Selecting NC Environment [Select NC Environment] ...99
Adjusting the Noise Canceling effect [Set Noise Cancel Level] ... 100
Common Settings Changing the Common Settings ...101
Displaying the player information [Unit Information] ... 101
Limiting the volume [AVLS (Volume Limit)] ... 102
Turning off the beep sound [Beep Settings] ... 102
Setting the time for blanking the screen [Screen Off Timer] ... 103
Adjusting the brightness of the screen [Brightness] ... 104
Setting up wallpaper [Wallpaper Settings] ... 105
Setting the current time [Set Date-Time] ... 106
Setting the date format [Date Display Format] ... 107
Setting the time format [Time Display Format] ... 107
Limiting the charge amount [Battery Care] ... 108
Returning to the factory settings [Reset All Settings] ... 108
Table of
Cont
ents
Home
Menu
Inde
x
Formatting memory [Format] ... 109
Using USB connection mode [USB Connection Mode] ... 109
Selecting the display language [Language Settings] ... 110
Useful Facts About Battery Life ...111
What are Format and Bit Rate? ...112
What is audio format? ... 112
What is video format? ... 113
What is photo format? ... 113
Storing Data ...114
Upgrading the Player’s Firmware ...115
Troubleshooting Troubleshooting ...116
Messages ...129
Additional Information Precautions ...131
License and Trademark Notice ...142
Specifications...160
ModelName: Falcon_E PartNumber: 4-164-613-11
Table of
Cont
ents
Home
Menu
Inde
x
Parts and Controls
BACK/HOME button
Press to go up one list screen level, or
to return to the previous menu.
Press and hold the BACK/HOME
button to display the Home menu
(
p. 10).
5-way button
*1Starts playback and enables
navigation of the player’s on-screen
menus (
p. 13, 16).
Headphone jack
Insert the headphone plug until it
clicks into place. If the headphones
are connected improperly, the sound
from the headphones will be
impaired.
About the Noise Canceling function
The Noise Canceling function is
available only when using the
supplied headphones.
The supplied headphones can only
be used for these models, and cannot
be used for other equipment.
WM-PORT jack
Connect the supplied USB cable, or
optional peripheral devices. You can
also connect the player to a television
using the optional video/audio
output cable (
p. 45, 64).
Display
See
p. 40, 60, 73, 82, 88.
VOL +
*1/– button
Adjusts the volume.
OPTION/PWR OFF button
Press to display the option menu (
p. 16, 48, 67, 79, 85, 91).
If you press and hold the OPTION/
PWR OFF button, the screen turns
off and the player enters standby
mode(
p. 9).
Table of
Cont
ents
Home
Menu
Inde
x
HOLD switch
You can protect the player against
accidental operation during
transportation by setting the HOLD
switch. By sliding the HOLD switch
in the direction of the arrow
,
all operation buttons are disabled. If
you slide the HOLD switch in the
opposite position, the HOLD
function is released.
Strap hole
This is used to attach a strap (sold
separately).
RESET button
Press the RESET button with a small
pin, etc., to reset the player (
p. 116).
*1 There are tactile dots. Use them to help with
ModelName: Falcon_E PartNumber: 4-164-613-11
Table of
Cont
ents
Home
Menu
Inde
x
Installing the earbuds
If the earbuds do not fit your ears correctly, the noise canceling effect will not
be optimal. To optimize noise canceling and to enjoy better sound quality,
change the earbuds to another size, or adjust the earbud position to fit your
ears comfortably and snugly.
The M size earbuds are attached to the headphones before shipment. If you feel
the M size earbuds do not suit your ears, replace them with the supplied S or L
size earbuds. Confirm the size of the earbuds by checking the color inside.
When you change the earbuds, turn to install them firmly on the headphones
to prevent the earbud from detaching and remaining in your ear.
Earbud sizes (inside color)
L
S M
To detach an earbud
While holding the headphone, twist and pull the earbud off.
Hint
If the earbud slips and cannot be detached, wrap it in a dry soft cloth.
To attach an earbud
Twist and push the inside parts of the earbud into the headphone until the
projecting part of the headphone is fully covered.
Colored parts
Small Large
Table of
Cont
ents
Home
Menu
Inde
x
Turning the Player On and Off
To turn on the player
Press any button to turn the player on.
Hint
If appears on the top of the screen, slide the HOLD switch in the opposite direction of the arrow to cancel the HOLD function.
To turn off the player
Press and hold the OPTION/PWR OFF button. [POWER OFF]appears, then
the player enters standby mode, and the screen turns off.
Hint
Set the date and time on the player before using it ( p. 22, 106).
During pause, if there is no operation for about 10 minutes, the player automatically enters standby mode, and the screen turns off. In standby mode, press any button to turn on the screen again.
While the player is in standby mode, if there is no operation for about a day, the player completely turns off automatically.
Note
You cannot operate the player when it is connected to a computer. Disconnect the USB cable before operating the player.
After connecting to a computer with the USB cable, the resume information of the last played song, video, photo, etc., is cleared. Reselect the desired content from the list screen.
The player consumes battery power very slightly even when it is in standby mode. Therefore, the player might turn completely off unexpectedly depending on the power remaining in the battery.
OPTION/PWR OFF button HOLD switch
ModelName: Falcon_E PartNumber: 4-164-613-11
Table of
Cont
ents
Home
Menu
Inde
x
About the Home Menu
The following table shows the items of the Home menu. For details on the item
list of each menu, see
p. 11.
For details about each menu item, refer to the specified reference page.
[Go to video
playback screen] Display the video playback screen.
[FM Radio] Listen to FM radio broadcasting ( p. 87).
[Noise Canceling] Reduce unwanted ambient noise by active noise control technology ( p. 93). Select this icon to enable or disable the Noise Canceling function.
[Photos] View photos transferred to the player ( p. 81). [Music] Listen to songs transferred to the player ( p. 39). [Videos] Watch videos transferred to the player ( p. 59). [Settings] Set up the player and its applications ( p. 101). [Podcasts] Play back podcast episodes transferred to the player (
p. 72). [Go to song
playback screen] Display the music playback screen.
Continued [FM Radio]
[Go to video playback screen] [Photos] [Music] [Settings]
Information area
[Videos]
[Go to song playback screen] [Podcasts]
Table of
Cont
ents
Home
Menu
Inde
x
[Go to video playback screen] ... 60
[FM Radio] ... 87
[Noise Canceling]
[Noise Canceling: On/Off] ...95[NC Modes] ...96, 98
[Photos] ... 81
[Music] ... 39
[Videos] ... 59
[Settings]
[Music Settings] [Play Mode] ... 50 [Playback Range] ... 51 [Equalizer]... 51 [VPT(Surround)] ... 53 [DSEE(Sound Enhance)] ... 54 [Clear Stereo] ... 54 [Dynamic Normalizer] ... 55[Album Display Format] ... 55
[Language Learning Mode] .... 56
[DPC (Speed Control)] ... 58 [TV Output(Music)] ... 45 [NTSC/PAL settings] ... 46 [Video Settings] [Zoom Settings]... 68 [On-Hold Display] ... 71
[Order of Video List] ... 71
[TV Output(Video)] ... 64
[NTSC/PAL settings] ... 65
[TV Output Size] ... 65
[Photo Settings] [Photo List Format] ... 86
[FM Radio Settings] [Scan Sensitivity] ... 92
[Mono/Auto] ... 92
[NC Settings] [Set Noise Cancel Level]...100
[Select NC Environment] ... 99
[Common Settings] [Unit Information] ...101
[AVLS (Volume Limit)] ...102
[Beep Settings] ...102
[Screen Off Timer] ...103
[Brightness] ...104
[Wallpaper Settings] ...105
[Clock Settings] ...106, 107 [Battery Care] ...108
[Reset/Format] ...108, 109 [USB Connection Mode] ...109
[Language Settings] ...21, 110
[Podcasts] ... 72
[Go to song playback screen] .... 40
ModelName: Falcon_E PartNumber: 4-164-613-11
Table of
Cont
ents
Home
Menu
Inde
x
About the information area
The icons shown in the table below appear in the information area. The icons
vary according to the playback status, setting or screen.
For details about the icons, see each reference page.
Icons Description
, , , ,
, , etc Playback status ( p. 40, 60, 82) Hold indication ( p. 7)
Noise Canceling indication ( p. 95)
TV output indication ( p. 45) Remaining battery power ( p. 19)
Table of
Cont
ents
Home
Menu
Inde
x
How to Use the Home Menu
The Home menu is the starting point of each application, such as searching for
songs, changing settings, etc.
You can display the Home menu by pressing and holding the BACK/HOME
button of the player.
From the Home menu, you can select the desired item on the screen by using
the 5-way button.
/
/
/
button: Selects an item.
button: Confirms an item.
Continued BACK/HOME button
ModelName: Falcon_E PartNumber: 4-164-613-11
Table of
Cont
ents
Home
Menu
Inde
x
In this manual, operating instructions from the Home menu are described as
below.
Example: From the Home menu, select [Music]
[Album]
desired
album
desired song.
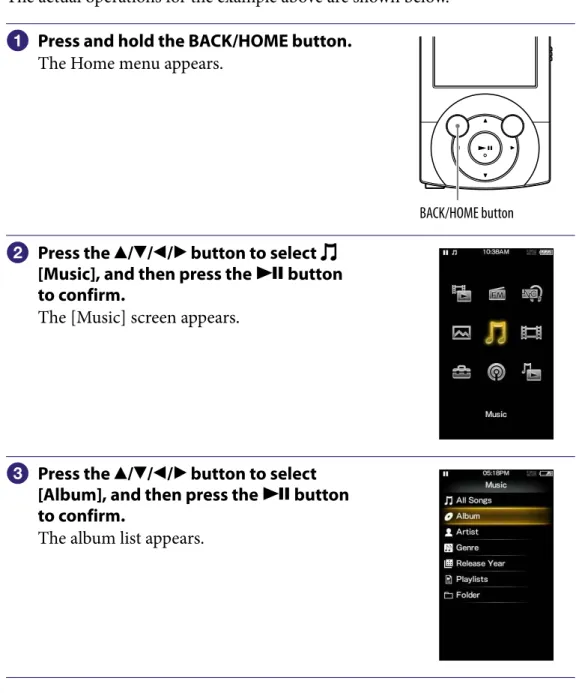
The actual operations for the example above are shown below.
Press and hold the BACK/HOME button.
The Home menu appears.
BACK/HOME button
Press the
/
/
/
button to select
[Music], and then press the
button
to confirm.
The [Music] screen appears.
Press the
/
/
/
button to select
[Album], and then press the
button
to confirm.
The album list appears.
Table of
Cont
ents
Home
Menu
Inde
x
Press the
/
/
/
button to select an
album, and then press the
button to
confirm.
The song list for the selected album appears.
Press the
/
/
/
button to select a
song, and then press the
button to
confirm.
The music playback screen appears and
playback begins.
To return to the Home menu during operation
Press and hold the BACK/HOME button.
To return to the previous screen during operation
ModelName: Falcon_E PartNumber: 4-164-613-11
Table of
Cont
ents
Home
Menu
Inde
x
How to Use the Option Menu
The option menu items vary depending on the function, allowing you to
change the settings of each application.
You can display the option menu by pressing the OPTION/PWR OFF button.
Press the OPTION/PWR OFF button once more to dismiss the option menu.
From the option menu, you can select the desired item on the screen by using
the 5-way button.
/
buttons: Select a menu from among the
option menu, (Search) menu, and [To
Playback Screen] menu.
*1
/
buttons: Select a menu item.
button: Confirms an item.
*1 The (search) menu or the [To Playback Screen]
icon is not displayed depending on the screen.
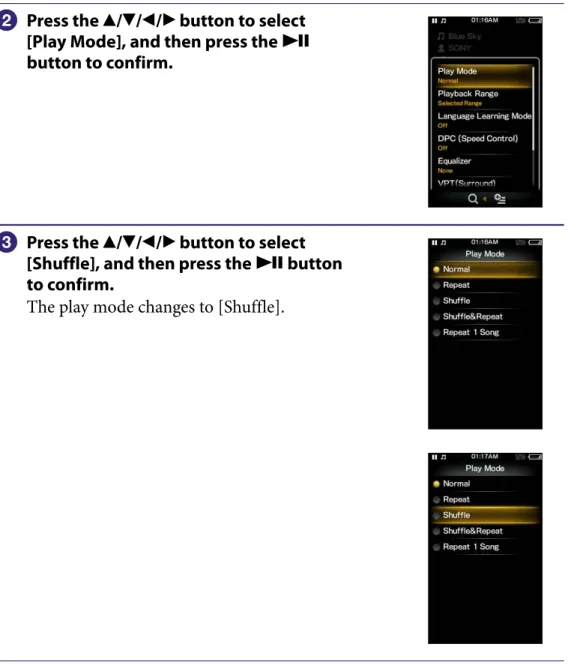
For example, the operations for setting [Play Mode] option to [Shuffle] are
shown below.
From the music playback screen, press
the OPTION/PWR OFF button.
The option menu appears.
OPTION/PWR OFF button
Continued 5-way button
OPTION/PWR OFF button
Table of
Cont
ents
Home
Menu
Inde
x
Press the
/
/
/
button to select
[Play Mode], and then press the
button to confirm.
Press the
/
/
/
button to select
[Shuffle], and then press the
button
to confirm.
The play mode changes to [Shuffle].
The items in the option menu differ, depending on the screen on which you
press the OPTION/PWR OFF button.
For details, see the following pages.
“Using the Music Option Menu” (
p. 48)
“Using the Video Option Menu” (
p. 67)
“Using the Podcast Option Menu” (
p. 79)
ModelName: Falcon_E PartNumber: 4-164-613-11
Table of
Cont
ents
Home
Menu
Inde
x
About the Software
Bundled Software
Content Transfer
Content Transfer can transfer music, videos or photos from a computer to the
player by a simple drag-and-drop operation. You can use Windows Explorer or
iTunes, etc., to drag-and-drop data to Content Transfer. Content Transfer can
also convert a video file of a format not supported by the player into a playable
format. For details on operation, refer to the Help of the software.
Transferable files: Music (MP3, WMA, AAC, WAV), Photo (JPEG), Video
(MPEG-4 Simple Profile, AVC (H.264/AVC) Baseline Profile, WMV
*1)
*1 Some WMV files cannot be played back after being transferred by Content Transfer. If you
retransfer them using Windows Media Player 11, they may become playable.
Hint
ATRAC files managed by SonicStage can be transferred to the player after conversion to MP3 file format.
WALKMAN Guide
The Operation Guide (this PDF file) and the useful list of links are available to
you.
Compatible Software
Windows Media Player 11
Windows Media Player can import audio data from CDs and transfer data to
the player.
Transferable files: Music (MP3, WMA), Video (WMV), Photo (JPEG)
For details on operation, refer to the Help of the software or visit the following
website.
Table of
Cont
ents
Home
Menu
Inde
x
Charging the Battery
The player’s battery is recharged while the player is connected to a running
computer.
When you connect the player to your computer, use the supplied USB cable.
When the remaining battery indication in the upper right corner of the display
shows:
, charging is completed (charging time is approx. 3 hours).
When you use the player for the first time, or if you have not used the player
for a long time, recharge it fully (to
in the remaining battery indication of
the display).
About the [Battery Care] mode
In the [Battery Care] mode, the player stops recharging a short time before the
battery is fully charged. When you do not need the extended use over many
hours, you can set [Battery Care] to [On] to increase the available number of
cycles of charge and discharge which affects the battery lifespan, i.e., extend the
battery lifespan.
For how to set the [Battery Care] mode, see “Limiting the charge amount
[Battery Care]” (
p. 108).
About the battery indicator
The battery indicator in the information area shows remaining battery charge.
As the battery power gets lower, the bars of the icon disappear. If [LOW
BATTERY. Please Charge.] appears, you cannot use the player. In this case,
charge the battery by connecting to your computer. See
p. 164 on battery
duration.
Hint
While charging, after a lapse of time of the [Screen Off Timer] setting ( p. 103), the screen turns off. To see the charging status or other indications, press any button to turn on the screen.
ModelName: Falcon_E PartNumber: 4-164-613-11
Table of
Cont
ents
Home
Menu
Inde
x
Note If you charge the player when it has not been used for a long period, your computer may not recognize the player or nothing may appear on the display. Charge the player for about 5 minutes, and it starts operating properly.
Charge the battery in an ambient temperature of between 5 ºC to 35 ºC (41 ºF to 95 ºF). If you try to charge the battery in an ambient temperature outside this range, the icon may appear, and charging cannot be performed.
The number of times the battery can be recharged before it is used up is approximately 500 times. This number may vary, depending on the conditions under which you use the player.
The battery indicator on the display is only an estimate. For example, one section of black in the indicator will not always indicate exactly one-fourth of the battery’s charge.
[Do not disconnect.] appears in the display while the computer accesses the player. Do not disconnect the supplied USB cable while [Do not disconnect.] appears. Otherwise, data being transferred or data in the player may be damaged.
The control buttons on the player become inoperative while it is connected to a computer.
If you do not intend to use the player for over half a year, charge the battery at least once during this time to maintain battery performance.
Some USB devices connected to the computer may interfere with proper operation of the player.
We do not guarantee battery recharging using a personally assembled/modified computer.
If the computer enters a power saving mode, such as the Sleep or Hibernation mode, while the player is connected via the USB cable, the player’s battery will not be charged. Instead, the player continues to draw power from the battery, discharging it.
Do not leave the player connected for extended periods to a laptop computer that is not connected to AC power, since the player may discharge the computer’s battery.
While the player is connected to a computer, do not turn on, restart, wake up from sleep mode, or shut down the computer. These operations may cause the player to
malfunction. Disconnect the player from the computer before performing these operations.
Heat may build up in the player while charging. This is not malfunction.
After connecting to a computer with the USB cable, the resume information of the last played song, video, photo, etc., is cleared. Reselect the desired content from the list screen.
Table of
Cont
ents
Home
Menu
Inde
x
Selecting the Display Language
You can select from a variety of languages for menus and messages.
From the Home menu, select [Settings]
[Language Settings]
desired language setting.
Language Messages and menus are displayed in
[Deutsch] German [English] English [Español] Spanish [Français] French [Italiano] Italian [Português] Portuguese [Русский] Russian [ ]*1 Japanese [ ] Korean [ ] Simplified Chinese [ ] Traditional Chinese
*1 Japanese display may not be available, depending on the release region of the player.
BACK/HOME button 5-way button
ModelName: Falcon_E PartNumber: 4-164-613-11
Table of
Cont
ents
Home
Menu
Inde
x
Setting the Date and Time
Some applications of the player do not work correctly until the date and time
are set. Set the current date and time before using the player.
From the Home menu, select [Settings]
[Common Settings]
[Clock Settings]
[Set Date-Time].
Press the
/
button to select a year, and then press the
/
button to change the value.
As in step
, adjust the settings for month, date, hour, and
minutes, and then press the
button to confirm.
Hint
You can select the date format from among [YYYY/MM/DD], [MM/DD/YYYY], and [DD/MM/YYYY]. Furthermore, you can select the time format from either [12-hour] or [24-hour]. For details, see “Setting the date format [Date Display Format]” ( p. 107), or “Setting the time format [Time Display Format]” ( p. 107).
Note
If the battery power is used up because, for example, the player has not been used for a long time, your settings for date and time may be lost and “-” will be displayed instead of the current date and time.
The clock may gain or lose up to 60 seconds per month. In this case, set the clock again.
BACK/HOME button 5-way button
Table of
Cont
ents
Home
Menu
Inde
x
Selecting the Way to Transfer Music
You can import music from audio CDs or from the Internet, etc. To import
music into your computer, use appropriate software.
You can transfer music to the player in the following three ways.
Transferring music from CDs using Windows Media Player 11 (
p. 25)
You can import music from your CDs, etc., to your computer, and transfer
them to the player using Windows Media Player 11.
Transferring music from iTunes, etc., using Content Transfer (
p. 29)
If you have already managed music with iTunes, etc., you can transfer
them to the player using Content Transfer.
Transferring music by drag-and-drop using Windows Explorer (
p. 31)
You can directly transfer music stored on your computer by drag-and-drop
using Windows Explorer.
ModelName: Falcon_E PartNumber: 4-164-613-11
Table of
Cont
ents
Home
Menu
Inde
x
Hint
For detailed information on how to import music, refer to the Help of each software.
For details about supported file formats, see “Supported file format” ( p. 160).
The player does not use SonicStage software (SonicStage software, developed by Sony, manages music on a computer or transfers music to other types of players). For this player, you can transfer music in the above three ways, not using SonicStage.
ATRAC files managed by SonicStage can be transferred to the player after conversion to MP3 file format.
Note
During data transfer between the player and a computer, [Do not disconnect.] appears on the player’s screen. While [Do not disconnect.] is displayed, do not disconnect the USB cable. Otherwise, the data being transferred or the data stored in the player may be damaged.
Do not leave the player connected for extended periods to a laptop computer that is not connected to AC power, since the player may discharge the computer’s battery.
If you turn on or restart the computer while the player is connected to the computer, the player may malfunction. In this case, press the RESET button of the player to reset it (
Table of
Cont
ents
Home
Menu
Inde
x
Transferring Music Using Windows Media Player 11
You can import songs from your CDs, etc., to your computer, and transfer
them to the player using Windows Media Player 11.
Hint
For details about usage, or support on Windows Media Player, refer to the Windows Media Player information from the following web site:
http://support.microsoft.com/
Importing music from CDs
You can use Windows Media Player 11 to copy (rip) music from your CDs.
Follow these instructions to rip songs from a CD to your computer.
Insert an audio CD.
Start up Windows Media Player 11, and then click the [Rip] tab at
the top of the window.
When connected to the Internet, Windows Media Player 11 obtains CD
information (CD title, song name or artist name, etc.), and displays it in
the window.
ModelName: Falcon_E PartNumber: 4-164-613-11
Table of
Cont
ents
Home
Menu
Inde
x
Click [Start Rip].
Windows Media Player 11 begins to import the CD.
The imported songs are indicated as [Ripped to library]. Wait until all
songs have been imported.
Hint
Imported songs are stored in the [My Music] folder (Windows XP) or [Music] folder (Windows Vista) of the computer. Click the [Library] tab of the Windows Media Player 11 window to find them.
Windows Media Player 11 obtains the CD information from a database on the Internet. However, depending on the CD, information may not be available in the database. If your CDs’ information is missing, you can add it after importing. For information about adding and editing CD information, refer to the Help of Windows Media Player 11. If you want a song not to be imported, uncheck the checkbox to the left of the song title.
Note
Imported songs are limited to private use only. Use of a song beyond this limitation requires permission of the copyright holders.
Table of
Cont
ents
Home
Menu
Inde
x
Transferring Music
You can use Windows Media Player 11 to transfer music from your computer
to the player.
Note
If Content Transfer starts automatically after connecting the player to your computer using the supplied USB cable, close or ignore Content Transfer as Content Transfer need not be used. For details on setting automatic start of Content Transfer, refer to the Help of Content Transfer.
Start up Windows Media Player 11, and then connect the player to
your computer using the supplied USB cable.
Insert the connector of the USB cable into the player with the mark
facing up.
The [Device Setup] window appears.
Click [Cancel].
Close the auto play window, if it appears, by clicking [Cancel] or the Close
icon.
If you click [Finish] instead of [Cancel], the entire library data of
Windows Media Player is automatically copied to the player. If the
library data size is larger than the available storage space on the player,
the copy process will not start.
You can open the [Device Setup] window at any time. To open it,
right-click [WALKMAN] on the left side of the Windows Media Player
window, and then click [Set Up Sync].
ModelName: Falcon_E PartNumber: 4-164-613-11
Table of
Cont
ents
Home
Menu
Inde
x
Click the [Sync] tab on the Windows Media Player 11 window.
Drag-and-drop the desired songs to the Sync List on the right side
of the window.
The songs are added to the Sync List.
Click [Start Sync] to start synchronization.
When synchronization is complete, a message confirming you can
disconnect the player appears on the Sync List. After completion, close
Windows Media Player 11, and disconnect the player from the computer.
Table of
Cont
ents
Home
Menu
Inde
x
Transferring Music Using Content Transfer
If you have already managed music with iTunes, etc., you can transfer them to
the player using Content Transfer. You can use iTunes, etc., to drag-and-drop
music to Content Transfer.
Note
Content Transfer cannot be used for Windows Media Player contents.
Contents with copyright protection cannot be transferred.
Content Transfer supports data transfer from iTunes 8.1 to the player. For details on restrictions on transferring songs from iTunes, visit the customer support Web sites (
p. 141).
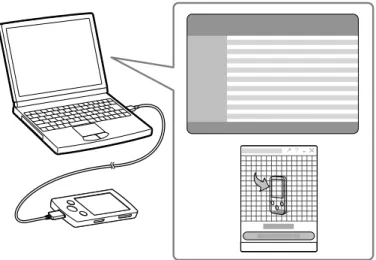
Connect the player to your computer using the supplied USB cable.
Insert the connector of the USB cable into the player with the mark
facing up.
Content Transfer starts automatically.
For details on setting automatic start and general operation of Content
Transfer, refer to the Help of Content Transfer.
You can also click [All programs] in the [start] menu, and then [Content
Transfer] - [Content Transfer] to start the software.
Start up iTunes, etc.
ModelName: Falcon_E PartNumber: 4-164-613-11
Table of
Cont
ents
Home
Menu
Inde
x
Select the desired songs from iTunes, etc., and drag-and-drop them
to Content Transfer.
Content Transfer recognizes the type of data by filename extension, and
sends it to the appropriate folder of the player.
iTunes, etc.
Table of
Cont
ents
Home
Menu
Inde
x
Transferring Music Using Windows Explorer
You can directly transfer data by drag-and-drop using Windows Explorer on
your computer.
Connect the player to your computer using the supplied USB cable.
Insert the connector of the USB cable into the player with the mark
facing up.
Click [start] – [My Computer] or [Computer] – [WALKMAN] –
[Storage Media], and then select the [MUSIC] folder.
Data hierarchy may differ, depending on your computer environment.
ModelName: Falcon_E PartNumber: 4-164-613-11
Table of
Cont
ents
Home
Menu
Inde
x
Drag-and-drop files or folders into the [MUSIC] folder, or one of its
subfolders.
Accessibility to files and folders beyond the 8th level is not guaranteed.
Note
Do not disconnect the USB cable while [Do not disconnect.] appears on the player. Otherwise, data being transferred or stored on the player may be damaged. If the player is disconnected while files are being transferred, unnecessary files may be left in the player. In this case, transfer usable files back to the computer and format the player (
p. 109).
Do not change folder names or delete the [MUSIC], [MP_ROOT], [MPE_ROOT], [VIDEO], [DCIM], [PICTURE], [PICTURES]and [PODCASTS]folders.
Do not change folder or file names directly under the [MP_ROOT] or [MPE_ROOT] folders, otherwise, they will not be displayed on the player.
Some files may not be played back on the player due to copyright protection.
If Content Transfer starts automatically after connecting the player to your computer using the supplied USB cable, close or ignore Content Transfer as Content Transfer need not be used. For details on setting automatic start of Content Transfer, refer to the Help of Content Transfer.
1st 7th 8th 9th
Music files or folders in your computer
Table of
Cont
ents
Home
Menu
Inde
x
Selecting the Way to Transfer Videos/Photos/
Podcasts
Before transferring videos/photos/podcasts to the player, you need to import
them into your computer. You can import videos from recorded videos or from
the Internet, etc., or photos from a digital camera, etc., and import podcast
episodes from the Internet.
To import videos/photos/podcasts into your computer, use appropriate
software.
You can transfer videos/photos/podcasts to the player in the following three
ways.
Transferring videos/photos/podcasts using Content Transfer (
p. 34)
You can transfer videos/photos/podcasts stored on your computer to the
player using Content Transfer.
Transferring videos/photos/podcasts by drag-and-drop using
Windows Explorer (
p. 36)
You can directly transfer videos/photos/podcasts stored on your computer
by drag-and-drop using Windows Explorer.
Transferring videos/photos using Windows Media Player 11
You can transfer videos/photos managed with Windows Media Player 11
to the player using Windows Media Player 11.
For details about usage, or support on Windows Media Player, refer to the
Windows Media Player information from the following web site:
http://support.microsoft.com/
ModelName: Falcon_E PartNumber: 4-164-613-11
Table of
Cont
ents
Home
Menu
Inde
x
Transferring Videos/Photos/Podcasts Using
Content Transfer
You can transfer videos/photos/podcasts stored on your computer to the player
using Content Transfer. You can transfer videos/photos/podcasts by
drag-and-drop of the desired videos/photos/podcasts from Windows Explorer to Content
Transfer.
Note
Do not disconnect the USB cable while [Do not disconnect.] appears on the player, as the data being transferred may be damaged.
Contents with copyright protection cannot be transferred.
Connect the player to your computer using the supplied USB cable.
Insert the connector of the USB cable into the player with the mark
facing up.
Content Transfer starts automatically.
For details on setting automatic start and general operation of Content
Transfer, refer to the Help of Content Transfer.
You can also click [All programs] in the [start] menu, and then [Content
Transfer] - [Content Transfer] to start the software.
Table of
Cont
ents
Home
Menu
Inde
x
Select the desired videos/photos/podcasts from Windows Explorer,
and drag-and-drop them to Content Transfer.
Content Transfer recognizes the type of data by filename extension, and
sends it to the appropriate folder of the player.
Content Transfer Video/photo/podcast files or folders
ModelName: Falcon_E PartNumber: 4-164-613-11
Table of
Cont
ents
Home
Menu
Inde
x
Transferring Videos/Photos/Podcasts Using
Windows Explorer
You can directly transfer data by drag-and-drop using Windows Explorer on
your computer.
Hint
Some WMV files can be played back only by transferring using Windows Media Player 11.
Connect the player to your computer using the supplied USB cable.
Insert the connector of the USB cable into the player with the mark
facing up.
Click [start] – [My Computer] or [Computer] – [WALKMAN] –
[Storage Media], and then select the [VIDEO], [PICTURE],
[PICTURES], [DCIM] or [PODCASTS] folder.
Data hierarchy may differ, depending on your computer environment.
Table of
Cont
ents
Home
Menu
Inde
x
Drag-and-drop files or folders into the [VIDEO], [PICTURE],
[PICTURES], [DCIM] or [PODCASTS] folder or one of its subfolders.
Video files or folders: drag-and-drop into the [VIDEO] folder, or one of
its subfolders.
Photo files or folders: drag-and-drop into the [PICTURE], [PICTURES]
or [DCIM] folder, or one of their subfolders.
Podcast folders and episode files: drag-and-drop podcast folders into the
[PODCASTS] folder and episode files into the podcast folders.
Note
Do not disconnect the USB cable while [Do not disconnect.] appears on the player. Otherwise, data being transferred or stored on the player may be damaged. If the player is disconnected while files are being transferred, unnecessary files may be left in the player. In this case, transfer usable files back to the computer and format the player (
p. 109).
Do not change folder names or delete the [MUSIC], [MP_ROOT], [MPE_ROOT], [VIDEO], [DCIM], [PICTURE], [PICTURES] and [PODCASTS] folders.
Do not change folder or file names directly under the [MP_ROOT] or [MPE_ROOT] folders. Otherwise, they will not be displayed on the player.
Continued Video/photo/podcast files or
folders in your computer
Video: [VIDEO] folder in your player
Photo: [PICTURE], [PICTURES] or [DCIM] folder in your player
ModelName: Falcon_E PartNumber: 4-164-613-11
Table of
Cont
ents
Home
Menu
Inde
x
Drag and drop files or folders into the correct folder as shown in the following illustrations.
The player can play back videos on the 1st to 8th level of the [VIDEO] folder, and can display photos on the 1st to 8th level of the [PICTURE], [PICTURES] and [DCIM] folders. The player can play back podcast episodes on the 2nd level of the [PODCASTS] folder.
Videos
Photos
Podcasts
1st 7th 8th 9th 1st 7th 8th 9th 1st 2nd 3rd
Some files may not be played back on the player due to copyright protection.
If Content Transfer starts automatically after connecting the player to your computer using the supplied USB cable, close or ignore Content Transfer as Content Transfer need not be used. For details on setting automatic start of Content Transfer, refer to the Help of Content Transfer.
Table of
Cont
ents
Home
Menu
Inde
x
Playing Music
[Music]
To play music, select [Music] on the Home menu to display the [Music]
screen.
From the Home menu, select [Music].
The music menu appears.
You can select the desired search method to display the music list screen
and search for songs. For details, see “Search method” of “Searching for
Songs” (
p. 43).
Select desired search method
desired
song.
The music playback screen appears and
playback of the songs begins.
Select items until a song list appears.
For details on how to operate the music
playback screen, see “Music playback
screen” (
p. 40).
BACK/HOME button 5-way button
ModelName: Falcon_E PartNumber: 4-164-613-11
Table of
Cont
ents
Home
Menu
Inde
x
Music playback screen
*1 While playing back variable bit rate (VBR) songs, the elapsed time indication and the progress bar
indicator may be unstable and inaccurate.
Operations on the music playback screen
To (screen indication) Do this
Play ()/pause ()*1 Press the button.
Fast forward ()/
fast rewind () Press and hold the / button. Find the beginning of the previous
(or current) song ()/ find the beginning of the next song ()
Press the / button.
Browse album covers to select an
album*2 Press the
/ button.
Return to the list screen Press the BACK/HOME button
*1 During pause, if there is no operation for a while, the player automatically enters standby mode. *2 You can browse album covers only when [Language Learning Mode] is set to [Off] ( p. 56).
Icons which appear by pressing the OPTION/PWR OFF button
Icon Description
(Search) Shows the search menu. You can select the desired search method to display the list screen and search for songs. For details, see “Searching for Songs” ( p. 42).
(Option Menu) Shows the option menu. For details on the music option menu, see “Using the Music Option Menu” ( p. 48).
Progress bar*1
Play Mode ( p. 50), Playback Range ( p. 51), Equalizer ( p. 51), VPT (Surround) ( p. 53), A-B repeat ( p. 57) indication icons
Song name Artist name Album title
Current song number/Total song number to be played Elapsed time/Total time*1
Table of
Cont
ents
Home
Menu
Inde
x
Music list screen
The following are examples of music list screens.
Hint
You can change the display format of the album list to display the cover arts only (
p. 55).
Operations on the music list screen
To Do this
Confirm an item in the list Press the button. Move the cursor up or down Press the / button.
Press and hold the / button to scroll up or down faster.
Move the cursor left/right when
an index is displayed Press the / button. Display the previous/next screen
of the list when an index is not displayed
Press the / button.
Move the cursor left/right when
displaying cover arts only Press the / button. Return to the list screen of the
next upper level Press the BACK/HOME button.
Icons which appear by pressing the OPTION/PWR OFF button
Icon Description
(Search)*1 Shows the search menu. You can select the desired search
method to display the list screen and search for songs. For
Index
The initials of song and album, etc., names in the list section appear.
ModelName: Falcon_E PartNumber: 4-164-613-11
Table of
Cont
ents
Home
Menu
Inde
x
Searching for Songs
When you select (Search) on the music playback screen or the list screen,
the search menu appears. You can select the desired search method on the
search menu to search the music list for a desired song.
On the music playback screen or the list screen, press the OPTION/
PWR OFF button.
Select (Search)
the desired search method
the desired song.
Select items as follows until a song list appears.
Continued OPTION/PWR OFF
button
(Search) 5-way button
Table of
Cont
ents
Home
Menu
Inde
x
Search method
Method Description[All Songs] Select a song from the all songs list. [Album] Select an album song.
[Artist]*1 Select an artist an album song.
[Genre] Select a genre an artist an album song. [Release Year] Select a release year an artist song. [Playlists]*2 Select a playlist a song.
[Folder] Select a folder song.
*1 “The” at the beginning of the artist name is omitted when arranging the list.
*2 Playlists are created by using Windows Media Player 11. For information on how to create a
playlist, refer to the Help of the Windows Media Player 11. Cover art images registered to a playlist are not displayed on the player.
Hint
[All Songs], [Album], [Artist] and [Genre] lists are arranged in alphanumeric order. [Release Year] list is arranged in reverse chronological order. In [Folder] list, folders are displayed in name order first, then files are displayed in name order. In this case, upper or lower case letters are not distinguished.
Browsing cover arts to select an album
(Album Scroll)On the music playback screen, you can press the
/
button to scroll the cover
art up or down and select the album.
Note
When [Language Learning Mode] is set to [On], you cannot use the album scroll function ( p. 56).
From the Home menu, select [Music]
desired item to display
the playback screen.
Press the
/
button on the music playback screen.
The album scroll screen appears.
ModelName: Falcon_E PartNumber: 4-164-613-11
Table of
Cont
ents
Home
Menu
Inde
x
Press the
/
button to browse album covers.
The cover art images are arranged by title in alphabetical order.
Select the cover art of the desired album, then press the
button.
The music playback screen reappears and playback of the selected album
begins.
To cancel the browsing
Press the BACK/HOME button.
Hint
Cover art only appears if cover art information is available. You can set cover art using Windows Media Player 11, or another transfer capable software for setting cover art. For details on operation, refer to the Help or maker of the software. Cover art may not be displayed, depending on the cover art file format.
Note
The cover art only appears when the cover art information is included in the song file.
The cover art may not appear depending on its format.
Table of
Cont
ents
Home
Menu
Inde
x
Enjoying Music Playback on a Television
You can connect the player to a television to output the music screen and
audio. You can view cover art, etc., on a larger screen.
Outputting the music playback screen and audio to a television
[TV Output(Music)]
Connect the player and a television using the optional video/audio
output cable (WMC-NWV10).
For details, refer to the manual of the video/audio output cable.
Depending on the country/region, the video/audio output cable
(WMC-NWV10) may not be available.
From the Home menu, select [Settings]
[Music Settings]
[TV Output(Music)]
[On].
Setting type
Type Description
[On] Outputs the music screen to a television connected to the player. [Off] Displays the music screen on the player’s screen. (Default
setting)
Continued Video/audio output cable (WMC-NWV10) (optional)
ModelName: Falcon_E PartNumber: 4-164-613-11
Table of
Cont
ents
Home
Menu
Inde
x
Note If you connect the player to a computer while outputting to a television, the TV output stops because the USB connection has precedence over the TV output.
Some televisions may suffer screen burn if you continue to display a still image on the screen for a long time. Refer to the operation guide of your television, and if it is vulnerable to screen burn, avoid displaying the same image on the television.
The [TV Output Size] setting ( p. 65) takes effect on video output but does not affect music screen output.
Pixel length-to-width ratio differs between the player and television. As a result, the height of the music screen on the television may be slightly stretched.
Depending on song, playback volume may be low compared to television broadcast programs. If the volume is too low, turn up the television. Be sure to turn it down before watching television programs.
Switching the television signal format
[NTSC/PAL settings]You can select the player’s video output signal. Select the signal format that is
appropriate to the television you intend to connect, if necessary.
From the Home menu, select [Settings]
[Music Settings]
[NTSC/PAL settings]
appropriate setting for the television.
Type Description
[NTSC] Outputs video signal in NTSC format. [PAL] Outputs video signal in PAL format.
Table of
Cont
ents
Home
Menu
Inde
x
Deleting Songs
When you delete songs from the player, use the software you used to transfer
the songs, or Windows Explorer.
For details about using the software, see the Help of the software.
Note
ModelName: Falcon_E PartNumber: 4-164-613-11
Table of
Cont
ents
Home
Menu
Inde
x
Using the Music Option Menu
You can bring up the music option menu by pressing the OPTION/PWR OFF
button on the music list or on the music playback screen. For details on how to
use the option menu, see
p. 16.
The option items shown on the option menu vary depending on the screen
from which you bring it up. See the reference page for settings and usage.
Option items appearing on the music list screen
Option items Description/reference page
[Album Display Format] Selects the album list format ( p. 55).
Option items appearing on the music playback screen
Option items Description/reference page
[Play Mode] Sets the play mode ( p. 50). [Playback Range] Sets the playback range ( p. 51).
[Language Learning Mode] Allows you to use the [Quick Replay] function and the A-B repeat function ( p. 56).
[DPC (Speed Control)] Adjusts the playback speed of songs ( p. 58). [Equalizer] Customizes the sound quality ( p. 51).
[VPT(Surround)] Customizes the [VPT(Surround)] settings ( p. 53). [Add to Wishlist/Remove from
Wishlist] Adds the song to the wish list to purchase it on the service corresponded software./ Removes the song from the wish list.
[Detailed Information] Displays detailed information of a song, such as playing time, audio format, bit rate, and file name ( p. 49).
Table of
Cont
ents
Home
Menu
Inde
x
Displaying the detailed information screen
[Detailed Information]
From the music playback screen, press the OPTION/PWR OFF
button to bring up the option menu.
Select [Detailed Information].
Detailed information screen
Song name Artist name Album title Release year Length of Song Genre Codec
While playing back copyright protected songs, [Secured] appears. Bit rate
While playing back variable bit rate songs, [VBR] is shown. File name
ModelName: Falcon_E PartNumber: 4-164-613-11
Table of
Cont
ents
Home
Menu
Inde
x
Changing the Music Settings
To change the music settings, select [Settings] from the Home menu, then
select [Music Settings].
Setting the play mode
[Play Mode]The player offers a variety of play modes, including random play and selected
repeat play.
From the Home menu, select [Settings]
[Music Settings]
[Play Mode]
desired play mode type.
Type (icon) Description
[Normal] (No icon) The songs within the playback range are played back in the song list order. (Default setting)
[Repeat] ( ) The songs within the playback range are played back in the song list order and then repeated.
[Shuffle] ( ) The songs within the playback range are played back in random order.
[Shuffle&Repeat]
( ) The songs within the playback range are played back in random order and then repeated. [Repeat 1 Song] ( ) The current song or the song selected from a song list is played
back repeatedly.
Note
Songs to be played back differ depending on the [Playback Range] settings ( p. 51).
BACK/HOME button
[Settings] 5-way button