SpringCM SSO and User
Management Guide
March 2013OVERVIEW... 4
SPRINGCM ADDRESS BOOK ... 5
ADDRESS BOOK ITEMS ... 5
ENABLE/DISABLE USERS AND ACTIVATION ... 6
PASSWORD POLICIES ... 8
USER SYNCHRONIZATION ... 10
BULK USER IMPORT CSVFILE AND DOCUMENT RULE ... 10
CSV Format ... 10
Processing via Address Book Upload ... 11
Document Rule Configuration ... 12
WEB SERVICES ... 19
Authentication ... 19
Create, Delete, Update, and Load Users and Groups ... 20
Sample Operations ... 21
SALESFORCE USER SYNCHRONIZATION ... 23
Step 1 – Set Field-Level Security on SpringCM user components ... 24
Step 2 – Apply SpringCM user components to user page layout ... 25
Step 3 – Configure SpringCM settings for each user ... 26
Step 4 – Mapping Salesforce users to SpringCM security groups ... 27
Step 5 – Enable user sync ... 28
SINGLE SIGN-ON (SSO) ... 29
OVERVIEW ... 29
SAML2.0FEDERATED AUTHENTICATION ... 29
Configuring SpringCM for an Identity Provider ... 30
Configuring an Identity Provider for SpringCM ... 31
INVOKING SP-INITIATED SSO ... 33
SAMPLE IDENTITY PROVIDER CONFIGURATIONS ... 34
Active Directory Federation Services (ADFS) ... 34
Salesforce Identity Provider ... 42
OneLogin ... 46
Ping Identity ... 46
SPRINGCMPROPRIETARY SALESFORCE SSO ... 47
SALESFORCE SSO VS.SALESFORCE AS A SAMLIDENTITY PROVIDER ... 48
SPRINGCMAPI'S AND SINGLE SIGN ON ... 49
Salesforce SSO API Authentication ... 49
OAuth 2.0 ... 50
SpringCM User Keys ... 50
MIXING SSO AND PASSWORD LOGIN ... 53
SAMLSSO FOR SPRINGCMMOBILE,EDIT,SCAN AND SYNC ... 55
APPENDIX A: C# .NET USER MANAGEMENT SAMPLE CODE ... 56
APPENDIX B: JAVA USER MANAGEMENT SAMPLE CODE ... 59
Overview
The management of users and what they are authorized to do in an account is an important consideration of any SpringCM implementation. Regular maintenance of a SpringCM customer account includes periodically adding, deleting, and updating users and groups within the account. Other user management related tasks include password maintenance, user profile updates, and group membership assignment. This document provides an overview of user management within a SpringCM account, outlines best practices for synchronizing an existing customer user repository with a SpringCM account, and provides a methodology for implementing authentication via Single Sign-On (SSO) between the customer's environment and SpringCM.
In SpringCM, the Address Book is the primary interface for managing user creation and deletion, password management, group membership, roles, user profile information, and distribution groups. As SpringCM is a cloud based vendor, the Address Book provides everything a customer implementation needs to provide secure content to its end users without requiring any additional infrastructure in the customer's environment. When a customer chooses to do all of their user management directly in SpringCM, the management of users, groups, passwords, and profiles is done directly in the SpringCM Address Book user interface by an account administrator.
However, in many cases, SpringCM customers have already made a significant investment in creating and managing an enterprise user store as part of their local intranet, commonly an instance of Active Directory, an LDAP compliant directory, or custom database. Often times, when customers first implement SpringCM, the community of users granted access to the account may be comprised of a subset of the users in the enterprise repository as well as users that are not part of the enterprise repository such as contractors and partners. In this scenario, customers often will opt to maintain users in two places, managing authentication and authorization for applications hosted in the local intranet through the enterprise user store and manage SpringCM users through the SpringCM administrative user interface.
In other cases however, customers do not want to manage users, group membership, and passwords in two different places and find it advantageous to leverage their existing enterprise user repository as part of their SpringCM implementation. In this scenario, SpringCM offers multiple integration methods for synchronizing users, groups, and profile information from a customer enterprise user repository to the SpringCM Address Book. Additionally, a SpringCM account can optionally enable Single Sign-On (SSO) so that users will not have to keep a separate password to log into their SpringCM account. With SSO in place, authentication and password management is always delegated to infrastructure managed by the customer or a cloud based identity provider.
The following section of this document gives an overview of managing users via the SpringCM administrative user interface and the remaining sections cover integration options and samples for user synchronization and Single Sign-On with an existing customer enterprise user repository.
SpringCM Address Book
Before designing an integration with SpringCM for user synchronization or SSO, it is helpful to have a
fundamental understanding of the SpringCM Address Book and how user's are managed within SpringCM. The Address Book is accessed via a top level tab in SpringCM. A typical view of it is depicted in Figure 1.
Figure 1. The SpringCM Address Book
Address Book Items
The Address Book allows you to create and manage four different top level items:
User -- Users are members of the SpringCM account who will authenticate via the SpringCM login page or SSO and participate in routine activities such as document management and workflow.
Contact -- A contact is information about a person that does not directly login or access the SpringCM account directly. The contact information is used to allow SpringCM users to easily distribute documents via email or fax.
Distribution Group -- Distribution Groups can contain Contacts or Users and are used to easily distribute documents via email and fax to a group of people.
Security Group -- Security groups are used to provide authorization in SpringCM. Groups can contain one or more users and are then used to provide View, Edit, Create, and Delete access to documents and folders.
In addition to contacts, users, and groups, another important item managed in the Address Book is a user's role. Roles determine actions that user can take in the account. There are 5 roles in SpringCM:
Guest -- only view access to documents
Limited Subscriber -- Similar to guests, but can participate in Advanced Workflow
Full Subscriber -- Complete access to document management features. Most users will be configured with this role.
User Administrator -- Complete access to document management features and the ability to perform some administrative tasks, such as creating users and document rules.
Super Administrator -- Complete access to document management features and full administrative power including managing user security. There should generally only be one or a few Super
Administrators per account.
SpringCM allows roles to be used to set security on documents and folders; however, best practices recommend using security groups for this purpose.
Best Practice: A common best practice for users that have Super Administrator responsibility is to maintain two user logins. The user's normal day-to-day login is created with a role of "Full Subscriber", and a second, special login is created that the user only uses when they have to do account administration. This keeps the user from inadvertently making changes as part of their day to day activities in the account.
Enable/Disable Users and Activation
SpringCM will optionally allow you to set an Enabled From and Enabled Until date. If they are left blank, users will always be allowed to access the account. If the dates are set, users will only be allowed to access the account when the current date is between the from and until dates. This will allow you to create users, but not allow them to access an account until some point in the future, such as a go live date. If you create a user with a date in the future in the Enabled From field and choose the Send Activation E-Mail box, the email will not go out to user until the date specified in the Enabled From date field is reached.
A second common scenario is that you may want to create a user and only give them temporary access to the account, such as is often the case when using contractors or third parties that need access to your SpringCM account for designated period of time. In this case, you specify an end date in the Enabled Until box and the user will no longer have access to the account when the date is reached. You may set both an Enabled From and an Enabled Until, but it is not required that you set both. For example, you may create a user with a blank
Enabled From date and an Enabled Until date 3 months in the future. This will give the user immediate access to the account and then automatically remove access in 3 months time.
Enabled/Disabled is separate, unrelated, concept from a user's Status, which is either Active or Inactive.
Active/Inactive applies to the user across all accounts that they have access to and refers to the status of the user when they are first created and sent an activation email. They will remain Inactive until they click the link in their activation email and set a password, at which point they will be become Active. In certain user sync scenarios described later in this document, activation emails are not sent to the user and they may be shown as Active immediately upon creation. Users may not SSO to an account while they are Disabled, however SSO will still work if a user has a status of Inactive.
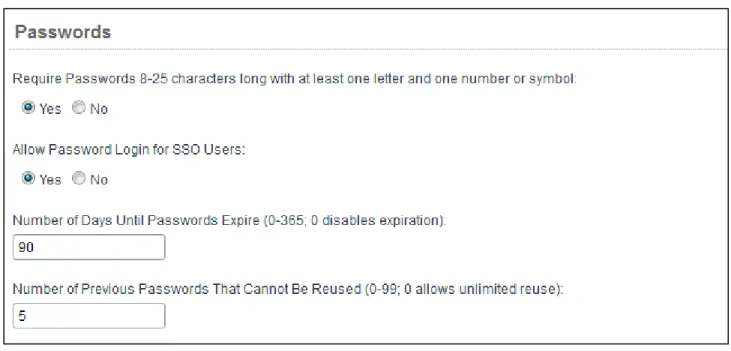
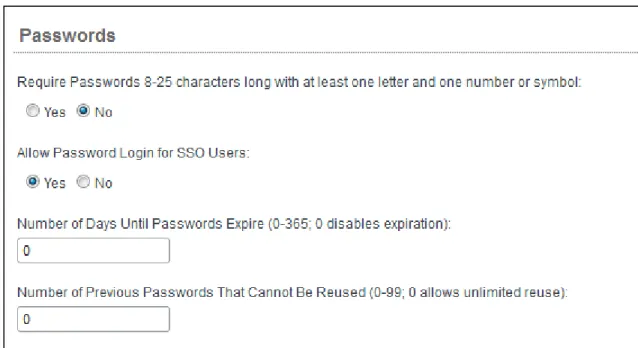
Password Policies
SpringCM also provides facilities for password management. Password policies are set by a Super Administrator and are configured by choosing the Preferences tab and then choosing the Security sub-tab and navigating to the Passwords section. Figure 2 shows the options for setting password polices for an account.
Figure 2. SpringCM password policy configuration
Additionally, the Security section of the Preferences tab has other password related settings such as the number of consecutive failed logins allowed before locking an account and IP Address and time based login restrictions.
Reference:
Further information on managing the Address Book can be obtained from SpringCM's online knowledge base. The following list contains link to the most pertinent articles:
Account Contact -- http://www.springcm.com/knowledge-article/address-book/account-contact
Address Book Workspace -- http://www.springcm.com/knowledge-article/address-book/address-book-workspace Change User Role -- http://www.springcm.com/knowledge-articles/address-book/change-user-role
Create Contact -- http://www.springcm.com/knowledge-article/address-book/create-contact Create User -- http://www.springcm.com/knowledge-article/address-book/create-user
Distribution Groups -- http://www.springcm.com/knowledge-article/address-book/distribution-groups
Edit Users and Contacts -- http://www.springcm.com/knowledge-article/address-book/edit-users-and-contacts Personas -- http://www.springcm.com/knowledge-articles/address-book/personas
Private Contact Entries -- http://www.springcm.com/knowledge-article/address-book/private-contacts-entries Resend Account Activation Email -- http://www.springcm.com/knowledge-article/address-book/resend-account-activation-email
Reset Password -- http://www.springcm.com/knowledge-articles/address-book/reset-password Security Groups -- http://www.springcm.com/knowledge-articles/address-book/security-groups Share Contacts -- http://www.springcm.com/knowledge-article/address-book/share-contacts
User Synchronization
SpringCM offers three integration methodologies for the synchronization of users and groups from an enterprise user repository to the SpringCM Address Book. The three methods are:
1. Bulk loading via predefined CSV formats 2. SOAP based Web services
3. Synchronization from Salesforce
Note: The first 2 methods listed above do not involve directly connecting SpringCM to an internal LDAP or Active Directory instance. They first require the data to be queried from the repository and then pushed via web services or CSV. With the third option, SpringCM will directly connect to Salesforce for synchronization.
All options are described in detail in this section.
Bulk User Import CSV File and Document Rule
Web services, described in the following section, provide quite a bit of functionality to maintain the Address Book programmatically. However, some organizations may not have the resources for building and maintaining this type of integration between their enterprise user repository and SpringCM.
Fortunately, SpringCM also offers a non programmatic way of synchronizing an enterprise user repository with the Address Book. SpringCM provides a standard CSV format that can be used to create users, delete users, create groups, and update group memberships. The CSV may be uploaded directly in the Address Book user interface or triggered via a Bulk User Import Document Rule that is often used in conjunction with FTP/SFTP. The CSV file may be generated manually in tool like Microsoft Excel, or scripted against a source repository. Some scripting examples are shown later in this section.
CSV Format
The first row of the CSV file must contain the headers describing each column's data. The headers can be the following:
Email -- The email address of the user. This is always required. FirstName -- First name of the user
LastName -- Last name of the user
Role -- The users role. If omitted for a new user, the user will be created with the role of "Full Subscriber". If updating the user, they will maintain their current role.
Groups -- This is a pipe(‘|’) delimited list of the group names that the user on the line is a member of. The user will be removed from any groups they are currently a member of that are not in the list and will be added to any new groups in the list. If the group name does not exist in the account, the group will automatically be created and the user will then be added as a member.
Active -- Valid values for this field is either "true" or "false". A value of "true" means they belong in the Address Book, and false means that they will be deleted.
Title -- The user's title that will show in the address book.
Department -- The user's department that will show up in the address book. Company -- The user's company that will show up in the address book. Address1 -- The user's address line 1 that will show up in the address book. Address2 -- The user's address line 2 that will show up in the address book. Address3 -- The user's address line 3 that will show up in the address book. City -- The user's city that will show up in the address book.
State -- The user's state/province that will show up in the address book. PostalCode -- The user's postal code that will show up in the address book.
Country -- The user's country that will show up in the address book. Should be a valid country name from the address book's country drop down list.
PhoneNumber -- The user's phone number that will show up in the address book. FaxNumber - The user's fax number that will show up in the address book.
Persona -- The user's persona, should a valid name of a persona already created in the account. ManagedBy -- The user's manager, should be a valid email address of a user in the account.
SendActivationEmail -- Valid values for this field is either "true" or "false". Indicates if activation email will be sent to created user.
EnabledStartDate -- The start date when this user can access the account. EnabledEndDate -- The end date when this user can access the account.
Processing via Address Book Upload
Once a CSV file is created, it may be uploaded directly in the Address Book user interface. On the Address Book tab choose Address Book>Bulk Import Users. You will be taken to a new screen and prompted to upload your CSV. If any errors or warnings occur, SpringCM will email you with a detailed log of the data issues encountered while processing the CSV.
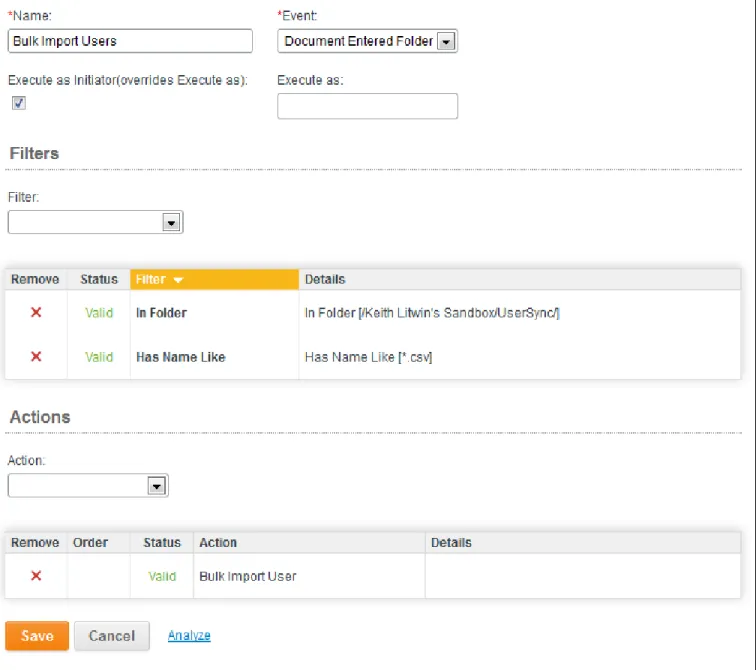
Document Rule Configuration
To setup an account to process bulk user import formatted CSV files, first create a folder in SpringCM that will be used as the destination for uploading the inbound CSV files. Best practices dictate that this folder should only be accessible by Super Administrators and only used to upload bulk user import CSVs. Once the folder is created, navigate to Preferences, click on Smart Rules and then choose Rule-> New Document Rule from the drop down menu and configure a new rule with the following parameters.
Event: Document Added
Filters: In Folder [your bulk user import folder] and Has Name Like [*.csv]
Actions: "Bulk Import Users" is the only action required. It is optional, but a best practice to add a "Move Document" action following the "Bulk Import Users" action so that the CSV file is moved to an archive folder after it has been processed. It can be moved to the Trash as well. When a Bulk Import Users Document Rule
executes, the document rule log will indicate how many users were Added, Updated and Deleted.
Figure 3. Bulk User Import Document Rule Configuration
Since the CSV file is a standard format, it can be generated from any source user repository. Customers may opt to generate the files manually as part of a one-time load, or may generate them as part of an automated nightly process to keep the Address Book users and groups in sync with the enterprise repository.
The following two examples show how a CSV can be generated from Active Directory using Powershell and then SFTP'd to SpringCM using Wincsp scripting. Powershell and Winscp are both free tools, see
http://technet.microsoft.com/en-us/scriptcenter/dd742419 and http://winscp.net/eng/docs/scripting for more information on obtaining them.
Note: The samples shown below will only work on a machine that has Powershell 2.0 and .NET Framework 3.5 or higher installed. These examples are only for illustration purposes only. If they are leveraged for a production implementation, they must updated with filters and directory roots that correspond to the customer Active
Directory implementation. They may be used, edited, and distributed in any way the customer sees fit however given that customers have different environments and configurations of their Active Directory, the scripts will not be supported by SpringCM support. Customers may use them as a starting point and will likely need filters to only extract a smaller subset of users and groups than what these samples will add to the CSV file.
Generate Bulk User Import CSV simple, all users in an Organizational Unit: #This script will only work with Powershell 2.0 and .NET 3.5
#Import the account management assembly
Add-Type -AssemblyName "System.DirectoryServices.AccountManagement"
#Variable for the output file, whatever directories specified here must exist $outputfile ="C:\temp\springusers.csv"
#Create the header, this will also create the file if it does not exist "Email,FirstName,LastName,Groups,Active" | Out-File $outputfile
# create the context i.e. connect to the domain
$ctype = [System.DirectoryServices.AccountManagement.ContextType]::Domain
$coptions = [System.DirectoryServices.AccountManagement.ContextOptions]::Negotiate
$context = New-Object -TypeNameSystem.DirectoryServices.AccountManagement.PrincipalContext -ArgumentList $ctype,"mydomain.com","ou=user,dc=mydomain,dc=com",$coptions
$userQueryFilter = New-Object
-TypeNameSystem.DirectoryServices.AccountManagement.UserPrincipal -ArgumentList $context
$searcher = New-Object System.DirectoryServices.AccountManagement.PrincipalSearcher
$users = $searcher.FindAll()
#Loop through the users foreach ($user in $users) {
$outputGroups = New-Object System.Collections.ArrayList
#This will get all of the groups and nested groups $groups = $user.GetAuthorizationGroups()
foreach($group in $groups) {
$outputGroups.Add($group.name) }
#Format the output
$delimitedGroups = [string]::join('|',$outputGroups) $line =
[string]::join(',',($user.emailaddress,$user.GivenName,$user.Surname,$delimitedGroups,"true")) $line | Out-File $outputfile -append
}
Generate Bulk User Import CSV, users changed in the last day: #This script will only work with Powershell 2.0 and .NET 3.5 #Import the account management assembly
Add-Type -AssemblyName "System.DirectoryServices.AccountManagement"
#Variable for the output file, whatever directories specified here must exist $outputfile ="C:\temp\usersdaily.csv"
#Create the header, this will also create the file if it does not exist "Email,FirstName,LastName,Groups,Active" | Out-File $outputfile
## create the context i.e. connect to the domain
$ctype = [System.DirectoryServices.AccountManagement.ContextType]::Domain
$coptions = [System.DirectoryServices.AccountManagement.ContextOptions]::Negotiate
$context = NewObject TypeNameSystem.DirectoryServices.AccountManagement.PrincipalContext -ArgumentList $ctype,"mydomain.com","ou=users,dc=mydomain,dc=com",$coptions
#Here we create a filter for users who have changed in the last day
#Note that whenChanged is used instead of modifyTimeStamp because whenChanged is replicated $editTime = (Get-Date).AddDays(-1).ToUniversalTime().ToString("yyyyMMddHHmmss") + ".0Z"
$filter = "(&(objectCategory=User)(whenChanged>=$editTime))"
#Create the connection and search root $searchRoot = New-Object
System.DirectoryServices.DirectoryEntry("LDAP://ou=users,dc=mydomain,dc=com")
#These are the properties we want returned
$propertiesToLoad = "distinguishedname","name","givenname","sn","mail"
#Setup the the search and load matching users
$directorySearcher = New-Object System.DirectoryServices.DirectorySearcher -ArgumentList $searchRoot,$filter,$propertiesToLoad,"OneLevel"
$users = $directorySearcher.FindAll()
$userQueryFilter = New-Object -TypeNameSystem.DirectoryServices.AccountManagement.UserPrincipal -ArgumentList $context
$searcher = New-Object System.DirectoryServices.AccountManagement.PrincipalSearcher $searcher.QueryFilter = $userQueryFilter
foreach ($user in $users) {
#Convert from a directory entry object to user principal...makes it easier to get the groups $userPrincipal =
[System.DirectoryServices.AccountManagement.UserPrincipal]::FindByIdentity($context,$user.Proper ties.distinguishedname)
#Process groups
$outputGroups = New-Object System.Collections.ArrayList $groups = $userPrincipal.GetAuthorizationGroups() foreach($group in $groups) { $outputGroups.Add($group.name) } $delimitedGroups = [string]::join('|',$outputGroups)
#Print the output to a file $line =
[string]::join(',',($userPrincipal.emailaddress,$userPrincipal.GivenName,$userPrincipal.Surname, $delimitedGroups,"true"))
$line | Out-File $outputfile -append }
Winscp script sftptospring.txt:
Open [email protected]:[email protected] cd "/My Path/Usersync"
option transfer ascii put c:\users.csv close
Web services
SpringCM exposes a SOAP based Web services API that provides a wide range of functionality that includes folder and document management, workflow functions, and user management. This document assumes that the reader has some familiarity with Web services and will only focus on the user and group management functions exposed in the API. The examples in the section are shown in C# .NET, PHP, and Java (Axis client), however SpringCM does not dictate any preferred client technology. Virtually any SOAP client can be used with the API, and the demonstrated method calls will remain the same regardless of the SOAP client technology used. SpringCM Web services are secure and before getting started with them, you will need to contact SpringCM support via email ([email protected] or servicedesk.springcm.net) to generate an API key for your account. For general information on getting started with SpringCM Web services and reference for the full API, see the following URL:
http://www.springcm.com/faq/faqs-for-apis
Note: SpringCM versions the WSDL used to access the API as new functionality is added. At the time of this writing, the current version is v12 however it maybe versioned at any major release.
Authentication
To start any session with Web services, the first call made will always be to one of the authenticate methods. The authenticate methods will return you a token in the context of the user you authenticated with and will be used in all subsequent API calls. The sample shown below is the recommended way to authenticate with a username, password and account id. To create Users and Contacts, you must authenticate with a user that has the User Administrator or Super Administrator role. To create Groups or manage group membership, you must
authenticate with a user that has the Super Administrator role. Best practices dictate creating a dedicated user that is used only for connecting to the API. The section SpringCM API's and Single Sign On at the end of this document outlines some alternate ways of connecting to the API.
Authentication .NET Sample:
SpringCMServiceSoapClient service = new SpringCMServiceSoapClient();
string token =
Authenticate Java Sample:
SpringCMServiceSoapProxy springCMService = new SpringCMServiceSoapProxy(); String token =
springCMService.authenticateNonDefault(<username>,<password>,<accountId>,<apikey>);
Authenticate PHP Sample:
$authResult = $springCM->AuthenticateNonDefault( array( 'userName'=>'<your id>',
'password'=>'<your password>', 'AccountId'=>'<your account id>', 'apiKey'=>'<your api key>'
));
// Get the inner object from the SOAP response $token = $authResult->AuthenticateNonDefaultResult;
Once you have authenticated, you can start working with the API. The web service API is object oriented with the following objects representing items in the Address Book:
SCMUserAccount -- Represents a user in the SpringCM Address Book. Derives from SCMContactInfo and SCMBaseObject.
SCMContact -- Represents a contact in the SpringCM Address Book. Derives from SCMContactInfo and SCMBaseObject.
SCMGroup -- Represents a SpringCM security or distribution group. Derives from SCMBaseObject.
Create, Delete, Update, and Load Users and Groups
The creation, deletion, and update of contacts, users and groups in the SpringCM Address Book are all handled similarly in the SpringCM API. The SpringCM service exposes the following methods that apply to all
SCMBaseObjects:
Load -- Used to get an object based on its internal id Save -- Used to create or update an object in SpringCM Delete -- Used to delete an object in SpringCM
In addition to the above methods, the SpringCM API exposes methods specific to User and Contact management: UserGetByAccountId -- Gets all the users in a given account.
ContactFind -- Used to find a Contact or User via search criteria. Searchable fields are First Name, Last Name, Email Address, and Company
UserSetPassword -- Changes the password for the user context used in the authenticate call ResetPassword -- Sends an email to a user that allows them to change their password
Additionally, there are methods specific to Group management: GroupFind -- Used to find a Group via search criteria
GroupGetByContact -- Used to get the groups that a User is assigned to
Sample Operations
Appendices A,B and C contain sample code that depict some common operations executed using the above objects and methods. They are code snippets and assume that authentication has taken place and a token has been generated. Appendix A contains C# .NET examples, Appendix B contains Java examples and Appendix C has samples written in PHP.
Each appendix has a sample for the following operations that highlight programmatic management of the SpringCM Address Book:
Create User Delete User
Find user and list group memberships Find or Create Group and Add Users Reset Password
References:
Object Link SCMUserAccount https://www.springcm.com/atlas/webservices/v12/documentation/html/T_AD EXS_WebServices_v12_Common_SCMUserAccount.htm SCMContact https://www.springcm.com/atlas/webservices/v12/documentation/html/T_AD EXS_WebServices_v12_Common_SCMContact.htm SCMGroup https://www.springcm.com/atlas/webservices/v12/documentation/html/AllMe mbers_T_ADEXS_WebServices_v12_Common_SCMGroup.htm Method Link AuthenticateNonDefault https://www.springcm.com/atlas/webservices/v12/documentation/html/M_AD EXS_WebServices_v12_Common_SCMBase_AuthenticateNonDefault.htm Load https://www.springcm.com/atlas/webservices/v12/documentation/html/M_AD EXS_WebServices_v12_SpringCMService_Load.htm Save https://www.springcm.com/atlas/webservices/v12/documentation/html/M_AD EXS_WebServices_v12_SpringCMService_Save.htm Delete https://www.springcm.com/atlas/webservices/v12/documentation/html/M_AD EXS_WebServices_v12_SpringCMService_Delete.htm UserGetByAccountId https://www.springcm.com/atlas/webservices/v12/documentation/html/M_AD EXS_WebServices_v12_SpringCMService_UserGetByAccountId.htm ContactFind https://www.springcm.com/atlas/webservices/v12/documentation/html/M_AD EXS_WebServices_v12_SpringCMService_ContactFind.htm UserSetPassword https://www.springcm.com/atlas/webservices/v12/documentation/html/M_AD EXS_WebServices_v12_SpringCMService_UserSetPassword.htm ResetPassword https://www.springcm.com/atlas/webservices/v12/documentation/html/M_AD EXS_WebServices_v12_SpringCMService_ResetPassword.htm GroupFind https://www.springcm.com/atlas/webservices/v12/documentation/html/M_AD EXS_WebServices_v12_SpringCMService_GroupFind.htm GroupGetByContact https://www.springcm.com/atlas/webservices/v12/documentation/html/M_AD EXS_WebServices_v12_SpringCMService_GroupGetByContact.htmSalesforce User Synchronization
SpringCM's native Salesforce integration provides the ability to synchronize users directly from Salesforce to the SpringCM Address Book. This section assumes that you have already installed and configured SpringCM's managed package for Salesforce in the account you want to synchronize, but if not, you can visit SpringCM's listing on the App Exchange for more information about SpringCM's managed package and account configuration:
http://appexchange.salesforce.com/listingDetail?listingId=a0N300000016coCEAQ
After your integration is complete, you can optionally configure automatic user synchronization. Configuration of the SpringCM Cloud Connector for Salesforce to sync users from Salesforce to SpringCM is discussed in this section and consists of the following steps:
1. Set Field-Level Security on SpringCM user components 2. Apply SpringCM user components to user page layout 3. Configure SpringCM user components
4. Map Salesforce user types to SpringCM security groups 5. Enable user sync
Step 1 – Set Field-Level Security on SpringCM user components
The following will describe the steps necessary to Set Field-Level Security on SpringCM user components 1. In Salesforce, navigate to Setup ->Customize -> Users -> Fields
2. Scroll down to User Custom Fields and find the SpringCM Role and SpringCM User fields
3. Click on the SpringCM Role/User field and press button to Set Field-Level Security
4. Set the Visible and Read-Only checkboxes for each Profile as appropriate to only allow certain users to see and/or manage these fields on the User record
Best Practice: Before adding these fields to the page layout for Users, it is recommended to secure these fields to only be editable by the Profiles, like System Administrator, who are responsible for managing users in your Salesforce.com account. Securing these fields to only certain Profiles prevents users from changing their SpringCM permissions by changing their SpringCM User flag or SpringCM Role in Salesforce.com.
Step 2 – Apply SpringCM user components to user page layout
The following will describe the steps necessary to apply the SpringCM user components to the Salesforce user layout
5. In Salesforce, navigate to Setup -> Manage Users -> Users 6. Choose any user to view
7. Click the blue Edit Layout link in the upper right
8. Drag the SpringCM User field down to additional information 9. Drag the SpringCM Role field down to additional information 10. Click Save
Step 3 – Configure SpringCM settings for each user
This section will walk you through how to set the SpringCM User Flag and role for each user. During the user sync process, this information will be passed to SpringCM to create, modify or delete the user record in SpringCM.
1. In Salesforce, navigate to Setup -> Manage Users -> Users 2. Choose any user to view
3. Click the Edit button
4. Scroll down to the section titled Additional Information 5. Check the box labeled SpringCM User
6. Select the appropriate SpringCM Role from the drop down list 7. Click Save
Step 4 – Mapping Salesforce users to SpringCM security groups
This section walks you through the process to map your Salesforce users to SpringCM security groups. 1. In SpringCM, navigate to Preferences -> Account Preferences -> Salesforce Configuration 2. Scroll down to the bottom of the page, to a section called Map Salesforce and SpringCM Security 3. Click the blue Add New Mapping Link
4. Choose the Salesforce Profile you would like to map from the dropdown list
Note: Salesforce Profile is the default setting, please contact SpringCM support if you would like to set up mappings based on Salesforce Role
5. Select the appropriate SpringCM security groups from the list of available security groups. Use the Shift or Control functions on your keyboard to select multiple.
6. Click the orange right arrow to move them to the selected side 7. Click Save
Step 5 – Enable user sync
The last step is to now enable synchronization between SpringCM and Salesforce
Note: this step may have been completed during your configuration of the package during initial set up.
1. Scroll to the middle of the Salesforce Configuration Page in SpringCM 2. Find the section called Keep Users in sync with Salesforce
3. Click the Yes radio button 4. Click Save
Single Sign-On (SSO)
Overview
When Single Sign On is enabled for a SpringCM account, user passwords do not have to be set in order for a user to access SpringCM via a web browser. Authentication is delegated to a trusted outside source by calling into infrastructure hosted by the customer or a cloud based identity provider. SSO provides a number of advantages to both end users and administrators including allowing users to maintain a single password that is used to access both their local intranet applications and SpringCM, as well as giving administrators the ability to control access to SpringCM, reset passwords and enforce security polices from outside SpringCM.
SpringCM supports two types of Single Sign On. SpringCM is a SAML 2.0 Service Provider and supports both Identity Provider Initiated (IdP-Initiated) SSO and Service Provider Initiated (SP-Initiated) SSO as described by the SAML 2.0 standard. Additionally, SpringCM has developed a proprietary SSO for use with Salesforce. Detailed description and configuration options for both types are described in this section.
Note: If you are part of multiple SpringCM accounts, you will only be able to SSO onto your default account which needs to have SSO configured. After that, you will be able to switch to any account you have access to.
SAML 2.0 Federated Authentication
Customers that have implemented a SAML 2.0 compliant Identity Provider can use it to participate in federated authentication SSO with SpringCM. When authenticating to SpringCM via IdP-Initiated SSO, users first navigate to a portal page on their local intranet that authenticates the user and then passes a SAML response to SpringCM to create their SpringCM security context. When authenticating via SP-Initiated SSO, users first come to
SpringCM directly requesting a secure resource via a URL. SpringCM will then POST-Redirect them to their Identity Provider which prompts the user for authentication if they have not already authenticated. The Identity provider then generates a SAML Response that is posted back to SpringCM. If the response is valid their SpringCM security context is created and the user is redirected to the originally requested URL.
Figure 4 depicts the flow for SP-Initiated SSO. Note that IdP-Initiated SSO is a similar process, however steps 1-3 do not take place. The process starts with the user authenticating to the Identity Provider (Step 4), and then choosing to be redirected and logged into SpringCM (Steps 5-7). In order to enable SAML SSO for a SpringCM account, follow the instructions in the following two sections, Configuring SpringCM for an Identity Provider and Configuring an Identity Provider for SpringCM.
Figure 4. SAML 2.0 Authentication Flow
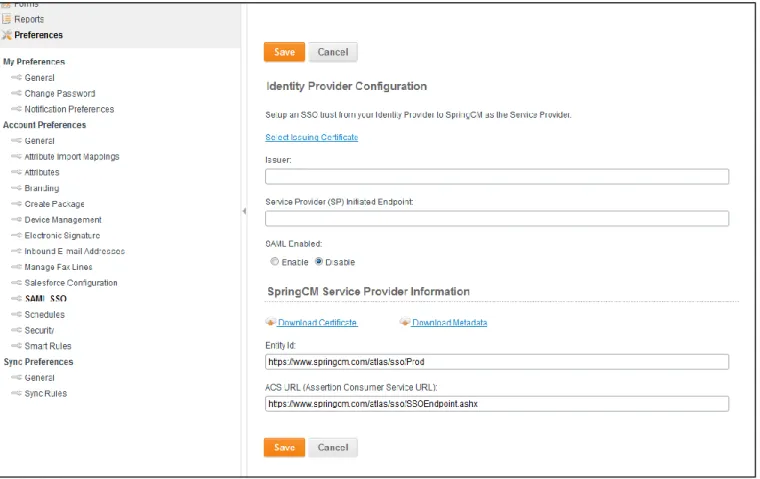
Configuring SpringCM for an Identity Provider
As part of setting up SAML 2.0 Federated SSO, a onetime configuration must be done by a Super Administrator in the SpringCM account preferences. To navigate to the SAML configuration options, click on Preferences and then choose the SAML SSO sub tab. You should see something similar to Figure 5. In the Identity Provider Configuration section there are four items to configure:
Select Issuing Certificate -- This is the public key certificate file used to verify authentication responses from the Identity Provider. Best practices dictates that a dedicated folder be created in the SpringCM Documents tree to store the certificate and then secured only to Super Administrators. The certificate should be uploaded to this folder and then chosen in this screen. Only documents with a ".cer" or ".cert" can be selected
Issuer -- This is the unique identifier of the Identity Provider
Service Provider (SP) Initiated Endpoint -- This is the Identity Provider URL that SpringCM will Post-Redirect the client to during when SP-Initiated SSO is invoked. At runtime, a SAML Authentication Request is sent asking the Identity Provider to authenticate the user and send a SAML Response.
Figure 5. SAML SSO Preferences
Configuring an Identity Provider for SpringCM
The SpringCM Service Provider Information section is informational only to help you configure your Identity Provider for use with SpringCM. As outlined in the samples below, the configuration URLs are different
depending on what SpringCM environment you are configuring SSO for which can either be UAT or Production.
If your Identity Provider supports auto configuration by importing Service Provider metadata, you can use the Download Metadata link to download the metadata xml and import it into your Identity Provider. Some Identity Provider's, such as ADFS, support auto configuration via URL and can be configured to monitor the URL periodically for changes and auto update your configuration. SpringCM supports this as well and provides a hosted version of the metadata:
UAT- https://uat.springcm.com/atlas/sso/SPMetadata.ashx
Not all Identity Providers support direct consumption of metadata to configure the outgoing assertions to SpringCM and need to be configured manually. The following are the key items needed for Identity Provider configuration.
Entity Id
This is the unique identifier of the SpringCM Service Provider: UAT - https://uat.springcm.com/atlas/sso/
Production - https://www.springcm.com/atlas/sso/Prod
Assertion Consumer Service URL
This is the URL where the Identity Provider POSTs the SSO Assertion to SpringCM: UAT - https://uat.springcm.com/atlas/SSO/SSOEndpoint.ashx
Production - https://www.springcm.com/atlas/SSO/SSOEndpoint.ashx
Name Id Format
This indicates what name identifier format SpringCM supports. The only supported format currently is email address: urn:oasis:names:tc:SAML:1.1:nameid-format:emailAddress
The email address in the SAML Assertion response should be the same email address that exists in the SpringCM Address Book.
Signing
SpringCM expects that all SAML Assertions posted to the Assertion Consumer Service will be signed and will sign all authentication requests to the Identity Provider. The XML returned from accessing the federated metadata URL will contain the public key certificate used for verifying authentication requests from SpringCM, so if you are using the metadata you should not need to download the certificate. If you are manually configuring your Identity Provider, use the Download Certificate link to download the public key certificate used to verify SAML Requests from SpringCM.
Note that this certificate will expire every few years. If you have SAML enabled in your account, SpringCM will notify the Super Administrators in the account in advance of certificate expiration and any action that needs to be taken.
Invoking SP-Initiated SSO
SpringCM will invoke SP-Initiated SSO when they following three conditions are met:
1. A request is made for a non-public, secured resource 2. The user does not have a current session
3. SpringCM can determine the user's account id via the aid parameter on the query string so that the configured Identity Provider to redirect to can be determined.
Because of the requirement that the account id be present on the query string to invoke SP-Initiated SSO, almost all system generated URL's from SpringCM will contain this parameter. This includes not only normal browsing URLs, but also links that are generated by sending documents via email in the UI or workflow.
Since SP-Initiated SSO is only invoked when a request for secure resource is made, there is currently no way for a user to invoke SP-Initiated SSO on demand from the login page. Because of this, it is common practice for customers to create a friendly URL that will invoke either Identity Provider initiated SSO or SP-Initiated SSO to SpringCM. This creates a better experience for end users, as they will follow a simple URL and invoke SSO onto SpringCM. If you do not know your Identity Provider's URL to invoke a SAML response to SpringCM, you can link to the SpringCM ACS URL. For example, a customer may create something like
springcm.mycompany.com and link it to https://www.springcm.com/atlas/SSO/SSOEndpoint.ashx?aid=XXXX, where 'XXXX' is replaced with the SpringCM account id.
Sample Identity Provider Configurations
SpringCM will work with any SAML 2.0 compliant Identity Provider. This section outlines configurations for common on premise and cloud based Identity Providers and how to configure them for SpringCM.
Active Directory Federation Services (ADFS)
There are a number of steps in setting up ADFS and the ADFS proxy and configuring them for your environment. The scope of this section of the document only covers setting up SpringCM as a Relying Party Trust and assumes that your ADFS infrastructure is already in place and configured.
ADFS uses slightly different terminology than SAML 2.0 as depicted in the following table:
ADFS Name SAML 2.0 Name
Security Token Assertion
Claims Provider Identity Provider
Relying Party Service Provider
Claims Assertion Attributes
To configure ADFS for SpringCM SAML SSO, execute the following steps:
Step 1: Install and Certificates
Install ADFS and select the certificate with which your tokens will be signed. The public key of the Token Signing certificate is the one you will upload to SpringCM.
Step 2: Configure a Relying Party Trust within ADFS
In this scenario the Relying Party is SpringCM. Open the ADFS Configuration Manager and choose Trust Relationships. Right Click on Relying Party Trusts and click on Add New.
Step 3: Configure the Data Source
On the Select Data Source screen, enter the SpringCM federation metadata address : UAT - https://uat.springcm.com/atlas/sso/SPMetadata.ashx
Production - https://www.springcm.com/atlas/sso/SPMetadata.ashx
Step 4: Update Security Properties
After the trust is setup, it is necessary to modify its properties. Right click on the trust and choose Properties. Navigate to the Advanced tab and change the Secure hash algorithm to SHA-1. ADFS will use SHA-256 by default, however SpringCM integration will only work with SHA-1.
Step 5: Edit Claim rules
Give it a name and select the attribute store which is usually Active Directory. For the mapping, under LDAP Attribute, choose E-mail addresses and under Outgoing ClaimType choose Name ID. Click Finish.
Step 6: Edit Authorization Rules
Do the same thing on the Issuance Authorization Rules tab that was done on the Issuance Transform Rules tab. You may also need to add a security rule to allow your users to use the SpringCM relying party.
Step 7: Test
At this point ADFS configuration is complete. Follow the SpringCM configuration instructions in the previous section to upload your certificate and configure the Issuer and Service Provider (SP) Initiated Endpoint in SpringCM preferences. Commonly they are in the following format when using ADFS:
Issuer - http://<your domain>/adfs/services/trust SP Initiated Endpoint -- https://<your domain>/adfs/ls/
You are now ready to test your configuration. IdP SSO to SpringCM can be invoked by the using the following the url: https://<your domain>/adfs/ls/IdpInitiatedSignOn.aspx, authenticating, and the choosing to be logged on to SpringCM.
Salesforce Identity Provider
Salesforce can be configured as a SAML Identity Provider, allowing users to then authenticate to SpringCM and other SAML Service Providers with their Salesforce credentials. There are some significant differences between using Salesforce as a SAML Identity Provider and SpringCM's proprietary Salesforce SSO. The Salesforce SSO section later in this document will compare and contrast the major differences between these. Configuring Salesforce and SpringCM for SAML SSO is done in 4 steps:
1. Configure Salesforce as an Identity Provider (if your Org has not set this up already) 2. Configure SpringCM as a Service Provider in Salesforce
3. Configure your SpringCM account for your Salesforce Identity Provider 4. Configure your Salesforce users with Federation Ids
Prerequisite: Configuring Salesforce as an Identity Provider
Before you can setup SpringCM as a Service provider, you must first enable your Salesforce Org as an Identity Provider, setup your domain, and provision your certificates as described in Salesforce's online documentation:
https://help.salesforce.com/htviewhelpdoc?err=1&id=identity_provider_about.htm&siteLang=en_US Once you have completed the Salesforce Identity Provider setup, you can add SpringCM as a Service Provider.
Configure SpringCM as a Service Provider in Salesforce
To setup SpringCM as a Service Provider, log into Salesforce as an administrator and navigate to
In another window, log into the SpringCM account you are configuring for SSO and navigate to Preferences and then SAML SSO. The SpringCM Service Provider Information section contains all of the information you will need to configure Salesforce. Note the screenshot below is for Production, the settings will be different if you are in the SpringCM UAT environment.
In the Salesforce screen, the Name can be anything you want such as simply "SpringCM". Copy the Entity Id and ACS URL from the SpringCM configuration screen to the Salesforce screen. The Subject Type needs to be a field that contains the user's email address that is their user id in SpringCM. If the Username or User ID field is not the user's email address, then choose Federation ID and see the section Configure your Salesforce users with Federation Ids later in the document. Click the Download Certificate from SpringCM, save it on your local machine, and then upload it as the Service Provider Certificate in the Salesforce configuration screen. Click Save in the Salesforce screen.
Configure your SpringCM account for your Salesforce Identity Provider
To configure your SpringCM account for Salesforce, you will now copy information from Salesforce to the SpringCM configuration screen. Back in the SpringCM account you are configuring for SSO and navigate to Preferences and then SAML SSO. There are four fields in the Identity Provider Configuration that need be filled out.
Set SAML Enabled to "Enable". Log into Salesforce as an administrator and navigate to Administration Setup>Security Controls>Identity Provider. You may optionally want to set Profiles that have access to the SpringCM Service Provider and then click on the SpringCM Service Provider itself.
Copy the Entity Id from Salesforce to the SpringCM Entity Id field and copy the SP-Initiated POST Endpoint from Salesforce to Service Provider (SP) Initiated Endpoint field in SpringCM. To configure the certificate on
the SpringCM side, navigate back to the Identity Provider Setup screen in Salesforce and click on Download Certificate. Upload this file to a folder in SpringCM that only Super Admins have access to and then select it in the Identity Provider Configuration section in SpringCM.
Configure your Salesforce users with Federation Ids
SpringCM uses a user's email address as their login id. At the time of this writing, Salesforce cannot be configured to use a user's email address as the login id as part of a SAML Response. If by convention, your Salesforce usernames are also the email address used to log into SpringCM, then you can configure your SpringCM service provider configuration to pass the username, and you are done. If not, then you must use the Federation ID. This is a free form property on a user that must be populated with the user's email address that they use to log into SpringCM. This can be done manually for each of your user's in Salesforce, however it may become tedious to always have to keep them in sync manually. Fortunately, Salesforce triggers can be used to automatically copy a user's email address to their Federation ID every time a new user is created or their email address changed as shown in the following sample Apex code. Full discussion of creating Salesforce triggers is outside the scope of this document, consult Salesforce's online help and tutorials for more information.
Sync Email to Federation ID Apex:
trigger CopyEmailToFederationId on User (before insert,before update) { for (User newUser: Trigger.new) {
User oldUser = null; if(Trigger.oldMap!=null) {
oldUser = Trigger.oldMap.get(newUser.Id); }
if (oldUser==null || oldUser.Email!= newUser.Email) { newUser.FederationIdentifier = newUser.Email; }
} }
OneLogin
OneLogin is a cloud based identity provider and a SpringCM partner. They offer a free licensing option for SpringCM customers. More information can be found at the following links:
http://www.onelogin.com/partners/app-partners/springcm/
https://onelogin.zendesk.com/entries/21568718-configuring-saml-for-springcm
Ping Identity
Ping Identity is a cloud based identity provider and a SpringCM partner. More information can be found at the following link or ask your SpringCM representative for a referral: https://www.pingidentity.com/
SpringCM Proprietary Salesforce SSO
Salesforce SSO from the UI
If your SpringCM account is configured for Salesforce integration, you can leverage SpringCM's propriety
Salesforce Single Sign On for your own purposes. Configuring Salesforce integration is outside the scope of this document, however you can visit SpringCM's listing on the App Exchange for more information about SpringCM's managed package and account configuration:
http://appexchange.salesforce.com/listingDetail?listingId=a0N300000016coCEAQ
Once your account is configured for Salesforce, the managed package will take care of logging you into SpringCM in a seamless manner whenever you visit a visual force page configured with a SpringCM Cloud Connector Salesforce widget. If you plan on doing a more customized integration, you can invoke Salesforce SSO in an ad hoc manner by appending 2 extra query string parameters to any SpringCM URL. The 2 parameters are:
sfsid - This should be the Salesforce session id for the user. This user's email address must exist in the SpringCM address book in the SpringCM account configured for the current Salesforce Org. In Apex it can be obtained by calling System.Userinfo.getSessionId() or from a Visual Force Page
sfapiurl - The API URL for the Salesforce Org. It can be obtained in a Visual Force Page.
If the SpringCM resource you link to is a secured resource, the browser does not have a SpringCM session, and the sfsid and sfapiurl are passed on the query string, SpringCM will take the data from the URL and try to SSO the user on to SpringCM. Note that this method is slightly different than SAML SSO in that the session you get is "locked down". The user will not be able to switch to other accounts they have access to, they are only allowed to work with documents in the SpringCM account that is configured for the Salesforce Org that they SSO'd from.
Salesforce SSO vs. Salesforce as a SAML Identity Provider
When building a customized solution leveraging both SpringCM and Salesforce, you may feel you that you need to choose between leveraging SpringCM's proprietary Salesforce SSO and using Salesforce as an Identity Provider. When making that decision, there are a number of key points to consider:
Salesforce SSO is inherently enabled in any SpringCM account using the SpringCM managed package for Salesforce. No further configuration is required.
Using Salesforce as a SAML Identity Provider is not specific to SpringCM. If it is setup, it can be used by other cloud based Service Providers that support SAML.
The 2 authentication mechanisms are not mutually exclusive, they can be used together. This may be desirable given that there are number of differences, which are outlined in the matrix below.
The following matrix compares and contrast functionality of the two forms of SSO:
Salesforce SSO Salesforce SAML IdP
Supports login initiated from Salesforce X X
Supports login initiated from SpringCM X
Supports multiple SpringCM accounts per SF Org X
Can authenticate to the SOAP API X
Can authenticate to the REST API X
Can use SpringCM user keys X
Can switch SpringCM accounts after authentication X
SpringCM API's and Single Sign On
SpringCM has both a SOAP and REST based API. Both API's must be authenticated to, and all subsequent calls are made in the context of the user that authenticated to the API. An API user can be used, but often times it is desirable to connect to the API in the context of a logged in user. Most users configured for SSO do not have passwords, and even if they did, it is not desirable to have to prompt and/or store a password for an end user to connect to the API with. Instead, SpringCM offers 3 options to securely connect to the API in the context of an end user:
Salesforce SSO - The Salesforce SSO mechanism described in the previous section can be used with both the REST and SOAP API's. As with the URL query string method, the user's Salesforce session id and API URL are used to authenticate to the SpringCM API.
OAuth 2.0 - SpringCM supports OAuth 2.0. With OAuth 2.0, end user's are prompted to authorize a 3rd party application to connect to the API as that user. The OAuth authorization screen is a secure SpringCM resource and can be authenticated to with either password or SAML 2.0. An OAuth authorization token must always be validated against the REST API and which point a REST access token is received. The rest access token can subsequently be exchanged for a token that can be used with the SOAP API.
SpringCM User Keys - SpringCM custom menu buttons can be configured to pass a user key to an external URL. The user key can then be used to authenticate to the SOAP API. User keys cannot be used with the REST API at this time. SpringCM user keys are a proprietary solution for enabling a third party application to authenticate to the SOAP API in the context of the logged in user.
Note that calling a configured SAML Identity Provider to participate in API authentication is not supported, as it is primarily a browser based protocol. However SAML can still can be leveraged indirectly as it can be used to authenticate the user to the SpringCM UI and then generate an OAuth token or user key to connect to the API in the context of that user. Configuration of all 3 API authentication methods are discussed in the following sections.
Salesforce SSO API Authentication
To authenticate to the SOAP API using Salesforce SSO, call the AuthenticateSSO method. This method takes five parameters:
userName - This is the SpringCM username, the user's email address
ssoToken - This is the Salesforce session id. In Apex it can be retrieved with UserInfo.getSessionId() ssoUrl - This is the Salesforce Org's API URL, it can be retrieved in a Visual Force page
apiKey - The SpringCM API Key accountId - The SpringCM Account Id
After authenticating successfully, a token will be returned in the context of the user that can be used for subsequent API calls.
To authenticate via the REST API, only the Salesforce session id and API URL are needed. The following Apex example shows how to properly pass this information in the Authorization header in a SpringCM REST call. This particular sample returns information about the SpringCM account configured for the current Org. Note that UAT and Production URL's are shown, however you will only use one or the other.
Retrieve Account Information Apex Sample: string apiURL = <your api url urlencoded>;
string oAuthUrlUAT = 'https://oauthuat.springcm.com/rest/201211/Salesforce/account/'; string oAuthUrlProd = 'https://oauth.springcm.com/rest/201211/Salesforce/account/';
HttpRequest req = new HttpRequest(); req.setMethod('GET');
req.setHeader('Accept', '*/*');
string url = oAuthUrlUAT + System.Userinfo.getOrganizationId();
req.setHeader('Authorization', 'Salesforce ' + System.Userinfo.getSessionId() + '|' + apiURL);
req.setEndpoint(url); Http http = new Http();
HttpResponse response = http.send(req);
Dom.XMLNode accountInfo = response.getBodyDocument().getRootElement(); string accountId = accountInfo.getAttribute('Id','');
OAuth 2.0
A full discussion of OAuth is outside the scope of this document. SpringCM supports OAuth 2.0 and OAuth tokens can be used to connect to the REST API. After a REST token is obtained, it may be used to authenticate to the SOAP API with the SOAP API call GetSoapAuthenticationTokenFromRestToken.
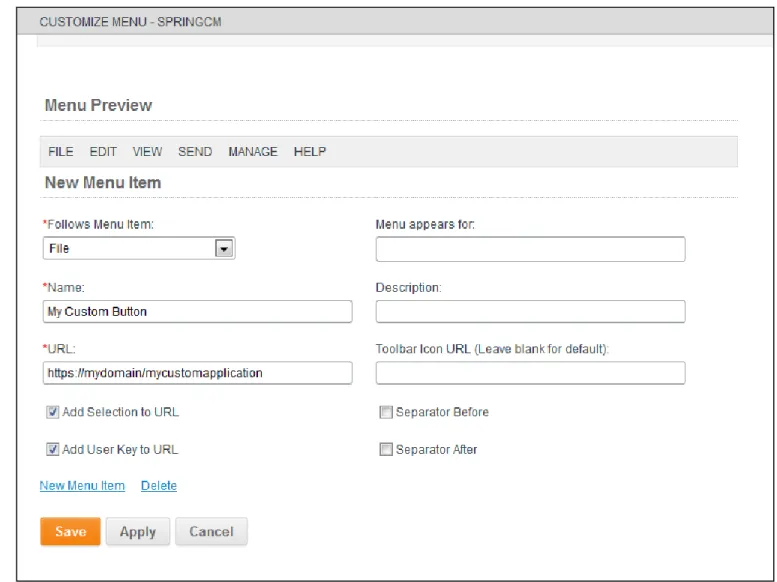
SpringCM User Keys
SpringCM allows custom buttons to be added to the SpringCM UI's menu drop downs and toolbar. To customize the menu, log in as an administrator and then navigate to View and then Customize Menu. Next click New Menu Item and you should see a screen similar to Figure 6. Make sure to check the box labeled Add User Key to URL for SpringCM to generate a user key in the context of the logged in user and pass it on the query string. Checking the Add Selection to URL box will pass the documents or folder selected on the query string as well, as it may be needed by your third party application. After saving the configuration on this screen you may optionally choose View and then Customize Toolbar if you want your custom button to show up on the toolbar as well as the menu drop down.
When the button is clicked you will notice that a parameter named userkey is passed on the query string, which is a token as well as a second parameter called uEmail that is the current user's email address. These two
parameters can be used to authenticate to the SOAP API in the context of the logged user by calling the AuthenticateWithKeys method which takes the following parameters:
userName -- This is the SpringCM username, which is the user's email address. The value of the uEmail query string parameter is passed as this parameter.
userKey -- The user key from the query string. apiKey -- Your SpringCM API Key
The method will return a token in the context of the logged in user than can be used for subsequent API calls.
The following code sample shows how to retrieve a the userkey and uEmail parameters passed from a SpringCM custom button and use them to authenticate to the API.
AuthenticateWithKeys PHP Sample: <?php
// A SpringCM custom button puts the selected items on the query // string in the format Selection=Document,<document id>;
// The document's ID will be needed later so we remove the labeling here $document = str_replace('Document,', '', $_GET['Selection']);
$document = rtrim($document, ';');
// Adding the User Key to the query string puts two parameters in the URL: the user's // email and a generated user key
$user_id = $_GET['uEmail']; $user_key = $_GET['userkey'];
// Get a SpringCM session using AuthenticateWithKeys $springcm = new
SoapClient("https://uat.springcm.com/atlas/webservices/v12/SpringCMService.asmx?wsdl"); $auth_result = $springcm->AuthenticateWithKeys( array (
'userName'=>$user_id, 'userKey'=>$user_key,
'apiKey'=>'<your api key>' ));
// The AuthenticateWithKeysResult is a wrapper around the token $token = $auth_result->AuthenticateWithKeysResult;
Mixing SSO and Password Login
Activating SSO for an account does not replace the ability for customers to also leverage the SpringCM login page. It is possible to setup an account so users can both use a username/password and SSO.
If SSO is configured for an account, the following are some scenarios why password authentication may want to be enabled as well:
Users need to use non-SSO enabled access methods to SpringCM. Access methods that require username and password include Webdav, FTP, and SFTP.
Code written against the SpringCM API may need to connect in an administrative context instead of in the context of a logged in user.
Users that have administrative access to SpringCM may not always want to be logged in as an Administrator. In this case, a second user may be created to be used strictly for logging in for administrative purposes.
Customers may want to grant access to their SpringCM account to users such as guests, temporary contractors, and partners that they don't want to add to their enterprise user repository used by the SAML Identity Provider.
For these cases, SpringCM allows you to choose how you want your account to behave when using SAML SSO (these settings are not used by Salesforce SSO). Start by choosing a default: either all users are allowed to create passwords in addition to SSO or all users are not allowed to use passwords by default. To set the account default navigate to Preferences then Security. Under the Passwords header choose the default under the option Allow Password Login for SSO Users as shown in Figure 7. After the default is set, you may selectively override the default for a user by clicking on that user in the Address Book and changing the value set for the Allow Password Login option as shown in Figure 8.
Figure 7. Set the Password Defaults
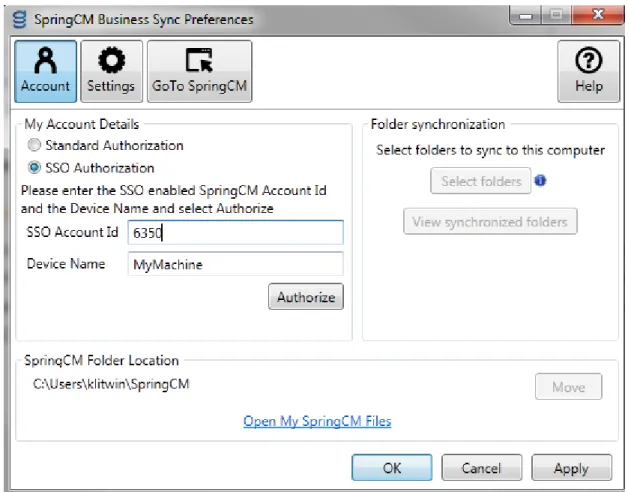
SAML SSO for SpringCM Mobile, Edit, Scan and Sync
SAML SSO is currently supported in the SpringCM iPhone and Android mobile clients (assuming your Identity Provider is Internet accessible), SpringCM Edit, SpringCM Scan, and SpringCM Sync. When configuring any of these clients for SSO, users will be prompted for a onetime setup. They will have to configure their client with the SpringCM account id of their default account and then authorize the client via SSO. Administrators should be able to easily find their account id either in the query string when logged in or from the help text when configuring SAML SSO in preferences. Figure 9 shows the sample setup for SSO for SpringCM Sync. The other SpringCM clients will have similar setup screens.
Appendix A: C# .NET User Management Sample Code
One of the most common business functions is the need to create or update a user. The following code shows how a user can be programmatically created in the Address Book.
Create User C# .NET Sample:
SCMUserAccount scmUserAccount = new SCMUserAccount(); scmUserAccount.Email = "[email protected]";
scmUserAccount.Role = SCMRole.FullSubscriber; scmUserAccount.Status = SCMUserStatus.Active; scmUserAccount.ObjectType = SCMObjectType.User; scmUserAccount.FirstName = "John";
scmUserAccount.LastName = "Doe";
scmUserAccount.Country = "UNITED STATES"; scmUserAccount.ProvinceState = "ILLINOIS"; scmUserAccount.PostalCode = "60654";
scmUserAccount.Address1 = "350 North Orleans Street, Suite 950"; scmUserAccount.City = "Chicago";
//ManagedBy can be set, but you must find the Id to set it, see examples with ContactFind //Persona can be set, but you must find the ID to set it, see examples with GroupFind
SaveResult saveResult = springCMService.Save(token, new[] { scmUserAccount }, true); if (!saveResult.Success)
{
foreach (Error e in saveResult.Errors)
{
Console.WriteLine( e.Message); //Handle error
} }
Console.WriteLine("User created with id: " + saveResult.SavedObjects[0].Id);
This example shows how to find a user and delete them from address book. Delete User .NET Sample:
SCMContactInfo[] users = springCMService.ContactFind(token, "[email protected]", false); if(users.Count()==1)
{
Console.WriteLine("User First Name: {0}", users[0].FirstName); Console.WriteLine("User Last Name: {0}", users[0].LastName); Console.WriteLine("Deleting user...{0}",users[0].Id);
springCMService.Delete(token, SCMObjectType.User, users[0].Id); }
Another common scenario is to search for a user and retrieve some information about them. This example searches for a user and if the user is found, displays the user's group memberships.
Note: Even though the method names are ContactFind and GroupGetByContact, they will work with both SCMContact and SCMUserAccount objects.
Find user and list group memberships .NET Sample:
SCMContactInfo[] users = springCMService.ContactFind(token, "[email protected]", false); if (users.Count() == 1)
{
Console.WriteLine("User First Name: {0}", users[0].FirstName);
Console.WriteLine("User Last Name: {0}", users[0].LastName);
SCMGroup[] groups = service.GroupGetByContact(token, users[0]);
Console.WriteLine("Group Memberships:");
for (int i = 0; i < groups.Length; i++)
{
Console.WriteLine(groups[i].Name); }
}
This next example shows how to work with groups. It will check if a group exists. If not it will create it and then adds a user to it.