A Web Development Environment
Setting up an Ubuntu (or Mint) Workstation to run in a Windows 7
based VirtualBox for a Hostgator Reseller or VPS Environment.
By: Andrew Tuline Date: February 8, 2014 Version: 2.0.5
Revisions ... 6 1. Introduction ... 7 1. Background 7 2. Introduction 8 3. This Document 10 4. Assumptions 10 5. Disclaimer 10 6. Conventions 11 2. The Architecture ... 13 1. Environment Overview 13 2. Architectural Diagram 15 3. Architectural Standards 16
3. Installation & Configuration ... 20
4. Oracle VirtualBox 20
5. Ubuntu Workstation 20
6. Creating the Virtual Machine 20
7. Installing Ubuntu As Your Virtual Machine (VM) 21
8. Start Up a Terminal 23
9. Hosts and Hostname 24
10. Networking 24
11. Configuring NAT 26
12. Configuring a Bridged Adapter 26
4. Installing Applications ... 39
1. Configuring Your Virtual Machine 39
2. FTP 39
3. Apache 40
4. Installing Apache 41
5. Apache Permalinks 42
6. Apache Permissions and Ownership 43
7. Changing Apache Process Ownership 44
8. MySQL 45 9. PHP 46 10. Installing PHP 5.3 48 11. Installing PHP 5.2 48 12. Open SSH Server 48 13. Samba 49
14. Samba with Security 52
15. phpMyAdmin 53
16. Installing Git 56
17. Installing drush 57
18. Take a Snapshot 57
19. Kick the Tires 57
5. Workstation Configuration ... 58
3. Using SFTP With Hostgator (Reseller, NOT VPS) 59
4. Setting up SSH On Hostgator (Reseller Only) 60
5. Setting up SSH on Hostgator Generic 61
6. Automating Hostgator SSH Authentication 62
6. Apache Sites ... 65
1. Create A Development Web Site 65
2. Apache Host Configuration Files 65
3. Hosts File 66
4. Edit and View your Virtual Host 67
7. Databases ... 68
1. Create a Database 68
2. Dump the Database 69
3. Drop the Database 70
4. Drop All Tables 70
5. Import Database 71
6. Combined Create, Dump, Drop and Import 71
8. Backups ... 72
1. Hostgator Site Backups 72
2. Crontab Configuration 72
3. daily.sh 72
4. weekly.sh 73
5. What about Git? 73
Revisions
1.04 Long standing version (in serious need of significant changes). 2.0.0 Major changes, such as adding SSH based procedures for backups.
Separate out Git and Virtualmin/Webmin. Complete Git overhaul. Add bitbucket.org and so on. 2.0.1 And the changes keep on coming. . . such as Apache permissions and ownership.
2.0.2 Apache permissions and ownership continued.
2.0.3 Adding NAT and Host Only networking. Thanks for the push Izzy. 2.0.4 Cleanup for the above.
1.
Introduction
1.
Background
When I first wrote this document, Ubuntu Linux 12.04 was the obvious choice for me to work with. It played nicely with Oracle’s VirtualBox and appeared to be the most popular Linux distribution available. Since then, I have experienced the following:
Ubuntu 12.04 patches often caused graphics driver problems with VirtualBox. Usually, I could re-install the VirtualBox Guest Additions software and restore the display, but I occasionally had to revert to a backup.
Ubuntu 12.10 required additional troubleshooting/configuration to get it to work with VirtualBox at all (in graphics mode). Ubuntu 13.04 and later 13.10 have since been released, and both have graphics issues similar to 12.10.
Mint 15 with Mate just worked; seamlessly with all display modes and without the need for the VirtualBox Additions.
I’m now primarily using Mint 15 with Mate on VirtualBox. In addition, I have migrated from a Hostgator Reseller account over to their VPS.
2.
Introduction
Many amateur web developers create sites for clients by writing html and uploading it to the production web site via FTP. In addition, many that use a CMS such as WordPress or Drupal, may even develop the site completely online.
The advantage is that this is a very quick and simple workflow, however the disadvantage is that: FTP is not a very secure protocol
You may not be able to easily recover from mistakes This does not scale well for teams
The web site may be ‘in production’ before you are paid
Your client’s audience may see the site development ‘scaffolding’ FTP
Production Server
CMS Edit
Most professional developers use ‘development’ and ‘staging’ servers for site development and, once complete, will migrate the site to the production server. In addition, many developers have moved on from FTP to more secure technologies, such as SSH, SFTP and RSYNC/SCP along with a version controlled workflow, such as Git.
The advantage is that this: Supports teams
Audience only sees completed site Ensure payment before site goes live
Customer can see the site before it goes live
Provides significantly better security when transferring files Provides fallback in the event of mistakes during development Encourages a methodology when migrating sites between hosts
The disadvantage to this process: Has a steep learning curve
Can be challenge to streamline when migrating a CMS and database to a different server
Production Server Staging Server Development Server SSH Git CMS Edit
3.
This Document
This document is a work in progress and provides a guideline on setting up a virtualized web development environment on a Windows 7 workstation. It was developed using Oracle Virtualbox with an Ubuntu Linux 12.04 LTS workstation configured with Apache, MySQL, PHP, as well as other important utilities. On the public hosting side, the discussion revolves around both Hostgator Reseller and VPS accounts. A follow-up document delves into configuring and using a Git based development environment for local as well as distributed workflow and site migration.
There will be a few sections of the document where content is repeated in order to help reinforce some ideas. As a result, you may not need to re-run some of the commands listed.
4.
Assumptions
This document assumes you have a good knowledge of Windows 7 along with web development using FTP, phpMyAdmin and that you have at least an introductory knowledge of Linux as well as the Linux terminal. As always, Google is the ultimate reference site.
Prior to installing VirtualBox, I turned off my Windows Firewall. If you are having difficulties, try that out.
5.
Disclaimer
There will most likely be mistakes in this document and I’m working to correct any I find. In the meantime, I welcome any any
constructive suggestions for improvement (you’re on your own for support though). Feel free to email them to [email protected], and please be as specific as you can. In addition, the examples demonstrated in this document are not necessarily ‘best practice’. They’re just where I’m at on the Google learning curve. You are encouraged to improve upon and develop your own standards and workflow. Some sites may be configured such that you require the web host provider to provide adequate permissions. For example:
Require write permission to the .ssh directory Unable to write to the home directory
Use ‘mysqldump -h 127.0.0.1’ because ‘mysqldump -h localhost’ doesn’t work. They use Plesk or other Control Panel
Their ‘jailshell’ does not support enough commands to perform what you require. Each web host provider is different.
6.
Conventions
The ‘~’ symbol refers the user’s HOME directory, typically /home/username or ~username or just plain ~. The prompt for a non-privileged account in Ubuntu will be ‘$’.
The prompt of a root (or privileged) account in Ubuntu is ‘#’. That is also the user prompt with Hostgator’s jail shell. An abbreviation for the host name will precede the above ‘$’ or ‘#’ prompts and may not be identical to real life prompts. All code is using the ‘Courier New’ font, while normal text is in Times New Roman.
Bolding will be used for terminal commands as well as for emphasis in the text.
The usernames, site and database names used here are fictional, but should be standardized throughout the document. Some instructions include comments, such as:
dev$ sudo apt-get install cool_program
# Don’t type this comment
If you need to use a privileged command, it will require the use of ‘sudo’, such as:
dev$ sudo apt-get install coolstuff
. . .
dev$
For permanent privileges, you can type:
dev$ sudo su
. . .
dev# apt-get install coolstuff
dev#
In the latter case, you will keep that root (or specificied user) privilege until you type ‘exit’.
If you decide to cut and paste commands from this document, you may encounter errors, and may need to re-type any single or double quotations.
2.
The Architecture
1.
Environment Overview
This is my current development and hosting environment, however yours may vary significantly: Hostgator web server Using a Hostgator VPS account for www.mycompany.com.
Hosts the client staging server at client1.mycompany.com (a subdomain).
Can also be used for the production client web sites. Prompt will be ‘stg$’ for staging site.
Prompt will be ‘live$’ for live/production site. Prompt will be ‘host$’ for the mycompany site.
Git repositories Use ‘bare’ Git repositories for each client on bitbucket.org. Use non-bare repository on development workstations. Windows 7
Workstation
Use Filezilla for basic FTP or SFTP.
Use Notepad++ or Sublime Text for general text editing. Use Oracle Virtualbox for Ubuntu VM’s (virtual machines). Can access files on the Ubuntu VM via Samba shares.
Use Windows mysysgit utility for Windows 7 based SSH access to Ubuntu or Hostgator. It includes Git functionality for Windows 7. Use Tortoise Git if you wish to use GUI based Git functionality in
Ubuntu Virtual Machine
Use Oracle Virtualbox to run Ubuntu VM’s. An Ubuntu 64-bit 12.04 LTS desktop.
Configured Ubuntu with Apache, MySQL and PHP.
Also added FTP, Samba, Git, SSH server, phpMyAdmin and drush.
Webhosting root directory is /var/www.
The Apache process and the /var/www directory structure are under the ownership of my ‘username’.
Configure Samba to share directories.
Use nano, vi or Sublime Text for code editing natively. Use drush for Drupal commands.
Prompt will be ‘dev$’.
Honourable Mention www.vagrantup.com is very popular these days.
www.turnkeylinux.org has many excellent virtual appliances all
ready to go.
MAMP for Mac based web developers. VMWare Workstation and VMWare Player. Server based hosting:
VMWare ESXi and VSphere. Xen. KVM (and Proxmox). Git hosting: github.com Public hosting www.wpengine.com www.linode.com A ‘host’ of others.
I do not recommend hosting these sites natively in Microsoft Windows, let’s say with XAMPP. The things you take for granted when using Linux will take a lot of extra effort in Windows.
2.
Architectural Diagram
This is the configuration I use for my single developer environment. In a team based environment, I would move the Master DB to an agreed upon location, possibly the staging server.
bitbucket.org Git Repository Bare Repo client1.mycompany.com Staging Server DB client1.dev Devel Workstation Working Repo & Web Site Master DB www.client1.com Production Server DB Web Site Web Site
3.
Architectural Standards
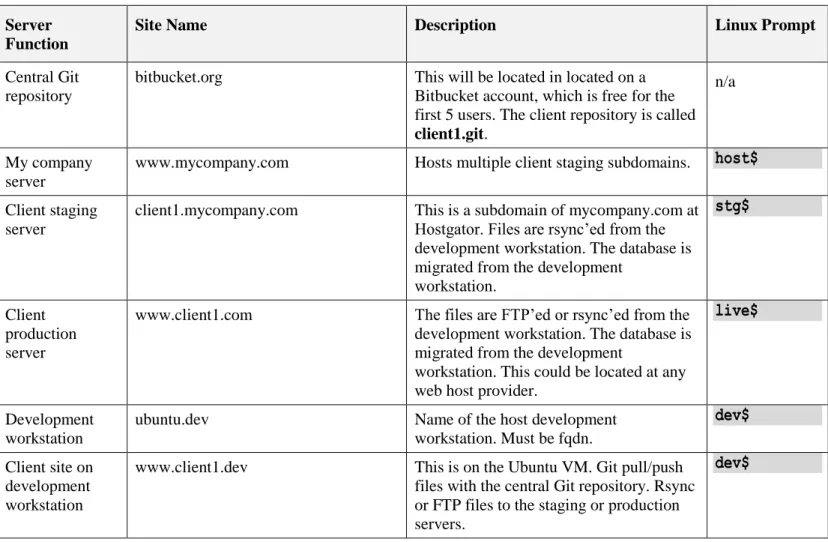
For this workflow, we’ll be using the following sites and directory structures.
Table 1 - Servers
Server Function
Site Name Description Linux Prompt
Central Git repository
bitbucket.org This will be located in located on a Bitbucket account, which is free for the first 5 users. The client repository is called client1.git.
n/a
My company server
www.mycompany.com Hosts multiple client staging subdomains.
host$
Client stagingserver
client1.mycompany.com This is a subdomain of mycompany.com at Hostgator. Files are rsync’ed from the development workstation. The database is migrated from the development
workstation.
stg$
Client production server
www.client1.com The files are FTP’ed or rsync’ed from the development workstation. The database is migrated from the development
workstation. This could be located at any web host provider.
live$
Development workstation
ubuntu.dev Name of the host development
workstation. Must be fqdn.
dev$
Client site ondevelopment workstation
www.client1.dev This is on the Ubuntu VM. Git pull/push files with the central Git repository. Rsync or FTP files to the staging or production servers.
Table 2 - My Company Server
www.mycompany.com Description
Hosting company This is a Hostgator VPS account.
www directory My corporate web site is located in ~mycompany/public_html. SSH SSH is free for the first domain (of a reseller account), and includes any
subdomains. It’s $10 each for any additional domains. It’s free for all accounts with a VPS.
Prompt
host$
Table 3 - Staging Server
client1.mycompany.com Description
www directory The web site will be located in ~mycompany/public_html/client1. SSH SSH is already enabled for www.mycompany.com, and is inherited for
free by any subdomains, such as client1.mycompany.com. Database Database is called mycompany_client1.
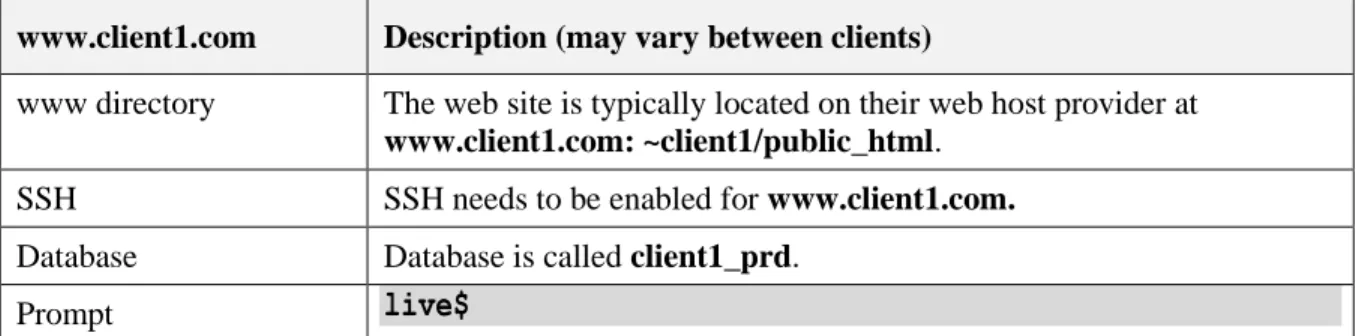
Table 4 - Client Server
www.client1.com Description (may vary between clients)
www directory The web site is typically located on their web host provider at www.client1.com: ~client1/public_html.
SSH SSH needs to be enabled for www.client1.com. Database Database is called client1_prd.
Prompt
live$
Table 5 - Development Server
client1.dev Description
www directory This is hosted on the Ubuntu 12.04 VM on my Windows 7 workstation. The main web site for this server is located in /var/www.
Site tools Shell tools for the client1 site will be located in /var/www/client1.dev Client1 www directory /var/www/client1.dev/www.
Git repository /var/www/client1.dev/www is also a working Git repository.
SSH Open up the VM Window and use a terminal, or access the server via an SSH terminal such as mysysgit.
Database Database is called client1_dev.
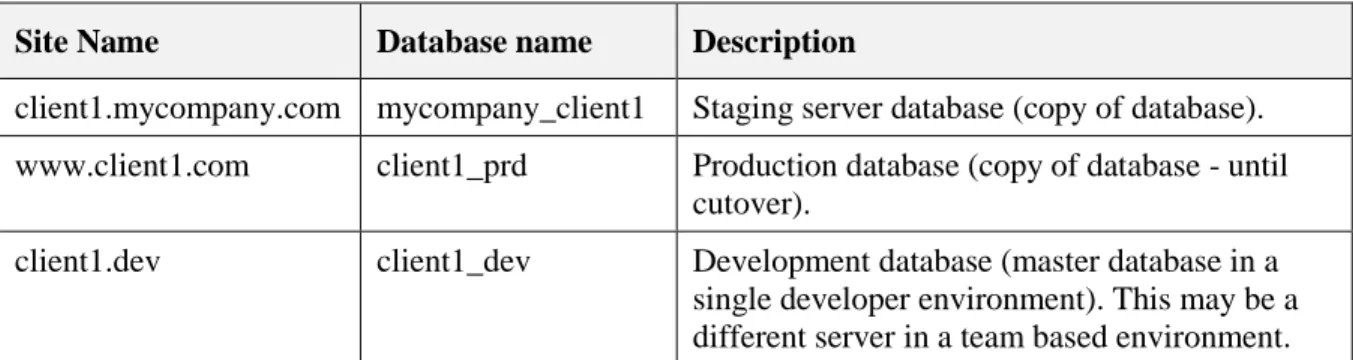
Table 6 - Databases
Site Name Database name Description
client1.mycompany.com mycompany_client1 Staging server database (copy of database). www.client1.com client1_prd Production database (copy of database - until
cutover).
client1.dev client1_dev Development database (master database in a single developer environment). This may be a different server in a team based environment.
3.
Installation & Configuration
4.
Oracle VirtualBox
First you need to download the virtual host software, such as Oracle VirtualBox (or VMWare Player/Workstation). I’ve been using VirtualBox 4.2.18.
Download a free copy from www.virtualbox.org and install it. You will need at least 4GB of memory on your computer and
(significantly) more than 25GB of free disk space for your virtual machine (VM). Not only will you require several gigabytes for your VM, you will also require significant disk space for any snapshots that you take. You can select an alternate drive if you have more than one.
5.
Ubuntu Workstation
I prefer Mint 15 with Mate, however Ubuntu 12.04 LTS workstation worked well. I used the 64 bit ISO version available from
www.ubuntu.com/download/desktop.
6.
Creating the Virtual Machine
Attribute Value
Name ubuntu.dev (or whatever you want to call it)
Type Linux
Version Ubuntu
Memory Size 1024 MB
Hard drive Create now
Hard drive file type VDI (VirtualBox Disk Image) Storage on physical drive Dynamically allocated File location (click the
folder)
Ubuntu
File size 10 GB (minimum)
Once the machine was created, go into ‘Settings’ and set as follows:
Attribute Value
Display 16 MB
Storage Clicked on the CD to select that drive. Clicked on the CD to the far right (with the black arrow) to select a disk file. I navigated to, and chose the Ubuntu disk image.
Network Keep NAT for now, however we’ll discuss this in greater detail later.
7.
Installing Ubuntu As Your Virtual Machine (VM)
Start your VM Starts Ubuntu 12.04 installation.
Install Type Install Ubuntu.
Internet You should be connected to the Internet. Preparing Select Download updates while installing. Installation type Select Erase disk and then ‘Install Now’. Where are you? Select your timezone.
Keyboard layout English (US).
Who are you? Enter computer, username and password information and write it down.
Logging in Log in automatically. (Only if your workstation is secure).
Run through the prompts to install the OS. Upon reboot, I left the Ubuntu disk image loaded, as it may be required for upgrades or adding for additional packages.
The next thing is to perform the various updates through the update manager. To do so: 1. Click on the cog at the top right of the Ubuntu desktop.
2. Click on ‘Software Updater’ or ‘Updates Available’. 3. I selected everything.
4. From the Update Manager, click on ‘Install Updates’. 5. Once you’ve entered your password, you can go to dinner. 6. You will be prompted to restart Ubuntu once complete.
After dinner, you will also want to install the VirtualBox Guest Additions in order to be able to resize the desktop to your full screen size. Do so by going to the very top menu and:
1. Select ‘Devices | Install Guest Additions’. 2. You should be prompted for your password.
3. You need to restart in order for the new desktop to take effect.
Note: I did not need to install the VirtualBox Guest Additions software in order to run Linux Mint with Mate in full screen mode.
This is your BASE VM!
At this point you might want to take a snapshot of your installation by going to the very top menu and: Select ‘Machine | Take Snapshot’.
Enter a description so you know what you’ve done.
The Oracle Virtualbox Snapshot feature allows you to experiment with your VM, and then return it back to the most recent Snapshot (you must turn your VM off in order to do so).
In the future, before patching your OS, TAKE A SNAPSHOT first! Be warned however, as snapshots take up a LOT of disk space, so you’d better have it.
8.
Start Up a Terminal
Prior to developing your web sites, you should get a reasonable feel for Ubuntu Linux and the terminal environment. Here’s some exercises:
Get to know the desktop . . . click around.
Find and open up the terminal and look around the Linux directory structure with the ‘ls’ and ‘cd’ commands. Try ‘ls-al’. Learn other Linux commands such as ‘mv’, ‘cp’, ‘pwd’, ‘rm’, ‘rmdir’, ‘mkdir’, ‘more’, ‘cat’ as well as ‘chmod’ and
‘chown’.
Take some time to learn about directory and file ownerships and permissions.
Spend some time learning ‘nano’, ‘vi’, ‘gedit’ or the text editor of your choice. Once you have configured Samba, you can use your favourite Windows text editor and edit files on your VM from Windows.
9.
Hosts and Hostname
Make sure your hostname is setup correctly as follows:
dev$ sudo vi /etc/hosts
# edit your hosts file
The entry for this host could be something along the lines of:
127.0.0.1
127.0.1.1 ubuntu.dev www.ubuntu.dev
dev$ sudo vi /etc/hostname
# edit your hostname file
This should be a hostname with a domain (fqdn), such as:
ubuntu.dev
# or www.ubuntu.dev
10.
Networking
The next few sections cover network configuration for your Ubuntu VM.
We’ll use different network configuration depending on whether you want to access your server from your host workstation, another VM on the host or a remote host.
Network Configurations
Network Type / Configuration
Advantage Disadvantage
Bridged Adapter Your virtual machine can access your virtual machine from your host workstation and other virtual machines as well as the Internet. It’s quick and easy.
This is not secure, especially if you take your host workstation on the road.
NAT Your virtual machine can still access the Internet and other hosts, while they cannot access your VM.
Your web site cannot be accessed by any host other than your VM.
Host Only A network that connects your VM, your host as well as other VM’s.
Your machine cannot access the Internet. Also, no access from external hosts.
DHCP assigned IP address Your virtual machine will change the IP address to match the network it’s on.
You don’t have a consistent IP address. Not good if other hosts are trying to access your VM.
Static IP address Your assigned IP address will always be consistent with your hostname. Excellent for hosting.
You may have IP address conflicts on your network. In addition, if you take your laptop elsewhere, the
network may use a different IP address range, thus no connectivity.
Network Configuration Selection
I would like to What I need to do
Just access the Internet from my VM. No inbound access. Continue with NAT and you’re secure.
Access the Internet from my VM and allow multiple physical Change from NAT to Bridged Adapter in the VirtualBox network settings for your VM. You may also want to change to a static IP
computers to access my VM. address if you’re staying in one place. Access the Internet from my VM and allow the host as well as
other VM’s on my host to access my VM. No external access to my VM though.
Use NAT on eth0 and Host Only networking on eth1.
11.
Configuring NAT
By default, NAT is already configured on the VM and no further work is required. It’s interesting to note that the
‘/etc/network/interfaces’ file does not contain a configuration entry for eth0, although running the ‘ifconfig’ command clearly shows it present.
12.
Configuring a Bridged Adapter
This section covers using a Bridged Adapter with either Static or DHCP assigned IP addresses.
We selected NAT when installing Ubuntu, but should be able change that over to a Bridged Adapter with either DHCP or a static IP address. This is a simple configuration change, but can add the additional risk of allowing external hosts to access your VM. In addition, your static assigned IP address may not work if you take your laptop elsewhere.
In order to set a static address for your bridged adapter, you will need to: 1. Shutdown your VM
2. Change the VirtualBox Machine entry from NAT to a Bridged Adapter 3. Then reboot your VM.
Once your VM has rebooted, add the eth0 configuration below to ‘/etc/network/interfaces’:
auto lo
# this shouldn’t change
iface lo inet loopback
auto eth0
iface eth0 inet dhcp
If you wish to change to a static IP address, determine your network information by going:
You should see something along the lines of:
inet addr:192.168.1.95 Bcast 192.168.1.255 Mask:255.255.255.0
This doesn’t include your default gateway, which you can determine by typing:dev$ route
-n
0.0.0.0 192.168.1.254
We now have enough information to configure Ubuntu with a static IP address. Find an available IP address on your network by using ‘ping’ as follows:
dev$ ping 192.168.1.195
# if no reply, you *may* be OK
Then modify your IP address as shown below:
dev$ sudo
vi
/etc/network/interfaces
auto lo
# this shouldn’t change
iface lo inet loopback
# auto eth0
# Comment out the DHCP configurations
# iface eth0 inet dhcp
auto eth0
iface eth0 inet static
address 192.168.1.195
# something different than your DHCP assigned address
netmask 255.255.255.0
network 192.168.1.0
# your network might be 192.168.0.0
broadcast 192.168.1.255
gateway 192.168.1.254
# or whatever your gateway is
dns-nameservers 192.168.1.254 8.8.8.8
# Update DNS
Note: Your network may also be 192.168.0.0, so substitute a ‘0’ for a ‘1’ where appropriate in the IP address and gateway. In addition, you may require two dns nameservers for this to work. I added the 8.8.8.8 Google public nameserver.
Restart networking with:
dev$ sudo
/etc/init.d/networking
restart
# I had to reboot my VM
After running ‘ifconfig’, we should see:
inet addr:192.168.1.195 Bcast 192.168.1.255 Mask:255.255.255.0
In order to stop/restart your network interfaces, you can try:
dev$ sudo ifdown eth0
# for a single adapter
dev$ sudo ifup eth0
orsudo /etc/init.d/networking stop
# for all adapters
Note: Ideally, you’d use DHCP reservations on your router in order to keep your pool of DHCP addresses separate from your static ones, however that’s out of scope of this dcoument. Some routers also support ‘reserved’ IP addresses.
Note: When testing this (again and again), I found on at least one occasion that when changing from NAT to a Bridged Adapter that eth0 would not work in Bridged Adapter mode. Couldn’t replicate it, so I dropped it.
13.
NAT and Host Only Configuration
In this section, we’ll configure networking more securely so that it:
Uses VirtualBox’s ‘NAT’ mode on eth0 to provide one way access to external hosts. Uses VirtualBox’s ‘Host Only’ mode on eth1 so that the host computer can access the VM. Uses VirtualBox’s ‘Host Only’ mode so that VM’s on the host can access each other. Can adapt to other networks while travelling (via NAT).
Uses a static IP address in the ‘Host Only’ mode.
First, let’s review ‘/etc/network/interfaces’:
dev$ sudo
vi
/etc/network/interfaces
Let’s edit it to say say:
auto lo
# this shouldn’t change
iface lo inet loopback
#auto eth0
# eth0 is not defined when using NAT
#iface eth0 inet dhcp
If you’ve made any significant changes, I’d recommend rebooting your Ubuntu workstation. Once it’s up again, open up a terminal and test eth0 by typing:
dev$ ifconfig
# You should see eth0 with a 10.0.X.X IP address
. . . .
dev$ ping 8.8.8.8
# Google DNS server
dev$ ping www.google.ca
# Google web server
. . . .
# You should get a response
In addition, you should not be able to ping that 10.0.X.X address of ‘eth0’ from your host computer.
In order to setup the ‘Host Only’ network , shutdown the Ubuntu workstation. We need to modify the VirtualBox preferences as follows:
In addition, you don’t really need the DHCP server as we require static VM hosts.
Now, go to the Network settings on your Ubuntu workstation and add another adapter to it:
You should now start up your Ubuntu workstation and edit that Ethernet adapter.
dev$ sudo
vi
/etc/network/interfaces
and add:
auto lo
# this shouldn’t change
iface lo inet loopback
#auto eth0
# eth0 defnition is not required when using NAT
#iface eth0 inet dhcp
auto eth1
# eth1 will be ‘host only’
iface eth1 inet static
address 169.254.88.195
netmask 255.255.0.0
network 169.254.0.0
broadcast 169.254.255.255
# A gateway is not defined for this port
Reboot or start the network service. From the host workstation, you should be able to ping the VM at 169.254.88.195. Just remember that the 169.254.X.X IP address of the host changes every time you restart VirtualBox.
I used bridged networking for a long time, but understood the risk if I used that with my laptop. Having now converted over to NAT and Host Only, I can safely take my laptop on the road with me, still connect to the Internet and access the host from my Windows 7
environment. It’s really the best of both worlds.
References:
http://www.sitepoint.com/ubuntu-12-04-lts-precise-pangolin-networking-tips-and-tricks/
4.
Installing Applications
1.
Configuring Your Virtual Machine
This section covers installing tools to support your development environment. These include:
Application Description
FTP File transfers to/from Ubuntu
Apache Web server
MySQL Database server
PHP Application support for Drupal and WordPress SSH Server Secure terminal and file copying
Samba Windows file sharing
phpMyAdmin Database administration
Git Version control
drush Drupal shell support
You might want to take a Snapshot of your Ubuntu host after installing/configuring these.
2.
FTP
As you already know, FTP allows you to transfer files to/from your host. Although not secure, WordPress requires FTP in order to upload themes and plugins via the dashboard.To install the FTP server on your Ubuntu workstation, type:
In order to allow user authenticated ftp, perform the following:
dev$ sudo
vi
/etc/vsftpd.conf
Remove the comment from the following lines:
local_enable=YES
write_enable=YES
Restart vsftpd with:
dev$ sudo
restart
vsftpd
You should now be able to ftp into your server and upload files to your user directory (or any directories that you have write access to). For further information on the FTP server, please see:
https://help.ubuntu.com/12.04/serverguide/ftp-server.html
3.
Apache
Before installing Apache, I wanted to cover permissions and ownership. We could configure Apache similar to that of a production server, where each account can have their own web site. In addition, the directory structure would look like:
The disadvantage is that with the recommended directory permissions, you will need to ‘sudo’ or become that particular ‘username’ when you want to edit the site. As a developer, this provides security compartmentalization for your clients, however it’s significantly more effort to setup and use.
Since I’m the only developer on my workstation, I’ll use the default Apache installation as follows:
/var/www
We’ll make your ‘username’ as owner of the Apache service and directory structure. As a result, you’ll only require your ‘username’ credentials to edit any of the hosts in this directory. We’ll also have to make your ‘username’ as the Apache process owner.
As for permissions, we’ll set them so that they are relatively secure: Directory ownership will be 2750
File ownership will be 644
4.
Installing Apache
In order to install the Apache web server, type:
dev$ sudo
apt-get
install
apache2
At the end of the installation, we may see a warning that says:
“Could not reliably determine the server’s fully qualified domain name. . .”
This is just an warning message. In order to remove that message, ensure your /etc/hostname entry has a domain appended to the hostname.
http://localhost
You should be greeted with:
It works!
This is the default web page for this server.
The web server software is running but no content has been added yet.
This index.html file is located at /var/www/index.html. At this point, you’ll need to use ‘sudo’ to edit this file, and we’ll be covering that later. For more information on installing and configuring Apache, see:
https://help.ubuntu.com/12.04/serverguide/httpd.html
5.
Apache Permalinks
At some point, you will need to support friendly ‘friendly’ URL’s or Permalinks on your web site. To enable this, there are two components. They are:
Apache configuration .htaccess file
To enable this in Apache, type:
dev$ sudo
a2enmod
rewrite
dev$ sudo
/etc/init.d/apache2
restart
# and NOT service apache2 restart
For the .htaccess file, both Wordpress as well as Drupal will create one as required that should work for your site. Remember, it’s a hidden file, and may not be copied by default with some programs.
Be careful when transferring a site from a subdomain such as client1.mycompany.com to a domain such as client1.dev, as the
.htaccess file may be slightly different and could cause the friendly URL’s on your site to break. I recommend adding a .htaccess entry in .gitignore (see my Git document) and keep each site’s .htaccess file unique.
If you encounter problems in WordPress when migrating your site, you should be able to fix it by setting your Permalinks back to default. Then there’s the database entries, but we’ll cover site migration much in the next document.
6.
Apache Permissions and Ownership
Upon initially installing Apache, a directory called /var/www is created with permissions/ownership of:
drwxr-xr-x root root
# Permission of 755
In addition, files created in that directory will have permissions of:
-rw-r--r-- root root
# Permission of 644
Note: Do not increase file permissions to ‘664’. Here’s why:
1. Create a simple file called foo.php on your Hostgator server and test that it works. 2. Change the permission of that file from ‘644’ to ‘664’ and try that again.
3. You should receive an ‘Internal Server Error’.
5. So, be careful with permissions.
Here’s the scenario:
At one point, an account called ‘www-data’ was both the owner and group owner of the directory and files. In order to allow my ‘username’ to edit the files, I added it to the ‘www-data’ group and changed all of the file permissions to 664 so that I could edit them. That worked great on the Ubuntu server, but broke the site on Hostgator.
Let’s make ‘username’ the user owner and ‘www-data’ as group owner of ‘/var/www’ with:
dev$ sudo
chown
-R
username:username
/var/www
If your www directory is brand new, set the inheritances with the ‘sticky’ bit:
dev$ sudo chmod 2750 /var/www
dev$ sudo chmod 0644 /var/www/index.html
Otherwise, if your www directory already has files in it, do this:
dev$ sudo
find
/var/www -type
d
-exec
chmod
2750
{}
\;
# set directories to this
dev$ sudo
find
/var/www -type
f
-exec
chmod
0644
{}
\;
# set files to this
Later on, we’ll make sure that Samba will apply the correct ownership/permissions as well.
7.
Changing Apache Process Ownership
export APACHE_RUN_USER=username
export APACHE_RUN_GROUP=username
Note: If you change ownership to your username, once phpMyAdmin has been installed, you will need to make a change there as well.
You will need to reboot your Ubuntu machine after this.
This is not recommended for a production environment, but in a single user development environment, this allows you to edit multiple hosts without using ‘sudo’ all the time. In addition, you won’t require multiple SSH keys when accessing remote hosts.
8.
MySQL
MySQL is the default database used with Drupal and the only database supported by WordPress. We can install it by typing:
dev$ sudo
apt-get
install
mysql-server
Once complete, you should be able to use MySQL from the command line by typing:
dev$ mysql
# type ‘exit’ to quit
The service can optionally be restarted with:
dev$ sudo
service
mysql
restart
For further information on MySQL, see:
https://help.ubuntu.com/12.04/serverguide/mysql.html
http://www.mysql.com
9.
PHP
PHP is the scripting language upon which both WordPress and Drupal are based. PHP has many extensions, however the focus of this tutorial is web based applications, so we are just going to install PHP to support:
Apache MySQL
Warning: Before proceeding, make sure you know WHICH version of PHP you want to install. If you need to support older web sites, you may require an older version of PHP. I recommend you research and install the version that your web host provider uses.
To install the current version of PHP in the apt repositories for the command line, Apache and MySQL, type:
dev$ sudo
apt-get
install
php5-mysql
dev$ sudo apt-get install php5-curl
dev$ sudo apt-get install php5-cli
# For use in a terminal
dev$ sudo
/etc/init.d/apache2
restart
Once complete, you’ll want to verify things are working by typing:
dev$ vi
/var/www/info.php
# you should no longer need to use ‘sudo’
and add:
<?php
phpinfo();
?>
Save and exit. Now open a browser in Ubuntu and type :
http://localhost/info.php
You should see the standard PHP information page. Please take note of the version of PHP that you are using. If you want to see this page in a Windows 7 browser, in the terminal type:
dev$ ifconfig
http://192.168.1.195/info.php
For more information on installing PHP, see: https://help.ubuntu.com/12.04/serverguide/php5.html
10.
Installing PHP 5.3
ahksfhasf
11.
Installing PHP 5.2
qwrwrwr12.
Open SSH Server
In addition, you can use a terminal to ‘SSH’ (or use a terminal) to access the Ubuntu system from a remote computer. In addition, SSH is used by several utilities such as ‘scp’, ‘rsync’ and ‘Git’to transfer files between hosts securely.To install it the SSH server, type:
dev$ sudo
apt-get
install
openssh-server
Test it by typing:
dev$ ssh localhost
# type ‘yes’ to continue connecting
. . . .
# you should be connected
dev$ exit
Connection to localhost closed
Note: If you wish to SSH into your Ubuntu workstation from elsewhere on the Internet, you will need to configure your router to support port forwarding. The default TCP port for SSH is 22.
For more information on Open SSH, see:
https://help.ubuntu.com/12.04/serverguide/openssh-server.html
13.
Samba
Although Virtualbox supports Shared Folders, I prefer to access Ubuntu files from my Windows 7 workstation via Samba. It’s
relatively easy to setup, provides greater functionality and you can fine tune directory/file ownership and permissions. Samba is installed by typing:
dev$ sudo
apt-get
install samba
You need to configure your Samba shares and hostname in order to be able to access the Ubuntu VM directories via your Windows file browser.
Since the Ubuntu system is on my home computer, I have configured Samba without file sharing security. If you are using a laptop that you take offsite, or if you have several staff in your office, you will need to implement adequate security (see the following section). Remember that we have changed the group owner of the /var/www directory to be www-data.
Create Samba shares by moving the original /etc/samba/smb.conf to smb.conf.orig and create/edit a new smb.conf as follows:
dev$ cd
/etc/samba
dev$ sudo
mv
smb.conf
smb.conf.orig
# make a copy of the original config file
dev$ sudo
vi
smb.conf
# and then add
[global]
workgroup = MYCOMPANY
# your company name
netbios name = Ubuntu
restrict anonymous = no
security = share
[root]
read only = no
path = /
# For the love of root, be careful
guest ok = yes
force user = root
force group = root
force directory mode = 2750
force create mode = 644
[www]
read only = no
path = /var/www
# The www directory structure
guest ok = yes
force user = username
# You are now the god of www
force group = username
force directory mode = 2750
force create mode = 644
# Apache group gets read only access by default
[username]
read only = no
# You can now access your own files via Windows
path = /home/username
guest ok = yes
force user = username
# With proper ownership
force group = username
force directory mode = 2755
# And permissions to boot
force create mode = 644
Save and exit. Run "testparm" to check that you have not made any errors as follows:
To restart Samba, type:
dev$ sudo
restart
smbd
dev$ sudo
restart
nmbd
It may take some time to propagate, but you should be able to open a ‘My Computer’ browser (not a web browser) in Windows 7 and type \\Ubuntu in the bar and see:
You have full privileges via the root share, so be careful!
For more information on Samba, see: https://help.ubuntu.com/12.04/serverguide/samba-fileserver.html
14.
Samba with Security
Setting up Samba without permissions is a BAD idea, especially on a shared network. This section provides a more secure configuration for the [www] section.
dev$ cd
/etc/samba
dev$ sudo
vi
smb.conf
# and then change
[www]
read only = no
path = /var/www
valid users = username
# some username
force user = username
force group = www-data
force directory mode = 2750
force create mode = 644
Then you need to setup a username/password:
dev$ sudo smbpasswd -a username
dev$ sudo
restart
smbd
Please consider your networking environment and configure your shares accordingly.
15.
phpMyAdmin
To manage your database via a web front end, type:
dev$ sudo
apt-get
install
phpmyadmin
Press ‘spacebar’ to select ‘Apache2’ and then tab over and press ‘Ok’. Select any further defaults. Finally, to log into PhpMyAdmin, open a browser in your VM and type:
http://localhost/phpmyadmin
At this point, if you have changed ownership of the Apache2 process to your username, attempting to 'Import' a sql database, it will fail. In order to fix that you need to:
$ sudo chown username:username /var/lib/phpmyadmin/tmp
In order to upload larger files in phpMyAdmin, it's recommended that you edit '/etc/php5/apache2/php.ini' and change to the following:
upload_tmp_dir = /tmp
upload_max_filesize = 50M
16.
Installing Git
Git provides our version control, and is installed by typing:
dev$ sudo apt-get install git
Once you’ve downloaded Git, you should perform a basic configuration as follows:
dev$ git
config
--global
user.name
"Joe Blow"
dev$ git
config
--global
user.email
[email protected]
dev$ git
config
-l
# as in lower case ‘L’
In addition to Git for Ubuntu, you can also download ‘mysysgit’ for Windows 7, which comes with a shell as well as a Git client. It can be downloaded from http://msysgit.github.com/. Also see http://git-scm.com/downloads.
17.
Installing drush
Drush provides Drupal based maintenance functions via the command line. Install it by typing:
dev$ sudo
apt-get
install
drush
I won’t be covering the use of drush in this document, but it’s an excellent tool, so look around for some tutorials.
18.
Take a Snapshot
STOP
Take a Snapshot of your VM!!!
19.
Kick the Tires
Spend some time learning the tools you’ve installed:
You should already be familiar with the Desktop as well as using basic commands in the Terminal. Learn nano or vi as well as other Linux commands.
Move files between your Windows workstation and Linux.
Load up phpMyAdmin (http://localhost/phpmyadmin). Make a database and delete it. Edit your /var/www/index.html or index.php and view it (http://localhost).
5.
Workstation Configuration
In this section of the document, we’ll be configuring our development environment as well as covering a few miscellaneous topics.
1.
Host Naming
You will need to edit your hosts file on various servers in order to support them on your development workstation. In Ubuntu, you would edit as follows:
dev$ sudo
vi
/etc/hosts
Here’s an example:
# Run ifconfig on your Ubuntu server to get the IP address of your Ubuntu server.
# Then change the address listed below to it.
# Remove the first '#' on the following line to view the development server.
192.168.1.195 ubuntu.dev www.ubuntu.dev
# This is the IP address of the Ubuntu server
Additional hosts, such as ‘client1.dev’ would be added with:
192.168.1.195 client1.dev www.client1.dev
# Client1 on your development workstation
To do this in Windows 7, we need to edit /windows/system32/drivers/etc/hosts and you must use a text editor in ‘Run as administrator’ mode in order to change it.
2.
Hostgator Account Directory Structure
The home directory of your account on a Hostgator website is not the web root (where index.html is located). Rather, the home directory contains other directories, such as mail, ftp and so on. In the case of www.mycompany.com, the ~mycompany directory contains:
Directory
Description
bin May contain programs.
etc Configuration files.
keys May contain security keys.
logs May contain log files.
mail May contain email.
public_ftp May contain ftp file transfers.
public_html This is the ‘web root’, and mycompany’s web site files go in here. Subdomains for clients are in subdirectories.
public_html/client1 The directory for the client1.mycompany.com staging server.
Note: I assume you are familiar with creating a subdomain in CPanel.
3.
Using SFTP With Hostgator (Reseller, NOT VPS)
The majority of this document will use the command line in order to access Hostgator remotely, however I’d like to cover Filezilla just briefly.
Traditionally, we have used the regular FTP protocol when uploading/downloading files from Hostgator. When using a Windows 7 file transfer GUI, such as Filezilla, we should be using the much more secure SFTP. In the case of a Hostgator Reseller account, they use port 2222 instead of the standard port 22. Here’s a sample configuration for Filezilla to a reseller account.
In summary, a Hostgator VPS still uses port 22 for SFTP, however if you’re using a Reseller account, you’ll need to set your port configuration to 2222.
4.
Setting up SSH On Hostgator (Reseller Only)
In order to be able to use SSH with your Hostgator Reseller account, you require an SSH server to be configured for your domain. For a Hostgator reseller account, this is free for your primary account along with any subdomains , but is a one time $10 US charge for each additional domain (you’ll need to generate a service request with Hostgator). For example, these all get SSH for free:
www.mycompany.com (primary account) client1.mycompany.com (subdomain)
client2.mycompany.com (subdomain)
On the other hand, I had to pay $10 to enable SSH for www.client1.com and another $10 for www.myotherclient.com. See the following reference:
https://support.hostgator.com/articles/hosting-guide/lets-get-started/how-do-i-get-and-use-ssh-access
5.
Setting up SSH on Hostgator Generic
Once you have enabled SSH access for your Hostgator account, you can access it from your Ubuntu workstation or from Windows via an SSH terminal shell such as mysysgit (available from msysgit.github.com). From a terminal, you can remotely access your account on Hostgator as follows:
dev$ ssh -p 2222 [email protected]
# your Hostgator username on your reseller account
OR
dev$ ssh [email protected]
# your Hostgator username on your VPS
The first time you ssh to your Hostgator account, you will be prompted with:
The authenticity of host '[www.mycompany.com]:2222 ([172.16.55.51]:2222)' can’t be established.
RSA key fingerprint is 67:a9:b4:4e:d5:c3:b3:18:93:67:f8:c4:36:ab:94:68.
Are you sure you want to continue connecting (yes/no)? yes
Warning: Permanently added '[www.mycompany.com]:2222, [172.16.55.51]:2222' (RSA) to the list of known
hosts.
In order to be able to remove the username and ‘-p2222’ component of SSH commands in Ubuntu, you need to create an SSH
configuration file. On the Ubuntu system, in both your user account as well as the root account, create a file called ‘~/.ssh/config’ which would contain:
Host
www.mycompany.com
User
username
Port
2222
# For Reseller account only
SSH simply becomes:
$ ssh www.mycompany.com
. . .
# You’ll still get asked for a password
Let’s deal with the password in the next section.
6.
Automating Hostgator SSH Authentication
Everytime you ‘ssh’ or ‘git push’ to the Hostgator site, you will be asked for your password as follows:
dev$ ssh www.mycompany.com
[email protected]’s password:
Last login: Fri Feb 1 15:48:24 . . . .
host$
# The prompt might look different
If you don’t already have one, you can create a private/public key pair that can be used to automate the authentication process so that you don’t need to enter your password everytime you wish to access Hostgator using the SSH protocol. The public key will be stored as ‘~/.ssh/id_rsa.pub’.
Here’s how to create that key pair on your Ubuntu workstation:
dev$ cd ~
dev$ ssh-keygen
# Only do this ONCE!
Generating public/private rsa key pair.
Enter file in which to save the key (/home/username/.ssh/id_rsa):
Enter passphrase (empty for no passphrase):
# Keep this blank.
Enter same passphrase again:
Your identification has been saved in /home/username/ssh/id_rsa.
Your public key has been saved in /home/username/.ssh/id_rsa.pub.
. . .
dev$
Now, we need to append ‘/home/username/.ssh/id_rsa.pub’ to a file on your Hostgator account called ‘~/.ssh/authorized_keys’. Assuming you don’t have a .ssh directory in Hostgator, do the following:
dev$ ssh www.mycompany.com
# ssh to your Hostgator account
. . .
# enter your password
host$ mkdir ~/.ssh
# create the .ssh directory
host$ exit
# to go back to Ubuntu
dev$ ssh-copy-id -i ~/.ssh/id_rsa.pub [email protected]
OR
dev$ cat ~/.ssh/id_rsa.pub | ssh www.mycompany.com "mkdir ~/.ssh; cat >> ~/.ssh/authorized_keys"
If you have added the username and port number into the known_hosts file, you should now be able to SSH into your Hostgator account without requiring either your username or your password:
dev$ ssh www.mycompany.com
Last login: Fri Feb 1 1640:26 2013 . . .
host$
6.
Apache Sites
1.
Create A Development Web Site
On the Ubuntu system, Apache is initially configured to use /var/www directory. The sites we’ll be creating will have a .dev extension, so type:
dev$ mkdir
/var/www/client1.dev
Scripts and tools will be stored in this directory, while the actual http://client1.dev web site will be stored in a ‘www’ subdirectory as follows:
dev$ mkdir
/var/www/client1.dev/www
Feel free to create your own directory standards. Just keep it consistent and document it, especially if you are working with a team. On a multi-user system, you may wish to use /home/username/public_html for your web site directory structure. This also has the advantage of more closely mirroring the directory structure of your production server and is one of the strings that needs to be modified when migrating your WordPress database to another server. More on that in the next document.
2.
Apache Host Configuration Files
The Apache virtual host configuration files are located in /etc/apache2/sites-enabled and can only be edited while in privileged mode. To do so, perform the following:
Add the following:
<VirtualHost
*:80>
DocumentRoot
"/var/www/client1.dev/www"
ServerName
client1.dev
ServerAlias www.client1.dev
</VirtualHost>
As mentioned earlier, the ‘/var/www/client1.dev’ directory itself is reserved for any command line tools you may need to use for the development of this site, and that the actual website is in the ‘/var/www/client1.dev/www’ subdirectory.
Once you’ve added the configuration file for the client, restart Apache with:
dev$ sudo
/etc/init.d/apache2
restart
3.
Hosts File
Don’t forget to add a line to ‘/etc/hosts’ as follows:
dev$ sudo
vi
/etc/hosts
Add:
If you wish to view your Ubuntu based client site in Windows, you’ll edit c:\system32\drivers\etc\hosts in ‘Run as administrator’ mode with:
192.168.1.195 client1.dev www.client1.dev
# or IP address of your Ubuntu server
4.
Edit and View your Virtual Host
Create an index.html file as follows:dev$ cd /var/www/client1.dev/www
# your username should already have full privileges
dev$ vi index.html
# add some text here
Once you’ve created a small test file, open up a browser in Ubuntu and type:
http://client1.dev
You should be able to see the text.
Even better, create an index.php file. A simple one might contain:
7.
Databases
1.
Create a Database
I assume you can already create a database and import/dump it with phpMyAdmin, however you might want to learn the command line method if you wish to automate some of your database operations, such as performing secure backups.
Warning!!! Databases created via the terminal will probably not show up in phpMyAdmin. See
http://forums.cpanel.net/f354/databases-not-show-phpmyadmin-149965.html.
You cannot be ‘#’ to perform this operation on Ubuntu. In addition, you cannot do this in the Hostgator shell unless you have a VPS and are logged in as root. Rather, you must use CPanel’s phpMyAdmin instead. In the meantime, let’s press on while logged into the Ubuntu workstation as ‘username’:
dev$ mysql
-uroot
-pmypassword
# use the MySQL database password
mysql> create
database
client1_dev;
mysql> grant
all
on
client1_dev.*
to
'root@localhost';
mysql> exit
Bye
dev$
or create and run a script (don’t forget to chmod +x scriptname.sh and run it with ./scriptname.sh):
#!/bin/bash
# put this at the beginning of all your scripts
mysql -uroot -pmypassword -e "create database client1_dev";
2.
Dump the Database
You can, however perform the rest of the commands in the Hostgator shell as well as your Ubuntu server. In order to dump the database on the Ubuntu server type:
dev$ cd
/var/www/client1.dev
dev$ mysqldump
-uroot
-ppassword
client1_dev
>
client1_dev.sql
List the contents of your .sql file as follows:
dev$ cat client1_dev.sql | more
# press space bar to see each page
or
dev$ more client1_dev.sql
To dump the database on your Hostgator based staging server, you need your (and NOT the database) username and password. Then type:
dev$ ssh
www.mycompany.com
# assuming you modified .ssh/config and added the keys
. . .
host$ cd
public_html/client1
host$ mysqldump
-uusername
-ppassword
mycompany_client1
>
mycompany_client1.sql
host$ exit
dev$ scp
-r
www.mycompany.com:public_html/client1/mycompany_client1.sql
mycompany_client1.sql
For security reasons, you should remove any database dump files from the staging server once the transfer is complete. You can also dump the staging server database directly onto your development workstation with:dev$ ssh mycompany.com mysqldump -uusername -ppassword mycompany_client1 > mycompany_client1.sql
Warning: For a WordPress site, the URL’s and directories in the database need to match the host server, and is more involved than a simple string edit. You will need to use a migration tool in order to modify the database for use on different servers and will be discussed/provided in the next document. For further information, do a Google search on ‘WordPress migration serialized strings’. To copy an entire directory structure with ‘scp’, you could use:dev$ scp -r mycompany.com:~/mycompany/public_html/. /var/www/.
For site deployment and updates, we’ll be using the ‘rsync’ command in my next document.
3.
Drop the Database
You can delete (or drop) the database on your Ubuntu server as follows:
dev$ mysqladmin
-uroot
-pmypassword
drop
client1_dev;
4.
Drop All Tables
As mentioned previously, you cannot create a database via the command line on a Hostgator Reseller account. What about dropping all the tables and then re-importing the database? That’s not so straightforward, but it IS possible. The basic command is:
mysqldump u[USERNAME] p[PASSWORD] adddroptable nodata [DATABASE] | grep ^DROP | mysql
-u[USERNAME] -p[PASSWORD] [DATABASE]
or in the case of our Ubuntu workstation with client1_dev:
dev$ mysqldump uroot ppassword adddroptable nodata client1_dev | grep ^DROP | mysql uroot
-ppassword client1_dev
This works well on the Ubuntu workstation as well as on Hostgator. The key is to understand WHICH username/password works on which server.
5.
Import Database
There have been times where phpMyAdmin times out when attempting to import a database. Here is a quick and easy way to get around that as follows:
dev$ mysql
-uroot
-ppassword
client1_dev
<
client1_dev.sql;
6.
Combined Create, Dump, Drop and Import
Once you can use the command line to perform various MySQL operations, the world is your oyster. Just be aware that it might not show up in phpMyAdmin.
8.
Backups
1.
Hostgator Site Backups
If you have ever experienced the horror of losing files or a database, then you’ll understand the importance of implementing and TESTING your backups and site recovery capabilities. Unless you have a pre-existing arrangement in place, do not assume that your web host provider has adequate backup/recovery protection for your web sites.
I’ve developed some simple scripts that run on my Ubuntu server (and more recently a VPS on a Proxmox host), which backup my Hostgator sites and associated databases on a daily as well as a weekly basis.
2.
Crontab Configuration
Scheduled backups are performed with the use of a crontab and shell scripts. You can create your crontab with:
dev$ crontab -e
I then added:
30 1 * * 6 sh /home/username/weekly.sh > /dev/null 2>&1
30 0 * * * sh /home/username/daily.sh > /dev/null 2>&1
3.
daily.sh
Daily backups use names such as client1_Monday.sql.gz and client1_Monday.tgz. This weeks backup will overwrite last week’s backup and is then download to the offsite backup server. Don’t forget to ‘chmod +x daily.sh’ which contains:
# client1