Defender 5.7
Installation Guide
This guide contains proprietary information protected by copyright. The software described in this guide is furnished under a software license or nondisclosure agreement. This software may be used or copied only in accordance with the terms of the applicable agreement. No part of this guide may be reproduced or transmitted in any form or by any means, electronic or mechanical, including photocopying and recording for any purpose other than the purchaser's personal use without the written permission of Quest Software, Inc.
If you have any questions regarding your potential use of this material, contact: Quest Software World Headquarters
LEGAL Dept 5 Polaris Way
Aliso Viejo, CA 92656 USA
www.quest.com
email: [email protected]
Refer to our Web site for regional and international office information. TRADEMARKS
Quest, Quest Software, the Quest Software logo, and Defender are trademarks and registered trademarks of Quest Software, Inc in the United States of America and other countries. For a complete list of Quest Software's trademarks, please see
http://www.quest.com/legal/trademark-information.aspx. Other trademarks and registered trademarks are property of their respective owners.
Disclaimer
The information in this document is provided in connection with Quest products. No license, express or implied, by estoppel or otherwise, to any intellectual property right is granted by this document or in connection with the sale of Quest products. EXCEPT AS SET FORTH IN QUEST'S TERMS AND CONDITIONS AS SPECIFIED IN THE LICENSE AGREEMENT FOR THIS PRODUCT, QUEST ASSUMES NO LIABILITY WHATSOEVER AND DISCLAIMS ANY EXPRESS, IMPLIED OR STATUTORY WARRANTY RELATING TO ITS PRODUCTS INCLUDING, BUT NOT LIMITED TO, THE IMPLIED WARRANTY OF MERCHANTABILITY, FITNESS FOR A PARTICULAR PURPOSE, OR NON-INFRINGEMENT. IN NO EVENT SHALL QUEST BE LIABLE FOR ANY DIRECT, INDIRECT, CONSEQUENTIAL, PUNITIVE, SPECIAL OR INCIDENTAL DAMAGES (INCLUDING, WITHOUT LIMITATION, DAMAGES FOR LOSS OF PROFITS, BUSINESS INTERRUPTION OR LOSS OF INFORMATION) ARISING OUT OF THE USE OR INABILITY TO USE THIS DOCUMENT, EVEN IF QUEST HAS BEEN ADVISED OF THE POSSIBILITY OF SUCH DAMAGES. Quest makes no representations or warranties with respect to the accuracy or completeness of the contents of this document and reserves the right to make changes to specifications and product
descriptions at any time without notice. Quest does not make any commitment to update the information contained in this document.
Quest Defender Installation Guide Updated: April 2012
Q
UESTO
NEI
DENTITYS
OLUTION. . . 6
W
HYD
EFENDER. . . 7
RADIUS A
UTHENTICATION. . . 7
C
OMMUNICATIONSP
ROTOCOL. . . 8
D
EFENDERT
OKENS. . . 8
D
EFENDERT
OKEND
EPLOYMENTS
YSTEM. . . 9
B
ENEFITS OFD
EFENDER. . . 9
A
UDIENCE ANDS
COPE. . . .10
C
ONVENTIONS. . . .10
A
BOUTQ
UESTS
OFTWARE. . . .11
C
ONTACTINGQ
UESTS
OFTWARE. . . .11
C
ONTACTINGC
USTOMERS
UPPORT. . . .12
C
HAPTER1
I
NTRODUCTION. . . 13
D
EFENDERC
OMPONENTS. . . .14
P
LANNING YOURD
EFENDERI
NSTALLATION. . . .15
L
ICENSER
EQUIREMENTS. . . .16
D
EFENDERU
SERL
ICENSE. . . .16
A
CQUIRING AL
ICENSEK
EY. . . .18
D
EFENDERD
ESKTOPT
OKENL
ICENSE. . . .19
U
PGRADING FROMD
EFENDER5.6
OR EARLIER. . . .20
S
YSTEMR
EQUIREMENTS. . . .24
C
HAPTER2
I
NSTALLATION. . . 26
I
NSTALLATIONP
REREQUISITES. . . .27
P
RE-
INSTALLATIONC
HECKLIST. . . .28
I
NSTALLATIONS
EQUENCE. . . .29
I
NSTALLING THED
EFENDERS
ECURITYS
ERVER. . . .36
I
NSTALLING AD
EFENDERU
SERL
ICENSE. . . .45
C
ONTENTS OF YOURD
EFENDERU
SERL
ICENSEE
MAIL. . . .45
D
EFENDERD
ELEGATEDA
DMINISTRATION. . . .56
C
ONTROLA
CCESSR
IGHTS. . . .56
S
ETTINGC
ONTROLA
CCESSR
IGHTS ON THED
EFENDERU
SERSOU .58
A
FTERS
ETTINGC
ONTROLA
CCESSR
IGHTS. . . .60
R
EMOVINGC
ONTROLA
CCESSR
IGHTS. . . .61
D
EFENDERD
ESKTOPL
OGIN. . . .61
About
• Quest One Identity Solution
• Why Defender
• RADIUS Authentication
• Communications Protocol
• Defender Tokens
• Benefits of Defender
• Audience and Scope
• Conventions
• About Quest Software
Quest One
Identity Solution
Defender is a component of the Quest One Identity Solution, a set of enabling technologies, products, and integration that empowers organizations to simplify identity and access management by:
• Reducing the number of identities • Automating identity administration • Ensuring the security of identities
• Leveraging existing investments, including Microsoft Active Directory Quest One improves efficiency, enhances security and helps organizations achieve and maintain compliance by addressing identity and access management challenges as they relate to:
• Single sign-on
• Directory consolidation • Provisioning
• Password management • Strong authentication
• Privileged account management • Audit and compliance.
Why Defender
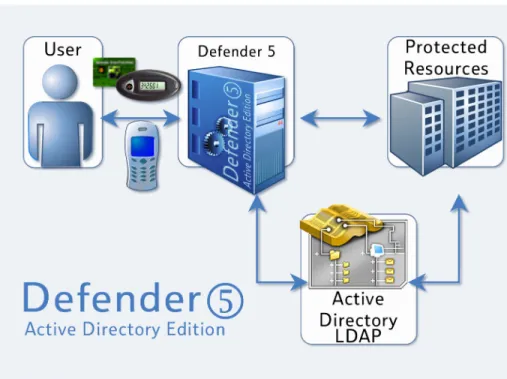
Defender is an easy-to-install, simple-to-use product that utilizes the power and flexibility of Microsoft Active Directory (AD) to provide strong two-factor authentication for your organization.
The two-factor authentication requires something unique the user has (a security token) and something unique that the user knows (a PIN).
Figure 1: Defender Environment
RADIUS Authentication
Defender allows authentication by means of the RADIUS protocol for environments that include RADIUS users and/or RADIUS protected access devices.
Devices that use the RADIUS protocol for authentication must be able to communicate with the Defender Security Server on the ports that they have
Defender includes the facility for Vendor Specific Attributes (VSAs) to be specified in the RADIUS Payload. For further information on VSAs, refer to the RADIUS RFC at www.ietf.org/rfc.
Communications Protocol
Defender uses TCP/IP to communicate with AD via LDAP on port 389.
Defender Tokens
Defender 5 supports the following token types: • Authenex OATH Compliant Token • Defender Go-3 Token
• Defender Go-6 Token • Defender Go-7 Token • Defender DualTok Token • Digipass Pro 260 Token • Digipass Pro 300 Token • Defender One Token • Defender Hand-Held Token • Defender Hand-Held Token Plus
• Defender Desktop Tokens for the following: • Android • Java • Palm • Blackberry • iPhone • Windows Desktop • Windows Mobile/iPaq • Defender SMS • Email OTP • GrIDsure.
Defender Token Types
A Defender token implemented in software or hardware helps remote users gain access to computer resources on a Defender-protected network. The process of gaining access to a secure network through the use of passwords,
challenge/response methods, and synchronous methods is called authentication.
The Defender solution includes a variety of token options. All provide strong two-factor authentication.
Defender Token Deployment System
This feature allows users to register and request hardware and software tokens. This means that the administrator does not have to perform this task for each user and the administrative overheads are significantly reduced. The Defender Token Deployment System is implemented as a Web-based service, typically provided on a company’s Intranet.
Benefits of Defender
Some of the benefits that Defender brings to your organization are:
• seamless integration with Microsoft AD, using AD administration tools and techniques
• centralized administration for all Defender users
• simple migration from earlier versions of Defender with no change to end-user experience
• automated replication and backup for Defender data
• multiple points of authentication for load balancing and redundancy • the ability for users to register their own hardware and software
tokens using the Token Deployment System • Defender Desktop Login for Windows • extensive reporting facilities
• integration with other Quest products including Webthority, Quest Password Manager, ActiveRoles Server, Change Auditor and Quest Authentication Services.
Audience and Scope
This book is intended for administrators who want to install and configure Defender, assign and distribute Defender tokens and manage Defender agents and the Defender Security Server.
This book does not provide tutorial information on the use of the Windows operating system or on network communication concepts. Users must have experience in using the specified operating system and an understanding of networking concepts.
Conventions
In order to help you get the most out of this guide, we have used specific formatting conventions. These conventions apply to procedures, icons, keystrokes, and cross-references.
ELEMENT CONVENTION
Select This word refers to actions such as choosing or highlighting various interface elements, such as files and radio buttons.
Bolded text Used to highlight installation questions and responses.
courier text File, daemon, utility, option, attribute names.
Italic text Used for comments.
Bold Italic text Used for emphasis.
Blue text Indicates a cross-reference. When viewed in Adobe Acrobat, this format can be used as a hyperlink. Used to highlight additional information pertinent to the process being described.
Used to provide Best Practice information. A best practice details the recommended course of action for the best result.
Used to highlight processes that should be performed with care.
About Quest Software
Quest Software, Inc., a two-time winner of Microsoft’s Global Independent Software Vendor Partner of the Year award, delivers innovative products that help organizations get more performance and productivity from their
applications, databases Windows infrastructure and virtual environments. Through a deep expertise in IT operations and a continued focus on what works best, Quest helps more than 100,000 customers worldwide meet higher expectations for enterprise IT. Quest’s Windows management solutions simplify, automate secure and extend Active Directory, Exchange Server, SharePoint, SQL Server, .NET and Windows Server as well as integrating Unix, Linux and Java into the managed environment. Quest Software can be found in offices around the globe and at www.quest.com.
Contacting Quest Software
Phone 949.754.8000 (United States and Canada) Email [email protected]
Mail Quest Software World Headquarters 5 Polaris Way
Aliso Viejo, CA 92656 Web site www.quest.com
+ A plus sign between two keystrokes means that you
must press them at the same time.
| A pipe symbol (vertical bar) between elements means
that you must select the elements in that particular sequence.
\ The back slash, immediately followed by a new line,
indicates a Unix command line continuation. <version>.<build number> References to the product version you are installing
are displayed with <version>.<build number> in angle brackets.
Contacting Customer Support
Quest Software's world-class support team is dedicated to ensuring successful product installation and use for all Quest Software solutions.
SupportLink www.quest.com/support
Email at [email protected]
You can use SupportLink to do the following:
• Create, update, or view support requests • Search the knowledge base
• Access FAQs • Download patches
Introduction
• Defender Components
• Planning your Defender Installation
• License Requirements
Defender Components
Defender consists of four main components:COMPONENT FUNCTION
Defender
Security Server a software device that performs two-factor authentication of users. Defender
Management GUI AD schema and MMC snap-in extensions used to manage Defender users and tokens. Defender
Management Portal System
a web based management portal that will provide Defender administrators, helpdesk administrators and end users options for token management, token deployment, real-time log viewing, helpdesk troubleshooting and access to Defender reports
Defender Report Service
a report console providing access to a variety of reports that can be extracted for viewing or printing, based on specific selection criteria.
In Defender 5.7 and later, Defender Reports is included within the Defender Management Portal.
Planning your Defender Installation
This section describes the information you need to gather and the actions to perform before you install Defender. Ask yourself the following questions:• Where should I locate the Defender components?
Quest strongly recommends that all machines running Defender are located where you can strictly control physical access to them. You should consider adding a backup Defender Security Server to enable you to continue authenticating users if your primary Defender Security Server becomes unavailable.
• What are the network considerations?
Defender components communicate with each other using the methods described below. If your environment uses routers and firewalls, these must be configured to allow the Defender components to communicate.
The DSS uses LDAP to communicate with the domain controllers in Active Directory using port 389 (and port 636 if enabled).
Defender Access Nodes are the firewalls, VPN devices, etc within your environment. These use RADIUS to communicate with the DSS. RADIUS communication uses ports UDP 1812/1813 or 1645/1646. Defender Agents use TCP port 2626 to communicate with the DSS. Defender components use TCP/IP to communicate with AD via LDAP on port 389. The machines on which you install the Defender components must be able to communicate with one another. If your environment uses routers and firewalls, these will need to be configured appropriately.
Devices that use the RADIUS protocol for authentication must be able to communicate with the Defender Security Server on the ports that they have been configured to use.
License Requirements
A valid user license is required for each user account that will use Defender for authentication.
A valid Desktop Token license is also required for each Desktop Token that is generated.
A number of different license types are available (Permanent, Temporary and Trial).
Defender User License
Trial User License
For new installations of Defender (5.6 and 5.7) a 25 user trial license is provided to help get you started quickly and easily.
Trial licenses are installed only with a new Defender installation. They are not included in an upgrade from an earlier version of Defender to Defender 5.7, or if existing licenses are detected.
Figure 1: Defender - All Licenses
In the screenshot above a trial user license is available after a new installation allowing 25 users to have a token assigned to their AD account. The license will expire on 16 May 2012 – users will not be able to authenticate after this date. 0 / 25 shows that currently no user accounts have been assigned a token. When you install a permanent, or temporary user license, the trial 25 user trial license is overwritten.
Defender Security Server version 5.6.0.1476 or later must be installed when using trial licenses
.
Permanent User License
A permanent user license has no expiry date and will allow tokens to be assigned to the configured number of user accounts.
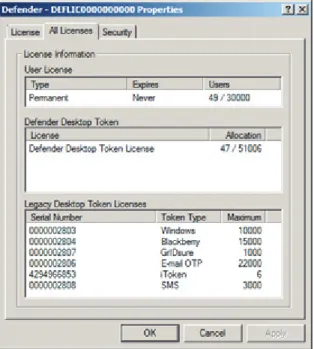
Figure 2: Defender - All Licenses
In the screenshot above a permanent user license has been imported allowing 30,000 users to have a token assigned to their AD account. The license has no expiry date.
49 / 30000 shows that currently 49 user accounts have been assigned a token. User accounts can have multiple tokens assigned – this will only count as one user license.
The Defender User license is imported using the Defender Administration Console by selecting Install User License from the Defender menu.
Acquiring a License Key
Complete the form located at the following link for licensing assistance with any Quest product:
https://support.quest.com/SUPPORT/index?page=licenseKey
For a permanent Defender license, you will need to provide the fully qualified domain name of the domain in which Defender is installed.
To obtain a trial license for a Quest product, send an email to [email protected].
Temporary User License
A temporary Defender User license can be installed, which will allow for a configured number of users to be able to authenticate up until the license expiry date.
Figure 4: Defender - All Licenses
In the screenshot above a temporary user license has been imported allowing 25 users to have a token assigned to their AD account. The license will expire on 17 March 2012 – users will not be able to authenticate after this date.
6 / 25 shows that currently 6 user accounts have been assigned a token. User accounts can have multiple tokens assigned – this will only count as one user license.
The Defender User license is imported using the Defender Administration Console by selecting Install User License from the Defender menu.
Defender Desktop Token License
A Defender Desktop Token license is required to allow Desktop Tokens to be created.
Desktop Tokens are software tokens that can be installed on devices such as Blackberries, iPhone, Android, Windows Mobile devices, etc.
For version 5.7 the Defender Desktop Token license has changed. In this version a single ‘Universal’ Desktop Token license is used.
Figure 5: Defender - All Licenses
The screenshot above shows the licensing dialog following a new installation of Defender 5.7. A trial ‘Universal’ Desktop Token license is available for 200 tokens. This would allow any type of token to be generated, which differs from previous versions of Defender.
New installation of Defender 5.7
As described above a new installation of Defender 5.7 will install a trial 200 x Desktop Token license so that you can get started using Defender quickly. The license will allow for 200 Desktop tokens to be created of any of the following types: • Android • Blackberry • E-mail OTP • GrIDsure • iToken • Java • Palm • SMS
• Windows Mobile / iPAQ and Windows
A permanent license (or further temporary license) will be required before the expiry date of the trial license.
Installing a permanent or temporary license will replace the trial license.
Upgrading from Defender 5.6 or earlier
In Defender 5.6, and earlier versions of Defender, individual licenses were required for each token type.
When upgrading to 5.7 the existing token licenses will be converted to ‘Universal’ Desktop Token licenses and will allow for any type of token to be generated. To explain further:
Figure 6: Defender - All Licenses
The example above shows a company that had a number of different token licenses installed whilst using Defender 5.6. Following the upgrade to Defender 5.7 the licenses have now been combined in to a single license as can be seen here:
The 51006 total is a combination of the existing token licenses, which are now displayed in the Legacy Desktop Token Licenses section:
Figure 8: Defender Legacy Desktop Token Licenses
In Defender version 5.6 the iToken was not licensed therefore any iTokens that have been generated will be included in the combined total of existing token licences and will appear as a license within the Legacy Desktop Token Licenses section.
Additional Universal licenses can be installed and will appear within the License section as in the example below:
Figure 9: Defender license Properties
The above screenshot shows an additional 2000 Desktop Token licenses being added.
System Requirements
This section describes the system requirements for Defender components:
DEFENDER
COMPONENTS SYSTEM REQUIREMENTS
Defender Administration Console Windows Server 2008 R2 Windows Server 2008 Windows Server 2003 Windows Server 2003 R2 Windows 7 Windows XP Windows Vista
Microsoft Active Directory
Active Directory Administration Tools 128 MB RAM
Disk space usage per user: 2K
Defender Security Server Windows Server 2008 R2 Windows Server 2008 Windows Server 2003 R2 Windows Server 2003 128 Mb RAM
Disk space usage per authentication: 300 bytes Memory usage per authentication: 4K (transient)
A single server should be able to handle between 30,000 to 40,000 authentications per day depending on Active Directory performance, with a maximum transaction turnaround time of 2 authentications per second.
Recommended Server specification: - physical or virtual
- 1 x Dual core (at 2GHz per core) - 2GB RAM
Defender Management Portal (includes Defender Reports) Windows Server 2008 R2 Windows Server 2008 Windows Server 2003 R2 Windows Server 2003 Internet Information Services Recommended Server specification:
- physical or virtual - 2GHz
- 2GB RAM - diskspace 40GB
Note: Clients require Internet Explorer 7 or higher Disk space usage: approximately 100 bytes per (historic) authentication. Defender Desktop Token Windows Server 2008 R2 Windows Server 2008 Windows Server 2003 R2 Windows Server 2003 Windows Server 2000 Windows XP Windows Vista DEFENDER
Installation
• Installation Prerequisites
• Pre-installation Checklist
• Installation Sequence
• Installing the Defender Security Server
• Installing a Defender User License
• Contents of your Defender User License
• Defender Desktop Token License
• Defender Delegated Administration
• Defender Token Deployment System
• Defender Delegated Administration
• Setting Permissions and Control Access
Rights
• Setting Control Access Rights
• Removing Control Access Rights
• Defender Desktop Login
This section provides all the information you need to install the Defender components.
Installation Prerequisites
Quest recommends that all machines running Defender are located where you can strictly control access to them. Consider adding a second Defender Security Server (DSS) to ensure that user authentication can continue if one becomes unavailable.
Before you install Defender, ensure that:
• the account you will use to install Defender is a member of the Domain Admins group
• the account you will use to install the Schema updates is a member of the Schema Admins group
• you have created the service account that the DSS will use to access the Active Directory, and that this account is a member of the Domain Admins group or has the permissions required to access the Defender attributes within Active Directory. For further information, refer to the Delegation of Administration Rights guide available from
http://support.quest.com
• TCP/IP is installed on the machines where you will install Defender • the machines where you will install the Defender components have
static IP addresses
• you have administrative privileges on all the machines on which you install Defender components
• you are familiar with the Microsoft Active Directory system that will be used by Defender
• If you are installing the Defender Management Console on: Windows 2008 x64, the following redistributables are required: - Microsoft Visual C++ 2008 SP 1 Redistributable Package (x86) - Microsoft Visual C++ 2008 SP 1 Redistributable Package (x64). Windows 2003 x86, the following redistributable is required: - Microsoft Visual C++ 2008 SP 1 Redistributable Package (x86).
• If you are installing the Defender Management Console, Defender Group Policy feature, ensure that .Net 2.0 or higher is installed on the server where you are installing the Defender Management Console. The Defender Management Console must be installed after .Net to ensure that the required dll’s are registered correctly.
Pre-installation Checklist
Before installing the Defender components, take a moment to complete the following checklist. This will ensure that you have completed the pre-installation requirements and have all the necessary information to-hand for the Defender installation procedure.
1. Where do you want to install the Defender Management Console? You can specify a directory path or accept the default path offered by Defender. 2. If you are performing a first-time installation of Defender, check the
Schema Updates checkbox when prompted. The MMC Snap-in Extensions check box is checked by default.
3. If you are upgrading from Defender version 4.x to Defender 5.7, contact Customer Support for assistance.
4. Where do you want to install the Defender Security Server? You can specify a directory path or accept the default path offered by Defender. 5. What is the DNS name or IP address of the machine on which Active
Directory is running?
6. What is the number of the LDAP port for Active Directory.
This is the port number that Defender will use to access the Active Directory.
You can specify a port number or accept the default port number offered by Defender (389).
7. What is the full distinguished user name for the administrator or service account that is used to change passwords?
Installation Sequence
You are now ready to start the installation procedure. Install the Defender components in the following sequence:
• Defender Management Console:
• Schema updates - updates to your Active Directory Schema required to support Defender
• Defender OU - default container for Defender objects
• MMC Snap-ins - extends the Active Directory User and Computers tool to include the Defender Management Console
• Defender Security Server - authenticates RADIUS and Defender Agent requests
• Defender User License • Defender Tokens
• Defender Desktop Token License (if you want to generate Desktop Tokens)
Installing the Defender Management Console
To install the Schema updates, MMC Snap-ins and create the Defender container:1. From the Defender 5.7 Autorun, select Defender, Defender Adminis-tration Console.
2. If Visual C++ Runtime redistributable package is not installed on this machine, the following message is displayed:
The information on the above example applies to a Defender Management Console installation on a Windows 2003 x86 system. If you are installing the Defender management Console on Windows 2008 x64 system, the following redistributables are required:
- Microsoft Visual C++ 2008 SP 1 Redistributable Package (x86) - Microsoft Visual C++ 2008 SP 1 Redistributable Package (x64)
To install the Visual C++ Runtime redistributable package(s), select Yes. On completion of the installation, the Defender Management Console installation will proceed, as shown in Step 3.
If you select No, choosing not to install the Visual C++ Runtime
redistributable package(s), the Defender Management Console installation will terminate.
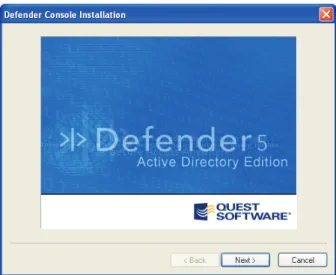
3. The Defender ADE MMC Installation dialog box is displayed:
Figure 1: Defender ADE MMC Installation dialog box
4. Select Next. The Software License Agreement is displayed.
5. Select Next. The Defender Console Installation (Install Location)dialog box is displayed:
The Defender ADE MMC Installation (Component Installation) dialog box is displayed:
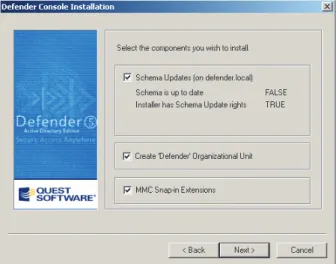
Figure 3: Defender MMC (Component Installation) dialog box
7. If you are performing a first installation of Defender, you must check the Schema Updates checkbox.
8. The Create ‘Defender’ Organizational Unit checkbox is checked by default. This will create an organizational unit in Active Directory called Defender.
9. The MMC Snap-in Extensions check box is checked by default. This will install the Defender Management Console extensions.
The schema updates are only installed once for the enterprise. The MMC extensions are installed on all PCs that will be used to manage Defender.
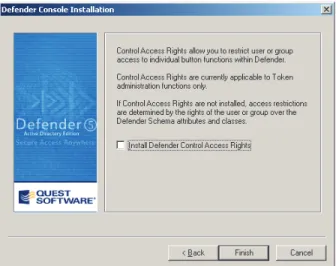
10. Select Next. The Defender Console Installation (Control Access Rights) dialog box is displayed:
Figure 4: Defender Console Installation (Control Access Rights) dialog box 11. To delegate access control rights to Defender users, check the Install
Defender Control Access Rights checkbox.
Control Access Rights are used to provide an additional level of access rights by controlling access to the individual buttons on the User’s Defender tab within ADUC.
The default setting is to not install these additional rights.
On completion of the installation, refer to Control Access Rights, for information on how to delegate control access rights.
12. Select Finish. The Defender Console Installation (Installation Progress) dialog box is displayed.
13. The Defender Console Installation Progress dialog is displayed:
Figure 5: Defender Console Installation (Installation Progress) dialog box
14. On completion, the Defender Console Installation Complete dialog is displayed.
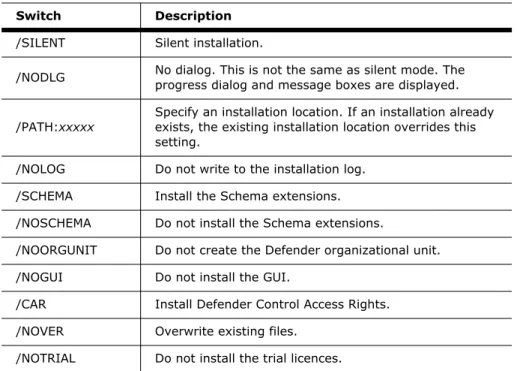
Optional Installation Switches
The table below describes the installation switches that can be used if you are installing the Defender Management Console from the command line.
Table 1: Defender Management Console Installation Switches
Switch Description
/SILENT Silent installation.
/NODLG No dialog. This is not the same as silent mode. The progress dialog and message boxes are displayed.
/PATH:xxxxx Specify an installation location. If an installation already exists, the existing installation location overrides this setting.
/NOLOG Do not write to the installation log. /SCHEMA Install the Schema extensions. /NOSCHEMA Do not install the Schema extensions.
/NOORGUNIT Do not create the Defender organizational unit. /NOGUI Do not install the GUI.
/CAR Install Defender Control Access Rights. /NOVER Overwrite existing files.
Installing the Defender Security
Server
To install the Defender Security Server:
1. Run Defender Security Server Installer.exe. The Defender Security Server Installation dialog box is displayed:
Figure 6: Defender Security Server Installation dialog box
3. Select Next. The Defender Security Server Installation (Install Location) dialog box is displayed:
Figure 7: Defender Security Server Installation (Install Location) dialog box 4. Select Finish to accept the default setting as the location where the
Defender Security Server will be installed. Alternatively, select Browse to choose a different directory, then select Finish.The following message is displayed:
5. If you select No, you must perform the configuration via the shortcut on the Programs menu before the Defender Security Server is started for the first time. To configure the Defender Security Server now, select Yes. The Defender Security Server Configuration dialog box is displayed:
Figure 8: Defender Security Server Installation (AD LDAP) dialog box 6. In the Address field, type the DNS name or IP address of either the
domain or individual domain controllers used by the Defender Security Server.
7. In the Port field, type the number of the LDAP port that the Defender Security Server will use to establish a connection to the Active Directory. The default port number is 389.
8. In the SSL Port field, type the number of port that the Defender Security Server will use to establish a secure connection to the Active Directory. This port number will be used to communicate user password changes only between the Defender Security Server and the Active Directory. The default port number is 636.
On installation the SSL Port field is set to 0. If you do not want to use SSL, ensure that the SSL Port field remains set to 0 to avoid errors appearing when you run the connectivity tests.
9. In the Account Name field, type the full distinguished user name for the service account that will be used to communicate with Active Directory. This user ID must have administrative authority over the Defender OU and Defender attributes assigned to user accounts. Please refer to the Delegated Admin User Guide for further information on assigning the required permissions for a service account.
For example:
The Administrator or a Domain Admin account will have the required permissions.
10. In the Account Password field, type the password used by the account defined in the Account Name field above.
11. To configure Defender logging information, select the Audit Log tab. The Defender Security Server (Audit Log) tab is displayed:
Figure 9: Defender Security Server Installation (Audit Log) dialog box
12. To specify a different log path for the Defender Security Server log file, select Browse and navigate to the required location.
13. To change the maximum size of the Defender Security Server log file, enter the required size in the Size of Log field.
14. To create a duplicate copy of the current Defender Security Server log, check the Create additional log with fixed name field, and then enter the name of the log file in the Log name field.
15. If you want to save Defender Security Server logging information to a syslog server, as well as to the Defender Security Server log, check the Enable syslog checkbox.
16. In the Collector hostname field, enter the name of the host computer where the syslog server is running.
17. In the Collector Port field, enter the port number used by the computer specified in the Collector hostname field.
18. To test the connections between the Defender Security Server and the domain controllers in your environment, select the Test Connection tab. The Defender Security Server (Test Connection) dialog is displayed:
Figure 10: Defender Security Server (Test Connection) dialog
19. Select Test. The Defender Security Server will now check that it is able to connect to LDAP and communicate with the domain controllers within the Defender environment. After a short delay, the test results are displayed:
If you want to run connectivity tests while the Defender Security Server is running, check the Perform periodic connectivity tests whilst the DSS operates checkbox.
Tests will be performed every 3 hours. If a test is unsuccessful, it will be repeated at 30 minute intervals until a successful result is achieved. Results of the tests can be viewed in the Defender Security Server log, available in:
C:\Program Files\Quest Software\Defender\DSS Active Directory Edition\Logs
or
C:\Program Files(x86)\Quest Software\Default\DSS Active Directory Edition\Logs
20. Select OK. The Defender Security Server Installation Progress dialog is displayed:
Figure 12: Defender Security Server Installation (Installation Progress) dialog 21. To display a log of the actions performed during the Defender Security
Server installation procedure, check the Show Log checkbox. The log includes the names and version numbers of files copied and the directory locations they are copied into during installation.
22. Select Next. The Defender Security Server (Installation Complete) dialog is displayed:
Figure 13: Defender Security Server Installation (Installation Complete) dialog 23. Select Finish. On completion of the installation, a Defender Active
After Installation
To configure the Defender Security Server after installation:
1. From the Start menu, select Defender Active Directory Edition program group, then Configure Defender Security Server. The Defender Security Server Installation dialog box is displayed:
Figure 14: Defender Security Server Installation (AD LDAP) dialog
2. To test the connections between the Defender Security Server, LDAP and the domain controllers, select the Test Connection tab.
3. To check the status of the Defender Security Server service, select the Service tab. The Defender Security Server Configuration (Service) dialog box is displayed:
Figure 15: Defender Security Server Configuration (Service) dialog box
The Service dialog box indicates whether the Defender Security Server service is installed and whether it is currently running or stopped. To restart the service if it is currently stopped, select Restart Service. To stop the service if it is currently running, select Stop Service.
Installing a Defender User License
Before you can assign tokens to users, add or authenticate users at the Defender Security Server, you must install your user license.Contents of your Defender User License
Your user license is in the email received from Quest Software. The license key and details are contained in the attachment called customername - licensetype - dateofissue.msg:
Figure 16: Defender User License Key and Details
The user license must be valid for the total number of users that will be assigned tokens. Check the details carefully before installing your license.
Attached to the license details is a .txt file, called customername - licensetype - dateofissue.txt. This .txt file contains your encrypted license file:
Figure 17: Defender User License Example .txt file
Right-click customername - licensetype - dateofissue.txt and select Save as from the list. Save this file to a location of your choice. You will retrieve the file from this location during the license installation procedure.
Installing the License
To install your Defender user license:
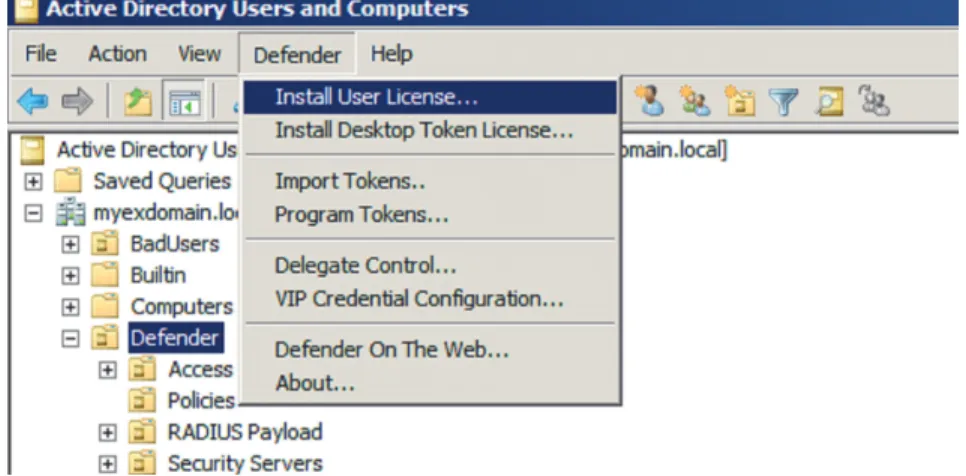
1. From the Users and Computers tree, select Defender on the menu bar.
Figure 18: Install User License option
2. Select Install User License from the menu. The Defender License Import Wizard starts:
3. Select Next. The Defender Import Wizard (File and Key) dialog box is displayed:
Figure 20: Defender Import Wizard (File and Key) dialog box
4. Select Browse to navigate to the directory where thecustomername - licensetype - dateofissue.txt file is located. Select the file, then select Open. The name of the license file is displayed in the Filename field. 5. You need your Defender user license key to unlock the license file. The
license key is in the email sent to you from Quest Software Licensing. An example email is shown below:
Figure 21: Example Defender License Key
6. Open the email, then highlight the license key.
8. Return to the Defender Import Wizard (File and Key) dialog box, then select Paste to paste the license key into the Key fields.
Figure 22: Defender Import Wizard (File and Key) dialog box
9. Select Next. The Defender Import Wizard (License Type) dialog box is displayed:
10. Select Next. The Defender Import Wizard (Storage Location) dialog box is displayed:
Figure 24: Defender Import Wizard (Storage Location) dialog box
11. Click Select to navigate to the location where you want to store the user license. Alternatively, click Next to accept the default location and continue. The Defender Import Wizard (Import Progress) dialog box is displayed:
12. Select Next. The Defender Import Wizard (Defender Import Complete) dialog box is displayed:
Defender Desktop Token License
Before you can generate Defender Desktop Tokens, you must have a valid Defender Desktop Token license.Your Desktop Token license is in the email received from Quest Software. The license key and details are contained in the attachment called customername - licensetype - dateofissue.msg:
Figure 27: Defender Desktop Token License Key and Details
The Desktop Token license must be valid for the total number of tokens that you require. Check the details carefully before installing your license.
Attached to the license details is a .txt file, called customername - licensetype - dateofissue.txt. This .txt file contains your encrypted license file.
Right-click customername - licensetype - dateofissue.txt and select Save as from the list. Save this file to a location of your choice. You will retrieve the file from this location during the license installation procedure.
The Defender Desktop Token license is required in addition to the Defender User license. For further information about the Defender User license, refer to
To install a Defender Desktop Token license:
1. From the Users and Computers tree, select Defender on the menu bar.
Figure 28: Install Desktop Token License option
2. Select Install Desktop Token License from the menu. The Defender LicenseImport Wizard starts:
3. Select Next. The Defender Import Wizard (File and Key) dialog box is displayed:
Figure 30: Defender Import Wizard (License Files) dialog box
4. To add a license file to the Licenses to install list, select Add File. Browse to the Defender Desktop License file that you saved earlier, as described on page 51. Select the required file, then click Open. The selected file is added to the Licenses to install list.
5. Select Next. The license details aredisplayed:
6. Select Next, the storage location dialog is displayed. The default is to store the license in the Defender OU. Either accept the default or use the Select option to store the license in a different location.
Figure 32: Defender Import Wizard (Storage Location) dialog box
If the storage location is changed the logged on user must have the correct AD permissions to allow for the license object to be created.
7. Select Next to continue the import process.
8. Select Next. The Defender Import Wizard (Defender Import Complete) dialog box is displayed:
Defender Delegated Administration
Defender Delegated Administration provides a scalable approach to the administration of access rights, enabling you to create and manage users or groups with delegated administrative roles. A simple configuration wizard enables system administrators to administer users and groups, and delegate the appropriate administrative roles. Please refer to the Defender Delegated Administration User Guide for further information.Control Access Rights
Control Access Rights are provided as an optional setting during the installation of the Defender Admin Console and provide an additional layer of administration security be simply enabling or disabling the token related buttons that are available on the User’s Defender tab.
Control Access Rights are combined with the Delegated Administration privileges assigned to security groups or users.
You can specify control access rights for the following token administration options:
• Program
program a token for a Defender user • Recover
unlock a token • Test
perform a non-intrusive test to verify the token’s response • Helpdesk
• Reset - re-synchronize the user’s token
• Assign - allocate a temporary token response to the user • Unassign
unassign a Defender token from a user
• Add
assign a Defender token to a user • Set PIN
set a PIN for the user to use with this token • Password
Setting Control Access Rights on
the Defender Users OU
To set permissions on the OU containing the Defender users, perform the following steps:
1. From the Active Directory, Users and Computers page, right-click the OU containing the user accounts that will be using Defender authentication. 2. From the dropdown list, select Properties.
3. Select the Security tab, then select Advanced. 4. Select Add.
5. Select the required AD security group or user account, then select OK. The Permission Entry for Users dialog box is displayed.
6. In the Apply Onto field, select User Objects or Descendant User Objects.
7. In the Permissions list, check the Allow boxes adjacent to the Defender Token attributes that you want the selected group or user to be able to access.
Figure 36: Permission Entry for Users dialog box
In the example above the security group Defender Admins has been allowed permissions to Set Password, Token Assign and Token
Program. This will enable the relevant buttons on the Defender tab for user objects within the selected OU. The other buttons will be disabled as can be seen in figure 33.
After Setting Control Access Rights
1. Log on to your server and access Active Directory Users & Computers as a member of the security group configured to have the additional control access rights applied to their account. The buttons available on the Defender tab will correspond to the settings applied above..
Removing Control Access Rights
To remove control access rights for a group:
1. Locate the permission entry in the Permission entries table in the Advanced Security Settings dialog box:
Figure 38: Advanced Security Settings for groupname dialog box 2. Select Remove.
3. Select OK.
Defender Desktop Login
For information on Defender Desktop Login, please refer to the Defender Desktop Login Installation and Configuration Guide.
Pluggable Authentication Module (PAM)
For information about installing and configuring the Defender Pluggable Authentication Module (PAM), refer to the guide entitled Defender - Pluggable Authentication Module (PAM).