Scholarship@Western
Scholarship@Western
Electronic Thesis and Dissertation Repository
7-23-2015 12:00 AM
Development of a Physical Shoulder Simulator for the Training of
Development of a Physical Shoulder Simulator for the Training of
Basic Arthroscopic Skills
Basic Arthroscopic Skills
Laura C. McCracken
The University of Western Ontario
Supervisor Dr. Michael Naish
The University of Western Ontario Joint Supervisor Dr. Ana Luisa Trejos
The University of Western Ontario
Graduate Program in Biomedical Engineering
A thesis submitted in partial fulfillment of the requirements for the degree in Master of Engineering Science
© Laura C. McCracken 2015
Follow this and additional works at: https://ir.lib.uwo.ca/etd
Part of the Biomedical Devices and Instrumentation Commons
Recommended Citation Recommended Citation
McCracken, Laura C., "Development of a Physical Shoulder Simulator for the Training of Basic Arthroscopic Skills" (2015). Electronic Thesis and Dissertation Repository. 2955.
https://ir.lib.uwo.ca/etd/2955
This Dissertation/Thesis is brought to you for free and open access by Scholarship@Western. It has been accepted for inclusion in Electronic Thesis and Dissertation Repository by an authorized administrator of
(Thesis format: Monograph)
by
Laura Catherine McCracken
Faculty of Engineering
Graduate Program in Biomedical Engineering
A thesis submitted in partial fulfillment of the requirements for the degree of
Master of Engineering Science
The School of Graduate and Postdoctoral Studies The University of Western Ontario
London, Ontario, Canada
ii
Development of a Physical Shoulder Simulator for the Training of
Basic Arthroscopic Skills
Laura McCracken
M.E.Sc Thesis, 2015
Graduate Program in Biomedical Engineering
The University of Western Ontario
Abstract
Increasingly, shoulder surgeries are performed using arthroscopic techniques, leading to
reduced tissue damage and shorter patient recovery times. Orthopaedic training programs are
responding to the increased demand for arthroscopic surgeries by incorporating arthroscopic
skills into their residency curriculums. A need for accessible and effective training tools
exists.
This thesis describes the design and development of a physical shoulder simulator for
training basic arthroscopy skills such as triangulation, orientation, and navigation of the
anatomy. The simulator can be used in either the lateral decubitus or beach chair orientation
and accommodates wet or dry practice. Sensors embedded in the simulator provide a means
to assess performance.
A study was conducted to determine the effectiveness of the simulator. Novice subjects
improved their performance after practicing with the simulator. A survey completed by
experts, recognized the simulator as a valuable tool for training novice surgeons in basic
arthroscopic skills.
Keywords: minimally invasive surgery, arthroscopy, orthopaedic, shoulder, surgical, physical
iii
Acknowledgments
First and foremost I would like to thank my supervisors Dr. Michael Naish and Dr. Ana
Luisa Trejos for their guidance, patience, and support. I truly appreciate being given the
opportunity to combine my interests in biology and engineering in pursuing my thesis.
I would like to express my sincere gratitude to Dr. LeBel for her constructive feedback
throughout the project, and for allowing me a glimpse into the world of orthopaedic surgery.
I am grateful for my wonderful, supportive colleagues at CSTAR. In particular, I would like
to thank Abelardo Escoto and Chris Ward for providing their expertise in 3D printing and
microcontroller programming. I would like to thank Behnaz Poursartip for being a wonderful
collaborator to work with while conducting the study.
Last but not least, I would like to thank my husband for his loving encouragement and
unwavering support over the course of my studies.
iv
Table of Contents
Abstract ... ii
Acknowledgments... iii
Table of Contents ... iv
List of Tables ... vii
List of Figures ... viii
List of Acronyms ... xi
List of Symbols ... xiii
List of Appendices ... xiv
1 Introduction ... 1
1.1 Arthroscopic Surgery ... 1
1.2 Motivation ... 2
1.3 Research Objectives ... 3
1.4 Thesis Outline ... 4
2 Literature Review ... 5
2.1 Psychomotor Skill Acquisition ... 5
2.1.1 The Challenge of Arthroscopy ... 6
2.2 Arthroscopic Training ... 6
2.3 Arthroscopic Simulators... 9
2.2.1 Virtual Reality Simulators ... 10
2.2.2 Physical Simulators ... 12
2.4 Simulator Validation ... 13
2.4.1 Face and Construct Validity... 14
2.4.2 Transfer Validity ... 15
v
2.5.1 Global Rating Scales ... 16
2.5.2 Quantitative Metrics... 18
3 Simulator Design ... 20
3.1 Design Requirements ... 20
3.2 Conceptual Design and Specifications... 21
3.2.1 Range of Motion for the Arm ... 21
3.2.2 Physical Anatomy ... 22
3.3 Waterproof Connection ... 37
3.4 Switches for Objective Assessment of Probing Tasks ... 40
3.4.1 Sensor ... 40
3.4.2 Data Recording and Graphical User Interface ... 42
3.4.3 Visual Indication ... 43
3.5 Simulator Base and Integrated Force/Torque Sensor ... 44
3.6 Summary ... 49
4 Experimental Evaluation ... 51
4.1 Recruitment and Ethics ... 51
4.2 Equipment ... 52
4.3 Instructions to Novice and Intermediate Trainees: ... 55
4.4 Instructions to Expert Subjects ... 56
4.5 Tasks ... 56
4.5.1 Task 1: Intra-articular Probing ... 57
4.5.2 Task 2: Subacromial Probing ... 58
4.5.3 Task 3: Intra-articular Grasping ... 59
4.6 Data Analysis ... 60
4.7 Performance Metrics ... 60
vi
5 Conclusions and Future Work ... 68
5.1 Contributions... 69
5.2 Future Work ... 69
References ... 72
Appendices ... 81
vii
List of Tables
Table 3.1: Bones of the shoulder. ... 24
Table 3.2: Results of the shaving test averaged over 10 samples. ... 28
Table 3.3: Tissues in the shoulder. ... 30
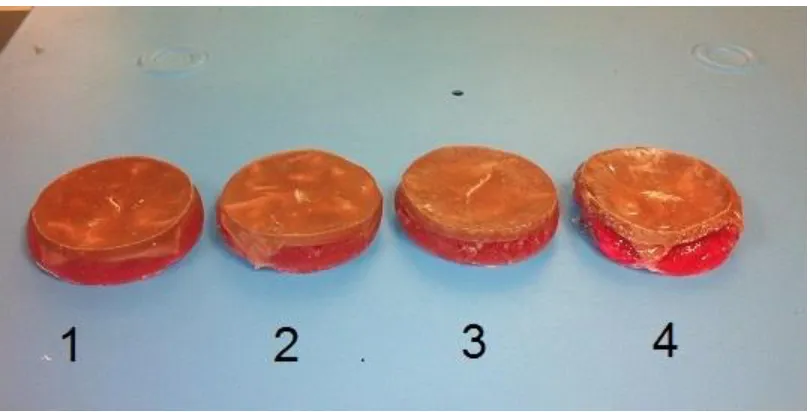
Table 3.4: Tested fat formulations. ... 36
Table 3.5: Stress analysis for select parts in lateral decubitus position. ... 46
Table 4.1: Agenda for novice subjects. ... 56
Table 4.2: Task completion time. ... 61
Table 4.3: Instrument path length. ... 62
Table 4.4: Average instrument force. ... 62
Table 4.5: Maximum instrument force. ... 63
Table 4.6: F/T sensor average force. ... 63
Table 4.7: F/T sensor maximum force. ... 63
viii
List of Figures
Figure 1.1: (a) Beach chair position (b) Lateral decubitus position ... 1
Figure 3.1: Required range of motion for the arm. ... 22
Figure 3.2:Sagittal view of the shoulder joint showing the glenoid . ... 23
Figure 3.3: External view of shoulder joint with capsule ... 23
Figure 3.4: (a) Instron machine performing the three point bend test. (b) Polyurethane foam samples soaking. ... 26
Figure 3.5: Results from day one of the three point bend test by density (kg/m3). ... 27
Figure 3.6: Results from day 2 of the three point bend test by density (kg/m3). ... 27
Figure 3.7: Shoulder bones (coronal view). ... 29
Figure 3.8: Shoulder bones (sagittal view). ... 29
Figure 3.9: Creation of rotator cuff muscles and tendons. ... 31
Figure 3.10: (a) Straw mould and biceps tendon. (b) Biceps tendon attached to glenoid. ... 32
Figure 3.11: (a) Synthetic joint capsule (b) Capsule attached to glenoid with velcro. ... 32
Figure 3.12: Arm with humerus inserted and sealed using silicone. ... 33
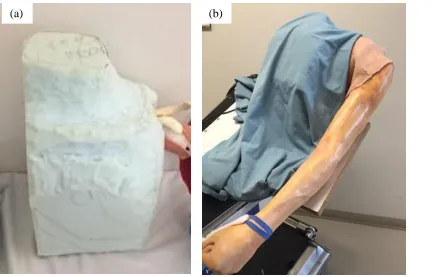
Figure 3.13: (a) Sculpted foam torso. (b) Torso covered by drape. ... 34
Figure 3.14: Silicone skin with fat layer curing. ... 35
Figure 3.15: Tested fat formulations. ... 35
Figure 3.16: Arm with skin attached... 37
ix
Figure 3.18: Locations of the three portals. ... 39
Figure 3.19: Seal around portal. ... 40
Figure 3.20: (a) Switches for probing task. (b) Wires for switches threaded through the bone. (c) Switches installed on the bones. ... 41
Figure 3.21: (a) Switch submerged in water. (b) Circuit with 5 VDC power supply. ... 42
Figure 3.22: Microcontroller and wiring. ... 43
Figure 3.23: GUI. ... 43
Figure 3.24: LED indicators. ... 43
Figure 3.25: Non-ABS parts of torso and support base. ... 44
Figure 3.26: ABS printed parts of support base. ... 45
Figure 3.27: Simulator in the beach chair position. ... 47
Figure 3.28: Simulator in the lateral decubitus position. ... 48
Figure 3.29: Completed simulator. ... 50
Figure 3.30: Simulator in use by an expert surgeon. ... 50
Figure 4.1: Equipment setup for simulator study... 52
Figure 4.2: The sensorized arthroscopy probe tool. ... 53
Figure 4.3: The sensorized arthroscopy grasper tool. ... 53
Figure 4.4: Arthroscope and camera with position sensor attached. ... 54
Figure 4.5: Video tower. ... 54
Figure 4.6: Switch locations for task one... 58
x
Figure 4.8: Loose bodies used in grasping task. ... 59
xi
List of Acronyms
ABOS American Board of Orthopaedic Surgery
ABS Acrylonitrile Butadiene Styrene
ASSET Arthroscopic Surgical Skill Evaluation Tool
BAKSSS Basic Arthroscopy Knee Skill Scoring System
CSTAR Canadian Surgical Technologies and Advanced Robotics
DOF Degree of Freedom
ESSKA European Society of Sports Traumatology, Knee Surgery &
Arthroscopy
FAST Fundamentals of Arthroscopic Surgery Training
FLS Fundamentals of Laparoscopic Surgery
F/T Force / Torque
GOALS Global Objective Assessment of Laparoscopic Skills
GRS Global Rating Scale
GRSSA Global Rating Scale for Shoulder Arthroscopy
GUI Graphical User Interface
IGARS Imperial Global Arthroscopy Rating Scale
LED Light-Emitting Diode
xii
Skills
NO Normally Open
OR Operating Room
OSATS Objective Structured Assessments of Technical Skills
PASSPORT Practice Arthroscopic Surgical Skills for Perfect Operative Real-life
Treatment
PCF Pounds per Cubic Foot
PGY Post graduate year
ROVIMAS Robotics Video & Motion Assessment Software
SPST Single Pull Single Throw
USB Universal Serial Bus
xiii
List of Symbols
cm centimetres
g grams
gf gram-force
GPa gigapascals
kg/m3 kilograms per cubic metre
lbf pounds force
m metres
min minutes
MPa megapascals
N newtons
N/m2 newtons per square metre
P path length
s seconds
xiv
List of Appendices
Appendix A: Letter of Information and Consent ... 81
Appendix B: Ethics Approval ... 87
Appendix C: Novice Informational Handout ... 88
Appendix D: Questionnaire ... 92
Appendix E: Permissions ... 93
Chapter 1
Introduction
1.1 Arthroscopic Surgery
Surgical interventions of the shoulder are increasingly performed using a minimally
invasive approach known as arthroscopic surgery [1]. In arthroscopic surgery, the
surgeon enters the joint through small incisions using long, slender instruments and a
long slender video camera. Images from the camera are displayed on a two dimensional
screen and used to navigate the joint. A low-pressure saline solution is pumped into the
joint in order to clear debris and inflate the joint space. The benefits to patients are
several when compared to open surgery, including reduced tissue trauma, less
post-operative pain and a shorter recovery time.
Arthroscopy is performed with the patient in one of two positions: beach chair or lateral
decubitus. The operating position is selected based on the type of procedure and the
surgeon’s preference. For some procedures, the lateral decubitus position offers better
joint visualization and instrument access, while the beach chair position has the
advantage of easier set-up and easier conversion to open surgery if required [2].
Figure 1.1: (a) Beach chair position [3] (b) Lateral decubitus position [3]
(a)
) (b)
(b)
1.2 Motivation
Arthroscopic surgery has now become a standard component of orthopaedic residency
training programs [4, 5]. At the same time, surgical residents are receiving fewer hours of
training, while still having one of the busiest schedules of the surgical specialties [6, 7].
In a survey across 151 programs, Hall, et al. reported that only one third of fifth-year
orthopaedic residents felt that they had adequate training in arthroscopy and 66% did not
feel as prepared to use arthroscopic interventions when compared to open surgery [5].
Arthroscopic surgery presents new challenges when compared to traditional open
surgery, as surgeons are operating in an environment with different demands on their
hand–eye coordination and limited tactile feedback [8]. For novice trainees, even the
basic skill of triangulating an instrument tool tip in the view of the arthroscope can be
challenging.
Inexperienced residents are at a high risk of committing errors, with the potential to
inflict irreparable damage to a patient’s joint while learning. They are also slow to
complete tasks, due to a steep learning curve. Ideally, residents would be trained to a
level of basic competence to ensure the safety of their first patients before entering the
operating room (OR).
A simulated surgical environment would allow for the teaching and practice of basic
skills, resulting in lower risk to patients and with the added benefit of saving valuable OR
time and the time of the expert surgeon. With the availability of a simulator, students are
permitted to explore and repeatedly practice in a way that allows for one to learn from
their mistakes, whereas traditionally there was no room for “teaching through errors” and students did not have “permission to fail” while learning [9]. By learning and practicing
the basic skills before they enter the OR, residents would be able to use their time with
their mentor to focus on more advanced skills and procedures [4].
Existing surgical simulators fall into one of two categories: Virtual Reality (VR) and
Physical Simulators. A physical simulator is a bench top box trainer or anatomical model
that is physical by nature, while a VR simulator is defined as “the computer-generated
seemingly real or physical way by a person using special electronic equipment” [4].
Physical simulators have an advantage because they can realistically simulate the “feel”
of the target anatomy and allow the trainee to use real surgical tools. By manipulating
physical objects, trainees experience realistic tactile feedback. VR trainers have the
advantage of easily offering “knowledge of results” in the form of performance metrics
and results to the trainee, while this type of feedback has historically been lacking in
physical simulators. Objective measures of performance are helpful to motivate trainees
and track improvement during training. This “knowledge of results” has been found to be
key to the learning process and the acquisition of psychomotor skills [10]. A detailed
review of existing simulators is presented in Chapter 2.
This research focuses on the development of a physical shoulder simulator constructed
with realistic anatomy, and a flexible joint, in order to provide a realistic feel to the
trainees. Existing physical shoulder simulators lack quantifiable performance metrics
which can provide valuable feedback to the trainees. The proposed simulator will allow
for quantifiable performance metrics to be calculated.
1.3 Research Objectives
With shoulder surgeries increasingly being performed using an arthroscopic approach,
there is a need for more effective training tools and improved evaluation methods to help
train orthopaedic residents. The shoulder joint is second only to the knee in the number of
arthroscopic procedures performed annually[11]. While many simulators have been
developed for the knee, few are available for the shoulder. The physical shoulder
simulators that exist lack a flexible joint that is able to accommodate both lateral
decubitus and beach chair positions and have limited anatomy. The goal of this thesis is
to develop, construct, and test a novel shoulder arthroscopy learning aid in the form of a
physical simulator that could be used to train junior residents.
To design and build a novel physical shoulder joint-shaped simulator that helps
novices to improve their basic arthroscopy skills through practice, while
providing a means of assessing performance.
To evaluate the simulator by collecting data from novice and expert users. Metrics
will be calculated to determine if the simulator helps improve performance.
1.4 Thesis Outline
Chapter 2: Literature Review
This chapter details the existing work in the field of arthroscopic education using joint
simulators. Existing simulators are reviewed. Work that has been done on evaluative
metrics and validation is also discussed.
Chapter 3: Simulator Design
In the third chapter, the criteria that formed the basis of the simulator design are
presented. The process followed towards creating the shoulder simulator and meeting the
design criteria is discussed. The final version of the simulator is also presented.
Chapter 4: Testing and Validation
This chapter outlines the methods used for testing the surgical simulator and collecting
data towards determining validity. The metrics that were computed based on force and
position are also described. A summary of the results is presented.
Chapter 5: Conclusions and Future Work
This chapter presents the concluding remarks for this research and outlines future work,
Chapter 2
Literature Review
2.1 Psychomotor Skill Acquisition
Certain basic motor skills have been shown to correlate with arthroscopic competence
[12]. Learning to effectively use a new surgical tool requires processing visual and
proprioceptive sensory information in order to produce the desired muscle movements to
manipulate the tip of the instrument. The process involves creating internal models of
both our body and the instrument through repeated practice. To a certain extent, these
skills are innate to an individual, with motor skill proficiency equating to the trainee’s
psychomotor ability multiplied by the amount of practice they have undergone [4].
Psychomotor skill is defined by the Oxford English Dictionary as “the potential to
produce voluntary muscular movements after practice” [13]. Therefore, lower
psychomotor ability can, to an extent, be compensated for with increased practice [10]. In
the mastery approach to training, all trainees should achieve a certain level of competence
in order to function as a professional. With this approach, the training period should vary
in length, as some trainees will require more practice time than others [10].
The acquisition of psychomotor skills was proposed by Fitts and Posner to occur in three
stages: cognitive, associative and autonomous [14]. The cognitive stage requires the
trainee to understand the task that they are setting out to complete. This is followed by
the associative stage, which requires practicing, and learning from errors. During this
stage, it is important that the trainee receive a “knowledge of results” to determine if they
have performed the task adequately. After sufficient practice, the trainee moves to the
autonomous third stage, at which very little cognitive intervention is required to perform
the task. This learning paradigm is echoed by Satava who describes a two-step process:
cognitive and psychomotor skill. Through repeated practice the trainee can automate
many of the manual dexterity skills, thus freeing up cognitive resources for situational
experts have reached the autonomous level for simple tasks and can then focus on
perception of the anatomy and forecasting the subsequent steps to be taken [9].
2.1.1 The Challenge of Arthroscopy
Arthroscopic surgery requires the practitioner to learn delicate and precise motor skills.
The surgeon must combine muscle strength, dexterity, and spatial perception in order to
achieve good control over the instruments and tissues being manipulated [10].
There are several aspects of arthroscopic surgery that make it especially challenging to
learn and master. The view from the arthroscope is two-dimensional and appears
zoomed-in on the display screen, with the power of magnification initially unknown to an
inexperienced trainee. This often results in the novice underestimating of the motion of
the instrument tip, and over-extending their movements [4]. Second, the standard and
most generally used arthroscope captures the image from a viewpoint that is offset from
the longitudinal axis by 30 degrees and can rotate a full 360 degrees. The result is that the
visual system is no longer aligned as expected, making coordinated movements
challenging. Third, since the instruments are being manipulated through a narrow portal,
there is a fulcrum effect, where the subject’s hands move in the opposite direction to the
desired motion at the instrument tip. Furthermore, since the long, slender instruments are
gripped outside of the joint, frictional forces from the portal and tissues can distort the
forces experienced at the handle, resulting in confusing feedback sensations [4].
2.2 Arthroscopic Training
Arthroscopic surgery is taught as a core component in a majority of orthopaedic
residency programs. Traditionally, this learning has occurred using a mentor–apprentice
approach in the OR, with trainees using real instruments on human anatomy. However,
this is not an ideal venue for novice trainees. With a patient’s safety at stake, trainees are
not permitted to make errors, which can be an important element of learning psychomotor
skills.
In July 2013, the American Board of Orthopaedic Surgery (ABOS) introduced simulation
curriculum for teaching basic skills, known as the “Fundamentals of Arthroscopic
Surgery Training” (FAST) program, is currently under development by The American
Academy of Orthopaedic Surgeons in collaboration with the Arthroscopy Association of
North America and the ABOS. The FAST program will determine what basic motor
skills are required for arthroscopic surgery and develop training modules aimed at
improving the identified motor skills [15], [16]. In the future, it is anticipated that the
FAST program may become an American Board certification requirement, much like the
Fundamentals of Laparoscopic Surgery (FLS) program is required for general surgery
certification [7].
The European Society of Sports Traumatology, Knee Surgery & Arthroscopy (ESSKA),
introduced the ESSKA Basic Arthroscopy Course (EBAC) in November 2013. The
three-day course uses a cow knee, cadaver knee and shoulder, and physical knee and shoulder
simulators to hone trainees’ motor skills and teach simple procedures.
In general, formal simulator based training initiatives for basic arthroscopic skills are still
in the early stages of introduction. While a national training program has not yet been
developed in Canada, some Canadian residency programs already encourage the use of
simulators to hone arthroscopic skills. A well-constructed training program aligns
learning objectives with means of training and methods of assessment [17]. The learning
objectives should identify what skills are to be learned, and to what level of proficiency.
Research has been conducted into which skills should be learned for basic arthroscopy. In
2008, Safir et al. conducted a survey of orthopaedic surgeons across Canada. They
investigated which elements are important for a simulator to possess to train residents in
arthroscopic surgery before entering the OR [18]. Surgeons were asked to rank 35 skills
on a five-point scale, and 111 responded. The top-rated specific skills were: 1) Precise
portal placement 2) Triangulation of the probe with a 30-degree scope 3) Identification of
specific structures of the knee, and 4) Insertion of the scope into the anterolateral portal.
In a second questionnaire, surgeons ranked the importance of five skills for a trainee to
possess prior to performing in the OR. Anatomical knowledge and triangulation/depth
dexterity and tactile sensation. When asked which simulator type would be most helpful
for a trainee, cadaveric specimen was ranked first, followed by a high-fidelity physical
simulator, a VR simulator and lastly, a box trainer.
In 2013, Hui et al. [19] surveyed orthopaedic residents across Canada to identify what
skills they felt were important to possess before entering the OR. The survey consisted of
35 questions and was answered by 67 residents. The top four specific skills for knee
arthroscopy were, in terms of importance: 1) Triangulation of the tip of the probe, 2)
Precise portal placement, 3) Arthroscopic examination-identification of specific knee
anatomy, 4) Shaving of the synovium, cartilage and meniscus. These top five skills did
not vary with year of residency. The top five general skills were 1) Anatomical
Knowledge, 2) Spatial perception, 3) Triangulation/depth perception, 4) Manual
dexterity, and 5) Tactile sensation. The residents preferred using cadaveric or synthetic
knees as simulators, above VR or bench top models.
Preliminary results from a similar survey by the Dutch Arthroscopy Society among
residents and experienced surgeons suggest that the most important priorities relating to
simulator-based training prior to entering the OR are [4]: 1) Anatomical knowledge, 2)
Spatial perception, 3) Tactile sensation, 4) Manual dexterity, and 5) Triangulation.
All three studies rated anatomical knowledge and triangulation as key area for training
with a simulator, and in a review of these three studies, Karahan and Tuijthof concluded
the important skills for training to be those required to gain access to and navigate the
joint [17]. A 2008 study by Bayona et al. agreed with this finding. They asked 94
arthroscopists to examine a VR simulator. The surgeons rated anatomical knowledge,
hand–eye coordination and manual precision as important factors for novices training on
the simulator [20].
A review study in 2014 by Frank et al. indicated that the basic skills needed for
arthroscopic surgery are: 1) Visual–spatial coordination to interpret 3-dimensional
structures from 2-dimensional camera images. 2) Hand-eye coordination to triangulate
without causing iatrogenic injury [6]. These should be the skills that new residents
acquire before encountering their first patient.
There has been debate on the level of fidelity that should be present in simulators for
novice trainees. Low-fidelity box trainers have been reported as less useful for training
basic skills because they lack simple anatomy, which is regarded as a key element in
training novices [17]. However, Norman argues that having a simulator with very high
fidelity results in unnecessary higher costs, and cognitive overload where the additional
sensory information may overwhelm novices and detract from learning basic skills [21].
Norman concludes that training with either high fidelity or low fidelity simulation results
in improved performance. However the gains for very high fidelity simulation over lower
fidelity simulation are not statistically significant and rarely justify the higher cost.
Norman reports that for motor skills, the feel of instruments and tissues is important,
while the colour and shape are less important. The paper by Norman also calls into
question the importance of context in training. Contextualized practice is when the
simulator and environment more closely mimics the operating environment.
2.3 Arthroscopic Simulators
The historical beginnings of simulator training can be traced back to the early days of the
aviation industry, as a way to train pilots in the principles of flying an aircraft without
risk to the trainee [4]. Since then, industries such as the military and nuclear power have
also embraced simulators as a way to train personnel. Simulators were introduced as a
way to train surgeons in the late 1980s, with neurosurgery and vascular surgery acting as
the early adopters [9]. While orthopaedic surgery has been slow to adopt simulation as a
training method, this is beginning to change [22].
Cadavers are often the first choice of surgeons for practice because they provide a real
anatomical experience [4]. However cadaver use in a training program is limited by
expense, availability, and locations at which residents can train. There may also be
concerns related to the presence of pathogens. Animal models have also been used to
teach surgical skills [23] and have been proposed as a model for teaching knee
arise from the use of animal models for training, especially when alternatives are
available. Animal models can also be expensive and difficult to acquire [23].
Furthermore, while a bovine knee may be a representative model for the human knee
joint; the anatomy of the human shoulder joint is quite different from animals due to our
bipedal stance. As a result, animal models are much less useful for training arthroscopy
of the human shoulder joint. While both cadavers and animal models have limited
opportunity for integrated performance feedback, synthetic simulators offer the
possibility to include quantitative performance feedback metrics so that trainees can
follow their own progression. Synthetic simulators are a promising alternative to animal
or cadaver practice. With the use of simulators, residents will be able to gain exposure at
their own pace, as often and whenever they want.
There are two main categories of synthetic joint simulators: physical and VR.
Arthroscopic surgery relies on the senses of touch and vision, so an effective simulator
should provide a realistic feel and visual feedback.
2.2.1 Virtual Reality Simulators
VR simulators provide a computer-simulated environment that includes the main
characteristics of the joint anatomy. Through the use of haptic devices, these simulators
can provide force feedback and create a somewhat realistic interaction with the simulated
environment.
VR trainers have the advantage of easily offering performance metrics and results to the
trainee, while this type of feedback has historically been lacking in physical simulators.
Objective measures of performance are helpful to motivate trainees by allowing them to
track their improvement during training. This “knowledge of results” has been found to
be key to the learning process and to the acquisition of psychomotor skills [10]. The main
drawbacks of VR simulators are high costs and poor haptic feedback [17].
Several VR arthroscopy simulators have been researched and developed over the past
decade and a half. The Virtual Environment Knee Arthroscopy Training System
structures visualized [26]. In 2004, Heng et al. described the PHANToM Desktop for
knee arthroscopy, along with a mock-up leg and sensors. The setup allowed for both
visual feedback and robotic haptic feedback, however there was no performance
evaluation of trainees [27]. The Mentice Corp Procedicus shoulder arthroscopy simulator
was evaluated by Srivastava et al. in 2004 [28]. The simulation of a right shoulder was
found to be much larger than a human shoulder and the anatomic model was static and
had poor resemblance to a human shoulder joint. The authors note the need for standard
performance measurements of accuracy and efficiency, which are lacking. The Munich
Knee Joint Simulator consisted of an “interactive phantom” with a user interface
providing haptic, visual and acoustic feedback. A force sensor located between the
phantom joint and the actuator recorded the forces applied by the user. Position based
performance metrics were not included in the system [29]. In 2006, the Sheffield Knee
Arthroscopy Training System (SKATS) was shown to produce metrics such as task time,
ability to locate pathologies, and arthroscope path length. The simulator included
physical bone models in the limb interface to provide passive haptic feedback. The
authors note that it is important for the simulator to feel realistic and have a physical
sense of resistance [30]. Bayonat et al. collaborated with GMV to design the
instightMIST shoulder simulator, with graphical and haptic rendering, in order to provide
a more realistic environment to trainees. An evaluation module was available to record
performance metrics; however it was not validated [31]. This group later reported the
development of the insightArthroVR simulator for knee and shoulder surgery, which was
validated. In 2012, the Simbionix Corporation acquired the insightArthroVR and
renamed it the ArthroMENTOR training system. The system is commercially available
and has active haptic feedback provided by robotic force feedback devices and can
simulate diagnostic and therapeutic procedures as well as presenting statistical data for
training assessment [32].
There have been several other VR simulators that have recently become commercially
available. VirtaMed offers the ArthroS knee and shoulder trainers, which combine a
plastic model of the anatomy with a VR visual user interface. Their knee simulator was
evaluated by Fucentese et al. in 2014 and the study noted that there was a mismatch
inaccurate haptic feedback [33, 34]. ToLTech has developed the ArthroSim Arthroscopy
Simulator for the knee and shoulder. The simulator employs active force-feedback haptic
devices and is currently exclusively used for training in diagnostic procedures.
The main difficulty in the development of the VR simulators is achieving realistic
kinesthetic and tactile feedback [31]. Existing haptic devices do not provide a true
representation of the forces that exist. The impaired instrument motion realism or reduced
quality of certain graphic designs’ realism can compromise the applicability of VR
simulators to training for real surgery.
2.2.2 Physical Simulators
Physical simulators have an advantage because of their realistic “feel”, as the trainee can
use real surgical tools to manipulate physical objects providing them with realistic tactile
feedback.
Physical simulators are often described as either “box trainers” or “anatomical bench
models” depending on their level of realism [4]. Box trainers are low-fidelity simulators
that do not have a close resemblance to a human joint. Anatomical bench models,
otherwise known as phantoms or dummies, more closely resemble the human joint when
compared to box trainers. Meyer et al. created a knee trainer in 1993 called the “Black Box”, which could be used in either a dry or wet configuration. The “Black Box” also
included electrical feedback for the dry configuration, such that contact of the probe and
the metallic meniscus completed an electrical circuit, producing a buzzing sound.
However, the electrical components had to be removed before using the trainer in the wet
configuration. The “Black Box” design was considered low fidelity and did not
realistically resemble a knee [35].
Hillway Surgical have developed anatomical bench models of the knee and shoulder with
replaceable parts that can be utilized in both wet and dry training [4], however no
automated performance feedback is available [36]. Escoto et al. reported the development
of an anatomical knee trainer that could be used in a realistic wet environment [37]. Force
The probing task used a visual estimate to determine completion of the task. Stunt et al.
described the PASSPORT version one and version two knee simulators, developed to
imitate the surgical setting. The system uses standard arthroscopic tools on a physical
simulator consisting of an anatomically correct knee model accessed using the three most
common portal locations and irrigation provided by a gravity pump and suction. The goal
of the system was to provide clinical variety, visual and force feedback and performance
feedback. Motion is recorded in a two dimensional plane and force is recorded by
sensors placed at the tibia plateau and the femur [38]. Sawbones offers several anatomical
bench models of the knee and shoulder (ALEX II and III Shoulder Professor, ACL Knee
Trainer, and Encased Knee) [39], which offer replaceable parts. Some of these models
can be used in both wet and dry conditions. However they have yet to add sensors to
these models to provide feedback. Other anatomical bench top models of the knee and
shoulder that provide realistic anatomy but lack any sensing ability are available from
Adam, Rouilly, CLA, and Beijing Yimo [40]–[42].
In their 2015 textbook, ESSKA acknowledges that physical simulators have the
advantage of offering natural feedback through the user’s visual and proprioceptive
senses, due to their physical nature. Physical simulators are typically less expensive than
VR simulators, making them more affordable. The main criticism of physical simulators
lies in their ability to provide meaningful, objective feedback to the trainee [4].
In their survey of orthopaedic surgeons, Safir et al. found that simulation with a
high-fidelity physical model ranked after cadaveric specimens as the most helpful method for a
novice trainee to prepare for the OR. VR simulators ranked third, ahead of box trainers
[18].
The shoulder simulator proposed herein combines the desired sensory feedback available
in physical simulators with the objective measurements available in the VR designs.
2.4 Simulator Validation
In order to ensure that the simulator effectively accomplishes what it proposes, it must be
types are presented here. Face validity is typically the first validation performed. It is a
subjective measure that relies on expert opinion to determine how closely the simulator
appears to resemble what it is supposed to. Construct validity is important as it shows the
ability of the simulator to distinguish between levels of performance, such as between
experts and novices. Transfer validity indicates that skills trained on the simulator
transfer to the OR or to performance on a cadaver. The literature contains several
examples ofthese validities for arthroscopy simulators.
2.4.1 Face and Construct Validity
In 2011, Tuijthof et al. evaluated two VR knee simulators for face and construct validity
[43]. They invited novice, intermediate and expert subjects to use the simulator. To test
face validity they used a questionnaire that asked about realism, perception and
educational value. To assess construct validity, the time to perform a task was measured
and compared between novice, intermediate and expert subjects. They found satisfactory
face validity and partial construct validity.
The insightArthro VR knee and shoulder simulator was assessed by Bayona et al. for face
and construct validity [20]. They recruited 94 arthroscopists at a conference and asked
them to perform a task on the simulator, and to answer a questionnaire. The results
supported face and construct validity for the VR simulator.
Another VR shoulder simulator, the Procedicus from Mentice Corp, was validated by
Srivastava et al. [28]. The study showed construct validity by verifying that experienced
surgeons score better than novices on three tasks: anatomical identification, hook
manipulation, and scope navigation.
The PASSPORT physical knee simulator was assessed in 2014 [38]. A standardized joint
navigation task to probe 9 landmarks was timed, and used to assess construct validity. A
questionnaire was used to determine face validity and participants rated the realistic
Correlation between performance on a VR shoulder simulator and level of surgical
experience was shown by Gomoll et al. in 2007 [44]. The metrics that were compared were time to completion, distance travelled compared to an “optimal distance”, average
probe velocity, and number of probe collisions with the tissues. A strong correlation was
found between these results and level of surgical experience.
In 2011, Martin et al. showed a correlation between performance on a cadaveric shoulder
and a VR shoulder simulator. The task completion time on the simulator was shown to
predict performance on a cadaver [45].
2.4.2 Transfer Validity
Transfer validity is important to demonstrate because it shows that skills learned in
simulator training can translate to performance in the OR. This provides justification for
incorporating arthroscopic simulation into core residency training. Transfer validity in
laparoscopic training is well established and shows that skills training on a simulator
transfers to performance in the OR [46] [47] [48]. It is less established for arthroscopic
simulators; however several studies have been published that demonstrated skill transfer
to cadavers and patients.
In 2008, Howells et al. studied junior orthopaedic trainees who trained on a physical knee
simulator with three sessions per week and six simulations per session. They were
compared to trainees who received no additional practice. The trainees who used the
simulator performed significantly better in the OR, demonstrating transfer validity of
arthroscopic skills from the physical knee simulator [49].
A second study demonstrating the transfer validity of simulator-trained arthroscopic skill
to the OR was published in 2014 by Cannon et al. and utilized a VR knee simulator. The
study spanned seven academic institutions, involving 48 PGY three residents, who were
randomized into two groups for either simulator training or no additional training. The
residents who were in the simulator training group underwent four rounds of progressive
training on the simulator for visualization and probing skills. Both groups then performed
and sent to the AAOS for evaluation [50]. The residents trained on the simulator showed
greater skill in the OR, in particular when completing the probing tasks, thereby
demonstrating transfer validity. No difference was shown for the visualization task.
A study conducted in 2013 by Henn et al., demonstrated transfer validity from VR
shoulder simulator to a cadaver by comparing the effect of training on 17 first-year
medical students with no prior experience. All candidates performed a baseline task on a
cadaver. Nine students received six training sessions over three months, while the other 8
students received no training. The students then repeated the same cadaveric arthroscopy.
The simulator group was found to have significantly improved time to completion,
compared to the untrained group, demonstrating a value of simulator training in
arthroscopy [51].
In a separate 2013 study by Butler et al., subjects were trained to perform a diagnostic
arthroscopy on a physical knee simulator before training for the same procedure on a
cadaver. The control group had no prior training before performing the diagnostic
arthroscopy on the cadaver. The two groups were compared based on the mean number
of trials required before attaining proficiency on the cadaver, and the mean number was
found to be significantly lower for the group who received training on the simulator,
indicating a transfer of training [52].
The demonstration of transfer validity from these studies offers strong support for further
work developing arthroscopic simulators and their use as a training tool.
2.5 Performance Evaluation
Providing trainees with an objective assessment of their performance is an important part
of the motor learning process. Feedback to the trainee can be given using global rating
scales or quantitative metrics. An effective evaluation is reliable, valid, and unbiased.
2.5.1 Global Rating Scales
Global rating scales (GRS) are structured scoring rubrics with well-defined anchors. They
(Objective Structured Assessments of Technical Skills) and GOALS (Global Objective
Assessment of Laparoscopic Skills) have been developed, validated and used to evaluate
performance in laparoscopic surgery [23][53]. Recently, several global rating scales have
also been proposed for performance evaluation in arthroscopic surgery.
In 2009, Insel et al. developed the Basic Arthroscopy Knee Skill Scoring System
(BAKSSS), which showed a strong correlation between scores from a 5-point Likert type
global rating scale and arthroscopic experience [54].
A “Global Rating Scale for Shoulder Arthroscopy” (GRSSA) was proposed in 2011 by
Hoyle et al. as the first such scale for arthroscopy of the shoulder. The global scale used
six criteria for assessment, each of which were scored on a 5-point Likert type scale [55].
The GRSSA was shown to be able to discriminate between different levels of training,
but lacked inter-rater reliability.
The Arthroscopic Surgical Skill Evaluation Tool (ASSET), described in 2013,uses a
5-point Likert-type GRS scale. The ASSET tool aims to evaluate a resident’s global
arthroscopic technical skill using eight domains to assess a particular part of arthroscopic
skill acquisition. The tool was shown to have the ability to discriminate between levels of
surgeon experience, as well as have good inter-rater reliability [1].
Bayona et al. created the Imperial Global Arthroscopy Rating Scale (IGARS) in 2014. It
was tested on a VR shoulder simulator and comprised ten criteria rated on a 5-point
Likert type scale. The IGARS scale was able to distinguish between levels of experience
on the simulator [56].
It can be noted that the scales are similar, with several arthroscopic skills being rated on a
5-point scale. Such Global Rating Scales can provide validated and meaningful feedback
to trainees. However, they require an expert surgeon to rate the performance either during
the training session, or later via video replay. This evaluation can be a costly and
substantial time burden when used for very basic skills training. The GRS may be better
2.5.2 Quantitative Metrics
Alternatives to the GRS are quantitative metrics that can be monitored and rated by a
computer. A metric is defined by ESSKA as “a quantity that in this context is supposed to reflect part of the performance of a trainee” and is synonymous with a measure or
parameter [4]. Objective metrics are recorded by sensors and the data can be used to
provide real-time feedback, or it can be post-processed to provide feedback after the task.
Time based, position based and force based metrics have been previously studied in
laparoscopic and arthroscopic surgery.
The task time, which is the time elapsed between start and finish of the task, is a widely
used metric and is easy to measure. It has been used in many studies [8], [43], [57]–[59]
[47]. Although it is not a good reflection of the quality of executed task, it does highly
reflect economy of motion [60].
The PASSPORT V2 training environment incorporated force and motion sensors into
their physical knee simulator, in addition to task time. Motion was measured using a
webcam and yellow markers that were attached to the scope and instrument. The 3D
force sensors measured the forces applied to the simulator at the tibia plateau and the
femur and were used to deliver a warning to subjects when a maximum force was
exceeded [38].
Tashiro et al. used an electromagnetic motion tracking system and a force sensor with a
physical knee simulator to collect task performance data. Experienced surgeons were
compared to novices and found to follow a shorter path length and have a higher probe
velocity. The novices were found to apply stronger forces to the joint during a probing
task [61].
Motion analysis was investigated as a way to distinguish between orthopaedic surgeons
and non-surgeons by Howells et al. in 2008. The study used a physical shoulder simulator
combined with the Patriot motion tracking system from Polhemus. Subjects performed
probing and grasping tasks. Experienced surgeons were found to travel shorter path
length and hand movements were also shown to correlate with learning curves in two
arthroscopic tasks (one shoulder, one knee) in a study by Alvand et al. in 2011[36].
Jerk, or motion smoothness (m/s3) is a metric that measures changes in acceleration and reflects jerky movements of the instrument. Smooth motion is important for safe tissue
manipulation. In 2012, Oropesa et al. showed significant differences between groups, in
particular for grasping tasks involving bimanual coordination in a laparoscopic surgical
context [62]. Jerk was also shown to be a relevant metric in laproscopy by [63]. Whether
jerk is also relevant to arthroscopy has not yet been determined. Smoothness was
considered to be an important metric for the IGARS scale, but was not quantified [56].
Other possible motion based metrics that could be investigated are average velocity and
peak velocity.
In a 2014 review paper by Frank et al., it was concluded that a standardized objective
measurement scheme to evaluate performance based on simulator use is necessary [6]. In
this thesis, a Likert-type scale will be used to assess the face validity of the simulator
while quantative metrics based on time, force and position will be used to assess
construct validity.
The current state of arthroscopy simulation suggests that a physical shoulder simulator
which provides realistic tactile feedback, realistic anatomy for the training of navigation
skills, and accommodates both the beach chair and lateral decubitus positions, would be
helpful in training novice surgeons. The following chapters present the design and
Chapter 3
Simulator Design
The literature review revealed a lack of physical simulators for the shoulder joint that
provide quantitative feedback to the trainee. To address this limitation, a physical
simulator was designed in order to provide novice trainees with a means for practicing
basic arthroscopy skills, such as triangulation, navigation of anatomy, and probing,
before they enter the operating theatre.
The physical shoulder simulator was conceived with guidance from Dr. Marie-Eve
LeBel, an orthopaedic surgeon at St. Joseph’s Health Care Centre in London, Ontario,
who specializes in arthroscopic procedures. The simulator was designed in response to a
need for better training devices for junior orthopaedic residents.
3.1 Design Requirements
The design of the physical shoulder simulator was driven by a number of requirements.
The most important of these being:
The simulator must include basic anatomic structures of the shoulder, and permit the
completion of realistic arthroscopic surgical actions.
The design must utilize economical and replaceable parts.
The simulator must facilitate either dry or wet practice.
The design must accommodate both lateral decubitus and beach chair operating
positions.
The simulator must allow measurement of the actions of trainees while developing
basic arthroscopic skills in tasks such as triangulation, precise instrument motion,
The simulator must include the posterior, anterior and lateral subacromial portals to
access the joint.
3.2 Conceptual Design and Specifications
In order to specify the design, each component of the simulator was carefully evaluated
and selected, as detailed in the following sections.
3.2.1
Range of Motion for the Arm
Arthroscopic surgery can be performed in either the beach chair or lateral decubitus
position. In the beach chair position, the arm is down by the patient’s side and the torso is
reclined. In the lateral decubitus position, the patient is lying on their side with their arm
suspended above. The simulator’s arm must be able to accommodate both positions. The
required range of motion was determined through consultation with an orthopaedic
Figure 3.1:Required range of motion for the arm.
3.2.2
Physical Anatomy
Another requirement of the simulator was that it needed to include basic anatomic
structures of the shoulder. The glenohumeral joint of the shoulder is the most mobile
joint in the human body, and comprises the head of the humerus in articulation with the
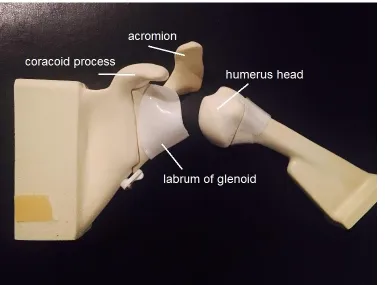
surface of the glenoid. The coracoid process is an anterior protrusion of the scapula
(shoulder blade), while the acromion is a posterior bony protrusion of the scapula (Figure
the head of the humerus, inside the joint capsule, attaching to the top of the glenoid
(Figure 3.2 and Figure 3.3). The muscles of the rotator cuff cover the capsule, and act to
stabilize the shoulder. These muscles have origins on the scapula and their tendons insert
on the humerus.
The simulator aims to teach basic arthroscopic skills such as navigation of the anatomy.
As such, the simulator design must include the basic anatomic structures of the shoulder
(bones and soft tissues).
Figure 3.2: Sagittal view of the shoulder joint showing the glenoid [64].
3.2.1.1 Synthetic Bone Selection
The selection of which bones should be included in the simulator was determined through
consultation with an orthopaedic surgeon. The selected bones are shown in Table 3.1, as
well as whether or not they will be visualized by the arthroscope during use. The scapula
and diaphysis of the humerus are not visualized during basic arthroscopy tasks but are
included in the simulator for structural reasons. The clavicle is normally seen through the
arthroscope, and would contribute to the realism of the simulator, but was excluded from
the design because it would breach the waterproof compartment around the shoulder
joint.
The realistic feel of the properties of human bone had to be considered, as the simulator
could be used to train residents using a shaving tool to remove bone. Currently,
arthroscopy surgical residents use cadaver bones to practice the use of a surgical shaving
tool. However, cadavers are not readily available, are expensive and can present a
biohazard. Foam bones are advantageous to use for training because they have consistent
mechanical properties, are relatively inexpensive, are readily available, and can be used
anywhere [65].
Table 3.1: Bones of the shoulder.
Bone Included in simulator Visualized with arthroscope
Humerus (epiphysis) yes yes Humerus (diaphysis) yes no
Glenoid yes yes
Scapula yes no
Acromion yes yes
Coracoid process yes yes Clavicle for future development yes
Polyurethane foam was selected as a material for the synthetic bones because the
mechanical properties have been reported to approximate those of human bone [65]. This
conclusion is supported by the ASTM Standard Specification for Rigid Polyurethane
which states: “the uniformity and consistent properties of rigid polyurethane foam make
it an ideal material for comparative testing of bone screws and other medical devices and
instruments” [66]. Polyurethane bones are easily moulded into realistic shapes, which
make them ideal for building physical orthopedic models, including surgical simulators.
Pacific Research Laboratories (Vachon Island, WA) produces synthetic polyurethane
bones from rigid thermoset polyurethane foam under the brand Sawbones. Sawbones
have been previously used to construct surgical simulators [37]. However, the Sawbones
product is typically used to approximate human bone in dry applications. Preliminary
tests showed that the Sawbones were more difficult to shave when submerged in water,
compared to shaving in a dry environment. It was hypothesized that using lower density
foam for submerged shaving tasks could improve the realism of the task. In order to
select the correct foam density for the simulator, tests were performed to examine the
mechanical changes in the synthetic bone between wet and dry environments, as
described below.
Methods:
A total of seven polyurethane solid foam samples were obtained from Sawbones with
density ranging from 80 kg/m3 to 640 kg/m3. A series of evaluations were performed on the foam samples, as follows:
Three Point Bend Test: The modulus of elasticity was measured, to see if a change
occurred in the physical properties after soaking the polyurethane foam in water. A three
point bend test was performed using an Instron 8874 machine as directed in the ASTM
standard [67], as shown in Figure 3.4 (a). Testing blocks were cut from five different density Sawbones’ bones (300 kg/m3
, 350 kg/m3, 360 kg/m3, 390 kg/m3 and 450 kg/m3) into the standard test size. On day one, samples were tested dry and tests were repeated at
5, 15, 30 and 60 minutes of total soak time, Figure 3.4 (b). The samples were left to air
Figure 3.4: (a) Instron machine performing the three point bend test. (b) Polyurethane foam samples soaking.
Cutting Test: The “machinability” of the Sawbones was also tested directly by shaving a
section of the bone for a set period of time and measuring the depth of the cut. A Stryker
arthroscopic hand controlled shaver was attached to a weighted board set up to pivot as
the shaver moved through the substrate with the force of gravity. The shaver was applied
to the sample block while dry and also while the blocks were submerged, after soaking
for 15 minutes. The test was repeated 10 times. For this test, a wider range of bone
densities was used for testing (80 kg/m3, 300 kg/m3, and 640 kg/m3) in order to highlight any effect of density. The test was also performed on a human cadaveric humerus for
comparison, as this was a customized test and there were no published values for
reference.
Results:
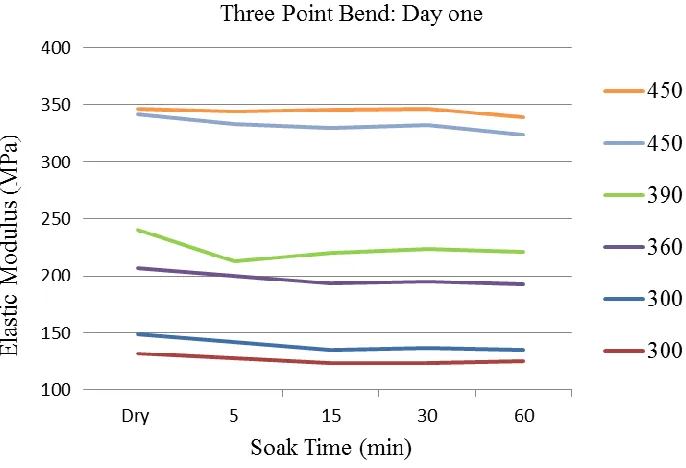
The results of the three point bend tests are presented below. On average, the elastic
modulus decreased by 6% after 60 minutes of soaking on day one, as shown in Figure 3.5
and by 7.9% after 60 minutes of soaking on day two as shown in Figure 3.6. As expected, the elastic modulus was found to increase with density and the density was the most
influencing factor. The blocks were found to have the highest elastic modulus when dry,
compared to the soaked samples. The results were found to be similar to published values
of 164–260 MPa for Sawbones with foam densities of 320–332 kg/m3 [68], [69]. The values were found to be lower than the published values for human cortical bone and on
the low end for human cancellous bone [70, 71]. The decrease in elastic modulus was not
significant and was not considered sufficient to explain the difficulty with shaving the
bones under water.
Figure 3.5: Results from day one of the three point bend test by density (kg/m3).
With respect to the cutting test, there was a significant change noticed in the depth of the
cuts when the blocks were cut with the shaver in a dry environment compared to a wet
environment (Table 3.2). The human humerus was a defrosted fresh frozen sample,
which was inherently moist. It was not dried for testing because the goal of the test was to
select a foam density to use while in water.
Table 3.2:Results of the shaving test averaged over 10 samples.
Material Dry (mm) Submerged (mm) p value 80 kg/m3 12.72 3.55 3.4 10-6 300 kg/m3 6.50 2.32 1.410-5 640 kg/m3 1.88 0.73 1.8610-5 Human humerus -- 1.16 --
As expected, the density varied inversely with machinability, both in the wet and dry
environments. A thermocouple was attached to the shaver tip to measure the cutting
temperature while dry. The temperature was found to exceed 150 °C. One explanation for
the increased shaving depth in dry environments could be that the increased temperature
of the shaving tool in the dry environment allows for easier cutting, compared to the
quenched wet environment.
Based on the results, it was determined that the preferred foam density for performing
shaving tasks in water is slightly higher than 300 kg/m3, which is the standard density foam used by Sawbones.
Procured Bones
The bones (Figure 3.7 and Figure 3.8) were procured from Sawbones (Models 1051-26,
1051-27, 1050-34-4, and 1050-69, Vashon Island, Washington). The acromion, humerus
head and glenoid (with labrum) are replaceable parts and therefore could be used for
destructive tasks such as shaving. The bones were available for the left shoulder only, and
Figure 3.7: Shoulder bones (coronal view).
3.2.1.2 Soft Tissues
Certain soft tissues were identified for inclusion in the simulator through consultation
with an orthopaedic surgeon. In particular, the labrum, biceps tendon, capsule and rotator
cuff tendons were identified as required components. The subacromial bursa,
coracoacromial and acromioclavicular ligaments were identified for inclusion in future
simulator versions that are aimed at training more advanced skills. The remaining tissues
were not included in the simulator as they would not be visualized with the arthroscope
and are not required for structural integrity.
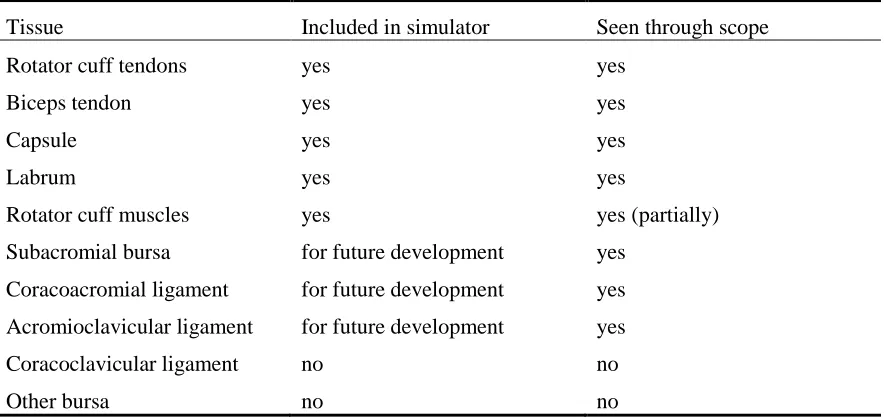
Table 3.3: Tissues in the shoulder.
Tissue Included in simulator Seen through scope Rotator cuff tendons yes yes
Biceps tendon yes yes
Capsule yes yes
Labrum yes yes
Rotator cuff muscles yes yes (partially) Subacromial bursa for future development yes
Coracoacromial ligament for future development yes Acromioclavicular ligament for future development yes Coracoclavicular ligament no no
Other bursa no no
The soft tissues needed to be made of a flexible material that also allowed for a method
of attachment to the bones. After testing different materials, it was found that Ecoflex
00-30 Silicone rubber (Smooth-On, Inc., Macungie, PA) with nylon reinforcement was a
good combination. The silicone provided structure and flexibility. The nylon allowed for
stretch, while preventing the silicone from tearing, and it also permitted Velcro to be
sewn onto the structure. The materials tolerate both wet and dry environments.
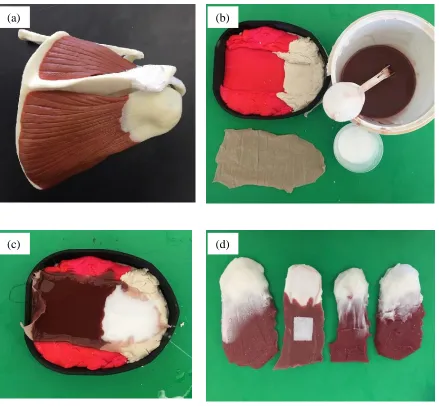
The muscles and tendons of the rotator cuff were formed using a Playdough mould,
textured by using the surface of a hard plastic shoulder muscle model. Two colours of
silicone, white and maroon, were used to distinguish the tendon and muscle. The process
Figure 3.9: Creation of rotator cuff muscles and tendons. (a) Plastic shoulder model (b) Materials used to construct muscles and tendons. (c) Silicone and nylon in mould. (d) Finished muscles.
The biceps tendon was also moulded from nylon-reinforced silicone using a plastic
drinking straw, as shown in Figure 3.10 (a). The biceps tendon was sewn to the top of the
glenoid under the labrum and attached to the humerus using Velcro, as shown in Figure
3.10 (b).
(a) (b)
Figure 3.10: (a) Straw mould and biceps tendon. (b) Biceps tendon attached to glenoid.
The joint capsule is a thin layer than sheathes the glenohumeral joint beneath the rotator
cuff tendons. During arthroscopic surgery, portals are created in the capsule to allow the
arthroscope and instruments to access the joint space. Originally, a white latex balloon
was proposed for the capsule, but it ripped when punctured with the instruments. The
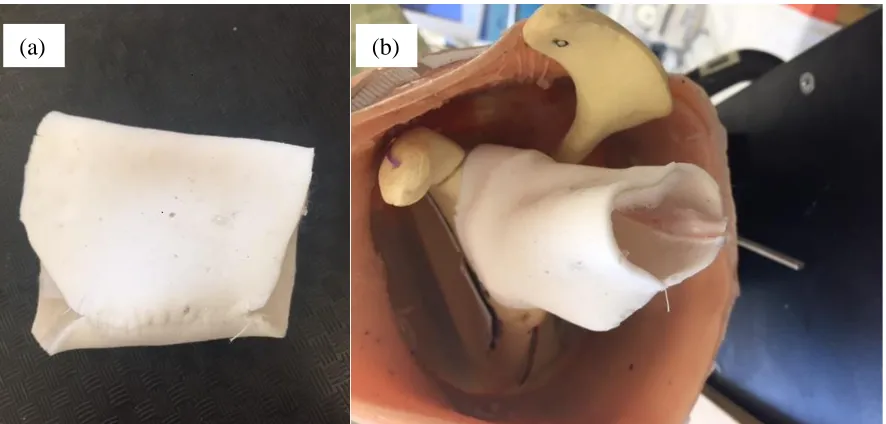
final design (Figure 3.11) was a thin layer of white silicone reinforced with nylon, which
was cut and sewn into the correct shape. Velcro was also sewn to the capsule to allow it
to anchor onto the bones on either side of the joint.
Figure 3.11: (a) Synthetic joint capsule (b) Capsule attached to glenoid with velcro.
(a)
) (b)
(b)
(a)
) (b)
(b)
![Figure 3.2: Sagittal view of the shoulder joint showing the glenoid [64].](https://thumb-us.123doks.com/thumbv2/123dok_us/7764986.1276248/38.612.164.543.236.448/figure-sagittal-view-shoulder-joint-showing-glenoid.webp)