by Wallace Wang
Office 2007
FOR
Office 2007 For Dummies® Published by
Wiley Publishing, Inc.
111 River Street Hoboken, NJ 07030-5774
www.wiley.com
Copyright © 2007 by Wiley Publishing, Inc., Indianapolis, Indiana Published by Wiley Publishing, Inc., Indianapolis, Indiana Published simultaneously in Canada
No part of this publication may be reproduced, stored in a retrieval system or transmitted in any form or by any means, electronic, mechanical, photocopying, recording, scanning or otherwise, except as permit-ted under Sections 107 or 108 of the 1976 Unipermit-ted States Copyright Act, without either the prior written permission of the Publisher, or authorization through payment of the appropriate per-copy fee to the Copyright Clearance Center, 222 Rosewood Drive, Danvers, MA 01923, (978) 750-8400, fax (978) 646-8600. Requests to the Publisher for permission should be addressed to the Legal Department, Wiley Publishing, Inc., 10475 Crosspoint Blvd., Indianapolis, IN 46256, (317) 572-3447, fax (317) 572-4355, or online at
http://www.wiley.com/go/permissions.
Trademarks:Wiley, the Wiley Publishing logo, For Dummies, the Dummies Man logo, A Reference for the Rest of Us!, The Dummies Way, Dummies Daily, The Fun and Easy Way, Dummies.com, and related trade dress are trademarks or registered trademarks of John Wiley & Sons, Inc. and/or its affiliates in the United States and other countries, and may not be used without written permission. Microsoft is a trademark or registered trademark of Microsoft Corporation. All other trademarks are the property of their respective owners. Wiley Publishing, Inc., is not associated with any product or vendor mentioned in this book.
LIMIT OF LIABILITY/DISCLAIMER OF WARRANTY: THE PUBLISHER AND THE AUTHOR MAKE NO REP-RESENTATIONS OR WARRANTIES WITH RESPECT TO THE ACCURACY OR COMPLETENESS OF THE CONTENTS OF THIS WORK AND SPECIFICALLY DISCLAIM ALL WARRANTIES, INCLUDING WITHOUT LIMITATION WARRANTIES OF FITNESS FOR A PARTICULAR PURPOSE. NO WARRANTY MAY BE CRE-ATED OR EXTENDED BY SALES OR PROMOTIONAL MATERIALS. THE ADVICE AND STRATEGIES CON-TAINED HEREIN MAY NOT BE SUITABLE FOR EVERY SITUATION. THIS WORK IS SOLD WITH THE UNDERSTANDING THAT THE PUBLISHER IS NOT ENGAGED IN RENDERING LEGAL, ACCOUNTING, OR OTHER PROFESSIONAL SERVICES. IF PROFESSIONAL ASSISTANCE IS REQUIRED, THE SERVICES OF A COMPETENT PROFESSIONAL PERSON SHOULD BE SOUGHT. NEITHER THE PUBLISHER NOR THE AUTHOR SHALL BE LIABLE FOR DAMAGES ARISING HEREFROM. THE FACT THAT AN ORGANIZATION OR WEBSITE IS REFERRED TO IN THIS WORK AS A CITATION AND/OR A POTENTIAL SOURCE OF FUR-THER INFORMATION DOES NOT MEAN THAT THE AUTHOR OR THE PUBLISHER ENDORSES THE INFORMATION THE ORGANIZATION OR WEBSITE MAY PROVIDE OR RECOMMENDATIONS IT MAY MAKE. FURTHER, READERS SHOULD BE AWARE THAT INTERNET WEBSITES LISTED IN THIS WORK MAY HAVE CHANGED OR DISAPPEARED BETWEEN WHEN THIS WORK WAS WRITTEN AND WHEN IT IS READ.
For general information on our other products and services, please contact our Customer Care Department within the U.S. at 800-762-2974, outside the U.S. at 317-572-3993, or fax 317-572-4002. For technical support, please visit www.wiley.com/techsupport.
Wiley also publishes its books in a variety of electronic formats. Some content that appears in print may not be available in electronic books.
Library of Congress Control Number: 2006934817 ISBN-13: 978-0-470-00923-9
ISBN-10: 0-470-00923-3
Manufactured in the United States of America 10 9 8 7 6 5 4 3 2 1
About the Author
The author currently divides his time between writing computer books, writing articles for CPU Magazine, performing stand-up comedy, and writing and speaking on a weekly comedy radio show along with fellow comedians Rick Gene, Wes Sample, and Justin Davis. The show airs on 103.7 Free FM in San Diego (http://1037freefm.com).
Dedication
This book is dedicated to a variety of people, including the following: All the long-suffering victims forced to learn the arcane features of Microsoft Office, which seem to change with every version, not always for the best. Take heart. You’re not stupid — it’s the people who write, sell, and encourage the clumsy and complicated computer programs on the market who are the really stupid ones.
All the friendly folks at the Riviera Comedy Club, located at the Riviera Hotel & Casino (www.theriviera.com) in Las Vegas: Steve Schirripa (who appears in HBO’s hit show, The Sopranos), Don Learned, Bob Zany (www.bobzany.com), Gerry Bednob, Russ Rivas, Bruce Clark, Darrell Joyce, and Kip Addotta. Additional thanks must also go to Chris (the Zooman) Clobber, Dante, Rick Gene, Wes Sample, Justin Davis, and Leo (the man, the myth, the legend) Fontaine just because they like seeing their names in print for no apparent reason.
Continuing the theme of thanking people who had nothing to do with this book, the author would also like to dedicate this book to LeStat’s, the best little coffeehouse in San Diego, for providing a warm, friendly environment to practice stand-up comedy in the safety and comfort of intelligent people who haven’t drowned their inhibitions away in alcohol.
Author’s Acknowledgments
Margot Hutchison and Bill Gladstone at Waterside Productions deserve spe-cial acknowledgment because if it weren’t for their work, I might never have been hired to write this book; and you would be reading some other author’s acknowledgments and dedication. These two are the best agents an author could hope for, so they deserve all the 15 percent of the book royalties that they get.
Some other people who deserve thanks include Bob Woerner, acquisitions editor; Jean Rogers, project editor; and Teresa Artman, copy editor; and the rest of the happy gang of editors, managers, and workers who make Wiley Publishing the best publisher to work for because they’re the complete oppo-site of their competition.
Additional thanks go to technical editor Lee Musick for making sure that everything in this book is accurate.
Publisher’s Acknowledgments
We’re proud of this book; please send us your comments through our online registration form located at www.dummies.com/register/.
Some of the people who helped bring this book to market include the following:
Acquisitions, Editorial, and Media Development
Associate Project Editor:Jean Rogers
Acquisitions Editor:Bob Woerner
Senior Copy Editor:Teresa Artman
Technical Editor:Lee Musick
Editorial Manager:Kevin Kirschner
Media Development Specialists:Angela Denny, Kate Jenkins, Steven Kudirka, Kit Malone
Media Development Coordinator:
Laura Atkinson
Media Project Supervisor:Laura Moss
Media Development Manager:Laura VanWinkle
Media Development Associate Producer:
Richard Graves
Editorial Assistant:Amanda Foxworth
Sr. Editorial Assistant:Cherie Case
Cartoons:Rich Tennant (www.the5thwave.com)
Composition
Project Coordinator: Kristie Rees
Layout and Graphics:Jonelle Burns, Lavonne Cook, Denny Hager, Joyce Haughey, Barbara Moore, Barry Offringa, Heather Ryan
Proofreaders: David Faust, Techbooks
Indexer: Techbooks
Anniversary Logo Design:Richard Pacifico
Publishing and Editorial for Technology Dummies
Richard Swadley,Vice President and Executive Group Publisher
Andy Cummings,Vice President and Publisher
Mary Bednarek,Executive Acquisitions Director
Mary C. Corder,Editorial Director
Publishing for Consumer Dummies
Diane Graves Steele,Vice President and Publisher
Joyce Pepple,Acquisitions Director
Composition Services
Gerry Fahey,Vice President of Production Services
Contents at a Glance
Introduction ...1
Part I: Getting to Know Microsoft Office 2007...7
Chapter 1: Getting to Know Microsoft Office 2007...9
Chapter 2: Editing Data...29
Chapter 3: Getting Help from Office 2007...43
Part II: Working with Word ...51
Chapter 4: Typing Text in Word ...53
Chapter 5: Formatting Text ...71
Chapter 6: Designing Your Pages...91
Part III: Playing the Numbers with Excel...125
Chapter 7: The Basics of Spreadsheets: Numbers, Labels, and Formulas ...127
Chapter 8: Playing with Formulas ...159
Chapter 9: Charting and Analyzing Data ...181
Part IV: Making Presentations with PowerPoint ...203
Chapter 10: Creating a PowerPoint Presentation...205
Chapter 11: Adding Color and Pictures to a Presentation ...221
Chapter 12: Showing Off a Presentation ...241
Part V: Getting Organized with Outlook...259
Chapter 13: Organizing E-Mail with Outlook...261
Chapter 14: Storing Contacts and Organizing Tasks...287
Chapter 15: Scheduling Your Time...301
Part VI: Storing Stuff in Access ...309
Chapter 16: Using a Database ...311
Chapter 17: Searching, Sorting, and Querying a Database ...331
Chapter 18: Creating a Database Report ...353
Part VII: The Part of Tens ...368
Chapter 19: Ten Tips for Using Office 2007 ...369
Chapter 20: Ten Keystroke Shortcuts for Office 2007...379
Table of Contents
Introduction...1
Who Should Buy This Book ...1
How This Book Is Organized...1
Part I: Getting to Know Microsoft Office 2007 ...2
Part II: Working with Word ...2
Part III: Playing the Numbers with Excel ...2
Part IV: Making Presentations with PowerPoint...2
Part V: Getting Organized with Outlook ...3
Part VI: Storing Stuff in Access ...3
Part VII: The Part of Tens ...3
How to Use This Book ...3
Conventions ...4
Icons Used in This Book...4
Getting Started ...5
Part I: Getting to Know Microsoft Office 2007 ...7
Chapter 1: Getting to Know Microsoft Office 2007 . . . .9
Loading an Office 2007 Program ...10
Getting to Know the New User Interface...11
The File menu ...12
Using the Quick Access toolbar ...19
Using the Ribbon ...23
Customizing an Office 2007 Program...26
Exiting Office 2007...27
Chapter 2: Editing Data . . . .29
Adding Data by Pointing...29
Selecting Data ...31
Selecting data with the mouse...31
Selecting data with the keyboard ...33
Selecting multiple chunks of data with the mouse and keyboard...34
Editing Data with the Pop-up Toolbar ...34
Deleting Data...35
Cutting and Pasting (Moving) Data...36
Dragging with the Mouse to Cut, Copy, and Paste...37
Undo and Redo ...38
Sharing Data with Other Office 2007 Programs...39
Using the Office Clipboard ...40
Viewing and pasting items off the Office Clipboard...40
Deleting items from the Office Clipboard...41
Chapter 3: Getting Help from Office 2007 . . . .43
Browsing the Help Window...43
Searching in the Help Window ...45
Making the Help Window Easier to Read ...46
Resizing the Help window ...46
Enlarging the text in the Help window...47
Keeping the Help window visible at all times ...48
Printing the text in the Help window ...48
Viewing the Table of Contents ...48
Part II: Working with Word ...51
Chapter 4: Typing Text in Word . . . .53
Moving the Cursor with the Mouse ...53
Moving the Cursor with the Keyboard ...54
Viewing a Document ...55
Switching between views ...56
Using Full Screen Reading view ...57
Using Outline view ...58
Navigating through a Document ...62
Navigating with the mouse...62
Using the Go To command ...63
Finding and Replacing Text...64
Using the Find command...64
Using the Find and Replace command ...66
Checking Your Spelling ...66
Checking Your Grammar ...68
Proofreading Your Document ...68
Typing Symbols ...69
Chapter 5: Formatting Text . . . .71
Changing the Font ...72
Changing the Font Size ...73
Changing the Text Style...74
Changing Colors ...75
Changing the color of text ...75
Highlighting text ...76
Adjusting Line Spacing ...77
Making Lists ...78
Indenting list items...79
Converting list items back into text...79
Customizing a list ...80
Renumbering numbered lists...80
Using the Ruler ...82
Adjusting left and right paragraph margins...83
Defining indentation with the Ruler ...84
Showing Formatting Marks ...84
Using Format Painter ...86
Using Styles...87
Using Templates ...88
Creating a new document from a template ...88
Creating a document based on an existing document ...89
Removing Formatting from Text ...89
Chapter 6: Designing Your Pages . . . .91
Inserting New Pages...91
Adding (And Deleting) a Cover Page ...92
Inserting Page Breaks ...93
Inserting Headers and Footers ...93
Creating a header (or footer)...93
Defining which pages to display a header (or footer) ...94
Deleting a header (or footer) ...95
Organizing Text in Tables...96
Creating a table by highlighting rows and columns ...96
Creating a table with the Insert Table dialog box ...97
Creating a table with the mouse...98
Creating a table from existing text ...99
Formatting and Coloring a Table...102
Selecting all or part of a table ...102
Aligning text in a table cell ...103
Coloring all or part of a table...104
Adding borders ...104
Picking a table style ...106
Resizing columns and rows...107
Defining cell margins...108
Defining cell spacing ...109
Splitting (and merging) cells ...110
Sorting a Table...111
Deleting Tables ...112
Deleting an entire table...112
Deleting rows and columns...113
Deleting cells...114
Deleting cell borders...115
xiii
Making Text Look Artistic ...115
Creating drop caps ...115
Creating WordArt...116
Dividing Text into Columns...118
Editing columns ...118
Removing columns ...120
Previewing a Document before Printing...120
Defining page size and orientation...120
Using Print Preview ...122
Printing ...123
Part III: Playing the Numbers with Excel ...125
Chapter 7: The Basics of Spreadsheets:
Numbers, Labels, and Formulas . . . .127
Understanding Spreadsheets...127
Storing Stuff in a Spreadsheet ...128
Typing data into a single cell ...128
Typing data in multiple cells...129
Typing in sequences with AutoFill ...130
Formatting Numbers and Labels...131
Formatting numbers ...131
Formatting cells ...134
Navigating a Spreadsheet...138
Using the mouse to move around in a spreadsheet ...138
Using the keyboard to move around a spreadsheet ...138
Naming cells ...140
Searching a Spreadsheet ...142
Searching for text ...142
Searching for formulas...143
Editing a Spreadsheet ...144
Editing data in a cell...144
Changing the size of rows and columns with the mouse ...144
Typing the size of rows and columns ...145
Adding and deleting rows and columns ...146
Adding sheets ...146
Renaming sheets ...146
Rearranging sheets...148
Deleting a sheet ...148
Clearing Data ...148
Printing Workbooks ...149
Using Page Layout view ...150
Adding a header (or footer) ...151
Printing gridlines ...152
Inserting (and removing) page breaks...153
Printing row and column headings ...155
Defining printing margins ...156
Defining paper orientation and size...156
Printing in Excel...158
Chapter 8: Playing with Formulas . . . .159
Creating a Formula...159
Organizing formulas with parentheses...162
Copying formulas ...163
Using Functions ...164
Using the AutoSum command ...166
Using recently used functions ...167
Editing a Formula ...168
Goal Seeking...168
Creating Multiple Scenarios...170
Creating a scenario...170
Viewing a scenario ...172
Editing a scenario ...173
Viewing a scenario summary ...174
Auditing Your Formulas...175
Finding where a formula gets its data...176
Finding which formula(s) a cell can change ...176
Data Validation ...177
Chapter 9: Charting and Analyzing Data . . . .181
Understanding the Parts of a Chart ...181
Creating a Chart ...184
Editing a Chart...185
Moving a chart on a worksheet ...185
Moving a chart to a new sheet...186
Resizing a chart ...187
Using the Chart Tools ...187
Changing the chart type ...188
Changing the data source...189
Switching rows and columns ...189
Changing the parts of a chart ...190
Designing the layout of a chart...191
Deleting a chart ...192
Organizing Lists in Pivot Tables ...192
Creating a pivot table...193
Rearranging labels in a pivot table ...196
Modifying a pivot table ...197
Filtering a pivot table ...199
Summing a pivot table ...201
xv
Part IV: Making Presentations with PowerPoint ...203
Chapter 10: Creating a PowerPoint Presentation . . . .205
Defining the Purpose of Your Presentation ...205
Creating a PowerPoint Presentation...206
Designing a presentation with Slide view...208
Designing a presentation with Outline view ...210
Working with Text ...213
Typing text in a text box...213
Formatting text ...214
Aligning text ...215
Adjusting line spacing...216
Making numbered and bullet lists...217
Making columns...218
Moving and resizing a text box...219
Rotating a text box ...220
Chapter 11: Adding Color and Pictures to a Presentation . . . .221
Applying a Theme ...221
Changing the Background ...224
Choosing a solid color background ...224
Choosing a gradient background ...226
Choosing a picture background ...228
Adding Graphics to a Slide...229
Placing picture files on a slide ...230
Placing clip art on a slide ...230
Creating WordArt...232
Resizing, moving, and deleting graphic images...232
Rotating graphics ...233
Layering objects ...234
Adding Movies to a Slide...235
Adding an animated cartoon to a slide ...235
Adding a movie to a slide ...235
Adding Sound to a Slide ...237
Adding an audio file to a presentation ...238
Adding an audio clip to a presentation ...239
Adding a CD audio track to a presentation ...239
Chapter 12: Showing Off a Presentation . . . .241
Spell-Checking Your Presentation ...241
Adding Visual Transitions ...242
Adding slide transitions ...243
Adding Hyperlinks...246
Creating Web page hyperlinks ...246
Creating hyperlinks to external files ...247
Creating hyperlinks to different slides ...247
Running a program through a hyperlink ...249
Viewing a Presentation ...250
Creating a custom slide show ...251
Hiding a slide ...252
Organizing with Slide Sorter view ...253
Timing yourself ...254
Creating Handouts ...256
Packing Presentations to Go...257
Part V: Getting Organized with Outlook ...259
Chapter 13: Organizing E-Mail with Outlook . . . .261
Configuring E-Mail Settings ...261
Adding an e-mail account ...265
Deleting an e-mail account ...266
Editing an e-mail account ...266
Creating E-Mail...267
Creating a new e-mail message ...267
Replying to an e-mail message...269
Using a stored e-mail address to create a new e-mail message....270
Forwarding an e-mail message ...271
Attaching Files to Messages...272
Attaching a file to a message ...272
Attaching Outlook information to another message ...273
Formatting E-Mail ...274
Formatting text ...274
Adding signatures to your messages ...275
Reading and Organizing E-Mail...279
Categorizing messages ...279
Retrieving a file attachment from a message...282
Deleting E-Mail Messages ...284
Chapter 14: Storing Contacts and Organizing Tasks . . . .287
Storing Contact Information ...287
Searching Contact Information...289
Viewing and Printing Contact Information ...290
Categorizing Contact Information...291
Creating categories ...292
Storing names in categories...293
Viewing names by categories...294
xvii
Sharing Contact Information ...294
Defining Tasks...295
Creating a task ...296
Editing a task...297
Organizing and viewing your tasks ...298
Finishing a task ...299
Deleting a task...299
Chapter 15: Scheduling Your Time . . . .301
Setting Appointments ...301
Making a new appointment ...301
Editing an appointment ...304
Deleting an appointment ...305
Defining a recurring appointment ...305
Editing a recurring appointment ...306
Printing Your Schedule ...307
Part VI: Storing Stuff in Access ...309
Chapter 16: Using a Database . . . .311
Understanding the Basics of a Database...312
Designing a Database...313
Creating a database from scratch ...314
Creating a database from a template ...316
Editing and Modifying a Database ...317
Naming a field ...317
Adding and deleting a field ...317
Defining the type and size of a field ...318
Typing Data into a Database...321
Using Datasheet view...321
Using Form view ...322
Creating a form ...322
Viewing and editing data in a form...323
Editing a form...324
Closing and Saving a Database ...328
Closing a database table...328
Closing a database file ...329
Chapter 17: Searching, Sorting, and Querying a Database . . . .331
Searching a Database...332
Searching for a specific record ...332
Filtering a database ...333
Querying a Database...340
Creating a simple query...340
Creating a crosstab query ...343
Creating a query that finds duplicate field data...346
Creating an unmatched query ...348
Viewing and deleting queries...350
Chapter 18: Creating a Database Report . . . .353
Using the Report Wizard ...353
Viewing and Printing a Report...357
Manipulating the Data in a Report ...359
Counting records or values...360
Sorting a field ...361
Filtering a field ...362
Editing a Report...363
Resizing fields ...364
Deleting fields ...365
Deleting a Report ...366
Part VII: The Part of Tens...367
Chapter 19: Ten Tips for Using Office 2007 . . . .369
Saving Office 2007 Files ...369
Password-Protecting Your Files...370
Guarding Against Macro Viruses and Worms ...371
Create Your Own Word Keystroke Shortcuts ...372
Zooming In (And Out) to Avoid Eyestrain...373
When in Doubt, Right-Click the Mouse...374
Freezing Row and Column Headings in Excel...374
Displaying Slides Out of Order in PowerPoint...375
Reduce Spam in Outlook ...375
Setting up Outlook’s junk e-mail filter...375
Creating a Safe Senders list ...377
Creating a Blocked Senders list ...378
Using Pocket Office ...378
Chapter 20: Ten Keystroke Shortcuts for Office 2007 . . . .379
Protecting Yourself with Undo (Ctrl+Z) and Redo (Ctrl+Y)...379
Cut (Ctrl+X), Copy (Ctrl+C), and Paste (Ctrl+V) ...380
Using the Cut and Paste commands ...380
Using the Copy and Paste commands ...381
Using the Paste command with the Office Clipboard...381
Saving a File (Ctrl+S)...382
xix
Printing a File (Ctrl+P) ...382
Checking Your Spelling (F7)...382
Opening a File (Ctrl+O)...383
Creating a New File (Ctrl+N) ...384
Finding Text (Ctrl+F)...384
Finding and Replacing Text (Ctrl+H) ...385
Closing a Window (Ctrl+W)...386
Introduction
M
icrosoft Office 2007 contains loads of new features. Unfortunately, find-ing — let alone usfind-ing — these new features can be troublesome. So, with Office 2007, Microsoft added its most important feature ever — making the programs easier to use.Office 2007’s biggest change is its new user interface. If you’re familiar with the more traditional pull-down menus and toolbar icons from previous edi-tions of Microsoft Office, you’ll soon find that this latest version of Microsoft Office is designed to help you make the most out of Word, Excel, PowerPoint, Access, and Outlook so you can find the features you need and use them right away.
Who Should Buy This Book
This book is targeted toward two distinct groups. First, there are the people already familiar with Microsoft Office who want to bone up on the new ways that Office 2007 works. For these people, this book can serve as a handy ref-erence to finding where Microsoft put various commands in the new Office 2007 user interface.
Then there’s a second group of people who may not be familiar with any Microsoft Office program at all. For these people, this book can serve as a guide through word processing (Microsoft Word), number calculations (Microsoft Excel), presentations (Microsoft PowerPoint), database manage-ment (Microsoft Access), and managing your personal resources like time, appointments, and e-mail (Microsoft Outlook).
No matter how much (or how little) you may know about Microsoft Office, this book introduces you to the most common features so you can start being productive with Office 2007 right away.
How This Book Is Organized
Part I: Getting to Know Microsoft
Office 2007
Microsoft Office 2007 may look confusing at first glance, but after you under-stand how it works, you’ll find that it’s surprisingly easy to use. This part of the book explains the new Office menus and toolbars while also showing you common commands that you can use in any Office 2007 program. By the time you finish this part of the book, you’ll better understand how to use the indi-vidual programs that make up the rest of Office 2007.
Part II: Working with Word
Word processing is the most popular use for Office 2007, so this part of the book explains the basics to using Word. Not only does this part of the book explain how to create and save text, but it also covers different ways to alter text, such as using color, changing fonts, adding headers and footers, check-ing spellcheck-ing and grammar, and printcheck-ing your written masterpiece so it looks perfect.
Part III: Playing the Numbers with Excel
If you need to manipulate numbers, you need Microsoft Excel. This part of the book explains the three basic parts of any spreadsheet, how to format data, how to create formulas, and how to create different types of charts to help you visualize what your spreadsheet numbers really mean. Not only will this part of the book give you the lowdown on spreadsheets, but it shows you how Microsoft Excel can make creating, formatting, and displaying spread-sheets simple and easy — and most importantly, useful and fun.
Part IV: Making Presentations
with PowerPoint
Throw away your overhead transparencies and clumsy whiteboard and pads of paper. If you need to give a presentation to a large group, you need to know how to create colorful and visually interesting presentations using
PowerPoint, you can create presentations that grab an audience’s attention and emphasize the points you want to make.
Part V: Getting Organized with Outlook
Almost nobody feels like they have enough time to stay organized, so this part of the book explains why and how to use Microsoft Outlook. With Outlook, you can read, sort, and write e-mail, keep track of appointments, store names and addresses of your most important contacts, and even orga-nize your daily to-do tasks. By reading about how to use Outlook in this part of the book, you can see how to turn your computer into a personal assistant to make you more productive.
Part VI: Storing Stuff in Access
If you need to store large amounts of information, such as tracking invento-ries, organizing customer orders, or tracking prospective customers, you may need to use a database program like Microsoft Access. In this part of the book, you’ll see how to use Access to store, retrieve, sort, and print your data in different ways. With Access able to slice and dice your information, you can better analyze your data to understand how your business really works.
Part VII: The Part of Tens
Almost every program offers multiple ways of accomplishing the same task, and Office 2007 is no exception. After you get familiar with using Office, take a peek in this part of the book to read about different types of shortcuts you can use to work with Office even faster than before. This part of the book also offers tips for using Office to make the programs even easier and more useful. By the time you get to this part of the book, you may not be an Office expert, but you’ll be much more comfortable using Office — and then you’ll feel comfortable exploring and experimenting with different features on your own.
How to Use This Book
Although you can just flip through this book to find the features you need, consider reading Part I of this book to discover how the new menus and tool-bar icons of Office 2007 work and how they differ from previous versions of
3
Microsoft Office. After you understand the basics to the way Office 2007 works, you’ll have a much better understanding for how each specific pro-gram works.
Conventions
To get the most from this book, you need to understand the following con-ventions:
The mouse pointerappears as an arrow and serves two purposes. First, you use the mouse pointer to select data (text, numbers, e-mail mes-sages, and so on) to change. Second, you use the mouse pointer to tell Office 2007 which commands you want to use to change the data you selected.
Clickingmeans moving the mouse pointer over something on the screen (such as a menu command or a button), pressing the left mouse button once, and then letting go. Clicking tells the computer, “See what I’m pointing at? That’s what I want to choose right now.”
Double-clickingmeans pointing at something with the mouse pointer and clicking the left mouse button rapidly twice.
Draggingmeans holding down the left mouse button while moving the mouse. Dragging typically moves something from one location to another, such as moving a word from the top of a paragraph to the bottom.
Right-clickingmeans moving the mouse pointer over something and clicking the right mouse button once. Right-clicking typically displays a shortcut menu of additional options.
In addition to understanding these terms to describe different mouse actions, you also need to understand different keystroke conventions too. When you see an instruction that reads Ctrl+P, that means to hold down the Ctrl key, press the P key, and then let go of both the Ctrl and P key at the same time.
Icons Used in This Book
Icons highlight important or useful information.
This icon emphasizes information that can be helpful, although not crucial, when using Office 2007.
Look out! This icon highlights something dangerous that you need to avoid before making a mistake that you might not be able to recover from again.
This icon highlights interesting technical information that you can safely ignore but which might answer some questions for why Office 2007 works a certain way.
Getting Started
The best way to master anything is to jump right in and start fiddling with dif-ferent commands just to see what they do and how they work. In case you’re afraid of breaking your computer or wiping out important data, play around with Office 2007 on a “dummy” document filled with useless information you can afford to lose (like your boss’s income tax returns).
Here’s your first tip. Any time you do something in Office 2007, you can undo or take back your last command by pressing Ctrl+Z. (Just hold down the Ctrl key, press the Z key, and release both keys at the same time.) There, now that you know about the powerful Undo command, you should have a surging sense of invulnerability when using Office 2007, knowing that at any time you make a mistake, you can turn back time by pressing Ctrl+Z to undo your last command.
If you get nothing else from this book, always remember that the Ctrl+Z com-mand can save you from yourself. See? Mastering Office 2007 is going to be easier than you think.
5
Part I
Getting to Know
Microsoft
In this part . . .
A
t first glance, Microsoft Office 2007 may seem a com-plicated beast that gobbles up megabytes of hard drive space and offers enough features to overwhelm even the most battle-hardened veteran of the personal com-puter wars. But after you get over your initial impression (or fear) of Office, you can understand (and even admire) the elegant madness behind its massive bulk.Despite the fact that Microsoft Office 2007 contains more commands than any sane person could ever possibly use, it can be conquered. Perhaps the most important part of this book explains the completely redesigned user interface of Microsoft Office 2007. While this user interface may look strange and confusing at first, it’s actually much easier to learn than previous incarnations of Microsoft Office. After you get familiar with this new user interface, you’ll find yourself being more productive than ever before. To guide you through the multitude of commands you may need to get your work done, Office provides several ways to get help, one of which (hopefully) will actually provide you with the answers you need.
Chapter 1
Getting to Know Microsoft
Office 2007
In This Chapter
Starting an Office 2007 program
Understanding the Office 2007 user interface
Using the Quick Access toolbar
Customizing an Office 2007 program
Exiting from Office 2007
M
icrosoft Office 2007 consists of five core programs: Word, Excel, PowerPoint, Access, and Outlook. Each of these core programs spe-cializes in manipulating different data. Word manipulates words, sentences, and paragraphs; Excel manipulates numbers; PowerPoint manipulates text and pictures to create a slide show; Access manipulates data, such as inven-tories; and Outlook manipulates personal information, such as e-mail addresses and phone numbers.Although each Office 2007 program specializes in storing and manipulating different types of data, they all work in similar ways. First, you have to enter data into an Office 2007 program by typing on the keyboard or loading data from an existing file. Second, you have to tell Office 2007 how to manipulate your data, such as underlining, enlarging, coloring, or deleting it. Third, you have to save your data as a file.
If you’re already familiar with computers and previous editions of Microsoft Office, you may want to browse through this chapter just to get acquainted with how Office 2007 rearranges common program commands. If you’ve never used a computer before or just don’t feel comfortable using Microsoft Office, read this chapter first.
Loading an Office 2007 Program
The first step to using Office 2007 is loading the program you want to use. To load any Office 2007 program, follow these steps:
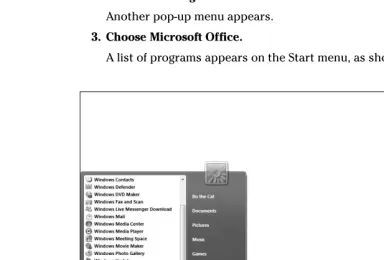
1. Click the Start button on the Windows taskbar.
A pop-up menu appears.
2. Choose All Programs.
Another pop-up menu appears.
3. Choose Microsoft Office.
A list of programs appears on the Start menu, as shown in Figure 1-1.
4. Choose the Office 2007 program you want to use, such as Microsoft Word or Microsoft PowerPoint.
Your chosen program appears on the screen.
Getting to Know the New User Interface
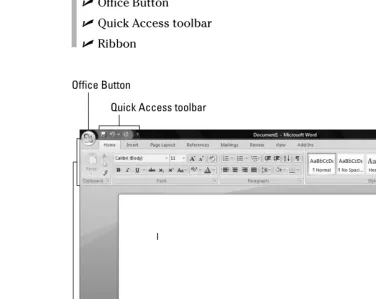
Office 2007 offers a new user interface for Word, Excel, PowerPoint, Access, and some parts of Outlook. This new user interface consists of three parts, as shown in Figure 1-2:
Office Button
Quick Access toolbar
Ribbon
Office Button
Quick Access toolbar
Ribbon Figure 1-2:
The three parts of the new Microsoft Office 2007 user interface.
11
The File menu
The File menu contains commands for opening, saving, printing, and closing a file. In Word, a file is called a document.In Excel, a file is called a workbook.
In PowerPoint, a file is called a presentation.In Access, a file is called a database.
In previous versions of Office, the File menu was clearly labeled File. In Office 2007, the File menu appears when you click the Office Button in the upper-left corner (refer to Figure 1-2).
You can display the File menu by clicking the Office Button or by pressing Alt+F.
Creating a new file
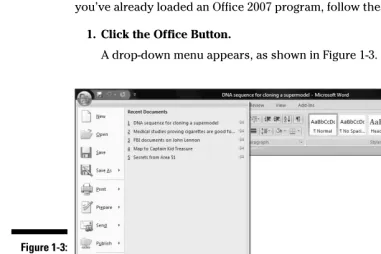
When you first load an Office 2007 program, it automatically creates an empty file for you to use right away. In case you need to create a new file after you’ve already loaded an Office 2007 program, follow these steps:
1. Click the Office Button.
A drop-down menu appears, as shown in Figure 1-3.
2. Choose New.
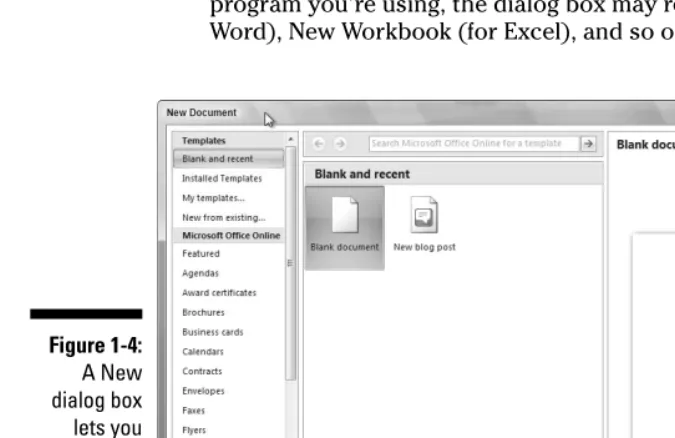
A New dialog box appears, as shown in Figure 1-4. Depending on which program you’re using, the dialog box may read New Document (for Word), New Workbook (for Excel), and so on.
3. Click Blank (such as Blank Document or Blank Workbook) and then click the Create button.
Depending on which program you’re using, you may choose Blank Document for Word or Blank Presentation for PowerPoint. A blank file appears ready for you to start storing data in it.
Creating a new file from a template
Rather than create a blank file, you may find it easier to use a template instead. A templatecontains predefined formatting for creating different types of files easily, such as calendars, newsletters, sales reports, or a corpo-rate slide show presentation. Office 2007 provides three types of templates:
Office 2007 templates installed on your computer
Templates available over the Internet on the Microsoft Web site
Existing files that you create and format yourself
Figure 1-4: A New dialog box lets you create a blank file or use an existing template.
13
Using an Office 2007 template on your computer
Installing Office 2007 automatically installs dozens of templates for Word, Excel, PowerPoint, and Access. To use one of these templates, follow these steps:
1. Click the Office Button and choose New.
A New window appears (refer to Figure 1-4).
2. Click Installed Templates.
The New window displays all the installed templates on your computer.
3. Click the template you want to use and then click the Create button.
Office 2007 creates a new file based on your chosen template.
Downloading and using a template off Microsoft’s Web site
Microsoft provides a huge library of templates that you can download from its Web site. To retrieve these templates, you need to connect to the Internet and then follow these steps:
1. Click the Office Button and then choose New.
A New window appears (refer to Figure 1-4).
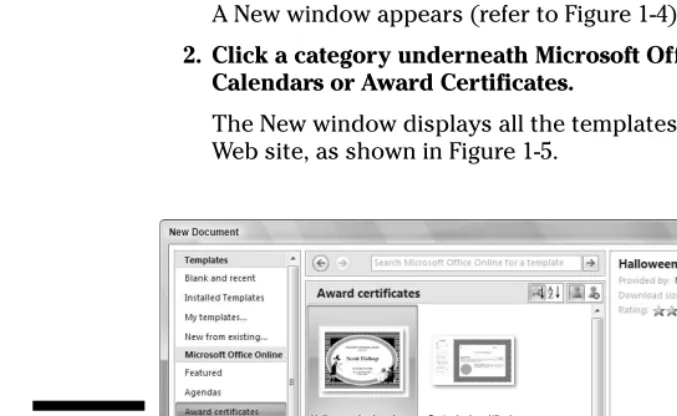
2. Click a category underneath Microsoft Office Online, such as Calendars or Award Certificates.
The New window displays all the templates available from the Microsoft Web site, as shown in Figure 1-5.
3. Click the template you want to use and then click the Download button.
Office 2007 downloads and creates a new file based on your chosen template.
Opening an existing file
When you load an Office 2007 program, you’ll probably want to edit a file that you had created and modified before. To open an existing file, you need to tell Office 2007 the location and name of the file you want to open. Just follow these steps:
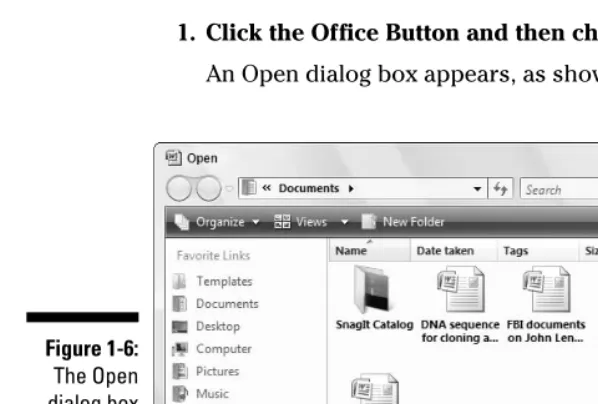
1. Click the Office Button and then choose Open.
An Open dialog box appears, as shown in Figure 1-6.
2. (Optional) To choose a different drive to look for files, click Computer under the Favorite Links panel (see the left side of Figure 1-6). Then click the drive where you want to load the file, such as the C: drive. 3. (Optional) Click a folder and then click Open to search for a file inside
a folder. Repeat this step as many times as necessary. 4. Click the file you want to open and then click Open.
Your chosen file appears ready for editing.
Figure 1-6: The Open dialog box lets you change drives and folders to find the file you want
to use.
15
When you click the Open command under Microsoft Word, Excel,
PowerPoint, and Access, an additional window appears to the right that con-tains a list of the last files you opened. If you want to load a file you’ve recently used, just click that filename to load that file.
Saving files
Saving a file stores all your data on a hard disk or other storage device (such as a Compact Flash card). The first time you save a file, you need to specify three items:
The drive and folder to store your file
The name of your file
The format to save your file
The drive and folder where you store your files is completely arbitrary. However, it’s a good idea to store similar files in a folder with a descriptive name, such as Tax Evasion Information for 2008or Extortion Letters to
Grandma.By default, Office 2007 stores all your files in the Documents folder. The name of your file is also completely arbitrary, but it’s also a good idea to give your file a descriptive name such as Latest Resume to Escape My Dead-End Jobor Global Trade Presentation for World Domination Meeting on September 9, 2008.
The format of your file defines how Office 2007 stores your data. The default file format is known as Office 2007 format,which simply means that only people with Office 2007 can reliably open and view the contents of that file. If you want to share your files with people who don’t use Office 2007, you have to save your files in a different file format.
Saving a file for Office 2007
If you’re the only person who needs to view and edit your files, you can save a file in Office 2007 format by following these steps:
1. Click the Office Button.
A drop-down menu appears.
2. Click Save.
For a quick way to choose the Office Button➪Save command, click the Save icon that appears to the right of the Office Button or press Ctrl+S.
3. (Optional) To specify a drive and folder to save your file, click Browse Folders.
This causes the dialog box to expand, as shown in the bottom dialog box in Figure 1-7. Now you can click Computer, under Favorite Links, and then click a folder. Or, click the New Folder button; when the New Folder dialog box appears, type a name for your new folder and then click OK.
4. Click in the File Name text box and type a descriptive name for your file.
5. Click Save.
After you’ve saved a file, you’ll only have to go through Steps 1 and 2 because you don’t have to specify a location and filename to save an existing file.
Figure 1-7: The Save As dialog box lets you choose the name, file format, and a location to save your file.
17
Saving a file for older versions of Microsoft Office
If you need to share files with people using older versions of Microsoft Office, you need to save your files in a different file format known as 97-2003,such as
Word 97-2003 Documentor PowerPoint 97-2003 Presentation.
This special 97-2003 file format saves Office 2007 files so that previous ver-sions of Microsoft Office 97/2000/XP/2003 can open and edit your files. When you save files in the 97-2003 format, Microsoft Office 2007 saves your files with a three-letter file extension, like .docor .xls. When you save files in the Office 2007 format, Microsoft Office 2007 saves your files with a four or five-letter file extension, such as .docxor .pptx, as shown in Table 1-1.
Table 1-1
File Extension Names Used by Different Versions
of Microsoft Office
Program Microsoft Office Microsoft Office 2007 File Extension 97-2003 File Extension
Microsoft Word .docx .doc
Microsoft Excel .xlsx .xls
Microsoft PowerPoint .pptx .ppt
Microsoft Access .accdb .mdb
To save your Office 2007 files as a 97-2003 format, follow these steps:
1. Click the Office Button and then choose Save As.
A Save As dialog box appears.
2. Click in the Save as Type list box.
A list of different formats appears, as shown in Figure 1-8.
When you choose the Save As command in Step 1, you’re making a copy of your original file.
3. Choose the 97-2003 format option, such as Word 97-2003 Format or Excel 97-2003 Format.
4. (Optional) Click in the File Name text box and type a descriptive name for your file.
5. Click Save.
Closing a file
When you’re done editing a file, you need to close it. Closing a file simply removes the file from your screen but keeps your Office 2007 program run-ning so you can edit or open another file. If you haven’t saved your file, clos-ing a file will prompt you to save your changes.
To close a file, follow these steps:
1. Click the Office Button and then choose Close.
If you haven’t saved your file, a dialog box appears asking whether you want to save your changes.
For a faster way to choose the Close command, press Ctrl+F4.
2. Click Yes to save your changes, No to discard any changes, or Cancel to keep your file open.
If you click either Yes or No, Office 2007 closes your file.
Using the Quick Access toolbar
The Quick Access toolbar appears to the right of the Office Button (refer to Figure 1-2) near the top of the screen, displaying icons that represent com-monly used commands such as Save, Undo, and Redo as shown in Figure 1-9.
Figure 1-8: The Save as Type list box lets you choose a file format for saving your file.
19
Using the Quick Access icons
If you click the Save icon in the Quick Access toolbar, Office 2007 saves your current file. If you’re saving a new file, a dialog box pops up, asking you to choose a name for your file.
If you click the Print icon in the Quick Access toolbar, Office 2007 immediately prints one copy of your entire file through the default printer. (If you want to specify a different printer to use, the number of copies to print, or specific pages to print, click the Office Button and choose Print instead.)
The Redo icon reverses the last Undo command you chose. For example, if you delete a paragraph, Office 2007 makes that paragraph disappear. Then if you immediately click the Undo icon, the paragraph magically reap-pears. If you immediately click the Redo icon, the Redo command reverses the Undo command and deletes the paragraph once more.
The Undo icon is unique in that it offers two ways to use it. First, you can click the Undo icon to undo the last action you chose. Second, you can click the downward-pointing arrow that appears to the right of the Undo icon to display a list of one or more of your previous actions, as shown in Figure 1-10.
Figure 1-10: The Undo icon displays a list of actions you can undo.
Save
Undo
Redo Customize Quick Access toolbar Figure 1-9:
The most recent action you chose appears at the top of this list, the second most recent action appears second, and so on. To undo multiple commands, follow these steps:
1. Click the downward-pointing arrow that appears to the right of the Undo icon in the Quick Access toolbar.
2. Move the mouse pointer to highlight one or more actions you want to undo.
3. Click the left mouse button.
Office 2007 undoes all the multiple actions you selected.
Adding icons
The Quick Access toolbar is designed to put your most commonly used com-mands where you can always find them. To add other icons to the Quick Access toolbar, follow these steps:
1. Click the Customize Quick Access Toolbar arrow (refer to Figure 1-9).
A pull-down menu appears.
You can add an icon to the toolbar by just clicking on an icon name, such as Quick Print or New, from the pull-down menu.
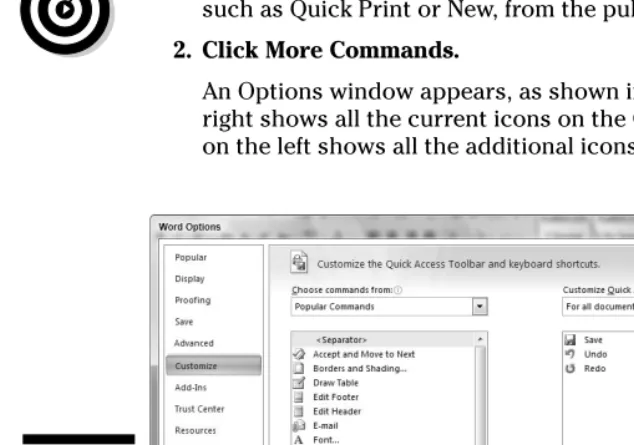
2. Click More Commands.
An Options window appears, as shown in Figure 1-11. The panel on the right shows all the current icons on the Quick Access toolbar. The panel on the left shows all the additional icons you can add.
Figure 1-11: The Options window lets you select the icons you want to add to the Quick Access toolbar.
21
3. Click in the Choose Commands From list box and choose a menu title, such as File or Page Layout.
The left panel displays a list of icons and commands.
4. Click an icon and then click the Add button.
5. (Optional) Repeat Steps 3 and 4 for each additional icon you want to add to the Quick Access toolbar.
6. Click OK.
Your chosen icon (or icons) now appears on the Quick Access toolbar.
Removing icons
You can remove icons from the Quick Access toolbar at any time. To remove an icon, follow these steps:
1. Right-click an icon on the Quick Access toolbar.
A pull-down menu appears.
2. Click Remove from Quick Access Toolbar.
Office 2007 removes your selected icon from the Quick Access toolbar.
Moving the Quick Access toolbar
The Quick Access toolbar can appear in one of two places:
Above the Ribbon (its default location)
Below the Ribbon
To move the Quick Access toolbar, follow these steps:
1. Click the Customize Quick Access Toolbar arrow.
A pull-down menu appears.
2. Choose Place Quick Access Toolbar Below (or Above) the Ribbon.
If the Quick Access toolbar currently appears over the Ribbon, you’ll see the Place Quick Access Toolbar Below the Ribbon command. If the Quick Access toolbar appears under the Ribbon, you’ll see the Place Quick Access Toolbar Above the Ribbon command.
Minimizing the Ribbon
1. Click the downward-pointing arrow that appears to the right of the Undo icon in the Quick Access toolbar.
A pull-down menu appears.
2. Click Minimize the Ribbon.
Office 2007 hides the Ribbon and only displays the tabs. To display the Ribbon again, repeat these two steps.
Using the Ribbon
The Ribbon organizes commands into categories called contextual tabs.Each tab displays a different group of commands. For example, the Page Layout tab displays only those commands related to designing a page, and the Insert tab displays only those commands related to inserting items into a file, such as a page break or a picture, as shown in Figure 1-12.
Using the Ribbon is a two-step process. First, you must click the tab that con-tains the command you want. Second, you click the actual command.
Tabs act exactly like traditional pull-down menus. Whereas a pull-down menu simply displays a list of commands, tabs display a list of icons that represent different commands.
Deciphering Ribbon icons
The main idea behind organizing commands within tabs is to avoid over-whelming you with a barrage of different commands. Although most icons include a short text description, you can get additional help deciphering dif-ferent icons through ScreenTips, which typically displays the following, as shown in Figure 1-13:
Figure 1-12: Each tab displays a different group of related commands.
23
The official name of the command (which is Format Painter in Figure 1-13)
The equivalent keystroke shortcut you can use to run the command (which is Ctrl+Shift+C in the figure)
A short explanation of what the command does
To view the ScreenTip for a command, move the mouse pointer over a com-mand and wait a few seconds for the ScreenTip appear.
Shortcut keystrokes let you choose a command from the keyboard without the hassle of clicking a tab and then clicking the command buried inside that tab. Most shortcut keystrokes consist of two or three keys, such as Ctrl+P or Ctrl+Shift+C.
Using Live Preview
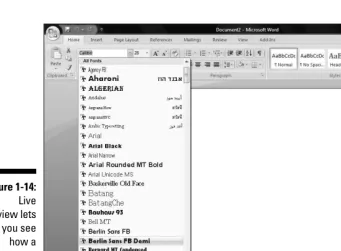
In the past, you might have known what a particular command did, but you would never know how it would affect your file until after you chose that com-mand. Oftentimes, you might choose a command, see how it changed your file, and then undo the change because it may not be what you really wanted. To avoid this hassle of constant experimentation with different commands, Office 2007 offers a feature called Live Preview.Live Preview lets you move the mouse pointer over certain icons displayed in a tab and then immediately see the changes displayed in your current file.
To use Live Preview, follow these steps:
1. Move the cursor (or click the mouse) on an object (text, picture, table, and so on) that you want to change.
2. Move the mouse pointer over any command.
Office 2007 shows you how your chosen object will look if you choose the command, as shown in Figure 1-14.
3. Click the command to change your object (or move the mouse pointer away from the command so you don’t choose that command).
In Word, Live Preview will not work if you display your document in Draft view.
Giving commands to Office 2007
To give a command to Office 2007, you need to follow these basic steps: 1. Select an item (text, picture, table, and so on) that you want to modify. 2. Click a tab that contains the command you want.
3. Click the command you want to use.
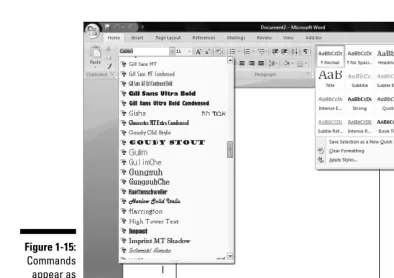
Command icons work in one of three ways, as shown in Figure 1-15:
Clickable icons:Clicking an icon immediately chooses a command to alter your data. The Bold and Italic icons are examples of icons that you click only once to choose them.
List box icons:Some icons display a downward-pointing arrow to the right. Clicking these icons displays a list of additional options. The Font and Font Size icons are examples of list box icons.
Gallery icons:Some icons display a downward-pointing arrow that dis-plays a drop-down list of additional commands, called a gallery.
Figure 1-14: Live Preview lets you see how a particular command could change your file.
25
Customizing an Office 2007 Program
If you want to modify how a particular Office 2007 program works, you can customize its features. To customize an Office 2007 program, follow these steps:
1. Load the Office 2007 program you want to customize. 2. Click the Office Button.
A pull-down menu appears.
3. Click the Options button in the bottom-right corner, such as Word Options or Excel Options.
An Options dialog box appears, as shown in Figure 1-16.
List box Gallery
4. Click a category, such as Save or Display.
The Options dialog box displays multiple options for you to customize.
5. Click OK when you’re done choosing different customizing options.
If you click the Save category in Step 4, you can define a default file format and file location for storing files for each Office 2007 program (Word, Excel, and so on).
Exiting Office 2007
No matter how much you may love using Office 2007, eventually there will come a time when you need to exit an Office 2007 program and do something else with your life. To exit from any Office 2007 program (except Outlook), choose one of the following:
Click the Close box in the upper-right corner of the Office 2007 window.
Click the Office Button and then click the Exit button (refer to Figure 1-3).
Press Alt+F4.
Figure 1-16: The Options dialog box lets you change how an Office 2007 program behaves.
27
If you try to close an Office 2007 program before saving your file, a dialog box pops up to give you a chance to save your file. If you don’t save your file before exiting, you’ll lose any changes you made to that file.
Chapter 2
Editing Data
In This Chapter
Selecting dataUsing the pop-up toolbar
Copying, cutting, and pasting
Copying and cutting with the mouse
Sharing data within Office 2007
A
lthough you create a file only once, you can edit it many times. Editingcan add, rearrange, or delete data, such as text, numbers, or pictures. All Office 2007 programs work in similar ways to edit data, so whether you use Word, Excel, PowerPoint, or Access, you’ll know the right commands to edit data no matter which program you may be using.
Whenever you edit a file, save your file periodically by clicking the Save icon in the Quick Access toolbar, pressing Ctrl+S, or clicking the Office Button and choosing Save. That way if your computer crashes or the power goes out, you won’t lose all the editing changes you made.
Adding Data by Pointing
When you enter data into a file, your data appears wherever the cursor appears on the screen. The cursor appears as a blinking vertical bar, which basically says, “Anything you type now will appear right here!”
Because the cursor won’t always magically appear exactly where you want to type data, you must move the cursor using either the mouse or the keyboard. To move the cursor using the mouse, follow these steps:
1. Move the mouse pointer where you want to move the cursor. 2. Click the left mouse button.
To move the cursor using the keyboard, you can use one of many cursor movement keys:
The (up/down/left/right) arrow keys
The Home/End keys
The Page Up/Page Down keys
Use the up/down/right/left arrow keys when you want to move the cursor a small distance, such as up one line or right to the next cell in an Excel spreadsheet.
To move the cursor faster, hold down the Ctrl key and then press the arrow keys. If you hold down the Ctrl key, the up-arrow key moves the cursor up one paragraph, the down-arrow key moves the cursor down one paragraph, the left-arrow key moves the cursor left one word, and the right-arrow key moves the cursor right one word.
Pressing the Home key moves the cursor to the beginning of a sentence (or a row in a spreadsheet), and pressing the End key moves the cursor to the end of a sentence (or a row in a spreadsheet).
Pressing the Page Up/Page Down keys moves the cursor up or down one screen at a time.
Using any of the cursor movement keys moves the cursor to a new location. Wherever the cursor appears will be where you can enter new data. Table 2-1 lists ways to move the cursor in each Office 2007 program.
Table 2-1
Moving the Cursor in Office 2007 Programs
Keystroke Word Excel PowerPoint Access
Home Beginning Column A of the cur- Displays first slide; First field of of the line rent row that cursor beginning of the the current
appears in; (Ctrl+ line (when text record Home appears in; box is selected)
moves to cell A1)
End End of NA; (Ctrl+End Displays last slide; Add New the line moves to last cell) end of the line Field of
(when text box is current selected) record
Page Up Half a Up 27 rows Displays Up 25 page up previous slide records
Page Half a page Down 27 rows Displays next slide Down 25
Keystroke Word Excel PowerPoint Access
Up/Down Up/down Up/down one row Next/previous Up/down arrow one line slide; up/down one one record
line (when text box is selected)
Left/Right Left/right one Left/right one Next/previous Left/right arrow character column slide; left/right one field
one character (when text box is selected)
Selecting Data
To modify data, you must tell Office 2007 what you want to change by select-ing it. Then choose a command that changes your data, such as underlinselect-ing text or deleting a picture.
To select anything in Office 2007, you can use either the mouse or the key-board. Generally, the mouse is faster but takes some time getting used to coordinating the motion of the mouse with the movement of the mouse pointer on the screen. The keyboard is slower but much simpler to use.
Selecting data with the mouse
The mouse provides two ways to select data. The first way involves pointing and dragging the mouse, as shown in Figure 2-1.
1. Point the mouse pointer at the beginning or end of the data you want to select.
2. Hold down the left mouse button and drag (move) the mouse pointer over the data to select it.
When you drag the mouse, hold down the left mouse button. If you don’t hold down the left mouse button as you move the mouse, you won’t select any data when you move the mouse pointer across the screen.
You can also select data by clicking the mouse. To select a picture, such as a chart in Microsoft Excel or a photograph added to a Microsoft Word docu-ment, just click the picture to select it. Office 2007 displays rectangles, called
handles,around the border of any selected picture, as shown in Figure 2-2.
31
Handles Figure 2-2:
To select text with the mouse, you can click the mouse in one of three ways, as shown in Figure 2-3:
Single-click:Moves the cursor
Double-click:Selects the word that you click
Triple-click:Selects the entire paragraph that contains the word you click
Office 2007 defines a paragraphas any chunk of text that begins on a sep-arate line and ends with a Return character (¶), created by pressing the Enter key.
Selecting data with the keyboard
To select data with the keyboard, you need to use the following keys:
The cursor movement keys (up/down/left/right arrow keys, Home/End keys, or Page Up/Page Down keys)
The Shift key
Figure 2-3: To select text, you can either double- or triple-click it.
33
The cursor movement keys simply move the cursor. The Shift key acts like the left mouse button and tells Office 2007 what to select. To select data, you have to follow these steps:
1. Move the cursor to the beginning or end of the data you want to select. 2. Hold down the Shift key. (Keep it pressed down.)
3. Move the cursor using any of the cursor movement keys, such as the up-arrow key or the End key.
4. Release the Shift key.
You may find it easier to place the cursor with the mouse and then hold down the Shift key while pressing a cursor movement key to select data more pre-cisely than you can by dragging the mouse.
To select all the data in a file, press Ctrl+A.
Selecting multiple chunks of data
with the mouse and keyboard
For greater flexibility in selecting data, you can use both the mouse and the keyboard to select multiple chunks of data at the same time. To select two or more chunks of data, follow these steps:
1. Select a picture or chunk of text using either the keyboard or the mouse. 2. Hold down the Ctrl key.
3. Select another picture or chunk of test using either the keyboard or the mouse.
4. Repeat Step 3 for each additional item you want to select. 5. Release the Ctrl key when you’re done selecting data.
Editing Data with the Pop-up Toolbar
To use this pop-up toolbar, follow these steps:
1. Select data using the mouse.
Selecting data with the keyboard will notdisplay the pop-up toolbar.
2. Move the mouse pointer to the area to the upper right of the selected data.
The pop-up toolbar appears.
The closer you move the mouse to the toolbar, the more visible the tool-bar will appear.
3. Click a command (icon) on the pop-up toolbar.
Deleting Data
The simplest way to edit a file is to delete your existing data. If you just need to delete a single character, you can use one of two keys:
Backspace:Deletes the character immediately to the left of the cursor
Delete:Deletes the character immediately to the right of the cursor
If you need to delete large chunks of text, follow these steps:
1. Select the data you want to delete using either the keyboard or the mouse. (See the earlier section, “Selecting Data.”)
2. Press the Delete key.
Office 2007 wipes away your data.
Figure 2-4: Whenever you select data, Office 2007 displays a pop-up toolbar in the upper-right area.
35
Cutting and Pasting (Moving) Data
Moving data in Office 2007 requires a two-step process: cut and paste. When you cutdata, you delete it but save a copy in a special area of the computer’s memory known as theClipboard.When you pastedata to a new location, you copy the data off the Clipboard and paste it in your file, as shown in Figure 2-5.
To move data, follow these steps:
1. Select the data you want to move, using the keyboard or mouse as explained in the earlier section, “Selecting Data.”
2. Choose one of the following:
• Click the Cut icon (from the Home tab).
• Right-click the mouse; when the pop-up menu appears, choose Cut. • Press Ctrl+X.
3. Move the cursor to a new location. 4. Choose one of the following:
• Click the Paste icon (from the Home tab).
• Right-click the mouse; when the pop-up menu appears, choose Paste. • Press Ctrl+V.
If you select data in Step 3, you can replace the selected data with the pasted data you selected in Steps 1 and 2.
Copying and Pasting Data
Unlike the Cut command, the Copy command leaves your selected data in its original location but places a second copy of that data somewhere else. To copy and paste data, follow these steps:
1. Select the data you want to copy, using the keyboard or mouse, as explained in the earlier section, “Selecting Data.”
2. Choose one of the following:
• Click the Copy icon.
• Right-click the mouse; when the pop-up menu appears, choose Copy. • Press Ctrl+C.
3. Move the cursor to a new location. 4. Choose one of the following:
• Click the Paste icon.
• Right-click the mouse; when the pop-up menu appears, choose Paste. • Press Ctrl+V.
Dragging with the Mouse
to Cut, Copy, and Paste
The mouse can also cut/copy and paste data. To move data with the mouse, follow these steps:
1. Select the data you want to move using the methods described in the earlier section, “Selecting Data.”
2. Move the mouse pointer over the highlighted data.
3. Hold down the left mouse button and drag (move) the mouse.
The mouse pointer displays an arrow and a box while the cursor turns into a dotted vertical line.
Alternatively, to copy data, hold down the Ctrl key while holding down the left mouse button and dragging (moving) the mouse. The mouse pointer displays an arrow and a box with a plus sign while the cursor turns into a dotted vertical line.
37
4. Move the dotted vertical line cursor where you want to place the data you selected in Step 1.
5. Release the left mouse button.
Your data appears in its new location.
Undo and Redo
To protect you from mistakes, Office 2007 offers a special Undo command, which essentially tells the computer, “Remember that last command I just gave? Pretend I never chose it.”
You can use the Undo command any time you edit data and want to reverse your changes. The two ways to choose the Undo command are
Click the Undo icon on the Quick Access toolbar (see Figure 2-6).
Press Ctrl+Z.
Sometimes you may make many changes to your file and suddenly realize that the last five or ten changes you made messed up your data by mistake. To undo multiple commands, follow these steps:
1. Click the downward-pointing arrow that appears to the right of the Undo icon.
A list of your previously chosen commands appears.
2. Move the mouse pointer to highlight all the commands that you want to undo, as shown in Figure 2-7.
3. Click the left mouse button.
Office 2007 undoes your chosen commands.
Undo Redo Figure 2-6:
Until you choose the Undo command at least once, the Redo icon appears dimmed. The Redo command lets you reapply the last command you chose to undo. The two ways to choose the Redo command are
Click the Redo icon (refer to Figure 2-6).
Press Ctrl+Y.
Each time you choose the Redo command, you reverse the effect of the last Undo command. For example, if you use the Undo command four times, you can choose the Redo command only up to four times.
Sharing Data with Other
Office 2007 Programs
Cutting, copying, and pasting data may be handy within the same file, but Office 2007 also gives you the ability to cut, copy, and paste data between dif-ferent programs, such as copying a chart from Excel and pasting it into a PowerPoint presentation.
Figure 2-7: The downward-pointing arrow to the right of the Undo icon lets you view a list of your last commands.
39
Using the Office Clipboard
When you cut or copy any data, Windows stores it in a special part of memory called the Clipboard.This Windows Clipboard can only hold one item at a time, so Office 2007 comes with its own