Americas Headquarters
Cisco Systems, Inc. 170 West Tasman Drive San Jose, CA 95134-1706 USA
http://www.cisco.com Tel: 408 526-4000
800 553-NETS (6387) Fax: 408 527-0883
THE SPECIFICATIONS AND INFORMATION REGARDING THE PRODUCTS IN THIS MANUAL ARE SUBJECT TO CHANGE WITHOUT NOTICE. ALL STATEMENTS, INFORMATION, AND RECOMMENDATIONS IN THIS MANUAL ARE BELIEVED TO BE ACCURATE BUT ARE PRESENTED WITHOUT WARRANTY OF ANY KIND, EXPRESS OR IMPLIED. USERS MUST TAKE FULL RESPONSIBILITY FOR THEIR APPLICATION OF ANY PRODUCTS. THE SOFTWARE LICENSE AND LIMITED WARRANTY FOR THE ACCOMPANYING PRODUCT ARE SET FORTH IN THE INFORMATION PACKET THAT SHIPPED WITH THE PRODUCT AND ARE INCORPORATED HEREIN BY THIS REFERENCE. IF YOU ARE UNABLE TO LOCATE THE SOFTWARE LICENSE OR LIMITED WARRANTY, CONTACT YOUR CISCO REPRESENTATIVE FOR A COPY.
The Cisco implementation of TCP header compression is an adaptation of a program developed by the University of California, Berkeley (UCB) as part of UCB’s public domain version of the UNIX operating system. All rights reserved. Copyright © 1981, Regents of the University of California.
NOTWITHSTANDING ANY OTHER WARRANTY HEREIN, ALL DOCUMENT FILES AND SOFTWARE OF THESE SUPPLIERS ARE PROVIDED “AS IS” WITH ALL FAULTS. CISCO AND THE ABOVE-NAMED SUPPLIERS DISCLAIM ALL WARRANTIES, EXPRESSED OR IMPLIED, INCLUDING, WITHOUT
LIMITATION, THOSE OF MERCHANTABILITY, FITNESS FOR A PARTICULAR PURPOSE AND NONINFRINGEMENT OR ARISING FROM A COURSE OF DEALING, USAGE, OR TRADE PRACTICE.
IN NO EVENT SHALL CISCO OR ITS SUPPLIERS BE LIABLE FOR ANY INDIRECT, SPECIAL, CONSEQUENTIAL, OR INCIDENTAL DAMAGES, INCLUDING, WITHOUT LIMITATION, LOST PROFITS OR LOSS OR DAMAGE TO DATA ARISING OUT OF THE USE OR INABILITY TO USE THIS MANUAL, EVEN IF CISCO OR ITS SUPPLIERS HAVE BEEN ADVISED OF THE POSSIBILITY OF SUCH DAMAGES.
Catalyst 6500 Series and Cisco 7600 Series Switch Firewall Services Module Command Reference, 3.2 Copyright © 2006 Cisco Systems, Inc. All rights reserved.
CCVP, the Cisco Logo, and the Cisco Square Bridge logo are trademarks of Cisco Systems, Inc.; Changing the Way We Work, Live, Play, and Learn is a service mark of Cisco Systems, Inc.; and Access Registrar, Aironet, BPX, Catalyst, CCDA, CCDP, CCIE, CCIP, CCNA, CCNP, CCSP, Cisco, the Cisco Certified Internetwork Expert logo, Cisco IOS, Cisco Press, Cisco Systems, Cisco Systems Capital, the Cisco Systems logo, Cisco Unity, Enterprise/Solver, EtherChannel, EtherFast, EtherSwitch, Fast Step, Follow Me Browsing, FormShare, GigaDrive, GigaStack, HomeLink, Internet Quotient, IOS, IP/TV, iQ Expertise, the iQ logo, iQ Net Readiness Scorecard, iQuick Study, LightStream, Linksys, MeetingPlace, MGX, Networking Academy, Network Registrar, Packet, PIX, ProConnect, RateMUX, ScriptShare, SlideCast, SMARTnet, StackWise, The Fastest Way to Increase Your Internet Quotient, and TransPath are registered trademarks of Cisco Systems, Inc. and/or its affiliates in the United States and certain other countries.
About This Guide
This preface describes who should read the Catalyst 6500 Series Switch and Cisco 7600 Series Router Firewall Services Module Command Reference, how it is organized, and its document conventions. This preface includes the following sections:
• Document Objectives, page xxxiii
• Audience, page xxxiii
• Document Organization, page xxxiv
• Document Conventions, page xxxv
• Related Documentation, page xxxvi
• Obtaining Documentation, page xxxvi
• Documentation Feedback, page xxxvii
• Cisco Product Security Overview, page xxxvii
• Obtaining Technical Assistance, page xxxix
• Obtaining Additional Publications and Information, page xl
Document Objectives
This guide contains the commands available for use with the FWSM to protect your network from unauthorized use.
You can also configure and monitor the FWSM by using ASDM, a web-based GUI application. ASDM includes configuration wizards to guide you through some common configuration scenarios, and online Help for less common scenarios. For more information, see:
http://www.cisco.com/univercd/cc/td/doc/product/netsec/secmgmt/asdm/index.htm.
Audience
About This Guide Document Organization
Document Organization
This guide includes the following chapters:
• Chapter 1, “Using the Command-Line Interface,” introduces you to the FWSM commands and access modes.
• Chapter 2, “aaa accounting command through accounting-server-group Commands,” provides detailed descriptions of the aaa accounting through accounting-server-group commands.
• Chapter 3, “activation-key through auto-update timeout Commands,” provides detailed descriptions of the activation-key through auto-update timeout commands.
• Chapter 4, “backup-servers through bridge-group Commands,” provides detailed descriptions of the backup-servers through bridge-group commands.
• Chapter 5, “cache-time through clear capture Commands,” provides detailed descriptions of the cache-time through clear capture commands
• Chapter 6, “clear configure through clear configure xlate-bypass Commands,” provides detailed descriptons of the clear configure through clear configure virtual commands.
• Chapter 7, “clear console-output through clear xlate Commands,” provides detailed descriptons of the clear console-output through clear xlate commands.
• Chapter 8, “client-access-rule through crl-configure Commands,” provides detailed descriptons of the client-access-rule through crl-configure commands.
• Chapter 9, “crypto ca authenticate through crypto map set trustpoint Commands,” provides detailed descriptons of the crypto ca authenticate through crypto map set trustpoint commands.
• Chapter 10, “debug aaa through debug sip Commands,” provides detailed descriptons of the debug aaa through debug sip commands.
• Chapter 11, “default through drop Commands,” provides detailed descriptons of the default through drop commands.
• Chapter 12, “email through ftp-map Commands,” provides detailed descriptons of the email through ftp-map commands.
• Chapter 13, “gateway through hw-module module reset Commands,” provides detailed descriptons of the gateway through http-map commands.
• Chapter 14, “icmp through ignore lsa mospf Commands,” provides detailed descriptons of the icmp through ignore lsamospf commands.
• Chapter 15, “inspect ctiqbe through inspect xdmcp Commands,” provides detailed descriptons of the inspect ctiqbe through inspect xdmcp commands.
• Chapter 16, “interface through issuer-name Commands,” provides detailed descriptons of the interface through issuer-name commands.
• Chapter 17, “join-failover-group through kill Commands,”provides detailed descriptons of the join-failover-group through kill commands.
• Chapter 18, “ldap-base-dn through log-adj-changes Commands,” provides detailed descriptons of the ldap-base-dn through log-adj-changes commands.
• Chapter 19, “logging asdm through logout Commands,” provides detailed descriptons of the inspect ctiqbe through inspect xdmcp commands.
About This Guide
Document Conventions
• Chapter 21, “name through ospf transmit-delay Commands,” provides detailed descriptons of the name through ospf transmit-delaycommands.
• Chapter 22, “pager through pwd Commands,” provides detailed descriptons of the passwd through
pwd commands.
• Chapter 23, “quit through router-id Commands,” provides detailed descriptons of the queue-limit through router-id commands.
• Chapter 24, “same-security-traffic through show asdmsessions Commands,” provides detailed descriptons of the same-security-traffic through show asdm sessions commands.
• Chapter 25, “show asp drop through show curpriv Commands,” provides detailed descriptons of the show asp drop through show curpriv commands.
• Chapter 26, “show debug through show ipv6 traffic Commands,” provides detailed descriptons of the show debug through show ipv6 traffic commands.
• Chapter 27, “show isakmp sa through show route Commands,” provides detailed descriptons of the show isakmp sa through show route commands.
• Chapter 28, “show running-config through show running-config isakmp Commands,” provides detailed descriptons of the show running-config through show running-config isakmp commands.
• Chapter 29, “show running-config logging through show running-config xlate-bypass Commands,”
provides detailed descriptons of the show running-config logging through show running-config vpn-sessionb commands.
• Chapter 30, “show service-policy through show xlate Commands,” provides detailed descriptons of the show service-policy through show xlate commands.
• Chapter 31, “shun through sysopt uauth allow-http-cache Commands,” provides detailed descriptons of the shun through sysopt unauth allow-http-cache commands.
• Chapter 32, “tcp-map through tunnel-limit Commands,” provides detailed descriptons of the tcp-map through tunnel-limit commands.
• Chapter 33, “upgrade-mp through xlate-bypass Commands,” provides detailed descriptons of the upgrade-mp through write terminal commands.
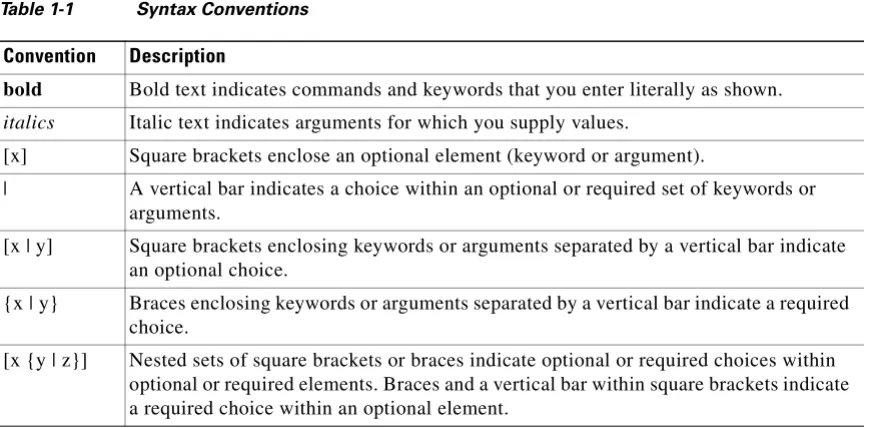
Document Conventions
The FWSM command syntax descriptions use the following conventions:
Command descriptions use these conventions:
• Braces ({ }) indicate a required choice.
• Square brackets ([ ]) indicate optional elements.
• Vertical bars ( | ) separate alternative, mutually exclusive elements.
• Boldface indicates commands and keywords that are entered literally as shown.
• Italics indicate arguments for which you supply values.
Examples use these conventions:
• Examples depict screen displays and the command line in screen font.
About This Guide Related Documentation
• Examples might include output from different platforms; for example, you might not recognize an interface type in an example because it is not available on your platform. Differences should be minor.
Note Means reader take note. Notes contain helpful suggestions or references to material not covered in the manual.
For information on modes, prompts, and syntax, see Chapter 1, “Using the Command-Line Interface.”
Related Documentation
For more information, refer to the following documentation:
• Catalyst 6500 Series Switch and Cisco 7600 Series Router Firewall Services Module Configuration Guide
• Catalyst 6500 Series Switch and Cisco 7600 Series Router Firewall Services Module Logging Configuration and System Log Messages
• Upgrading the Catalyst 6500 Series Switch and Cisco 7600 Series Router Firewall Services Module to Release 3.1
• Catalyst 6500 Series Switch and Cisco 7600 Series Router Firewall Services Module Release Notes
• Cisco ASDM Release Notes
Obtaining Documentation
Cisco documentation and additional literature are available on Cisco.com. This section explains the product documentation resources that Cisco offers.
Cisco.com
You can access the most current Cisco documentation at this URL:
http://www.cisco.com/techsupport
You can access the Cisco website at this URL:
http://www.cisco.com
You can access international Cisco websites at this URL:
About This Guide
Documentation Feedback
Product Documentation DVD
The Product Documentation DVD is a library of technical product documentation on a portable medium. The DVD enables you to access installation, configuration, and command guides for Cisco hardware and software products. With the DVD, you have access to the HTML documentation and some of the PDF files found on the Cisco website at this URL:
http://www.cisco.com/univercd/home/home.htm
The Product Documentation DVD is created and released regularly. DVDs are available singly or by subscription. Registered Cisco.com users can order a Product Documentation DVD (product number DOC-DOCDVD= or DOC-DOCDVD=SUB) from Cisco Marketplace at the Product Documentation Store at this URL:
http://www.cisco.com/go/marketplace/docstore
Ordering Documentation
You must be a registered Cisco.com user to access Cisco Marketplace. Registered users may order Cisco documentation at the Product Documentation Store at this URL:
http://www.cisco.com/go/marketplace/docstore
If you do not have a user ID or password, you can register at this URL:
http://tools.cisco.com/RPF/register/register.do
Documentation Feedback
You can provide feedback about Cisco technical documentation on the Cisco Support site area by entering your comments in the feedback form available in every online document.
Cisco Product Security Overview
Cisco provides a free online Security Vulnerability Policy portal at this URL:
http://www.cisco.com/en/US/products/products_security_vulnerability_policy.html
From this site, you will find information about how to do the following:
• Report security vulnerabilities in Cisco products
• Obtain assistance with security incidents that involve Cisco products
• Register to receive security information from Cisco
A current list of security advisories, security notices, and security responses for Cisco products is available at this URL:
http://www.cisco.com/go/psirt
To see security advisories, security notices, and security responses as they are updated in real time, you can subscribe to the Product Security Incident Response Team Really Simple Syndication (PSIRT RSS) feed. Information about how to subscribe to the PSIRT RSS feed is found at this URL:
About This Guide Product Alerts and Field Notices
Reporting Security Problems in Cisco Products
Cisco is committed to delivering secure products. We test our products internally before we release them, and we strive to correct all vulnerabilities quickly. If you think that you have identified a vulnerability in a Cisco product, contact PSIRT:
• For emergencies only —[email protected]
An emergency is either a condition in which a system is under active attack or a condition for which a severe and urgent security vulnerability should be reported. All other conditions are considered nonemergencies.
• For nonemergencies —[email protected]
In an emergency, you can also reach PSIRT by telephone:
• 1 877 228-7302
• 1 408 525-6532
Tip We encourage you to use Pretty Good Privacy (PGP) or a compatible product (for example, GnuPG) to
encrypt any sensitive information that you send to Cisco. PSIRT can work with information that has been encrypted with PGP versions 2.x through 9.x.
Never use a revoked encryption key or an expired encryption key. The correct public key to use in your correspondence with PSIRT is the one linked in the Contact Summary section of the Security
Vulnerability Policy page at this URL:
http://www.cisco.com/en/US/products/products_security_vulnerability_policy.html
The link on this page has the current PGP key ID in use.
If you do not have or use PGP, contact PSIRT to find other means of encrypting the data before sending any sensitive material.
Product Alerts and Field Notices
Modifications to or updates about Cisco products are announced in Cisco Product Alerts and Cisco Field Notices. You can receive these announcements by using the Product Alert Tool on Cisco.com. This tool enables you to create a profile and choose those products for which you want to receive information.
To access the Product Alert Tool, you must be a registered Cisco.com user. Registered users can access the tool at this URL:
http://tools.cisco.com/Support/PAT/do/ViewMyProfiles.do?local=en
To register as a Cisco.com user, go to this URL:
About This Guide
Obtaining Technical Assistance
Obtaining Technical Assistance
Cisco Technical Support provides 24-hour-a-day award-winning technical assistance. The
Cisco Support website on Cisco.com features extensive online support resources. In addition, if you have a valid Cisco service contract, Cisco Technical Assistance Center (TAC) engineers provide telephone support. If you do not have a valid Cisco service contract, contact your reseller.
Cisco Support Website
The Cisco Support website provides online documents and tools for troubleshooting and resolving technical issues with Cisco products and technologies. The website is available 24 hours a day at this URL:
http://www.cisco.com/en/US/support/index.html
Access to all tools on the Cisco Support website requires a Cisco.com user ID and password. If you have a valid service contract but do not have a user ID or password, you can register at this URL:
http://tools.cisco.com/RPF/register/register.do
Note Before you submit a request for service online or by phone, use the Cisco Product Identification Tool to locate your product serial number. You can access this tool from the Cisco Support website
by clicking the Get Tools & Resources link, clicking the All Tools (A-Z) tab, and then choosing Cisco Product Identification Tool from the alphabetical list. This tool offers three search options: by product ID or model name; by tree view; or, for certain products, by copying and pasting show command output. Search results show an illustration of your product with the serial number label location highlighted. Locate the serial number label on your product and record the information before placing a service call.
Tip Displaying and Searching on Cisco.com
If you suspect that the browser is not refreshing a web page, force the browser to update the web page by holding down the Ctrl key while pressing F5.
To find technical information, narrow your search to look in technical documentation, not the entire Cisco.com website. After using the Search box on the Cisco.com home page, click the Advanced Search link next to the Search box on the resulting page and then click the Technical Support & Documentation radio button.
About This Guide Obtaining Additional Publications and Information
Submitting a Service Request
Using the online TAC Service Request Tool is the fastest way to open S3 and S4 service requests. (S3 and S4 service requests are those in which your network is minimally impaired or for which you require product information.) After you describe your situation, the TAC Service Request Tool provides recommended solutions. If your issue is not resolved using the recommended resources, your service request is assigned to a Cisco engineer. The TAC Service Request Tool is located at this URL:
http://www.cisco.com/techsupport/servicerequest
For S1 or S2 service requests, or if you do not have Internet access, contact the Cisco TAC by telephone. (S1 or S2 service requests are those in which your production network is down or severely degraded.) Cisco engineers are assigned immediately to S1 and S2 service requests to help keep your business operations running smoothly.
To open a service request by telephone, use one of the following numbers:
Asia-Pacific: +61 2 8446 7411 Australia: 1 800 805 227 EMEA: +32 2 704 55 55 USA: 1 800 553 2447
For a complete list of Cisco TAC contacts, go to this URL:
http://www.cisco.com/techsupport/contacts
Definitions of Service Request Severity
To ensure that all service requests are reported in a standard format, Cisco has established severity definitions.
Severity 1 (S1)—An existing network is “down” or there is a critical impact to your business operations. You and Cisco will commit all necessary resources around the clock to resolve the situation.
Severity 2 (S2)—Operation of an existing network is severely degraded, or significant aspects of your business operations are negatively affected by inadequate performance of Cisco products. You and Cisco will commit full-time resources during normal business hours to resolve the situation.
Severity 3 (S3)—Operational performance of the network is impaired while most business operations remain functional. You and Cisco will commit resources during normal business hours to restore service to satisfactory levels.
Severity 4 (S4)—You require information or assistance with Cisco product capabilities, installation, or configuration. There is little or no effect on your business operations.
Obtaining Additional Publications and Information
Information about Cisco products, technologies, and network solutions is available from various online and printed sources.
• The Cisco Online Subscription Center is the website where you can sign up for a variety of Cisco e-mail newsletters and other communications. Create a profile and then select the subscriptions that you would like to receive. To visit the Cisco Online Subscription Center, go to this URL:
About This Guide
Obtaining Additional Publications and Information
• The Cisco Product Quick Reference Guide is a handy, compact reference tool that includes brief product overviews, key features, sample part numbers, and abbreviated technical specifications for many Cisco products that are sold through channel partners. It is updated twice a year and includes the latest Cisco channel product offerings. To order and find out more about the Cisco Product Quick Reference Guide, go to this URL:
http://www.cisco.com/go/guide
• Cisco Marketplace provides a variety of Cisco books, reference guides, documentation, and logo merchandise. Visit Cisco Marketplace, the company store, at this URL:
http://www.cisco.com/go/marketplace/
• Cisco Press publishes a wide range of general networking, training, and certification titles. Both new and experienced users will benefit from these publications. For current Cisco Press titles and other information, go to Cisco Press at this URL:
http://www.ciscopress.com
• Internet Protocol Journal is a quarterly journal published by Cisco for engineering professionals involved in designing, developing, and operating public and private internets and intranets. You can access the Internet Protocol Journal at this URL:
http://www.cisco.com/ipj
• Networking products offered by Cisco, as well as customer support services, can be obtained at this URL:
http://www.cisco.com/en/US/products/index.html
• Networking Professionals Connection is an interactive website where networking professionals share questions, suggestions, and information about networking products and technologies with Cisco experts and other networking professionals. Join a discussion at this URL:
http://www.cisco.com/discuss/networking
• “What’s New in Cisco Documentation” is an online publication that provides information about the latest documentation releases for Cisco products. Updated monthly, this online publication is organized by product category to direct you quickly to the documentation for your products. You can view the latest release of “What’s New in Cisco Documentation” at this URL:
http://www.cisco.com/univercd/cc/td/doc/abtunicd/136957.htm
• World-class networking training is available from Cisco. You can view current offerings at this URL:
C H A P T E R
1
Using the Command-Line Interface
This describes how to use the CLI on the FWSM, and includes the following topics:
• Firewall Mode and Security Context Mode, page 1-1
• Command Modes and Prompts, page 1-2
• Syntax Formatting, page 1-3
• Abbreviating Commands, page 1-3
• Command-Line Editing, page 1-3
• Command Completion, page 1-3
• Command Help, page 1-4
• Filtering show Command Output, page 1-4
• Command Output Paging, page 1-5
• Adding Comments, page 1-5
• Text Configuration Files, page 1-6
Note The CLI uses similar syntax and other conventions to the Cisco IOS CLI, but the FWSM operating system is not a version of Cisco IOS software. Do not assume that a Cisco IOS CLI command works with or has the same function on the FWSM.
Firewall Mode and Security Context Mode
The FWSM runs in a combination of the following modes:
• Transparent firewall or routed firewall mode
The firewall mode determines if the security appliance runs as a Layer 2 or Layer 3 firewall.
• Multiple context or single context mode
The security context mode determines if the FWSM runs as a single device or as multiple security contexts, which act like virtual devices.
Chapter 1 Using the Command-Line Interface Command Modes and Prompts
Command Modes and Prompts
The FWSM CLI includes command modes. Some commands can only be entered in certain modes. For example, to enter commands that show sensitive information, you need to enter a password and enter a more privileged mode. Then, to ensure that configuration changes are not entered accidentally, you have to enter a configuration mode. All lower commands can be entered in higher modes, for example, you can enter a privileged EXEC command in global configuration mode.
When you are in the system configuration or in single context mode, the prompt begins with the hostname:
hostname
When you are within a context, the prompt begins with the hostname followed by the context name:
hostname/context
The prompt changes depending on the access mode:
• User EXEC mode
User EXEC mode lets you see minimum FWSM settings. The user EXEC mode prompt appears as follows when you first access the FWSM:
hostname>
hostname/context>
• Privileged EXEC mode
Privileged EXEC mode lets you see all current settings up to your privilege level. Any user EXEC
mode command will work in privileged EXEC mode. Enter the enable command in user EXEC
mode, which requires a password, to start privileged EXEC mode. The prompt includes the number sign (#):
hostname#
hostname/context#
• Global configuration mode
Global configuration mode lets you change the FWSM configuration. All user EXEC, privileged EXEC, and global configuration commands are available in this mode. Enter the configure terminal command in privileged EXEC mode to start global configuration mode. The prompt changes to the following:
hostname(config)#
hostname/context(config)#
• Command-specific configuration modes
From global configuration mode, some commands enter a command-specific configuration mode. All user EXEC, privileged EXEC, global configuration, and command-specific configuration commands are available in this mode. For example, the interface command enters interface configuration mode. The prompt changes to the following:
hostname(config-if)#
Chapter 1 Using the Command-Line Interface
Syntax Formatting
Syntax Formatting
Command syntax descriptions use the following conventions:
Abbreviating Commands
You can abbreviate most commands down to the fewest unique characters for a command; for example, you can enter wr t to view the configuration instead of entering the full command write terminal, or
you can enter en to start privileged mode and conf t to start configuration mode. In addition, you can
enter 0 to represent 0.0.0.0.
Command-Line Editing
The FWSM uses the same command-line editing conventions as Cisco IOS software. You can view all previously entered commands with the show history command or individually with the up arrow or ^p command. Once you have examined a previously entered command, you can move forward in the list with the down arrow or ^n command. When you reach a command you wish to reuse, you can edit it or press the Enter key to start it. You can also delete the word to the left of the cursor with ^w, or erase the line with ^u.
The FWSM permits up to 512 characters in a command; additional characters are ignored.
Command Completion
To complete a command or keyword after entering a partial string, press the Tab key. The FWSM only completes the command or keyword if the partial string matches only one command or keyword. For example, if you enter s and press the Tab key, the FWSM does not complete the command because it matches more than one command. However, if you enter dis, the Tab key completes the command Table 1-1 Syntax Conventions
Convention Description
bold Bold text indicates commands and keywords that you enter literally as shown.
italics Italic text indicates arguments for which you supply values.
[x] Square brackets enclose an optional element (keyword or argument).
| A vertical bar indicates a choice within an optional or required set of keywords or
arguments.
[x | y] Square brackets enclosing keywords or arguments separated by a vertical bar indicate an optional choice.
{x | y} Braces enclosing keywords or arguments separated by a vertical bar indicate a required choice.
Chapter 1 Using the Command-Line Interface Command Help
Command Help
Help information is available from the command line by entering the following commands:
• help command_name
Shows help for the specific command.
• help?
Shows commands for which there is help.
• command_name?
Shows a list of arguments available.
• string? (no space)
Lists the possible commands that start with the string.
• ? and +?
Lists all commands available. If you enter ?, the FWSM shows only commands available for the current mode. To show all commands available, including those for lower modes, enter +?.
Note If you want to include a question mark (?) in a command string, you must press Ctrl-V before typing the question mark so you do not inadvertently invoke CLI help.
Filtering show Command Output
You can use the vertical bar (|) with any show command and include a filter option and filtering expression. The filtering is performed by matching each output line with a regular expression, similar to Cisco IOS software. By selecting different filter options you can include or exclude all output that matches the expression. You can also display all output beginning with the line that matches the expression.
The syntax for using filtering options with the show command is as follows:
hostname# show command | {include | exclude | begin | grep [-v]} regexp
In this command string, the first vertical bar (|) is the operator and must be included in the command. This operator directs the output of the show command to the filter. In the syntax diagram, the other vertical bars (|) indicate alternative options and are not part of the command.
The include option includes all output lines that match the regular expression. The grep option without -v has the same effect. The exclude option excludes all output lines that match the regular expression. The grep option with -v has the same effect. The begin option shows all the output lines starting with the line that matches the regular expression.
Replace regexp with any Cisco IOS regular expression. See The regular expression is not enclosed in quotes or double-quotes, so be careful with trailing white spaces, which will be taken as part of the regular expression.
Chapter 1 Using the Command-Line Interface
Command Output Paging
To use these special characters as single-character patterns, remove the special meaning by preceding each character with a backslash (\).
Command Output Paging
On commands such as help or?, show, show xlate, or other commands that provide long listings, you can determine if the information displays a screen and pauses, or lets the command run to completion. The pager command lets you choose the number of lines to display before the More prompt appears.
When paging is enabled, the following prompt appears:
<--- More --->
The More prompt uses syntax similar to the UNIX more command:
• To view another screen, press the Space bar.
• To view the next line, press the Enter key.
• To return to the command line, press the q key.
Adding Comments
You can precede a line with a colon ( : ) to create a comment. However, the comment only appears in the command history buffer and not in the configuration. Therefore, you can view the comment with the show history command or by pressing an arrow key to retrieve a previous command, but because the comment is not in the configuration, the write terminal command does not display it.
Table 1-2 Using Special Characters in Regular Expressions
Character Type Character Special Meaning
period . Matches any single character, including white space.
asterisk * Matches 0 or more sequences of the pattern.
plus sign + Matches 1 or more sequences of the pattern.
question mark ?1
1. Precede the question mark with Ctrl-V to prevent the question mark from being interpreted as a help command.
Matches 0 or 1 occurrences of the pattern.
caret ^ Matches the beginning of the input string.
dollar sign $ Matches the end of the input string.
underscore _ Matches a comma (,), left brace ({), right brace (}), left parenthesis,
right parenthesis, the beginning of the input string, the end of the input string, or a space.
brackets [] Designates a range of single-character patterns.
Chapter 1 Using the Command-Line Interface Text Configuration Files
Text Configuration Files
This section describes how to format a text configuration file that you can download to the FWSM, and includes the following topics:
• How Commands Correspond with Lines in the Text File, page 1-6
• Command-Specific Configuration Mode Commands, page 1-6
• Automatic Text Entries, page 1-6
• Line Order, page 1-7
• Commands Not Included in the Text Configuration, page 1-7
• Passwords, page 1-7
• Multiple Security Context Files, page 1-7
How Commands Correspond with Lines in the Text File
The text configuration file includes lines that correspond with the commands described in this guide.
In examples, commands are preceded by a CLI prompt. The prompt in the following example is:
hostname(config)# context a
In the text configuration file you are not prompted to enter commands, so the prompt is omitted:
context a
Command-Specific Configuration Mode Commands
Command-specific configuration mode commands appear indented under the main command when entered at the command line. Your text file lines do not need to be indented, as long as the commands appear directly following the main command. For example, the following unindented text is read the same as indented text:
interface gigabitethernet0/0 nameif inside
interface gigabitethernet0/1 nameif outside
Automatic Text Entries
Chapter 1 Using the Command-Line Interface
Text Configuration Files
Line Order
For the most part, commands can be in any order in the file. However, some lines, such as ACEs, are processed in the order they appear, and the order can affect the function of the access list. Other commands might also have order requirements. For example, you must enter the nameif command for an interface first because many subsequent commands use the name of the interface. Also, commands in a command-specific configuration mode must directly follow the main command.
Commands Not Included in the Text Configuration
Some commands do not insert lines in the configuration. For example, a runtime command such as show running-config does not have a corresponding line in the text file.
Passwords
The login, enable, and user passwords are automatically encrypted before they are stored in the configuration. For example, the encrypted form of the password “cisco” might look like
jMorNbK0514fadBh. You can copy the configuration passwords to another FWSM in their encrypted form, but you cannot unencrypt the passwords yourself.
If you enter an unencrypted password in a text file, the FWSM does not automatically encrypt them when you copy the configuration to the FWSM. The FWSM only encrypts them when you save the
running configuration from the command line using the copy running-config startup-config or write memory command.
Multiple Security Context Files
For multiple security contexts, the entire configuration consists of multiple parts:
• The security context configurations
• The system configuration, which identifies basic settings for the FWSM, including a list of contexts
• The admin context, which provides network interfaces for the system configuration
The system configuration does not include any interfaces or network settings for itself. Rather, when the system needs to access network resources (such as downloading the contexts from the server), it uses a context that is designated as the admin context.
C H A P T E R
2
Chapter 2 aaa accounting command through accounting-server-group Commands aaa accounting command
aaa accounting command
To send accounting messages to the TACACS+ accounting server when you enter any command other than show commands at the CLI, use the aaa accounting command command in global configuration mode. To disable support for command accounting, use the no form of this command.
aaa accounting command [ privilege level ] server-tag
no aaa accounting command [ privilege level ] server-tag
Syntax Description
Defaults The default privilege level is 0.
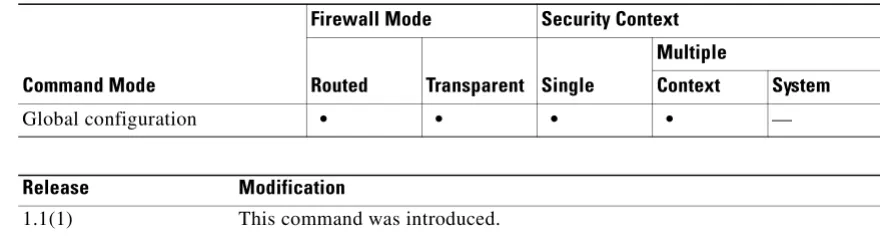
Command Modes The following table shows the modes in which you can enter the command:
Command History
Usage Guidelines When you configure the aaa accounting command command, each command other than show commands entered by an administrator is recorded and sent to the accounting server or servers.
Examples The following example specifies that accounting records will be generated for any supported command, and that these records are sent to the server from the group named adminserver.
hostname(config)# aaa accounting command adminserver
Related Commands
server-tag Specifies the server or group of TACACS+ servers to which accounting records are sent, as specified by the aaa-server protocol command. privilegelevel If you customize the command privilege level using the privilege command,
you can limit which commands the FWSM accounts for by specifying a minimum privilege level. The FWSM does not account for commands that are below the minimum privilege level.
Command Mode
Firewall Mode Security Context
Routed Transparent Single
Multiple
Context System
Global configuration • • • • —
Release Modification
Chapter 2 aaa accounting command through accounting-server-group Commands
aaa accounting command
Command Description
aaa accounting Enables or disables TACACS+ or RADIUS user accounting (on a server designated by the aaa-server command).
Chapter 2 aaa accounting command through accounting-server-group Commands aaa accounting console
aaa accounting console
To enable support for AAA accounting for administrative access, use the aaa accounting console command in global configuration mode. To disable support for accounting for administrative access, use the no form of this command.
aaa accounting {telnet | ssh | enable} console server-tag
no aaa accounting {telnet | ssh | enable} console server-tag
Syntax Description
Defaults By default, AAA accounting for administrative access is disabled.
Command Modes The following table shows the modes in which you can enter the command:
Command History
Usage Guidelines Sessions from the switch to the FWSM are not accounted for in the admin context, even if you have Telnet authentication enabled.
Examples The following example specifies that accounting records will be generated for enable access, and that these records are sent to the server named adminserver.
enable Enables accounting records to mark the entry to and exit from privileged EXEC mode.
server-tag Specifies the server or group of servers to which accounting records are sent. Valid server group protocols are RADIUS and TACACS+. You must specify the name of the server group, previously specified in an aaa-server command.
ssh Enables accounting records to mark the establishment and termination of
admin sessions created over SSH.
telnet Enables accounting records to mark the establishment and termination of admin sessions created over Telnet. This command does not account for sessions from the switch to the FWSM (system execution space).s
Command Mode
Firewall Mode Security Context
Routed Transparent Single
Multiple
Context System
Global configuration • • • • —
Release Modification
1.1(1) This command was introduced on the FWSM.
Chapter 2 aaa accounting command through accounting-server-group Commands
aaa accounting console
hostname(config)# aaa accounting enable console adminserver
Related Commands Command Description
aaa accounting match Enables or disables TACACS+ or RADIUS user accounting.
aaa accounting command Specifies that each command, or commands of a specified privilege level or higher, entered by an administrator/user is recorded and sent to the accounting server or servers.
Chapter 2 aaa accounting command through accounting-server-group Commands aaa accounting include, exclude
aaa accounting include, exclude
To enable accounting for connections through the FWSM, use the aaa accounting include command in global configuration mode. To exclude addresses from accounting, use the aaa accounting exclude command. To disable accounting, use the no form of this command.
aaa accounting {include | exclude}service interface_name inside_ip inside_mask [outside_ip outside_mask] server_tag
noaaa accounting {include | exclude}service interface_name inside_ip inside_mask [outside_ip outside_mask] server_tag
Syntax Description exclude Excludes the specified service and address from accounting if it was already specified by an include command.
include Specifies the services and IP addresses that require accounting. Traffic that is not specified by an include statement is not processed.
inside_ip Specifies the IP address on the higher security interface. This address might be the source or the destination address, depending on the interface to which you apply this command. If you apply the command to the lower security interface, then this address is the destination address. If you apply the command to the higher security interface, then this address is the source address. Use 0 to mean all hosts.
inside_mask Specifies the network mask for the inside IP address. Use 0 if the IP address is 0. Use 255.255.255.255 for a host.
interface_name Specifies the interface name from which users require accounting.
outside_ip (Optional) Specifies the IP address on the lower security interface. This address might be the source or the destination address, depending on the interface to which you apply this command. If you apply the command to the lower security interface, then this address is the source address. If you apply the command to the higher security interface, then this address is the destination address. Use 0 to mean all hosts.
outside_mask (Optional) Specifies the network mask for the outside IP address. Use 0 if the IP address is 0. Use 255.255.255.255 for a host.
server_tag Specifies the AAA server group defined by the aaa-server host command.
service Specifies the services that require accounting. You can specify one of the following values:
• any or tcp/0 (specifies all TCP traffic)
• ftp
• http
• https
• ssh
• telnet
• tcp/port
Chapter 2 aaa accounting command through accounting-server-group Commands
aaa accounting include, exclude
Defaults By default, AAA accounting for administrative access is disabled.
Command Modes The following table shows the modes in which you can enter the command:
Command History
Usage Guidelines The FWSM can send accounting information to a RADIUS or TACACS+ server about any TCP or UDP traffic that passes through the FWSM. If that traffic is also authenticated, then the AAA server can maintain accounting information by username. If the traffic is not authenticated, the AAA server can maintain accounting information by IP address. Accounting information includes when sessions start and stop, username, the number of bytes that pass through the FWSM for the session, the service used, and the duration of each session.
Before you can use this command, you must first designate a AAA server with the aaa-server command.
To enable accounting for traffic that is specified by an access list, use the aaa accounting match command. You cannot use the match command in the same configuration as the include and exclude commands. We suggest that you use the match command instead of the include and exclude commands; the include and exclude commands are not supported by ASDM.
You cannot use the aaa accounting include and exclude commands between same-security interfaces. For that scenario, you must use the aaa accounting match command.
Examples The following example enables accounting on all TCP connections:
hostname(config)# aaa-server mygroup protocol tacacs+
hostname(config)# aaa-server mygroup (inside) host 192.168.10.10 thekey timeout 20 hostname(config)# aaa accounting include any inside 0 0 0 0 mygroup
Related Commands
Command Mode
Firewall Mode Security Context
Routed Transparent Single
Multiple
Context System
Global configuration • • • • —
Release Modification
1.1(1) This command was introduced.
Command Description
aaa accounting match Enables accounting for traffic specified by an access list. aaa accounting
command
Enables accounting of administrative access.
aaa-server host Configures the AAA server.
clear configure aaa Clears the AAA configuration. show running-config
aaa
Chapter 2 aaa accounting command through accounting-server-group Commands aaa accounting match
aaa accounting match
To enable accounting for TCP and UDP connections through the FWSM, use the aaa accounting match command in global configuration mode. To disable accounting for traffic, use the no form of this command.
aaa accounting match acl_name interface_name server_tag
noaaa accounting match acl_name interface_name server_tag
Syntax Description
Defaults No default behavior or values.
Command Modes The following table shows the modes in which you can enter the command:
Command History
Usage Guidelines The FWSM can send accounting information to a RADIUS or TACACS+ server about any TCP or UDP traffic that passes through the FWSM. If that traffic is also authenticated, then the AAA server can maintain accounting information by username. If the traffic is not authenticated, the AAA server can maintain accounting information by IP address. Accounting information includes when sessions start and stop, username, the number of bytes that pass through the FWSM for the session, the service used, and the duration of each session.
Before you can use this command, you must first designate a AAA server with the aaa-server command.
Accounting information is sent only to the active server in a server group unless you enable simultaneous accounting using the accounting-mode command in aaa-server protocol configuration mode.
acl_name Specifies the traffic that requires accounting my matching an access-list name. Permit entries in the access list are accounted, while deny entries are exempt from accounting. This command is only supported for TCP and UDP traffic. A warning message is displayed if you enter this command and it references an access list that permits other protocols.
interface_name Specifies the interface name from which users require accounting.
server_tag Specifies the AAA server group tag defined by the aaa-server command.
Command Mode
Firewall Mode Security Context
Routed Transparent Single
Multiple
Context System
Global configuration • • • • —
Release Modification
Chapter 2 aaa accounting command through accounting-server-group Commands
aaa accounting match
You cannot use the aaa accountingmatch command in the same configuration as the aaa accounting include and exclude commands. We suggest that you use the match command instead of the include and exclude commands; the include and exclude commands are not supported by ASDM.
Examples The following example enables accounting for traffic matching a specific access list acl2:
hostname(config)# access-list acl12 extended permit tcp any any
hostname(config)# aaa accounting match acl2 outside radserver1
Related Commands Command Description
aaa accounting include, exclude
Enables accounting by specifying the IP addresses directly in the command.
access-list extended Creates an access list. clear configure aaa Removes AAA configuration. show running-config
aaa
Chapter 2 aaa accounting command through accounting-server-group Commands aaa authentication challenge disable
aaa authentication challenge disable
To disable authentication challenge for FTP, Telnet, HTTP, or HTTPS, use the aaa authentication challenge disable command in global configuration mode. To reset the FWSM to default authentication, use the no form of this command.
aaa authentication {ftp | telnet | http | https } challengedisable
no aaa authentication {ftp | telnet | http | https } challengedisable
Syntax Description
Defaults By default, if you enable authentication using the aaa authentication match or aaa authentication [include | exclude] commands, authentication challenge is enabled for FTP, Telnet, HTTP, and HTTPS.
Command Modes The following table shows the modes in which you can enter the command:
Command History
Usage Guidelines You can configure whether the FWSM challenges users for a username and password. By default, the FWSM prompts the user when a AAA rule enforces authentication for traffic in a new session and the protocol of the traffic is FTP, Telnet, HTTP, or HTTPS. In some cases, you may want to disable the authentication challenge for one or more of these protocols. You can use the aaa authentication challenge command to do so.
If you disable challenge authentication for a particular protocol, traffic using that protocol is allowed only if the traffic belongs to a session previously authenticated. This authentication can be accomplished by traffic using a protocol whose authentication challenge remains enabled. For example, if you disable challenge authentication for FTP, the FWSM denies a new session using FTP if the traffic is included in an authentication rule. If the user establishes the session with a protocol whose authentication challenge is enabled (such as HTTP), FTP traffic is allowed.
ftp Disables the authentication challenge for FTP connections.
http Disables the authentication challenge for HTTP connections.
https Disables the authentication challenge for HTTPS connections.
telnet Disables the authentication challenge for Telnet connections.
Command Mode
Firewall Mode Security Context
Routed Transparent Single
Multiple
Context System
Global configuration • • • • —
Release Modification
Chapter 2 aaa accounting command through accounting-server-group Commands
aaa authentication challenge disable
Examples The following example permits inbound access to a TCP IP address in the range of 209.165.201.1 through 209.165.201.30 indicated by the 209.165.201.0 network address (subnet mask
255.255.255.224). All services are permitted by the access-list command, and the aaa authentication command requires authentication. The authentication server is at IP address 10.16.1.20 on the inside interface. The final command disables challenge authentication for FTP, which means that users whose sessions are identifed by the aaa authentication include command must be authenticated by Telnet, HTTP, or HTTPS, and not by FTP.
hostname(config)# aaa-server AuthIn protocol tacacs+
hostname(config)# aaa-server AuthIn (inside) host 10.16.1.20 thisisakey timeout 20 hostname(config)# access-list acl-out permit tcp 10.16.1.0 255.255.255.0 209.165.201.0 255.255.255.224
hostname(config)# access-group acl-out in interface outside
hostname(config)# aaa authentication include tcp inside 0 0 0 0 AuthIn hostname(config)# aaa authentication ftp challenge disable
Related Commands Command Description
aaa authentication Enables or disables authentication by including or excluding traffic. aaa authentication
match
Specifies the name of an access list, previously defined in an access-list command, that must be matched, and then provides authentication for that match.
aaa authentication secure-http-client
Provides a secure method for user authentication to the FWSM prior to allowing HTTP requests to traverse the FWSM.
Chapter 2 aaa accounting command through accounting-server-group Commands aaa authentication clear-conn
aaa authentication clear-conn
To force any active connections to close immediately after the user authentication times out or when you clear the authentication session with the clear uauth command, use the aaa authentication clear-conn command in global configuration mode. To disable this feature, use the no form of this command. Without this command, active connections are not terminated even though the user authentication session expired.
aaaauthenticationclear-conn interface-name source_ip source_mask
noaaaauthenticationclear-conn interface-name source_ip source_mask
Syntax Description
Defaults No default behavior or values.
Command Modes The following table shows the modes in which you can enter the command:
Command History
Usage Guidelines To set the authentication timeout values, see the timeout uauth command.
When a connection is ended because of this command, system log message 109036 is generated.
Examples The following example authenticates users on the inside interface from the 10.0.0.0/24 network when they access 192.168.2.0/24. These same user connections are terminated when their authentication times out.
hostname(config)# access-list mylist permit tcp 10.0.0.0 255.255.255.0 192.168.2.0 255.255.255.0
hostname(config)# aaa authentication mylist inside radius1
hostname(config)# aaa authentication clear-conn inside 10.0.0.0 255.255.255.0 interface-name Sets the interface name connected to the source IP address.
source_ip Specifies the source IP address of the user for which you want to terminate connections.
source_mask Specifies the source IP subnet mask.
Command Mode
Firewall Mode Security Context
Routed Transparent Single
Multiple
Context System
Global configuration • • • • —
Release Modification
Chapter 2 aaa accounting command through accounting-server-group Commands
aaa authentication clear-conn
Related Commands Command Description
aaa authentication match
Enables authentication for traffic through the FWSM.
clear configure aaa Removes AAA configuration. clear uauth Clears the authentication sessions. show running-config
aaa
Displays the AAA configuration.
Chapter 2 aaa accounting command through accounting-server-group Commands aaa authentication console
aaa authentication console
To authenticate users who access the FWSM CLI over an SSH, HTTP (ASDM), or Telnet connection, or to authenticate users who access privileged EXEC mode using the enable command, use the aaa authentication console command in global configuration mode. To disable authentication, use the no form of this command.
aaa authentication {enable | telnet | ssh | http} console {LOCAL | server_group[LOCAL]}
noaaa authentication {enable | telnet | ssh | http} console {LOCAL | server_group[LOCAL]}
Syntax Description
Defaults By default, fallback to the local database is disabled.
If the aaa authentication telnet console command is not defined, you can gain access to the FWSM CLI with the FWSM login password (set with the password command). If you enter the aaa authentication telnet console command in the admin context in multiple context mode, then authentication also applies to sessions from the switch to the FWSM (which enters the system execution space). You cannot enter any AAA commands directly in the system execution space.
enable Authenticates users who access privileged EXEC mode when they use the
enable command.
http Authenticates ASDM users who access the FWSM over HTTPS. You only
need to configure HTTPS authentication if you want to use a RADIUS or TACACS+ server. By default, ASDM uses the local database for
authentication even if you do not configure this command.
LOCAL Uses the local database for authentication. LOCAL is case sensitive. If the local database is empty, the following warning message appears:
Warning:local database is empty! Use 'username' command to define local users.
If the local database becomes empty when LOCAL is still present in the configuration, the following warning message appears:
Warning:Local user database is empty and there are still commands using 'LOCAL' for authentication.
server_group
[LOCAL]
Specifies the AAA server group tag defined by the aaa-server command. You can use a RADIUS or TACACS+ server group.
If you use the LOCAL keyword in addition to the server_group, you can configure the FWSM to use the local database as a fallback method if the AAA server is unavailable. LOCAL is case sensitive. We recommend that you use the same username and password in the local database as the AAA server because the FWSM prompt does not give any indication which method is being used.
ssh Authenticates users who access the FWSM using SSH.
Chapter 2 aaa accounting command through accounting-server-group Commands
aaa authentication console
If a aaa authentication http console command is not defined, you can gain access to the FWSM (via
ASDM) with no username and the FWSM enable password (set with the enablepassword command).
If the aaa commands are defined, but the HTTP authentication requests a time out, which implies the AAA servers might be down or not available, you can gain access to the FWSM using the default administrator username and the enable password. By default, the enable password is not set.
If a aaa authentication ssh console command is not defined, you can gain access to the FWSM CLI with the username pix and with the FWSM enable password (set with the enablepassword command). By default, the enable password is blank. This behavior differs from when you log into the FWSM without AAA configured; in that case, you use the login password (set by the passwd command).
Command Modes The following table shows the modes in which you can enter the command:
Command History
Usage Guidelines Before the FWSM can authenticate a Telnet or SSH user, you must first configure access to the FWSM using the telnet or ssh commands. These commands identify the IP addresses that are allowed to communicate with the FWSM. The exception is for access to the system in multiple context mode; a session from the switch to the FWSM is a Telnet session, but the telnet command is not required.
After you connect to the FWSM, you log in and access user EXEC mode.
• If you do not enable any authentication for Telnet, you do not enter a username; you enter the login password (set with the password command). For SSH, you enter “pix” as the username, and enter the login password.
• If you enable Telnet or SSH authentication according to this section, you enter the username and password as defined on the AAA server or local user database.
To enter privileged EXEC mode, enter the enable command or the login command (if you are using the local database only).
• If you do not configure enable authentication, enter the system enable password when you enter the enable command (set by the enable password command). However, if you do not use enable authentication, after you enter the enable command, you are no longer logged in as a particular user. To maintain your username, use enable authentication.
• If you configure enable authentication, the FWSM prompts you for your username and password.
For authentication using the local database, you can use the login command, which maintains the
Command Mode
Firewall Mode Security Context
Routed Transparent Single
Multiple
Context System
Global configuration • • • • —
Release Modification
1.1(1) This command was introduced.
2.2(1) This command was modified to support fallback to LOCAL.
3.2(1) Support for Telnet authentication (sessioning from the switch to the FWSM)
Chapter 2 aaa accounting command through accounting-server-group Commands aaa authentication console
By default, you can log in to ASDM with a blank username and the enable password set by the enable password command. However, if you enter a username and password at the login screen (instead of leaving the username blank), ASDM checks the local database for a match.
Although you can configure HTTP authentication using this command and specify the local database, that functionality is always enabled by default. You should only configure HTTP authentication if you want to use a RADIUS or TACACS+ server for authentication. The maximum username prompt for HTTP authentication is 30 characters. The maximum password length is 16 characters.
In multiple context mode, you cannot configure any AAA commands in the system configuration. However, if you configure Telnet authentication in the admin context, then authentication also applies to sessions from the switch to the FWSM (which enters the system execution space).
As the following table shows, the action of the prompts for authenticated access to the FWSM CLI differ, depending on the option you choose with the aaa authentication console command.
Examples The following example shows use of the aaa authentication console command for a Telnet connection to a RADIUS server with the server tag “radius”:
hostname(config)# aaa authentication telnet console radius
The following example identifies the server group “AuthIn” for enable authentication:
hostname(config)# aaa authentication enable console AuthIn
The following example shows use of the aaa authentication console command with fallback to the LOCAL user database if all the servers in the group “svrgrp1” fail:
hostname(config)# aaa-server svrgrp1 protocol tacacs
hostname(config)# aaa authentication ssh console svrgrp1 LOCAL
Related Commands
Option Number of Login Attempts Allowed
enable 3 tries before access is denied
ssh 3 tries before access is denied
telnet Continual until success
http Continual until success
Command Description
aaa authentication match Enables user authentication.
aaa-server host Specifies the AAA server to use for user authentication. clear configure aaa Clears the AAA configuration.
Chapter 2 aaa accounting command through accounting-server-group Commands
aaa authentication include, exclude
aaa authentication include, exclude
To enable authentication for connections through the FWSM, use the aaa authentication include command in global configuration mode. To exclude addresses from authentication, use the aaa authentication exclude command. To disable authentication, use the no form of this command.
aaa authentication{include | exclude}serviceinterface_name inside_ip inside_mask [outside_ip outside_mask] {server_tag | LOCAL}
noaaa authentication{include | exclude} service interface_name inside_ip inside_mask
[outside_ip outside_mask] server_tag
Syntax Description exclude Excludes the specified service and address from authentication if it was already specified by an include command.
include Specifies the services and IP addresses that require authentication. Traffic that is not specified by an include statement is not processed.
inside_ip Specifies the IP address on the higher security interface. This address might be the source or the destination address, depending on the interface to which you apply this command. If you apply the command to the lower security interface, then this address is the destination address. If you apply the command to the higher security interface, then this address is the source address. Use 0 to mean all hosts.
inside_mask Specifies the network mask for the inside IP address. Use 0 if the IP address is 0. Use 255.255.255.255 for a host.
interface_name Specifies the interface name from which users require authentication.
LOCAL Specifies the local user database.
outside_ip (Optional) Specifies the IP address on the lower security interface. This address might be the source or the destination address, depending on the interface to which you apply this command. If you apply the command to the lower security interface, then this address is the source address. If you apply the command to the higher security interface, then this address is the destination address. Use 0 to mean all hosts.
Chapter 2 aaa accounting command through accounting-server-group Commands aaa authentication include, exclude
Defaults No default behavior or values.
Command Modes The following table shows the modes in which you can enter the command:
Command History
Usage Guidelines To enable authentication for traffic that is specified by an access list, use the aaa authentication match command. You cannot use the match command in the same configuration as the include and exclude commands. We suggest that you use the match command instead of the include and exclude commands; the include and exclude commands are not supported by ASDM.
You cannot use the aaa authentication include and exclude commands between same-security interfaces. For that scenario, you must use the aaa authentication match command.
server_tag Specifies the AAA server group defined by the aaa-server command.
service Specifies the services that require authentication. You can specify one of the following values:
• any or tcp/0 (specifies all TCP traffic)
• ftp
• http
• https
• ssh
• telnet
• tcp/port
• udp/port
• icmp/type
• protocol[/port]
Although you can configure the FWSM to require authentication for network access to any protocol or service, users can authenticat