INSTRUCTION
MANUAL
FOR
For Product Service on This Model Please Call:
(520) 778-6555 (See p. 23)
STURM, RUGER & Company, Inc.
Southport, Connecticut 06490 U.S.A.
THIS INSTRUCTION MANUAL SHOULD ALWAYS ACCOMPANY THIS FIREARM AND BE TRANS-FERRED WITH IT UPON CHANGE OF OWNERSHIP, OR WHEN THE FIREARM IS LOANED OR
PRE-SENTED TO ANOTHER PERSON.
G 4/01 R2
READ THE INSTRUCTIONS AND
WARNINGS IN THIS MANUAL CAREFULLY
BEFORE USING THIS FIREARM
!
BLUED
STEEL
CALIBERS
9MM &. 40 Auto
RUGER
®CARBINE
This firearm was originally sold
with a key-operated locking device.
While it can help provide secure
storage for your
unloaded
firearm,
any locking device can fail. All guns
are designed to fire if they are
loaded and the trigger is pulled.
Therefore,
never install the locking
device inside the trigger guard or
in any way that it can possibly pull
the trigger!
Do not leave the keys
in the lock.
The ultimate responsibility for
secure storage of any firearm must
depend upon its owner and his or
her individual circumstances.
Guns should be securely stored
unloaded, in a secure location,
separate from their ammunition.
See “Storage Warning”, page 20.
NEVER INSTALL
LOCKING DEVICE
INSIDE TRIGGER GUARD
WA RNING - U
NLO
ADING
!
GUN W ILL FIR E W ITH M AGAZINE O UT
!
WARNING – LOCKING DEVICES
DO NOT INSTALL
INSIDE TRIGGER GUARD
FIREARMS SAFETY-YOUR RESPONSIBILITY
SAFETY MUST BE THE FIRST AND CONSTANT
CONSIDERATION OF EVERY PERSON WHO
HANDLES FIREARMS AND AMMUNITION.
This Instruction Manual is designed to assist you in learning how to use
and care for your
RUGER
®CARBINE
properly. Please contact us if
you have any questions about it.
Only when you are certain you fully understand the Manual and can
properly carry out its instructions should you practice loading, etc. with
live ammunition. If you have any doubts about your ability to handle or
use a particular type of gun safely, then you should seek supervised
instruction. Such personalized instruction is often available from gun
dealers, gun clubs or police departments. If none of these sources can
help you, write to the National Rifle Association, 11250 Waples Mill Rd.,
Fairfax, VA 22030-7400. They will assist you.
The person possessing a gun has a full-time job. You cannot guess; you
cannot forget. You must know how to use your firearm safely.
Do not use
any firearm without having a complete understanding of its particular
characteristics and safe use.
Remember: There is no such thing as a
fool-proof gun.
TABLE OF CONTENTS
Page
General Information . . . .4
Operation of Safety . . . .6
The Slide Stop . . . 7
Ammunition . . . 8
To Load and Fire (With Magazine) . . . 9
To Load and Fire (Without Magazine) . . . 11
To Unload . . . 11
To Extract and Eject a Chambered Cartridge . . . 13
To Clear a Malfunction (“Jam”) . . . 13
To Minimize Malfunctions (“Jams”) . . . .13
To Disassemble . . . .15
Reassembly . . . .16
Magazine Inspection and Care . . . .18
Care and Cleaning . . . .18
Storage . . . .19
Attaching Ruger Scope Rings . . . .21
Sight Adjustment . . . 21
Ghost Ring Sight Adjustment . . . .22
Service and Parts Policy . . . 23
Parts Drawing . . . 30
The Basic Rules of Safe Firearms Handling . . . .
31
Warranty Information . . . 36
“RUGER®
WARNING–ALTERATIONS
This product was designed to func-tion properly in its original condi-tion. Alterations can make it unsafe. Do not alter any part or add or sub-stitute parts or accessories not made by Sturm, Ruger & Co. Inc.
DO NOT ALTER ANY GUN
!
!
FIREARMS ARE DANGEROUS WEAPONS–
READ THE INSTRUCTIONS AND WARNINGS
IN THIS MANUAL THOROUGHLY AND
CAREFULLY BEFORE USING.
GENERAL INFORMATION
AND MECHANICAL CHARACTERISTICS
The RUGER®CARBINEis an autoloading rifle chambered for either the 9mm Luger (Parabellum) or .40 Auto cartridges. The correct caliber of each rifle is rollmarked on its receiver. Use only ammunition of the correct caliber for that rifle. It is “blowback” operated and uses standard Ruger P-Series pistol magazines of the same caliber. Retracting the cocking handle cocks the internal hammer and compresses the guide rod/recoil spring assembly. When the slide is manually released, it moves forward (driven by the recoil spring), strips a cartridge from the magazine, if a loaded magazine is in place, and chambers the cartridge. The slide is held against the chambered cartridge by the recoil spring.When the trigger is pulled, the hammer is released and strikes the firing pin. The firing pin indents the cartridge primer and ignites the priming compound. This ignites the powder in the cartridge case and a great volume of gas is instantly generated, which acts on the interior of the cartridge case in all directions.
WARNINGS OF GREAT IMPORTANCE ARE
FOUND ON THE FOLLOWING PAGES:
Locking Devices 2 Unloading 11
Alterations 4 Malfunctions 14
Manual Safety 6 Disassembly 15
Lead Exposure 8 Lubrication 19
Ammunition 8 Storage 20
Firing 10 Parts Purchasers 24
Handling 11
Because the bullet offers the least resistance, it moves out of the cartridge case and exits the muzzle. The bolt then moves rearward automatically, extracting and ejecting the fired cartridge case, and at the same time cocking the hammer and compressing the guide rod/recoil spring assembly, etc., as described above. Once the trigger is released, the rifle is ready to fire again.
Each time the trigger is pulled and released, the same cycle is repeated until there are no more cartridges in the magazine or in the chamber.
The rifle will fire if there is a cartridge in the chamber and the trigger is pulled, whether or not there is a magazine in place! Removing the magazine does not unload the rifle. Never assume the rifle is unloaded. Visually inspect the chamber and the magazine each time the rifle is handled to be certain there are no car-tridges in either.
All models have the same basic operating mechanism and include the following features with which the gun user should be thoroughly familiar.
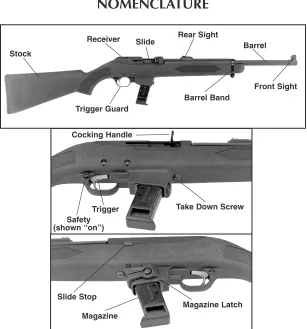
Figure 1.In these illustrations the frequently used operating components are identified. Note that the safety is protruding fully from the right side of the trigger guard and is there-fore in its “on” (safe) position.
NOMENCLATURE
Stock
Receiver Slide Rear Sight
Front Sight Barrel Band
Trigger Take Down Screw Cocking Handle
Trigger Guard
Barrel
Magazine Latch Magazine
OPERATION OF SAFETY
The RUGER®CARBINE has a cross-button safety which is located in the rear portion of the trigger guard (Figure 1, p. 5).
The safety is “on” when it protrudes fully from the right side (the cocking handle side) of the trigger guard, as shown in Figure 1, p. 5. In this position, the gun cannot be fired from a normal pull on the trigger.
The safety should always be in the “on” (safe) position except when the shooter is actually firing the gun. The safety should be moved to the “on” position whenev-er the shootwhenev-er ceases firing, even temporarily.
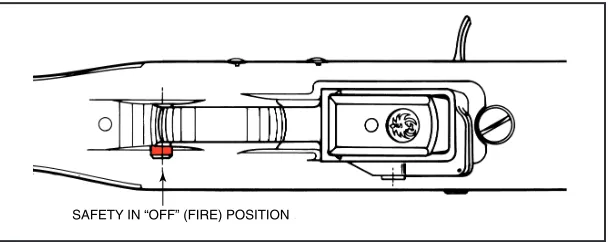
The safety is “off” (fire) when it protrudes from the left side of the trigger guard, as shown in Figure 2. When the safety is off, the red band shows on the safety button, but do not totally rely on the appearance of the red band to indicate that the safety is off. In poor light or if dirt is present, the red band may not be visi-ble. If the safety is “off” and the trigger is pulled, the rifle will fire if a cartridge is in the chamber.
SAFETY IN “OFF” (FIRE) POSITION
Figure 2.The underside of the trigger guard section of the rifle. In this illustration the safety is shown in the “off” (fire) position. The position of the safety and red band indicate the safety is “off.”
!
WARNING – MANUAL SAFETY
SAFETY IN THE “ON” SAFE POSITION
Keep the safety on unless actually firing. Always move the safety fully to its intended position and check it. The safety is not “ON” unless it is completely “ON”. Never depend on a safety mechanism or any other mechanical device to justify careless handling or permit-ting the rifle to point in an unsafe direction. The only “safe” rifle is one in which the bolt is open, the chamber is empty, and there is no magazine in the gun.
THE SLIDE STOP
The slide stop is located on the left side of the receiver (see Figure 1, p. 5). The slide stop is the manually operated means of retaining the slide in the rearward (open) position. When the slide of an empty rifle is held open, the rifle is in an inoperative safe condition for inspection of the chamber, cleaning, etc.
To hold the slide open:Retract the cocking handle to its extreme rearward posi-tion and, while holding it there, press the slide stop upward. Release pressure on the cocking handle and the slide will move forward a fraction of an inch, and then be held in its open position.
To release the slide:The slide can be released by drawing back slightly on the cocking handle and depressing the slide stop thumbpiece. When the slide is released, it will move forward under pressure from the recoil spring. The safety of the rifle should always be in the “on” position except when the user is actually firing at a selected target.
When the last shot has been fired and the magazine is empty, the slide stop auto-matically holds the slide open. When there is an empty magazine in the rifle and the slide is retracted manually, the slide stop will have to be manually actuated to hold the slide open. If a loaded magazine is inserted in the rifle when the slide is closed and the slide is then retracted fully, the slide stop will not automatically hold open the slide. The user can actuate the slide stop mechanism to hold the slide open at any time by retracting the slide and pushing up the slide stop.
2
1
2
1
3
Discharging firearms in poorly ventilated areas, cleaning firearms, or handling ammunition may result in exposure to lead and other substances known to the state of California to cause birth defects, reproductive harm, and other serious physical injury. Have adequate ventilation at all times. Wash hands thoroughly after exposure.
SHOOTING OR CLEANING GUNS
MAY EXPOSE YOU TO LEAD
!
WARNING – LEAD EXPOSURE
!
WARNING – AMMUNITION
Death, serious injury, and damage can result from the use of wrong ammu-nition, bore obstructions, powder overloads, or incorrect cartridge com-ponents. Always wear shooting glass-es and hearing protectors.
IMPROPER AMMUNITION
DESTROYS GUNS
AMMUNITION
The RUGER®CARBINEis chambered for, and designed to properly func-tion with, only factory loaded 9mm Luger (Parabellum) or .40 Auto ammunifunc-tion (standard, high velocity, +P, or +P+ ammunition) manufactured to U.S. industry standards.
SPECIAL NOTE:The higher pressures produced by the .40 auto cartridge make the use of aluminum-cased .40 auto ammunition inadvisable in the Ruger Carbine or any other “blowback” -operated firearm. Occasional case separations and jamming of the mechanism may occur. This does not apply to locked-breech firearms such as the Ruger P-94 pistols.
TO LOAD AND FIRE (WITH MAGAZINE)
Practice this important aspect of gun handling (with an unloaded rifle) until you can perform each of the steps – described below – with skill and confidence. But before you do anything with the rifle, please first read completely through this manual. Keep your finger off the trigger until you are ready to immediately shoot at a target!1.Keep the muzzle pointed in a safe direction. (See Rule 2, p. 31).
2.Put the safety “on”(fully protruding from the right side of the trigger guard). See Figure 1, p. 5.
3. Pull the cocking handle rearward. Engage the slide stop so that the slide is held open. Check the chamber to be certain it is empty.
4. To remove the magazine, use thumb to depress magazine latch button on the left side of the magazine well and at the same time grasp the magazine between the fingers of the same hand to draw it out of the magazine well. (See Figure 3). Do not drop the magazine out of the rifle onto a hard or dirty sur-face -- you may damage it or otherwise induce malfunctions.
Figure 3.The safety should be “on” when the magazine is being removed or inserted.When the magazine latch button is pushed in, the magazine is released. Depress the latch with the thumb and at the same time grasp the magazine between your fingers and draw it downward out of the gun.
REMEMBER to check to be sure the chamber is empty after removing the magazine!
5. Load the magazine by sliding up to 15*9mm or 11*.40 Auto cartridges of the same caliber as that marked on the receiver of your rifle into the magazine. The Ruger CARBINE is designed to function properly only with correct Ruger magazines loaded with factory ammunition of the correct type and caliber loaded to U.S. industry specifications.
6. Insert magazine fully into the firearm, with bullet end of the cartridges toward the muzzle, until it is locked in place by the magazine latch. (Magazine cannot be seated if reversed).
* By Federal Law, newly manufactured magazines with a capacity of greater than 10 (ten) cartridges are designated “For Law Enforcement Use Only” and are only sold to law enforcement and government agencies. Commercially sold rifles are supplied with 10 round magazines only.
2
1
3
!
WARNING – FIRING
9. Immediately following the firing of a shot, if a subsequent shot is not to be fired at once, put the safety “ON” while the rifle is still pointing in a safe direction down range. The safety should be moved to the “on” position as soon as firing is completed, and it should be “on” at all times except when the rifle is on target and being fired.
10. If all cartridges are fired from the magazine, the slide remains open after the last shot has been fired. When firing is completed, if the slide is shut, manu-ally retract the slide, hold it open by pushing the slide stop up, and visumanu-ally check the chamber to be sure it is empty. If the slide is shut, the shooter should always assume that there is a cartridge in the chamber. Don’t rely on your memory to know if a gun or magazine is loaded. Visually inspect the magazine and the chamber area.
The slide automatically opens and shuts quickly while firing. Keep face and hands away from it. Hot brass and powder gas is ejected quickly and can burn you. The rifle should be fired from the right shoulder. Always wear shooting glasses and hearing protectors.
SLIDE OPENS FAST–
HOT BRASS EJECTED
7. Load a cartridge into the chamber by fully retracting the cocking handle,pushing down the slide stop, and then releasing the cocking handle. The slide will forcibly move forward, chambering a cartridge from the magazine. Don’t touch the trigger.Do not ‘ride’ the cocking handle as it moves forward. Do not apply force to the cocking handle to chamber a cartridge. If a cartridge does not readily chamber, eject it from the rifle, hold the slide open with the slide stop, remove the magazine and see MALFUNCTION WARNING, p. 14.
So that the rifle can be used as a single loader, it will fire whether or not a magazine is in the gun if a cartridge is chambered. Removing magazine does not unload rifle! To unload, first remove magazine, then pull slide to rear, eject chambered cartridge, and visually inspect chamber. The safety should always be in the “on” (safe) position when loading or unloading the rifle.
GUN WILL FIRE WITH
MAGAZINE OUT
TO LOAD AND FIRE (WITHOUT MAGAZINE)
The rifle can be used as a single shot rifle in the absence of a magazine or for safety or training purposes. To do so, follow steps 1 and 2, p. 9. Then load a car-tridge into the chamber, and follow steps 7 and 8, p. 10, disregarding the maga-zine. Engage the safety between shots.!
WARNING – UNLOADING
TO UNLOAD
NOTE:This sequence must be followed exactly as spelled out. Failure to do so can result in the rifle’s chamber becoming unintentionally loaded with a car-tridge!
!
WARNING – HANDLING
SAFETY IN THE“OFF” (FIRE) POSITION
If dropped or
struck with the
safety “off”, the
rifle may fire.
Keep chamber
empty unless
actually firing!
Keep safety “on”
unless actually
firing!
ANY GUN
MAY FIRE IF
CORRECT UNLOADING SEQUENCE
1
2
3
4
6. Cartridges can be removed from the magazine by simply pushing them lightly downward and forward with the thumb, forefinger, or the rubber eraser end of a pencil against the base of the top cartridge. Do not use a loaded cartridge as a ‘tool’ to strip cartridges from the magazine.
7. If desired, the slide can be left in the open position, being held there by the slide stop. If it is desired to close the slide, again look to be certain the cham-ber is empty. Keep the safety “on”, retract the slide to its rearmost position, push the thumbpiece of the slide stop down, and let the slide snap forward. Keep your fingers out of the receiver!
8.With the muzzle pointed in a safe direction,push the safety to the “off” posi-tion and pull the trigger to decock it. The rifle can be “dry fired” for practice as long as it is empty and pointed in a safe direction.
9. Push empty (unloaded) magazine into the rifle until the magazine latch locks it in place. If an empty magazine is inserted into a rifle with the slide held open, it will be necessary to press the bolt stop downward in order to close the slide.
1. Keep the muzzle pointed in a safe direction at all times and keep the fingers outside the trigger guard. Move the safety to the “on” position.
2. Remove the magazine. Rememberthat even though the magazine has been removed, a cartridge remaining in the chamber can still be fired!
3. Retract the slide to its open position and hold it open by pressing the slide stop up.
4.Always visually double check the chamber to be certain it is empty.
TO EXTRACT AND EJECT
A CHAMBERED CARTRIDGE
When the rifle is fired, the same gas pressure which drives the bullet forward also acts through the cartridge case to push the slide to the rear. That action causes extraction and ejection of the fired cartridge case. But, when the slide is operated by hand, there can be a failure to extract the cartridge from the chamber, or a failure to eject the cartridge clear of the rifle. These failures usually are the result of the slide not being pulled rearward vigorously, coupled with an accumulation of firing residue in the chamber. From the foregoing it is clear that the gun user must:
1.Always visually check the chamber after opening the slide to eject a chambered cartridge.If the slide is not vigorously retracted when being operated by hand, the extracted cartridge can be ‘ejected’ into the magazine area, instead of out-side the rifle. (Remember that the magazine should be removed prior to unloading the chamber.)
2. Thoroughly clean the chamber and the extractor as often as necessary to pre-vent the accumulation of grease and dirt.
3. If an empty magazine is in the rifle when the slide is being hand retracted to extract a cartridge, the cartridge may drop on top of the magazine. Then when the slide goes forward, the cartridge will be chambered again! Always remove the magazine before clearing the chamber, and visually ensure that no car-tridges remain in the gun.
TO CLEAR A MALFUNCTION (“JAM”)
Any autoloading firearm may occasionally malfunction. If it does:1.Be certain the muzzle is pointed in a safe direction and the safety is “on”.
2. If possible, remove the magazine. It may be necessary to manually remove a jammed cartridge which has only partially been stripped from the magazine. If so, use extreme care. Hold the slide open with the slide stop before attempting to clear the jam. Drawing the slide fully to the rear may bring the jammed car-tridge along. Keep your face away from the ejection port during this operation.
When attempting to clear a jam, use only wood ‘tools’ so that a cartridge will not be ignited if you strike a primer and so that the chamber and magazine will not be damaged. A 3/16” wood dowel rod with a point on one end is useful. 3. Visually check to make sure all cartridges have been removed from the rifle.
Safely dispose of any cartridges involved in a malfunction incident. Do not use damaged ammunition in any firearm.
TO MINIMIZE MALFUNCTIONS (“JAMS”)
Most malfunctions are caused by improper or damaged magazines, incorrect ammunition, or poor maintenance.A cartridge fires when the firing pin impacts the primer, and also can be “discharged” before it is chambered if its primer receives a sharp blow. If a cartridge hangs up, jams, or binds when being chambered or when being fed from the magazine into the chamber, do not attempt to force it into the chamber by pushing or striking the cock-ing handle.Any jam or feeding problem is a signal to immediately stop using the gun until it can be deter-mined what is wrong. Most failures of a cartridge to feed or to chamber are caused by a damaged magazine, improper gun handling, or defective ammunition.
Whatever the cause, cartridge jams can result in the potentially dangerous situation of a cartridge discharging before it is chambered. If this occurs, the cartridge case will rupture and its fragments will fly out of the gun with sufficient force to cause injury. Always wear shooting glasses and hearing protectors! Keep face away from chamber!
STRIKING COCKING HANDLE
CAN BURST CARTRIDGE
2. If changing to another type or brand of cartridges does not at once eliminatemalfunctions, then the following steps should be taken:
a. Make certain the gun and the magazine are unloaded and that the safety is “on”. Remember, the magazine should be removed first, then check the chamber and be certain it and the magazine well are clear of cartridges.
b. Thoroughly clean the magazine and slide mechanism, paying particular attention to removing accumulated grease. Use a bristle brush and solvent to remove grease and fouling from the slide, the extractor, the chamber, and the feed ramp. (See the “Care and Cleaning” section of this manual for detailed cleaning instructions).
c. Check to see that the magazine spring tension is adequate and that the magazine follower moves freely up and down.
d. Check the magazine lips to be certain they are free of nicks and burrs and are not deformed.
e. Remove excess oil and solvent from all cleaned components, load the magazine, and try the firearm again. As always, proceed slowly. Be certain bystanders are not close and that you are wearing eye and hearing protec-tion and that your face is a safe distance from the rifle so that any discharge resulting from a jammed cartridge will not injure anyone.
If the above procedures do not result in a smooth and reliably functioning firearm, don’t use the gun. The rifle can be returned directly to our Prescott, Arizona Service Department for repair. See the “Service and Parts Policy” section of this manual for packing and shipping information.
Another precaution:When using any autoloading firearm, form the habit of examining fired cartridge cases. If they have bulged heads or frequently show splits on any part of the case, the rifle should be returned to the factory for inspection.
!
WARNING – DISASSEMBLY
TO DISASSEMBLE
Make Sure Gun Is Unloaded!
1.With the rifle pointing in a safe direction, remove the magazine. (See Fig. 4) 2. Remove screw and
bar-rel band from front of stock. (See Fig. 4) It may be necessary to carefully spread the barrel band slightly apart with a screwdriv-er blade so that the band can be removed from its stock recess. Remove the take down screw and lock washer from the bottom of the stock. (See Fig. 4) 3. Lift front end of
barrel/receiver assembly and remove it upward from stock. (See Fig. 5) Remove the receiver spacer from the inside of the stock (refer to parts list, p. 27, for applicable serial number range).
4. Pull slide assembly to rear far enough to expose a cross hole in the guide rod (about 1 3/4”). Insert a pin/punch to hold slide in this posi-tion. (See Fig. 6)
1
2 3
4
1
2
3
2
1
4
5
6
Always unload a firearm
before cleaning, lubrication,
disassembly or assembly.
5. Move slide/recoil spring assembly slightly forward to disengage guide rod and rotate it downward out of the receiver. The cocking handle and plunger will pop free. (See Fig. 7)
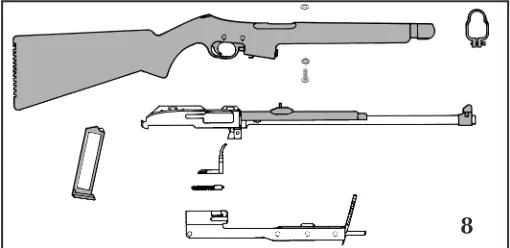
6. Handguard may be removed by carefully placing both thumbs at rear corners and slowly pushing upward; but this is not recommended for routine cleaning or maintenance. (See Fig. 8)
7. Further disassembly is not necessary or recommended for routine service.
REASSEMBLY
1. Replace cocking handle and plunger into top of slide assembly. (See Fig. 9) Plunger end goes into cocking handle.
2. Carefully ease assembly back into receiver (See Fig. 10)
2 2
1
7
8
9
2
1
3. Making sure the guide rod is engaged in the hole in the front of the receiver, hold the slide assem-bly in place (See Fig. 11A) while removing the pin/punch and allow slide to go forward slowly. (See Fig. 11B)
4. Place the receiver washer in its position around the take down screw hole inside the stock (refer to parts list, p. 27, for applicable serial number range). Then hook rear receiver hooks into stock recesses (See Fig. 12) and lower barrel back into place while hold-ing cockhold-ing handle back slightly (approximately 1 inch). (See Fig. 13)
Note:If bolt is not held open slightly while lowering barreled action into stock, it will be impossible to operate action! If this occurs, simply lift the action slightly out of the stock, retract the bolt slightly, and keep it open as you lower the action back into the stock. Once the barrel/receiver assembly is in place in the stock, replace the take down screw and lock washer. While replacing the take down screw and lock washer, ensure that the receiver spacer is in place inside the stock if your carbine is so equipped. (See Fig. 14)
5. Replace barrel band and screw. Check to assure free movement of slide and cor-rect functioning of trigger and manual safety. (See Fig.14)
2 1
3
1
2
12
13
14
11A
1
2
MAGAZINE INSPECTION AND CARE
Check the magazine frequently. The magazine follower must move freely and have adequate spring tension so that each cartridge is quickly raised to the feed-ing position. The magazine lips should be clean and free of cracks, dents, or nicks, so that cartridges are held in their proper feeding position.If the magazine becomes dirty, it should be disassembled and thoroughly cleaned. You could encounter two types of Ruger magazines, with either a pinned base or a snap-on base. The following disassembly instructions apply:
Pinned Base(used on 10 round 9mm magazines) - Use a punch to remove the roll pin that extends through the side of the magazine body. Once the roll pin has been removed, pull the magazine base from the bottom of the magazine body, taking care to prevent the forcible ejection of the compressed magazine spring. Withdraw the magazine spring from the magazine body. Turn the maga-zine upside down and remove the follower.
Snap-On Base- Use a punch to press in on magazine spring seat where it pro-trudes into the hole in the magazine floorplate. Slide the magazine floorplate toward the rear of the magazine, taking care to prevent the forcible ejection of the magazine spring seat and compressed magazine spring. Withdraw the maga-zine spring seat and magamaga-zine spring from the magamaga-zine body. Turn magamaga-zine upside down and remove magazine follower. Reassemble in reverse order. When cleaning is necessary, use a solvent that will not rust the metal compo-nents or adversely affect the magazine follower. After the magazine has been soaked in solvent to loosen foreign matter, be certain to shake it vigorously (with the loading opening away from you) to remove solvent or residue from within the magazine. Penetrating oils and solvents inside a magazine can “kill” or weak-en cartridge primers, which can result in failures to fire or other possibly danger-ous malfunctions, such as leaving a bullet in the bore!
After cleaning, always check to be certain that the magazine follower movement and spring tension are correct, and that no solvent or debris remain. Improper reassembly of the magazine spring can cause a potentially dangerous malfunc-tion. If cleaning does not restore proper tension, or if you experience a problem with the magazine, don’t use it. Get a new one.
CARE AND CLEANING
Make Sure Gun Is Unloaded!
Before cleaning, be certain the rifle and its magazine contain no cartridges (see “To Unload”, p. 11).
At regular intervals, or whenever the rifle has been exposed to sand, dust, extreme humidity, condensation, immersion in water, or other adverse
3. Using powder solvent on a clean patch or bristle brush, remove powder residue from all components of the mechanism. After cleaning, run a dry patch through the bore, then follow with a patch that is very lightly oiled. Wipe all surfaces clean with a cloth, then wipe all surfaces with a patch or cloth that has been very lightly oiled.
4. NOTE: Only a light application of oil or grease is needed to provide adequate lubrication of moving parts and to prevent rust. Excess accumulations of oil tend to attract particles of dust and dirt and may congeal in cold weather which can interfere with the safe and reliable function of the rifle.
STORAGE
GUNS SHOULD NOT BE STORED LOADED!
USE THE LOCKING DEVICE SUPPLIED WITH THE RIFLE FOR STORAGE. (SEEPAGE2)
Do notstore the rifle in a leather case or scabbard. Leather attracts moisture, even though it may appear to be dry.
conditions, disassemble, clean and oil it. Proper periodic maintenance is essential to the reliable functioning of any firearm.
To clean the rifle, proceed as follows:
1. Disassemble (field-strip) the rifle to the extent described on pages 15 & 16. 2. Using a cleaning rod, run a solvent-wetted patch through the bore several
times. Then attach a solvent-wetted bristle brush to the rod and run it back and forth the full length of the bore as many times as necessary to remove grease and dirt from the bore and chamber. Clean bore with dry patches and examine. Bore fouling can contribute to reduced accuracy, and grease accumu-lation in the chamber can interfere with proper feeding of cartridges from the magazine.
!
WARNING – LUBRICATION
OIL
Firing a rifle with oil, grease, or any other material even partially obstructing the bore may result in dam-age to the rifle and serious injury to the shooter and those nearby. Do not spray or apply lubricants directly on ammunition. If the powder of a cartridge is affected by the lubricant, it may not be ignited, but the primer firing may push the bullet into the bore where it may be lodged. Firing a subsequent bullet into the obstructed bore may damage the rifle and cause seri-ous injury or death to the shooter and those nearby.
Use lubricants properly. You are responsible for the proper care and maintenance of your firearms.
TO RENDER THE RIFLE INOPERATIVE FOR SAFE STORAGE
With the muzzle pointed in a safe direction, remove the magazine, open the bolt, and check the chamber to be sure the rifle is completely unloaded! Loosen barrel band screw and slide barrel band forward off stock. Unscrew and remove take-down screw on underside of stock. Carefully lift barrel/receiver assembly out of the stock. Pull slide assembly to the rear far enough to expose cross hole in the guide rod. Insert a pin/punch to hold slide in this position, and then allow slide assembly to move forward to disengage guide rod. Now rotate the assembly downward out of the receiver. Reassemble rifle without slide housing assembly, which contains the bolt and most of the firing mechanism.
Store the rifle and the slide housing/bolt assembly in different locations. When disassembled in this manner, the rifle is inoperable. It is impossible to fire the rifle until the slide housing/bolt assembly has been correctly replaced into the rifle.
To reassemble the rifle for firing, remove the barrel/receiver assembly from the stock as above and reinstall the trigger housing/bolt assembly (see pages 16 - 17 of this manual). Carefully reinstall the barrel/receiver/trigger housing assembly into the stock. Check to be sure the bolt, trigger, and safety mechanisms can be operated fully and freely. The rifle is now reassembled and can be loaded and fired normally.
While the rifle is less likely to be used by unauthorized persons when disas-sembled in the above manner, it is always safest to store any firearm with the supplied locking device correctly installed or to store the firearm in a gun safe or other secure location, away from children and unauthorized adults. Guns should always be stored securely, unloaded and separate from their ammuni-tion.
Never place or store any firearm in such a manner that it may be dis-lodged. Firearms should always be stored securely and unloaded, away from children and careless adults. Use the locking device originally supplied with this firearm for storage. The use of a locking device or safety lock is only one aspect of responsible firearms storage. For increased safety, firearms should be stored unloaded and locked in a location that is both sepa-rate from their ammunition and inac-cessible to children and any other unauthorized person.
STORE SECURELY & UNLOADED
ATTACHING RUGER SCOPE RINGS
Each Ruger telescope ring is a mated assembly of a top and a base. Do not mix the parts of the two ring assemblies as they are not interchangeable. On the underside of each mounting ring assembly there is an integral lug, located off center with respect to the front and back sides of the mount. The lug is nearer to the front surface. By reference to the lug, the mounting ring can be correctly assembled with the front of the ring toward the muzzle of the rifle.1. Disassemble one ring and reassemble over the scope body between the turret and the eyepiece. Remember - the lug on the base should be on the front side of the scope.
2. Install the four top screws. Do not tighten.
3. Disassemble the other ring and install it on the forward section of the scope tube with the lug forwardly also. Install the four top screws. Again, do not tighten.
4. Assemble the rings to the receiver with the lugs engaging the recesses in the top surface of the receiver. Tighten the clamp nuts so that the rings are locked to the semicircular cuts on the sides of the receiver.
5. Rotate the scope until cross-hairs are aligned properly and slide scope to desired eye relief. Then tighten the eight top screws each a bit at a time to grip the scope body.
6. Sight in according to the directions with your scope.
SIGHT ADJUSTMENT
The RUGER®
CARBINE
rifles are equipped with an adjustable rear sight. Each click of the sight adjustment screw (either windage or elevation) will move the point of impact of the bullet approximately 3/4” at a range of 25 yards. Be careful not to use one of the curved front sight blade protectors as a front sight when you aim -- the front sight is a vertical post.UP DOWN
ELEVATION
RIGHT
LEFT WINDAGE
To raise point of impact: turn screw counterclockwise.
To lower point of impact: turn screw clockwise.
To move the point of impact to the right: turn screw counterclockwise.
Serrated Sight Base G06302
Windage
Adjustment - Screw G06250
Lock Screw G06410
(Must be loosened 1/2 turn prior to any sight adjustment) Aperture G06202
Base Screw (2 Req'd) G06401
Rear Sight Nut G06451
WINDAGE ADJUSTMENT
1. Loosen Lock Screw approximately 1/2 turn. 2. Windage Screw can now turn:
a. Turn screw clockwise to move bullet point of impact to the right.
b. Turn screw counter clockwise to move bullet point of impact to the left.
ELEVATION ADJUSTMENT
1. Loosen Lock Screw only enough to permit Aperture to slide across serrations on sight base.
2. Aperture elevation can now be adjusted.
a. Slide Aperture up Serrated Base to move bullet point of impact up. b. Slide Aperture down Serrated Base to move bullet point of impact down. Tighten Lock Screw when adjustments are completed.
NOTE:Do not remove Lock Screw completely. Complete removal of sight from Carbine will be required to reinstall the Lock Screw so that the sight can be cor-rectly reassembled.
R
L
SUGGESTED SIGHT PICTURE
Top of front sight even with top
of rear sight blade. Front sight
centered in notch of rear sight
blade. Target bulls-eye centered
on top of front sight.
GHOST RING SIGHT ADJUSTMENT
SERVICE AND PARTS POLICY
If you have any question with regard to the performance of your RUGER® CARBINErifle please write or call (520-778-6555) our Product Service Department in Prescott, Arizona 86301, fully describing all circumstances and conditions involved. If you should return your rifle to the factory for repair, or order parts for it, please comply with the following suggestions for prompt serv-ice:
WARNING: BEFORE SHIPPING ANY FIREARM,
BE ABSOLUTELY CERTAIN THAT IT AND ITS
MAG-AZINE ARE UNLOADED. DO NOT SHIP
CAR-TRIDGES WITH A FIREARM.
!
SHIPPING FIREARMS FOR REPAIR
RUGER®CARBINE rifles returned to the factory for repair should be sent to: Sturm, Ruger & Company, Inc., Product Service Department, 200 Ruger Road, Prescott, Arizona 86301-6181. Phone: (520) 778-6555.
Guns should be sent prepaid. We will not accept collect shipments.
The Federal Gun Control Act, as well as the laws of most States and localities, do not prohibit an individual (who is not otherwise barred from purchasing or pos-sessing a firearm) from shipping a firearm directly to the manufacturer for repair. However, before you ship your rifle to us, be certain that your State or locality does not have a law or regulation which will prohibit you from receiving the rifle from us after it has been repaired. If such receiving is prohibited, then please have a Federally Licensed firearms dealer ship the gun to us. If your rifle is sent to us by a dealer, it will be returned to him after being repaired. If a hand-gun (pistol or revolver) is shipped by an individual who does not hold a Federal Firearms License, it must be shipped via U.P.S. (Next Day Air) Persons who do not hold a Federal Firearms License are prohibited by Federal law from shipping a handgun by Mail. Handguns mailed in violation of the law are impounded by the Post Office.
It is the purchaser’s responsibility to be absolutely certain that any parts ordered from the factory are correctly fitted and installed. Firearms are compli-cated mechanisms and IMPROPER FITTING OF PARTS MAY RESULT IN A DANGEROUS MAL-FUNCTION, DAMAGE TO THE FIREARM, AND SERIOUS INJURY TO THE SHOOTER AND OTHER PERSONS. The purchaser and installer of parts must accept full responsibility for the correct adjustment and functioning of the pistol after such installation.
PARTS MUST FIT CORRECTLY
!
WARNING –PARTS PURCHASERS
ORDERING PARTS
Please contact the Arizona Product Service Department for parts availability and current prices. All parts orders for the RUGER®CARBINE rifles should be sent to: Sturm, Ruger & Company, Inc., Parts Department, 200 Ruger Road, Prescott AZ 86301-6181, (520)778-6555. We cannot comply with open account or C.O.D. requests. Payment in the form of a check, money order, Visa or
Mastercard must accompany your order. Credit Card orders must include the account number, expiration date and whether it is a Visa or Mastercard account. Minimum parts order is $1.00 plus a $3.50 shipping and handling charge. Order parts by Part Number and Part Name, include the entire serial number of the firearm for which the parts are being ordered. There is a minimum net labor charge of $20.00 plus $12.00 shipping and handling charge if the parts are facto-ry fitted. All factofacto-ry-fitted parts are fitted on an exchange basis only. We will not return the replaced parts.
Because the CARBINEreceiver (part number G00125 or G00101) is a serial numbered component, it is defined as a “firearm” by Federal law and is not sold as a separate component.
*Parts designated by an asterisk must be factory fitted. These parts are fitted on an exchange basis only. We will not return the replaced parts. We will not return any part that is broken, malfunctioning, badly worn or has been modified. See “Warning – Parts Purchasers” above.
CAUTION: A gun containing modified, broken, malfunctioning,
or badly worn parts should not be fired.
!
25
RUGER
®CARBINE
PARTS LIST
Design, prices and specifications subject to change without notice.
SPECIFY MODEL AND CALIBER WHEN ORDERING
(See Exploded View on Pages 30).
Part Name
Part No.
Model
* Barrel
G00325
PC9, PC9GR
* Barrel
G00300
PC4, PC4GR
Barrel Band
G06501
PC9, PC4
Barrel Band
G06510
PC9GR, PC4GR
Barrel Band Assembly
G06510-100
PC9GR, PC4GR
Barrel Band Screw
C-69H
All Models
* Bolt Lock
G07301
All Models
Bolt Lock Cross Pin, 2 Req’d
G07900
All Models
Bolt Lock Spring
G09000
All Models
Butt Plate Screw, 2 Req’d
C-91SM
All Models
Cable Lock, 10” -
For Ruger Rifles
Only
PM120A
All Models
Cocking Handle
G02505
All Models
Cocking Handle Plunger
G07100
All Models
Cocking Handle Plunger Spring
G07200
All Models
Disconnector
G06701
All Models
Disconnector Pivot Pin
G06800
All Models
Ejector
G00802
All Models
Part Name
Part No.
Model
Extractor
G01401
PC4, PC4GR
Extractor Spring
G01500
All Models
Extractor Pin
G01601
All Models
Firing Pin
KG01100
All Models
Firing Pin Retaining Pin
G06000
All Models
Firing Pin Spring
KV01850
All Models
* Front Sight
G05603
All Models
Front Sight Cross Pin
MA07201
All Models
Ghost Ring Sight Adjustment Nut
G06451
PC9GR, PC4GR
Ghost Ring Sight Aperture
G06202
PC9GR, PC4GR
Ghost Ring Sight Assembly
G06202-100
PC9GR, PC4GR
Ghost Ring Sight Base
G06302
PC9GR, PC4GR
Ghost Ring Sight Base Screw, 2 Req’d
G06401
PC9GR, PC4GR
Ghost Ring Sight Installation Kit
G06202-200
PC9, PC4
Ghost Ring Sight Lock Screw
G06410
PC9GR, PC4GR
Ghost Ring Sight Windage Adjustment Screw
G06250
PC9GR, PC4GR
Guide Rod/Recoil Spring Assembly
G15101
All Models
* Hammer
G01703
All Models
Hammer Pivot Pin
G01900
All Models
Hammer Spring
G04701
All Models
Hammer Strut
G01801
All Models
Handguard Assembly
G10500
All Models
Handguard Plug, Not Illustrated
G00551
PC9GR, PC4GR
Lever Actuator
G07501
All Models
27
Part Name
Part No.
Model
Magazine, Complete
P-18/10
PC9, PC9GR
Magazine, Complete
P-17/10
PC4, PC4GR
Magazine Latch
G03125
PC9 PC9GR
Magazine Latch
G03101
PC4, PC4GR
Magazine Latch Retaining Pin
G01200
All Models
Magazine Latch Spring
G05000
PC9, PC9GR
Magazine Latch Spring
G05050
PC4, PC4GR
Pivot Pin Retainer
G05501
All Models
Rear Sight, Adjustable, Complete
A15901-202
PC9
Rear Sight, Adjustable, Complete
A15901-203
PC4
Rear Sight Body, Complete
A15901-102
PC9
Rear Sight Body, Complete
A15901-103
PC4
Rear Sight Body
A05900
PC9, PC4
Rear Sight Base
A06100
PC9, PC4
Rear Sight Base Set Screw
A06200
PC9, PC4
Rear Sight Blade
G08701
PC9
Rear Sight Blade, with White Outline Notch
H07203
PC4
Rear Sight Detent Ball
MR05908
PC9, PC4
Rear Sight Elevation Screw
MR05902
PC9, PC4
Rear Sight Elevation Spring
MR05906
PC9, PC4
Rear Sight Windage Adjustment Screw
E05903
PC9, PC4
Rear Sight Windage Spring
MR05907
PC9, PC4
✝
Receiver Spacer
G09900
PC9, PC4
Part Name
Part No.
Model
Recoil Block
G00703
PC9, PC4
Recoil Block
G00704
PC9GR, PC4GR
Recoil Pad
J05602
All Models
Reversing Lever
G07403
All Models
* Safety
G03803
All Models
* Safety Plunger
KG04800
All Models
* Safety Plunger Spring
G04900
All Models
* Sear
G02305
All Models
Sear Interrupter
G01300
All Models
Sear Interrupter Plunger
G05200
All Models
Sear Interrupter Plunger Spring
G05301
All Models
Sear Spring
G02401
All Models
Sear Spring Plunger
G05900
All Models
* Slide
G13725
PC9, PC9GR
* Slide
G13701
PC4, PC4GR
Slide Stop Assembly
G13202
PC9, PC9GR
Slide Stop
G03205
PC4, PC4GR
Slide Stop Plunger
KV06700
PC4, PC4GR
Slide Stop Spring
G04605
PC4, PC4GR
Sling Swivel, Front
S-85
PC9GR, PC4GR
Sling Swivel Adapter, Front
B08600
PC9GR, PC4GR
Sling Swivel Rear Mounting Screw
S-87
PC9GR, PC4GR
Stock
G00400
All Models
Stock Bolt
G05700
All Models
Part Name
Part No.
Model
Stock Bolt Bushing
G08100
All Models
Stock Bolt Lock Washer
G06100
All Models
Take Down Screw
G09200
All Models
Take Down Screw Flat Washer
G09401
All Models
Take Down Screw Lock Washer
G09300
All Models
Trigger
KG02005
All Models
Trigger Pivot Pin
G02100
All Models
Trigger Spring
G02201
All Models
Trigger Spring Support
G03000
All Models
* PARTS SO MARKED MUST BE FACTORY FITTED
RUGER
®CARBINE
EXPLODED VIEW
THE BASIC RULES OF SAFE FIREARMS HANDLING
We believe that Americans have a right to purchase and use firearms for lawful purposes. The private ownership of firearms in America is traditional, but that ownership imposes the responsibility on the gun owner to use his firearms in a way which will ensure his own safety and that of others. When firearms are used in a safe and responsible manner, they are a great source of pleasure and satisfaction, and represent a fundamental part of our personal liberty.
Firearms do not cause accidents! Firearms accidents are almost always found to have been the result of carelessness, or ignorance on the part of the shooter of the basic rules of safe gun handling.
The following rules must be observed by gun users at all times. Safe gun handling is not just desirable, it is absolutely essential to your safety, the safety of others, and the continuation of gun ownership and sport shooting as we know it today.
1. LEARN THE MECHANICAL AND HANDLING
CHAR-ACTERISTICS OF THE FIREARM YOU ARE USING.
Not all firearms are the same. The
method of carrying and handling
firearms varies in accordance with
the mechanical provisions for
avoid-ing accidental discharge and the
vari-ous proper procedures for loading
and unloading. No person should
handle any firearm without first
hav-ing thoroughly familiarized himself
with the particular type of firearm he
is using, and with safe gun handling
in general.
2. ALWAYS KEEP THE
MUZZLE POINTED IN A
SAFE DIRECTION.
Be sure of the bullet stop behind your
target, even when dry-firing. Never
let the muzzle of a firearm point at
any part of your body or at another
person. This is particularly important
when loading or unloading a firearm.
In the event of an accidental
dis-charge, no injury can occur as long
as the muzzle is pointing in a safe
direction. A safe direction means a
direction which will not permit a
dis-charged bullet to strike a person, or to strike an object from which the bullet
may ricochet.
RUGER
®
A safe direction must take into account the fact that a bullet may
pene-trate a wall, ceiling, floor, window, etc., and strike a person or damage
property. Make it a habit to know exactly where the muzzle of your gun
is pointing whenever you handle it, and be sure that you are always in
control of the direction in which the muzzle is pointing, even if you fall
or stumble. Keep your finger off the trigger until you are ready to shoot.
3. FIREARMS SHOULD BE UNLOADED WHEN NOT IN
USE
.
Firearms should be loaded only
when you are in the field or on the
target range or shooting area,
ready to shoot. Firearms and
ammunition should be securely
locked in safes, racks or cabinets,
or by using the locking device
sup-plied with the firearm, when not in
use. Ammunition should safely be
stored separate from firearms.
Store your firearms out of sight of
visitors and children. It is the gun
owner’s responsibility to be certain
that children and persons
unfamil-iar with firearms cannot gain access to firearms, ammunition, or
compo-nents.
4. BE SURE THE BARREL IS CLEAR OF OBSTRUCTIONS
BEFORE SHOOTING.
E
ven a bit of mud, snow or excess
lubricating oil or grease in the
bore may cause the barrel to
bulge, or even burst on firing, and
can cause serious injury to the
shooter and bystanders. Be sure
that you are using ammunition of
the proper caliber and loading for
the gun you are using. If the
report or recoil on firing seems
weak, or doesn’t seem quite right,
CEASE FIRING IMMEDIATELY,
unload your firearm, and check to
be sure that no obstruction has
become lodged in the barrel. Never try to shoot out an obstruction!
1
2
3
5. BE SURE OF YOUR
TARGET BEFORE YOU
SHOOT.
Don’t shoot unless you know
exactly where your bullet is going
to strike. Be sure of the bullet
stop behind your target, even
when dry-firing with an unloaded
gun. If you are in the field
hunt-ing, do not fire at a movement or
noise. Take the time to be
absolutely certain of your target
before you pull the trigger.
6. WEAR SHOOTING
GLASSES AND HEARING
PROTECTORS WHEN
YOU SHOOT.
All shooters should wear
protec-tive shooting glasses and
ade-quate hearing protectors when
shooting. Exposure to shooting
noise can damage hearing, and
adequate eye protection when
shooting is essential.
7. NEVER CLIMB A TREE
OR FENCE WITH A
LOADED FIREARM.
8. DON’T SHOOT AT A
HARD SURFACE, OR AT
WATER.
Bullets can glance off many
sur-faces like rocks or the surface of
water and travel in unpredictable
directions with considerable
velocity.
9. NEVER TRANSPORT A
LOADED FIREARM.
Firearms should always be
unloaded before being placed in a
vehicle. A suitable carrying case
or scabbard should be used to
carry an unloaded firearm to and
from the shooting area.
10. AVOID ALCOHOLIC
BEVERAGES WHEN
SHOOTING.
A BRIEF ACCOUNT OF AN EXTRAORDINARY
ACHIEVEMENT: RUGER FIREARMS
One of the few American firearms manufacturers whose
manage-ment has remained unchanged since starting in business, Sturm, Ruger
& Company, Inc., had its beginning in a small machine shop occupying a
rented frame building in Southport, Connecticut. In January, 1949, with
an initial investment of only $50,000 and an idea, William B. Ruger and
Alexander M. Sturm started production of a .22 caliber autoloading
pis-tol–a design which was so successful that it became the cornerstone
upon which one of the most comprehensive lines of sporting firearms
ever made in America was established. After Alex Sturm’s death in 1951,
William B. Ruger continued to direct the company alone and today, as
Chairman Emeritus of the Board, he continues to provide the guidance
which has made this 52-year-old company a sound and successful
enter-prise.
Sturm, Ruger & Company, in this relatively short time, has established
itself as a leading small arms design organization, developing a unique
and broad line of fine quality sporting, military and police firearms to
become one of the world’s most famous producers of revolvers, pistols,
rifles and shotguns. From 1949 thru 2001 Ruger craftsmen have built
many millions of firearms.
During its five decades of growth and progress under the leadership of
William B. Ruger, the company has developed a business philosophy and
implemented policies which represent a constructive influence in the life
of modern America. From the beginning, Sturm, Ruger & Company
played a positive role in conservation efforts and has supported the
inter-ests of shooters through such groups as the National Rifle Association,
National Shooting Sports Foundation, and many regional sportsmen’s
organizations. The company has always endeavored to market its
firearms for constructive and recreational purposes, to emphasize the
traditional aspects of shooting, to render meaningful public services and
to encourage shooters in constructive, responsible, and safe participation
in the shooting sports.
Today, Sturm, Ruger & Company is particularly mindful of those
ele-ments which have contributed to the creation of its success, and extends
heartfelt thanks to its many loyal employees and customers.
WHY NO WARRANTY CARD HAS BEEN
PACKED WITH THIS NEW RUGER FIREARM
The Magnuson-Moss Act (Public Law 93-637) does not require any
seller or manufacturer of a consumer product to give a written
war-ranty. It does provide that if a written warranty is given, it must be
designated as “limited” or as “full” and sets minimum standards for a
“full” warranty. Sturm, Ruger & Company, Inc. has elected not to
pro-vide any written warranty, either “limited” or “full”, rather than to
attempt to comply with the provisions of the Magnuson-Moss Act and
the regulations issued thereunder. There are certain implied
war-ranties under state law with respect to sales of consumer goods. As
the extent and interpretation of these implied warranties varies from
state to state, you should refer to your state statutes. Sturm, Ruger &
Company wishes to assure its customers of its continued interest in
providing service to owners of Ruger firearms.
STURM, RUGER & Company, Inc.
Southport, Connecticut 06490 U.S.A.
http://www.ruger-firearms.com
“Arms Makers For Responsible Citizens”
A COPY OF THE INSTRUCTION MANUAL FOR ANY RUGER FIREARM IS AVAILABLE FROM THE FACTORY FREE ON REQUEST.
THESE INSTRUCTION MANUALS CONTAIN IMPORTANT WARNINGS WHICH MUST BE UNDERSTOOD
BEFORE USING THESE FIREARMS.
“RUGER”, the Sturm, Ruger logo, “SINGLE-SIX”, “BLACKHAWK”, “REDHAWK”, “SECURITY-SIX”, “SPEED-SIX”, “SERVICE-SIX”, “BEARCAT”, “OLD ARMY”, “10/22”, “MINI-14”, “MINI THIRTY”,