Treo™ 90 Handheld
User Guide
Page 2 Windows Edition
Copyright
Copyright © 2002 Handspring, Inc. All Rights Reserved. Handspring, Treo, and the Treo logo are trademarks of Handspring, Inc. and may be registered in some jurisdictions. Blazer and the Handspring logo are trademarks of Handspring Inc., are registered trademarks in the U.S.A., and may be registered in other jurisdictions. Portions copy-right © 1998-2002 Palm, Inc. or its subsidiaries. All copy-rights reserved. Palm OS and HotSync are registered trade-marks and Palm and the Palm Powered logo are tradetrade-marks of Palm, Inc. and are used by Handspring under license. The SD logo is a trademark. All other trademarks and trade names are the property of their respective owners.
Disclaimer and limitation of liability
Handspring, Inc. and its suppliers assume no responsibility for: (i) any damage or loss resulting from the use of this handbook, (ii) any loss or claims by third parties that may arise through the use of this software, or (iii) any damage or loss caused by deletion of data as a result of malfunction, dead battery, or repairs. Be sure to make backup copies of all important data on other media to protect against data loss.
Warranty and License Agreement
In order to obtain warranty service, you must immediately notify Handspring of any defect within the warranty period and provide dated proof of original purchase. For further information about the warranty service procedure, please visit our website at: http://www.handspring.com
A copy of the Warranty and End User License Agreement are included in this guide. You can also view a copy of the warranty on our website at http://support.handspring.com/esupport/forms/hsFileList.jsp?Type=Warranties.
The information included in this guide sets forth Handspring's sole and complete warranty and software licensing obligations with respect to your Handspring product. Use of the product indicates your acceptance of the terms of the warranty and the End User License Agreement.
Software download available
Introduction to Your Treo™ 90 Handheld . . . 11
Getting to know your handheld . . . .11
What is a Treo handheld? . . . .11
System requirements . . . .12
Upgrade information . . . .12
Treo components . . . .14
Locking and unlocking the keyboard . . . .16
Adjusting the display . . . .16
Charging the battery . . . .17
Using the protective cover . . . .18
Using the stylus to get things done . . . .19
Elements of the handheld interface . . . .19
Moving around the screen . . . .20
Displaying online tips . . . .20
Customizing your handheld . . . .21
Connecting the HotSync cable . . . .23
Using desktop software . . . .24
Using your handheld with Palm Desktop software . . . .24
Using your handheld with Microsoft Outlook . . . .25
Using your handheld with another PIM . . . .25
Entering Data in Your Handheld . . . 27
Using the handheld keyboard . . . .27
Typing capital letters . . . .27
Typing numbers and symbols . . . .28
Navigation keystrokes . . . .29
Using menus . . . .29
Using text ShortCuts . . . .30
Typing accented characters . . . .31
Typing extended characters . . . .31
Using the onscreen keyboard . . . .33
Using your computer keyboard . . . .33
Importing data . . . .34
Page 4 Contents
Managing Your Applications . . . 37
Using the Applications Launcher . . . 37
Opening applications . . . 37
Switching between applications . . . 38
Categorizing applications . . . 38
Changing the Applications Launcher display . . . 38
Choosing preferences . . . 39
Installing and removing applications . . . 40
Installing add-on applications . . . 40
Removing applications . . . 42
Removing Palm Desktop software . . . 43
Working with expansion cards . . . 44
Opening applications on an expansion card . . . 45
Copying applications to an expansion card . . . 45
Using the Card Info application . . . 46
Security . . . 47
Assigning a password . . . 48
Changing or deleting a password . . . . 48
Locking your handheld . . . 49
Recovering from a forgotten password . . . 50
Applications Overview . . . 53
Date Book Plus . . . 54
Contacts . . . 55
To Do List . . . 56
Memo Pad . . . 57
CityTime . . . 58
Calculator . . . 59
Expense . . . 60
Common Tasks . . . 61
Creating records . . . 61
Editing records . . . 62
Entering text . . . 62
Edit menu . . . 62
Deleting records . . . 63
Other ways to delete records . . . 64
Purging records . . . 64
Categorizing records . . . 65
Contents Page 5
Finding records . . . 67
Looking up Contacts records . . . 68
Using Find . . . 69
Using Phone Number Lookup . . . . 69
Sorting lists of records . . . 72
Making records private . . . 73
Hiding and masking private records . . . 73
Attaching notes . . . 75
Choosing fonts . . . 76
Exchanging and updating data: HotSync operations . . . 76
Performing a HotSync operation for the first time . . . 77
Beaming information . . . 78
Application-Specific Tasks . . . 81
Date Book Plus . . . 82
Working in Day View . . . 82
Scheduling an event . . . 82
Rescheduling an event . . . 84
Setting an alarm for an event . . . 85
Scheduling repeating or continuous events . . . 86
Changing the Date Book Plus view . . . 88
Working in Week View . . . 89
Working in Week View with Text . . . . 90
Working in Month View . . . 91
Working in Year View . . . 91
Working in List View . . . 92
Spotting event conflicts . . . 93
Working with floating events . . . 93
Working with To Do items . . . 94
Using the Daily Journal . . . 94
Using templates . . . 95
Date Book Plus menus . . . 96
Contacts . . . .103
Creating a Contacts entry . . . .103
Duplicating a Contacts entry . . . .104
Selecting types of phone numbers . . . .104
Changing Contact entry details . . . .105
Dialing a number in your Contacts list . . . .105
Contacts menus . . . .106
To Do List . . . .109
Setting priority . . . .109
Setting a due date . . . .109
Page 6 Contents
Checking off a To Do item . . . 111
To Do Show Options . . . 111
To Do List menus . . . 112
Memo Pad . . . 114
Reviewing memos . . . 114
Memo Pad menus . . . 115
CityTime . . . 116
Setting your home city . . . 116
Selecting remote cities . . . .116
Adding cities . . . 117
CityTime menus . . . .117
Calculator . . . 118
Selecting the Calculator mode . . . 118
Using the Basic Calculator buttons . . . 118
Displaying Recent Calculations . . . .119
Using the Advanced Calculator mode . . . 119
Using the Advanced Calculator buttons . . . .119
Creating a custom view . . . 126
Calculator menus . . . 127
Expense . . . 128
Changing the date of an Expense item . . . 128
Entering receipt details . . . 129
Customizing the Currency pick list . . . 130
Show Options . . . 131
Transferring your data to Microsoft Excel . . . .132
Expense menus . . . .134
Setting Preferences for Your Handheld . . . 137
Viewing Preferences . . . 137
Buttons Preferences . . . 138
HotSync Buttons Preferences . . . 138
Connection Preferences . . . 139
Connection Types . . . 139
Date & Time Preferences . . . 140
Digitizer Preferences . . . 140
Formats Preferences . . . 140
Country default . . . 140
Time, date, week start, and numbers formats . . . 141
General Preferences . . . 141
Auto-off delay . . . 141
Contents Page 7
Network Preferences and TCP/IP software . . . .142
Selecting a service . . . .142
Entering a user name . . . .143
Entering a password . . . .144
Selecting a connection . . . .144
Adding telephone settings . . . .145
Connecting to your service . . . .147
Creating additional service templates . . . .147
Adding detailed information to a service template . . . .148
Creating a login script . . . .150
Deleting a service template . . . .152
Network Preferences menu commands . . . .152
TCP/IP troubleshooting . . . .152
Owner Preferences . . . .153
Phone Preferences . . . .154
ShortCuts Preferences . . . .154
Creating a ShortCut . . . .154
Editing a ShortCut . . . .155
Deleting a ShortCut . . . .155
Advanced HotSync
®Operations . . . 157
Selecting HotSync setup options . . . .157
Customizing HotSync application settings . . . .159
IR HotSync operations . . . .160
Preparing your computer for infrared communication . . . .160
Configuring HotSync Manager for infrared communication . . . .162
Performing an IR HotSync operation . . . .163
Returning to serial cable HotSync operations . . . .164
Conducting a modem HotSync operation . . . .164
Preparing your computer . . . .165
Preparing your handheld . . . .166
Selecting the conduits for a modem HotSync operation . . . .167
Performing a modem HotSync operation . . . .167
Conducting a HotSync operation via a network . . . .168
Connecting to your company’s dial-in server . . . .168
Performing a dial-in network HotSync operation . . . .169
Performing a network HotSync operation via a LAN . . . .170
Using File Link . . . .170
Creating a user profile . . . .171
Synchronizing with your desktop e-mail application . . . .172
Preparing your computer to synchronize desktop e-mail . . . .173
Page 8 Contents
Viewing e-mail items . . . 175
Creating e-mail items . . . 176
Looking up an address . . . .177
Adding details to e-mail items . . . 178
Storing e-mail to be sent later . . . 181
Filing e-mail . . . 183
Deleting e-mail . . . 184
Message list options . . . 185
Sorting the Message list . . . .186
Palm Mail HotSync options . . . 186
Palm Mail menus . . . 191
Using the Wireless Application Suite . . . 193
Preparing for mobile communications . . . 194
Blazer Web Browser . . . 195
Viewing web pages . . . 195
Working with bookmarks . . . 196
Blazer menus . . . 200
Palm™ SMS . . . 204
Receiving SMS messages . . . .205
Creating text messages . . . 206
Creating a message signature . . . 207
Sending data via SMS . . . 208
Modifying messages . . . 208
SMS Messaging menus . . . 209
One-Touch Mail . . . 211
Maintaining Your Handheld . . . 213
Caring for your handheld . . . 213
Battery considerations . . . 213
Resetting your handheld . . . 214
Performing a soft reset . . . 214
Performing a warm (or safe) reset . . . 215
Performing a hard reset . . . 215
Troubleshooting Tips . . . 217
Software installation problems . . . 217
Operating problems . . . .218
Tapping and keyboard problems . . . 218
Wireless communication problems . . . .219
Application problems . . . 221
HotSync problems . . . 222
Contents Page 9
Password problems . . . .224
Technical support . . . .224
Creating a Custom Expense Report . . . 225
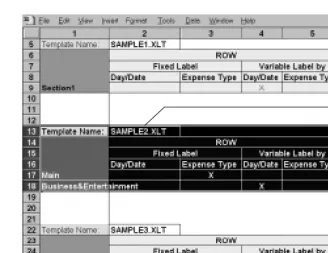
About mapping tables . . . .225
Customizing existing sample templates . . . .225
Determining the layout of the Expense Report . . . .227
Labels . . . .227
Sections . . . .227
Analyzing your custom Expense Report . . . .228
Programming the mapping table . . . .228
Using applications other than Microsoft Excel . . . .232
Expense file details . . . .232
Non-ASCII Characters for Login Scripts . . . 233
Use of ^char . . . .233
Carriage return and line feed . . . .233
Literal characters . . . .233
Warranty and Other Product Information . . . 235
Product Warranty . . . .235
Handspring, Inc. End User Software License Agreement . . . .236
GNU Library General Public License . . . .237
FCC Statement . . . .243
Canadian RFI Statement . . . .243
Acknowledgments . . . .244
Chapter 1 Page 11
Chapter 1
Introduction to Your
Treo™ 90 Handheld
This chapter explains the physical buttons and controls on your Treo™ 90 handheld, how to use your handheld for the first time, and how to install Palm™ Desktop software and the HotSync®
Manager synchronization software so you can synchronize your handheld and your computer.
Getting to know your handheld
What is a Treo handheld?
Your Treo handheld is one of the smallest, lightest, color Palm OS® handhelds available today.
With your new handheld, you will no longer have trouble getting to meetings and appointments on time, remembering people’s names and personal details, or keeping track of all the items on your to do list. Your handheld can help you improve your track record in all these areas, both at work and at home.
You can enter all your schedule details in Date Book Plus so you can view them by the day, week, month, year, or in list format; you can even set an alarm to remind you of important meetings. Keep all your contact names, addresses, phone numbers, and other details in Contacts, so you can find them as soon as you need them. Add your tasks to To Do list, prioritize them so you don’t overlook them, and assign them a due date.
To make sure you don’t lose any of this important information, you can synchronize your data with Palm Desktop software on your computer so you always have a backup copy. You can set different levels of security for your handheld so unauthorized eyes cannot view your data.
When you are out of the office, track your expenses for your expense reports; then transfer the data to your computer to print it out. Using the IR port or a cable to connect to your data-enabled mobile phone, you can dial your ISP and use the included Wireless Application Suite to send and receive e-mail, exchange SMS text messages, and to browse the Internet. Alternatively you can write, edit, and view your e-mail, and then use Palm Mail to synchronize your e-mail with your desktop e-mail application when you return to your office.
Page 12 Introduction to Your Treo™ 90 Handheld
System requirements
To install and operate Palm Desktop software and the HotSync Manager synchronization software, your computer system must meet the following requirements:
Minimum requirements
■ Windows 98, Windows Me, Windows 2000, or Windows XP with USB port, (for USB HotSync® cable)
--or--Windows 95, --or--Windows 98, --or--Windows Me, --or--Windows 2000, --or--Windows XP, or --or--Windows NT 4.0 with serial port (for serial HotSync cable)
■ 32 MB RAM (memory)
■ 25 MB available hard disk space
■ VGA monitor or better
■ CD-ROM drive (you can also download Palm Desktop software from www.handspring.com)
■ Internet Explorer 5.01 or higher (recommended)
Upgrade information
If you already own a Palm OS handheld, Handspring recommends that you install the version of Palm Desktop software that comes with your Treo handheld into the same folder as your current Palm Desktop software. When you install the new version in the same folder as the previous version, all your data is preserved. If you use another personal information manager (PIM), you still need to install Palm Desktop software in order to update the HotSync Manager on your computer.
You perform HotSync operations in exactly the same way, so you can quickly synchronize your old data with your new handheld.
Note: If you used password protection on your old handheld, you must upgrade to the most current desktop. The method of storing passwords has changed with the latest release of the desktop. Therefore, your password-protected information will not be synchronized if you don’t upgrade.
To upgrade:
1. Synchronize your old handheld with your old Palm Desktop software. This ensures that the latest information from your handheld is on your desktop computer.
2. (Optional) To ensure against any data loss, go to the folder that stores Palm Desktop software (this is usually the Handspring or Palm folder), copy (do not move) your user name folder, and store the copy outside the Palm Desktop software folder.
3. Follow the installation instructions that begin on page 24. Be sure to install the new software in the same folder as the old software.
Chapter 1 Page 13
5. If you had important settings on your old handheld, such as Network Preferences or Connection Preferences, manually copy them from your old handheld to your new handheld.
6. Compare the applications on your old handheld and your new handheld.
7. Beam any third party applications that did not transfer from your old handheld to your new handheld, or install them from the original files.
8. If any data for your third party applications did not transfer, beam it from your old handheld to your new handheld.
9. If you created a password on your old handheld, enter it on your new handheld.
Note: Records you previously marked Private remain marked Private, but you need to reenter a password on your new handheld.
Each device must have a unique name
After you complete the upgrade process described above, you have two devices with the same name. This is an undesirable situation. Each device must have a unique name in order to prevent unexpected results during HotSync operations and other complications.
We strongly recommend that you perform a hard reset on your old handheld. See page 215 for details.
Page 14 Introduction to Your Treo™ 90 Handheld
Treo components
Locating front panel controls
Lanyard holder Enables you to attach a lanyard to your handheld so that it’s easy to carry.
Contrast/ Brightness Control
Opens the Adjust Display dialog box where you can adjust the appearance of your handheld screen for the clearest screen display. See page 16 for instructions.
Scroll buttons Displays text and other information that extends beyond the area of the handheld screen. Pressing the bottom scroll button scrolls down to view information below the viewing area, and pressing the top scroll button scrolls up to view the information above the viewing area.
Lanyard holder
Scroll buttons Screen
Keyboard
Application buttons Contrast/
Chapter 1 Page 15
Locating back panel controls
Application buttons
Activates the applications that correspond to the icons on the buttons: Date Book Plus, Contacts, To Do List, and Memo Pad. See page 138 for details on reassigning these buttons to activate any application on your handheld.
You can also use these buttons in combination with Option to activate other applications. See Chapter 4 in this guide for details.
Tip: If your handheld is turned off, pressing any application button turns on your handheld and opens the corresponding application.
Keyboard Enables you to type letters, numbers and symbols on your handheld. See Chapter 2 to learn how to enter information.
Handheld screen
Displays the applications and information stored in your handheld. It is touch-sensitive and responds to the stylus.
Power button/ LED
Turns your handheld on and off, locks and unlocks the keyboard, and indicates the status of the battery as it charges.
When your handheld is connected to the travel charger or HotSync cable, the LED blinks while the battery charges and stays on after the battery is charged. When the LED alarm setting is active, the LED blinks as an alarm notification. See page 142 for details.
Expansion slot
Insert optional Secure Digital (SD) cards or MultiMedia Cards (MMC) to add features to your handheld. See the section that begins on page 44 for information about how to use expansion cards.
Stylus Serves as the instrument used to tap options on your handheld screen. To use the stylus, slide the stylus out of the slot, and hold it as you would a pen or pencil.
IR port Uses infrared technology to transmit data to and receive data from other Palm OS devices. See the section that begins on page 78 for details. You can also use the IR port to update the information between your handheld and computer using HotSync technology. See the section that begins on page 160 for details.
Page 16 Introduction to Your Treo™ 90 Handheld
Locking and unlocking the keyboard
To avoid accidentally pressing keys while your handheld is in your pocket, purse, etc., you can lock the keyboard. Locking the keyboard helps conserve battery power, and prevents unintentional creation and deletion of records. When the keyboard is locked, you cannot enter data or view information on your handheld until you unlock the keyboard.
To lock the keyboard:
■ Press and hold the power button for two seconds.
To unlock the keyboard:
1. Press and hold the power button for two seconds.
2. In the KeyLock Off dialog box, tap OK to unlock the keyboard.
Adjusting the display
Depending on the lighting conditions or temperature of the environment where you use your handheld, you may need to adjust the brightness and color saturation of the display.
The Adjust Display dialog box contains two sliders. The upper slider adjusts color saturation and the lower slider adjusts brightness. The display usually looks best at maximum brightness but you may want to decrease the brightness to conserve battery power.
To adjust the display:
1. Press Option .
2. Type the letter Q.
3. Press the scroll buttons, or drag the top slider, to adjust the color saturation until you can see the three shapes as distinctly as possible.
4. Hold Option and press the scroll buttons, or drag the bottom slider, to adjust the screen brightness
Tip: You can also tap to the left or right of the sliders to fine tune the display settings.
5. Hold Option and press Return to finish.
Reset button Under normal use, you should not have to use the reset button. See Appendix A for information about when and how to use the reset button.
Chapter 1 Page 17
Charging the battery
To use your handheld, you must connect the travel charger or the HotSync cable and charge the battery. When you’re near your computer, connect your handheld to the HotSync cable with the travel charger connected to a wall outlet as shown in the section that begins on page 23. When travelling, connect the travel charger cable directly to your handheld as shown in this section.
It takes about 90 minutes to charge the battery. A fully charged battery provides approximately 10 days of use. If the battery drains to the point where your handheld does not turn on, it stores your data safely for about three days.
Note: Recharge the battery after the first low battery warning. This prevents data loss that can occur if your handheld sits idle for more than five days after the first battery warning. See Appendix A for tips on extending the life of the battery.
To charge the battery with the travel charger:
1. Plug the travel charger into a wall outlet.
2. With the word “UP” facing up (as shown), connect the travel charger cable to the charger connector on the bottom of your handheld.
Tip: The LED blinks green while your handheld charges. When the LED turns solid green, your handheld is charged. It takes approximately 90 minutes to charge a fully drained battery.
Page 18 Introduction to Your Treo™ 90 Handheld
Using the protective cover
The cover protects the handheld screen when it is not in use.
To remove the cover:
1. Unclip the top of the cover from your handheld.
2. Lift the cover off your handheld.
To reattach the cover:
1. Insert the pegs on the cover into the holes on the top of the sides of your handheld.
Chapter 1 Page 19
Using the stylus to get things done
Like using a mouse to click elements on a computer screen, using the stylus to tap elements on your handheld screen is a way to get things done on your handheld.
The first time you start your handheld, setup instructions appear on the screen. These instructions include a calibration screen, or digitizer. Calibration aligns the internal circuitry of your handheld with its touch-sensitive screen so that when you tap an element on the screen, the handheld can detect exactly which task you want to perform.
Important: Always use the point of the stylus for tapping the handheld screen. Never use an actual pen, pencil, or other sharp object to tap the handheld screen.
With your handheld turned on, you can tap the handheld screen to perform many operations, such as the following:
■ Open applications
■ Choose menu commands
■ Select options in dialog boxes
Just as you can drag the mouse to select text or move objects on your computer, you can also drag the stylus to select text. You can also use the stylus to drag the slider of any scroll bar.
Elements of the handheld interface
Menu bar A set of commands that are specific to the application. Not all applications have a menu bar.
Command buttons
Tap a button to perform a command. Command buttons appear in dialog boxes and at the bottom of application screens.
Check box When a check mark appears in a check box, the corresponding option is active. If a check box is empty, tapping it inserts a check mark. If a check box is checked, tapping it removes the check mark.
Pick list Tap the arrow to display a list of choices, and then tap an item in the list to select it.
Menu bar
Command buttons
Pick list
Page 20 Introduction to Your Treo™ 90 Handheld
M
oving around the screen
You can move between entry fields, pick lists, check boxes, and other options by using the stylus, or the scroll buttons.
To move around the screen do one of the following:
■ Tap an item with the stylus.
■ Press the scroll buttons to scroll through the items on the screen.
Tip: To learn how to move around the screen using the Treo keyboard, see page 33.
Displaying online tips
Many of the dialog boxes that appear on your handheld contain an online Tips icon in the upper-right corner. Online tips anticipate questions you have in a dialog box, provide shortcuts for using the dialog box, or give you other useful information.
To display an online tip:
1. Tap the Tips icon .
2. After you review the tip, hold Option and press Return to finish.
Previous/ next arrows
Tap the up and down arrows to display the previous and next page of information; tap the left and right arrows to display the previous and next record.
Scroll bar Press the scroll buttons on the front panel of your handheld to scroll to the previous and next pages. To scroll the display one line at a time, tap the top or bottom arrow.
You can also scroll by dragging the slider or by tapping the scroll bar just above or below the slider to scroll to the previous or next page.
Scroll bar Previous/next
arrows
Chapter 1 Page 21
Customizing your handheld
You can customize your handheld by using the Preferences application. You can enter personal information such as your name and address; change the time and date; view different date and time formats when you travel; turn off sounds, and configure your handheld to work with a modem or network. See Chapter 7 for more information on customizing your handheld.
To open the Preferences screens:
1. Press Option and then press Menu to access the Applications Launcher.
2. Tap the Preferences icon .
3. Tap the category pick list in the upper-right corner of the screen.
4. Tap the Preferences category you want to view.
The following procedures for setting the time and date give you an example of how to customize your handheld using the Date & Time Preferences.
To set the current time:
1. Tap the Set Time box.
2. Tap the up or down arrows to change the hour.
3. Tap each minute number, and then tap the arrows to change them.
4. Tap AM or PM.
Note: Your handheld can also display time based on a 24-hour clock. See page 140 for details.
5. Hold Option and press Return to finish.
Page 22 Introduction to Your Treo™ 90 Handheld
To set the current date:
1. Tap the Set Date box.
2. Hold Option and press a scroll button to scroll to the current year.
3. Hold Shift and press a scroll button to scroll to the current month.
4. Type the number for the current date.
5. Press Space to select the date.
Tip: You can also select the date by tapping the screen as shown above.
To set the time zone:
1. Tap the Set Time Zone box.
2. Press the scroll buttons or tap the arrows to scroll to your country and time zone.
Tip: Choose the time zone that corresponds to where you are. When you travel, use this dialog box to change time zones. If you’re not sure what time zone you are in, find out what time it is, and select the time zone which shows the correct New Time. Do not use the time zone dialog to switch between daylight savings time and standard time. Use the Daylight Savings pick list.
3. Hold Option and press Return to finish.
To set the daylight savings time:
■ Tap the Daylight Savings pick list to toggle this feature on and off.
Tap arrows to select year
Tap to select month
Tap to select date Tap here
Chapter 1 Page 23
Connecting the HotSync cable
The HotSync cable that comes with your Treo enables you to charge your handheld battery and to synchronize the information on your handheld using HotSync technology.
Note: If your computer does not have a USB port, or it uses Windows 95 or Windows NT, you need a serial HotSync cable to connect to your computer. You can purchase a serial HotSync cable from www.handspring.com.
To connect the HotSync cable:
1. Connect the travel charger cable to the short end of the Hotsync cable. Be sure to match the sides of the connectors labeled “UP.”
2. Connect the USB HotSync cable to a USB port on your computer, or connect the Serial HotSync cable to a Serial port on your computer.
3. Connect the long end of the HotSync cable to your handheld with the button facing up.
USB cable and port
Page 24 Introduction to Your Treo™ 90 Handheld
Note: If you are unsure about the exact location of the USB port or serial port on your computer, refer to the manual supplied with the computer.
4. Plug the travel charger into a wall outlet.
Tip: The travel charger does not need to be plugged into a wall outlet to perform a HotSync operation. However, if you want to use the HotSync cable to charge your Treo handheld, you must plug the travel charger into a wall outlet.
Using desktop software
When you use desktop software with HotSync technology, you can do any of the following:
■ Work with your handheld applications on your computer. Most desktop software applications
duplicate many of the applications on your handheld, so you can view, enter, and modify most of the data stored on your handheld.
■ Back up and synchronize data between your handheld and your computer. Synchronization is a one-step procedure that ensures that changes you make on your handheld or desktop software appear in both places. See the section that begins on page 76 for details.
■ Import and export data, so you can easily transfer data from other desktop applications into many of your applications. See the section that begins on page 34 for details.
■ Print data from your desktop software on any printer.
Using your handheld with Palm Desktop software
Your handheld comes with Palm Desktop software. Palm Desktop software includes many of the same applications as your handheld: Date Book, Address (Contacts), To Do List, Memo Pad, Expense, and desktop e-mail connectivity.
The following instructions guide you through installing Palm Desktop software. After installation, refer to the online Help in Palm Desktop software for information about how to use the software.
Note: You must install the software that comes with your Treo handheld even if you already installed Palm Desktop software for a previous Palm OS handheld.
To ensure a safe and uninterrupted installation of Palm Desktop software, please do not simply copy the Palm Desktop software files to your computer’s hard disk. You must use the installer to place the files in their proper locations and to decompress the files.
To install Palm Desktop software:
1. Connect the HotSync cable. See page 23 for instructions.
2. Exit any open programs, including those that run at startup such as Microsoft Office, and disable any virus-scanning software.
3. Insert the Handspring CD-ROM into the computer’s CD-ROM drive.
Chapter 1 Page 25
5. Follow the onscreen instructions to complete the installation.
6. If you have a data-enabled mobile phone with an IR port, or a special cable that connects to your handheld, complete the next part of the installation to install the Wireless Application Suite and configure your Treo for wireless data communication, otherwise skip this step.
When the set up process is done, the installation screen closes automatically.
Using your handheld with Microsoft Outlook
The software that comes with your Treo handheld includes everything you need to synchronize your handheld with Microsoft Outlook. If you already have Microsoft Outlook installed on your computer, the installation program prompts you to choose the Microsoft Outlook synchronization option.
Using your handheld with another PIM
If you prefer to use another personal information manager (PIM), such as Lotus Notes, you can use it if third-party connection software, called a conduit, is available for your PIM. You must install the software that came with your Treo handheld along with the conduit for your PIM to
Chapter 2 Page 27
Chapter 2
Entering Data in Your Handheld
This chapter explains how to enter data into your Treo™ 90 handheld using each of the following methods:
■ Using the handheld keyboard
■ Using the onscreen keyboard
■ Using your computer keyboard
■ Importing data
Using the handheld keyboard
The handheld keyboard is the primary method you’ll use to enter data into your handheld. Each letter key on the keyboard has three functions:
Normal: Types a lowercase letter.
Shift: Types an uppercase letter.
Option: Types the number/symbol, or activates the function, that appears in blue on the key.
Typing capital letters
To type capital letters, you must first “shift” to caps and then type the character.
Note: Your handheld includes a feature that automatically capitalizes the first letter when you create a new sentence or a new record (by tapping New or a blank line).
Page 28 Entering Data in Your Handheld
To type a single capital letter (Caps Shift):
1. Press Shift :
When Caps Shift is active, an “up arrow” symbol appears in the lower-right corner of the Treo screen. If you accidentally activate Caps Shift, press Shift twice to cancel it, or if you do nothing for five seconds, it reverts to lowercase.
2. Type the letter you want to capitalize.
To enter only capital letters (Caps Lock):
1. Press Shift twice.
When Caps Lock is active, an underlined “up arrow” symbol appears in the lower-right corner of the handheld screen.
2. Type the text you want to capitalize.
3. Press Shift to turn off Caps Lock.
Typing numbers and symbols
Typing numbers and symbols with your handheld is similar to typing symbols on a computer keyboard. You must first “shift” to option mode and then type the number or symbol strokes.
To enter a single number or symbol (Option Shift):
1. Press Option .
When Option Shift is active, a dot appears in the lower-right corner of the Treo screen. If you accidentally activate Option Shift, press Backspace to cancel it.
2. Press the key where the number or symbol appears in blue.
To enter only numbers or symbols (Option Lock):
1. Press Option twice.
2. Press the keys where the numbers or symbols appear in blue.
When Option Lock is active, an underlined dot appears in the lower-right corner of the Treo screen.
3. Press Option to turn off Option Lock.
Caps Shift
Caps Lock
Option Shift
Chapter 2 Page 29
Navigation keystrokes
In addition to character symbols, your handheld includes special keystrokes that you can use to navigate within text or fields in your applications.
Note: Some applications may not support these navigation keystrokes.
Using menus
Menus on your handheld are easy to use. Once you have mastered them in one application, you can use them the same way in all other applications.
The menus and menu commands that are available depend on the application. Also, the menus and menu commands vary depending on which part of the application you’re using. For example, in Memo Pad, the menus are different for the Memo list screen and the Memo edit screen.
The menus of each application are illustrated in the section on that application in Chapter 6. The Edit menu is described in the section that begins on page 62.
To use the menu bar:
1. Open an application (such as Memo Pad).
2. Press Menu to open the menu bar.
Tip: You can also open the menu bar by tapping the inverted tab at the top of any application’s screen (except Calculator).
Command Keystrokes
Move cursor right Hold Option while pressing the bottom scroll button.
Move cursor left Hold Option while pressing the top scroll button.
Previous field Press the top scroll button.
Next field Press the bottom scroll button.
Affirm an action Hold Option and press Return . Use these keys instead of tapping the following onscreen buttons: OK, Done, Yes, Next, Accept, Send, and Dial.
Annul an action Hold Option and press Backspace . Use these keys instead of tapping the following onscreen buttons: Cancel, No, Previous, and Reject.
Open or dial the
Page 30 Entering Data in Your Handheld
In this example, three menus are available: Record, Edit, and Options. The Record menu is selected and contains the commands New Memo, Delete Memo, and Beam Memo.
3. Press the top scroll button to switch between menus.
4. Press the bottom scroll button to select a command within a menu.
5. Press Space to run the selected command.
Tip: To close the menus without running a command, press Menu again.
Keyboard shortcut menu commands
Most menu commands have an equivalent keyboard shortcut. The shortcut letters appear to the right of the menu command names. Throughout this guide, the shortcut letters appear in parentheses (/C) next to menu selection instructions.
To use keyboard shortcuts for menu commands:
1. Press Menu to open the menu bar.
2. Type the menu command shortcut letter.
For example, to choose Copy in the Edit menu, press Menu followed by the letter “c.”
Tip: When the menu bar is open, you can enter a shortcut letter for any menu item in the current application view, not just the ones that appear on the current menu.
Using text ShortCuts
ShortCuts make entering commonly used words or phrases quick and easy. ShortCuts are similar to the Glossary or Autotext features of some word processors.
Your handheld comes with several predefined ShortCuts, and you can also create your own. Each ShortCut can represent up to 45 characters. For example, you might create a ShortCut for your name, or for the header of a memo. See the section that begins on page 154 to learn about creating your own ShortCuts.
Inverted tab
Chapter 2 Page 31
Your handheld includes the following predefined ShortCuts:
To use a ShortCut:
1. Type the letter s. 2. Press ListType .
3. Use the scroll buttons to select the ShortCut symbol .
Note: The ShortCut symbol appears by the cursor to show that you are in ShortCut mode.
4. Type the ShortCut characters.
Typing accented characters
The ListType feature enables you to enter accented characters. You can enter the following accented letters:
à á ä â ã å ç è é ë ê ì í ï î ñ ò ó ö ô õ ù ú ü û ý ÿ
To enter accented characters:
1. Type the letter (uppercase or lowercase) to which you want to add an accent.
2. Press ListType .
3. Use the scroll buttons to select the accent you want to apply.
4. Press Space to insert the accented character.
Tip: You can also select the accented character you want to insert by repeatedly pressing ListType .
Typing extended characters
The ListType feature also enables you to enter many extended characters that are not on the keyboard, such as currency symbols and emoticons. Extended characters are often found under related characters. For example, the £ symbol is located under $.
Entry ShortCut
Date stamp ds
Time stamp ts
Date / time stamp dts
Meeting me
Breakfast br
Lunch lu
Page 32 Entering Data in Your Handheld
To enter extended characters:
1. Position the cursor where you want to insert the extended character.
2. Type the base character associated with the extended character you want to insert:
Tip: To view a list of available accented and symbol characters, press Menu and under Edit select Keyboard Help (/G).
3. Press ListType .
4. Use the scroll buttons to select the extended symbol you want to insert.
5. Press Space to insert the extended character.
Tip: To enter a tab, press Shift and then press Space .
Base character
Symbols Base character
Symbols Base character
Symbols
a
æ
OØ
.? ! …
A
Æ
p¶
,‚‚‚
b
ß
P¶
!¡
B
ß
r®
?¿
c
¢ © ^ ˆ
R®
:; :-) :-( ;-)
:-D
C
¢ © ^ ˆ
sß š §
'‘ ’ ‹ › ~ `
d
† ‡
Sß Š §
"“ ” « »
D
† ‡ Ð
t~ ™ † ‡
$£ ¥
e T
~ ™ † ‡
+&
E x
×
-_ ~ • – —
f
ƒ
X×
/\ ÷ ¦
F
ƒ
y¥
%‰
l
£
Y¥
#=
L
£
0‰ º
(<[{‹
m
µ
1¹ ¼ ½
)>]}›
M
µ
2²
Chapter 2 Page 33
Using the onscreen keyboard
You can open the onscreen keyboard anytime you need to enter text or numbers on your handheld. When used in conjunction with the backlight, the onscreen keyboard is especially useful for typing in the dark.
To use the onscreen keyboard:
1. Open a record in an application that requires you to enter data (such as Memo Pad).
2. Press Menu .
3. Under Edit, select Keyboard (/K).
4. Tap the characters to enter text, numbers, and international characters.
Note: The onscreen keyboard also includes a dialog box for international characters. You can switch among the three dialogs at any time to enter the exact text you need.
5. After you finish, tap Done to close the onscreen keyboard and place the text in the record.
Using your computer keyboard
Many of the applications on your handheld are available in Palm Desktop software and in most Personal Information Manager (PIM) applications. If you have a lot of data to enter, or prefer to use the computer keyboard, you can use Palm™ Desktop software, or any supported PIM such as Microsoft Outlook, to enter information. You can then perform a HotSync® operation to
synchronize the information on your computer with the information on your handheld. See the section that begins on page 76 for details on HotSync operations.
Refer to Palm Desktop online Help or the documentation that came with your PIM software for more information on entering data on your computer.
Backspace
Carriage return Tab
Caps lock
Caps shift
Tap here to display alphabetic keyboard
Tap here to display numeric keyboard
Page 34 Entering Data in Your Handheld
Importing data
If you have data stored in computer applications such as spreadsheets and databases, or if you want to import data from another Palm OS® handheld, you can transfer the data to your handheld
without having to key it in manually. Save the data in one of the file formats listed below, import it into Palm Desktop software, and then perform a HotSync operation to transfer the data to your handheld.
Palm Desktop software can import data in the following file formats:
■ Comma delimited (.csv, .txt): Address and Memo Pad only
■ Tab delimited (.tab, .tsv, .txt): Address and Memo Pad only
■ CSV (Lotus Organizer 2.x/97 Mapping): Address only
■ vCal (.vcs) Date Book only
■ vCard (.vcf) Address only
■ Date Book archive (.dba)
■ Address archive (.aba)
■ To Do List archive (.tda)
■ Memo Pad archive (.mpa)
Archive formats can only be used with Palm Desktop software. Use the archive file formats to share information with other people who use Palm OS handhelds or to create a copy of your important Palm Desktop information.
To import data:
1. Open Palm Desktop software.
2. Click the application into which you want to import data.
3. If you are importing records containing a field with category names, select All in the Category box.
Be sure that the same categories that appear in the imported file also exist in the application. If the categories do not exist, create them now; otherwise, the records are imported into the Unfiled category.
4. From the File menu, select Import.
5. Select the file you want to import.
6. Click Open.
7. To import data into the correct Palm Desktop fields, drag fields in the left-hand column so that they are opposite the corresponding imported field on the right.
Chapter 2 Page 35
9. Click OK.
The imported data is highlighted in the application.
10. To add the imported data to your handheld, perform a HotSync operation.
Chapter 3 Page 37
Chapter 3
Managing Your Applications
This chapter explains how to switch between applications on your Treo™ 90 handheld, how to change application settings so they are personalized to your work methods, and how to categorize applications so you view them in related groups.
Using the Applications Launcher
Your handheld is equipped with a variety of applications. All the applications installed on your handheld appear in the Applications Launcher.
Opening applications
You can use the Applications Launcher to open any application installed on your handheld. You can also open the four main applications — Date Book Plus, Contacts, To Do List, and Memo Pad — with the application buttons on the front panel of your handheld.
Tip: When you press an application button on the front panel of your handheld, you have instant access to the selected application. You don’t even need to turn on your handheld first.
In addition to providing a way for you to open applications, the Applications Launcher displays the current time, battery level, and application category.
To open an application:
1. Press Option and then press Menu to access the Applications Launcher.
2. Press the scroll buttons to select the application you want to open.
3. Press Space or press Return to launch the application.
Page 38 Managing Your Applications
Switching between applications
When working in any application, press Option and then press Menu , or press an application button on the front panel of your handheld to switch to another application. Your handheld automatically saves your work in the current application and displays it when you return to that application.
Categorizing applications
The category feature enables you to manage the number of application icons that appear onscreen in the Applications Launcher. You can assign an application to a category and then display a single category or all your applications.
To categorize an application:
1. Press Option and then press Menu to access the Applications Launcher.
2. Press Menu again to open the menus.
3. Under App, select Category (/Y).
4. Tap the pick list next to each application to select a category.
Tip: To create a new category, tap Edit Categories from the pick list. Tap New, enter the category name. Hold Option and press Return twice to add the category.
5. Hold Option and press Return to finish.
To display applications by category:
1. Press Option and then press Menu to access the Applications Launcher. 2. Do one of the following:
■Hold Option and press Menu repeatedly to cycle through all your categories.
■Tap the pick list in the upper-right corner of the screen and select the category you want to display.
Changing the Applications Launcher display
Chapter 3 Page 39
To change the Applications Launcher display:
1. Press Option and then press Menu to access the Applications Launcher.
2. Press Menu again to open the menus.
3. Under Options, select Preferences(/R).
4. Tap the View By pick list and select List.
5. Hold Option and press Return to finish.
To open the Applications Launcher to the last opened category:
1. Press Option and then press Menu to access the Applications Launcher.
2. Press Menu again to open the menus.
3. Under Options, select Preferences (/R).
4. Tap the Remember Last Category check box to select it.
5. Hold Option and press Return to finish.
Choosing preferences
You can set options that affect an entire application in the application’s Preferences dialog box.
To change preferences for an application:
1. Open an application.
2. Press Menu .
3. Under Options, select Preferences (/R).
Note: Not all applications have a Preferences command.
4. Make changes to the settings.
Page 40 Managing Your Applications
Installing and removing applications
This section explains how to install and remove applications on your handheld and how to remove Palm™ Desktop software from your computer.
Installing add-on applications
Your handheld comes with the Contacts, Date Book Plus, To Do List, Memo Pad, Expense, Calculator, CityTime, and Palm Mail applications installed and ready to use. The Handspring CD-ROM also includes a wireless application suite which you can install from the CD-CD-ROM if you want to configure your handheld for wireless communication.
You can also install additional applications on your handheld, such as business applications, games, and other software. The Install Tool makes it easy to install software on your handheld during a HotSync® operation. There are a variety of third-party applications available for devices
that use Palm OS software. To learn more about these applications, go to the web site: www.handspring.com.
When you download an add-on application from the Internet, it is probably in a compressed format such as a .zip or .sit file. If the file is compressed, you need to use a decompression utility on your computer, to decompress the .prc and .pdb files inside the compressed file. A trial version of the PKZIP decompression utility is located on your computer in the Programs\Handspring\Utility folder. If you need a different decompression utility, search the Internet using phrases like 'zip decompression' or 'how to unzip'. This will lead you to various third-party utilities that you can use to decompress any kind of compressed or downloaded file--not just add-ons for your handheld. After you install the utility, you are ready to decompress the add-on application files that you downloaded.
Note: Any applications that you install on your handheld resides in RAM memory; you can delete them at any time.
To install add-on software on your handheld:
1. Copy or download the application you want to install into the add-on folder in your Handspring (or Palm) directory on your computer.
Note: If the software you download is compressed, you need to decompress it into this folder. If you prefer to place the application into another folder, you need to navigate to that folder before you complete step 5.
Chapter 3 Page 41
3. Click Install.
Tip: You can also access the Install Tool dialog box by selecting Install Tool under Handspring on the Start menu, or by double-clicking any file with a PRC file extension.
4. In the User drop-down list, select the name that corresponds to your handheld.
Page 42 Managing Your Applications
6. Select the application(s) that you want to install on your handheld.
7. Click Open.
Note: Review the list of applications you selected in the Install Tool dialog box. If you do not want to install an application, select it, and then click Remove. (This does not remove the application from your computer; it simply removes it from the list of applications to install.)
8. If you want to install the application(s) on an expansion card, click Change Destination, click the arrows to move the application(s) to the expansion card pane, and then click OK.
Note: Before you install an application on an expansion card, make sure that it is compatible with Palm OS version 4.0. Older applications may not work properly when installed on an expansion card.
9. Click Done.
10. Perform a HotSync operation to install the application(s) you selected in step 6. See the section that begins on page 76 for details.
Tip: You can also install an application by simply double-clicking the application’s icon.
Removing applications
In the event that you run out of memory or decide that you no longer need an application you installed, you can remove applications from your handheld. You can remove only add-on applications, patches, and extensions that you install; you cannot remove the applications that reside in the ROM portion of your handheld.
To remove an add-on application:
1. Press Option and then press Menu to access the Applications Launcher.
2. Press Menu again to open the menus.
3. Under App, select Delete (/D).
Chapter 3 Page 43
Note: To delete an application from an expansion card, you must first insert the card into your handheld. See page 44 for details.
5. Tap the application that you want to remove.
6. Tap Delete.
7. Hold Option and press Return twice to finish.
8. Check the Backup folder in the Palm Desktop folder on your computer. If you find a PRC file for the application you just removed, delete the PRC file from the Backup folder.
Tip: If you installed Palm Desktop software for the first time when you purchased your Treo handheld, the Palm Desktop software is located in the Handspring folder. If you upgraded from a previous version of Palm Desktop software, these files are most likely located in the Palm folder.
Removing Palm Desktop software
Removing Palm Desktop software also removes HotSync Manager. If you remove this software from your computer, you cannot synchronize your data. So, we highly recommend leaving Palm Desktop software on your computer.
To remove Palm Desktop software:
1. From the Windows Start menu, choose Programs, Handspring (or Palm) and then Uninstall.
Page 44 Managing Your Applications
Working with expansion cards
The expansion slot on your handheld enables you to add Secure Digital (SD) cards and MultiMedia Cards (MMC) that extend the functionality and storage capacity of your handheld. Your Treo comes with a mock, non-functional card inside the expansion slot. When you do not have a functioning card inside the expansion slot, reinsert the mock card to protect the slot opening.
To insert and remove an expansion card:
1. Press down and release the mock card.
2. After you feel the expansion slot eject the mock card, remove the card from the expansion slot.
3. Hold the card so it is facing in the same direction as the card icon on the back of your handheld.
4. Insert the card into the expansion slot until you feel the card lock into place and hear the confirmation tone.
5. When you’re done using the expansion card, repeat steps 1 and 2 to remove the expansion card.
Chapter 3 Page 45
Opening applications on an expansion card
After you insert an expansion card in the expansion slot, you can open any of the applications stored on the expansion card.
To open an application on an expansion card:
1. Insert the expansion card into the expansion slot as described in the previous section.
The Applications Launcher automatically displays its contents.
2. Press the scroll buttons to select the icon associated with the application you want to open.
Tip: To switch between the applications on the expansion card and your handheld, tap the category pick list in the upper-right corner and select another category. When you insert an expansion card, the card name appears as a new category with a card icon next to the name. This enables you to easily switch between applications on your handheld and the expansion card.
3. Press Space or press Return to launch the application.
Copying applications to an expansion card
You can copy applications between your handheld and your expansion card.
Note: Before you copy an application to an expansion card, make sure that it is compatible with Palm OS version 4.0. Older applications may not work properly when used on an expansion card.
To copy an application to an expansion card:
1. Press Option and then press Menu to access the Applications Launcher.
2. Press Menu again to open the menus.
Page 46 Managing Your Applications
4. Tap the Copy To pick list and select the destination: card name, or Handheld.
5. Tap the From pick list and select the location of the application you want to copy: card name, or Handheld.
6. Tap the application you want to copy.
7. Tap Copy.
Using the Card Info application
The Card Info application displays general information about the expansion card that is currently in the expansion slot and it enables you to rename and format a card.
To view expansion card information:
1. Press Option and then press Menu to access the Applications Launcher.
2. Press the scroll buttons to select the Card Info icon .
3. Press Space or press Return to launch the application.
Card name
Chapter 3 Page 47
Renaming an expansion card
If you change the contents of an expansion card, you may at some point want to rename the card to better match it’s contents.
To rename an expansion card:
1. Press Menu .
2. Under Card, select Rename Card (/R).
3. Enter the new name for the card.
4. Hold Option and press Return to finish.
Formatting an expansion card
When you format an expansion card, you erase all the data stored on the card and prepare it to a blank state. Formatting an expansion card is similar to formatting a diskette on a computer.
To format an expansion card:
1. Press Menu .
2. Under Card, select Format Card (/F).
3. Hold Option and press Return to finish.
Security
Your handheld comes with a Security application so that unauthorized users cannot view the entries you wish to protect.
In Security, you can do the following:
■ Mask or hide entries you define as private. The Mask option displays a gray bar over private
records, and the Hide option completely removes (hides) private records. See the section that begins on page 73 for more information.
■ Assign a password to the Security viewing options. Assigning a password requires you to
enter a password to view masked or hidden private entries; not assigning a password enables you (or anyone else) to view individual masked private entries by tapping them, and to view all hidden or masked private entries by selecting Show Records in the Security dialog box.
■ Lock and turn off your handheld so that it does not operate until you enter the correct
Page 48 Managing Your Applications
Assigning a password
You can assign a password to protect your private records and to lock your handheld.
To assign a password:
1. Press Option and then press Menu to access the Applications Launcher.
2. Tap the Security icon .
3. Tap the Password box.
4. Enter a password.
5. Hold Option and press Return .
6. Enter the same password a second time.
7. Hold Option and press Return to finish.
Changing or deleting a password
Once you define a password for your handheld, you can change or delete it at any time. You must enter the current password before you can change or delete it.
To change or delete your password:
1. Tap the Password box.
2. Enter the current password.
3. Hold Option and press Return .
Tap here
Chapter 3 Page 49
4. Do one of the following:
■To change the password, enter the new password, and hold Option and press Return .
■To delete the password, tap Unassign.
Locking your handheld
You can also lock your handheld so that you need to enter your password to operate it. There are two ways to lock your handheld: manually and automatically.
Important: If you lock your handheld, you must enter the exact password to re-activate your handheld. If you forget the password, you need to perform a hard reset to resume using your handheld. Performing a hard reset deletes all the records in your handheld; however, you can restore all previously synchronized data at the next HotSync operation. See page 215 for details.
To lock your handheld manually:
1. Assign a password.
2. Tap Lock & Turn Off.
3. Tap Off & Lock.
4. To start your handheld, turn it on, and then enter the password.
Page 50 Managing Your Applications
To lock your handheld automatically:
1. Assign a password.
2. Tap the Auto Lock Handheld box.
3. When prompted, enter your password.
4. Tap one of the following options:
5. Hold Option and press Return to finish.
6. To start your handheld, turn it on, and then enter the password.
Recovering from a forgotten password
If you lock your handheld and you forget your password, you can delete the password from your handheld. Deleting a forgotten password also deletes all entries and files marked as Private.
Important: If you synchronize with your computer before deleting a forgotten password, your handheld restores your private entries the next time you perform a HotSync operation, but it does not restore the password.
Never Prevents your handheld from locking automatically.
On power off Locks your handheld when you turn it off, or when it shuts off with the auto-off feature.
At a preset time Locks your handheld at a specific time of day. If you choose this option, the Set Time dialog box appears for you to specify when you want your handheld to lock.
After a preset delay Locks your handheld after a period of inactivity. If you choose this option, the minutes field appears for you to specify the number of minutes after which you want your handheld to lock.
Chapter 3 Page 51
To delete a forgotten password:
1. Tap the Password box.
2. Tap Lost Password.
3. Hold Option and press Return for Yes.
Chapter 4 Page 53
Chapter 4
Applications Overview
This chapter briefly describes each application and how to open it. Your Treo™ 90 handheld comes with these applications already installed:
■ Date Book Plus
■ Contacts
■ To Do List
■ Memo Pad
■ CityTime
■ Calculator
Page 54 Applications Overview
Date Book Plus
Date Book Plus lets you quickly and easily schedule appointments or any kind of activity associated with a date and/or a time.
In Date Book Plus, you can do the following:
■ Enter a description of your appointment and assign it to a specific time and date.
■ Display a chart of your appointments for an entire week to easily spot available times and any
potential scheduling overlaps or conflicts, or display descriptions of your appointments for one or two weeks.
■ Display a monthly calendar to quickly spot days where you have morning, lunch, or afternoon
appointments, or display a calendar for an entire year.
■ Display a list of both your appointments and your To Do items.
■ Create unscheduled events or To Do items that float from one day to the next until you complete them.
■ Create a Daily Journal to track events with automatic time stamps.
■ Set an alarm to sound prior to the scheduled activity, and create reminders for events that are
based on a particular date, rather than time of day, such as birthdays and anniversaries.
■ Attach notes to individual events for a description or clarification of the entry in your Date Book.
To open Date Book Plus:
■ Press Date Book Plus . Date Book Plus opens to today’s schedule.
Tip: Press Date Book Plus repeatedly to cycle through the Day, Week, Week with Text, Month, Year, and List views.
" P # O 3 I 2 U 1 Y * T / R $ E @ W Q ' L 6 K 5 J 4 H 9 M 0 ... . 8 N 7 B + G – F ) D ( S % A V C X : Z
Chapter 4 Page 55
Contacts
Contacts enables you to keep names, addresses, phone numbers, and other information about your personal or business contacts.
In Contacts, you can do the following:
■ Store thousands of names, addresses, phone numbers, e-mail addresses, and more.
■ Quickly look up, enter, or duplicate names, addresses, phone numbers, and other information.
■ Enter up to five phone numbers (home, work, fax, mobile, etc.) or e-mail addresses for each name.
■ Attach a note to each Contacts entry, in which you can enter additional information about the
entry.
■ Assign Contacts entries to categories so that you can organize and view them in logical groups.
■ Dial numbers using infrared communication and a data-enabled mobile phone.
To open Contacts:
■ Press Contacts . Contacts opens to display the Contacts list.
Tip: Press Contacts repeatedly to cycle through the categories in which you have entries.