THE ANALYTIC DATABASE SYSTEMT ..
USER'S GUIDE
(c)1985, Borland! Analytica, Inc. All Rights Reserved.
CONTENTS
ONE WELCOME TO REFLEX
A DATABASE CONCEPT
What Is a Database?
B FIVE VIEWS OF YOUR INFORMATION
The Form View'" The List View'" The Graph View'" The Crosstab View'" The Report View'"
Five Views of the Information
C REFLEX FEATURES Calculated Fields Sorting
Search/Filter Vary
Translate Other Features
D LEARNING TO USE REFLEX Starting Out
The Tutorials
The Reference Chapters Appendices
Index
E USING YOUR COMPUTER
The Keyboard The Mouse
TWO STARTING OUT
A THE REFLEX DISKETTES
Care and Handling of Your Diskettes
B FORMATTING DISKETTES
For Two Diskette Drives For a Hard Disk
2 2 4 4 5 6 7
8 8
9 9 9 9 9 9 10 10 10 10 11 11 11 11 12 15
2
3
4 4
REFLEX THE ANALYTIC DATABASE SYSTEM
C MAKING BACKUP COPIES OF THE REFLEX DISKETTES 6
For Two Diskette Drives 6
D INSTALLATION 7
For Two Diskette Drives 7
For a Hard Disk 8
E STARTING REFLEX 9
Two Diskette Drives 9
Hard Disk 10
F USING THE REPORT & UTILITIES DISKETTE 11
G OPTIONAL HARDWARE SETUP 11
H IF THE REFLEX SYSTEM DISK IS DAMAGED OR LOST 15
THREE BASIC TUTORIAL
PART 1 SCREENHANDLING 4
REFLEX CONCEPT THE FORM VIEW 16
PART 2 DESIGNING A FORM 18
PART 3 ENTERING INFORMATION IN THE FORM VIEW 22
PART 4 SAVING A DATABASE 27
REFLEX CONCEPT THE LIST VIEW 30
PART 5 ENTERING INFORMATION IN THE LIST VIEW 31
REFLEX CONCEPT SORTING 36
PART 6 SORTING YOUR RECORDS 38
REFLEX CONCEPT SEARCHING 43
PART 7 SETTING SEARCH CONDITIONS:
FINDING AND FILTERING 44
PART 8 CHANGING THE LIST VIEW AND PRINTING 51
CONTENTS
FOUR ADVANCED TUTORIAL
REFLEX CONCEPT CALCULATED FIELDS 2
PART 1 CALCULATED FIELDS 5
REFLEX CONCEPT THE GRAPH VIEW 14
PART 2 MAKING A GRAPH 16
REFLEX CONCEPT THE CROSSTAB VIEW 27
PART 3 USING CROSSTABS FOR ANALYSIS 29
REFLEX CONCEPT VARY 44
PART 4 PLANNING BREAK-EVEN ANALYSIS 46
REFLEX CONCEPT THE REPORT VIEW 50
PARTS DESIGNING AND PRINTING A REPORT 53
FIVE
REFERENCE A
PART 1 REFLEX BASICS 3
A THE REFLEX SCREEN 4
B WINDOWS: VIEWS AND TOOLS 6
Views 6
Tools 6
C SELECT AND CHOOSE 7
Cursor Movement 7
D IMPORTANT KEYS AND THEIR USES 10
The Function Keys 10
Other Important Keys 12
E REFLEX MENUS 12
REFLEX THE ANALYTIC DATABASE SYSTEM
PART 2 SCREENHANDLING 15
A MANAGING THE VIEWS 16
Opening a View 16
Opening Multiple Views 16
Closing a View 17
Changing the Active View 18
Resizing a View 18
Expanding and Shrinking a View 18
B TOOLS 19
Moving Around in Tools 19
PART 3 ENTERING AND EDITING DATA 21
A THE DATABASE-RECORDS AND FIELDS 22
Creating the Database 22
Entering Data 23
The Current Record 24
B FIELD SPECIFICATIONS 25
Field Names 25
Field Types 26
C CHOICES 28
Selecting from a Choice List 29
D EDITING 30
The Edit Mode 30
The Edit Menu 31
Delete 31
Insert 32
Set Column Width 32
Row Select 33
Column Select 33
Window Clear 33
PART 4 THE VIEWS 34
A FORM DESIGN 35
Opening Form Design 36
Closing Form Design 37
Positioning the Cursor 37
CONTENTS
Moving Field Names 38
Adding Field Names 38
Deleting Field Names 39
Renaming Fields 39
Entering Labels 40
B THE FORM VIEW 40
Opening and Closing the Form View 41
Moving Around the Form View 42
Scanning the Records 42
Entering Data in Form View 43
C THE LIST VIEW 44
. Opening and Closing the List View 45
Working in the List View 45
Rearranging the Columns 46
Entering and Editing Data in the List View 48
D THE GRAPH VIEW 49
The Graph View Screen 49
Opening and Closing the Graph View 51 Setting Up a Graph: Plotting Data 51 Working with Records in the Graph 54
Graph Types 56
Graphing Summaries and for Each 60
Scaling, Titles, and Grids 63
E THECROSSTAB VIEW 66
Opening and Closing the Crosstab View 67
Moving Around the Crosstab View 68
Rowand Column Manipulation 69
Creating a Crosstab 70
Additional Formulas 77
Saving, Retrieving, and Deleting Crosstabs 80
PARTS THE PRINT/FILE MENU 81
A DOS DIRECTORIES 82
U sing Directories 82
The Current Directory 83
DOS File Extension 83
REFLEX THE ANALYTIC DATABASE SYSTEM
C RETRIEVING A DATABASE 86
Retrieving Part of a File 87
D SAVING A DATABASE 89
Updating a File 90
Saving a Filtered Database 90
E ERASING A DATABASE 90
F PRINTING 91
Graph Printing 93
Margin and Page Length Limits and Defaults 94
Setup Strings 94
Saving the Print Settings 95
Printer Setup 95
PART 6 RECORDS 96
A FIELD 8r SORT SETTINGS 97
Using the Field & Sort Settings Tool 97
Fields 99
Field Types 99
Formulas 102
The Sort Order 102
Display Formats 105
Precision 106
B VARY 107
The Vary Tool 108
Conditions and Effects 110
C RECORDS COMMANDS 112
Add Record 112
Delete Record 112
Perform Sort 113
Recalc 113
Clear Database 113
PART 7 SEARCH 114
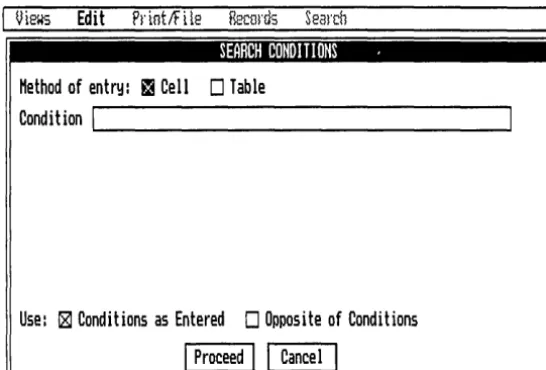
A SEARCH CONDITIONS 115
Operators 117
Text Search Conditions 120
CONTENTS
Date Search Conditions 124
Special Search Conditions 124
How Are Search Conditions Evaluated? 125
B SET SEARCH CONDITIONS 126
U sing the Search Conditions Table 127 Use Conditions as Entered or Opposite 130
C FILTER, FIND, AND KEEP 131
Apply Filter 131
Remove Filter 132
Find Record 132
Keep Records 133
PARTS CALCULATED FIELDS 134
A FORMULAS 135
Values: The Basic Elements 135
Formulas 136
B FORMATS FOR FORMULAS 138
Arithmetic Operators 138
The General Format 138
Precedence of Operators in Calculations 139 U sing Parentheses to Change the Order of Calculations 139
C ENTERING FORMULAS 140
Local Values and Formulas 141
Entering Numbers, Dates, and Text
In Formulas 142
Entering Constants 143
D FUNCTIONS 143
Format of Functions 144
Function Type 144
Function List 145
E WORKING WITH DATES 147
Date Consolidation 147
Date Arithmetic 153
F RECALCULATION: AUTOMATIC AND MANUAL 154
G EDITING AND DELETING FORMULAS 155
REFLEX THE ANALYTIC DATABASE SYSTEM
SIX
REFERENCEB
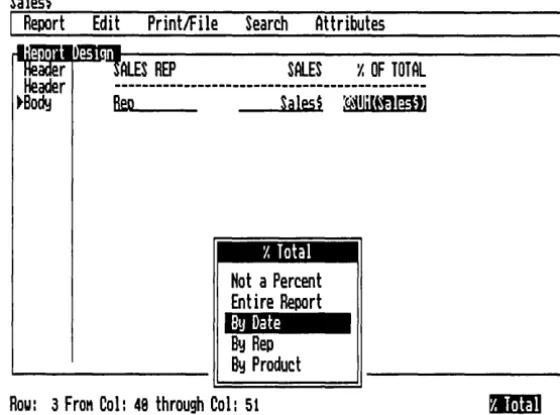
PART 1 THE REPORT VIEW 2
A THE REPORT VIEW SCREEN 4
B OVERVIEW OF REPORTING 6
Preliminary Steps 6
Designing the Report 7
Save and Print the Report 7
C MOVING AROUND REPORT VIEW 8
0 THE DESIGN AREA 9
Design Elements 9
E THE WHEN PRINTED COLUMN 17
The Row Flags 17
F REPORT MENU 20
Preview on Screen 20
Change Sort Settings 21
Display Values ON/OFF 23
Save Report Design 23
Retrieve Report Design 24
Erase Report Design 25
Quit 25
G THE EDIT MENU 26
Delete 26
Insert 26
Set Column Width 27
Row Select 27
Move 28
Copy 29
Window Clear 29
H THE PRINT/FILE MENU 30
Retrieve File 30
Print 31
Change Printer Settings 31
Global Settings 34
SEARCH 34
J ATTRIBUTES 35
Using Attributes 35
Display Attributes 36
CONTENTS
K EXAMPLE REPORTS 53
Basic Columnar Report 53
Columnar Report with Subtotals 54
Summary Report Using Subtotals 56
Columnar Report Using Special Report
Functions and Cumulative 58
Mailing Labels 59
PART 2 TRANSLATE 62
A TRANSLATE 63
Overview of Translating 63
B TRANSLATING PFS AND DBASE FILES 67
C TRANSLATING 1-2-3, SYMPHONY, AND DIF FILES 69
Changing the "From ... To" Coordinates 72
Using Named Ranges 73
Using the "Show Data from Row" Cell 74
The Fields Menu Command 74
The Types Menu Command 75
D TRANSLATING ASCII TEXT FILES 76
Text File Formats 77
How to See Your File Format 78
What Reflex Needs to Know 79
Using the Text File Translate Table 80 The Go From and Stop On Choices 81
Text Translation Examples 83
If You Have a Problem 90
PART 3 MERGE 92
Merging Databases 93
PART 4 GRAPH PRINT 95
Printing Graphs 96
Color Settings 98
The Graph Print Menus 100
REFLEX THE ANALYTIC DATABASE SYSTEM
SEVEN APPENDICES
A SYSTEM PARAMETERS
B FUNCTIONS AND OPERAnONS
C PRINTER SETUP STRINGS
D HARDWARE NOTES
E ERROR MESSAGES F HANDY HINTS
EIGHT INDEX
2
2 19 20
22
NOTICES FOR ADVANCED USERS
If you will be using the Reflex Merge facility with files containing Repeating Text fields, please note:
If files containing fields of the type Repeating Text are merged, any null values in those fields will be overwritten with other values in the merged data-base; (A field in a particular record has a null value when no value has been entered into it.) A work-around for this is to replace the null values with a temporary value prior to merging. The dummy values can then be replaced with null in the merged file. To replace all null values with "temp" in a field, enter a formula such as ="temp" in the field. To then replace "temp" with the null values in the merged database, remove the formula by entering
=I~I.
If you will be creating very large Report designs, please note:
ONE
ONE
A DATABASE CONCEPT
B FIVE VIEWS
C REFLEX FEATURES
D LEARNING TO USE REFLEX
E USING YOUR COMPUTER
WELCOME TO REFLEX
WHAT IS A DATABASE? 2
What is a database? Entering information into the records.
FIVE VIEWS OF YOUR INFORMATION
The FORM View™; The LIST ViewTM; The GRAPH View™; The CROSSTAB View™; The REPORT View™;
Five views of the information.
REFLEX FEATURES
Calculated fields; Sorting; Search/filter; Vary; Translate; Other features.
LEARNING TO USE REFLEX
Starting out; The tutorials; The reference chapters; Appendices; Index.
USING YOUR COMPUTER The keyboard; The mouse.
9
10
11
ONE
A
The field names on this sales record identify fields fllr different kinds of information.
Field names
1-2
REFLEX THE ANALYTIC DATABASE SYSTEM
Welcome to Reflex, The Analytic Database. Reflex provides powerful ways to analyze the records you keep so that you can quickly understand the meaning behind the information. It
is designed to be the easiest program to use for filing and keeping track of information.
This chapter is an orientation to Reflex. It provides a quick introduction to the main parts of the program and the User's Guide.
WHAT IS A DATABASE?
A database is any organized collection of information-a telephone book or a monthly sales report, for instance. Com-puter database programs allow you to handle such information in electronic form so that you can rearrange the order of items or search for a single piece of information.
Reflex keeps track of records, in which the information is entered. Each record consists of a series of fields. A field is the area that contains a particular item of information. A field
name identifies the kind of information that goes in each field.
I
Views Edit PrintlFile Tyler Canoe COlWany Monthly Sales Report Date:I
\._-~ ~--)
Rep: y
Field Product:
Quantity: Unit Cost: Total Cost: Avg Price:
Sales $:
Records Search ForM
ONE
Fields have been added to the sales report to provide additional information. They have been rearranged for more effective display.
WELCOME TO REFLEX
DESIGNING THE FORM OF YOUR RECORDS
You use the Reflex Form Design screen to enter your field names. You can arrange them however you want, move them to any location, and edit them at any time. In addition, you can add and delete fields instantly, as your business needs change.
!
Uiews Edit PrintlFileTyler Canoe Cotlpany "onthly Sales Report Rep:
I
Product: Quantity: Unit Cost: Total Cost: Aug Price:
Records Search Forti
Date:
)
FieldS rearranged
Sales $: $ Margin: }
X Margin: Fields added COtltl iss ion:
ENTERING INFORMATION INTO THE RECORDS
You enter infor.mation as you would fill out any form. Each time you complete a form, Reflex creates another blank one. You can enter new information and edit old information at any time, instantly.
In addition, Reflex features let you translate files you have created with 1-2-3®, SymphonyTM, dBase II®, dBase IIP\ PFS®, and also DIF and ASCII (text) files.
1-3
~
m
h
o
~
ONE
B
The May sales report for your top Sales Rep. All the details of his record are visible.
1-4
REFLEX THE ANALYTIC DATABASE SYSTEM
FIVE VIEWS OF YOUR INFORMATION
Reflex provides five views of your database-that is, five different ways of working with the information.
THE FORM
VIEW™The Form View displays information in detail, one complete record at a time. The screen appears exactly as you have designed it.
I
Uiews Edit PrintlFile Records Search ForM I"Tyler Canoe COMpany
Monthly Sales Report Date: May-a5 Rep: Alan
PrnJuct: Silent
Qtmtity: 32 Sales $: ~
Unit Cost: $578 $ Margin: $28,736 Total Cost: $18,248 X Margin: 53.2 Avg Price: $1,218 COMMission: $6,228.88
ONE
Sales records for each of your Sales Reps, arranged by month so you can compare their results over time.
WELCOME TO REFLEX
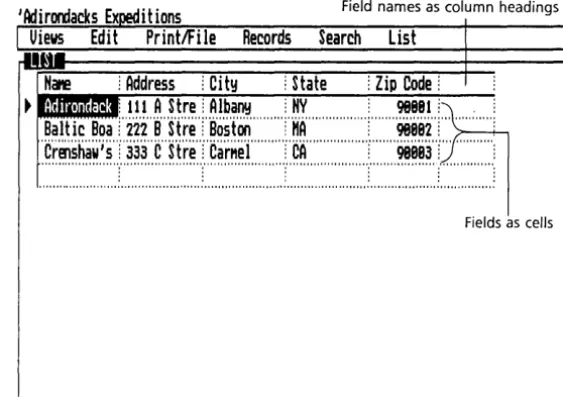
THE LIST VIEW™
The List View enables'you to see several records at once. It displays all the records in order, in a row and column format.
I
Uiews Edit PrintlFile Records Search List.11' ....
Date
j
Repj
Sales $ j $ Marginj
Quantij
Aug Pricej
Total Cj
Unit Cj
Apr-85
j
Alan
j
$16,987
j
$8,437
j
15
j
$1,132
j
$8,559
j
$579
j
"Ap'r~'85'!"B'ob""""!"""Si';'i'7'S"!"""$'i';'e'j·s··!····,'···i·!·'···h;8·S·S··:
.. ·'$'i';·i·4·S··: .. ····$·S78··: .. '····
'Ap·r'~85·'i'Ca'thy·.. ·i····'·$4·;a9'i";'····'$i';84'i'·;'···'5··;'·',··,'···'$978··;····$2';a58'·; .. ···'$578··
i .. ··· ··Apr~85'·j·'bave···j'····'$7·;544··j'··.. ·$i;4·i4··j··,',·'···9'·j···'·'··$838··j' .. ·$5';·i39··j'···$579'·( .. ···,·
•
··Hay~85'(Alan··'..
·lilim:····$28>736·'(···"···'32''(·'·'···$I~·2i·8·r·$18~·248·'(···$578·r···'··· 'H'ay~'85"!'B·ob" ...
j$6,992!"" "h;'s'si'! ... 7''1'' ... '$9'99''1'' "h;99ff:'" .. '$'578 .. : .. · .. ··
·Hay·~85··;·Cathy··'·;···{3·;a·i3";··'··{'i·;533'r"··'···4··;···'····$953'·;····$2';2a8··;···"·$578··;
... .
··HaY~85··j'·bave'··.. 'j'·"$ii;578··j'···$8·;898·'j'····'··'·24'·j'··· .. ····$94·'··j··$'i3';689··j'···$578 .. j .... , .. .
.
'Jljn~85'r'A j·an'·· ..
·j·· ..$29
~'876"j""$15
~'626'r·'· .. ··· '25' r""'" $1
~'195"j"$
14
~'258'r"'" $578' .j .... , .. .
·Ju·n·~·8·s··:·B'ob·'····"!···'··Si';·i69··:··'·"h;8i9··!···,···i·:·"·'·'·$'1';·s·85··:·
.. '$'1';·1'4·s··:···$'5·78··: .. ···
.~~]~:~~
•••
r;~:~ti
••• •
.•
;~:;;tT·....~~].,·"~l;;~b~:~r
••
~~~r
•• •
To make comparisons easier, you can rearrange the columns instantly to bring important details into focus. You can even temporarily set aside whole columns of information, leaving vis-ible only the exact details you want.
1-5
~
m
~
o
U --1 UJ
3
ONE
Your sales are generally rising. In May, Cathy's sales took off, but what is happening to Bob?
1-6
REFLEX THE ANALYTIC DATABASE SYSTEM
THE GRAPH VIEWTM
The Graph View automatically presents a graphic representa-tion of your informarepresenta-tion. Often a visual summary reveals
important trends or exceptions that would otherwise take you hours to discover from raw data.
Edit PrintlFile Records Search Graph Type
S
U
H
6BBBe
a
1
e 4BBBB s
2BeBB
B For Each:
IPn-
BBob E§CathyYour graph is created instantly; you simply enter field names for the information you want to display, and Reflex draws the graph. Then, by selecting any point on the graph, you bring up the corresponding detailed record in the Form or List Views.
This unique summary-to-detail capability puts graphic analysis
ONE
Summarize your
department's performance instantly. Alan's
contribution to total Sales $
is the highest of all your Sales Reps.
Bob's average percent Margin is highest. Is he pushing too hard on price at the expense of volume?
WELCOME TO REFLEX
THE CROSSTAB VIEW™
The Crosstab View divides your information into categories and displays them in a numeric summary table. Use it to pinpoint trends and relationships among the data. Or quickly change the crosstab for a second analysis, and Reflex shows you a different aspect of your information.
1 Uiews Edit Print/File Records Search Crosstab
SUMMary: 1 @SUM Field: \ - 1 S_al_es_$ _ _ _ _ _ _ _____ Rep
~ "I.',~,~,~,~,~,~,~,I,I,,,,,,,"""""~,~,~,!,~,~.?,!,'"""~,~,~,!,~,~,~, """"~,~,~,!,~,?.?.,!,"",J~,~,!,?,~,~,,!,""'~,~,~,?,!,~,~,~,
o "I,I,~,~,~,~JI,I"",,"',!,""'~,~,~.?!,~,~,~,,!,'"""~,~,~,!,~,~,~" """"~,~,~,!.?~,~,,!,"""'~.?~,!,~,~,~,,!,""'~,~,~.?!.??,~"
~ "',',~P9t~,',~,,,,""""""""~~!,~?,~,!,,"""~,~~!,~~~, """'~,~?!,~,~,~,!,""'''~~?!,~~~,!,'''''~,~,~~,!,~,~,~"
c "Swiftwater" ! $84,148! $56,925 $74,888! $92,567! $388,448
t
::~~::::::::::::::::::::III1W.::::::F~:~:;!:~~:: ::::::~i:~~:;~:~:~::::::::I~~~:;~X::::::::~:~:~X;:~:~:~::
. 1 Uiews Edit PrintIFile Records Search Crosstab
SUtlMan;!: 1 @AUG Field: \ - 1 y._M_ar..._9_in _ _ _ _ _ _ _____
Rep
i "Alan" i "Bob" i "Cathy" i "Dave"! ALL !
p
"Paddles" i (12.8) i 27.8! 9.8 i 15.7 i 9.7 i r """"''''''''''''''''''''''''''''''''''''''''''''''''''''''''''""""""""""""""""""""""'"''''''''''''''''""'"
o "I,~,P,~,~,~,I,I,,,,,,,,,,,,,,,,,, ,~? ~,~,,!,'''''' ,~,?, ~,~,,!,""" ,~,~, ~,?,.!""", ,~,~, ~ ,~,,!,,"'" ,~,~, ~,~,,!,,""''''
.. , .. ,.,
~ "I,~,~,~,~,I,I,
'"'''''''''''''''',~,~, ~,~,,!,""" ,~,~, ~
,?,,!,""",~,~, ~,?,,!,""" ,~,~, ~,~,,!,"'''' ,~,?,~,~,,!,"""""""'"
c "Swiftwater" i 43.8 i 48.5 i 43.7 i 36.7 i 43.8 i t::~~,~::::::::::::::::::::::::::::~~:;:~::_:::::::::~X;~:::::::::::i~:;:~:::::::::::~j:;:~:!::::::::::::::::::
These kinds of analyses are so quick that you can ask question after question about your information. Your understanding becomes deeper and more complete.
ONE
A customized report drawn directly from your records makes your understanding available to others.
Preview on the screen what will be printed out.
1-8
REFLEX THE ANALYTIC DATABASE SYSTEM
THE REPORT VIEW™
The Report View enables you to design custom printouts of your information.
Report Edit Options Search Attributes FIRST QUARTER SALES BY REP Silent
Sport Swiftwater First Quarter Sales For Alan
Silent Sport Swiftwater First Quarter Sales For Bob
Silent sport Swiftwater
First Quarter Sales For Cathy
131,599,99 39,971,99 74,149,99 ---_.-. $235,711. 99
22,228,99 22,533,88 56,915,98
---$181,678,99 . 34,795,99
32,142,89 75,898.88 ---$142,655,99
You can format the printout of your data almost any way you want it, directly on the Reflex screen. Setting up your report is easy, and you can save the format for use later on. The Report View lets you instantly preview what will appear in print.
FIVE VIEWS OF THE INF.ORMATION
Reflex Views give you five different ways of seeing and analyzing your information. Each view contributes to your understanding in a different way.
ONE
c
WELCOME TO REFLEX
REFLEX FEATURES
CALCULATED FIELDS
You can enter formulas into any field for automatic calculation of values. Use built-in mathematical, statistical, financial, and date functions for building sophisticated models.
SORTING
You can arrange your records in exactly the order you want them. For instance, you may want your employee records in alphabetical order to print a directory, and then change to date-of-hire order for benefit analysis.
SEARCH/FILTER
You can search for individual records that meet conditions you specify. Or you can use the same conditions to divide the database instantly into a subset of the records for quick analysis. For example, if you want to look at only high-margin sales, you apply a Reflex Filter and instantly create a temporary "working database" of only those records.
VARY
You can automatically enter a sequence of data and create many records at once to set up a skeleton database or to build
hypothetical scenarios.
TRANSLATE
You can use information from other computer programs without having to reenter the data. Reflex can use 1-2-3, Symphony, dBase II, dBase III, PFS, DIF, and ASCII (text) files you already have. Reflex can also work with the data from many of the popular micro-to-mainframe programs.
1-9
~
m r;
o
s:
ONE
D
1-10
REFLEX THE ANALYTIC DATABASE SYSTEM
OTHER FEATURES
Reflex combines the five views and analysis features with easy-to-use menus that work directly from the screen. Pop-down menus provide quick access to 50 commands.
Reflex also makes full use of the special function keys on the IBM keyboard. For instance, you can press [TIQJ to see a choice list of current field names, functions, or other options, then select the entry you want. When you need help, press []I] to display a Help screen.
Complete directions for operating Reflex can be found in the first tutorial and at the beginning of Reference A.
LEARNING TO USE REFLEX
STARTING OUT
You need to do a few things to prepare Reflex to run on your computer. Turn to the "Starting Out" chapter for step-by-step directions.
THE TUTORIALS
This package includes an electronic tutorial which you will find on your help diskette.
If you prefer a written tutorial, you will find two sections of the User's Guide particularly useful. The Basic Tutorial takes you step by step through setting up, creating, and using a database. The tutorials are arranged so that you can begin working with Reflex quickly. The Advanced Tutorial uses step-by-step examples to show you how to do analyses with Reflex.
ONE
E
WELCOME TO REFLEX
Both the electronic and written tutorials use sample databases, constructed so that you can practice using Reflex at your own convenience.
THE REFERENCE CHAPTERS
The Reference chapters provide complete descriptions of all of the parts of Reflex. If you want to plunge right in with your own work, read the appropriate parts of the Reference chapters as you need to.
APPENDICES
Different appendices provide helpful hints for using Reflex, a troubleshooting guide with a list of error messages, and several technical charts.
INDEX
Use the Index to find references to any topic in this User's Guide.
USING YOUR COMPUTER
Throughout this User's Guide, we are assuming you have an IBM PC with two diskette drives, or an IBM XT with one diskette drive and a hard disk. If you have an IBM pc-compatible computer, or an IBM AT, you will have no trouble using Reflex on it. If your keyboard is different, you will need to consult your computer manual to find the keys equivalent to the IBM keys.
LU
2 o
~
LU
~
ONE REFLEX THE ANALYTIC DATABASE SYSTEM
THE KEYBOARD
The computer keyboard looks like an expanded version of a standard typewriter keyboard. There are groups of keys to the right and left of the regular typewriter keys, and several special-purpose keys.
Tab Control Backspace Break key
Shift Alt Shift Caps Lock Insert Delete
Function keys
1-12
Typewriter keys Cursor movement keys
THE TYPEWRITER KEYS
The typewriter keys act just like the keys on a typewriter. The characters you type in appear on the screen.
NOTE You cannot use the letters 0 and I for the numbers zero (0) and
one (1). Your computer takes these things literally.
Use the shift key ~ to get capital letters just as you would with a typewriter. When two symbols are pictured on a key, the ~ key gives you the upper one.
The
I
f~r~I
key makes all the letter keys uppercase, but it doesn't affect the number keys or the punctuation keys.You will still have to use the ~ key to get the upper symbols. The
I
f~f~I
key toggles: Press it once and it's on; press it again and it's off. Using the ~ key withI
f~f~I
on gives you a lowercase letter.ONE
The function keys with template.
WELCOME TO REFLEX
When you are typing an entry, the (Backspace) key moves you one space to the left, wiping out the character it passes over. Do not confuse the backspace key with the other keys with arrows on them.
THE CURSOR MOVEMENT KEYS
You use the cursor movement keys to move the cursor, a highlighted rectangle on your screen, to the location you want Reflex to pay attention to. The cursor can be one character wide or as wide as the whole screen. The arrow keys move the cursor one space in the direction of the arrow. Depending on the context, the
I
HomeI, I
EndI, I
Pg UpI,
andI
Pg OnI
keys move the cursor in larger jumps.Pressing the
I
~~~I
key turns the cursor movement keys into a numeric keypad. This key also toggles: Press it again to return these keys to cursor movement keys. In most cases, you will find it convenient to enter numbers from the top row of the typewriter keys.FUNCTION KEYS
RECORD
FIRST jLABT
F7 _ _ FB
PRIOR NEXT
\
The function keys
[ill
through [flQ] perform specific Reflex commands. These keys are described in several places in this User's Guide; a complete chart is found at the beginning1-13
~
m
h o
~
ONE
1-14
REFLEX THE ANALYTIC DATABASE SYSTEM
of Reference A. Your Reflex manual includes a paper template that you can cut out and place over the function keys to remind you of which key does what.
SPECIAL KEYS
The
I
CtrlI
key is used to double the capability of some other key. For example, whenI
CtrlI
is used with ~ and ~, these keys act like ''Page Left" and ''Page Right" to move the screen in large jumps over the information.The
I
InsI
key inserts a row or a column in a display so you can add information to what is already there.The
I
DelI
key deletes the contents of a field, or an entire row or column in a display. If you use this key while you are in Edit mode, this key deletes one character at a time.The enter key
I
~I
is sometimes called the carriage return key, because it is in the same location as the carriage return on a typewriter keyboard. This key causes Reflex to "enter" what you have typed into a cell or to carry out a menu com-mand. It means, "Go ahead, do it!"The
I
EscI
key is the opposite of theI
~I
key: It cancels what you have been doing. It means, "I've changed my mind."ONE WELCOME TO REFLEX
THE MOUSE
As an option, Reflex can be used with a mouse, a hand-operated pointing device attached to your computer. If you use a mouse, an arrow known as the pointer will appear on your screen. You control the pointer by rolling the mouse across your desktop.
5/81/85
I
Uiews Edit PrintlFile Records Search FontTyler Canoe Cor4lany
I10nthly Sales Report Date: ~
Rep: Alan ~-"~
ProliJet: S i
lent~
,...,....::::, ,,-" ,""().Jant ity: 32 Sales $: $38,976 lklitCost: $578 $ Kargin: $28,736 Total Cost: $18,248 X Kargin: 53,2 Avg Price: $1,218 CoMission: $6,228.88
U sing a mouse is explained fully in the first tutorial.
1-15 :E m h o
~
ONE REFLEX THE ANALYTIC DATABASE SYSTEM
Notes:
TWO
TWO
A REFLEX DISKETTES
B FORMATTING
C BACK UP COPIES
D INSTALLATION
E STARTING REFLEX
F REPORT 8r UTILITIES
G OPTIONAL HARDWARE
STARTING OUT
THE REFLEX DISKETTES
Care and handling of your diskettes.
FORMATTING DISKETTES
For two diskette drives; For a hard disk.
MAKING BACKUP COPIES OF THE REFLEX DISKETTES For two diskette drives.
INSTALLATION
For two diskette drives; For a hard disk.
STARTING REFLEX
Two diskette drives; Hard disk.
USING THE REPORT 8r UTILITIES DISKETTE
OPTIONAL HARDWARE SETUP
2
6
7
9
11
VI W ~ W
~ VI
is x
W ...J
u..
w
a:::
TWO
A
2-2
REFLEX THE ANALYTIC DATABASE SYSTEM
In this section we describe the things you need to do before using Reflex.
Although Reflex is ready to run on your IBM Personal Com-puter right away, there is a little preparation to be done first. In particular, you need to:
1. Prepare a formatted diskette to store databases.
2. Make backup copies of the Reflex diskettes.
3. Install the Reflex program, so it may be used to start (''hoot'') the system.
In addition to these preparatory procedures, this chapter discusses the hardware you need for running Reflex, how to
start running Reflex, and finally, what to do if your Reflex
System Disk is damaged.
EQUIPMENT
Reflex will work on the IBM PC, IBM XT, IBM AT, and fully IBM
pc-compatible computers.
Your computer must have at least 384K of main memory
(RAM) and be equipped to use double-sided diskettes with 360K bytes of storage.
Your computer must also have an IBM Color/Graphics Adapter and a display capable of high resolution graphics (although a color monitor is unnecessary), or a Hercules (Monochrome) Graphics Card for the IBM Monochrome Display.
Your Operating System (DOS) must be version 2.0 or later.
THE REFLEX DISKETTES
Your Reflex package includes three diskettes, two of which youll use for running Reflex, and one disk containing the Help fIles.
Reflex System Disk The main Reflex program.
Reflex Report & Utilities Disk The Report View,
TWO
The parts of a diskette.
STARTING OUT
Reflex Help Disk The Help files and sample files for the User's Guide tutorials.
By following the instructions in this chapter, you will make both the Reflex System Disk and the Report & Utilities Disk ''bootable'', i.e. you can put either into Drive A: and start the computer. Which disk you actually use at any given time will depend on which Reflex facility you wish to use.
If you have a hard disk, you can copy both diskettes to the hard disk and have all the Reflex facilities available at once.
In addition to the Reflex diskettes, you will need a few blank diskettes. These must be formatted before you work with Reflex. You will use these diskettes to save the work you do with Reflex.
CARE AND HANDLING OF YOUR DISKETTES
Diskettes are sensitive. If they aren't handled properly, they can be damaged, losing the information stored on them. In general, if you treat them carefully and keep backup copies, you can count on overcoming any mishaps that may occur. Always handle a diskette by the edge. Never touch any part of the recording surfaces. Store diskettes in the envelopes they come in. This will keep dust, smoke, and anything else off of the recording surface.
REFLEX.. SYSTEM DISK
00
- Write-protect notch
n.··
lU.-+ ..
··---t-
Recording surface2-3
;;0 m "'T1 r m
X
o
Vi
7'\
TWO
B
2-4
REFLEX THE ANALYTIC DATABASE SYSTEM
Keep your diskettes away from magnets and machines that emit magnetic fields (telephones, for instance). Magnets are found in many unlikely places around the office, such as paper clip containers, so be cautious.
Don't let diskettes get too hot or too cold. They are designed to be safe between 50 and 125 degrees Fahrenheit. Even on a cool day, however, direct sunlight can heat a diskette and damage it.
Don't write on them (except carefully with a felt-tip pen)-instead, write on a new label first, then stick the label on the diskette cover.
We recommend that you store your original Reflex diskettes and your backup copies in their paper envelopes in a vertical position. Use a hard-covered box to keep them safe from dust and damage.
And always make backup copies of any diskette containing
important information. If something is very important, make
two backup copies and store them in different places.
FORMATTING DISKETTES
Before you can use a diskette to store the work you do on Reflex, it must be formatted. Here is the procedure to format a blank diskette.
FOR TWO DISKETTE DRIVES
1. Be sure your DOS diskette is in Drive A and the com-puter is on.
2. Type Format B: and press
I~I
3. Place a new diskette in Drive B and press
I
~I
Your screen displays A> If it doesn't, type A: and press
I
~I
Your screen prompts you to
TWO STARTING OUT
Formatting takes a little while. When it is finished, your computer displays a message asking whether to format another diskette. Type N (for "no"). The A> prompt appears.
FOR A HARD DISK
1. Be sure that the hard disk is the default Drive.
2. Type CD \ and press
I
~I
3. Type Format A: and press
I~I
4. Place a new diskette in Drive A and press
I
~I
Assuming the hard disk is
Drive C (it generally is), your
screen displays C>. If it
doesn't, type C: and press
I~I
This makes the root directory
of your hard disk the current
directory. If your DOS files are
on a different directory, then
you must change the current
directory to it.
Your screen prompts you to
insert
a
diskette in Drive A.The screen displays Formatting while it works.
Formatting takes a little while. When it is finished, your computer displays a message asking if you want to format another diskette. Type N (for ''no''). The C> prompt appears.
WARNING Always have an extra, format-ted diskette available. If you reach the end of a Reflex session and want to save the work you have been doing, you will then be able to do so. If you turn off the computer or exit Reflex without saving your work, it will be lost.
TWO
c
2-6
REFLEX THE ANALYTIC DATABASE SYSTEM
MAKING BACKUP COPIES OF THE
REFLEX DISKETTES
Your Reflex disks are not copy-protected. Before using Reflex, you should make a backup copy of the Reflex System Disk and Report & Utilities Disk. Should anything happen to your origi-nal Reflex disks you can use your backup disks. If you are using a hard disk system, your original Reflex disks can serve as your backup copies.
FOR TWO DISKETTE DRIVES
To make a backup copy of your Report & Utilities Disk, follow the procedure described above and use your Reflex Report &
Utilities disk instead of your Reflex System Disk.
1. Be sure your DOS dis-kette is in Drive A and your computer is on.
2. Type format b:/s and press
I
~I
3. Place a new diskette in Drive B and press
I
~I
The screen displays A> If it
doesn't, type A: and
press
I
~I
Your screen prompts you to
insert a diskette in Drive B.
The screen displays Format-ting during the formatFormat-ting process.
Formatting takes a little while. When it isfmished, your com-puter displays a message asking whether to format another diskette. Type N (for "no"). The A> prompt appears.
4. Remove your DOS disk from Drive A and Replace it with your Reflex System Disk.
5. Type copy
*.*
B: and pressI
~I
DOS will display a listing of
the files as they are coped to
your backup disk in Drive B.
You now have
a
fully-func-tional backup copy of your
TWO
D
STARTING OUT
When all the Reflex diskettes have been copied and labeled, enter N. The A> prompt appears.
INSTALLATION
The final step is to "install" Reflex. This simply means copying it to your hard disk, if you have one, or copying DOS to the Reflex System Disk and Report & Utilities Disk so you can use them to start (boot) your computer.
FOR TWO DISKETTE DRIVES
1. Be sure your DOS diskette is in Drive A, and the com-puter is on.
2. Insert your Reflex System Disk into Drive B.
3. Type B:lnstall and press
I~I
The screen displays A>
If it doesn't, type A: and
press
I
~I
Don't space after the colon.
This command executes the Install program on your Reflex disk. Reflex copies several important files from the DOS diskette onto your System Disk. A message appears when the process is complete.
4. Remove your Reflex System disk from Drive B.
Your Reflex System Disk is ready for use. You have made the disk "self-booting" which means that you do not have to load DOS first. You can start the computer with the Reflex System Disk in Drive A.
Repeat steps 2 through 4 for the Reflex Report & Utilties disk.
TWO REFLEX THE ANALYTIC DATABASE SYSTEM
FOR A HARD DISK
Reflex will be installed in a sub-directory of your hard disk named \Reflex. This installation process creates the sub-directory and copies the necessary files from the diskettes to the hard disk.
NOTE The Reflex System Disk and the Report & Utilities Disk will
take about 300K of disk space each. The Help Disk will take about 200K.
1. Be sure that the hard disk is the default drive.
WARNING The hard disk must be the
Assuming the hard disk is
Drive C (it generally is), the
screen displays C>. If it
doesn't, type C: (or whatever
letter designates your hard
disk) and press
I
~I
6
current drive. If it is not, the~ installation will not be
- l
~ performed properly. Check to
~ be sure the screen displays
C> (or whichever letter designates your hard disk),
not A>.
2-8
2. Place your Reflex System disk into Drive A.
3. Type A: HDNSTAL 1 and press
I
~I
Don't space after the colon, and the final character is the
number one (1). A message
on the screen will tell you that the files were installed on the hard disk.
If your screen has the message, "Bad command or file name", you may have the wrong diskette in Drive A or you did not include the "A:" when you typed in "A:HDNSTALl". Start again with step 2.
TWO
E
STARTING OUT
4. Remove your Reflex Sys-tem disk from Drive A. 5. Place your Reflex Report & Utilities Disk in Drive A.
6. Type A: HDNSTAL2 and press
I
~I
7. Remove the Report & Utili-ties Disk from Drive A. 8. Place the Help Disk in Drive A.
9. Type
Copy A: Help.RXH and
press
I
~I
Reflex copies the files on this disk to the same Reflex subdirectory.
Reflex copies the Help file into the Reflex subdirectory on the hard disk.
Reflex has been successfully transferred to a new sub-directory named "Reflex" on your hard disk.
, STARTING REFLEX
TWO DISKETTE DRIVES
1. Place your Reflex System disk in Drive A.
2. Turn on the power switch to your computer.
3. Type in the date using the MM/DDIYY format.
4. Press
I
~I
5. Enter the time using the HH:MM format.
6. Press
I
~I
The screen prompts: Enter new date:
(e.g., 7118184)
The screen prompts: Enter new time:
(e.g., 15:53)
The screen shows the A> prompt.
2-9 V\
~
~
z
G) :::0
m
-n
r m
x
W --I
u..
W c:::
\.!J Z
~
~ VI
TWO
The Reflex title screen.
Press
IT]
to startworking with Reflex.
2-10
REFLEX THE ANALYTIC DATABASE SYSTEM
7 .. Type Reflex and press I~I
8. Remove your Reflex Sys-tem disk from Drive A, and replace it with your backup Help disk.
9. Place a formatted diskette in Drive B to save your Reflex data files.
Your computer will load Reflex and display the Reflex title screen.
This disk contains the Help files. Reflex will read from this disk whenever you press the Help key [IT]
You and Reflex are ready for action!
PrintlFile Records Search
Weleotte to Reflex - The Analyt ic Database
FORf1 LIST
REFLEX
XTAB GRAPH
To choose a ttenU I press the slash (/) key, For He Ip I press the F 1 key,
HARD DISK
1. With the door to Drive A open, turn on the power switch to your computer.
2. Type in the date using the
MM/DDIYY format.
The screen prompts: Enter new date:
TWO
F
STARTING OUT
3. Press
I
~I
4. Enter the time using the HH:MM format.
5. Press
I
~I
6. Type CD \Reflex and press
I~I
7. Type Reflex and press
I~I
The screen prompts: Enter new time:
(e.g., 15:53)
The screen shows. the C> prompt.
Note the space after CD. This command takes you to the Reflex subdirectory.
Your computer will load Reflex and display the Reflex title screen.
You and Reflex are now ready for action!
USING THE REPORT
8r
UTILITIES DISKETTEThe facilities on the Report & Utilities diskette may be used with the same procedure as running Reflex from the Reflex System Diskette.
If you have a hard disk, follow the procedures for starting Reflex, but type Reflex2 rather than Reflex in step 7.
If you are using a floppy-based system, follow the procedures above, but place the Report & Utilities Disk in Drive A, rather than the Reflex System Disk, and type Reflex2 rather than Reflex in step 7.
2-11
0:::0
- m
VI-o
AO
m:::o
~--i
mQO
C
-t
r= =i m
TWO
G
2-12
REFLEX THE ANALYTIC DATABASE SYSTEM
OPTIONAL HARDWARE SETUP
USING A HERCULES GRAPHICS CARD
Reflex will run with either an IBM Graphics card or a Hercules Graphics card (monochrome version).
To use Reflex with a Hercules graphics card, use the following procedure each time you start your system.
Prior to running Reflex enter the following command: Set Reflex = HERe
Alternatively, you may run a ''batch file" which is included with Reflex and will both enter the required command and then start Reflex. To use this, enter
Reflexh
in place of entering Reflex to start the program. This will enter the Hercules command and then start Reflex. This command should be given at the same time the Reflex command would have been given (see Starting Reflex, above). Similarly, you can enter Reflex2h for the Report & Utilities Disk.
If you are using a floppy-based system, and you would like to give the Hercules command and then start Reflex automatically when you start your system, rename the Reflexh.Bat file to Autoexec.Bat. If you are already using an Autoexec.Bat file, you may want to incorporate the "Set Reflex
=
HERe" command into your Autoexec file.ACTIVATING THE PRINT-SCREEN (PrtSc) KEY
Since Reflex runs in graphics mode, rather than text mode, the PrtSc key is not automatically enabled for sending a copy of the screen to a printer. There is a program included on the DOS disk, though, which will enable the PrtSc key. To use this program copy it from the DOS disk to the Reflex disk and then run it prior to running Reflex.
TWO STARTING OUT
1. Be sure your DOS diskette is in Drive A, and the com-puter is on.
2. Type dir graphics and press
I
~I
The screen displays A> If it doesn't type A: and press I~I
This will check to see if the required program is on your DOS disk.
3. If you see a message "File not found", then the program isn't on your DOS disk. See your dealer to get a copy of it. If the file name is shown (Graphics.com), proceed.
4. Insert the Reflex System Disk in Drive B. 5. Type
copy graphics.com b: and
press
I
~I
This transfers the program to your Reflex disk.
6. Repeat steps 4 and 5 with your Report & Utilities disk.
Use this procedure with a hard-disk system:
1. Be sure that the hard disk is the default drive
Assuming the hard disk is Drive C (it generally is), the screen displays C>. If it doesn't, type C: and press I~I
2. Insert your DOS diskette in Drive A.
3. Type dir A:graphics and This will check to see if the
press
I
~I
required program is on your DOS disk.4. If you see a message "File not found", then the program isn't on your DOS disk. See your dealer to get a copy of it. If the file name is shown (Graphics.com), proceed.
5. Enter cd \reflex and press This will change your current
I
~I
directory to the same one containing your Reflex program.6. Type
copy a:graphics.com and
press
I
~I
This transfers the program to your hard disk.
You are now set up to use the graphics program. To actually make use of it, use the following procedure each time you start your system.
2-13
:LO 5;~ 00
~~
;:!Or m Vl m -i
C
0..
::J
f-w
Vl
UJ ...J~
~~
0 0
t~
0:1:
TWO
2-14
REFLEX THE ANALYTIC DATABASE SYSTEM
Prior to running Reflex enter the following command:
Graphics
If you have a hard disk, enter this command after you've
changed the directory to the one containing Reflex (with the "cd" command.)
Alternatively, you may run a "batch file" which is included with
Reflex and will both enter the required command and then
start Reflex. To use this, enter
Reflexg
in place of entering Reflex to start the program. This will enter
the graphics command and then start Reflex. This command
should be given at the same time the Reflex command would
have been given (see Starting Reflex, above).
If you are using a floppy-based system, and you would like to
give the graphics command and then start Reflex automatically when you start your system, rename the Reflexg.Bat file to
Autoexec.Bat. If you are already using an Autoexec.Bat file, you may want to incorporate the "Graphics" command into your Autoexec file.
NOTES 1. The graphics program which comes with DOS is designed to work with IBM or Epson dot-matrix printers with graphics
capability and the IBM graphics card. It will not work with
other printers or other graphics cards, including the Hercules card.
2. If the PrtSc key is pressed without a printer attached, your
computer will appear to freeze. This is independent of
whether the graphics program is used (or whether Reflex is
used.)
USING A SERIAL PRINTER
If you plan to use a serial printer with Reflex, there is some
TWO STARTING OUT
USING A MOUSE
If you are using Reflex with a mouse, it is generally necessary to run the mouse "driver" program prior to running Reflex.
This program in effect "activates" the mouse. Refer to the documentation accompanying your mouse for instructions.
a:: o
o~
LU Vl
TWO
~CS
~~ 2-16
«Vl
09
REFLEX THE ANALYTIC DATABASE SYSTEM
THREE
THREE
PART 1
PART 2
PART 3
PART 4
PARTS
PART 6
PART 7
PART 8
PART 9
BASIC TUTORIAL
PART 1: SCREENHANDLING
REFLEX CONCEPT: THE FORM VIEW PART 2: DESIGNING A FORM
PART 3: ENTERING INFORMATION IN THE FORM VIEW
PART 4: SAVING A DATABASE
REFLEX CONCEPT: THE LIST VIEW PART 5: ENTERING INFORMATION IN THE LIST VIEW
REFLEX CONCEPT: SORTING PART 6: SORTING YOUR RECORDS
REFLEX CONCEPT: SEARCHING
PART 7: SETTING SEARCH CONDITIONS: FINDING AND FILTERING
PART 8: CHANGING THE LIST VIEW AND PRINTING
PART 9: EDITING THE RECORDS
4
16 18
22
27
30
31
36 38
43 44
51
59
3-1
OJ
~
V'I
n
-I
c
a
;:::0
j>
THREE
3-2
REFLEX THE ANALYTIC DATABASE SYSTEM
This chapter is designed to give you a good idea of how to use Reflex. You will find that Reflex is both easy to understand and easy to use. Reflex can be used quickly. You will be able to work productively with the program after the first three short parts.
The first three parts are fundamental. The first explains how to operate the program and the next two explain how to set up and enter information into a database-in this case, how to create a mailing list. The remaining basic parts give step-by-step instructions for doing different things with the mailing list you create; for example, how to sort your list, search for a specific record, and print out a copy. The Advanced Tutorial in Chapter Four shows how to use Reflex's powerful analysis capabilities. The nine parts cover these topics:
Part 1, Screenhandling
Introduces skills you will need to work with the Reflex Views and windows.
Part 2, Designing a Form
Starts from scratch with setting up the form. Part 3, Entering Information in the Form View
Introduces the Form View, and explains how to enter informa~
tion into the form you design. Part 4, Saving a Database
Explains how to save your database in a file (on a data disk). Part 5, Entering Information in the List View
Introduces the List View and explains how to enter information using this view.
Part 6, Sorting Your Records
Explains how to rearrange the order of your records. Part 7, Setting Search Conditions: Finding and Filtering Explains how Reflex finds a particular record or group of records from conditions you set and introduces the idea of filtering the records so that you can work with a smaller portion of them.
Part 8, Changing the List View and Printing
Explains how to rearrange the columns in the List View and. how to print out the list of names and addresses.
Part 9, Editing
THREE BASIC TUTORIAL
ABOUT THE TUTORIALS
These tutorials take the point of view that you are just begin-ning to use a computer. In the beginning, everything is explained thoroughly. In later parts, we assume that you don't need to have everything explained again. Nevertheless, we never abandon the step-by-step approach to doing specific tasks.
The clearly marked "Reflex Concepts" sections give you a quick overview of the program. You will find·the tutorials useful even if you don't follow every lesson step by step. Each
section begins with a description of what it contains, and each part stands alone, so you can learn what you need when you need it. Even if you are experienced, we recommend that you begin with Part 1 because most of the basic screenhandling skills are covered in that part.
WHAT TO LOOK FOR
The tutorials contain both general explanatory information and specific instructions for you to follow. The instructions assume you are using a two-diskette drive system. If you have a hard-disk system, note that you may use Drive C for Drive A.
The instructions are printed in the left-hand column. What you actually type in is printed in boldface.
Explanations or comments for each step are in the right-hand column.
THIS IS NOT THE REFERENCE SECTION
Everything about Reflex is explained in the Reference sections. The tutorials simply present one approach to using the
program that we tested and found effective for learning. If you want to set out on your own, feel free to do so, using the Reference sections as your guide.
A CONTINUING EXAMPLE
The tutorials use the example of the (fictional) Tyler Canoe Company. The company is fairly small, employing several craftspeople to build high-quality canoes and several sales rep-resentatives to sell them.
Assume you are the Sales Manager for Tyler. The tutorials present tasks for you to accomplish and problems for you to solve-all fairly straightforward and all common to business.
~
Z ::J
o z « :r: z
UJ UJ
0:::
U Vl
THREE
PART 1
3-4
REFLEX THE ANALYTIC DATABASE SYSTEM
Using these examples, you will quickly learn the skills of using Reflex. The sample files included on the Reflex Help Disk contain the Tyler Canoe Company's business records.
SCREENHANDLING
In this part, you will learn how to work with Reflex. We have provided a sample database, which you will retrieve. Then, without paying much attention to the information, you will
practice selecting an object, choosing a menu command, splitting the screen to display two views at once, and changing the active view.
WHAT YOU'LL DO
D Retrieve a sample database
D Look at the information in the Form View, one of the five Reflex Views
D Replace the Form View with the List View D Split the screen to use two views at once D Change the size of a view
RETRIEVE A FILE
THREE'
The Reflex screen when it first appears. The
instructions will disappear when you take any action.
Windows area
Message
line-BASIC TUTORIAL
Main menu line -Edit
line-PrintlFile Records Search
WelcotM! to Reflex - The fmlytic Database
FORtt LIST
REFLEX
XTAB riIAPH
To choose a tteOO, press the slash (/) key, For Help, press the Fl key,
D The instructions on the title screen will disappear when you press the slash key
[TI.
D The edit line displays the contents of whatever is selected on your screen.
D The main menu line shows the main menu titles. Hidden beneath each title is a pop-down menu, which we will use in the next step.
D The windows area is where the different Reflex Views are displayed.
D The message line displays useful information at different times, depending on what Reflex is doing.
Before you can retrieve a file, you have to insert the disk with the file on it into the diskette drive. Do so now.
1. Remove the Reflex System Disk from Drive A.
2. Insert the Help disk into Drive A and shut the door.
You are now ready to retrieve
a file.
CHOOSING A MENU COMMAND
In order to choose the Retrieve File menu command, you first pop down the menu under the Print/File title, then move the cursor to Retrieve File on that menu.
3-5
V\ n
~
m
m Z I
»
Z
o
r-Z
1.9 Z
:::i
o z « :r: z
LU LU
0::
U V1
THREE
The Print/File menu provides the Retrieve command.
The Retrieve File tool.
REFLEX THE ANALYTIC DATABASE SYSTEM
PI" mtiF i Ie RetrIeve Flle"
Uiews Edit ds Search
---~---~
Save File I I }
Erase File I I
!.\ • I Menu commands
rrHh \ \
Global Settings, ,
There are two ways to choose a menu command from the keyboard:
o Press
[Z]
to activate the menu line. Use the ~ or~ keys to move the highlight to the Print/File title. When
the menu pops down, use the
[IJ
or[IJ
keys to movethe highlight to the Retrieve File command. Press
1~I.Or,
o
Press[Z]
and type PR-the P is the first letter of thePrint/File menu title. The R is the first letter of the Retrieve File menu command. This method is quicker once you
become more familiar with what is under each menu title.
[m] If you have a mouse, you can choose the menu option by
using the pointer. Put the tip of the pointer on the Print/File menu title. Press-and-hold the left button. (If you click the left button, the menu will pop down and then pop back up right away.) As long as you continue to hold down the left button, the menu will stay popped down. Move the pointer down to the Retrieve File command and release the button.
Using the mouse this way can be a little tricky at first. Once you have done it a few times, you will get used to it. Remember that the tip of the pointer is what you need to position.
1. Choose Retrieve File from the Print/File menu. Type: IPR
The introduction screen is re-placed by the Retrieve File tool.
Directory
I
A:\ !---++--Directory cell NaMe _ - - f f - - F i l e Name cellProceed button
-#--1
Proceed1 1
Canee I1
Cancel buttonTHREE BASIC TUTORIAL
Tools allow you to specify what you want done. The Retrieve File tool is similar to other tools you will see in Reflex. In this case, you will specify which file to retrieve.
The Name cell is highlighted, ready for you to enter the file name to retrieve. The Directory cell tells Reflex where to look for the file. In this case, your file is in Drive A, so if the cell shows something else (e.g., C:\, if you are using a hard disk) you need to change it:
2. Press
[IJ
once. The selection moves to the directory cell.3. Type: A: and press 1 ~ I. Reflex automatically enters a backslash.
SELECTING FROM A CHOICE LIST
Now we'll introduce a very important feature of Reflex-Choices. At any time, you can press lliQJ and Reflex will dis-playa list of entries appropriate for that particular place. Rather than typing one in, you can simply select the one you want.
4. Press Choices [ITQ]. Reflex displays a choice list of
files in Drive A.
The files choice list gives you the names of all the Reflex files on your data disk. If you use the keyboard, there are two ways to select from a choice list.
o
Use the[IJ
and[IJ
keys to highlight the name you want, and pressI
~I.
Or,o
Type the first letter of the name you want. (If more than one name begins with the same letter, Reflex will highlight the first one. Type the same letter again and the next namewill be highlighted) When the name you want is highlighted,
press
I
~I.
[m] If you have a mouse, put the pointer on the name you want and click the left button .
. NOTE Often a choice list contains more items than can be displayed on the screen at once. The list automatically scrolls as you move the cursor with the cursor movement keys.
The file you want is named "Salesrep".
3-7
Vl (") :;:1;J m m
Z
I
~
Z
o
r
Z
l!J
Z
::J
Q
Z
« :r: z
w
LU
0:::
U Vl
THREE
Tyler Sales Report: Form View. This is one sales rep's record for one product for one month.
Windows area
REFLEX THE ANALYTIC DATABASE SYSTEM
5. Use the
CO
key to high- The Proceed cell is selected. light Salesrep, and pressI~I.
PROCEEDING FROM A TOOL
After you fill out a tool, you Proceed (or Cancel if you change
your mind), and Reflex carries out the command you have specified.
Once you have moved the cursor to Proceed, you can use the
~ and
GJ
keys to move between Proceed and Cancel.6. Now that Proceed is high-lighted, press 1 ~ I.
The tool disappears, and Reflex retrieves the file you have specified.
1/S1/85 -Edit line- Main menu line (
I
Uiews Edit PrintlFile Records SearchTyler Canoe Coftpany
~nthly Sales Report
Date: ~
Rep: Alal
Product: Paddles
~tity: 81
Sales $: $6,558
Aug Price: $81 ~it Cost: $n
Total Cost: $6,237
Fo",
/Message line
-3-8
The file you have retrieved is the Tyler Canoe Company's
monthly sales records. You will first see this file in the Form
View. Each screenful of information in the Form View is the record of sales for one product sold by a particular sales rep
for a given month. We will explain the Form View fully in the
next section. Notice particularly the added main menu title:
THREE BASIC TUTORIAL
If You Don't See The Form View
If someone else has accidentally saved this file with another view displayed, you need to make a quick adjustment: 1. If the Form View is not on the screen, open it by choosing
Form from the Views menu (/VF), then press
I
~I.
Iftwo or three Views remain on the screen, go to the next step.
2. If the Form View is on the screen, you need to close the other View(s). Press
Q[J
until the List or Graph view labelis highlighted, then choose Close from the Views menu
(/Ve).
SELECT AN OBJECT ON THE SCREEN
To select an object on the screen means to move the cursor to it so that it is highlighted. You select something to tell Reflex what it should pay attention to. Then you either enter informa-tion at that locainforma-tion or command Reflex to carry out an operation on that object. Now try selecting objects in the Form View.
Use the cursor movement keys to move the selection from place to place.
Practice until you get the hang of it.
The fields in the Form View have a specific order. The ~ and
o::J
keys take you to the next field (to the right and down). The ~ and[IJ
keys take you to the previous field (left and up). ~ andI
0II§ I
also take you to the next and previous fields.I
HomeI
andI
EndI
select the first and last fields.I
Pg UpI
andI
Pg OnI
don't work in this case, because the entire form fits on the screen. Otherwise, they would move other fields into view.[m] If you have a mouse, put the pointer on one of the field names on the screen and click the left button.
That's all there is to selecting. The cursor movement keys will
work a little differently in other places, depending on which view is displayed. In general, they move in the direction of the arrow. In Form View, the cursor skips from field to field; you can't select any other part of the screen. We'll come back to the Form View in the next tutorial. Now let's open th