User’s Guide
BlackICE Defender User’s Guide – Version 1.0
Copyright © 1999, Network ICE CorporationAll Rights Reserved
Author: Andrew Plato
The use and copying of this product is subject to a license agreement. Any other use is strictly prohibited. No part of this publication may be reproduced, transmitted, transcribed, stored in a retrieval system or translated into any language, in any form by any means without the prior written consent of Network ICE Corporation. Information in this user’s guide is subject to change without notice and does not constitute any commitment on the part of Network ICE Corporation.
Network ICE Corporation may have patents or pending patent applications, trademarks, copyrights, and other intellectual property rights covering the subject matter of this user’s guide. Furnishing of this document does not in any way grant you license to these patents, trademarks, copyrights, or any other intellectual property of the Network ICE Corporation.
BlackICE, ICEpick, ICEcap, ICEpac and the Network ICE logo are all trademarks of the Network ICE Corporation.
Windows® and Microsoft® are registered trademarks and Windows NT™, Windows 98™, SQL Server™, and Internet Explorer™ are all trademarks of the Microsoft Corporation.
Internet Security Systems (ISS) is a trademark of Internet Security Systems, Inc.
CyberCop is a trademark of Network Associates, Inc.
Conventions Used in this Manual
Bold The names of screen objects, such as menu choices, window names, field names, and items in lists.
Italics Italics are used for emphasis or to highlight an important word or concept.
Monospaced Pathnames, filenames, and code are shown in monospaced font.
Monospaced Bold Values you must type in are shown in monospaced, bold font.
Monospaced Italics
Variables, such as a server name, are shown in monospaced, italic font. These are usually enclosed in angled brackets <servername> as well.
C
ONTENTS
Section I:
Introduction...1
Overview ... 1
What Can Hackers Do? ... 1
How BlackICE Works... 3
Security Levels ... 4
Security Level Descriptions ... 6
The Network ICE Product Line... 7
Other Network ICE Products... 8
Section II:
Installing BlackICE ...9
Minimum System Requirements ... 9
How to Install BlackICE ... 9
Uninstalling BlackICE ... 11
Section III:
Using BlackICE ...13
How to Run the BlackICE Summary Application... 14
The Attacks Tab ... 14
The Intruders Tab... 16
The History Tab... 18
Configuring BlackICE ... 19
Back Trace Tab... 20
Packet Log Tab ... 22
Evidence Log Tab ... 23
Protection Tab... 24
Trusted Addresses Tab ... 25
Blocked Addresses Tab... 27
ICEcap Tab... 28
Clearing the Attack List... 29
Updating BlackICE ... 30
Evidence Files ... 31
Disabling BlackICE ... 32
Section IV:
System Security ...33
What Hackers Can Do ... 33
How They Do It... 34
Stopping Hackers ... 34
Section V:
How to Handle Attacks ...37
Index of Attacks... 37
BlackICE Attacks... 40
Appendix A:
For More Help ...105
Online Help ... 105
Network ICE Web Site ... 105
1
1
1
1
I
NTRODUCTION
Thank you for purchasing BlackICE Defender. BlackICE is a powerful way to detect, stop, and analyze the activities of people trying to hack into your computer. BlackICE was designed from the ground up to work seamlessly with Internet connections. BlackICE is ideal for any computer using a standard dial-up modem, cable modem, or DSL connection.
Overview
In the past, computer hacking presented very little threat to home or small-business
computer users. Hackers spend most of their time attacking large corporate networks where there were valuable things to steal or vandalize. Most home computers of five to ten years ago held few if any files of interest to a hacker. Furthermore, Internet connections in the past were slow and extremely difficult to locate for even advanced hackers.
Today, the typical home or small-business computer presents numerous opportunities for hackers. Many home computers store credit card numbers, account numbers, and
confidential information for on-line commerce, banking, or stock trading. Furthermore, home computers are easy targets. Most home computers have little, if any, protection from hackers. Exacerbating this problem is the rise of “always-on” Internet connections such as cable modems or DSL connections. The more people there are using the Internet, the more opportunities there are for hackers to steal things.
Until now, detecting and stopping hackers meant purchasing expensive hardware or mastering complex networking tools. BlackICE places on your home computer the same powerful intrusion detection and protection tools that big corporations use. Now you can stop hackers before they stop you.
What Can Hackers Do?
When you connect to the Internet your computer is a part of the huge global network. You can send data (outbound) and receive data (inbound). When you download photos on a web site, you send a request outbound to the web server, then the web server transmits the photo data back inbound to your computer.
Hackers, exploit the capability of your computer to communicate with other computers. A hacker can use widely available networking tools to connect to your computer and send it commands. For example, a hacker could connect to your system and download an
encrypted file containing your credit card number. Then using a freely available decrypting program, the hacker cracks the file, gets the number, and goes on a buying spree at your expense.
Therefore, if your Internet connection is live 24 hours a day, a hacker has more
opportunities to find your system. Dial-up connections are slightly safer, but still pose a significant opportunity to hackers. While you are chatting on-line with a friend over a dial-up connection, a hacker in Russia could have located your computer and begun hacking.
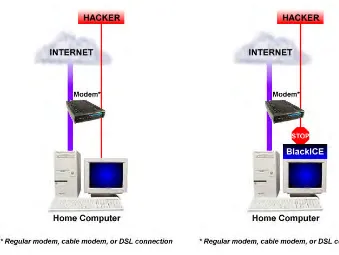
BlackICE operates like a persistent “traffic cop.” When BlackICE detects inappropriate access to your computer, it blocks access to the offending user. All other Internet access remains open and unaffected. Only the hacker is blocked, you can continue to browse the web, send email, and listen to Internet radio stations while BlackICE rejects the hackers.
Figure 1 – Without BlackICE Figure 2 – With BlackICE.
The figure on the left illustrates a common home computer when connected to the Internet. While many ISPs have some protection from hacking, this protection only stops the most primitive attacks. Most novice hackers can easily break through your ISP’s protection measures. When they do, your computer is vulnerable to attack.
[image:5.612.150.489.172.427.2]How BlackICE Works
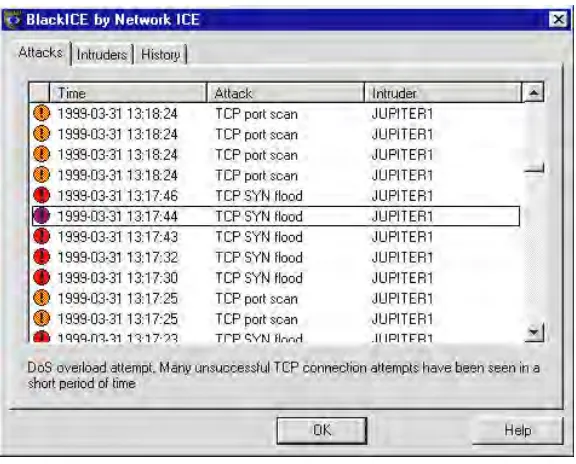
[image:6.612.145.433.167.399.2]BlackICE consists of an extremely powerful detection and analysis engine that constantly monitors the inbound and outbound traffic between your computer and the Internet or any other computers on a network. When suspicious behavior is detected, BlackICE springs into action and begins logging information about the event. Information about the attacker is displayed on the Intruders tab. Information about the type of attack the intruder attempted is displayed on the Attacks tab.
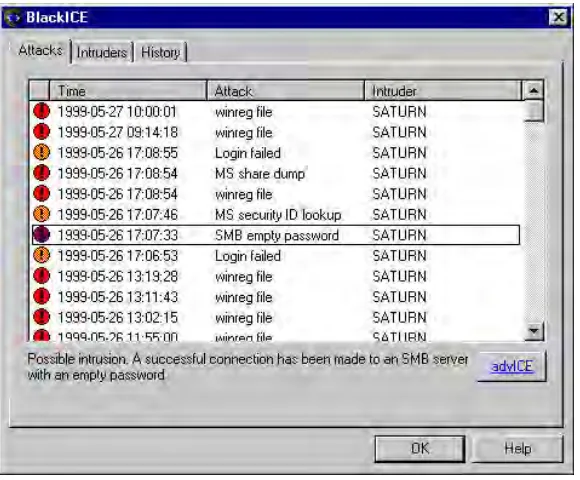
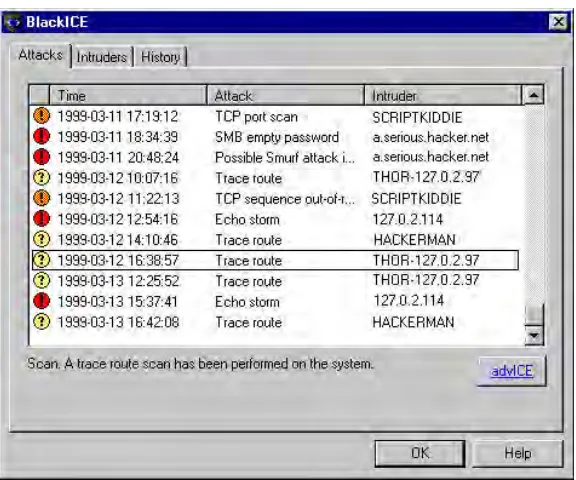
Figure 3 – The BlackICE Attacks tab.
The information BlackICE collects regarding an attack is analyzed with sophisticated networking algorithms. If the event is determined to be an intrusion, BlackICE
automatically blocks any access from the hacker’s machine (IP address). No matter how hard the hacker tries to crack your system, he cannot outrun BlackICE. BlackICE blocks the hacker’s access at the packet level. In other words, any transmission the hacker sends to your computer is rejected before it ever gets inside the computer.
When BlackICE reports an attack, it not only tells you what the attack was but exactly who carried out the attack. BlackICE “backtraces” hackers when they try to break into your computer. Backtracing allows you to know exactly who is attacking you. In extreme cases, this information could be very valuable if you wish to pursue legal action against the hacker.
BlackICE also captures a complete record of the attack in Evidence files. These files contain all the data the hacker sent to your computer. In the hands of an experienced network engineer or Internet Service Provider, you can know exactly what the hacker was trying to do. See page 31 for more information about Evidence Files.
Additionally, the History tab displays attacks and network traffic in colorful line graphs. This can help you spot trends and patterns in when hackers are trying to get into your computer.
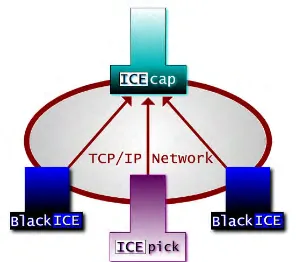
Figure 4 – On a corporate network, BlackICE is used to defend each workstation and report events to an ICEcap server. The ICEcap server aggregates and reports the events that took place on each network workstation where BlackICE is installed.
For proactive security assessment and monitoring, Network ICE’s ICEpick can regularly scan your network for security problems. This information is also reported to the ICEcap server for analysis and review.
For more information about ICEpick and ICEcap, visit the Network ICE web site at www.networkice.com.
Security Levels
When BlackICE detects an attack, it automatically blocks access from the hacker’s system. However, not all Internet transmissions are attacks. What constitutes an attack vs.
legitimate use of the Internet is not always easy to determine. Some legitimate Internet applications communicate with your computer in such a way that data is sent to you and then executed. For example, an on-line virus scanning tool may appear to BlackICE as an attack, since the web site is transmitting data directly to your computer and then executing it.
Hackers often take advantage of legitimate Internet technologies to make their activities seem innocuous. One of the most common ways to hack into a computer is to exploit open “ports.”
Communication ports are divided into two categories: System and Application. The System Ports, or low-end ports, are used for services installed on a computer, such as e-mail or web browsing. The Application ports, or high-end ports, are used by client applications such as chat programs or the Internet telephone.
It is generally harder to crack high-end ports since they are only open when specific applications are running. The lower ports are easier to crack since many of them are always open.
There are two categories of ports for Internet connections: TCP and UDP. TCP connections are the most common. They are used for web browsing, downloading files, etc. UDP ports are essentially the same as TCP. However, UDP connections do not have the error
correction features that TCP has. UDP is used for streaming content like RealAudio.
BlackICE has four Security Levels that define how rigorously it blocks unsolicited traffic for ports and port type. Inbound traffic is blocked on the security level you select. The more restrictive the security level, the more likely BlackICE will block unsolicited inbound traffic. Outbound traffic is never blocked. This ensures that web browsing and other regular Internet functions remain unaffected.
There are four security levels for BlackICE: Trusting, Cautious, Nervous, and Paranoid. The following chart demonstrates the relative protection of these four levels.
Inbound Ports Outbound Ports Security
Level Port Type System Application System Application
UDP
þ
*
þ
þ
þ
Trusting
TCP
þ
þ
þ
þ
UDP
ý
þ
þ
þ
Cautious
TCP
ý
þ
þ
þ
UDP
ý
þ
þ
þ
Nervous
TCP
ý
ý
þ
þ
UDP
ý
ý
þ
þ
Paranoid
TCP
ý
ý
þ
þ
Security Level Descriptions
Trusting: When set to Trusting, BlackICE only blocks file sharing over the Internet, unless Internet file sharing is specifically enabled on the Protection tab (See page 24 for more information). Blocking Internet file sharing ensures that hackers cannot download files off your computer. All other ports remain open and unblocked. Even though Internet file sharing is disabled, file sharing on an internal network remains unaffected. This setting is good to use if you have a slower Internet connection and little threat of attack.
Cautious: The Cautious setting is best for regular use of the Internet. This setting only blocks inbound intrusions on System Port(s). All other ports remain unblocked and therefore should not interfere with any Internet usage.
Nervous: This setting is good if you are experiencing repeated intrusions. For the Nervous setting, BlackICE blocks inbound intrusions on all the System ports and TCP Application ports. This setting may restrict some interactive content on web sites. Streaming media and other “application specific” Internet usage remains unaffected.
Paranoid: The Paranoid setting is very restrictive, but useful if your system has endured numerous attacks. Under this setting BlackICE blocks all inbound intrusions. This setting may restrict some web browsing and interactive content.
The Network ICE Product Line
For superior detection and protection, BlackICE offers the power to stop hackers before they do any damage.
BlackICE Defender
BlackICE Defender features the same powerful detection abilities as BlackICE Personal, however BlackICE Defender protects against intrusions. When attacks are detected, BlackICE Defender automatically blocks the attacker from gaining access to your system.
BlackICE Pro
Intended for workstations on corporate networks, BlackICE Pro features the same powerful detection and protection as BlackICE Defender. However, this version integrates with a ICEcap server for the ultimate network defense against intruders.
BlackICE Sentry
This version of BlackICE is specially tuned to monitor key subnets of a network and report any suspicious activity to an ICEcap server. BlackICE Probe is ideal for monitoring devices not covered by other versions of BlackICE or that are connected to the network via shared media.
BlackICE Auditor
Other Network ICE Products
Network ICE offers these other products for use identifying and stopping intrusions and security breeches.
ICEpick
ICEpick is a security auditing program. ICEpick scans the network for common network security vulnerabilities that hackers might exploit. ICEpick runs many of the same procedures hackers attempt and reports the success or failure of such attacks. ICEpick also includes an advanced scheduling and tracking system. The
scheduling feature allows you to keep constant watch on the network even in the middle of the night. The tracking features look out for new systems added to the network.
ICEcap
ICEcap is a centralized reporting system for BlackICE and ICEpick products. ICEcap can produce consolidated reports on the events and potential security breeches on a network. Using these reports, system administrators can, from one central location, review the security of all systems in a corporate enterprise. ICEcap can also identify attacks that single BlackICE installations may not detect as a serious intrusion. For example, ICEcap can detect that someone has
performed a ping sweep on the network. An individual BlackICE system would not consider one ping an attack.
2
2
2
2
I
NSTALLING
B
LACK
ICE
Installing BlackICE only takes a few minutes. This section steps you through the process of installing the BlackICE application.
Minimum System Requirements
n Operating Systems: Windows NT Workstation 4.0, Windows NT Server 4.0, Windows 95, Windows 98
NOTE: BlackICE has not been tested on Windows 2000 or Windows NT 5.0.
n Processor: Pentium or better.
n Memory: 16 MB or more.
n Hard Drive Space: 10 MB free.
n Network Connection: 10-BASE-T, ADSL, ISDN, cable modem, or regular modem connection using the TCP/IP protocol.
How to Install BlackICE
1. Locate the Setup Application.You must have the setup application to install BlackICE. There are a number of places to acquire this program.
l If you have the ICEpac suite or a CD copy of BlackICE run Setup.EXE from the
BlackICE folder.
l If you are using ICEcap to distribute BlackICE, contact your system administrator about the correct internal web address where the setup application is located.
l If you purchased BlackICE directly from Network ICE, you can download the latest version from www.networkice.com. Once you download the latest version, you can run BIsetup.EXE or you can chose to install across the net.
2. Run Setup.EXE or BIsetup.EXE. If you are running BIsetup.EXE, the application must unpack the setup files and verify them first. Once that is finished, Setup.EXE runs.
ý If setup detects and existing version of BlackICE, the setup prompts you to uninstall or continue to upgrade the previous version. See page 11 for more information about uninstalling BlackICE.
3. A welcome screen is displayed. Click Next to continue.
4. Review the Licensing Agreement. If you accept the agreement terms, click Yes. Otherwise, click No to exit the BlackICE setup application.
6. Verify the folder where BlackICE shortcuts are located on the Windows Start menu. If you wish to use a different folder, select it from the list or enter a name in the Program Folders field. Do not place BlackICE shortcuts in the Startup folder. BlackICE automatically places a shortcut here to start BlackICE when the system is first started. Click Next to continue.
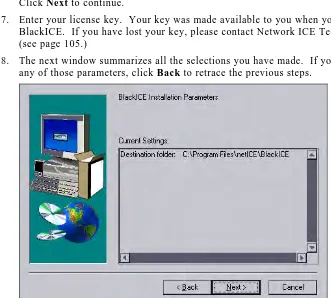
7. Enter your license key. Your key was made available to you when you purchased BlackICE. If you have lost your key, please contact Network ICE Technical Support (see page 105.)
[image:13.612.143.474.103.401.2]8. The next window summarizes all the selections you have made. If you need to change any of those parameters, click Back to retrace the previous steps.
Figure 5 – BlackICE Installation Parameters window.
If the information is correct, click Next.
9. The installation begins. When it is finished, the BlackICE service is started.
10. The system then prompts you to read the Release Notes. If this is your first time installing this version of BlackICE, it is good idea to review this information. To review the release notes, click Yes. Otherwise, click No.
Uninstalling BlackICE
To uninstall BlackICE follow these instructions. Once BlackICE is uninstalled, your system is no longer protected from intrusions.
1. From the Start menu, select Settings. The Control Panel is displayed.
[image:14.612.146.385.150.440.2]2. Double-click Add/Remove Programs. The Add/Remove Programs Properties dialog box is displayed.
Figure 6 – The Add/Remove Programs dialog box.
3. Locate BlackICE in the list of programs.
4. Select BlackICE and click Add/Remove.
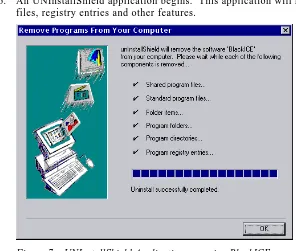
6. An UNInstallShield application begins. This application will remove the BlackICE files, registry entries and other features.
Figure 7 – UNInstallShield Application removing BlackICE.
7. When the application is completed, click OK.
3
3
3
3
U
SING
B
LACK
ICE
BlackICE consists of two main components: an invisible monitoring and detection engine and a summary application.
The monitoring and detection engines of BlackICE are always running when the computer is operating. These engines are “invisible” to anyone using the computer to ensure that they are not accidentally or purposefully disabled. Therefore, once BlackICE is installed, there is no need to worry about intrusion detection and monitoring. BlackICE works silently whenever the computer is operating.
The BlackICE summary application displays all the recent attacks on the system and intruders who made those attacks. It also includes a graph of all the recent network traffic and attacks.
[image:16.612.145.435.304.544.2]The BlackICE summary application consists of three tabs, each displaying a different aspect of the intrusion monitoring and detection.
Figure 8 – The BlackICE application displaying the Attacks Tab.
How to Run the BlackICE Summary Application
n If the BlackICE summary application has already been started, a small icon is displayed in the task-bar.
l Right-click on the icon. A sub-menu of choices is displayed. Select Open BlackICE. You can also use this submenu to access the Network ICE web site or Exit BlackICE.
l A single regular click on the task-bar icon opens the utility as well.
n If the tool is not already running, from the Start menu, select Programs, then select Network ICE, then select BlackICE Utility.
The Attacks Tab
This tab summarizes all intrusion events on your system. The tab displays the time, type of event, and the intruder’s name.
[image:17.612.145.433.384.624.2]By default, the information in the Attacks tab is sorted first by time then by severity. Clicking a column header re-sorts the list by that column. Clicking the column header again toggles the sort order (ascending or descending).
Indicator: Each event is indicated with one of four severity levels.
Critical event: Red exclamation point. These are deliberate attacks on your system for the purpose of damaging data or crashing the system. Critical events always trigger protection measures.
Serious event: Orange exclamation point. These are deliberate attempts to access information on your system, yet not directly damage anything. Some serious events trigger protection measures.
Suspicious event: Yellow question mark. These are network activities that are not immediately threatening, but may indicate that someone is attempting to locate security vulnerabilities in your system. For example, hackers often scan the available ports or services on a system before attacking it. Suspicious events do not trigger protection measures.
Not all suspicious events are indicative of a true attack. For example, many Internet Service Providers have scanning programs installed on their servers to check if a connection is still valid. This is a completely safe and legitimate scan from your ISP, but BlackICE would still report it as a suspicious event. After a few weeks of
information is collected, you may notice recurring scans from one location. Note the IP address(es) where the scans originate and contact your ISP. It is likely these scans are a standard part of your ISP’s service and pose no threat to your system.
Informational event: Green “i”. These indicate that a network event occurred that is not threatening but worthy of taking note. Informational events do not trigger
protection measures.
Time: This is the time of the attack/event, listed in the format: YYYY-MM-DD-hh:mm:ss. Time is in a 24-hour format for the time zone applicable to your system.
Attack: The name of the attack. For more information about a particular attack, select the attack in the list. A brief description of the attack is displayed at the bottom of the screen.
For a full description of an attack, as well as suggested remedies, see Section 6: How to Handle Attacks on page 37, or select the attack of interest and click the advICE button.
Intruder: The best name BlackICE can gather from the attacking system. This column displays the NetBIOS (WINS) name, DNS name, or IP address for the attacking system. If BlackICE cannot determine a name, it displays “unknown”.
For more information about a particular intruder, double-click an event on the Attacks tab. The application displays the Intruders tab, which aggregates all known information about each intruder who has provoked an event on your system.
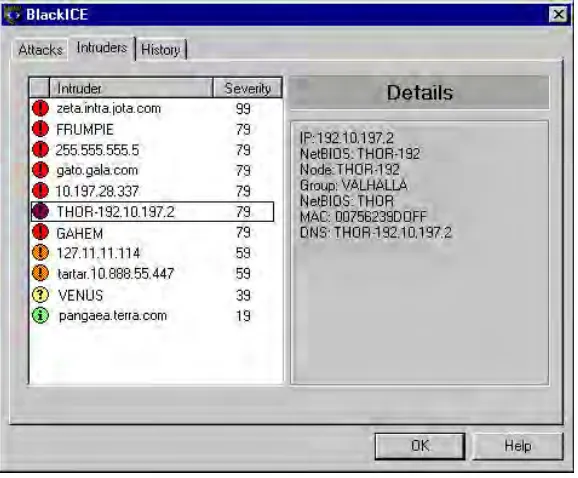
The Intruders Tab
This tab aggregates information about all the intruders who have provoked events on your system. This tab is designed to help you determine the severity and location of each event.
[image:19.612.145.434.164.403.2]By default, the information in the Intruders tab is sorted first by Intruder then by severity. Clicking a column header re-sorts the list by that column. Clicking the column header again toggles the sort order (ascending or descending).
Figure 10 – Intruders tab.
Indicator: Each entry is associated with one of four severity levels. The severity level reflects the most severe attack attributed to the Intruder.
Icon Severity Description
100 –80 Critical event: Red exclamation point. These are deliberate attacks on your system for the purpose of damaging data or crashing the system. Critical events always trigger protection measures.
80 – 40 Serious event: Orange exclamation point. These are deliberate attempts to access information on your system, yet not directly damage anything. Some serious events trigger protection measures.
40 – 20 Suspicious event: Yellow question mark. These are network activities that are not immediately threatening, but may indicate that someone is attempting to locate security vulnerabilities in your system. For example, hackers often scan the available ports or services on a system before attacking it. Suspicious events do not trigger protection measures.
Intruder: The best name BlackICE can gather from the attacking system. This column displays the NetBIOS (WINS) name, DNS name, or IP address name for the attacking system. If BlackICE cannot determine a name, it displays unknown.
For more information on a particular intruder, select the intruder in the list. A description of all the information discovered about the intruder is displayed on the right side of the window.
Severity: The highest severity rating attributed to the intruder.
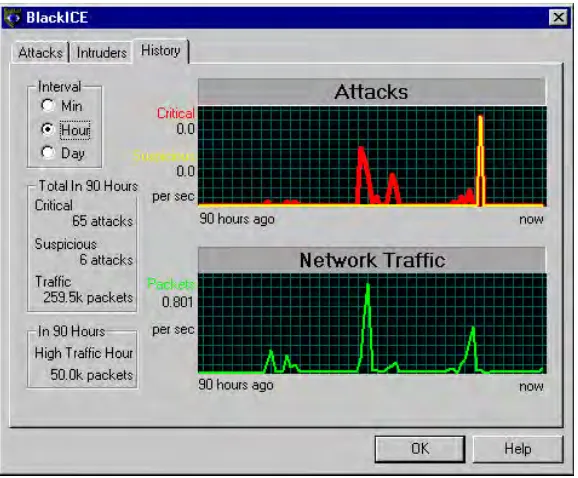
The History Tab
[image:21.612.145.434.145.384.2]This tab displays the recent activity on your system. These graphs are a good way to check for trends in hacking or scanning. For example, if many hacks are grouped together in the late hours of the night, there is a good chance that someone is trying to break into your system at that time.
Figure 11 – The History tab is a good way to spot trends in intrusions.
Interval: Use these option buttons to select the interval for both graphs. Min displays the last 90 minutes of activity, Hour displays the last 90 hours of information, and so forth. BlackICE automatically displays the most informative interval.
Total Critical: The total number of events rated as critical for the selected interval. The events of this type are tracked on the Attacks graph with a red line.
Total Suspicious: The total number of events rated as serious andsuspicious for the selected interval. The events of this type are tracked on the Attacks graph with a yellow line.
High Traffic: The highest amount of network traffic, measured in number of packets, for the selected interval. Traffic is tracked on the Network Traffic graph with a green line.
Configuring BlackICE
This section describes how to customize the monitoring, detection, and use of BlackICE
You can access the Configuration dialog box two ways, from the Windows task bar or from the BlackICE summary application.
1. From the Windows Taskbar, right-click on the BlackICE icon.
2. Select BlackICE Configuration from the pop-up menu.
1. From the BlackICE Summary Application, right click on the BlackICE icon in the upper, left corner of the window.
Back Trace Tab
When BlackICE’s monitoring engine detects a suspicious event, it immediately starts collecting information. One way BlackICE can locate an intruder is using a networking procedure called backtracing.
Backtracing is the process of tracing network connection back to its origin. When somebody connects to your computer via a network such as the Internet, your system and the intruder’s system exchange packets. Before an intruder’s packets reach your system, they travel through several routers. BlackICE can strip information off these packets and determine each router the intruder’s packets had to travel or “hop” through. Eventually, BlackICE can “hop” all the way back to the intruder’s system.
There are two ways that BlackICE can backtrace information: directly or indirectly.
An indirect trace uses protocols that do not make contact with the intruder’s system, but collect information indirectly from other sources along the path to the intruder’s system. On the other hand, a direct trace goes all the way back to the intruder’s system to collect information.
Most hackers are not sophisticated enough to watch for backtracing, therefore direct tracing does not reveal anything or harm your systems. However, experienced hackers can detect backtracing and in many cases this will deter the hacker from attempting to break into your system again. Being backtraced can be very frightening for less experienced hackers.
Only the most advanced and most experienced hackers have defenses against direct
backtracing and therefore may consider a direct backtrace a challenge to continue hacking.
[image:23.612.144.434.383.642.2]The Back Trace tab allows you to view and modify the configuration parameters that control the backtracing functions of BlackICE.
Indirect Trace
The Indirect Trace parameters establish how BlackICE executes indirect backtracing. Because indirect backtracing does not make contact with the intruder’s system it does not acquire much information. Therefore, it is best for lower severity attacks.
Threshold: Indicates the attack severity level that will trigger an indirect trace of the attack.
Severity refers to the level of each attack. The following list summarizes how BlackICE categorizes severities. The default attack severity for the indirect trace threshold is 30.
Icon Severity Description
100-80 Critical Event: This is a deliberate attack on your system for the purpose of damaging data or crashing the system.
80-40 Serious Event: This is a deliberate attempt to access information on your system, yet it does not directly damage anything. These events can trigger protection measures, if applicable.
40-20 Suspicious Event: This is network activity that is not immediately threatening but may indicate that someone is attempting to locate security vulnerabilities in your system. For example, hackers often scan the available ports or services on a system before attacking it. Suspicious events do not trigger protection measures, and not all suspicious events are indicative of a true attack.
20-0 Informational Event: This indicates that a network event occurred to your computer that is not threatening. Informational events do not trigger protection measures.
DNS LookUp: When checked, BlackICE queries available DNS (Domain Name Service) servers for information about the intruder. The DNS Lookup is enabled by default.
Direct Trace
The Direct Trace parameters establish how BlackICE executes direct backtracing. Because direct backtracing makes contact with the intruder’s system it acquires a great deal of information. Therefore, it is best used for high severity attacks.
Threshold: The attack severity level that triggers a direct trace of the intruder. The default attack severity for the direct trace threshold is 60.
Packet Log Tab
The Packet Log tab allows you to configure the packet logging features of BlackICE.
When packet logging is enabled, BlackICE records the system traffic into log files. Files are filled until a maximum size is reached. Then a new file is generated until the maximum files are used. Then BlackICE starts over replacing the first log file with a new file.
It is important to note that packet logging keeps track of ALL system traffic, not just intrusions. Therefore, packet logs can become very large and consume a great deal of system resources. However, if you are having repeated intrusions on a system, packet logging can help gather additional information about activity on the system.
[image:25.612.144.434.226.493.2]BlackICE also captures network traffic specifically when an intrusion is detected in Evidence Files.
Figure 13 – The Packet Log tab.
Logging Enabled: When checked, BlackICE captures packet logs. Packet logging is disabled by default.
File Prefix: Specifies the prefix for the packet log file names. Use %d to place an
incremented counter in the file name. For example, if you enter ABC%d the file names will be ABC0001.log, ABC0002.log, etc. The default file prefix is “log”.
Maximum Size (kbytes): Specifies the maximum size, in kilobytes, for each log file. The default value for the maximum log file size is 0.
Evidence Log Tab
BlackICE constantly monitors your system. When suspicious activity is detected,
BlackICE immediately begins to collect information about the event. This information can be placed in Evidence Files. An evidence file is a raw dump of all network traffic from a suspected intruder.
Evidence files are not the same as Packet Logging. Evidence collection is performed for a specific event. Also an evidence file contains much more information than a packet log. A packet log is merely a report of all network traffic. For more information, see page 29 for more information.
[image:26.612.145.434.234.491.2]BlackICE captures evidence files in a “round-robin” fashion. It collects files until the maximum number of files are used then recycles to the first file and replaces it with a new one.
Figure 14 – The Evidence Log tab.
Logging Enabled: When checked, BlackICE collects evidence files for suspicious events. Evidence logging is enabled by default.
File Prefix: Specifies the prefix for the evidence file names. Use %d to place an
incremented counter in the file name. For example, if you enter ABC%d the file names will be ABC0001.enc, ABC0002.enc, etc. The default file prefix is “evd%d”.
Maximum Size (kbytes): Specifies the maximum size, in kilobytes, for each evidence file. The default is 1400 kbytes.
Maximum Number of Files: Specifies the maximum number of evidence files to generate. When BlackICE reaches the maximum file, it recycles to the beginning of the file list. The default value for the maximum number of evidence files to log is 32.
Protection Tab
The Protection tab establishes the Security Level BlackICE should enforce on the system. There are four pre-set security levels, as defined below.
Trusting: When set to Trusting, BlackICE only blocks file sharing over the Internet, unless Internet file sharing is specifically enabled on the Protection tab. Internet file sharing allows the user to share files on their disk with others across the Internet. Blocking Internet file sharing ensures that hackers cannot download files off your computer. All other ports remain open and unblocked. File sharing on an internal network remains unaffected even though Internet file sharing is disabled. This setting is good to use if you have a slower Internet connection and little threat of attack.
Cautious: The Cautious setting is best for regular use of the Internet. This setting only blocks inbound intrusions on System Port(s). All other ports remain unblocked and therefore should not interfere with any Internet usage.
Nervous: This setting is good if you are experiencing repeated intrusions. For the Nervous setting, BlackICE blocks inbound intrusions on all the System ports and TCP Application ports. This setting may restrict some interactive content on web sites. Streaming media and other “application specific” Internet usage remains unaffected.
Paranoid: The Paranoid setting is very restrictive, but useful if your system has endured numerous attacks. Under this setting BlackICE blocks all inbound intrusions. This setting may restrict some web browsing and interactive content.
[image:27.612.144.434.351.614.2]For more information about how security levels work, see page 4.
Figure 15 – The Protection Tab
Setting the Security Level
1. Select the Security Level you wish to use. The default Security Level is Cautious.
WARNING: Enabling Internet file sharing makes your computer very vulnerable to simple intrusions. However, when enabled, you can connect to your computer over the Internet and upload or download files. For example, if you want to transfer files from home to your work computer, this option must be enabled. Network ICE does not recommend leaving Internet file sharing enabled for extended periods of time.
3. Click Apply to begin using the new security level.
Trusted Addresses Tab
The Trusted Addresses tab allows you to identify network addresses to exclude from all BlackICE monitoring and protection. When an address is trusted, BlackICE considers all network traffic from that address to be safe.
[image:28.612.144.458.287.559.2]NOTE: Be very careful which systems you tell BlackICE to trust. A trusted system is completely free from any monitoring or protection. This should only be used for trusted ICEpick servers, network management servers, or other devices that may inadvertently trigger BlackICE events.
Figure 16 – Trusted Addresses tab.
IP addresses of trusted systems: Displays a list of the IP addresses of trusted systems. The default setting has no entries.
Add: Click to display the Add dialog box. Enter the IP address of the system you wish to exclude from all BlackICE monitoring and protection (the trusted system) and click Add.
Adding a New Trusted Address
[image:29.612.149.374.80.231.2]1. Click Add to place a new trusted address in the list. The IP Address to Trust dialog box is displayed.
Figure 17 -- IP Address to Trust dialog box.
2. Enter the IP address for the system you wish to trust.
3. Click Add. The new trusted address is added to the list.
Editing a Trusted Address
To change an address, delete the existing record and add a new one.
Deleting a Trusted Address
1. Click on the address entry you wish to delete.
2. Click Delete.
Blocked Addresses Tab
The Blocked Addresses tab shows you the network addresses that BlackICE is blocking. BlackICE rejects all network traffic from blocked IP addresses. This identifies the current hackers.
[image:30.612.144.432.145.405.2]Blocked addresses have a specific end time, which can be a few minutes or a few days.
Figure 18 – Blocked Addresses tab.
n Address: The blocked address(es). The default setting has no entries.
n Start Time: The date and time the address was first blocked. The format is: YYYY-MM-DD-hh:mm:ss. The time is in 24 hour format for the time zone applicable to your system.
n End Time: The date and time the address block will expire. The format is: YYYY-MM-DD-hh:mm:ss. The time is in 24 hour format for the time zone applicable to your system.
n Name: The best name BlackICE discovered for the blocked system. This may be a DNS or NetBIOS (WINS) name. If BlackICE cannot determine the name of the system, the column is left blank.
n Enable Auto-Blocking: Leave this box checked to have BlackICE automatically block hackers when they attempt to break into your system. Unchecking this box disables auto-blocking. Attacks are still reported and logged, but not blocked.
Unblocking an Address and Changing it to a Trusted Address
This option is handy if BlackICE inadvertently blocks legitimate use of your system from another computer. However, you should only trust addresses that are from known systems. Advanced hackers can masquerade as a trusted address to crack into your system, so use this feature carefully.
1. Right-click on the blocked address entry you wish to change.
2. Select Unblock and Trust from the pop-up menu. The selected address is immediately removed from blocking, and then trusted. Note that once Unblock and Trust is selected, this action cannot be reversed. You can delete trusted addresses if necessary from the Trusted Addresses tab. See page 25 for more information.
ICEcap Tab
BlackICE can integrate with an ICEcap server for centralized reporting and analysis of network intrusions. ICEcap is intended for use on internal networks (or LANs) where more than one system is connected to the Internet. For more information about how BlackICE and ICEcap can help manage your network, download a copy of the ICEcap documentation from Network ICE at www.networkice.com
[image:31.612.147.433.337.599.2]Depending on the features enabled in your license key, the ICEcap tab may be disabled. This tab allows you to establish the parameters for BlackICE to report events to an ICEcap server.
Figure 19 – ICEcap tab.
Reporting Enabled: Check this box to activate ICEcap reporting. Uncheck to turn off ICEcap reporting.
Account Name: The ICEcap account number to use when uploading data. Refer to your ICEcap documentation for more information about account numbers. The default account name is “default”.
Account Password: Enter the current password BlackICE is using to report information to ICEcap. Changing the password here does not change the account password in ICEcap. If BlackICE is not reporting any information to ICEcap, leave this field blank.
Proxy URL: If there is a proxy server between the BlackICE system and the ICEcap server, enter the fully qualified URL for the proxy server.
Clearing the Attack List
After a while, the attack list for BlackICE may become quite large. You can use the BlackICE Utilities to clear the attack list.
1. Right-click on the BlackICE icon within the BlackICE Summary Application.
[image:32.612.144.511.228.391.2]2. Select BlackICE Utilities, then select Clear Attack List from the sub menu.
Figure 20 - Clearing the Attack List.
Updating BlackICE
The BlackICE On-Line Update web page can automatically check your copy of BlackICE to see if you have the most recent version.
1. Right-click on the BlackICE icon within the BlackICE Summary Application.
[image:33.612.145.513.119.316.2]2. Select BlackICE Utilities, then select Download BlackICE Update from the sub menu.
Figure 21 – Download BlackICE Update.
3. BlackICE opens a web browser session and connects to the Network ICE web site. The site checks your version against the Network ICE database. If there is a newer version available, a link is displayed to download the update. Download the new version and install it as instructed on the update web page.
Evidence Files
Evidence files are part of BlackICE’s intrusion monitoring features. As a hacker is
attempting to break into your system, BlackICE can capture all network traffic attributed to the hacker and place that information into an evidence file.
BlackICE evidence files are located in the <installation directory>/Network ICE/BlackICE folder. If you installed BlackICE to the Program Files directory on the C: drive (the default), for example, the evidence files would be located in
C:/Program Files/Network ICE/BlackICE. Each file has an *.enc extension. The number of evidence files BlackICE captures, the filename prefix, and the size of each evidence file are established on the Evidence Log tab for BlackICE configuration. See page 23 for more information.
To view the contents of an evidence file, you need a trace file decoding application. Many networking and security product companies produce such decoders. There are also some shareware decoders available on the Internet.
If you are running a Windows NT Server 4.0, you can install the Network Monitoring service. This service includes the trace file decoding application Network Monitor.
Disabling BlackICE
Although it is not recommended, there may be special circumstances that require you to disable BlackICE on a system. When BlackICE is disabled, the system is not protected from any network intrusions.
To ensure that BlackICE is not disabled by a hacker, only a user sitting at a workstation or server can disable BlackICE on the system.
For Windows NT Workstation or Server
1. From the Start menu, select Settings.
2. Double-click Services on the Control Panel. The Services dialog box is displayed.
3. Locate the BlackICE service and click Stop.
n Windows NT stops the service. BlackICE will restart when the system is rebooted or restarted from the Services dialog box.
For a Windows 95/98 System
1. Press [CTRL] [ALT] [DEL] keys simultaneously.
2. A Close Program dialog box is displayed.
3. Select BlackICE in the list and click End Task.
4
4
4
4
S
YSTEM
S
ECURITY
The Internet is a big place. Along with all the great web sites and information on the Internet, there are also people who are committed to causing trouble.
What Hackers Can Do
Most hackers are inexperienced kids looking for fun. They merely want to show off to their friends that they could hack into a system. Unfortunately, even the most
inexperienced hacker can cause severe damage.
Corporations have long known about the risks hackers present to their business. However, most home office and casual computer and Internet users are unaware of what hackers can do. Hackers can render your computer totally unusable. They can steal or delete data. Hackers that are able to steal your digital identity can make financial transactions on your behalf, such as buying or selling securities or using your credit cards. A resourceful hacker can cause tremendous financial damage to anyone who uses the Internet.
In a 1997 report to a subcommittee of the United States Senate, Robert S. Litt, Deputy Assistant Attorney General stated, “Public reports have estimated that computer crime costs us between $500 million and $10 billion dollars per year. The Computer Security Institute has surveyed 428 information security specialists in Fortune 500 companies; 42% of the respondents indicated that there was an unauthorized use of their computer systems in the last year.”
There are countless stories of hacker communities targeting companies and organizations for any number of personal and political reasons. In 1997 a London trading firm was forced to pay millions of dollars to an unknown group of foreign extortionists who demonstrated that they could wipe out entire systems at will. These extortionists were never captured and the trading firm learned an expensive lesson in network security.
Contrary to what the movies or “cyberpunk” books might depict, not all hackers are kids trying to deface web sites or steal credit card numbers. Many hackers are dedicated criminals and corporate spies trying to steal valuable information from companies and individuals. In the race to build faster and better networks, many Internet Service
Providers (ISPs) forget to erect barriers to stop the hackers. Moreover, most home systems have no protection whatsoever from hackers.
How They Do It
There are three basic attacks hackers can use to gain access to a system or network:
Internal Intrusions
An internal intrusion comes from within your corporation. It can be as simple as a curious employee or a serious attempt to hurt the company. Internal intrusions account for the most damage to companies because they come from people who already know the company, its security policies, and vulnerabilities. BlackICE can stop some internal intrusions.
External Intrusions
External intrusions include people trying to break into your systems from outside your company. These types of attacks are less common but almost always malicious in nature. BlackICE can stop external threats cold. Moreover, it can collect information about an external hacker to help you better defend yourself against that hacker in the future.
Social Intrusions
A social intrusion is when a hacker poses as an employee, authority figure, or friend, in an attempt to get sensitive information about you and your systems. Perhaps the most
common social intrusion is people posing as a system administrator asking for your password. Fortunately, social intrusions are pretty rare and easy to identify.
Unfortunately, no software can stop a hacker armed with legitimate information he stole.
Stopping Hackers
You have already taken the first step toward stopping hackers with BlackICE. In addition to BlackICE you should consider the following good security practices:
n If you are on a corporate network, install Network ICE’s ICEcap server. ICEcap is a powerful reporting and analysis server that aggregates data from BlackICE
workstations all over the network. With this information, system administrators can spot trends and patterns in intrusions. This can be extremely helpful to stop hackers who are probing for a security breech.
n If you have network, install Network ICE’s ICEpick. ICEpick can scan and analyze network devices and resources looking for common security breeches. When used in conjunction with an ICEcap server, system administrators can spot many security problems before hackers exploit them.
n If you have a DSL or cable modem connection, turn your computer off when not using it. These “always-on” connections are particularly vulnerable because they provide more opportunities for hackers to find your computer.
n Establish a good security plan. A good network takes into account what hackers can do and prepares for attacks. The best defense against hackers and crackers is information. Encourage your company or organization to develop a comprehensive security plan if you do not already have one.
n Never give out a password or any sensitive information to an unsolicited telephone call or e-mail.
n Never submit sensitive information via a web page unless the web site uses secure connections. You can identify a secure connection with a small “key” icon on the bottom of your browser (Internet Explorer 3.02 or better or Netscape 3.0 or better). If a web site uses a secure connection, it is safe to submit information. Secure web
transactions are quite difficult to crack.
n Never reveal your IP address or other system networking information to people outside your company.
n Be careful of files e-mailed to you from people you do not know. One common way of getting BackOrifice on a system is to include it as a Trojan horse with other files.
n Change your passwords regularly. Also, use passwords that are not easy to figure out. The most difficult passwords to crack are those with upper and lower case letters, numbers, and a symbol such as % or #.
n Upgrade your software regularly. Many older versions of software, especially web browsers, have well known security deficiencies. When you upgrade to the latest versions, you get the latest patches and fixes.
n If you use “chat rooms” or IRC sessions, be careful with any information you reveal to strangers.
n Be careful with e-mail or web site that originate in foreign countries, especially Russia and the former Soviet states. Russia has a very active hacker subculture. Many hackers use off-shore accounts and connections to hack because it is more difficult to backtrace these accounts.
n If your system starts exhibiting odd behavior, contact your ISP. Some hackers will set off hacks that cause your system to slowly become unstable or unusable. If this happens a lot, notify your ISP and reboot your machine. In extreme cases, hackers can damage the operating system on your computer, which would require re-installing the operating system.
n If you are using Windows NT and your system suddenly displays a blue screen, write down the information at the top of the screen and contact your ISP. Some serious Windows errors are the result of hackers or viruses on a system.
5
5
5
5
H
OW TO
H
ANDLE
A
TTACKS
This section describes all the attacks that BlackICE can detect as well as suggested ways to deal with those attacks. Please note, that these are merely suggested responses.
Index of Attacks
Use this index to quickly locate more information about an attack.
.
.
.bash.history URL · 40
.lnk URL type · 40
.url URL type · 40
A
A
Ascend attack · 41
Automount using rpc.statd · 41
B
B
Back Orifice ping · 41
Back Orifice response · 41
Back Orifice scan seen · 42
bat URL type · 42
Boink attack · 42
Bonk attack · 42
C
C
CGI aglimpse · 43
CGI anyform2 · 43
CGI bash · 43
CGI campas · 43
CGI convert.bas · 44
CGI csh. · 44
CGI faxsurvey · 44
CGI finger. · 44
CGI formmail · 45
CGI formmail.pl · 45
CGI glimpse · 45
CGI guestbook · 45
CGI guestbook.pl · 46
CGI handler · 46
CGI htmlscript · 46
CGI info2www · 46
CGI machineinfo · 47
CGI mlog.html · 47
CGI mylog.html · 47
CGI newdsn.exe · 47
CGI nph-test-cgi · 48
CGI perl · 48
CGI rksh · 49
CGI sh · 49
CGI snork.bat · 50
CGI tcsh · 50
CGI test-cgi · 50
CGI test-cgi.tcl · 50
CGI uploader.exe · 51
CGI view-source · 51
CGI webdist.cgi · 51
CGI webgais · 51
CGI websendmail. · 52
CGI wguest.exe · 52
CGI win-c-sample.exe · 52
CGI wwwboard.pl · 52
cmd URL type · 53
Cold Fusion sample URL · 53
Cybercop FTP scan · 53
D
D
DNS cache corruption · 53
DNS Chaos lookup · 54
DNS HINFO query · 54
DNS Internet not 4 bytes · 55
DNS I-Query · 54
DNS I-Query exploit · 54
DNS malformed · 55
DNS name very long · 55
DNS non-Internet lookup · 55
DNS port probe · 56
DNS spoof attempt · 56
DNS spoof successful · 56
DNS zone transfer · 56
Duplicate IP address · 57
E
E
Echo storm · 57
ExploreZip virus · 57
EZMall data URL · 57
F
F
favico.ico bad format · 58
Finger · 58
Finger command · 58
FINGER port probe · 59
Fragment overlap · 59
FrontPage service.pwd · 59
FTP command line very long · 60
FTP CWD ~root command · 60
FTP CWD directory very long · 60
FTP file name very long · 60
FTP invalid PORT command · 61
FTP login failed · 61
FTP password very long · 61
FTP PORT bounce to other system · 61
FTP port probe · 62
FTP PORT restricted · 62
FTP SITE EXEC command · 62
FTP user name very long · 62
H
H
HP Remote watch · 63
HTTP asp with . appended · 63
HTTP cgi starting with php · 63
HTTP cgi with ~ appended · 63
HTTP GET data contains ../../../.. · 64
HTTP GET data very long · 64
HTTP GET data with repeated char · 64
HTTP login failed · 64
HTTP port probe · 65
HTTP URL contains ../../../.. · 65
HTTP URL has many slashes · 65
HTTP URL very long · 65
HTTP URL with $DATA appended · 66
HTTP URL with %81-%fe appended · 66
I
I
ICMP subnet mask request · 66
ICMP unreachable storm · 67
IDENT port probe · 67
identd invalid response · 67
identd scan · 67
IGMP buffer overflow · 68
IIS data service query · 68
IIS malformed HTR request · 68
IIS password change · 68
IIS sample URL · 69
IMAP4 authentication very long · 69
IMAP4 command very long · 69
IMAP4 login failed · 69
IMAP4 password very long · 70
IMAP4 port probe · 70
IMAP4 user name very long · 70
IP source route · 70
IRC buffer overflow · 71
IRC port probe · 71
ISS scan · 71
ISS UDP scan · 71
L
L
Land attack · 72
Last fragment length changed
· 72
M
M
Melissa virus · 72
MS domain dump · 72
MS malformed LSA request · 73
MS name lookup · 73
MS rpc dump · 73
MS security ID lookup · 73
MS share dump · 74
MSRPC port probe · 74
N
N
NETBIOS names query · 74
NETBIOS port probe · 74
NetBus seen · 75
NewTear attack · 75
NNTP name very long · 75
NNTP pipe seen · 75
NNTP port probe · 76
O
O
Order Form data URL · 76
Order Form v1.2 data URL · 76
P
P
Papa virus · 76
PCAnywhere ping · 77
PCANYWHERE port probe · 77
PICTURE.EXE virus · 78
Ping of death · 78
Ping sweep · 78
POP3 command very long · 78
POP3 login failed · 79
POP3 MIME file name very long · 79
POP3 password very long · 79
POP3 port probe · 79
POP3 user name very long · 80
Possible Fraggle attack initiated · 80
Possible Smurf attack initiated · 80
PPTP malformed · 80
PPTP port probe · 81
pwl file type · 81
Q
Q
Quake backdoor · 81
QuikStore configuration URL · 81
R
R
Rlogin -froot backdoor · 82
RLogin login failed · 82
Rlogin login name very long · 82
Rlogin password very long · 82
RLOGIN port probe · 83
rpc nfs/lockd attack · 83
rpc.admind auth · 83
rpc.automountd overflow · 83
rpc.mountd overflow · 83
rpc.nfs mknod · 84
rpc.nfs uid is zero · 84
rpc.nisd long name · 84
rpc.pcnfs backdoor · 84
rpc.portmap dump · 85
rpc.portmap.set · 85
rpc.portmap.unset · 85
rpc.statd dotdot file create · 85
rpc.statd overflow · 86
rpc.tooltalkd overflow · 86
rpc.ypupdated command · 86
RWHO host name very long · 86
S
S
sam file · 87
Shopping cart order URL · 87
Site Server sample URL · 87
SMB empty password · 87
SMB file name very long · 88
SMB I/O using printer share · 88
SMB password very long · 89
SMB unencrypted password · 89
SMB Unicode file name very long · 89
SMTP command very long · 89
SMTP corrupted MAIL command · 90
SMTP corrupted RCPT command · 90
SMTP DEBUG command · 90
SMTP email name very long · 90
SMTP EXPN command · 91
SMTP login failed · 91
SMTP login name very long · 91
SMTP mail to decode alias · 91
SMTP mail to uudecode alias · 92
SMTP MIME file name very long · 92
SMTP pipe in mail address · 92
SMTP port probe · 92
SMTP relay attempt · 93
SMTP too many errors · 93
SMTP Too many recipients · 93
SMTP uucp-style recipient · 93
SMTP VRFY command · 94
SMTP WIZ command · 94
SNMP backdoor · 94
SNMP Corrupt · 94
SNMP Crack · 95
SNMP discovery broadcast · 95
Snork attack · 95
SOCKS port probe · 95
SoftCart password URL · 96
SQL login failed · 96
SQL port probe · 96
SUNRPC port probe · 96
SynDrop attack · 97
T
T
TCP port probe · 97
TCP port scan · 97
TCP sequence out-of-range · 97
TCP SYN flood · 98
Teardrop attack · 98
TearDrop2 attack · 98
Telnet abuse · 98
Telnet login failed · 99
Telnet login name very long · 99
Telnet password very long · 99
TELNET port probe · 99
TFTP file not found · 100
Too much fragmentation · 100
Trace route · 101
Trojan horse probe · 101
U
U
UDP port loopback · 101
UDP port scan · 101
Unknown IP protocol · 102
W
W
W97M.Marker.a virus · 102
WebStore admin URL · 102
WhatsUp scan · 102
win.ini file · 103
WinNuke attack · 103
winreg file · 103
X
X
BlackICE Attacks
This section lists all of the attacks BlackICE can detect. Attacks are broken out into six categories: nuke attacks, scans, service hacks, Trojans/backdoors, and client attacks. Alike attacks are grouped together under one entry.
.bash.history URL
Impact: An intruder may be gathering information which could be useful to setup a later attack.
Defense Patch Cobalt Qube/RaQ server.
Details: This file contains a history of shell commands some of which may contain confidential information.
Issue ID: 2002544
More Info: http://www.networkice.com/advice/Intrusions/2002544/default.htm
.lnk URL type
Impact: An intruder launches a program or an executable that could cause damage to a computer.
Defense Patch browser software.
Details: Attempt to access a lnk file which may cause access to privileged information on a client's system.
Issue ID: 2002546
More Info: http://www.networkice.com/advice/Intrusions/2002546/default.htm
.url URL type
Impact: An intruder launches a program or an executable that could cause damage to a computer.
Defense Patch browser software.
Details: Attempt to access a url file which may cause access to privileged information on the client system.
Issue ID: 2002545
Ascend attack
Impact: Older versions of Ascend routers may crash.
Defense Download and install patch from Ascend.
Details: Attacker sends a frame that can crash older versions of Ascend routers.
Issue ID: 2000204
More Info: http://www.networkice.com/advice/Intrusions/2000204/default.htm
Automount using rpc.statd
Impact: Intruder gains unauthorized access to system.
Defense Update operating system.
Details: An attacker is using the statd service to execute an automount command on the local system.
Issue ID: 2001716
More Info: http://www.networkice.com/advice/Intrusions/2001716/default.htm
Back Orifice ping
Impact: Back Orifice can give an attacker full access to a system. If an attacker discovers a known Trojan on your system such as
Backorifice he can use the application to break into your system and the network.
Defense Filter IP address from attacking source.
Details: Intruder attempts to see if you have BackOrifice installed.
Issue ID: 2001506
More Info: http://www.networkice.com/advice/Intrusions/2001506/default.htm
Back Orifice response
Impact: Intruder gains control of the system.
Defense Use anti-virus software to remove Back Orifice from system.
Details: An intruder is using BackOrifice to remotely control your system; it should be IMMEDIATELY removed from your system.
Issue ID: 2001505
Back Orifice scan seen
Impact: Attacker has full access to your machine.
Defense Never run programs given to you by untrustworthy people. Turn off file sharing when on the Internet.
Details: BackOrifice is a Trojan horse application that allows remote administration.
Issue ID: 2001501
More Info: http://www.networkice.com/advice/Intrusions/2001501/default.htm
bat URL type
Impact: Intruder gains access and may potentially crash system.
Defense Remove file if not necessary for operation. If necessary then update to a secure version.
Details: Attempt to execute a bat file which may have been misplaced in the cgi-bin directory.
Issue ID: 2002501
More Info: http://www.networkice.com/advice/Intrusions/2002501/default.htm
Boink attack
Impact: System crash BSoD (Blue Screen of Death).
Defense Update operating system install filters.
Details: The attacker overlaps fragments in a way designed to crash the machine.
Issue ID: 2000008
More Info: http://www.networkice.com/advice/Intrusions/2000008/default.htm
Bonk attack
Impact: System crash BSoD (Blue Screen of Death).
Defense Update operating system install filters.
Details: The attacker overlaps fragments in a way designed to crash the machine.
Issue ID: 2000007
CGI aglimpse
Impact: Intruder gains access and may potentially crash system.
Defense Remove file if not necessary for operation. If necessary then update to a secure version.
Details: Attempt to execute a CGI program with known weaknesses.
Issue ID: 2002503
More Info: http://www.networkice.com/advice/Intrusions/2002503/default.htm
CGI anyform2
Impact: Intruder gains access and may potentially crash system.
Defense Remove file if not necessary for operation. If necessary then update to a secure version.
Details: Attempt to execute a CGI program with known weaknesses.
Issue ID: 2002504
More Info: http://www.networkice.com/advice/Intrusions/2002504/default.htm
CGI bash
Impact: Intruder gains access and may potentially crash system.
Defense Remove file if not necessary for operation. If necessary then update to a secure version.
Details: Attempt to execute a Unix shell program; if successful the hacker gains unintended access to a server.
Issue ID: 2002505
More Info: http://www.networkice.com/advice/Intrusions/2002505/default.htm
CGI campas
Impact: Intruder gains access and may potentially crash system.
Defense Remove file if not necessary for operation. If necessary then update to a secure version.
Details: Attempt to execute a CGI program with known weaknesses.
Issue ID: 2002506
CGI convert.bas
Impact: Intruder gains access and may potentially crash system.
Defense Remove file if not necessary for operation. If necessary then update to a secure version.
Details: Attempt to execute a CGI program with known weaknesses.
Issue ID: 2002507
More Info: http://www.networkice.com/advice/Intrusions/2002507/default.htm
CGI csh.
Impact: Intruder gains access and may potentially crash system.
Defense Remove file if not necessary for operation. If necessary then update to a secure version.
Details: Attempt to execute a Unix shell program; if successful the hacker gains unintended access to a server.
Issue ID: 2002508
More Info: http://www.networkice.com/advice/Intrusions/2002508/default.htm
CGI faxsurvey
Impact: Intruder gains access and may potentially crash system.
Defense Remove file if not necessary for operation. If necessary then update to a secure version.
Details: Attempt to execute a CGI program with known weaknesses.
Issue ID: 2002509
More Info: http://www.networkice.com/advice/Intrusions/2002509/default.htm
CGI finger.
Impact: Intruder gains access and may potentially crash system.
Defense Remove file if not necessary for operation. If necessary then update to a secure version.
Details: Attempt to execute the finger program which may allow unintended access to a server.
Issue ID: 2002510
CGI formmail
Impact: Intruder gains access and may potentially crash system.
Defense Remove file if not necessary for operation. If necessary then update to a secure version.
Details: Attempt to execute a CGI program with known weaknesses.
Issue ID: 2002511
More Info: http://www.networkice.com/advice/Intrusions/2002511/default.htm