·
·
·
·
•·
·
·
• • • • •·
·
·
·
·
3+0pen™ IAN Manager
3+0pen'" LAN Manager
Installation and Setup Guide
A member of the 3+0pen family of products. For use with OS/2,
version 1.0 or 1.1, and DOS, version 3.1 or higher.
Copyright © 3Com Corporation, 1989. All rights reserved. 3165 Kifer Road
Santa Clara, CA 95052-8145
Printed in the U.S.A. Manual Part No. 4695-02
Copyright Statement
No part of this manual may be reproduced in any form or by any means or used to make any derivative work (such as translationt transformation, or adaptation) without permission from 3Com
Corporation by the United States Copyright Act of 1976, as amended.
Changes are made periodically to the information herein; these changes will be incorporated in new editions of this publication. Contents are the property of 3Com Corporation. All rights reserved. 3Com Corporation provides this guide without warranty of any kind, either implied or expressed, including, but not limited to, the implied warranties of merchantability and fitness for a particular purpose. 3Com may make improvements or changes in the product(s) and/or the program(s) described in this manual at any time.
Portions of this manual are reproduced in whole or in part with permission from Microsoft Corporation.
Trademarks
3Com, 3+, 3+MaiI, 3+Share, 3Server, 3Server3, 3Station, EtherLink, EtherLink Plust EtherLink
II, TokenLink, and TokenLink: Plus are all registered trademarks of 3Com Corporation. 3+Open, 3+0pen Mail, 3+Open Start, 3+Start are trademarks of 3Com Corporation.
Microsoft, Microsoft Word, MS, and MS-DOS are registered trademarks of Microsoft Corporation. IBM, AT, XT, PS{l, PC-DOS, and OS{l are trademarks of International Business Machines Corporation. Apple, LaserWriter, and Macintosh, are registered trademarks of Apple Computer, Incorporated. MacDraw is a registered trademark of Claris Corporation. Pagemaker is a registered trademark of Aldus Corporation. Adobe and PostScript are registered trademarks of Adobe Systems Incorporated.
Recognition
Writer: Jan Calvert. Editor: Ruth Hartman. Production: Christa Schmidt, Cate Lush, and Penelope West. Engineering information: Ray Marshall and Jeff Krause. Special thanks to the 3+OpenLANManager 1.1 team.
Table of Contents
Preface
Conventions Used in This Guide viii Keys viii
Key Combinations viii Notational Conventions ix Procedural Conventions ix Procedure Format x
Finding Further Information x
Chapter 1: Overview of 3+0pen and LAN Manager Installation
3+0pen 1-13+0pen LAN Manager 1-2
Versions of 3+0pen LAN Manager 1-3 3+0pen Network Environments 1-3 Installation Overview 1-4
Installation Process Flow Diagram 1-4
Chapter 2: MS OS/2 Installation and Disk Cache
Server-Adapted OS/2 Software 2-2 System Requirements 2-2
Installing MS OS/2 2-3
Formatting the Hard Disk Before Installation 2-4 Choosing an MS OS/2 Environment 2-5 MS OS/2 Disk Cache 2-6
Setting Default Cache Size 2-7 CACHE Command 2-7
Chapter 3: Installing LAN Manager on a PC Server
Hardware and Software Requirements 3-2 Required Hardware 3-2
Required Software 3-3
Information, Materials, and Decisions Needed 3-3 Information Needed 3-3
Materials Needed 3-4 Decisions 3-4
Netsetup 3-9
Before You Start the Netsetup Program 3-10
Running the Program from the Installation Diskettes 3-11 Running the Program from the Server's Hard Disk 3-12 Main Menu 3-12
On-line Help 3-13
Installing LAN Manager Software 3-14 Optional: Configuring Network Printers 3-15
Optional: Displaying and Modifying Basic Setup 3-16 Optional: Upgrading 3+0pen LAN Manager Software 3-17 Optional: Removing 3+0pen LAN Manager Software 3-17 Quitting and Restarting 3-18
Optional: Modifying STARTUP.CMD 3-18 Special Note: Dedicated Servers 3-19
Chapter 4: Setting Up Network Users and Resources
Terminology 4-2Overview 4-3 Survey and Plan 4-3
Identifying Users and Groups 4-3 Identifying Network Resources 4-4 Mapping Out Resource Allocation 4-8
Improving Security 4-10 Setting Up Users 4-11
Logging On and Running Net Admin 4-12
Concurrent Servers with User-Level Security 4-12 Concurrent Servers with Share-Level Security 4-13 Dedicated Servers 4-14
Creating Groups 4-15 Setting Up Users 4-16
Increasing the User Accounts Maximum 4-18
Sharing Directories on a Server with User-Level Security 4-18 Sharing Printers 4-21
Sharing PostScript Printers 4-22 Sharing Communication Devices 4-25 Saving the Server Profile 4-26
Chapter 5: Installing LAN Manager on Netstations
Hardware and Software Requirements 5-1OS/2 Netstations 5-2 DOS Netstations 5-3
Information, Materials, and Decisions Needed 5-4 Information Needed 5-4
Materials Needed 5-5 Decisions 5-6
Installing LAN Manager Software 5-10
Displaying and Modifying the Basic Setup 5-14
Optional: Upgrading 3+Open LAN Manager Software 5-15 Optional: Removing 3+0pen LAN Manager Software 5-15 . Quitting and Restarting the Netstation 5-16
List of Figures
Figure Title
1-1 Overview of LAN Manager Installation 1-5 2-1 Cache Options 2-9
2-2 Cache Statistics 2-9
3-1 Netsetup Program Main Menu 3-12
List of Tables
Table 2-1 2-2 4-1 4-2 4-3
Title
CACHE Command Options 2-8 Cache Statistics Entries 2-10
Initial Users and Groups on Servers with User-Level Security 4-4 Resources Initially Shared on Servers 4-5
Items from the Add User Account Dialog Box 4-17
Preface
This guide explains how to install and set up the 3+OpenTM LAN Manager and Server-Adapted Microsoft® Operating System/2 (MS® OS/2) on ffiM® and ffiM-compatible personal computers. It also outlines the procedure for setting up network users and resources on a server.
The guide assumes you have had a reasonable amount of experience with local area networks, microcomputers, and MS OS/2 or Microsoft Disk Operating System (MS-DOS®). Use this guide in conjunction with Netsetup, the 3+Open LAN Manager Installation and Setup program, and the 3 + Open LAN Manager Administrator Guide.
Conventions Used in This Guide
The following conventions are used throughout the guide.
Keys
The following table shows the symbols used to represent the keys on your keyboard.
Spelling Key Represented
[Esc] Escape
[Alt] Alternate [Ctrl] Control [Backspace] Backspace [Space bar] Space bar [Fl]-[Fx] Function keys
.J or [Return] or
Fl through Fx Return or [Enter] Enter key
Key Combinations
If two or more keys are to be pressed simultaneously, the keys are linked with a plus sign (+). For example, the following key combination resets a netstation:
[Ctrl] +[Alt] + [Del]
Notational Conventions
Throughout this manual, the following conventions are used to distinguish elements of text.
Text Element Indicates
ALL CAPITAL LETIERS Command names and filenames.
Bold New terms.
Bold Courier typeface Input you enter.
Regular Courier typeface Screen text.
[Brackets] Nonalphabetic key names, such as [Enter], or command options.
Italics Variable command option names.
Procedural Conventions
Information you should enter is shown in blue. Terms shown in italics should be replaced with specific information. For example:
makedisk n :.J
means that you type the command MAKEDISK followed by a drive identifier (n:) and press [Return].
Procedure Format
Procedures are organized in two levels. The first level, shown in bold type, describes the precIse action you must take. The second level, in regular type, provides further explanation of the step. If you are repeating a procedure you have performed before, it should be sufficient to refer only to the bold steps.
For example:
first level:
second level:
1. Insert the LAN Mgr. Server #1 diskette into a high-density
drive.
The 3+Open LAN Manager Advanced System comes with two sets of high-density diskettes, each with identical software. It does not matter which set you install. The 3-1/2-inch diskettes must be read in a 1.44 MB drive, and the 5-1/4-inch diskettes must be read in a 1.2 MB drive.
Finding Further Information
The following manuals are included with 3+0pen MS OS/2 LAN Manager:
• 3 + Open MS OS/2 LAN Manager Administrator Guide
• 3
+
Open MS OS/2 LAN Manager Administrator Reference • 3+0pen MS-DOS LAN Manager User Guide• 3+0pen MS-DOS LAN Manager User Reference • Managing Combined Networks: 3+0pen and 3+
Overview of
1
3+0pen and LANManager Installation
1-1
Chapter
1:
Overview of 3+0pen and LAN
Manager Installation
This chapter provides an overview of 3+Open, 3+0pen LAN Manager, and Server-Adapted MS OS/2, including examples of network environments where you can use 3+0pen. It also provides an overview of the procedure for installing the 3+Open LAN Manager software.
3+0pen
3+Open is a family of local area network products based on the multitasking operating system, MS OS/2. Its open architecture enables you to operate a wide variety of standard MS OS/2, MS-DOS, and Macintosh computers on a network. It uses the many features of MS OS/2 while maintaining compatibility with MS-DOS computers and applications.
3+Open supports several network protocols, including Xerox Network Systems (XNS), NetBIOS Protocol (NBP), and IBM Data Link Control (DLC).
1
1-2
Overview of 3+0pen and LAN Manager Installation
3+0pen LAN Manager
At the core of 3+Open is the 3+Open LAN Manager, the network system software. 3+Open LAN Manager has the following features:
• Security system that allows the network administrator to regulate access to network resources and to audit resource use.
• Logon scripts and user profiles that give the user automatic access to the same network resources, regardless of where the user logs on.
• Error logging and compilation of network usage statistics.
• PostScript® despooler and a facility for administering it.
• 3+Open DOS Manager, which provides a window-oriented file management feature for DOS net stations and memory-saving applications for DOS
computers.
• Netsetup, the program that automates installation of the LAN Manager on personal computers, sets tuning parameters to standard values, and configures printer services.
• Enhanced version of the MS OS/2 software.
Overview of
1
3+0pen and LANManager Installation
1-3
Versions of 3+0pen LAN Manager
Three versions of 3+Qoen LAN Manager software exist. They provide the same function, but differ in the number of network workstations (netstations) they support.
• 3+Open LAN Manager Advanced System is licensed for installation on one server and an unlimited number of netstations.
• 3+Open LAN Manager Entry System is licensed for installation on one server and up to five netstations. Only one Entry System can exist on a network.
• 3+Open LAN Manager Entry System II is licensed for installation on one server and up to ten netstations. Only one Entry System II can exist on a network.
The 3+Open LAN Manager software runs on 3Com 3Server servers and mM or ffiM-compatible personal computers. This guide helps you install the software only on mM and ffiM-compatible personal computers. The 3+ Open for 3Servers Installation and Setup Guide explains how to install the software on a 3Server.
3+0pen Network Environments
You can use 3+Open in a variety of network environments, including the following:
• Networks consisting of one server and multiple netstations all using the same protocol. This is the "basic" network configuration.
• Basic networks extended to support multiple protocols concurrently. In this configuration, not all netstations use the same protocol. For example, some use XNS, while others use DLC.
• Networks connected by a server bridge. The server could have multiple network adapters and, if necessary, use multiple protocols to link multiple networks.
1
1-4
Overview of 3+0pen and LAN Manager Installation
This guide discusses basic network installation. If you are installing the 3+Open LAN Manager Advanced System software, refer to Managing Combined Networks: 3 + Open and 3 + for information on 3+Open to 3+ communications.
Installation Overview
This section provides an overview of the basic procedures you follow to install the 3+0pen LAN Manager software and Server-Adapted MS OS/2 software on a personal computer and to set up network resources.
The installation instructions in this guide assume you have already performed the following tasks:
• Installed network adapters in your server and netstations. (Refer to the documentation that came with your adapter for installation instructions.)
• Connected your server and netstations using Ethernet or token ring cable. (Refer to your network cable documentation for information.)
Installation Process Flow Diagram
The process for installing and setting up the 3+Open LAN Manager software consists of three steps:
• Installing and setting up the server
• Setting up LAN Manager users and resources
• Installing and setting up OS/2 and DOS netstations
Overview of 3+0pen and LAN
Manager Installation
1
1-5
See Chapter 2
Install and Set Up Server See Chapter 3
See Chapter 4
[image:16.543.65.418.116.466.2]Install LAN Manager on DOS Netstations
MS OS/2 Installation and Disk Cache
2
2-1
Chapter 2: MS OS/2 Installation and Disk
Cache
Before you can install the 3+Open LAN Manager software on your server, you must install OS/2 version 1.0 or 1.1 software on your server. It is recommended that you install the Server-Adapted MS OS/2 version 1.1 software that is shipped with the 3+0pen LAN Manager software. However, you can use other vendors' versions of the software.
2
2-2
MS OS/2 Installation and Disk Cache
Server-Adapted OS/2 Software
Server-Adapted MS OS/2 software offers these benefits:
• Disk-caching to speed up perfonnance.
• Hard disk partitions of up to 4 gigabytes (GB) in size.
• Maximum file size of 2 GB.
System Requirements
To set up and use MS OS/2, your server must be a personal computer with the following features:
• An 80286 or 80386 processor.
• At least 4 megabytes (MB) of random-access memory. If you have added extra memory to your computer, make sure the memory is extended memory, not expanded memory.
• At least 8.2 MB of space available on drive C.
Installing MS OS/2
MS OS/2 Installation and Disk Cache
2
2-3
Before you begin installing MS OS/2, make sure you have the following five diskettes handy:
• OS/2 Server Adaptation Installation Disk
• OS/2 Server Adaptation Disk #1
• OS/2 Server Adaptation Disk #2
• OS/2 Server Adaptation Disk #3
• OS/2 Server Adaptation Disk #4
To install the OS/2 software, follow these steps:
1. Insert the IAN Manager OS/2 Server Adaptation Installation Disk into your floppy disk drive.
2. Start your server. If your server is already running, press [Ctrl]+[Alt]+[Del].
The installation program displays a welcome screen, explaining that the program will lead you through the installation of the MS OS/2 software, and prompting you to insert the other installation disks when needed.
2
2-4
MS OS/2 Installation and Disk Cache
Formatting the Hard Disk Before Installation
One of the first questions that the installation pro~am asks you is whether or not you want to use the FDISK utility to create, modIfy, or resize partitions on your server's hard disk. You must run this utility for a new server and for servers that have been running an operating system other than MS-DOS or MS OS/2. Refer to the MS OS/2 User's Guide for information on how to use the FDISK utility.
NOTE: Before you run the FDISK utility on a server that has been running an operating system other than MS-DOS or MS OS/2, you must do a low-level format of the server's hard disk. Refer to the manufacturer's documentation for
instructions.
The recommended range for the MS OS/2 partition size is from 16 to 127 MB. Although the FDISK utility accepts other values, partitions that are larger or smaller than the recommended sizes make less efficient use of the hard disk.
MS OS/2 Installation and Disk Cache
Choosing an MS OS/2 Environment
2
2-5
The installation program prompts you to choose one of three MS OS/2 environments:
• Presentation Manager, a graphics-based screen environment with windows and menus. In this environment, you can run several screen groups
simultaneously, each in its own window, with a different program in each.
• Program Selector, a command-line environment that supports multiple screen groups. This environment uses 1 MB less memory than Presentation Manager. It is also the mode you must choose if you are going to use the server as a dedicated server (a server that is only a server, not a server and a netstation).
2
2-6
MS OS/2 Disk Cache
MS OS/2 Installation and Disk Cache
A disk cache improves server perfonnance by using memory to temporarily store data that is moving between programs and the hard disk. There are two types of disk caching: read caching and write caching, also known as lazy write.
With read caching, blocks of data are read from the disk into a program and into the cache. If the same data is requested again, it is instantly available from the cache.
With write caching, data destined for the hard disk is temporarily stored in the cache until the server can write it to the disk without taking processing time away from other activities. Write caching can also save writes to the disk by updating data while it is still in the cache.
CAUTION: With write caching, data in the cache is lost if you turn
your server off without fIrst clearing the cache, or if power to your server is interrupted. To avoid data loss, perfonn one of the following steps:
• Press [Ctrl]+[Alt]+[Del] to restart the server.
• Stop the cache with the command:
cache /stop
• Stop write caching with the command:
cache /lazy:*:off
MS OS/2 Installation and Disk Cache
2
2-7
Setting Default Cache Size
The default cache size at installation is 512 KB. The minimum allowable cache size is 64K, and the maximum allowable cache size is 7.2 MB. To change the default cache size, edit the diskcache= entry in the CONFIG.SYS file. To set the default size to 1 MB (1024K), for example, change the diskcache= entry to:
diskcache=1024
There are no rules for cache size other than the minimum and maximum sizes stated earlier. However, the larger your cache, the better it works. For example, it is a good idea to set your default cache size to 1 MB or more if you can spare the memory. Use the CACHE command to change the cache size as you work, if necessary.
CACHE Command
The CACHE command lets you view or change the configuration of your disk cache. The syntax for the command is as follows:
cache options
T bl 21 CACHEC a e
-
.
Option
/help /start
/size:n
/caching: drive: on I off
Ilazy:drive:onloff /stop /options /stats[:ul:c]
2
2-8
ommanMS OS/2 Installation and Disk Cache
dO
'p'lons f FunctionDisplays CACHE command option information. Starts the cache. By default, the cache is started when you start up your system.
Sets the size of the cache, in kilobytes, overriding the diskcache= entry in the CONFIG.SYS file. The cache must be at least 64 KB. When you restart the server, the cache size reverts to the CONFIG.SYS file value. Starts or stops read caching. MS OS/2 allows onlr two disk drives: C and D. You can use an asteris (*)
in place of a specific drive letter to start or stop caching for both drives.
S tarts or stops write caching. You can use an asterisk
(*) in place of a drive letter to start or stop caching for all drives.
Stops the cache. If you restart the cache with the CACHE command, the configuration is as it was when you last stopped the cache, provided you have not restarted the server.
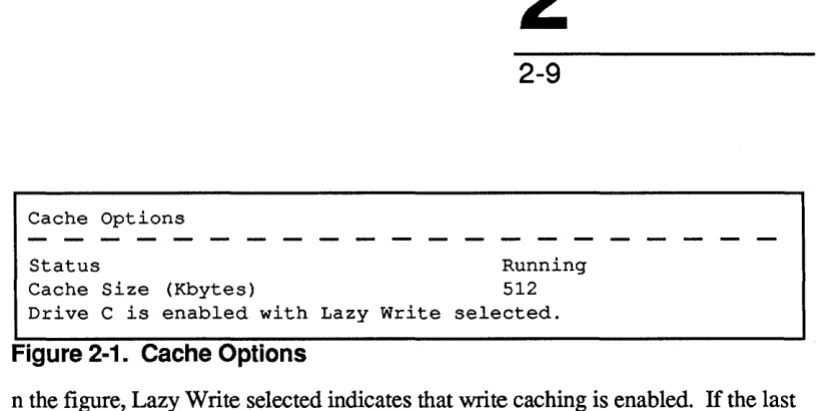
Displays th.e cac.he configuration. Figure 2-1 shows a sample optIon dIsplay.
Cache Options
MS OS/2 Installation and Disk Cache
2
2-9
Status Running
[image:26.541.69.478.45.250.2]Cache Size (Kbytes) 512 Drive C is enabled with Lazy Write selected.
Figure 2-1. Cache Options
n the figure, Lazy Write selected indicates that write caching is enabled. If the last line in the display is Write Through selected, write caching is not enabled.
Cache Statistics
Read Requests 1364 Disk Reads 480
Write Requests 136
Cache Hits 65% Figure 2-2. Cache Statistics
Disk Writes
Lazy Write Bypasses Lazy Write Flushes
Lazy Write Errors Disk C
43 26 66
o
[image:26.541.60.474.273.407.2]2
2-10
[image:27.541.62.473.141.466.2]MS OS/2 Installation and Disk Cache
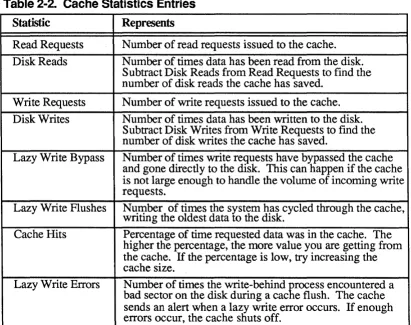
Table 2-2. Cache Statistics Entries
Statistic Represents
Read Requests Number of read requests issued to the cache. Disk Reads Number of times data has been read from the disk.
Subtract Disk Reads from Read Requests to find the number of disk reads the cache has saved.
Write Requests Number of write requests issued to the cache. Disk Writes Number of times data has been written to the disk.
Subtract Disk Writes from Write Requests to fmd the number of disk writes the cache has saved.
Lazy Write Bypass Number of times write requests have bypassed the cache and gone directly to the disk. This can happen if the cache is not large enough to handle the volume of incoming write requests.
Lazy Write Flushes Number of times the system has cycled through the cache, writing the oldest data to the disk.
Cache Hits Percentage of time requested data was in the cache. The higher the percentage, the more value you are getting from the cache. If the percentage is low, try increasing the cache size.
Installing LAN Manager on a PC Server
3
3-1
Chapter 3: Installing LAN Manager on a
PC Server
This chapter explains how to install and set up 3+Open LAN Manager on an ffiM or ffiM-compatible personal computer. Refer to the 3 + Open for 3Servers Installation and Setup Guide for information on installing 3+0pen LAN Manager on 3Com servers.
You install 3+Open LAN Manager with the Netsetup program. Netsetup also helps you set up users and share network resources. Before you begin the installation procedures, read "Hardware and Software Requirements" and "Information, Materials, and Decisions Needed." These sections list the
configuration of hardware and software required for 3+Open LAN Manager and discuss the decisions and information you need to answer the questions that the Netsetup program asks.
3
3-2
Installing LAN Manager on a PC Server
Hardware and Software Requirements
This section lists the configuration of hardware and software you must have for 3+Open LAN Manager.
Required Hardware
• mM A
'f®;
IBM PS/2® Model 50, 60, 70, or 80; or compatible computer.• High-density 3-1/2-inch or 5-1/4-inch diskette drive to read the installation diskettes.
• Hard disk with at least 9 MB of space available for the LAN Manager software.
• At least 4 MB of RAM (5 MB with Presentation Manager) for the basic LAN Manager configuration. Additional memory may be required, depending on the number of users and the services you plan to use. Refer to the 3
+
Open IAN Manager Release Notes for recommended memory configurations.• Network adapter.
• Monitor and adapter, color recommended.
Required Software
Installing LAN Manager on a PC Server
3
3-3
You must have MS OS/2 1.0 or 1.1. It is strongly recommended that you install the 3Com Server-Adapted MS OS/2 1.1 software that you received with 3+Open LAN Manager on your server. For information about installing the MS OS/2 software, refer to Chapter 2: MS OS/2 Installation and Disk Cache.
If you plan to use a server as a dedicated server, you must install Server-Adapted MS OS/2 1.1 and you must select the Program Selector when prompted for an MS OS/2 environment.
Information, Materials, and Decisions Needed
Before you begin installing the LAN Manager software, you must ~ather information, assemble installation materials, and make a few decislons.
Information Needed
• Name of the CONFIG file the server uses for MS OS/2. This is usually CONFIG.SYS; however, if you installed a version of MS OS/2 with the dual boot feature, the file is CONFIG.OS2.
• For the network adapter:
Manufacturer name (3Com or IBM) Model
Communication settings. These are the jumper or software settings for Interrupt, 10 Base Address, and so on. Refer to the adapter documentation for further information.
3
3-4
Materials Needed
Installing LAN Manager on a PC Server
The following diskettes are required to install 3+Open LAN Manager on a server:
LAN Mgr. Server #1 LAN Mgr. Server #2 OS/2 Netstation
DOS Netstation (Basic) DOS Netstation (Enhanced) OS/2 Drivers
DOS Drivers
3+Open LAN Manager is shipped on 3-1/2-inch 1.44 MB diskettes and 5-1/4-inch 1.2 MB diskettes. The Advanced System version includes both sizes. The Entry System and Entry System IT versions are available on both sizes; you specify the size that you need when you order the software.
Decisions
You must make decisions about the following issues before you start the installation procedures:
• Type
of server
instaIlationInstalling LAN Manager on a PC Server
3
3-5
• Source drive and target path for the LAN Manager software
Choose the drive where you will insert the installation diskettes (source drive), and the directory on the target drive where the Netsetup program will write the 3+Open LAN Manager software (target path). The source drive does not need to be on the server itself, as long as there is a network connection between the drive and the server.
• Server name
This name identifies the server to the network. You must spell it according to NetBIOS conventions. It must be unique on the network, no more than 15 characters long, and composed of letters, numbers, or the following characters:
$%;--@ {}--' !#()
The name cannot contain embedded spaces. If you want to separate name elements, use the underscore C) character.
• Password
Netsetup will ask you for a password for the server. The password can be up to 14 characters long.
• Type of security to set up on the server
Decide whether the server will use user-level or share-level security. For superior security, choose user-level security. This is the installation default.
The differences between user-level and share-level security concern how access permissions are assigned and the way passwords are used.
Permissions define which operations, such as reading, writing, and executing files, are allowable for a given user. Passwords limit access to server
3
3-6
Installing LAN Manager on a PC Server
Under user-level security, each resource has a list of users or groups of users that can use the resource in a given way. When administrators set up resources on a server with user-level security, they create accounts for individual users and for groups of users. Subsequently, when a resource is shared on the network, the administrator creates a sharename for the resource and adds the names of user and group accounts to the resource's access list. Each account is given specific access permissions. Only the accounts that are on an access list can use the resource, and only in accordance with their particular set of permissions.
Under user-level security, one or more users can link to a directory tree using a single sharename. They can then change to the specific subdirectories to which they have access. A separate sharename is not required for each subdirectory.
Under share-level security, sharenames control operations with shared
resources. Sharenames can be protected with passwords. One shared resource may have many sharenames, with each sharename having a different set of permissions and a different password. By creating different sharenames with different permissions, and giving certain sharenames to separate groups of users, the network administrator can assign different access permissions for different people using the same resource. Sharenames are assigned to files, directories, printers, communication devices, and other network resources that are to be shared.
You must choose one type of security for a server. However, both types of security can coexist on networks with more than one server.
Installing LAN Manager on a PC Server
• Type of protocol to install
3
3-7
The available protocols are NetBIOS Protocol (NBP), Xerox Network Systems (XNS), Data Link: Control (DLC), and NBP/XNS. The protocol you install on the server must be compatible with the application software used.
Use the XNS protocol when compatibility with 3+Share software is required, or if applications are installed that require XNS, such as the 3+Open Mail or the 3+Open Start programs.
Use the DLC protocol if communication with mM servers using DLC is required.
Use the NBP protocol in a workgroup where performance and DOS memory size are important and no protocol-specific applications or interoperability is required.
Use the NBPIXNS protocol option when you want to use NBP for all LAN Manager functions, such as file, print, or SQL, and you also need to use XNS-specific applications, such as 3+0pen Mail. If you are installing multiple servers on a network, only the servers where the server portion of the XNS-specific applications are installed require the NBP/XNS protocol. Select the NBP protocol for the other servers.
All three protocols support the NetBIOS interface, and therefore support NetBIOS-specific applications.
NOTE: When you view the servers available on your network, you will see a list of the servers on the network that use the same primary protocol as the netstation or concurrent server you are using. For example, if your netstation is configured with XNS, you cannot view servers on the network that are
3
3-8
Installing LAN Manager on a PC Server
• Servers using XNS or NBPIXNS protocols only:
Should the Locator service be installed on this server? The Locator service keeps track of NetBIOS names on a network using the XNS protocol. The service must be installed on one and only one server or netstation on the network. It is recommended that you install it on a server, although you can install it on an OS/2 netstation.
NOTE: A network using XNS will not function without the Locator running. Therefore, you must install it on a server or netstation that will not be turned off while other servers or netstations on the network are running.
• Concurrent servers only:
Who will be the primary user of the netstation, and what will be this person's user name? The user name you choose must follow NetBIOS spelling conventions (refer to the discussion of server names earlier in this section).
Netsetup
Installing LAN Manager on a PC Server
3
3-9
Netsetup, the 3+0pen LAN Manager installation and setup program, copies LAN Manager software to a disk you designate and sets LAN Manager operating parameters. The program also has options to let you configure network printers, to display and modify the basic LAN Manager settings you have chosen, and to upgrade or remove a LAN Manager installation.
Besides copying the LAN Manager software, Netsetup does the following:
• Configures the LANMAN. IN! and PROTOCOL.INI files. These are the LAN Manager configuration files.
• Modifies the CONFIG file, the STARTUP.CMD file, and the initialization batch file for sessions.
• Shares basic network resources on all servers. On user-level servers, creates several user and group accounts. Refer to Chapter 4: Setting Up Network Users and Resources for a list of accounts and resources initially set up by the Netsetup program.
• On dedicated PC servers:
Writes a command in the server's STARTUP.CMD file to log the server on by server name rather than user name.
Writes a command in the STARTUP.CMD file to run the LAN Manager Net Console program. This program puts a server that is running under either type of security into a restricted mode of operation, called console mode. Console mode limits user access to server facilities. (Users can still review printer and communication device status at the server.) You can protect console mode with a password, so that it can be exited only if the proper password is supplied.
3
3-10
Installing LAN Manager on a PC Server
Before You Start the Netsetup Program
If 3+0pen LAN Manager is already installed, there are two occasions when you must stop the LAN Manager (3Com's or other vendors') before you start Netsetup:
• When you want to use the Netsetup program to remove the LAN Manager.
• When you want to use the Netsetup program to reinstall the LAN Manager over the currently-installed LAN Manager.
If you want to use the Netsetup program in either of these situations, you must perform the following actions first:
1. Stop the LAN Manager by typing:
net stop workstation /y~
The /y option suppresses any confrrmation prompts.
2. If the MS OS/2 cache utility is running, stop it by typing:
cache /stop~
3. If any detached processes or memory-resident programs reside in or use files in any of the directories beneath the 30PEN directory, stop them by doing the following:
a. Edit the startup batch file (STARTUP.CMD or AUTOEXEC.BAT) either by inserting REM ahead of the command line that starts the process, or by deleting the command line altogether, to disable the command lines that start the detached process or memory-resident program.
For example:
rem mminder2 /color=on
b. Restart the server.
Installing LAN Manager on a PC Server
Starting the Netsetup Program
3
3-11
You can run Netsetup in the MS OS/2 protected mode, in the MS OS/2 real mode, or under MS-DOS. The program can be run from the installation diskettes or from the server hard disk after you have installed it there. Netsetup is in the directory \30PEN\SERVER\LANMAN\NETPROO.
NOTE: If you are viewing Netsetup on a monochrome monitor and the text on the screen is blanked out in certain areas, exit Netsetup and restart it by typing:
net setup /mono~
Running the Program from the Installation Diskettes
To start the program:
1. Insert the IAN Mgr. Server #1 diskette into a high-density drive.
The 3+Open LAN Manager Advanced System comes with two sets of high-density 3+Open installation diskettes, each with identical software. It does not matter which set you use to install the system. The 3-1/2-inch diskettes must be read in a 1.44 MB drive, and the 5-1/4-inch diskettes in a 1.2 MB drive.
When you install the server, the Netsetup program copies all of the 3+Open LAN Manager files from the installation diskettes to the server's hard disk. Included are the Netsetup program file, NETSETUP.EXE, and the files required for OS/2 and DOS netstation installation. This gives you the option of running NETSETUP.EXE at the server and creating DOS startup diskettes using the server hard drive as the source drive and the diskette drive as the target drive-without using the installation diskettes.
3
3-12
Installing LAN Manager on a PC Server
2. Make the drive where you inserted the diskette the current drive, then type:
netsetup.J
3. Follow the instructions on the screen to install the LAN Manager.
Running the Program from the Server's Hard Disk
To run Netsetup at the server, type:
netsetup.J
Main Menu
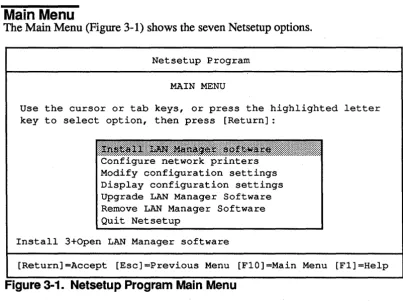
The Main Menu (Figure 3-1) shows the seven Netsetup options.
Netsetup Program
MAIN MENU
Use the cursor or tab keys, or press the highlighted letter key to select option, then press [Return]:
j~j~;iliMijij~Ij~j.j~j~jlljniifij~j~j~jij!iiiiiij~j~jI~j~j~j~j~jlIjljljljlj~jljljlIjljljlI Configure network printers
Modify configuration settings Display configuration settings Upgrade LAN Manager Software Remove LAN Manager Software Quit Netsetup
Install 3+0pen LAN Manager software
[image:39.544.63.467.302.603.2]On-line Help
Installing LAN Manager on a PC Server
Netsetup provides two forms of on-line help:
3
3-13
• One-line messages displayed at the bottom of each menu. These messages provide information about the menu option or data field currently highlighted.
• Help message screens that you display by pressing [FI]. You can use the [FI] key whenever a menu or error message is displayed.
Press [F I] twice within any screen to list the keys that perform the following functions:
• Control help message screens
• Select menu items
• Enter and edit data fields
• Control cursor movement within fields
3
3-14
Installing LAN Manager on a PC Server
Installing LAN Manager Software
1. Back up the following server files:
• The OS/2 system configuration file (CONFIG.SYSor CONFIG.OS2).
• The startup batch file, STARTUP.CMD.
• The batch file for session initialization, if the server has one. This is the file named in the PROTSHELL line of the server's CONFIG file. Standard filenames are OS2INIT.CMD and INITENV.CMD.
Netsetup prompts you for the names and paths of the configuration and startup batch files and modifies them. If it does not find them at the end of the path you give, it asks you whether it should create them. The program also modifies the session initialization flie if it finds one. If none exists, the program does not create one.
Netsetup restores these files to their original state if you halt the installation before completion. However, you should back them up in case you want to restore the server's preinstallation environment at a later date.
2. Start Netsetup (refer to "Netsetup" earlier in this chapter).
3. Select Install LAN Manager software from the Main Menu and proceed through the menus until the installation is complete.
NOTE: Make note of the password you select during the installation process. You will need this password when you start up the server after installation.
Installing LAN Manager on a PC Server
3
3-15
Optional: Configuring Network Printers
You can use Netsetup to configure parallel and serial printers connected to the server. The Configure network printers option creates separator page flies for printer queues and sets selected COM port parameters for serial printers.
A separator page flie contains instructions for printing banner pages and escape sequences for resetting the printer before each print job. Separator files are located in the directory 30PEN'SERVER\LANMAN\SPOOL and have the extension .SEP.
The program provides a standard banner page file, called 30PEN.SEP, and reset sequence files for several common printers. 30PEN.SEP prints a standard banner page. You combine reset sequence files, such as those provided by the program, with 30PEN.SEP to create separator files for printers. The program also allows you to define reset sequences for other kinds of printers, which you can then combine with 30PEN.SEP.
If you want to create custom banner pages and separator files, refer to the 3
+
OpenMS OS/2 LAN Manager Administrator Guide for instructions. Keep the files in the SPOOL directory.
To configure printers follow these steps:
1. After installing the 3+0pen LAN Manager software, quit Netsetup and restart the server.
You must restart the server before you can configure printers. This allows Netsetup to inventory the hardware ports on the server.
2. Select configure network printers from the Main Menu.
Use [Fl] for help, as needed.
3
3-16
Installing LAN Manager on a PC Server
The COM port parameters set by Netsetup are a s:ubset of the parameters you can set with the MS OS/2 MODE command. Netsetup writes the parameter values to the flie, SETMODE.CMD, which is located in the root directory of the server's startup drive. Whenever you start the server hardware, this program runs. You can edit this file to add parameters for other serial devices, such as modems. Refer to your MS OS/2 documentation for information on the MODE command.
Optional: Displaying and Modifying Basic Setup
You can use Netsetup to modify or display basic settings, such as server name, protocol, and network adapter.
To display installation settings without modifying them:
1. Select Display installation settin~ from the Netsetup Main Menu.
Press [FI] for help with the program.
2. Press [FlO] to return to the Main Menu when you are done.
To examine and modify installation settings:
1. Select Modify installation settin~ from the Netsetup Main Menu.
Press [FI] for help with the program.
2. Press [FlO] to return to the Main Menu when you are done.
I nstalling LAN Manager on a PC Server
3
3-17
Optional: Upgrading 3+0pen LAN Manager Software
You can use Netsetup to upgrade your LAN Manager software from the current version to a newer one. Before replacing the LAN Manager software, refer to "Before You Start Netsetup" earlier in this chapter.
To upgrade your LAN Manager software:
1. Select Upgrade LAN Manager software from the Netsetup Main Menu.
Press [FI] for help with the program.
2. Press [FlO] to return to the Main Menu when you are done.
Optional: Removing 3+0pen LAN Manager Software
You can use Netsetup to remove your LAN Manager software from the server. Before removing the LAN Manager software, refer to "Before You Start Netsetup" earlier in this chapter.
To remove your LAN Manager software:
1. Select Remove LAN Manager software from the Netsetup Main Menu.
Press [FI] for help with the program.
2. Press [FlO] to return to the Main Menu when you are done.
3
3-18
Installing LAN Manager on a PC Server
Quitting and Restarting
After you finish installing the 3+Open LAN Manager software, quit Netsetup and restart the server hardware to start the LAN Manager.
Optional: Modifving STARTUP.CMD
N etsetup adds a block o{ lines at the top and at the bottom of the server
STARTUP.CMD file. These lines are labeled "===OS/2 LAN MANAGER===".
You may want to modify one or more of the lines in the upper block. The block contains lines similar to these:
CD \30PEN\SERVER\LANMAN\NETPROG net start server
hwinfo2 logon2
net load srvshare.pro
net use e: \\server2\os2apps
You might, for example, want to modify the line net load srvshare.pro. This line loads a standard server profile that shares several network resources. After you share additional network resources using the procedures in Chapter 4, you might want to create a new profile file that you could then substitute for srvshare.pro. Alternatively, you could overwrite the SRVSHARE.PRO file using the Net Admin program (see Chapter 4: Setting up Network Users and Resources) and not change the line in STARTUP.CMD.
Installing LAN Manager on a PC Server
Special Note: Dedicated Servers
3
3-19
When you restart a dedicated PC server, the Net Console program runs
automatically. This program restricts access to the server by unauthorized users.
The frrst action you must take after restarting the server is to assign a password to console mode to prevent users who are not administrators from exiting the console and displaying a command prompt.
When you set up users and resources on a dedicated server (see Chapter 4), you must either exit Net Console and run Net Admin at the server, or remotely administer the server from an OS/2 netstation on the network.
Setting Up Network Users and Resources
4
4-1
Chapter
4:
Setting Up Network Users and
Resources
This chapter outlines the procedures for setting up network users and sharing network resources (directories, printers and other output devices, and modems) on a server. You must install 3+Open LAN Manager on the server before you can set up users and resources. If you have not yet installed the 3+Open LAN Manager software, install it now, referring to Chapter 3 for instructions.
Read this chapter in conjunction with the 3 + Open MS OS/2 LAN Manager Administrator Guide, which you received with your 3+Open LAN Manager
4
4-2
Terminology
Setting Up Network Users and Resources
The following tenninology is used in this chapter:
Group
Home directory
Permission
Resource
Sharename
User
A set of users for whom an account exists on a server with user-level security. A group is identified by a name, and its members share a defined set of access rights. Netsetup automatically creates two groups: Users and Admins.
A directory created for a user's private information. Access to a home directory is restricted.
Specific kind of access to a directory resource, for example, read access (abbreviated R), or execute access (abbreviated X). Refer to the 3
+
Open MS OS/2 IAN ManagerAdministrator Guide for more information.
A directory, file, network device (printer, modem, and so on), or reserved administrative resource (IPC$ or
ADMIN$).
A name by which network users access a specific resource on a server. Under user-level security, access rights can be assigned to user accounts and to group accounts.
A person who has an account on a server that has user-level security. A user is identified by a user name. Users can belong to groups. Netsetup automatically creates two users on a server with user-level security: Admin and Guest.
In general, someone who works at a concurrent server or a netstation on a network.
•
Overview
Setting Up Network Users and Resources
The user and resource setup process has two phases:
• Survey and plan
• User and resource setup
4
4-3
Survey and Plan
The survey and plan process is divided into three steps:
• Identifying users and groups
• Identifying network resources
• Mapping out resource allocation
If you have a large network, you may find it helpful to create worksheets for recording user needs and resource allocation. This process also produces a record of users and resources that will help the network administrator manage the network after it has been set up.
Identifying Users and Groups
The rrrst step in your survey should be to identify all the people who will be using the network. You should then list their resource needs and group them
accordingly.
4
4-4
Setting Up Network Users and Resources
On servers with user-level security, Netsetup creates several users and groups. Table 4-1 shows these initial users and groups.
T bl a e 4-1. I .. I U nltla sers an dG roups on
s
ervers Wit . h U ser- eve L ISe
c urity User Member of Group Access PrivilegesAdmin Users, Admins Admin
Guest none Guest
The Admin user has full administrative capabilities. It is initially created with a password you supply during installation.
The Guest user provides limited network access to users who do not have an account on the server. It is optional and, on networks where security is especially important, you should consider deleting it or putting a password on it.
Identifying Network Resources
There are two steps to identifying network resources:
• Examine the resources set up initially by Netsetup.
• List additional resources to share.
·
.
.Setting Up Network Users and Resources
4
4-5
NOTE: The sharename USERDIRS is set up only on a server with user-level security. The paragraphs following the table provide detailed information about each sharename.
T bl
a
e
4- . 2 Resources nltla
I .. II Sh,
are on
dSe
rvers
SharenaIIE link at Startup Directory Path Group Access USERDIRS OS/2&OOS \3open\users Users RX
netstations: H: drive
OS2APPS OS/2 netstations: \apps\os2apps Users RX
E: drive
DOSAPPS OOS netstations: \apps\dosapps Users RX
E: drive
FAMAPPS none \apps\famapps Users RX
APPSADMN non \apps Admin RWCADPX
PROFILES none \3open\serveNanman\profiles Users RX
ADMIN$ none \3open\serveNanman n/a n/a
IPC$ none none n/a n/a
A$ none a:\ n/a Admin only
B$ none b:\ n/a Admin only
4
4-6
Setting Up Network Users and Resou rees
USERDIRS is the sharename on a server with user-level security that is associated with the directory 30PEN\USERS, the recommended parent directory for users' home (private) directories. When you create an account for a user using the NET ADMIN command, the LAN Manager helps you set up a home directory for that user. You should plan to set up a subdirectory for each user under this directory. The group Users has read and execute access to USERDIRS (but not to any subdirectories you create-unless you specifically give access to them).
When you install 3+Open LAN Manager on a net station, Netsetup writes a NET USE command in the netstation startup batch file that links the user's H drive to the sharename USERDIRS on the home server. Logging in at a DOS netstation also logs you in as the default user. Refer to the 3 + Open MS OS/2 LAN Manager Administrator Reference for infonnation on the NET USE command.
The directories DOSAPPS, OS2APPS, and F AMAPPS are created to help organize application files on the server. Copy your application programs to these directories so users can access them. DOS programs should go in DOSAPPS, OS/2 programs in·OS2APPS, and applications that run in either environment (including the DOS environment of OS/2) in FAMAPPS. Users can access these directories by linking to their sharenames. The group Users created on servers with user-level security have read and execute access to these directories.
APPSADMN is an administrator sharename for the directory APPS, which is the parent directory to DOSAPPS, OS2APPS, and FAMAPPS. It provides the administrator full access rights to DOSAPPS, OS2APPS, and F AMAPPS. It is protected by the password you select for the Admin user during LAN Manager installation.
When you install 3+Open LAN Manager on an OS/2 netstation, Netsetup writes a NET USE command in the netstation startup batch file that.links the user's E drive
to the sharename OS2APPS. The E drive on DOS netstations is linked to the sharename DOSAPPS. No links are initially made to FAMAPPS or APPSADMN.
Setting Up Network Users and Resources
4
4-7
The directory PROFILES is for server and user profiles. Profiles contain commands to establish a particular resource share environment or to link to a particular sharename. The PROFILES directory initially contains a single file, SRYSHARE.PRO, which is a server profile. This profile is loaded automatically when you start the server. The profile shares the server resources that Netsetup sets up. After you set up additional resources on the server, you may want to modify SRYSHARE.PRO so that it shares the new resources as well. This is discussed later in this chapter in "Saving the Server Profile." Refer to the 3+0penMS OS/2 LAN Manager
Administrator Guide for further information about profiles.
ADMIN$ and IPC$ permit remote administration of a server. They are accessible to users with Admin privileges and are protected by the password you establish during LAN Manager installation. Refer to the 3
+
Open MS OS/2 LAN Manager Administrator Guide for further information.4
4-8
Setting Up Network Users and Resou rces
Mapping Out Resource Allocation
Once you know what network resources Netsetup provides, what additional network resources you have, who the potential users are, and what those users' needs are, you can map out who gets access to which resources.
User-level security provides access to network resources via user and group accounts. As you allocate resources, you should make the following decisions:
• What user accounts to set up
Different users can be given different access rights, depending on their needs or authority. For example, a manager might have access to all directories for all project teams reporting to him. Each user account can be associated with a private home directory where the user can keep personal files. Choose a home directory name and sharename that will be easy for the user to remember. Directory names must follow MS OS/2 filename conventions. Sharenames must follow MS OS/2 and MS-DOS filename spelling conventions.
Not every network user has to be given a private user account. Intennittent or casual users can be restricted to the Guest user account, whose access rights can be limited.
• What groups to set up
•
Setting Up Network Users and Resources
• What resources to allocate to each user and group
4
4-9
Access to network resources is provided through access lists. User and group accounts must be added to the list for a resource in order to be able to use that resource.
Under share-level security, there are no user and group accounts. Access to resources is regulated by means of sharenames and passwords. Individual users can be given home directories just as they can under user-level security. Groups of individuals can also be given access to their own group resources. As you set up resources, you should make the following decisions:
The directory name, sharename, and password for each user's home directory
The name of the directory and the sharename could be based on the user's name to make it easier to identify the owner of the directory. Directory names and sharenames must follow MS OS/2 filename conventions. Which resources should be accessible to all users
Choose sharenames for these resources. No passwords should be necessary because these resources are accessible to all users.
Which resources need to be restricted to groups or to individuals
4
4-10
Improving Security
Setting Up Network Users and Resources
Servers with user-level security provide a high degree of security for network resources by giving access through password-protected user accounts and groups. Guidelines for creating groups and users can be found later in this chapter in "Creating Groups" and "Setting Up Users."
At your option, you can take the following steps to increase the security of a server with user-level security. These steps further restrict access to network resources (refer to the 3
+
Open MS OS/2 LAN Manager Administrator Guide for additional infonnation).• Remove the keyboard and monitor from the server.
• Lock the server in a room.
• Run one and only one copy of the N etlogon service on the network.
• Add users to only a single server.
• Delete the Guest user. The LAN Manager automatically attempts to log in a user as Guest if it does not recognize the user's login name. Thus, an
unauthorized user can gain access to the network through Guest. You can also restrict Guest access by using the access control features of a server with user-level security.
• Restrict Admin permission to only one user on the network.
• Log on as Admin only when performing administrator functions, then immediately log off.
• Assign users with multiple accounts different passwords for each account. In multi server networks, it is sometimes desirable to create an account for a user on several servers. You can give each account a different password for better security.
Setting Up Network Users and Resources
4
4-11
At your option, you can take the following steps to increase the security of a server using share-level security. These steps further restrict access to network resources (refer to the 3 + Open MS OS/2 LAN Manager Administrator Guide for additional information).
• Remove the keyboard and monitor from the server.
• Lock the server in a room.
• Put passwords on all sharenames and restrict who is given the passwords.
• Create private home directories for each user.
• Selectively grant permissions to sharenames.
Setting Up Users and Resources
During this phase of the user and resource setup process, you will perform the following functions:
• Log on to the server and run the Net Admin program.
• For a server with user-level security, create users and groups.
• For a server using share-level security, create private home directories for each user.
• Share network resources on the server.
4
4-12
Setting Up Network Users and Resources
Logging On and Running Net Admin
There are three procedures for logging on and starting the Net Admin program: one for concurrent servers using user-level security, one for concurrent servers using share-level security, and one for dedicated servers. For detailed information on using the Net Admin program, refer to the 3 + Open MS OS/2 LAN Manager Administrator Guide.
Concurrent Servers with User-Level Security
To log on and run the Net Admin program from a concurrent server with user-level security, perfonn the following steps:
1. Restart the server hardware if you have not done so since installing 3+0pen LAN Manager.
2. When prompted for a user name, type:
acimin.J
3. When prompted, enter the p~ord you gave during LAN Manager installation.
When you ran Netsetup, you supplied the program with an administrator password. Type that password.
4. When the MS OS/2 prompt is displayed, start the Net Admin program by typing:
net acimin.J
The Net Admin program helps you set up users and resources and helps administer the server.
Continue setting up your server by following the procedures in the sections titled "Creating Groups" and "Setting Up Users" later in this chapter.
Setting Up Network Users and Resources
Concurrent Servers with Share-Level Security
4
4-13
To log on and run the Net Admin program from a concurrent server using share-level security, perform the following steps:
1. Restart the server hardware if you have not done so since installing 3+0pen
LAN Manager.
2. When prompted for a user name, press [Return].
3. When prompted for a p~ord, enter a password and press [Return].
This password will be applied to the default user name used in step 2.
4. When the MS OS/2 prompt is displayed, start the Net Admin program by
typing:
net admin.J
The Net Admin program helps you set up users and resources and helps administer the server.
5. When prompted, enter the password you gave during LAN Manager installation.
When you ran,Netsetup, you supplied the program with an administrator password. Type that password.
4
4-14
Dedicated Servers
Setting Up Network Users and Resources
To log on and run the Net Admin program from a dedicated server, perform the following steps:
1. Restart the server hardware if you have not done so since installing 3+0pen LAN Manager.
When the server restarts, it automatically runs the Net Console program. This program puts the server in console mode and displays the main console menu and a prompt for a password.
2. When you are prompted for a password, enter one and press [Return].
Give the password to the network administrator. The password helps prevent unauthorized users from exiting console mode and accessing other parts of the system.
3. Display the MS OS/2 program selector by pressing [etrl] + [Esc].
4. To start an MS OS/2 session, select the MS OS/2 command prompt, then press [Return].
s.
If your server has user-level security, when you are prompted for a username,
type:admin.J
6. When prompted, enter the password you gave during LAN Manager installation.
When you ran Netsetup, you supplied the program with an administrator password. Type that password.
7. When the OS/2 prompt is displayed, start the Net Admin program by typing:
net admin.J
The Net Admin program helps you set up users and resources and helps administer the server.
For servers with user-level security, continue setting up your server by following the procedures in "Creating Groups" and "Setting Up Users" later in this chapter.
Setting Up Network Users and Resources
4
4-15
For servers with share-level security, continue setting up your server by following the procedure in "Sharing Directories on a Server with Share-Level Security" later in this chapter.
Creating Groups
When you use the LAN Manager to set up groups and users on a server with user-level security, you can save a step by creating groups fIrst. Then, when you add users, you will be able to assign them to groups at the same time.
1. Pull down the Accounts menu.
2. Select Users/groups.
3. Choose New from the Groupname list box on the Users/Groups dialog box, and select Add.
4. Type the name of the group in the Add Group Account dialog box.
5. Optionally move the Admin and/or Guest user to the Members list box.
6. Select OK.
4
4-16
Setting Up Users
Setting Up Network Users and Resources
Refer to Chapter 8: Managing User-Level Security in the 3+0pen MS OS/2 LAN Manager Administrator Guidi for details on setting up users. Observe the
following guidelines when you create users:
Skip steps 1 and 2 if you just completed step 6, above.
1. Pull down the Accounts menu.
2. Select Users/groups.
3. Choose New from the Username list box and select Add.
4. Fin out the Add User Account dialog box, referring to the instructions in
Table 4-1 as needed. Table 4-3 describes the items listed in the User Account dialog box.
5.
SelectOK.
6.
If the message "The specified directory does not exist" appears, selectOK
to create it.7 • When the Edit File Permission dialog box is displayed, press [Return].
Only the user should be given access to the home directory, and the default permissions are normally appropriate.
Refer to the 3
+
Open MS OS/2 LAN Manager Administrator Guide for additionalSetting Up Network
Users and Resources
4
4-17
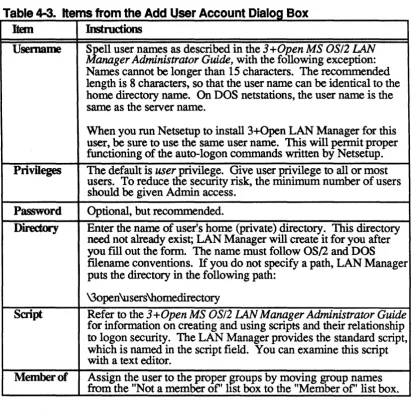
Table 4-3. Items from the Add User Account Dialog Box
Item Instructions
Usemame
Privileges Password Directory SaiptMember of
Spell user names as described in the 3 + Open MS OS/2 LAN Manager Administrator Guide, with the following exception: Names cannot be longer than 15 characters. The recommended length is 8 characters, so that the user name can be identical to the home directory name. On DOS netstations, the user name is the same as the server name.
When you run Netsetup to install 3+Open LAN Manager for this user, be sure to use the same user name. This will pennit proper functioning of the auto-logon commands written by Netsetup. The default is user privilege. Give user privilege to all or most users. To reduce tlie security risk, the minimum number of users should be given Admin access.
Optional, but recommended.
Enter the name of user's home (private) directory. This directory need not already exist; LAN Manager will create it for you after
you fill out the form. The name must follow OS/2 and DOS
filename conventions. If you do not specify a path, LAN Manager puts the directory in the following path:
\3open\users\homedirectory
Refer to the 3 + Open MS OS/2 LAN Manager Administrator Guide
for information on creating and using scripts and their relationship to logon security. The LAN Manager provides the standard script, which is named in the script field. You can examine this script with a text editor.
[image:64.543.82.494.130.544.2]4
4-18
Setting Up Network Users and Resources
Increasing the User Accounts Maximum
When Netsetup installs the Advanced System version of 3+Open LAN Manager, it sets a limit of 50 user accounts. You can raise this limit with the GROW ACC utility, as described in the 3 + Open MS OS/2 LAN Manager Administrator Guide.
You cannot increase the maximum number of accounts for the two Entry System versions of 3+Open LAN Manager.
Sharing Directories on a Server with User-Level Security
You can now set up additional directories for user and group accounts. Unlike servers with share-level security, servers with user-level security do not require each directory resource to have a sharename. Users can access a directory via a common sharename and then select the subdirectories to which they have been given explicit access on access lists. For example, the sharename OS2APPS could link all users to the directory C:\APPS\OS2APPS. However, only those users with specific access rights to the subdirectory C:\APPS\02SAPPS'SPRDSHT would be able to access files and directories under SPRDSHT.
Setting Up Network Users and Resources
4
4-19
Refer to the 3+0pen MS OS/2 LAN Manager Administrator Guide for more information on setting up directories.
1. Pull down the View menu and select This server.
2. Select Add share in the Resources This Server is Sharing dialog box.
3. Select OK to choose Disk directory.
4. Fin out the Share a Disk Resource With the Network dialog box, then select OK.
Sharename. Choose a suitably mnemonic sharename. Spell it according to OS/2 fIlename conventions.
Path. If the path does not exist, the program will create it for you.
Max user