2.0
Bar/ana
C++
Version 2.0
Rl
Copyright © 1991 by Borland International. All rights reserved. All Borland products are trademarks or registered trademarks of Borland International. Inc. Other brand and product names are trademarks or registered trademarks of their respective holders. Windows, as used in this manual, refers to Microsoft's
implementation of a windows system.
c
o
N
T
Introduction 1
Typefaces used in this book ... 2
Chapter 1 The Programmers Platform 3 Starting up and exiting ... 4
Running in real mode ... 4
Running in protected mode ... 4
Windows and protected mode ... 5
Command-line options ... 5
The
Ib
option ... 5The
I
d option ... 6The
Ie
andI
x options ... 7The
Ih
option ... 7The
II
option . . . .. 7The 1m option. . . .. 7
The
I
p option ... 7The
I
r option. . . .. 8Exiting Borland C++ ... 8
The components ... 8
The menu bar and menus ... 8
Shortcuts ... 10
Borland C++ windows . . . .. 13
Window management ... 15
The status line ... 16
Dialog boxes ... 17
Check boxes and radio buttons .... 18
Input boxes and lists ... 18
Editing ... 19
Project and configuration files ... 20
Turbo C files ... 20
Borland C++ project files . . . .. 20
Configuration files ... 21
Loading project files ... 21
The project directory ... 22
Desktop files ... 22
Changing project files ... 22
E
N
T
s
Default files ... . . . .. 22Chapter 2 Menus and options reference 25 :: (System) menu . . . .. 26
About ... 27
Clear Desktop ... 27
Repaint Desktop ... . . . .. 27
Transfer items ... . . . .. 27
File menu . . . .. 27
Open ... 28
Using the File list box. . . .. 29
New ... 29
Save ... 29
Save As ... 30
Save All ... 30
Change Dir ... 30
Print ... 31
Get Info ... 31
DOS Shell. .. .. .. .. .. .. .. . . .. .. . ... 32
Quit ... 33
Edit menu ... 33
Undo ... 34
Redo ... 35
Cut ... 35
Copy ... 35
Paste ... 35
Copy Example. . . .. 36
Show Clipboard ... 36
Clear ... 36
Search menu ... 36
Find ... 37
Replace ... 38
Search Again . . . .. 39
Go to Line Number ... 39
Next Error ... 40
Locate Function . . . .. 40
Runmenu ... 41
Run ... 41
Source code the same . . . .. 41
Source code modified . . . .. 41
Program Reset ... ; . . . .. 42
Go to Cursor ... 42
Trace Into . . . .. 42
Step Over . . . .. 43
Arguments . . . .. 44
Compile menu. . . .. 45
Compile to OBI ... 45
Make EXE File . . . .. 45
Link EXE File . .. .. .. .. .... .. . .. . . .. 46
Build All . . . .. 46
Remove Messages ... ~ . . . .. 46
Debug menu ... 46
Inspect ... 47
Ordinal Inspector windows ... 48
Pointer Inspector windows . . . .. 48
Array Inspector windows ... 49
Structure and union Inspector windows ... 49
Function Inspector windows ... 49
Class Inspector windows . . . .. 50
Constant Inspector window ... 50
Type Inspector window . . . .. 50
Evaluate/Modify ... 50
Call Stack . . . .. 51
Watches ... 54
Add Watch. . . .. 54
Delete Watch ... 54
Edit Watch . . . .. 54
Remove All Watches ... 55
Toggle Breakpoint ... 55
Breakpoints ... 55
Project menu ... 57
Open Project ... 57
Close Project ... 58
Add Item ... 58
Delete Item. . . .. 58
Local Options ... 59
Include Files ... 60
ii Options menu ... . . . .. 60
Compiler ... 61
Code Generation. . . .. 61
Entry /Exit Code . . . .. 65
C++ Options ... 67
Optimizations ... 68
Source ... 69
Messages ... 70
Names ... 73
Transfer ... 74
Transfer macros ... 76
Running DOS commands ... 82
Transfer memory settings ... 82
Make ... 82
Linker ... 84
The Set Application Options dialog box ... 86
Debugger . . . .. 87
Directories ... 89
Environment ... 90
Preferences. . . .. 90
Editor ... 92
Mouse ... 94
Desktop ... 94
Save ... 95
Window menu ... 95
Size/Move . . . .. . . .. 95
Zoom ... 96
Tile ... 96
Cascade ... 96
Next ... 96
Close ... 96
Message ... 96
Output ... 97
Watch ... 97
User Screen ... 97
Register ... 98
Project ... 98
Project Notes ... 98
List ... 98
Help menu ... ". . . . .. 98
Contents . . . .. 100
Index ... " ... 100
Previous Topic ... 100
Help on Help . . . .. 101
Chapter 3 Building a Windows application 103 The basic process ... 103
Compiling and linking within the IDE . 104 Understanding resource files ... 105
Understanding module definition files ... 105
Compiling and linking WHELLO ... 105
Setting compile and link options .. 106
Compiling and linking from the command line ... 107
Compiling from the command line .. 107
Linking from the command line . . . .. 108
Using a makefile ... 109
Another makefile for Windows ... 110
Prologs and epilogs ... 111
The _export keyword ... 113
Prologs, epilogs, and exports: a summary ... 113
Memory models ... 115
Linking for Windows . . . .. 115
Linking in the IDE ... 116
Linking with TLINK . . . .. 116
Linker options ... 116
Linking .OB] and .LIB files ... 117
Linking .OBJ and .LIB files for DLLs ... 118
Building a project for a Windows program ... 118
WinMain ... 120
The Resource Compiler ... 120
Resource Compiler syntax. . . .. 121
Dynamic link libraries ... 123
Compiling and linking a DLL within the IDE ... 123
Compiling and linking a DLL from the commandline ... 123
Module definition files . . . .. 124
Import libraries . . . .. 124
Creating DLLs . . . .. 125
LibMain and WEP ... 125
Pointers ill:ld memory . . . .. 126
Static data in DLLs ... 127
C++ classes and pointers . . . .. 127
Chapter 4 Managing multi-file projects 131 Using the project manager ... 132
Error tracking ... 135
Stopping a make . . . .. 136
Syntax errors in multiple source files . 136 Saving or deleting messages . . . .. 137
The power of the Project Manager . . . .. 137
Autodependency checking ... 138
Using different file translators ... 138
Overriding libraries ... 141
More Project Manager features ... 141
Looking at files in a project ... 143
Notes for your project ... 144
Chapter 5 The editor from A to Z 145 The new and the old. . . .. 145
Editor reference ... 146
Jumping around ... 148
Block commands. . . .. 148
Other editing commands . . . .. 150
Search and replace ... 151
Searching and searching again . . .. 151
Search and replace ... 152
Pair matching ... 152
Directional and nondirectional matching ... -. . . . .. 153
Nestable delimiters. . . .. 154
Comment delimiters ... 154
Chapter 6 The command-line compiler 157 Using the command-line compiler ... 158
Running in real mode ... 158
Running in protected mode ... 158
Using the options ... 159
Option precedence rules ... 160
Syntax and file names ... 163
Response files ... 163
Configuration files ... 164
Compiler options ... 165
Memory model ... 166
Macro definitions ... 167
Code generation options ... 167
The -v and -vi options. . . .. 171
Optimization options ... 172
Source code options ... 173
Error-reporting options ... 174
ANSI violations . . . .. 175
Frequent errors ... 175
Portability warnings ... 176
C++ warnings ... 176
Segment-naming control ... . . .. 177
Compilation control options . . . .. 178
EMS and extended memory options . 180 C++ virtual tables . . . .. 182
Linker options . . . .. 183
Environment options ... 183
Searching for include and library files ... 184
File-search algorithms ... 185
An annotated example ... 186
Chapter 7 Utilities 189 IMPDEF (module definition files) ... 190
IMPLIB (import libraries) ... 192
Re-creating IMPORT. LIB . . . .. 193
MAKE: The program manager . . . .. 193
How MAKE works . . . .. 194
Starting MAKE ... 195
The BUlL TINS.MAK file ... 196
Command-line options ... 196
A simple use of MAKE ... 197
Creating makefiles ... 200
Components of a makefile . . . .. 200
Comments ... 201
Command lists ... 201
Prefixes . . . .. 202
Command body ... 202
Batching programs ... 203
Executing DOS commands ... 205
Explicit rules ... 206
Special considerations ... 207
Examples ... 207
iv Automatic dependency checking . . . .. 208
Implicit rules ... . . .. 208
Macros ... 211
Defining macros ... 212
Using macros. . . .. 212
Special considerations ... 212
Predefined macros ... 213
File name macros ... 214
Directives ... 215
Dot directives ... 216
.path.ext ... 216
File-inclusion directive ... 217
Conditional execution directives .. 218
Expressions allowed in conditional directives ... 219
. Error directive . . . .. 220
Macro undefinition directive ... 221
MAKE errors . . . .. 221
TLIB: The Turbo Librarian ... 225
Why use object module libraries? ... 225
The TLIB command line ... 226
The operation list ... 227
File and module names ... 227
TLIB operations. . . .. 227
Using response files ... 228
Creating an extended dictionary: The IE option ... 229
Setting the page size: The
IP
option . 229 Advanced operation: TheI
C option . 230 Examples ... 231TLINK (linker) ... 231
Invoking TLINK ... . . .. . . .. 232
An example of linking for DOS ... 233
An example of linking for Win-dows ... 233
File names on the TLINK command line ... 233
Using response files ... 235
The TLINK configuration file ... 236
Using TLINK with Borland C++ modules ... 236
Startup code ... 237
Using TLINK with BCC . . . .. 240
TLINK options ... 241
The TLINK configuration file ... 241
/3 (80386 32-bit code) ... 241
/ A (align segments) ... 242
/c (case sensitivity) ... 242
/C (case sensitive exports) ... 242
/ d (duplicate symbols) ... 242
/e (no extended dictionary) ... 243
/i (uninitialized trailing segments) .243
/1 (line numbers) ... 243
/L (library search paths) ... 244
/m, Is, and /x (map options) ... 244
/n (ignore default libraries) ... 246
/0 (overlays) ... 246
/P (pack code segments) ... 247
/t (tiny model.COM file) ... 247
/Td and /Tw (target options) ... 248
/v (debugging information) ... 248
/ y (expanded or extended memory) . . . .. 249
Restrictions ... 249
The module definition file ... 250
Module definition file defaults . . .. 250
A quick example . . . .. 251
Module definition reference ... 252
CODE ... 252
DATA ... 253
DESCRIPTION ... 254
EXETYPE ... . . . .. 254
EXPORTS. . . .. 254
HEAPSIZE ... 255
IMPORTS. . . .. 255
LIBRARY ... . . .. 256
NAME ... 256
SEC;MENTS ... 257
STACKSIZE .. .. . . .. .. .. . .. . .. .. 258
STUB ... 258
TLINK messages . . . .. 258
Appendix A Precompiled headers 271 How they work . . . .. 271
Drawbacks . . . .. 272
Using precompiled headers ... 272
Setting file names ... 273
Establishing identity ... 273 Optimizing precompiled headers 274
T
A
B
1.1: General hot keys ... 10
1.2: Menu hot keys ... 11
1.3: Editing hot keys ... 11
1.4: Window management hot keys ... 12
1.5: Online Help hot keys ... 12
1.6: Debugging/Running hot keys ... 12
1.7: Manipulating windows ... 15
2.1: Get Info settings ... 32
2.2: Format specifiers recognized in debugger expressions ... 53
3.1: Compiler options and the _export keyword ... 115
3.2: Startup and library files for DLLs ... 118
3.3: Resource Compiler options ... 122
5.1: Full summary of editor commands .. 146
5.2: Block commands in depth ... 149
5.3: Other editor commands in depth ... 150
vi
L
E
s
5.4: Delimiter pairs ... 1546.1: Command-line options summary ... 160
7.1: IMPLIB options ... 193
7.2: MAKE options ... 197
7.3: MAKE prefixes ... 202
7.4: MAKE macros ... 213
7.5: MAKE directives ... 215
7.6: MAKE operators ... 220
7.7: TLIB options ... 226
7.8: TLIB action symbols ... 228
7.9: TLINK options ... 232
7.10: DOS application .OBJ and .LIB files .239 7.11: Windows application .OBJ and .LIB files ... 240
7.12: DLL object and library files ... 240
F
G
u
1.1: A typical window ... 14
1.2: A typical status line ... 16
1.3: A sample dialog box ... 17
2.1: The Load a File dialog box ... 28
2.2: The Save File As dialog box ... 30
2.3: The Change Directory dialog box .... 31
2.4: The Get Info box ... 32
2.5: The Find dialog box ... 37
2.6: The Replace dialog box ... 39
2.7: The Go to Line Number dialog box . .40 2.8: The Locate Function dialog box ... 40
2.9: The Arguments dialog box ... 44
2.10: The Evaluate/Modify dialog box ... 50
2.11: The Breakpoints dialog box ... 55
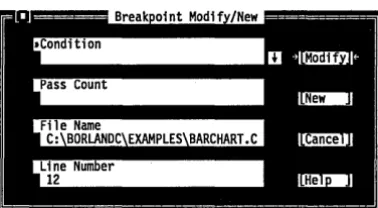
2.12: The Breakpoint Modify /New dialog box ... 56
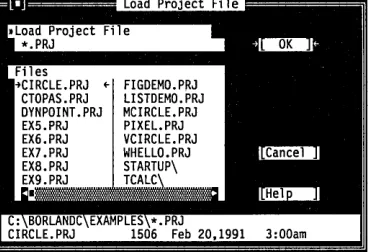
2.13: The Project File dialog box ... 57
2.14: The Add Item to Project List dialog box ... 58
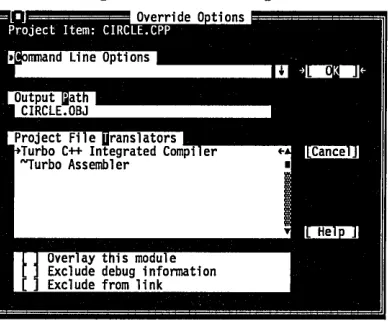
2.15: The Override Options dialog box ... 59
2.16: The Include Files dialog box ... 60
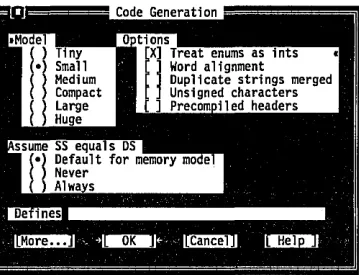
2.17: The Code Generation dialog box .... 61
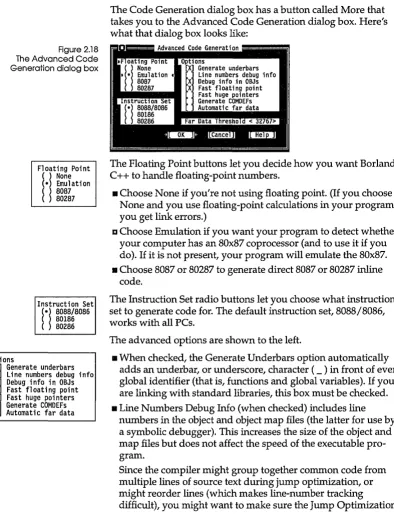
2.18: The Advanced Code Generation dialog box ... 63
2.19: The Entry/Exit Code dialog box .... 65
2.20: The C++ options dialog box ... 67
2.21: The Optimizations Options dialog box ... 68
R
E
s
2.22: The Source Options dialog box ... 692.23: The Compiler Messages dialog box .70 2.24: The Portability warnings dialog box .71 2.25: The ANSI Violations dialog box .... 72
2.26: The More ANSI Violations dialog box ... 72
2.27: The C++ Warnings dialog box ... 72
2.28: The Frequent Errors dialog box ... 73
2.29: The More Frequent Errors dialog box ... 73
2.30: The Segment Names dialog box .... 74
2.31: The Transfer dialog box ... 74
2.32: The Modify/New Transfer Item dialog box ... 75
2.33: The Make dialog box ... 83
2.34: The Linker dialog box ... 84
2.35: Set Application Options ... 86
2.36: The Debugger dialog box ... 87
2.37: The Directories dialog box ... 89
2.38: The Preferences dialog box ... 91
3.1: Compiling and linking a Windows program ... 104
5.1: Search for match to square bracket or parenthesis ... 154
5.2: Forward search I ... 155
5.3: Forward search II ... 155
5.4: Backward search ... 156
N T R
o
Du
c
To
NIf you haven't already done so, read the introduction, Chapter 1 ("Installing Borland C++"), and Chapter 2 ("Navigating the Borland C++ manuals") in Getting Started for information on the overall organization of the Borland C++ manuals. Those chapters tell you about many of the highlights of Borland C++, how to install Borland C++, and how to use the manuals most effectively.
This book, the User's Guide, contains reference-style information on the Programmer's Platform (the IDE), using Borland C++ to write a Windows application, the Project Manager, the integrated editor, the command-line compiler, and some of the many utilities included with Borland C++. See the introduction and Chapter 2, "Navigating the Borland C++ manuals," in Getting Started for information on how to most effectively use the Borland C++ documentation set.
Here is a breakdown of the chapters in this book:
Chapter 1: The Programmer's Platform introduces the features of
the Programmer's Platform, giving information and examples of how to use the IDE to full advantage. It includes information on how to start up and exit from the IDE.
Chapter 2: Menus and options reference provides a complete
reference to the menus and options of the IDE.
Chapter 3: Building a Windows application tells you what you
need and how to pull it together to write an application for Microsoft's Windows.
Chapter 4: Managing multi-file projects tells how to use the
Project Manager to manage multi-file projects.
Chapter 5: The editor from A to Z provides a complete reference
to the editor.
Chapter 6: The command-line compiler tells how to use the
Chapter 7: Utilities describes some of the utility programs that come with Borland C++.
Appendix A: Precompiled headers describes some of the utility
programs that come with Borland C++.
Typefaces used in this book
The typefaces used in this manual are described in Getting Started.
c
H A p T E R1
The Programmer's Platform
Borland's Programmer's Platform, also known as the integrated development environment or IDE for short, has everything you need to write, edit, compile, link, and debug your programs. For example, it provides
II multiple, movable, resizable windows
• mouse support • dialog boxes
• cut-and-paste and cut-and-paste commands • full editor undo and redo
• examples ready to copy from Help • a built-in assembler
• quick transfer to other programs (like T ASM) and back again • an editor macro language
The IDE runs in two modes: protected and real. Under "Starting up and exiting," you'll find a description of how to start up the IDE in either mode, and what the differences are. Since the IDE works the same in either mode, this chapter, and Chapter 2 (the menu reference) don't address the differences and the
implications for your programs.
This chapter is divided into two main sections: "Starting up and exiting" tells you how to enter and exit the IDE; "The
compo-nents that comprise the IDE. Chapter 2, starting on page 25, provides a reference to each menu item and dialog box.
Starting up and exiting
4
Running in real
mode
Running in
protected mode
You can run the IDE in either real or protected mode. You can use protected mode if you have a 286, 386, or i486 machine with 640K of conventional RAM and at least 576K of extended or (simulated or real) expanded memory. Otherwise, use real mode.
Note that, although you may be running Borland C++ in
protected mode, you are still generating applications to run in real mode. The greatest advantages to using Borland C++ in protected mode are:
• both the compiler and your application have much more room to run than if you were running Borland C++ in real mode • the linker runs faster
To invoke the IDE in real mode, type Be at the DOS prompt; you can follow it with one or more options.
Running Borland C++ in protected mode requires a small amount of preparation. It involves interaction between three files:
BCX.EXE, BCX.OVY, and TKERNEL.EXE. BCX.EXE loads
TKERNEL and BCX.OVY, which is the protected-mode version of the IDE. Although BCX.EXE loads these files automatically, so that you don't need to be concerned with invoking them yourself, they do both need to be on the path or in the BCX.EXE startup directory so it can find them.
Once you've verified that the correct directories are on the path, running Borland C++ in protected mode is as simple as running it in real mode; the syntax is identical except for using BCX in the
place ofBC. .
The options and menus are identical to those for BC; therefore, for the remainder of this chapter, when we mention the IDE we mean both BC and BCX (unless specifically called out otherwise).
. . BCX.EXE loads TKERNEL each time you invoke BCX. You can save some loading time by preloading TKERNEL; before rwming BCX, type
Windows and protected mode
You can a/so run the protected mode versions of the command-line compiler and TLINK under Windows using the same procedure.
Command-line
TKERNEL hi=yes
on the DOS command line. This has the added benefit of storing most of TKERNEL in extended memory, freeing more
conventional memory for your application. When you are through with your Borland c++ session, type
TKERNEL rem
to remove TKERNEL.
You can use the protected mode version of the IDE while rwming Windows. To do so, first load TKERNEL.EXE with the command:
TKERNEL hi=yes kilos=nnnn
where nnnn is the number of Kbytes to be managed by the kernel. We suggest kilos=2048. The remaining extended memory is available for Windows and other programs. Then run Windows in standard mode (type the command WIN / s). With Windows in standard mode, you can't run the IDE in a virtualized DOS window, but only as a full screen.
You can only run the protected mode IDE in Windows standard or real mode, 'not in enhanced mode.
options
The command-line options for Borland C++'s IDE are: fb, Id, Ie, /h,II, 1m, Ip, Irx, Is, and Ix. These options use this syntax:
BC I BCX [option [option ... ]] [sourcename I projectname [sourcename]]
where sourcename is any ASCII file (default extension assumed), projectname is your project file (it must have the .PRJ extension), and option can be one or more of the options.
6
Borland C++ determines what .EXE to build based on the project file or the file currently loaded in the Editor if no project file is found.
Enter the BC or BCX command with either Ib alone or the project file name followed by lb. For example,
Be /b
Be myproj.prj /b
Unless a project file is loaded, you can specify the name of a pro-gram to be compiled and linked on the command line. Type in the program name after the BC or BCX command, followed by /b:
Be myprog /b
The /d option The Id option causes Borland C++ to work in dual monitor mode if it detects appropriate hardware (for example, a monochrome card and a color card); otherwise, the /d option is ignored. Use dual monitor mode when you run or debug a program, or shell to DOS (File I DOS Shell).
If your system has two monitors, DOS treats one monitor as the active monitor. Use the DOS MODE command to switch between the two monitors (MODE
coao, for example, or
MODE MONO). In dual monitor mode, the normal Borland C++ screen will appear on the inactive monitor, and program output will go to the active monitor. So when you type BC / d or BCX / d at the DOS prompt on one monitor, Borland C++ will come up on the other monitor. When you want to test your program on a particular monitor, exit Borland C++, switch the active monitor to the one you want to test with, and then issue the BC / d or BCX / d command again. Pro-gram output will then go to the monitor where you typed the BCor BCX command.
Keep the following in mind when using the Id option: • Don't change the active monitor (by using the DOS MODE
command, for example) while you are in a DOS shell (File I DOS Shell).
• User programs that directly access ports on the inactive moni-tor's video card are not supported, and can cause unpredictable results.
• When you run or debug programs that explicitly make use of dual monitors, do not use the Borland C++ dual monitor option (ld).
The /e and /x options
Of the three options, Ie, Ix,
and Irx, Ix is the best to use, followed by Ie, with Irx the third best.
Normally, Turbo C++ swaps to a hard disk when allocating ory. The / e option tells Borland C++ to swap to expanded mem-ory, the / x option tells Borland C++ to swap to extended memory . The / e option is enabled by default. The syntax for these two options is as follows:
/e[=n]
where n equals the number of pages of expanded memory that you want the IDE to use for swapping. A page is 16K.
/x[=[r][,n]]
where n is the number of kilobytes of extended memory that you want the IDE to use for swapping and r is the number of kilobytes of extended memory to reserve for other programs.
. . You can also use these options with the protected-mode version of the IDE (BCX). If you are using simulated EMS (such as that provided by QEMM or 386MAX), BCX will also use the simulated EMS; use the Ix option.
The /h option If you type BC/h or BCX/h on the command line, you'll get a list of all the command-line options available. Their default values will also be shown.
The /1 option Use the II option if you're running Borland C++ on an LCD screen.
The /m option The 1m option lets you do a make rather than a build (that is, only outdated source files in your project are recompiled and linked). Follow the instructions for the Ib option, but use 1m instead.
The /p option Use the Ip option, which controls palette swapping on EGA video adapters, when your program modifies the EGA palette registers. The EGA palette will be restored each time the screen is swapped.
The /r option
Exiting Borland
C++
You return to the IDE affer you exit the program you transferred to.
Use the Irx option if all your extended or expanded memory has been allocated to a RAM disk. The x in Irx is the letter of the "fast" swap drive. For example, Ird will use drive D as the swap drive. This option is primarily for when you have committed all your extended or expanded memory to a RAM disk for other purposes.
There are three ways to leave the IDE.
• The first method exits the IDE "permanently;" you have to type '
BC or BCX again to reenter it. To exit this way, choose File I Quit (or press Alt-X). If you've made changes that you haven't saved, you'll see a prompt asking if you want to save your programs before exiting.
• The next method allows you to shell out from the IDE to enter commands at the DOS command line. To use this method, choose File I DOS Shell. You can enter any normal DOS mands, and you can even run other programs from the com-mand line. When you're ready to return to the IDE, type EXIT at the command line and press Enter. The IDE reappears just as you left it.
• The third method lets you temporarily transfer to another pro-gram without leaving the IDE. To do so, choose a propro-gram from the :: menu. If there are no programs installed on this menu, you can add some with the Options I Transfer command.
The components
The menu bar
There are three visible components to the IDE: the menu bar at the top, the window area in the middle, and the status line at the bot-tom. Many menu items also offer dialog boxes. Before we describe each menu item in the IDE, we'll explain these more generic components.
and menus
The menu bar is your primary access to all the menu commands. The only time the menu bar is not visible is when you're viewing your program's output or transferring to another program. You'llTo cancel an action, press Esc.
Borland C++ uses only the left mouse button. You can, however, customize the right button and make other mouse option changes, by choosing Options I Mouse (see page 90).
see a highlighted menu title when the menu bar is active; that menu title is the currently selected menu.
If a menu command is followed by an ellipsis ( ... ), choosing the command displays a dialog box. If the command is followed by an arrow (~), the command leads to another menu (a pop-up menu). If the command has neither an ellipsis nor an arrow, the action occurs as soon as you choose the command.
Here is how you choose menu commands using just the keyboard:
1. Press F10. This makes the menu bar active; the next thing you type will relate to the items on the menu bar.
2. Use the arrow keys to select the menu you want to display. Then press Enter.
As a shortcut for this step, you can just press the highlighted letter of the menu title. For example, from the menu bar, press
E to move to and display the Edit menu. From anywhere,
press Alt and the highlighted letter (such as Alt-E) to display the menu you want.
3. Use the arrow keys again to select the command you want. Then press Enter.
Again, as a shortcut, you can just press the highlighted letter of a command to choose it once the menu is displayed. At this point, Borland C++ either carries out the command, displays a dialog box, or displays another menu.
You can also use a mouse to choose commands.
1. Click the desired menu title to display the menu. 2. Click the desired command.
Or, drag straight from the menu title down to the menu
command. Release the mouse button on the command you want. (If you change your mind, just drag off the menu; no command will be chosen.)
10
Shortcuts Borland C++ offers a number of quick ways to choose menu commands. (For example, the click-drag method for mouse users.) From the keyboard, you can use a number of keyboard shortcuts (or hot keys) to access the menu bar and choose commands. Short-cuts for dialog boxes work just as they do in a menu. (But be aware that you need to hold down Alt while pressing the high-lighted letter when moving from an input box to a group of buttons or boxes.) Here's a list of the shortcuts available:
Table 1.1 General hot keys
Do this ...
Press Aft plus the highlighted letter of the command Gust press the highlighted letter in a dialog box). For the :: menu, press Alt-Spacebar.
Type the keystrokes next to a menu command.
To accomplish this ...
Display the menu or carry out the command.
Carry out the command.
For example, to cut selected text, press Alt-E T (for Edit I Cut) or you can just press Shift-Del, the shortcut displayed next to it. Many menu items have corresponding hot keys; one- or two-key shortcuts that immediately activate that command or dialog box. The following table lists the most-used Borland C++ hot keys.
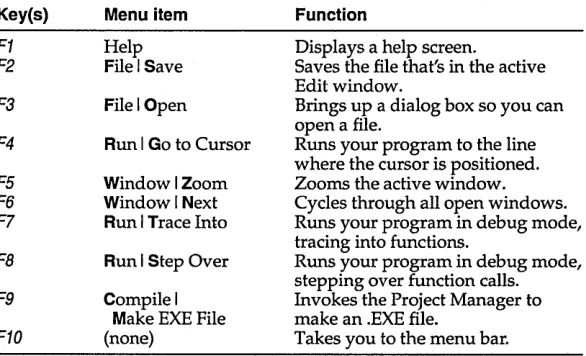
Key(s) Menu item Function
F1 Help Displays a help screen.
F2 File I Save Saves the file that's in the active Edit window.
F3 File I Open Brings up a dialog box so you can open a file.
F4 Run I Go to Cursor Runs your program to the line where the cursor is positioned. F5 Window I Zoom Zooms the active window. F6 Window I Next Cycles through all open windows. F7 Run I Trace Into Runs your program in debug mode,
tracing into functions.
FB Run I Step Over Runs your program in debug mode, stepping over function calls. F9 Compile I Invokes the Project Manager to
Make EXE File make an .EXE file.
F10 (none) Takes you to the menu bar.
[image:21.486.162.455.339.517.2]Table 1.1: General hot keys (continued) Table 1.2
Menu hot keys Key(s) Menu item Function
Aft-Spacebar ==menu Takes you to the == (System) menu
AIt-C Compile menu Takes you to the Compile menu
AIt-D Debug menu Takes you to the Debug menu
AIt-E Edit menu Takes you to the Edit menu
AIt-F File menu Takes you to the File menu
Aft-H Help menu Takes you to the Help menu
AIt-O Options menu Takes you to the Options menu
Alt-P Project menu Takes you to the Project menu
AIt-R Run menu Takes you to the Run menu
AIt-S Search menu Takes you to the Search menu
AIt-W Window menu Takes you to the Window menu
AIt-X File I Quit Exits Borland C++ to DOS
Table 1.3
Editing hot keys Key(s) Menu item Function
Clrl-Del Edit I Clear Removes selected text from the window and doesn't put it in the Clipboard
Clr/-Ins Edit I Copy Copies selected text to Clipboard
Shift-Del Edit I Cut Places selected text in the Clipboard, deletes selection
Shift-Ins Edit I Paste Pastes text from the Clipboard into the active window
Alt-Bkspc Edit I Undo Restores the text in the active window to a previous state.
Ctrl-L Search I Search Again Repeats last Find or Replace command
F2 File I Save Saves the file in the active Edit window
Table 1.3: Editing hot keys (continued) Table 1.4
Window management hot Key(s) Menu item Function
keys AIt-# Displays a window, where # is the number of the window you want to view
Alt-O Window I List Displays a list of open windows
AIt-F3 Window I Close Closes the active window
Alt-F4 Debug I Inspect Opens an Inspector window
Alt-FS Window I User Screen Displays User Screen
FS Window I Zoom Zooms/ unzooms the active window
F6 Window I Next Switches the active window
Ctrl-FS Changes size or position of active window
Table 1.5
Online Help hot keys Key(s) Menu item Function
F1 Help I Contents Opens a context-sensitive help screen
F1 F1 Brings up Help on Help. Gust press
F1 when you're already in the help system.)
Shift-F1 Help I Index Brings up Help index
Aft-F1 Help I Previous Topic Displays previous Help screen
Ctrl-F1 Help I Topic Search Calls up language-specific help in Editor only
Table 1.6
Debugging/Running hot keys Key(s) Menu item Function
Alt-F4 Debug I Inspect Opens an Inspector window
Aft-Fl Search I Previous Error Takes you to previous error
Aft-F8 Search I Next Error Takes you to next error
Aft-F9 Compile I Compile to OBI Compiles to .OBJ
Ctrl-F2 Run I Program Reset Resets running program
Ctrl·F3 Debug I Call Stack Brings up call stack
Ctrl-F4 Debug I Evaluate/Modify Evaluates an expression
Ctrl·F7 Debug I Add Watch Adds a watch expression
Ctr/-F8 Debug I Toggle Breakpoint Sets or dears conditional breakpoint
Ctrl-F9 Run I Run Runs program
F4 Run I Go To Cursor Runs program to cursor position
F7 Run I Trace Into Executes tracing into functions
F8 Run I Step Over Executes skipping function calls
F9 Compile I Make EXE File Makes (compiles/links) program
Borland C++
windows
If you exit Borland C++ with a
file open in a window, you are returned to your desktop, open file and all, when you next use Borland C++.
Most of what you see and do in the IDE happens in a window. A window is a screen area that you can open, close, move, resize, zoom, tile, and overlap.
You can have many windows open in the IDE, but only one window can be active at any time. The active window is the one that you're currently working in. Any command you choose or text you type generally applies only to the active window. (If you have the same file open in several windows, the action will apply to the file everywhere that it's open.)
You can spot the active window easily: It's the one with the double-lined border around it. The active window always has a close box, a zoom box, and scroll bars. If your windows are over-lapping, the active window is always the one on "top" of all the others (the frontmost one).
There are several types of windows, but most of them have these things in common:
13 a title bar .. a close box • scroll bars .azoom box
• a window number (1 to 9)
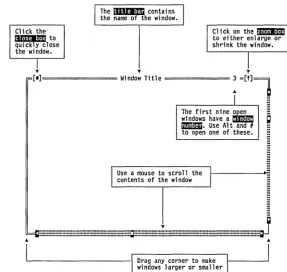
Figure 1.2 A typical window
Shortcut: Aft-Spacebar invokes theEimenu.
Shortcut: Double-click the title bar of a window to zoom
or restore it.
14
Cl ick the ~to quickly close the window.
I
The lIIII!I!li contai ns the name of the wi ndow.
T " "
'"
I
[1]======= Window Title = = = = = = : =[t]~
I
...
The first nine ~
~: ~::-:~t~
I
Use a mouse to scroll the contents of the wi ndow
T
J
m::::::::::::~::::::::::::::::m:::::::::::::::::::::::::::m::::::::::::C::::::::::::::::::::::::::::::::::::::::::::::::::::iii::::::::::::::::::::::::::::::::::::::::::::::::::
Drag any corner to make windows larger or smaller
'"
The close box of a window is the box in the upper left comer. Click this box to quickly close the window. (Or choose Window I Close or press Alt-F3.) The Inspector and Help windows are considered temporary; you can close them by pressing Esc.
The title bar, the topmost horizontal bar of a window, contains the name of the window and the window number. Double-clicking the title bar zooms the window. You can also drag the title bar to move the window around.
The zoom box of a window appears in the upper right comer. If the icon in that comer is an up arrow (t), you can click the arrow to enlarge the window to the largest size possible. 1£ the icon is a doubleheaded arrow (~), the window is already at its maximum size. In that case, clicking it returns the window to its previous size. To zoom a window from the keyboard, choose Window I Zoom, or press F5.
[image:25.489.152.440.63.336.2]Scroll bars also show you where you are in your file.
0..
The first nine windows you open in Borland c++ have a window number in the upper right border. Alt-O gives you a list of all windows you have open. You can make a window active (and thereby bring it to the top of the heap) by pressing Alt in
combination with the window number. For example, if the Help window is #5 but has gotten buried under the other windows,
Alt-5 brings it to the front.
Scroll bars are horizontal or vertical bars that look like this:
~111I11I"1'1I11I1"11I1"11"11111'1I11I11I11I'1I11I11I"I'CII"'U'1I11I11I1 . . . ItIIlIIl.II.IIIIIIII.III.IIIIII .... I . . IIIIII . . . I . . III . . . IIII . . III . . . . ~
. . . IIU . . III . . IIIIIIIIII . . . IIIIII . . . III . . . III . . . 11111 . . . 11111 . . . 1 . . . 1111 . . . ""11111
. . . . 111 . . . . 11111 . . 11 . . . 1111 . . . 11111 . . . 111 . . ' . . . 111 . . 111111 . . . . 11111.111111111 . . . 111,,,1.11 .. 1 . . .
You use these bars with a mouse to scroll the contents of the window. Click the arrow at either end to scroll one line at a time. (Keep the mouse button pressed to scroll continuously.) You can click the shaded area to either side of the scroll box to scroll a page at a time. Finally, you can drag the scroll box to any spot on the bar to quickly move to a spot in the window relative to the position of the scroll box.
You can drag any comer to make a window larger or smaller. To resize using the keyboard, choose Size/Move from the Window menu, or press Ctrl-F5.
Window management Table 1.7 gives you a quick rundown of how to handle windows in Borland C++. Note that you don't need a mouse to perform these actions-a keyboard works just fine.
Table 1.7
Manipulating windows To accomplish this: Use one of these methods
---Open an Edit window Choose File I Open to open a file and
Open other windows
Close a window
Activate a window
display it in a window, or press F3.
Choose the desired window from the Window menu
Choose Close from the Window menu (or
press Alt-F3), or click the close box of the
window.
Click anywhere in the window, or
Press Aft plus the window number (1 to 9,
16
The status line
Figure 1.3 A typical status line
Table 1.7: Manipulating windows (continued)
Move the active window
Resize the active window
Zoom the active window
Choose Window I List or press A/t-O and select the window from the list, or
Choose Window I Next or F6 to make the next window active (next in the order you first opened them).
Drag its title bar, or press Ctrl-F5 (Window I Size/Move) and use the arrow keys to place the window where you want it, then press Enter.
Drag any comer. Or choose Window I Size/Move and press Shift while you use the arrow keys to resize the window, then press Enter. The shortcut is to press Ctrl-F5
and then use Shift and the arrow keys. Click the zoom box in the upper right corner of the window, or
Double-click the window's title bar, or
Choose Window I Zoom, or press F5.
The status line appears at the bottom of the screen; it
• reminds you of basic keystrokes and shortcuts (or hot keys) applicable at that moment in the active window .
• lets you click the shortcuts to carry out the action instead of choosing the command from the menu or pressing the shortcut keystroke.
• tells you what the program is doing. For example, it displays
"Savingfilename ... " when an Edit file is being saved.
• offers one-line hints on any selected menu command and dialog box items.
The status line changes as you switch windows or activities. One of the most common status lines is the one you see when you're actually writing and editing programs in an Edit window. Here is what it looks like:
Fl Help F2 Save F3 Open F7 Trace Fa Step F9 Make FlO Menu
Dialog boxes
Figure 1.4 A sample dialog box
If you have a color monitor, Borland C++ uses different colors for various elements of the dialog box.
When you've selected a menu title or command, the status line changes to display a one-line summary of the function of the selected item. For example, if the Options menu title is selected (highlighted), the status line reads "Set defaults for IDE, compiler, debugger; define transfer programs." Similarly, when the Edit I Cut command is selected, the status line reads "Remove the selected text and put it in the Clipboard."
If a menu command has an ellipsis after it ( ... ), the command opens a dialog box. A dialog box is a convenient way to view and set multiple options. When you're making settings in dialog boxes, you work with five basic types of onscreen controls: radio buttons, check boxes, action buttons, input boxes, and list boxes. Here's a sample dialog box that illustrates some of these items:
This dialog box has three standard buttons: OK, Cancel, and Help. If you choose OK, the choices in the dialog box are made; if you choose Cancel, nothing changes and no action is made, but the dialog box is put away. Choose Help to open a Help window about this dialog box. Esc is always a keyboard shortcut for Cancel (even if no Cancel button appears).
If you're using a mouse, click the button you want. When you're using the keyboard, press Alt and the highlighted letter of an item to activate it. For example, Alt-K selects the OK button. Press Tab or
18
Check boxes and radio buttons
[Xl Checked check box
[ ] Unchecked check box
e ) None
ee) Emulation
e ) 8087
Input boxes and lists
highlighted.) You can select another button with Tab; press Enterto
choose that button. Be aware that tabbing to a button makes that button the default.
The dialog box also has check boxes. When you select a check box, an
x
appears in it to show you it's on. An empty box indicates it's off. To set a check box to on, click it or its text, by pressing Tabuntil the check box is highlighted and then pressing Spacebar, or by selecting Aft and the highlighted letter. You can have any number of check boxes checked at any time.
If several check boxes apply to a topic, they appear as a group. In that case, tabbing moves to the group. Once the group is selected, use the arrow keys to select the item you want, and then press
Spacebar to choose it. On monochrome monitors, the active check box or group of check boxes will have a chevron symbol (») to the left and right. When you press Tab, the chevrons move to the next group of checkboxes or radio buttons.
The dialog box also has radio buttons. Radio buttons are so called because they act just like the buttons on a car radio. There is always one-and only one-button pushed in at a time. Push one in, and the one that was in pops out.
Radio buttons differ from check boxes in that they present mutually exclusive choices. For this reason, radio buttons always come in groups, and exactly one (no more, no less) radio button can be on in anyone group at anyone time. To choose a radio button, click it or its text. From the keyboard, select Aft and the highlighted letter, or press Tab until the group is highlighted and then use the arrow keys to choose a particular radio button. Press
Tab or Shift-Tab again to leave the group with the new radio button chosen. The column to the left gives an example a a set of radio buttons.
Dialog boxes can also contain input boxes, which allow you to type in text. Most basic text-editing keys work in the text box (for example, arrow keys, Home, End, and insert/overwrite toggles by
Ins). If you continue to type once you reach the end of the box, the contents automatically scroll. If there's more text than what shows in the box, arrowheads appear at the end (~and ~). You can click the arrowheads to scroll or drag the text. If you need to enter control characters (such as AL or AM) in the input box, then prefix
You can control whether history lists are saved to the desktop using Options I
Environment I Desktop.
Editing
the character with a AP. So, for example, entering APAL enters a AL into the input box. (This ability is useful for search strings.)
If an input box has a down-arrow icon to its right, there is a history list associated with that input box. Press Enter to select an item from this list. In the list you'll find text you typed into this box the last few times you used this dialog box. The Find box, for example, has such a history list, which keeps track of the text you searched for previously. If you want to reenter text that you already entered, press J, or click the t icon. You can also edit an entry in the history list. Press Esc to exit from the history list without making a selection.
Here is what a history list for the Fin~ text box might look like if you had used it seven times previously:
Text to find • • • • • • •
U
struct date printf(1I printf( char buf[7]
/*
return (0 return 0
A final component of many dialog boxes is a list box. A list box lets you scroll through and select from variable-length lists (often file names) without leaving a dialog box. If a blinking cursor appears in the list box and you know what you're looking for, you can type the word (or the first few letters of the word) and
Borland C++ will search for it.
You make a list box active by clicking it or by choosing the high-lighted letter of the list title (or press Tab until it's highlighted). Once a list box is displayed, you can use the scroll box to move through the list or press
t
or J, from the keyboard.If you're a longtime user of Borland products, the following sum-mary of our major editing features can help you identify the areas that are different from our older products .
Project and
configuration files
20
Turbo C files
Borland C++ project files
• multiple windows let you have several views onto the same file or different files
• block mode that is switchable between persistent and destructive (see page 93)
• mouse support
• support for large files (greater than 64K; limited to 8 megabytes for all edit windows combined)
• Shift
i J.
~ ~ for selecting text• edit windows that you can move, resize, or overlap
• a sophisticated macro language, so you can create your own editor commands (documented online)
• a built-in assembler and support for inline assembler code • an undo and redo feature with an extensive buffer
• the ability to paste examples from the Help window
• an editable Clipboard that allows cutting, copying, and pasting in or between windows
• a Transfer function that lets you run other programs and capture output to an editor without leaving Borland C++
The IDE handles configuration files differently than Turbo C. The focus of the IDE has changed from configuration-based to
project-based. This means that instead of loading a configuration C.TC) file that defines your project, you load a project file that contains everything needed to build your program.
In Turbo C, all options (compiler, environment, and so on) are stored in the .TC file. The project file consists of an ASCII list of file names that comprise the project. Thus, the information needed to build the program that the project represents is spread across two files: the project file and the .TC file.
The IDE places all information needed to build a program into a binary project file. This includes compiler and linker options, directory paths, project specific settings (for example, program heap size, autodependencies used, and so on), and special translators (such as TASM). In addition, the project file contains other general information on the project, such as compilation statistics (shown in the project window), and cached
Configuration files
You might need only one copy of the. TC file on your
hard disk. When kept with the BC.EXE file, the TCCONFIG. TC file Is loaded, unless there is another copy in the current directory.
dependency information. Chapter 4, "Managing multi-file pro-jects," covers project files and the Project Manager in depth.
The TCCONFIG.TC file contains only environmental (or global) information; project files (.PRJ) now contain information on all other settings and options except those shown in the following list. For instance, the TCCONFIG.TC file knows whether to save breakpoints and watchpoints, but, if activated, the breakpoints and watchpoints themselves will be saved in the .PRJ. Thus the .TC file is no longer required to build programs defined by a project. The information stored in the . TC file includes
• editor key binding and macros
• editor mode setting (such as autoindent, use tabs, etc.) • color tables
• 25/43 line setting • mouse preferences • auto-save flags • history lists
Project files for the IDE correspond to the .CFG configuration files that you supply to the command-line compiler (the default command-line compiler configuration file is TURBOC.CFG). The PRJCFG utility can convert .PRJ files to .CFG files and .CFG files to .PRJ files. See Chapter 7, page 189 for more information.
Loading project files You can load project files in any of three ways:
1. When invoking Borland C++, give the project name with the .PRJ extension after the Be command; for example,
BC myproj ,PRJ
You must use the ,PRJ extension in order to differentiate it from source files.
2. If there is only one .PRJ file in the current directory, the IDE assumes that this directory is dedicated to this project and automatically loads it. Thus, typing BC (or Bex) alone while the current directory contains one project file causes that project file to be loaded.
3. From within the IDE, you load a project file using the Project I
The project directory
Desktop files
You can set some of these options on or off using Options I Environment I
Desktop.
When a project file is loaded from a directory other than the current directory, the current DOS directory is set to where the project is loaded from. This allows your project to be defined in terms of relative paths in the Options I Directories dialog box and also allows projects to move from one drive to another or from one directory branch to another. Note, however, that changing directories after loading a project may make the relative paths incorrect and your project unbuildable. If this happens, change the current directory back to where the project was loaded from.
Each project file has an associated desktop file (prjname.DSK). This file contains state information about the associated project. While none of the information it contains is needed to build the project, all of the information is directly related to the project. The desktop file includes
• the context information for each file in the project (that is, the position in the file, the location of the window on the screen, and so on)
• the history lists for various input boxes (for example, search strings, file masks, and so on)
• layout of the windows on the desktop • the contents of the Clipboard
• watch expressions • breakpoints
Changing project files Because each project file has its own desktop file, changing to another project file causes the newly loaded project's desktop to be used. Thus changing from one existing project to another existing project can change your entire window layout. When you create a new project (by using Project I Open Project and typing in a new .PRJ file), the new project's desktop inherits the previous desktop. When you select Project I Close Project, the default project is loaded and you get the default desktop and project settings.
Default files When no project file is loaded, there are two default files that serve as global place holders for project- and state-related infor-mation: TCDEF.DPR and TCDEF.DSK files, collectively referred to as the default project.
c
H A p T E R2
Menus and options reference
- File Edit Search Run Compil e Debug Proj ect Options Window Help
J
I
I
I
About ••• Run Ctrl-F9 Compiler ~
r--Cl ear desktop Program reset Ctrl-F2 Transfer ••• Repaint desktop Go to cursor F4 Make •••
Trace into F7 Linker ••• Transfer items Step over F8 Appl i cati on •••
Arguments ••• Debugger ••• Di rectori es ••• Environment
.~
I I
Open ... F3 Compi 1 e to OBJ C:MYFILLOBJ Save ••• New Make EXE file C:MYFILL EXE
Save F2 Link EXE file
Save as ••• Build all I
Save all Preferences •••
Remove messages Editor ...
Change dir ... Mouse •••
Print Desktop ...
Get info ... DOS shell
I
Quit Alt-X
Code generation ... Entry/Exit Code ... C++ options ... Optimi zati ons ••• Source ••• Messages ••• Names •••
I
I
Undo Alt-Bsp
I
Redo Inspect... Al t-F4
Evaluate/Modify ••• Ctrl-F4 Size/Move Ctrl-F5 Cut Shift-Del Call stack ... Ctrl-F3 Zoom F5 Copy Ctrl-Ins Watches ~
~
Tile Paste Shi ft-Ins Toggle breakpoint Ctrl-F8 CascadeCopy examgle Breakpoi nts ••• Next F6
Show clip oard Close Alt-F3
Clear Ctrl-Del I Message
Add watch ••• Ctrl-F7 Output Delete watch Watch
Edit watch ... User screen Alt-F5 Remove all watches Register
Project Project notes
I I List Alt-O
Find ... Open proj ect •••
I
Replace ... Close project
Search again Contents
Go to 1 i ne number ... Add item ... Index Shift-Fl Previ ous error Alt-F7 Delete item Topi c search Ctrl-Fl Next error Alt-F8 Local options ... Previ ous topi c Alt-Fl Locate function Include files ... Help on help
- (System) menu
26
The :: menu appears on the far left of the menu bar. Aft-Spacebar is the fastest way to get there. When you pull down this menu, you see several general system-wide commands (About, Clear
About
Clear Desktop
Repaint Desktop
Transfer items
File menu
a I About
Desktop, Repaint Desktop) and the names of programs you've installed with the Options I Transfer command.
The first command in the menu is About. When you choose this command, a dialog box appears that shows you copyright and version information for Borland c++. Press Esc or click OK (or press Enter) to close the box.
Choose:: I Clear Desktop to close all windows and clear all history lists. This command is useful when you're starting a new project.
Choose:: I Repaint Desktop to have Borland C++ redraw the screen. You may need to do this, for example, if a memory-resident program has left stray characters on the screen, or possibly if you have screen-swapping turned off (Options I Debug I Display swapping) and you're stepping through a program.
Any programs you've installed with the Transfer dialog box (Options I Transfer) appear here. To run one of these programs, choose its name from the :: menu. To install programs that will then appear in this menu, choose Options I Transfer.
If you have more than one program installed with the same shortcut letter on this menu, the first program listed with that shortcut will be selected. You can select the second item by clicking it or by using the arrow keys to move to it and then pressing Enter.
File I Open
28
Open
[image:39.492.165.352.123.249.2][ffi
Figure 2.1 The Load a File dialog box
The File I Open command displays a file-selection dialog box for you to select a program file to open in an Edit window. Here is what the box looks like:
.. INTROll.C INTR012.C INTR013.C INTR014.C INTR015.C INTR016.C INTR017.C
C
The dialog box contains an input box, a file list, buttons labeled Open, Replace, Cancel, and Help, and an information panel that describes the selected file. Now you can do any of these actions:
• Type in a full file name and choose Replace or Open. Open loads the file into a new Edit window. An Edit window must be active if you choose Replace; the contents of the window is replaced with the selected file.
• Type in a file name with wildcards, which filters the file list to match your specifications.
• Press J, to choose a file specification from a history list of file specifications you've entered earlier.
• View the contents of different directories by selecting a directory name in the file list.
The input box lets you enter a file name explicitly or lets you enter a file name with standard DOS wildcards (* and ?) to filter the names appearing in the history list box. If you enter the entire name and press
Enter,
Borland C++ opens it. (If you enter a file name that Borland C++ can't find, it automatically creates and opens a new file with that name.)If you press J, when the cursor is blinking in the input box, a history list drops down below the box. This list displays the last eight file names you've entered. Choose a name from the list by
If you choose Replace instead of Open, the selected file replaces the file in the active Edit window instead of opening up a new window.
Using the File list
box
You can also type a
lowercase letter to search for
a file name and an uppercase letter to search for a directory name.
New
Save
[ill
File I Open
double-clicking it or selecting it with the arrow keys and pressing
Enter.
Once you've typed in or selected the file you want, choose the Open button (choose Cancel if you change your mind). You can also just press Enter once the file is selected, or you can double-click the file name.
The File list box displays all file names in the current directory that match the specifications in the input box, displays the parent directory, and displays all subdirectories. Click the list box or press Tab until the list box name is highlighted. You can now press J, or
i
to select a file name, and then press Enter to open it. You can also double-click any file name in the box to open it. You might have to scroll the box to see all the names. If you have more than one pane of names, you can also use ~ and ~ .The file information panel at the bottom of the Load a File dialog box displays path name, file name, date, time, and size of the file you've selected in the list box. (None of the items on this panel are selectable.) As you scroll through the list box, the panel is
updated for each file.
The File I New command lets you open a new Edit window with the default name NONAMExx.C (the xx stands for a number from 00 to 99). These NONAME files are used as a temporary edit buffer; Borland c++ prompts you to name a NONAME file when you save it.
File I Save As
Save As
Figure 2.2 The Save File As dialog box
Save All
Change Dir
30
The File I Save As command lets you save the file in the active Edit window under a different name, in a different directory, or on a different drive. When you choose this command, you see the Save File As dialog box:
~ INTROll.C INTR012.C INTR013.C INTR014.C INTR015.C INTR016.C INTR017.C .c
Enter the new name, optionally with drive and directory, and click or choose OK. All windows containing this file are updated with the new name.
The File I Save All command works just like the Save command except that it saves the contents of all modified files, not just the file in the active Edit window. This command is disabled if no Edit windows are open.
The File I Change Dir command lets you specify a drive and a directory to make current. The current directory is the one Borland c++ uses to save files and to look for files. (When using relative paths in Options I Directories, they are relative to this current directory only.)
Here is what the Change Directory dialog box looks like:
Figure 2.3 The Change Directory dialog box
Get Info
File I Change Dir
There are two ways to change directories:
• Type in the path of the new directory in the input box and press
Enter, or
II Choose the directory you want in the Directory tree (if you're
using the keyboard, press Enter to make it the current directory), then choose OK or press Esc to exit the dialog box.
If you choose the OK button, your changes will be made and the dialog box put away. If you choose the Chdir button, the
Directory Tree list box changes to the selected directory and displays the subdirectories of the currently highlighted directory (pressing Enter or double-clicking on that entry gives you the same result). If you change your mind about the directory you've picked and you want to go back to the previous one (and you've yet to exit the dialog box), choose the Revert button.
The File I Print command lets you print the contents of the active Edit, Output, or Message window. Borland C++ expands tabs (replaces tab characters with the appropriate number of spaces) and then sends it to the DOS print handler. This command is disabled if the active window cannot be printed. Use Ctrl-K P to print selected text only.
File I Get Info
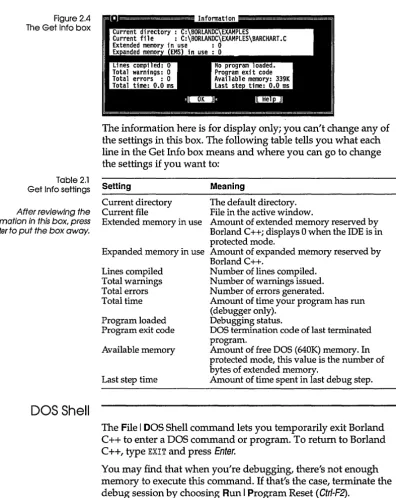
[image:43.490.58.455.52.550.2]Figure 2.4 The Get Info box
Table 2.1 Get Info settings
After reviewing the information in this box, press Enter to put the box away.
DOS Shell
32
The information here is for display only; you can't change any of the settings in this box. The following table tells you what each line in the Get Info box means and where you can go to change the settings if you want to:
Setting
Current directory Current file
Extended memory in use
Expanded memory in use
Lines compiled Total warnings Total errors Total time
Program loaded Program exit code
Available memory
Last step time
Meaning
The default directory. File in the active window.
Amount of extended memory reserved by Borland C++i displays 0 when the IDE is in protected mode.
Amount of expanded memory reserved by Borland C++.
Number of lines compiled. Number of warnings issued. Number of errors generated.
Amount of time your program has run (debugger only).
Debugging status.
DOS termination code of last terminated program.
Amount of free DOS (640K) memory. In protected mode, this value is the number of bytes of extended memory.
Amount of time spent in last debug step.
The File I DOS Shell command lets you temporarily exit Borland
c++ to enter a DOS command or program. To return to Borland
C++, type EXIT and press Enter.
You may find that when you're debugging, there's not enough memory to execute this command. If that's the case, terminate the debug session by choosing Run I Program Reset (Ctrl-F2).
Edit
menu
File I DOS Shell
. . Don't install any TSR programs (like SideKick) while you've shelled to DOS, because memory may get misallocated.
Quit
[][][KJ
Note: In dual monitor mode, the DOS command line appears on the Borland C++ screen rather than the User Screen. This allows you to switch to DOS without disturbing the output of your pro-gram. Since your program output is available on one monitor in the system, Window I User Screen and Alt-F5 are disabled.
You can also use the transfer items on the :: (System) menu to quickly switch to another program without leaving Borland C++.
The File I Quit command exits Borland C++, removes it from memory, and returns you to the DOS command line. If you have made any changes that you haven't saved, Borland C++ asks you if you want to save them before exiting.
The Edit menu lets you cut, copy, and paste text in Edit windows. If you make mistakes, you can undo changes, and even reverse the effect of your most recent undo. You can also open a
Clipboard window to view or edit its contents, and copy text from the Message and Output windows.
Before you can use most of the commands on this menu, you need to know about selecting text (because most editor actions apply to selected text). Selecting text means highlighting it. You can select text either with keyboard commands or with a mouse; the principle is the same even though the actions are different.
From the keyboard you can use any of these methods: • Press Shift while pressing any arrow key.
• To select text from the keyboard, press Ctrl-K B to mark the start of the block. Then move the cursor to the end of the text and press Ctrl-K K.
• To select a single word, move the cursor to the word and press
Ctrl-KT.
Edit
.... With a mouse:
34
Undo
@O
I
BackspaceI
If you delete large blocks, you may lose your Undo information.
• To select text with a mouse, drag the mouse pointer over the desired text. If you need to continue the selection past a window's edge, just drag off the side and the window will automatically scroll.
• To select a single line, double-click anywhere in the line. • To select text line-by-line, click-drag over the text (that is, click
once and then quickly press the mouse button again and begin to drag).
• To extend or reduce the selection, Shift-click anywhere in the document (that is, hold Shift and clIck).
Once you have selected text, the commands in the Edit menu become available, and the Clipboard becomes useful.
The Clipboard is the magic behind cutting and pasting. It's a special window in Borland C++ that holds text that you have cut or copied, so you can paste it elsewhere. The Clipboard works in close concert with the commands in the Edit menu.
Here's an explanation of each command in the Edit menu.
The Edit I Undo command restores the file in the current window to the way it was before the most-recent edit or cursor movement. There are restrictions on what operations can be undone