Practical Cryogenics
An Introduction to Laboratory Cryogenics
By N H Balshaw
Published by Oxford Instruments Superconductivity Limited
Contents
1 Foreword ... 5
2 Vacuum equipment ... 7
2.1 Vacuum pumps ... 7
2.2 Vacuum accessories ... 12
3 Detecting vacuum leaks ... 14
3.1 Introduction ... 14
3.2 Leak testing a simple vessel ... 15
3.3 Locating 'massive' leaks ... 16
3.4 Leak testing sub-assemblies ... 17
3.5 Testing more complex systems ... 17
3.6 Leaks at 4.2 K and below ... 19
3.7 Superfluid leaks (or superleaks)... 19
3.8 Overpressure leak detection ... 20
4 Cryostats and coolers... 21
4.1 Bath cryostats... 21
4.2 Lambda point refrigerators ... 24
4.3 Continuous flow cryostats... 26
4.4 Static and dynamic continuous flow systems... 28
4.5 Storage/transport dewars ... 29
4.6 Closed cycle coolers ... 30
4.7 'Stinger' systems ... 30
4.8 Peltier effect coolers... 30
4.9 Making indium seals... 30
5 Ultra low temperatures ... 32
5.1 3 He Refrigerators ... 32
5.2 3 He/4 He Dilution refrigerators ... 35
5.3 Sorption pumped dilution refrigerators ... 38
5.4 Nuclear demagnetisation systems ... 38
6 Superconducting magnet technology ... 39
6.1 Introduction ... 39
6.2 Construction of the magnet ... 40
6.3 Basic physics of the magnet ... 41
6.4 Homogeneity of the field ... 42
6.5 Persistent mode operation... 42
6.6 Quenches... 43
6.7 Protection circuit ... 44
6.8 Magnet power supplies... 45
6.9 Typical operating procedure... 46
6.10 Magnets for special applications ... 47
7 Transferring cryogens... 50
7.1 Liquid nitrogen... 50
7.2 Liquid helium... 50
7.3 Using liquid helium efficiently... 51
7.4 Avoiding helium transfer problems ... 53
7.5 Common problems ... 53
8 Cryostat wiring... 56
8.1 Thermal requirements... 56
8.2 Electrical requirements... 57
8.3 Practical techniques... 58
8.4 Ultra low temperatures... 61
8.5 UHV systems... 61
9 Properties of materials ... 62
9.1 Physical properties of helium and nitrogen... 62
9.2 Thermal conductivity integrals ... 62
10 Useful formulae and information... 67
10.1 Thermal conductivity and gas cooling ... 67
10.2 Thermal radiation... 68
10.3 Convection ... 68
10.4 Cooling materials to 4.2 K using liquid helium ... 69
10.5 Superconducting transitions of common materials... 69
11 Glossary of terms ... 70
12 Useful reference books... 95
12.1 General practical techniques ... 95
12.2 Safety ... 96
12.3 Thermometry and instrumentation... 96
12.4 Properties of materials ... 96
12.5 Theoretical reference books ... 96
Oxford Instruments Superconductivity Limited, 1996-2001. All rights strictly reserved.
ISBN 0 9527594 0 3
1
Foreword
This booklet has been written to help you to learn more about the basic principles of cryogenics, so that you can design your experiments to make the best possible use of your system. A little training often makes the difference between success and failure for a low temperature experiment.
The booklet is a collection of practical notes to introduce beginners to the fundamentals of good practice. It contains a 'glossary of terms' to explain some of the jargon commonly used in cryogenics. The descriptions are intended to translate these terms into plain English so that beginners can understand them.
The other sections give general advice on a range of relevant topics. A strong emphasis is placed on practical information rather than theoretical details. Previous editions of this booklet (then called Elementary Practical Cryogenics) contained some of this information. Several small errors have been corrected and more information has been added.
The subject of 'safety' has deliberately been omitted. All cryogens are potentially hazardous. Before you try to use a cryogenic or high magnetic field system you should receive training from a competent person who knows your laboratory and the laws in your country. You may then like to use the booklet Safety Matters (available from Oxford Instruments) to remind you about this training when you are using a system.
2
Vacuum equipment
Vacuum systems are used most commonly in laboratory scale cryostats and superconducting magnet systems for the following purposes:
• To pump out the high vacuum insulation spaces in the cryostat and transfer tube
• To pump out an exchange gas
• To set up a pressure gradient along a pumping line so that the flow of cryogen through the cryostat can be controlled
• To reduce the vapour pressure over liquid helium surfaces where temperatures below 4.2 K are required
• To pump out the nitrogen gas from a pre-cooled helium vessel, after the liquid has been blown out
All gases, except helium, hydrogen and neon, will condense on surfaces cooled to below about 60 K. Therefore, once liquid helium at 4.2 K is introduced into a vacuum vessel, all the residual gases that are normally present will condense (or cryopump), reducing the pressure in the vacuum space by one or two orders of magnitude. Therefore, the function of a vacuum system is to reduce the pressure in the vacuum space to a point where the thermal insulation is sufficiently good to allow liquid helium to be held in the vessel. In a typical laboratory scale system the pressure then drops to 10-5
mbar or less.
In cryostats that contain only liquid nitrogen, the coldest surface is at 77 K, which is above the temperature for effective cryopumping by a metal surface. If the cryostat is not pumped continuously by an external pumping system, a sorption pump is mounted on the liquid nitrogen reservoir to maintain the integrity of the vacuum. Occasionally it has to be cleaned by warming it to a temperature around 100o
C and pumping the vacuum space. It pumps air to a very low pressure when cooled with liquid nitrogen.
A booklet is available from Leybold to describe how to do most common vacuum calculations. (See section 12).
2.1
Vacuum pumps
2.1.1
Single stage rotary pumps
Rotary pumps are used as roughing pumps (to reduce the pressure to a rough vacuum) or as backing pumps (with a diffusion pump or turbomolecular pump). If the rotary pump's sole function is to back a small oil diffusion pump or a turbomolecular pump then a single stage rotary pump with a base pressure of about 10-2 mbar and a displacement of about
5 m3
/hour is adequate. However, some laboratories prefer to use a two stage rotary pump with a diffusion pump because of the risk of stalling the diffusion pump if the backing pressure exceeds a critical value (about 10-1
mbar). If the diffusion pump stalls oil back-streams into the vacuum system and can permanently affect the performance of the cryostat.
In most cases, it is best to use a pump fitted with a 'gas ballast' facility. This helps the pump to remove condensable vapours from the vacuum space of a cryostat. It is common for water to accumulate in the vacuum spaces of cryostats if the cold surfaces are ever exposed to air or if the cryostat is left unused for some time. Most surfaces release absorbed water vapour when the pressure is reduced.
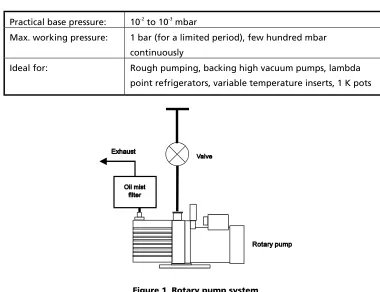
Practical base pressure: 10-2 to 10-3 mbar
Max. working pressure: 1 bar (for a limited period), few hundred mbar continuously
Ideal for: Rough pumping, backing high vacuum pumps, lambda point refrigerators, variable temperature inserts, 1 K pots
Figure 1 Rotary pump system
2.1.2
Two stage rotary pumps
In some cases, it is possible to replace a rotary / diffusion pump combination with a two stage rotary pump. A base pressure of 10-4
mbar can be achieved in ideal conditions and using a cold trap, but in practice the pressure in the cryostat will probably only be 10-1 to
10-2
mbar.
This type of pumping system is very simple but it cannot reach a low enough base pressure to give good thermal isolation . A large amount of liquid helium would be required to cryopump the residual gas and the static boil off of the system would be slightly increased. In addition, if the cryostat is used above 60 K and there is no sorption pump in the vacuum space, condensation or frosting may be seen on the outside of the cryostat.
2.1.3
Diffusion pumps
It is advisable to use a cold trap with a diffusion pump (although some people do not consider it to be essential). You should never pump the vacuum space of a cold cryostat without a cold trap between the pump and cryostat. This trap helps to remove water vapour from the vacuum space and prevents back streaming of oil vapour from the pump. Two types of trap are commonly used, liquid nitrogen filled traps and thermo-electric (Peltier effect) cooled baffles. The latter require less attention and are better for very long-term unattended operation.
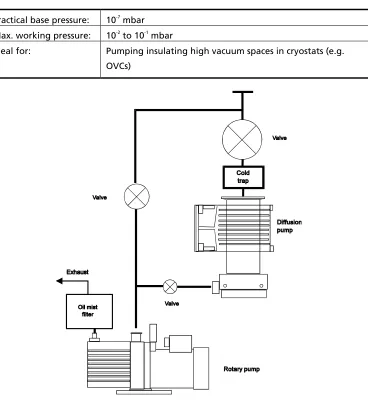
Practical base pressure: 10-7 mbar
Max. working pressure: 10-2
to 10-1
mbar
Ideal for: Pumping insulating high vacuum spaces in cryostats (e.g. OVCs)
Figure 2 Diffusion pump system
2.1.4
Turbomolecular pumps
Practical base pressure: 10-8
mbar
Max. working pressure: A few mbar (for conventional turbomolecular pumps). About 30 mbar (for some pumps with a molecular drag stage).
Ideal for: Pumping clean high vacuum spaces (with or without cold trap).
Figure 3 Turbomolecular pump system
The pumping speed for helium is about 20% higher than that for nitrogen, but the compression ratio is much lower. Therefore if the pump is to be used to pump helium from a vacuum space it is best to use a two stage rotary pump, so that the backing pressure is as low as possible. A diffusion pump is still better at pumping helium!
2.1.5
Roots pumps
Roots pumps (or roots blowers) are mechanical booster pumps, used (in conjunction with a backing pump) to reach the medium to high vacuum range with very high gas
throughputs. Two (or more) pumps can be used in series with some advantage. For example, if you need a pumping speed of 1000 m3
/h it may be best to use a 1000 m3
/h roots pump backed by a 250 m3
/h roots pump, which in turn is backed by a 65 m3
/h rotary pump. Vacuum companies often recommend a 1000 m3
/h roots pump backed by a 250 m3
/h rotary pump, but this option is usually more expensive.
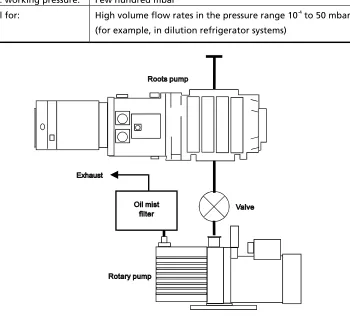
Practical base pressure: 10-4 mbar
Max. working pressure: Few hundred mbar
Ideal for: High volume flow rates in the pressure range 10-4
to 50 mbar (for example, in dilution refrigerator systems)
Figure 4 Roots pump system
2.1.6
Sorption pumps (or sorbs)
Sorption pumps are often used in vacuum spaces because they are cheap and reliable, and they require little maintenance. The adsorbent material (usually activated charcoal or a molecular sieve) has a very large surface area, and the gas molecules are trapped onto the surfaces when the sorb is cold.
Liquid nitrogen cryostats usually have a sorb fitted to the outside of the nitrogen vessel to maintain a good insulating vacuum. If a sorb is not used the vacuum slowly deteriorates as the warm surfaces outgas. A 77 K sorb will not trap helium gas, but if it is cooled to 4.2 K helium gas may be pumped to below 10-5
These pumps are single shot devices. They eventually become saturated and have to be warmed (and sometimes evacuated with a suitable high vacuum pumping system) to regenerate the absorbent material. The amount of gas that can be pumped before the sorb is saturated depends on the type of gas and the temperature of the pump, but in a high vacuum environment, they may be expected to last for a period of months or years before they need to be regenerated.
2.1.7
Cryopumps
A cryopump usually consists of a large number of metal plates cooled to a temperature close to 4.2 K, (either by liquid helium or by a closed cycle cooler). Like sorption pumps, these are single shot pumps and they have to be regenerated when a layer of ice has collected on the metal surfaces. The pump relies on the fact that the vapour pressure of most materials at a temperature below 10 K is negligible. This type of pump is essentially clean and it is suitable for use in ultra high vacuum systems.
2.2
Vacuum accessories
2.2.1
Oil mist filter
An oil mist filter is used to remove the fine mist of oil from the exhaust gas of a rotary pump. It is desirable to remove this mist for the following reasons.
• The vapour represents a health hazard if inhaled
• It may contaminate any flow meters or other fittings behind the pump, changing their calibration
• It is desirable to avoid contaminating the helium recovery system with pump oil.
Several different types of filter are available. The following are the most common:
a) Coalescing filters, which only need to be replaced if they are dirty. The oil normally runs back into the pump continuously.
b) Centrifugal filters or 'catch pots', which usually have a transparent bowl to collect the oil, and have to be emptied occasionally.
2.2.2
Vacuum gauges
High vacuum is normally measured using a combination of Pirani and Penning type gauges. Typically, the Pirani gauge operates in the range 10 mbar to 10-3
mbar, and the Penning in the range 10-2 mbar to 10-7 mbar. The calibration of these gauges (and some
others) depends on the type of gas in the system.
b) The throughput of the lines must be at least as high as that of the pumps. Otherwise their impedance limits the flow of gas and may affect the base pressure at the cryostat end of the line. It will certainly affect the amount of time required to pump down to the required pressure.
c) The lines should be clean inside. If there is any moisture in the lines it will limit the pressure that can be reached. If the lines are heavily contaminated with helium gas it will be difficult to perform the normal leak tests.
2.2.4
Mass spectrometer leak detectors
Although these machines are expensive, it is very useful to have access to one. The leak detector need not be dedicated to one system; it can be shared by the lab or the department. In general, the more complicated the system is, the more useful the leak detector will be. For example, a complex dilution refrigerator system may have 500 to 2000 joints that must be leak tight. Many of these are subject to thermal cycling, and a leak from almost any of them could cause a system failure. It is clearly important that any leaks can be traced and cured as quickly and easily as possible. A sensitivity of 10-8
mbar l/s (or standard cm3
/s) is sufficient for most purposes, but 10-10
mbar l/s is preferred when looking for very fine leaks or superleaks.
If you have little or no experience of using these leak detectors , refer to section 3.
2.2.5
Foreline traps
A foreline trap is sometimes used on the inlet of a rotary pump to reduce the amount of oil backstreaming up the pumping line. The active material in the foreline trap must be changed regularly so that it remains effective.
2.2.6
Choosing an appropriate 'O' ring material
Silicone rubber is often used for 'O' rings in electrical equipment, but it is not generally suitable for cryogenic equipment because the material is porous to helium gas. However, it is probably suitable for dynamic seals at temperatures down to -60°C, or static seals down to -100°C. It can also be used up to 250°C.
Butyl rubber was an old favourite material for vacuum applications, and it was often used because of its low gas permeability. Suitable for temperatures down to -60°C.
Nitrile rubber (or Buna N) is probably the best material for most common vacuum applications. It is cheap, easily available in a range of sizes, and appropriate for temperatures slightly below room temperature. It is also resistant to silicon grease (for example, vacuum grease). Its working temperature range is from -40°C to +120°C.
Fluoroelastomer (for example, 'Viton') is also suitable for vacuum. It is better than nitrile rubber for high temperature applications, but it is more expensive and tends to be deformed permanently after being compressed for a length of time. Its working temperature range is from -20°C to +200°C. Beware: if it is subjected to temperatures much higher than 200o
3
Detecting vacuum leaks
3.1
Introduction
These notes describe how to locate leaks in complex vacuum systems using a helium sensitive mass spectrometer leak detector. They do not describe how to use the leak detector in detail, because so many different models are available. Consult the instruction booklet for this information (and good luck!). Better still, ask someone to show you how to use the leak detector.
Warning: Before you attempt to carry out a leak test, it is important to check that it is safe to evacuate a vessel, and that there is no risk of it collapsing because of the external pressure of the atmosphere. This is especially important for vessels which have thin walled tubes (for thermal reasons) and for large vessels. If you collapse a vacuum vessel you might be badly injured by the shock wave or by flying fragments.
Helium sensitive leak detectors are used because:
• Helium atoms are small and mobile, so they can pass through small holes easily
• Helium gas is inert and safe to use
• There is very little helium in the air allowing the leak to be located precisely
Vacuum leaks are most commonly associated with:
Welds Leaks caused by imperfect welds, cracked welds, or corrosion around the weld.
Soldered joints Leaks caused by imperfect joints, or corrosion.
'O' ring seals Dry, damaged or broken 'O' rings, or scratches or hairs lying across the seal are the most common sources of problems. (As a rough guide, a hair lying across an 'O' ring may cause a leak in the range 10-6 to 10-3 mbar ls-1, depending on many factors.)
Indium seals Insufficient compression of the indium wire, dirt on the metal faces or scratches across the seal may cause leaks. Problems after thermal cycling might point to poor flange design.
Glued joints Leaks may be caused by bad joint design, bad surface preparation, inappropriate choice of glue, or rapid thermal cycling.
Superfluid leaks Components that are leak tight at room temperature and even in liquid helium may leak when subjected to superfluid helium (which has zero viscosity). This is the most difficult type of leak to find!
3.1.1
Getting started
Vacuum leak detection is an art, but a scientific approach helps. When you start to learn how to use the leak detector you will almost certainly find yourself looking for leaks that do not exist, and you could waste hours if you are not careful. These notes should help you to avoid most of the common problems.
Most leak detectors have an audible signal and a visual display. Both of these are useful. The visual display is used to quantify a leak and detect a slow change in the signal, so it is especially useful to help you locate small leaks. The audible signal is much easier to use for general leak testing, because you do not have to look at the leak detector. You can then concentrate on looking at the equipment that you are testing and if you hear the signal rise you can go back over the same area again more slowly, and try to pin point the position of the leak.
From time to time the sensitivity of the leak detector should be checked and reset using a 'standard leak', since the sensitivity peak may drift.
3.2
Leak testing a simple vessel
3.2.1
Preparations
Consider first how to test a simple vessel for leaks: for example, a flexible pumping line. The principles learnt here can then be extended to more complex systems.
Evacuate the line to a rough vacuum using a suitable rotary pump, and then pump it to a sufficiently high vacuum for the mass spectrometer to be used (typically 10-5 mbar). Many
leak detectors will evacuate the vessel and switch on the mass spectrometer for you automatically.
Select a suitable sensitivity range so that a small leak can be detected. For most cryogenic systems the 10-8 mbar l/s range (or 10-8 standard cm3/s) is best. If you use a more sensitive
range than this the background helium signal in the vacuum space may exceed full scale on the leak detector. If you use a less sensitive range you may not notice the leak.
If the background signal is too high to allow you to use a sensitive range, pump the vessel until the signal has been reduced sufficiently. You can sometimes reduce the signal more quickly by 'pumping and flushing'. Pump the air out of the system until it reaches a pressure of a few mbar, allow dry nitrogen (or air if this is not available) into the vacuum space again (slowly to avoid damaging the vacuum vessel), and repeat the process as often as necessary.
3.2.2
Leak testing the pumping line
If the signal on the leak detector rises at any time during the test, a leak should be suspected, and you should methodically check to find out whether the leak is real, or an artefact caused by the outgassing of some trapped gas within the vacuum system.
3.2.3
Work from the top
Remember that helium gas is lighter than air so it rises. Therefore you should start by spraying gas on the highest point, and slowly work downwards. If the signal on the leak detector rises at any time, go back over the area that you have just covered, and check again. If you do not start at the top you can get misleading results when you are checking an area below the position of the real leak.
When you have found the approximate location of the leak, fit a fine nozzle to the end of the helium gas line, and reduce the flow of gas. Check the suspect areas in detail. You can locate leaks very precisely. Usually (but not always) you can see a small hole, flaw in the material or dullness of the surface at the leak position.
If you want to test a long weld on a large vessel you can fix a tunnel of plastic sheet to the vessel with adhesive tape and fill the tunnel with helium gas.
3.3
Locating 'massive' leaks
Occasionally you may find a leak that is so big that you cannot reduce the pressure sufficiently to use the mass spectrometer. How can you find the position of the leak?
3.3.1
The safe method
It is sometimes possible to check for a leak by slightly pressurising the vessel with helium gas as described in section 3.8.
3.3.2
The other way (at your own risk)
Some people use water, acetone or methanol to locate leaks on small systems. Open the gas ballast valve on the pump to make sure that contamination does not collect in the pump oil.
Hazard: Acetone or methanol are flammable so you must not use them in large quantities. Take care not to create a fire hazard - contact your safety officer first.
Pump the vessel to a rough vacuum and measure the pressure. Brush liquid onto the outside of the vessel. The pressure rises quickly when the area of the leak is found.
These liquids may also be used to block a 'massive' leak temporarily, so that the rest of the vessel may be tested. Apply the liquid with a brush. Initially the pressure rises, but soon the liquid freezes and blocks the leak. You can remove the ice by gently warming the area with a hot air blower.
3.4
Leak testing sub-assemblies
If you are building a complex system you can test the sub-assemblies before you join them together. In this way you can locate leaks before the system is assembled. Components that are not fitted with standard vacuum fittings can be sealed to suitable plates using a product such as Apiezon TM
'Q compound'. This is a malleable material that can be used to make a temporary seal, but it is only suitable for use at room temperature.
Occasionally you may find a component that has a detectable leak in one direction but not in the other. Therefore it is best to test components by evacuating the side that will be under vacuum in the finished assembly. In any case you must check that it is safe to evacuate the vessel, and that there is no danger of it collapsing.
3.5
Testing more complex systems
Most real cryogenic systems are quite complex. It may be useful to consider a liquid nitrogen shielded liquid helium dewar, which would usually be tested at room temperature and at liquid nitrogen temperature. If a vessel is leak tight at 77 K it is unusual for it to develop a leak as it is filled with liquid helium at its normal boiling point. This is probably because most materials undergo very little thermal contraction below 77 K, so thermal stresses induced by cooling to 4.2 K are smaller than those caused by the initial pre-cooling process.
The dewar must be leak tight in the following ways:
• Outer vacuum chamber (OVC) to air
• Liquid helium reservoir to OVC
Evacuate the OVC, and set up the leak detector to monitor it. Check the outside of the dewar as described in section 3.2. Then flush the liquid nitrogen and liquid helium vessels with helium gas. The best way to check them thoroughly is to pump the air out of each vessel using a small rotary pump, and then to fill each vessel in turn with helium gas.
Sometimes the signal on the leak detector rises and falls again as the pressure in one of the reservoirs changes. This might not indicate a leak; small movements of the vessels can release gas from the surfaces. You can check this by repeating the test using air instead of helium gas.
If there is any doubt about the presence of a minute leak, use a chart recorder to monitor the signal from the leak detector. You should then see a step on the chart when the helium gas is allowed into (or pumped out of) the suspect space. This makes it easier to distinguish between a real leak signal and noise on the signal.
When you have finished the room temperature leak tests, you can pre-cool the cryostat to 77 K. Then blow the liquid nitrogen out of each space in turn using helium gas, while you monitor the OVC with the leak detector.
3.5.1
Pumping and flushing with helium gas
When you have removed all of the liquid, pump the vessel to a pressure of a few mbar, and then fill it with helium gas. This ensures that small leaks are not blocked by remaining droplets of liquid nitrogen.
3.5.2
Temperature effects
If you see a signal rise it may have been caused by a temperature change. Helium gas (trapped on the surfaces) may be released as warm gas is allowed into the vessel.
3.5.3
Masking cold leaks
If you discover a cold leak, you might be able to determine the approximate position of the leak by refilling the vessel with liquid nitrogen and then blowing the liquid out again with helium gas. When you see the signal rise again stop blowing out the liquid, and measure the level of the liquid. The leak is probably at this height in the vessel.
3.5.4
More complicated systems
3.6
Leaks at 4.2 K and below
Any leak found at a temperature below 4.2 K is difficult to locate, because helium gas tends to be absorbed onto the cold surfaces. It may take a long time for the leak detector to respond to a small leak, so patience is essential. Do not be tempted to hurry the tests. It may take many hours for a positive result to be obtained. It is sometimes best to warm up the system to 77 K and pump the helium gas away thoroughly before cooling to 4.2 K again, because this removes the gas absorbed on the cold surfaces. Check each possible source of the leak in turn, with the others under vacuum to eliminate any possibility of confusion. At best, you will only be able to determine which space is responsible for the leak.
If the leak is very small, it is possible for the leak detector to pump away the helium gas at the same rate as the leak, and so the signal may not be seen to rise at all. In this case, close off the vacuum space for a few hours, and compare the signals before and after the test period. Make sure that the conditions for both readings are identical, so that thermal effects on the outgassing rate can be neglected.
3.7
Superfluid leaks (or superleaks)
Superleaks will only be seen at temperatures below the lambda point (2.2 K). Superfluid liquid 4
He (also known as helium II) has zero viscosity and can pass through very small holes quickly. Fortunately these leaks are quite rare, because it can take days or weeks to cure them.
Location of the precise position of the leak is extremely difficult. It may be possible to open up the leak sufficiently to detect it at 77 K (or even room temperature) by rapid thermal cycling, but this technique is not always successful. Failing this, the only other course of action is to replace joints or components, starting from the easiest operations.
This would normally be done in the following order (probably with a leak test after each step):
• Indium seals replaced
• Wood's metal joints re-run
• Soft soldered joints re-run
• Silver soldered joints re-run1
• Welds re-made
• Components or sub-assemblies replaced
3.8
Overpressure leak detection
Overpressure helium sensitive leak detectors ('sniffers') can be used to detect helium gas in the air. You can use these to detect very large leaks on vacuum systems but they should not be relied upon for the routine testing of cryogenic equipment. The vessel should be slightly pressurised with helium gas, and the sniffer is then used to detect where the gas is escaping. It is also important to check that it is safe to over-pressurise the vessel before trying to use this technique.
4
Cryostats and coolers
Various types of cryostat are available, and each type has advantages and disadvantages compared with the others. The following notes may help you to decide on the best type of system for your application.
In general, if the cryostat has to be very large (for example, to contain a superconducting magnet or conventional 3
He/4
He dilution refrigerator) it is best to use a 'bath' cryostat. You can fit a suitable continuous flow insert within the bath cryostat to achieve the sample temperature range required for your experiment.
However, if the cryostat has to fit into a small space or has to be thermally cycled rapidly and often, and the experimental equipment does not need a self contained reservoir of cryogen, it may be better to feed liquid from a remote storage dewar through a special transfer tube. This is called a 'continuous flow' cryostat.
The different types of cryostat that are widely available are described individually in the following sub-sections.
4.1
Bath cryostats
Bath cryostats contain large enough supplies of cryogens for a convenient period of operation. There is no need to refill the cryostat continuously from a storage dewar. The 'hold time' depends on a number of factors, (for example, size, experimental heat load and cryogen consumption rate). They are typically designed to give operating periods between 10 hours and 4 months.
Two types of bath cryostat are commonly used for laboratory scale liquid helium temperature systems. Both types are vacuum insulated to reduce the heat load due to conduction and convection. However, the helium reservoir is shielded from the room temperature radiation heat load in different ways. According to Stefan's Law, the amount of heat radiated from a warm body to a cold body varies with the difference between the fourth power of their temperatures. Therefore a 300 K surface radiates 230 times more heat to a 4.2 K surface than a 77 K surface would radiate onto the same 4.2 K surface.
Therefore liquid helium reservoirs are always shielded from room temperature radiation by a cooled shield. In most cryostats, the radiation load is further reduced by the use of 'multi-layer superinsulation'. This consists of many thin layers of low emissivity material, in the insulating vacuum space.
4.1.1
Liquid nitrogen shielded cryostats for liquid helium
Figure 6 Low loss infra-red detector cryostat
The advantages and disadvantages of liquid nitrogen shielded cryostats are summarised in Table 1 on page 23.
4.1.2
Vapour shielded cryostats for liquid helium
As an alternative to liquid nitrogen cooled shields, it is possible to link several thermal shields to the neck of the liquid helium vessel. The cold gas that has evaporated from the reservoir is then used to cool these shields. This type of cryostat typically has between two and six shields (depending on the required performance) linked to different points on the neck. The space between the shields is filled with superinsulation.
Advantages of liquid nitrogen shielding
Disadvantages of liquid nitrogen shielding
The shield forms a firm point to fix the temperature of windows or thermal anchors, and the temperature of the shield is fairly constant.
The system may be warmed up quickly by allowing gas into the vacuum space. The small amount of superinsulation does not become badly contaminated, and the gas can be pumped out to an acceptable level.
Comparatively short systems can be made, because of the firm 77 K thermal link in the neck of the helium vessel.
Liquid nitrogen must be filled regularly.
Boiling liquid nitrogen creates intermittent vibration since it tends to boil in bursts. The gas flow from the LN2 exhaust port may be
very low for an extended period as liquid in the cryostat stratifies. Liquid near the bottom of the reservoir can become warmer than the surface because of the hydrostatic pressure of the liquid above it. When this stratification is disturbed the evaporation rate increases dramatically. This is sometimes sufficient to blow liquid out of the cryostat.
Table 1 Liquid nitrogen shielded cryostats for liquid helium
Advantages of vapour shielded cryostats.
Disadvantages of vapour shielded cryostats.
Liquid nitrogen does not need to be re-filled.
Vibration levels may be reduced, since there is no vibration from the
intermittent boiling of liquid nitrogen.
Warming up the system may take longer than it would take if the vacuum space could be 'softened' with gas.
Very short systems may have a higher boil off than a corresponding liquid nitrogen
shielded system.
The temperature of the shields varies with the liquid helium level.
Table 2 Vapour shielded cryostats for liquid helium
4.1.3
Bath cryostats for liquid nitrogen
4.2
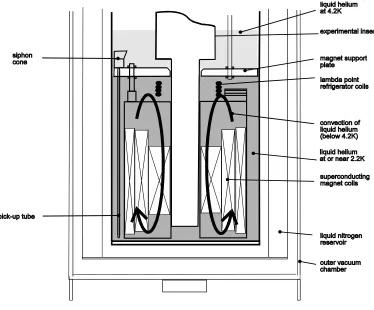
Lambda point refrigerators
Superconducting magnets are usually operated in liquid helium at 4.2 K. Their performance can often be enhanced by cooling the magnet to lower temperatures as described in section 6.3 on page 41. The simplest way to achieve temperatures below 4.2 K is to pump the whole liquid helium reservoir with a rotary pump, to reduce the vapour pressure above the liquid. If the bath is cooled to 2.2 K in this way, about 35% of the helium is evaporated to cool the remaining liquid. Temperatures below 2.2 K can be achieved, but if the bath is cooled below the lambda point, the liquid helium consumption increases significantly (both to reach the low temperature and to maintain it).
This simple approach has several disadvantages. A large amount of liquid is used to cool the magnet down, and since the reservoir is then below atmospheric pressure, access to the reservoir is difficult and all the fittings on the top plate have to be reliably leak tight. The liquid helium can only be re-filled by de-energising the magnet to its 4.2 K field and filling the reservoir to atmospheric pressure with helium gas, which interrupts the experiment.
Lambda point refrigerators (also known as 'lambda plates' or 'pumped plates') are used to cool superconducting magnets to about 2.2 K and maintain this temperature
continuously. See Figure 7. They consist of a needle valve (to control the flow of liquid helium into the refrigerator) and a tube or chamber with a pumping line. They are normally built into the 'magnet support system'. The refrigerator is in good thermal contact with the liquid helium just above the magnet.
Liquid is continuously fed into the refrigerator and pumped to a low pressure so that it cools. The cooling power is determined by the liquid flow rate and the size of the pump, and it can be adjusted using the needle valve. High flow rates are typically used at high temperatures to cool the system quickly or to obtain high cooling power, but when base temperature is reached, the flow can be reduced to make operation as economical as possible.
The density of liquid helium changes rapidly with temperature, so strong convection currents are set up, around the magnet. The cold liquid from the refrigerator sinks to the bottom of the reservoir, cooling the magnet and keeping it at about 2.2 K. Meanwhile the warmer liquid above the refrigerator is affected very little. The thermal conductivity of the liquid is so low that the region immediately above the plate has a steep
Figure 7 Lambda point refrigerator
Lambda point refrigerators have several advantages. In particular:
a) Since only a small proportion of the liquid in the reservoir is cooled by the lambda plate less liquid has to be used, and this reduces the cost of operation.
b) Operation can be automated (using a Teslatron Lambda controller).
c) The reservoir can be refilled without stopping operation of the system, as long as the transfer tube does not stir the liquid and upset the temperature gradient above the lambda plate.
The performance of these systems is dominated by the amount of liquid helium that has to be cooled. Although the mass of the magnet is much larger than that of the liquid, its heat capacity is very much lower. It is possible to calculate the amount of heat that has to be removed if the magnet and liquid are cooled from 4.2 K to 2.2 K. In a typical system, containing a 50 kg magnet, there may be about 3 litres (0.5 kg) of liquid below the lambda plate. Only 5 J has to be removed from the magnet, but about 3 kJ has to be removed from the liquid. Therefore it is important to minimise the amount of liquid around the magnet so that it will cool quickly and cheaply.
The heat from any warmer region in the reservoir would be rapidly conducted to the colder region, keeping its temperature above the critical level. However, in a few
specialised applications, the refrigerator is built into the top of a separate chamber around the magnet. The refrigerator is fed from a 4.2 K liquid reservoir, but thermally isolated from it. The lambda plate then cools the whole of this chamber, and temperatures below the lambda point can be reached and maintained continuously, while the liquid is at atmospheric pressure. The optimum temperature is about 1.8 K, as the superfluid is then able to carry heat away from the magnet most effectively.
4.3
Continuous flow cryostats
A wide range of continuous flow cryostats is available. Some of these are supplied with cryogens from a storage vessel; others are mounted in a bath cryostat which supplies liquid. In most of these systems the cooling power available from a flow of cryogen (LN2
or LHe) is balanced by power supplied electrically to a heater near the sample (usually by a temperature controller).
4.3.1
Variable temperature inserts (VTI)
Variable temperature inserts are used in bath cryostats to adjust the temperature of a sample without affecting the helium reservoir. 'Dynamic' and 'static' types of VTI are available, and the advantages and disadvantages of each type are described in section 4.4. The inner parts of the insert are vacuum insulated from the liquid helium. There may also be a radiation shield between the sample space and the liquid reservoir to reduce the radiated heat load on the reservoir when the sample is at a high temperature. This shield is usually cooled by the exhaust gas or the boil off from the main bath.
The temperature range of a VTI is typically from 1.5 to 300 K, but in certain circumstances this range may be extended. The sample temperature can be controlled continuously at any point in this range. Lower temperatures can often be achieved in single shot mode: the sample space is filled with liquid and the needle valve is closed to allow the pump to reduce the vapour pressure above the liquid to the lowest possible level.
4.3.2
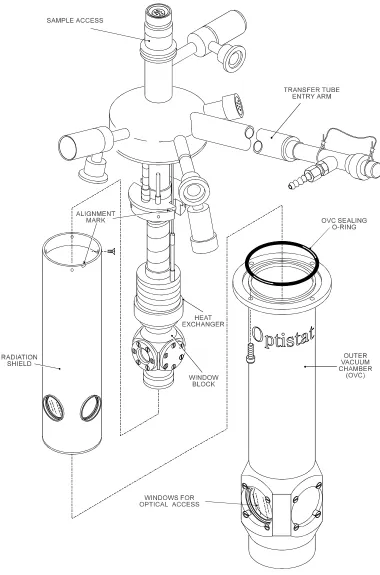
Independent continuous flow cryostats (CF)
Figure 8 Optistat - an optical continuous flow cryostat
The temperature range of CF cryostats is typically < 4 to 300 K in continuous mode, with lower temperatures available for limited periods in 'single shot mode'. However the range may be extended to give higher or lower temperatures if necessary. In general it is difficult to achieve temperatures as low as those available in VTIs because of the thermal losses in the transfer tubes, but some cryostats are designed to reach 1.6 K continuously. Figure 8 shows one of them schematically.
4.4
Static and dynamic continuous flow systems
Although all continuous flow cryostats work on the principle of balancing the cooling power of a flow of cryogen with electrical power from the temperature controller, there are several distinct types of cryostat: the most important are referred to as 'dynamic' and 'static'.
4.4.1
Dynamic systems
In a dynamic continuous flow cryostat, the sample is mounted in a flowing gas or in liquid, and its temperature is strongly influenced by the fluid. The temperature of the fluid is controlled by passing it through a heat exchanger (usually placed at the bottom of the sample space). The heat exchanger temperature is set by simultaneously controlling the cryogen flow rate and the heater on the heat exchanger. A temperature controller is usually used to do this automatically. Providing that the flow of cryogen through the heat exchanger is not too high the temperature of the flowing fluid can be controlled quite accurately. The fluid flows past the sample and out of the exhaust port of the insert to the pump.
This type of insert is easy to operate and it responds very quickly if the set temperature is changed to a new value. However, the temperature stability is not as high as that of a static insert. It is also possible to block the small capillary that feeds the cryogen to the heat exchanger with frozen water or air during the sample changing operation if care is not taken.
4.4.2
Static systems
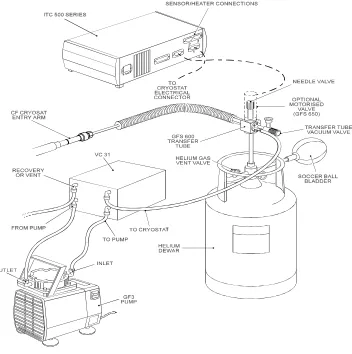
Static inserts are as easy to operate as the dynamic type, and have the advantage that it is not possible to block the heat exchanger during the sample changing process. Indeed, quite large amounts of air may be frozen into the sample space without affecting the operating procedure. However, the increased sample temperature stability has to be traded off against the increased time taken to change the sample temperature to a new value. In particular, it is not possible to cool the sample as quickly, and static systems are generally used for small sample spaces.
Figure 9 Flow system for a continuous flow cryostat
4.5
Storage/transport dewars
Storage (or transport) dewars are generally only suitable for supplying cryogens to the cryostat, (whether it is of the bath or continuous flow type). They are designed to be robust and to have a low evaporation rate. They usually have very narrow necks and a large amount of superinsulation. A few liquid helium storage dewars are fitted with liquid nitrogen jackets (especially older dewars).
4.6
Closed cycle coolers
Modern closed cycle coolers offer a highly reliable method of achieving low temperatures. They may either be used alone, to cool a sample and a radiation shield, or with a bath cryostat to cool one or two radiation shields and thus reduce the evaporation rate of the cryostat. This can considerably extend the hold time of a low loss cryostat, but it is not usually appropriate if the equipment inside the cryostat has a high consumption rate which has a dominant effect on the hold time. It is now possible to build cryogen free systems containing superconducting magnets.
However, this type of cooler has a high initial cost and the pay back time (in terms of reduced cryogen costs) may be very long. They also need to be serviced regularly (typically every 5,000 hours). There is also the possibility of introducing unwanted vibration into the experiment if it is not mounted very carefully.
4.7
'Stinger' systems
Some closed cycle cooler systems are used to re-condense helium gas into a bath cryostat continuously. They take the form of a cold finger that fits into the helium reservoir. They need quite high cooling powers both at the 4.2 K stage and at higher temperatures because they have to provide enough cooling to replace the enthalpy of the boil off gas, which usually helps to cool the neck of the reservoir. The helium reservoir is normally pressurised slightly so that the gas recondenses effectively, and so the liquid helium is held at a temperature close to 4.5 K.
4.8
Peltier effect coolers
Peltier effect coolers work by the thermoelectric effect; they are a thermodynamically reversible low impedance devices, operating at a high current from a d.c. power supply. A single stage cooler can typically achieve a temperature of -40°C, and lower temperatures can be achieved using several stages. A six stage device may achieve -100°C and give a cooling power of around 1 mW at -80°C. They do not introduce vibration into the cryostat. Although they have a small temperature range and limited cooling power, they offer a cheap solution for some requirements, (for example, Peltier effect cooled baffles, see section 2.1.3).
4.9
Making indium seals
4.9.1
Preparations
Before you make the seal ensure that the groove and the mating surfaces are clean. Thoroughly remove any old indium wire from the seal faces. If necessary a solvent can be used for cleaning. Some people like to grease the metal surfaces with silicone vacuum grease to make it easier to remove the wire later, but this is not necessary.
4.9.2
Making the seal
Lay a new piece of indium wire in the groove or round the male spigot on one of the flanges and overlap it as shown on the diagram. There are usually alignment marks on the flanges to indicate the correct orientation. Carefully bring the two flanges together and hold them loosely in place with two bolts while you put the other bolts into the flanges and tighten them by finger only. Slowly and evenly tighten all of the bolts with a small spanner (wrench) or Allen key. Do not tighten them too much. There is no need to use an extension on the tool to give extra leverage. On large seals (typically > 50mm diameter) it is then best to leave them for about an hour. The indium flows slightly during this period so it is often possible to tighten the bolts slightly more.
4.9.3
Separating indium seal flanges
It is often difficult to separate indium seal flanges because the indium metal seems to glue them together. Most large indium seals made by Oxford Instrumentshave two or more threaded holes in one of the flanges for 'jacking screws'.
Remove the bolts that hold the indium seal together (leaving two of the bolts loosely in place so that the flanges do not fall apart when they separate). Use another two of these bolts to jack the flanges apart by screwing them evenly into the jacking screw holes from the same side of the flange. This will push the flanges apart.
5
Ultra low temperatures
Refrigerators working at temperatures below 1 K are used for a surprisingly diverse range of applications in research establishments. A range of specialised techniques is used to achieve these temperatures. Most of the systems described in the previous chapters use liquid helium and liquid nitrogen to reach and maintain low temperatures, but it is difficult to achieve temperatures significantly below 1 K using these cryogens alone. However, most ultra-low temperature systems are immersed in liquid helium (4
He) at 4.2 K, so that the heat load from the surroundings is minimised.
It is possible to reach temperatures slightly below 1 K by pumping liquid 4
He to a low pressure but very large pumps are required and it is not usually economically viable. 4
He may also be used to give very low cooling powers at temperatures down to 0.7 K in 'vortex refrigerators' which rely on the special properties of superfluid 4
He.
However, the valuable lighter isotope of helium, 3
He, is usually used in refrigerators working below 1 K. Evaporating 3
He is used in some systems, and temperatures slightly below 0.3 K can be achieved by reducing its vapour pressure. Temperatures below 0.3 K are usually reached by continuously diluting a flow of 3
He in liquid 4
He using a 3
He/4
He dilution refrigerator.
5.1
3He Refrigerators
3He refrigerators are usually designed for routine operation in the temperature range
from 0.3 to 1.2 K, and they use evaporating 3
He as the refrigerant. Their operating range can often be extended to 100 K or higher. Some of these systems can run continuously, returning the liquid 3
He to the system to replace the evaporated liquid. Others work in 'single shot' mode, by pumping on a small charge of liquid 3He condensed into the system.
In an efficient cryostat a 20 cm3
charge of liquid 3
He may last for longer than 50 hours. Small laboratory refrigerators may give a cooling power of a few milli-watts at 0.5 K, but very large and high powered machines can give cooling powers of several watts at this temperature.
5.1.1
Sorption pumped
3He systems
Sorption pumped 3
He systems are usually single shot refrigerators, capable of high
performance operation for a limited time. Several types of system are available to suit the majority of laboratory requirements. Most of them can be used with high field
superconducting magnets if required. The top loading systems allow the sample to be mounted on a probe which is loaded directly into liquid 3
The Heliox 2VL insert is a low cost miniature 3
He system designed to allow inexperienced users to cool samples to 0.3 K. It is designed for operation in a liquid helium storage dewar, or with a superconducting magnet system. The sample is mounted in vacuum, and wiring can be connected easily. The whole insert is removed from the cryostat to change the sample, but since it is small, the time scale for sample changing is similar to that on the top loading systems. The Heliox system can be run up to about 200 K if it is used with a superconducting magnet, but higher temperatures (up to 300 K) can be reached if the insert is pulled up into the neck of the cryostat.
Figure 10 Principle of operation of a typical sorption pumped 3He system
(top loading type)
Figure 10 shows the working parts of a typical system. Although a top loading insert is shown, the principle of operation is similar for all Oxford Instruments' sorption pumped inserts. The insert has an inner vacuum chamber, (IVC), to provide thermal isolation from the main liquid helium bath.
The sorption pump, (or sorb), will absorb gas when cooled below 40 K, and the amount of gas that can be absorbed depends on its temperature. It is cooled by drawing some liquid helium from the main bath through a heat exchanger. The flow of 4
He through the heat exchanger is promoted by a small diaphragm pump and the rate of flow is controlled by a valve in the pumping line. A heater is fitted to the sorb so that its temperature can be controlled.
The 1 K pot is used to condense the 3
During condensation, the sorb is warmed above 40 K. When it is at this temperature it will not absorb any 3
He (see Figure 10). The 3
He condenses on the 1 K pot assembly and runs down to cool the sample and 3
He pot to the temperature of the 1 K pot. When most of the gas has condensed into the insert, the 1 K pot needle valve is closed completely so that the pot cools to the lowest possible temperature for optimum condensation. At this stage the 3
He pot is full of liquid 3
He at approximately 1.2 K. The sorb is now cooled, and it begins to reduce the vapour pressure above the liquid 3
He, (see Figure 10), so the sample temperature drops. As the limiting pressure is approached, the temperature of the liquid
3
He can be reduced to below 0.3 K.
The temperature of the sample can be controlled by adjusting the temperature of the sorb. If the sorb temperature is set between 10 and 40 K it is possible to control the pressure of the 3
He vapour, and thus the temperature of the liquid 3
He. However, if the best stability is needed, a temperature controller can be set up to measure the sample temperature and control the power supplied to the sorb heater. No heat is supplied directly to the liquid 3
He; this would evaporate it too quickly. The temperature of the sorb is continuously adjusted by the temperature controller, and the temperature of the sample can typically be maintained within 1 mK of the set temperature for the full hold time of the system.
These systems have limitations both in their cooling power and base temperature, and if high cooling powers (> 5 mW) are required, or operation must be continuous, it may be more appropriate to choose a continuously circulating 3
He refrigerator. If however, the base temperature is not low enough, a dilution refrigerator should be chosen. In general it is found that a dilution refrigerator has a better performance below 0.4 to 0.5 K, and a continuous 3
He system is better above this temperature. In either case, these refrigerators typically have large room temperature pumping systems, and they are therefore rather more expensive.
5.1.2
Continuously circulating
3He refrigerators
Continuously circulating 3
He refrigerators are capable of giving high cooling powers and of operating continuously for a long period. They use an external room temperature pumping system (including a rotary pump and a booster pump).
The 3
He gas is injected into the cryostat and it is cooled to approximately 4.2 K by the liquid helium bath before it enters the IVC. It is then cooled to 1.2 K and condensed by the 1 K pot.
The liquid 3
He then passes through a special heat exchanger where it is cooled by the outgoing 3
The flow rate determines both the base temperature and the cooling power available from the system. In general, a low flow rate will be required for a good base
temperature, and a high flow rate will allow a high cooling power to be achieved.
5.2
3He/
4He Dilution refrigerators
The principle of operation of the dilution refrigerator was originally proposed by
H. London in 1951, but the first working systems were not built until more than ten years later. Since that time, the performance of these systems has steadily improved, and the physical processes involved have become much better understood.
When a mixture of the two stable isotopes of helium is cooled below a critical temperature it separates into two phases. The lighter 'concentrated phase' is rich in 3
He and the heavier 'dilute phase' is rich in 4He. The concentration of 3He in each phase
depends upon the temperature. Since the enthalpy of the 3
He in the two phases is different, it is possible to obtain cooling by 'evaporating' the 3He from the concentrated
phase into the dilute phase.
Figure 11 Phase diagram of 3He/4He mixtures
The properties of the liquids in the dilution refrigerator are described by quantum mechanics and the details will not be described here. However, it is helpful to regard the concentrated phase of the mixture as liquid 3He, and the dilute phase as 3He gas. The 4He
which makes up the majority of the dilute phase is inert, and the 3
He 'gas' moves through the liquid 4He without interaction. This 'gas' is formed in the mixing chamber at the phase
boundary. This process continues to work even at the lowest temperatures because the equilibrium concentration of 3He in the dilute phase is still finite, even as the temperature
When the refrigerator is started the 1 K pot is used to condense the 3
He/4
He mixture into the dilution unit. It is not intended to cool the mixture enough to set up the phase boundary but only to cool it to 1.2 K. In order to get phase separation, the temperature must be reduced to below 0.86 K (the tri-critical point). The still is the first part of the fridge to cool below 1.2 K. It cools the incoming 3
He before it enters the heat exchangers and the mixing chamber, and phase separation typically occurs after a few minutes. Gradually, the rest of the dilution unit is cooled to the point where phase separation occurs.
It is important for the operation of the refrigerator that the 3
He concentration and the volume of mixture is chosen correctly, so that the phase boundary is inside the mixing chamber, and the liquid surface is in the still. The concentration of 3
He in the mixture is typically between 10 and 20%.
In a continuously operating system, the 3
He must be extracted from the dilute phase (to prevent it from saturating) and returned into the concentrated phase keeping the system in a dynamic equilibrium. Figure 12 shows a schematic diagram of a typical continuously operating dilution refrigerator. The 3
He is pumped away from the liquid surface in the still, which is typically maintained at a temperature of 0.6 to 0.7 K. At this temperature the vapour pressure of the 3
He is about 1000 times higher than that of 4
He, so 3
He evaporates preferentially. A small amount of heat is supplied to the still to promote the required flow.
The concentration of the 3
He in the dilute phase in the still therefore becomes lower than it is in the mixing chamber, and the osmotic pressure difference drives a flow of 3
He to the still. The 3
He leaving the mixing chamber is used to cool the returning flow of concentrated 3
He in a series of heat exchangers. In the region where the temperature is above about 50 mK, a conventional counterflow heat exchanger can be used effectively, but at lower temperatures than this, the thermal boundary resistance (Kapitza resistance) between the liquid and the solid walls increases with T -3
, and so the contact area has to be increased as far as possible. This is often done by using sintered silver heat exchangers, which are very efficient even at the lowest temperatures.
The room temperature vacuum pumping system is used to remove the 3
He from the still, and compress it to a pressure of a few hundred millibar. The gas is then passed through filters and cold traps to remove impurities and returned to the cryostat, where it is pre-cooled in the main helium bath and condensed on the 1 K pot. The primary impedance is used to maintain a high enough pressure in the 1 K pot region for the gas to condense.
The experimental apparatus is mounted on or inside the mixing chamber, ensuring that it is in good thermal contact with the dilute phase. All connections to the room
temperature equipment must be thermally anchored at various points on the refrigerator to reduce the heat load on the mixing chamber and give the lowest possible base
5.3
Sorption pumped dilution refrigerators
It is possible to build continuous dilution refrigerators which do not have external pumps for the 3He/4He mixture. Instead, two sorption pumps are used to pump the still to a low
pressure. A cold valve is fitted between each sorb and the still. While one of the sorbs is pumping, the other is regenerating. The temperatures of the sorbs are adjusted by electrical heaters to control the pumping cycle.
A special 'collector' is fitted below the 1 K pot to hold the liquid condensed by the pot. The pressure in this collector is controlled by maintaining a constant temperature, so that the flow of 3He to the dilution unit is kept constant even though the flow from the pumps
to the condenser is not constant.
The advantages of these systems are that the vibration levels can be significantly reduced, and the refrigerator system is compact. Since the 3
He/4
He mixture remains in the cryostat it is less likely that air can leak into it and block the system. They are controlled by a
computer, so they can be automated easily.
5.4
Nuclear demagnetisation systems
Temperatures below approximately 4 mK cannot be achieved easily or cheaply. Dilution refrigerators capable of reaching temperatures below 5 mK are available but they are large and expensive. Although temperatures as low as 2 mK have been achieved in this type of system, most experimentalists use other techniques.
Most experiments carried out below 4 mK rely on adiabatic demagnetisation of a nuclear paramagnet. This is a single shot process, but very long hold times can be achieved. However, the total amount of heat that can be absorbed from the sample by the demagnetisation stage is limited. Demagnetisation stages are typically pre-cooled to approximately 10 mK in a magnetic field of 8 to 10 T by a powerful dilution refrigerator. They are then isolated from the mixing chamber by a superconducting heat switch, and the magnetic field is slowly reduced. Temperatures slightly below 1 mK can be achieved using PrNi5 (an enhanced nuclear paramagnet), but copper can be demagnetised to
6
Superconducting magnet technology
6.1
Introduction
The world's first commercial superconducting magnet was produced by Oxford
Instruments., and now, more than 25 years later the company still leads the world, with fields higher than 20 T available. This technology allows customers to produce extremely high magnetic fields in laboratory scale cryostats without the kW to MW power supplies needed for non-superconducting magnets. In most cases the cost of refrigeration for a superconducting system is much less than the cost of the power required to run an equivalent non-superconducting system.
Many types of magnet are available, but solenoids and split pairs (sometimes referred to as split solenoids) are the types most commonly encountered in the laboratory. These two types of magnet are shown schematically in Figure 13. Solenoids are generally simpler, and it is cheaper to produce a magnet with a given field using a solenoid than it is using a split pair. It is also generally possible to achieve better homogeneity of the magnetic field using a solenoid. The very high forces between the coils make it difficult to produce fields higher than 15 T using a split pair magnet. However split pairs give access to the sample perpendicular to the magnetic field. They are commonly used for optical experiments which require this access.
Fields up to 9 T are usually produced using NbTi superconductor at 4.2 K (or 11 T at 2.2 K); higher fields (up to 20 T) require the use of the expensive and brittle intermetallic
compound Nb3Sn. However the Nb3Sn is only used for the inner sections of such a magnet
(where the field is highest) and the outer sections use the cheaper NbTi for economic reasons. Many kilometres of wire are used in the winding of even a modest magnet.
Fields up to about 40 T can be achieved with hybrid magnets. In this type of system a large bore superconducting magnet provides the background field (up to 16 T) for a high power, water cooled inner winding.
It is also likely that 'high TC' superconducting inner coils will soon be commercially
available to enhance the field produced by a Nb3Sn magnet. Although these materials
cannot yet tolerate very high current densities they have exceptionally high critical fields when cooled to 4.2 K.
Additional coils may be fitted to the basic windings to modify the shape of the field. 'Compensation coils' are often used to improve the homogeneity at the centre of field by reducing the rate at which the field drops at the ends of the coils (due to finite winding length effects). 'Shim coils' (or shims) are used to remove residual field gradients; they may be wired in series with the main coils to give a basic level of correction or
independently to give finer adjustment. Shims may be either cold superconducting coils or room temperature 'normal' coils.
Figure 13 Schematic diagram of a simple solenoid and split pair
6.2
Construction of the magnet
Superconducting magnets are typically constructed from a number of coaxial coils. They are wound from different grades of superconductor so that the cost is reduced as far as possible. The coils are impregnated to give a high mechanical stability and thus to prevent relative movement of the components as the field is changed. The Oxford Instruments 'Magnabond' system has been developed to achieve this.
The coils of split pair magnets have to be supported especially carefully to resist the large forces between and within the coils. These forces are typically tens of tonnes.
Compensation coils, shim coils and cancellation coils also have to be fixed very firmly to the main coils.
Electrical connections between the coils have to be made using superconducting joints so that the residual resistance of the magnet is reduced to a minimal level, (typically lower than 10-8
6.3
Basic physics of the magnet
Although the basic physics taught to a 16 year old is sufficient to explain many of the phenomena observed in a magnet, the production of a reliable magnet is extremely challenging. The magnet is effectively a pure inductor with zero resistance, and the circuit theory taught in schools explains that the magnet stores energy, that there is a time constant associated with a circuit containing an inductor and a resistor in parallel, and that it is difficult to change the current flowing in the inductor because of the induced back e.m.f. (or voltage).
Stored energy= 1LI 2
2 Induced back e m f LdI
dt ' . . '.= −
Time constant L R =
where L is the inductance of the magnet, I is the current in the magnet, and R is the resistance in parallel with the windings. As an example, a magnet with an inductance of 100 H is not unknown in a laboratory cryostat, and if it was operating at a current of 100 A, the stored energy would be ½ MJ!
The induced (or 'inductive') voltage observed when the magnet is energised or de-energised is explained further in the section on the typical operation procedure (see section 6.9 on page 46). In many cases this induced voltage limits the rate at which the magnetic field can be changed (or 'swept'), because of the limitations of the power supply. However, there are several effects within the windings of the magnet that cause heating (for example, eddy currents, hysteresis and diamagnetism), and ultimately these limit the sweep rate.
Large stresses are induced in the windings of the magnet because of the Lorentz forces between the field and current. These forces lead to large hoop stresses (trying to explode the magnet) and axial compression in the windings.
Ferromagnetic materials close to the magnet can have positive or negative effects. On the positive side, they may be used for fine 'shimming' of the magnetic field in certain
specialised magnets, or more commonly to reduce stray magnetic field to an acceptable level. On the negative side, they may make unwanted changes to the field shape in a region of high homogeneity and put extremely high forces on the magnet windings or the cryostat. The additional stress on the windings may even prevent the magnet from functioning correctly. For these reasons, any large magnetic items have to be positioned carefully, so that they neither affect the field shape nor cause damage to the magnet. If shielding is required, the effects on the magnet must be analysed carefully by computer simulation, and this is such a specialised field that it should only be undertaken by an expert.
6.4
Homogeneity of the field
The homogeneity of the magnetic field is often specified over a 10 mm diameter spherical volume (or d.s.v.). In a solenoid type magnet, a homogeneity of 1 in 103
can easily be achieved, and this is sufficiently high for the majority of experiments. This can be improved to 1 in 105
by using series shims (sufficient for low resolution NMR). However, high resolution NMR and similar experiments are usually carried out in magnets with homogeneity 1 in 107
(or better) over a 10 mm d.s.v., which can only be achieved using independent shims. It is much more difficult to obtain high homogeneity in a split pair magnet, and 1 in 102
to 104
over a 10 mm d.s.v. is typical. It is possible to achieve homogeneity of 1 in 106 (or better) if the magnet geometry is correct and independent
shims are added.
6.5
Persistent mode operation
One of the main advantages of the superconducting magnet is the ability to operate in 'persistent mode'. In this type of operation, the superconducting circuit is closed to form a continuous loop, and the power supply can then be switched off, leaving the magnet 'at field'. The field decays only very slowly, at a rate depending on the inductance, the design and number of superconducting joints and the choice of conductor. A decay rate of 1 part in 104 relative per hour is easily achieved in a typical magnet, but this can be improved to 1
in 107
relative per hour for specific applications (for example, high resolution NMR spectroscopy).
6.6
Quenches
The magnet will only function properly if all the conductors remain in the
superconducting state. If any part of the windings goes 'normal' (or resistive), the current passing through it will cause ohmic heating (I2
R). This heating increases the size of the normal zone. Once the process has started, it is possible to stop it only if the disturbance is very small, or the magnet is 'stabilised'. Otherwise, the normal zone propagates rapidly through the whole of the coil, and may spread into other parts of the magnet. All the stored energy in the magnet is dissipated, evaporating the liquid helium very quickly and often warming the magnet to significantly above 4.2 K. This is called a 'quench'.
The stability of the magnet is strongly influenced by the design of both the conductor and the windings. Only a very small amount of energy is required to start a quench, and this releases a very large amount of stored energy. It is said that the amount of energy released by a pin head falling through 1 mm is typically sufficient to start the quench, and the amount of energy released may be enough to put 250 g of butter into orbit! This is one of the reasons why the technology of superconducting magnets is so challenging. Even microscopic movements of the wires in the coils may be sufficient to quench the magnet.
After a magnet has quenched it will often be found that the quench has helped the windings to settle, and normal operation can continue after refilling the cryostat with liquid helium. Indeed in a brand new magnet several quenches may be experienced before the magnet reaches its design field, and the quenches occur at progressively higher fields. This procedure is known as 'training', and it is quite normal. The training is carried out in the factory, and the magnet is always given a thermal cycle to room temperature before it is re-energised, (to ensure that it will not quench again).