Developing Web Views for VMware
vCenter Orchestrator
vCenter Orchestrator 5.1
This document supports the version of each product listed and
supports all subsequent versions until the document is replaced
by a new edition. To check for more recent editions of this
document, see
http://www.vmware.com/support/pubs
.
You can find the most up-to-date technical documentation on the VMware Web site at: http://www.vmware.com/support/
The VMware Web site also provides the latest product updates.
If you have comments about this documentation, submit your feedback to: [email protected]
Copyright © 2008 – 2012 VMware, Inc. All rights reserved. This product is protected by U.S. and international copyright and intellectual property laws. VMware products are covered by one or more patents listed at
http://www.vmware.com/go/patents.
VMware is a registered trademark or trademark of VMware, Inc. in the United States and/or other jurisdictions. All other marks and names mentioned herein may be trademarks of their respective companies.
VMware, Inc.
3401 Hillview Ave. Palo Alto, CA 94304 www.vmware.com
Developing Web Views for VMware vCenter Orchestrator 5
1
Web View Overview 7
2
Weboperator Web View 9
Start the Weboperator Web View 93
Web View Development Tasks to Perform in Orchestrator 11
Create a Web View Skeleton 11Export a Web View as a Template 12 Create a Web View from a Template 13
Define a Web View Template as a Resource Element 14 Create a Web View from a Resource Element Template 14 Export Web View Files to a Working Folder 15
Configure the Server for Web View Development 16 Import Web View Files from a Working Folder 17 Create a Web View Attribute 17
Add a Resource Element to a Web View 18 Disable Web View Development Mode 19 Publish a Web View 19
4
File Structure of a Web View 21
5
Web View Home Page 23
6
Web View Components 25
Tapestry Web View Components 25Add a Tapestry Component in an HTML Page 26 Creating Tapestry Web View Components 26
Tapestry Component Specification File 27 Tapestry Component Template File 28 WebviewComponent Class 28 WebviewPage Class 29
WebObjectComponent Class 31
Orchestrator Tapestry Component Library 32 vco:DisplayProperty Component 32 vco:IfMemberOf Component 33 vco:IncludeJavascript Component 33 vco:IncludeStylesheet Component 33 vco:IncludeWorkflowHeader Component 34 vco:ListPane Component 35
vco:Login Component 36
vco:PageAccessControl Component 37 vco:TaskAction Component 38 vco:WebformContainer Component 39 vco:WorkflowLink Component 39
7
Accessing Server Objects from URLs 43
Running Actions from URLs 43Run an Action from a URL 44
Accessing Resource Elements from URLs 45 Obtain a Resource Element from a URL 45
8
Create a Simple Web View Using the Default Template 47
Import the Default Web View Template 48Export the Virtual Machine Manager Web View to a Working Folder 49 Contents of the Default Web View Template 49
Provide Unique Component Names 50
Configure the Server for Web View Development 50 Edit the Virtual Machine Manager Web View Home Page 51 Add a vco:ListPane Component to the Web View Home Page 53 Define the Web View Attributes for the vco:ListPane Component 54 Create a Web View Component to Display Virtual Machine Information 55 Create a Web View Tab by Using the Menu Component 56
Add Links to Run Workflows from a Web View by Using the vco:WorkflowLink Component 57 Customize the Web View Interface 59
Publish the Virtual Machine Manager Web View 59
Index 61
Orchestrator
Developing Web Views for VMware vCenter Orchestrator provides information about developing Web views for VMware® vCenter Orchestrator.
Orchestrator Web views are Web 2.0 frontends that allow users to access Orchestrator workflows and objects in the Orchestrator inventory by using a Web browser rather than by using the Orchestrator client.
Orchestrator provides a standard Web view that users can use to run workflows, called weboperator. The weboperator Web view provides end users with browser access to all of the workflows in the library, that they can run on all of the objects in the inventory.
The Web components which Orchestrator provides can be used to develop custom Web views.
Intended Audience
This information is intended for Web designers and developers who want to create or customize Web front ends for the Orchestrator processes, using the Web 2.0 technologies.
Web View Overview
1
A Web view is a package of Web pages, style sheets, icons, and banners that represent a complete Web site. Web views can contain special Java Web Components (JWC) that add Orchestrator functions to the pages of the Web views. For example, you can add components that allow users to run workflows from a browser. Orchestrator Web views update content dynamically without obliging users to reload complete pages. Orchestrator provides a library of Tapestry Framework 4.0 components to help you build customized Web views to access Orchestrator functions from a Web browser. Tapestry components provide access to objects in the Orchestrator server, such as the workflows in the library and the virtual machines in the inventory. You can also insert Dojo 0.4.1 components into Web views.
Orchestrator provides a Web view template that you can use as the basis for developing Web views. The Web view template contains skeleton HTML pages and Web view components that you can extend and adapt. You can also export existing Web views to use as templates that you can adapt to create new Web views.
You typically create or modify the pages of a Web view externally by using Web design tools. Creating or modifying Web pages independently of Orchestrator allows you to separate the Web design process from the process of developing Orchestrator Web view components. You import the Web view pages and components into the Orchestrator server and complete the process of creating the Web view in the Orchestrator client. Developing Orchestrator Web views can require knowledge of some or all of the following Web development technologies and standards. For documentation about the different technologies, consult the Web sites of the organizations that maintain the standards.
n Cascading stylesheets (CSS). See http://www.w3.org/Style/CSS/. n Ajax platform. See http://www.ajax.org/.
n Dojo toolkit. See http://www.dojotoolkit.org/.
n Java programming language. See http://www.oracle.com/technetwork/java/index.html. n Java Web Components (JWC) from the Tapestry Framework. See http://tapestry.apache.org/. n JavaScript Object Notation (JSON). See http://www.json.org/.
n Object-Graph Navigation Language (OGNL). See http://www.opensymphony.com/ognl/.
NOTE Third-party URLs are subject to changes beyond the ability of VMware to control. If you find a URL in
VMware documentation that is out of date, notify VMware at [email protected]. You might be able to locate a third-party document by searching from the third-party home page.
Weboperator Web View
2
Orchestrator provides a standard Web view called weboperator that allows users to run workflows from a browser.
The weboperator Web view provides an example of the orchestration functions that Web views can provide to end users in browsers, without requiring that those users use the Orchestrator client.
Start the Weboperator Web View
You start the weboperator Web view from the Orchestrator client.
Procedure
1 From the drop-down menu in the Orchestrator client, select Administer. 2 Click the Web Views view.
The weboperator Web view and any other Web views that you have imported into Orchestrator appear. 3 Right-click weboperator and select Publish.
4 Open a browser and go to http://orchestrator_server:8280.
In the URL, orchestrator_server is the DNS name or IP address of the Orchestrator server, and 8280 is the default port number where Orchestrator publishes Web views.
5 On the Orchestrator home page, click Web View List. 6 Click weboperator.
7 Log in using your Orchestrator user name and password.
8 Expand the hierarchical list of workflows to navigate through the workflows in the Orchestrator library. 9 Click a workflow in the hierarchical list to display information about the workflow in the right pane. 10 In the right pane, select whether to run the workflow now or at a later time.
Option Action
Run the workflow now a Click Start Workflow to run the workflow.
b Provide the required input parameters and click Submit to run the workflow.
Run the workflow at a later time a Click Schedule Workflow to run the workflow at a later time. b Provide the time, date, and recurrence information to set when and how
often to run the workflow and click Next.
c Provide the required input parameters and click Submit to schedule the workflow.
You can use the weboperator Web view to run workflows on objects in your inventory from a Web browser rather than from the Orchestrator client.
What to do next
If you only need a Web view to access the inventory and run workflows, the standard weboperator Web view should meet your requirements. If you require more complex functionality from a Web view, you can use the Web components and default Web view template that Orchestrator provides to develop custom Web views.
Web View Development Tasks to
Perform in Orchestrator
3
You create the Web pages and Web view components that form an Orchestrator Web view by using Web development tools. You also use the Orchestrator client and configuration interface to perform many of the steps of Web view development.
When you develop Web views, you use the Orchestrator client to perform tasks such as creating skeleton Web views, declaring objects in the Orchestrator server as Web view attributes, exporting and importing files to and from working directories, and creating and using templates to create other Web views. You set the Orchestrator server to Web view development mode by using the Orchestrator configuration interface. This chapter includes the following topics:
n “Create a Web View Skeleton,” on page 11 n “Export a Web View as a Template,” on page 12 n “Create a Web View from a Template,” on page 13
n “Define a Web View Template as a Resource Element,” on page 14 n “Create a Web View from a Resource Element Template,” on page 14 n “Export Web View Files to a Working Folder,” on page 15
n “Configure the Server for Web View Development,” on page 16 n “Import Web View Files from a Working Folder,” on page 17 n “Create a Web View Attribute,” on page 17
n “Add a Resource Element to a Web View,” on page 18 n “Disable Web View Development Mode,” on page 19 n “Publish a Web View,” on page 19
Create a Web View Skeleton
You can create a Web view by creating a Web view skeleton. A Web view skeleton contains no HTML files or Web view components, and requires you to create these elements using Web development tools.
Procedure
1 From the drop-down menu in the Orchestrator client, select Administer. 2 Click the Web Views view.
3 Right-click in the white space in the Web view list and select Add web view. 4 Type a name for the Web view in the Create Web View text box and click OK.
5 Right-click the Web view in the Web view list and select Edit. The Web view editor opens.
6 On the General tab, set the URL folder value to include a suffix for the URL on which Orchestrator will publish the Web view.
For example, if you set the URL folder to MyWebView, Orchestrator publishes the Web view at
http://orchestrator_server:8280/vmo/MyWebView/, where orchestrator_server is the IP address or DNS name of the machine on which the Orchestrator server is running.
By default, the name of the URL folder matches the Web view name, but you can change this value.
NOTE If the Orchestrator server is running in Web view development mode, the URL folder value must
match the name of the working folder in which you are developing the Web view. 7 Click the Version digits to increment the version number for the Web view.
The Version Comment dialog box opens.
8 Type a comment for this version of the Web view and click OK. For example, type Initial creation if you created the Web view.
9 On the General tab, type a description of the Web view in the Description text box . 10 Click Save and close to close the Web view editor.
You created a Web view skeleton that does not yet contain any HTML pages or Web view components. If you export the Web view skeleton to a working folder, the only file it contains is the
VSO-WEBVIEW-INF\.webview.xml file, which sets the Web view name and ID.
What to do next
You must add HTML pages and Web view components to the Web view.
Export a Web View as a Template
You can use an existing Web view as a template. You can export a Web view as a template, and then edit the exported template to create a Web view.
When you export a Web view as a template, Orchestrator creates a ZIP file that contains all the files of the original Web view. You can then create a new Web view that uses these files.
Prerequisites
You must have an existing Web view to export as a template.
Procedure
1 From the drop-down menu in the Orchestrator client, select Administer. 2 Click the Web Views view.
3 Right-click the Web view to export as a template and select Templates > Export as template. 4 (Optional) Change the name of the ZIP file as appropriate.
5 Select a location on your local system to save the ZIP file and click Save.
You exported the contents of an existing Web view to use as a template from which to create other Web views.
What to do next
Create a Web View from a Template
You can reduce the amount of development work by creating a Web view from a template.
A Web view template is a ZIP file that contains all the files and components of an existing Web view that you can use as the basis from which to create a new Web view. Orchestrator provides a default Web view template that you can use as the starting point for Web view development.
Prerequisites
You must have exported an existing Web view to use as a template. Alternatively, you can use the default Web view template that Orchestrator provides.
Procedure
1 From the drop-down menu in the Orchestrator client, select Administer. 2 Click the Web Views view.
3 Right-click in the white space in the Web view list and select New from > File template. 4 Navigate to a Web view template ZIP file and click Open.
Orchestrator provides a default Web view template at the following location on the Orchestrator server.
Option Action
If you installed the standalone
version of Orchestrator Go toinstall_directory\VMware\Orchestrator\apps\webviewTemplate s\default_webview.zip
If vCenter Server installed
Orchestrator Go toinstall_directory\VMware\Infrastructure\Orchestrator\apps\w ebviewTemplates\default_webview.zip
5 Type a name for the new Web view in the Create Web View dialog box and click OK. By default, the new Web view name is web_view_template_name_FromTemplate. 6 Right-click the Web view in the Web view list and select Edit.
The Web view editor opens.
7 On the General tab, set the URL folder value to include a suffix for the URL on which Orchestrator will publish the Web view.
For example, if you set the URL folder to MyWebView, Orchestrator publishes the Web view at
http://orchestrator_server:8280/vmo/MyWebView/, where orchestrator_server is the IP address or DNS name of the machine on which the Orchestrator server is running.
By default, the name of the URL folder matches the Web view name, but you can change this value.
NOTE If the Orchestrator server is running in Web view development mode, the URL folder value must
match the name of the working folder in which you are developing the Web view. 8 Click the Version digits to increment the version number for the Web view.
The Version Comment dialog box opens.
9 Type a comment for this version of the Web view and click OK. For example, type Initial creation if you created the Web view.
10 On the General tab, type a description of the Web view in the Description text box . 11 Click Save and close to close the Web view editor.
You created a new Web view from a Web view template.
What to do next
Export the contents of the new Web view to a working folder to modify them, and edit the Web view settings and attributes in the Orchestrator client.
Define a Web View Template as a Resource Element
Instead of exporting a Web view to your local system for use as a Web view template, you can define a Web view template as a resource element in the Orchestrator server.
Defining a Web view template as a resource element makes it available to all Web view developers who connect to the Orchestrator server.
Prerequisites
You exported a Web view template ZIP file to define as a resource element.
Procedure
1 From the drop-down menu in the Orchestrator client, select Design. 2 Click the Resources view.
3 Right-click a resource folder in the hierarchical list or the root and select New folder to create a folder in which to store the resource element.
4 Right-click the resource folder in which to import the resource element and select Import resources. 5 Select the resource to import and click Open.
Orchestrator adds the resource element to the folder you selected.
You defined a Web view template ZIP file as a resource element that all Web view developers who connect to the Orchestrator server can use.
What to do next
Create a Web view from a resource element template.
Create a Web View from a Resource Element Template
Instead of creating a Web view from the beginning, you can create a Web view from a resource element template that you or another developer has imported to the Orchestrator server.
A Web view template ZIP file that a developer has defined as a resource element is available to all developers who connect to the Orchestrator server.
Prerequisites
Orchestrator must define a Web view template that you or another developer has imported to the server as a resource element.
Procedure
1 From the drop-down menu in the Orchestrator client, select Administer. 2 Click the Web Views view.
3 Right-click in the white space in the Web view list and select New from > Resource template.
4 Press the Enter key in the Filter text box to display a list of all the resource elements that the Orchestrator server defines.
5 Select the Web view template ZIP file from the list of resource elements and click Select.
6 Provide an appropriate name for the new Web view in the Create Web View dialog box and click OK. 7 Right-click the Web view in the Web view list and select Edit.
The Web view editor opens.
8 On the General tab, set the URL folder value to include a suffix for the URL on which Orchestrator will publish the Web view.
For example, if you set the URL folder to MyWebView, Orchestrator publishes the Web view at
http://orchestrator_server:8280/vmo/MyWebView/, where orchestrator_server is the IP address or DNS name of the machine on which the Orchestrator server is running.
By default, the name of the URL folder matches the Web view name, but you can change this value.
NOTE If the Orchestrator server is running in Web view development mode, the URL folder value must
match the name of the working folder in which you are developing the Web view. 9 Click the Version digits to increment the version number for the Web view.
The Version Comment dialog box opens.
10 Type a comment for this version of the Web view and click OK. For example, type Initial creation if you created the Web view.
11 On the General tab, type a description of the Web view in the Description text box . 12 Click Save and close to close the Web view editor.
You created a new Web view from a Web view template that you or another developer has defined as a resource element.
What to do next
Export the contents of the new Web view to a working folder to modify them, and edit the Web view settings and attributes in the Orchestrator client.
Export Web View Files to a Working Folder
When you create a new Web view, either as a skeleton or from a template, you export the Web view files to a working folder on your local system for editing.
Prerequisites
You must have created a new Web view in the Orchestrator client, either as a skeleton or from a template.
Procedure
1 From the drop-down menu in the Orchestrator client, select Administer. 2 Click the Web Views view.
3 Right-click the Web view in the Web view list and select Export to directory.
4 Select the working folder in your local system in which to develop the Web view and click Export. The working folder in your local system now contains all the HTML, Web view component, image, and other files of the Web view.
What to do next
You can edit and adapt the Web view files by using Web development tools.
NOTE To preview the Web view from the working folder while you develop it, set the Orchestrator server to
Web view development mode.
Configure the Server for Web View Development
During the Web view development process, you can configure the Orchestrator server to publish the Web view from a working folder rather than from the Orchestrator server.
When the server runs in development mode, you can preview the Web view as you develop it, without having to import it to the Orchestrator server to view it. You set the Orchestrator server to Web view development mode in the Orchestrator configuration interface.
NOTE Because Orchestrator publishes Web views from the working folder, you cannot access Web views that
you have not exported to the working folder when the server is in development mode.
Prerequisites
To enable Web view development mode, your working folder must be on the same machine as the Orchestrator server.
Procedure
1 Log in to the Orchestrator configuration interface by using the your Orchestrator configuration username and password.
For example, go to https://orchestrator_server_DNS_name_or_IP_address:8283 or https://localhost:8283 in a Web browser.
2 On the General tab click Advanced Configuration. 3 Select the Enable Web view development mode check box. 4 Type the path to the root of your working folder in the text box.
Make sure you provide the path to the root of the working folder. Do not include the name of the folder that contains the Web view in the path.
For example, if you are working on a Web view in the folder C:\Documents and
Settings\username\Desktop\MyWebView\, type C:\Documents and Settings\username\Desktop\ as the path.
5 Click Apply changes.
6 On the Startup Options tab, click Restart Service to restart the Orchestrator server in Web view development mode.
7 After the Orchestrator server has restarted, start the Orchestrator client and log in. 8 Click Web Views.
9 Verify that your Web view's URL folder value matches the name of your working directory. For example, if you created the working folder C:\Documents and
Settings\username\Desktop\MyWebView\, set the URL folder to MyWebView. a If the Web view is running, right-click the Web view and select Unpublish. b Right-click the Web view and select Edit.
c On the General tab of the Web view editor, type the name of the working folder in the URL folder text box, and click Save and Close to close the Web view editor.
10 Right-click the Web view and select Publish.
You set the Orchestrator server to Web view development mode, in which you can preview a Web view from your working folder while you develop it.
Import Web View Files from a Working Folder
After you edit the files of a Web view in the working folder, you must import them back to the Web view in the Orchestrator server.
Prerequisites
Verify that you exported the files of a Web view to a working folder and edit them using Web development tools.
Procedure
1 From the drop-down menu in the Orchestrator client, select Administer. 2 Click the Web Views view.
3 Right-click the Web view in the Web view list and select Edit. 4 Click the Elements tab in the Web view editor.
5 Click Import from directory.
6 Select the working folder in your local system from which to import the modified Web view files and click
Import.
7 Click Save and Close to exit the Web view editor.
You imported to the Web view in the Orchestrator server the Web view files that you modified on your local system.
What to do next
Create Web view attributes.
Create a Web View Attribute
With Web view attributes, you can pass objects to Web view components. The functions that the Web view components define act on these objects to perform the orchestration actions that you run from the Web view. A Web view attribute can be an object of any type that the Orchestrator API supports. For example, a Web view attribute can be a VC:VirtualMachine object. A Web view component can define a function that requires this object as an attribute. For example, when a user clicks a button in a Web view, a Web view component associated to that button runs a workflow that starts a virtual machine. A Web view attribute provides the virtual machine object to the workflow that the Web view component starts.
Prerequisites
Create or import a Web view in the Orchestrator client.
Procedure
1 From the drop-down menu in the Orchestrator client, select Administer. 2 Click the Web Views view.
3 Right-click the Web view and select Edit. 4 Click the Attributes tab in the Web view editor.
5 Right-click in the Attributes tab and select Add attribute. 6 Click the attribute name and type a name.
7 Click the attribute Type link and select the attribute type from the list. 8 Click the attribute Value link and type or select the value of the attribute.
You type or select the attribute value depending on the type of the attribute. 9 Click Save and Close to exit the Web view editor.
You defined attributes that direct the Web view to the objects in the Orchestrator server on which it performs tasks.
What to do next
Add a resource element to a Web view.
Add a Resource Element to a Web View
Resource elements are external objects that you can import into the Orchestrator server for Web views to use as Web view attributes. Web view attributes identify objects with which Web view components interact.
Prerequisites
Verify that you have the following objects in your Orchestrator server:
n An image, script, XML, or HTML file, or any other type of object imported into Orchestrator as a resource
element.
n A Web view that requires the resource element as an attribute.
Procedure
1 From the drop-down menu in the Orchestrator client, select Administer. 2 Click the Web Views view.
3 If the Web view is running, right-click the Web view to which you want to add the resource element and select Unpublish.
4 Right-click the Web view and select Edit. 5 Click the Attributes tab.
6 Right-click within the Attributes tab and select Add attribute. 7 Click the attribute name and type a new name for the attribute. 8 Click Type to set the attribute type.
9 In the Select a type dialog box, type resource in the Filter box to search for an object type.
Option Action
Define a single resource element as
an attribute Select ResourceElement from the list. Define a folder that contains multiple
resource elements as an attribute
Select ResourceElementCategory from the list.
10 Click Value and type the name of the resource element or category of resource elements in the Filter text box.
11 From the proposed list, select the resource element or a folder containing resource elements and click
12 Click Save and close to exit the editor.
You added a resource element or folder of resource elements as an attribute in a Web view.
Disable Web View Development Mode
If you set the Orchestrator server to Web view development mode during the development process, you must set the Orchestrator server back to its normal mode before you can publish the Web view.
Prerequisites
You must have set the Orchestrator server to Web view development mode and finished modifying the Web view files in your working folder.
Procedure
1 Log in to the Orchestrator configuration interface by using the your Orchestrator configuration username and password.
For example, go to https://orchestrator_server_DNS_name_or_IP_address:8283 or https://localhost:8283 in a Web browser.
2 On the General tab click Advanced Configuration.
3 Deselect the Enable Web view development mode check box. 4 Click Apply changes.
5 On the Startup Options tab click Restart Service to restart the Orchestrator server in normal mode. You disabled Web view development mode. Orchestrator now publishes Web views from the Orchestrator server, rather than from the working folder.
What to do next
Publish the Web view.
Publish a Web View
When you finish Web view development and import the modified files to the Web view in the Orchestrator server, you can publish the Web view.
Prerequisites
You must have a Web view that is ready for publishing. You must also have disabled Web view development mode.
Procedure
1 From the drop-down menu in the Orchestrator client, select Administer. 2 Click the Web Views view.
3 Right-click the Web view to publish and select Publish.
Orchestrator publishes the Web view at http://orchestrator_server:8280/vmo/web_view_url_folder/. The IP address or DNS name of the machine on which the Orchestrator server is running is orchestrator_server. The name of the Web view URL folder is web_view_url_folder.
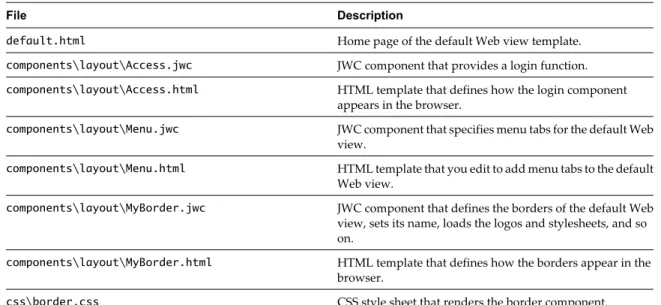
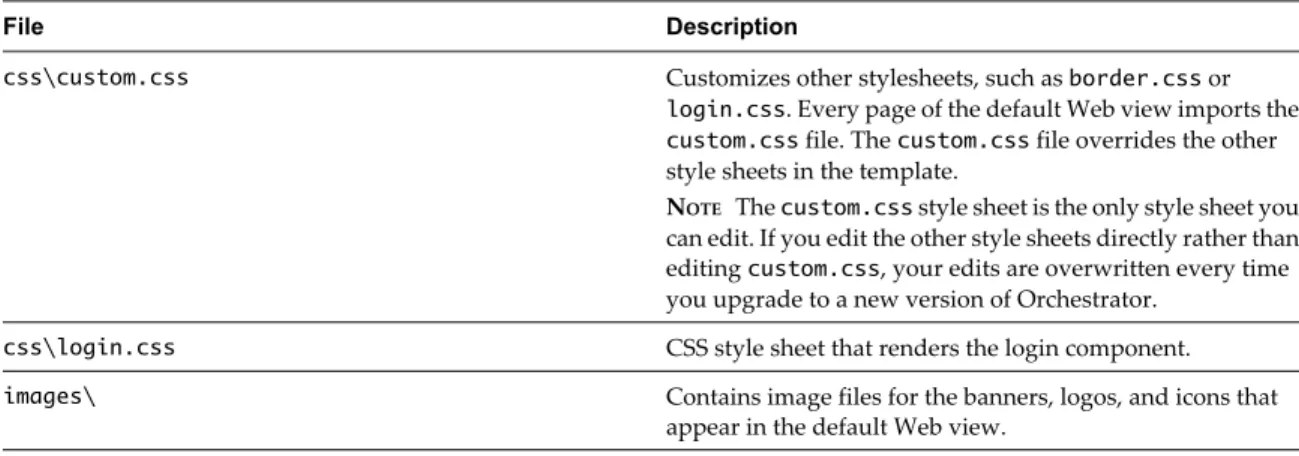
File Structure of a Web View
4
When you develop a Web view, you must save the collection of Web pages and Web view components that comprise the Web view to a working folder. The Web view working folder must conform to basic file-naming and file-structuring rules.
You can name the working folder in which you develop the Web view pages and components any name that is appropriate. The working folder must contain the following file and folder at its root.
Table 4-1. Web view file structure
File Description
<WebView_Folder>\default.html The home page of the Web view. All Web views must include a default.html file at the root of the working folder.
<WebView_Folder>\components\ Contains the JWC files and the associated HTML templates of the Web view components. The components folder must be at the root of the working folder.
IMPORTANT If you create more than one Web view to run in the same Orchestrator server, you must save the
Web view components in subfolders inside the components folder, to avoid conflicts between identically named components. Alternatively, create all Web view components with a unique name.
The default.html file and the components folder are the only mandatory elements that a Web view must contain. You can add other files and folders in the Web view folder and organize the files and folders in any way. You can include HTML files that are not Web view component templates anywhere in the Web view folder.
Web View Home Page
5
All Web views must contain a file named default.html, that you must save at the root of the Web view working folder. The default.html file is the home page of the Web view.
The default.html file is the point of entry to a Web view. The default Web view template that Orchestrator provides contains a skeleton default.html file that you can adapt and extend. The following code extract shows the contents of the default.html file from the default Web view template.
<vco jwcid="@layout/MyBorder" section="literal: home" title="Home"> <!-- Content of the homepage -->
<h2 style="margin-left: 16px; margin-top: 0px; padding-top:18px;"> Welcome to the default Web view template
</h2>
<p style="margin-left: 16px;">
This Web view template is a base for your own Web view development. </p>
</vco>
Table 5-1. Contents of the Web View Template default.html File
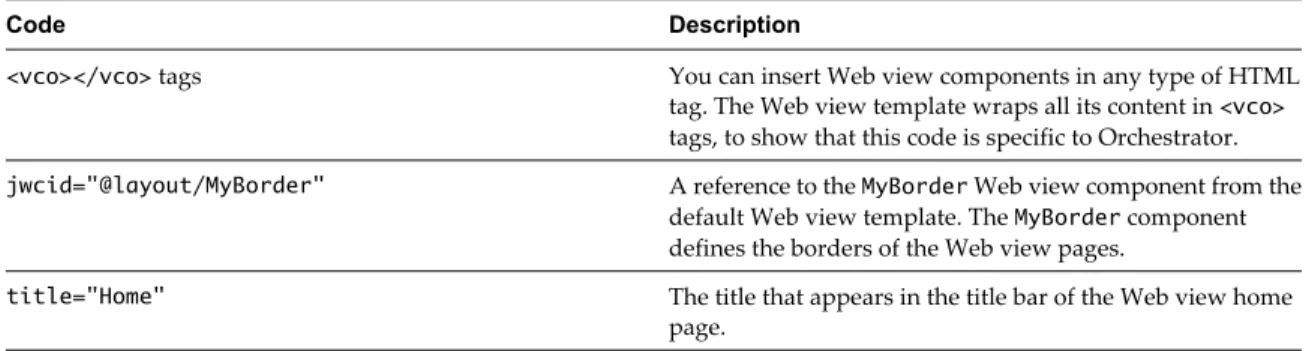
Code Description
<vco></vco> tags You can insert Web view components in any type of HTML tag. The Web view template wraps all its content in <vco>
tags, to show that this code is specific to Orchestrator.
jwcid="@layout/MyBorder" A reference to the MyBorder Web view component from the default Web view template. The MyBorder component defines the borders of the Web view pages.
title="Home" The title that appears in the title bar of the Web view home page.
The rest of the code in the default.html file is standard HTML. You can extend and adapt the content of the home page by adding HTML code and add functions to the page by adding Web view components.
Web View Components
6
Web view components add Orchestrator functions to Web pages. For example, you can add Web view components to Web pages that allow users to run workflows from a Web page in a browser.
You build Orchestrator Web views by adding JWC components to HTML Web pages. Orchestrator provides a library of JWC Web view components that add predefined orchestration functions to Web views. The JWC Web view components that Orchestrator provides conform to the Tapestry Framework 4.0 standard. In addition to the library of Web view components that Orchestrator provides, you can use every standard component from the Tapestry Framework 4.0 in Web views.
n Tapestry Web View Components on page 25
With the Tapestry Web view components in the Orchestrator Web view component library, you can add orchestration functions to Web views. The Tapestry Web components in the Orchestrator library define actions that access objects in the Orchestrator server.
n Creating Tapestry Web View Components on page 26
With Orchestrator, you can create custom Tapestry Web view components to perform orchestration functions from Web pages. A Tapestry Web view component conforms to the Tapestry Framework standard version 4.0.
n Orchestrator Tapestry Component Library on page 32
Orchestrator has a library of Tapestry components that you can reference in Web views. You can also use all of the components that the Tapestry Framework 4.0 standard defines.
Tapestry Web View Components
With the Tapestry Web view components in the Orchestrator Web view component library, you can add orchestration functions to Web views. The Tapestry Web components in the Orchestrator library define actions that access objects in the Orchestrator server.
The Tapestry Web view components that Orchestrator provides add functions to Web views such as obtaining and displaying the properties of an object in the server, starting workflows, or obtaining information from the user.
You add Tapestry components to a Web view by adding a jwcid attribute to an HTML tag in a Web page. When you reference a Web view component, you prefix the name of the component with the @ character. Certain Web view components require you to set additional properties when you set the jwcid attribute.
Add a Tapestry Component in an HTML Page
You add Tapestry components to a Web view by adding a jwcid attribute to an HTML tag in a Web page. The jwcid attribute references a Web view component.
You can add a jwcid attribute to any HTML tag. You can add references to components from the Orchestrator Web view component library, to components from the Tapestry Standard, or to custom components that you create.
Prerequisites
Create a Web view in the Orchestrator client and exported its contents to a working directory.
Procedure
1 Open an HTML page of a Web view in an HTML editor.
2 Add an arbitrary tag to the HTML file, in the position at which the Web view component is to appear in the page.
For example, add the following arbitrary tag in the appropriate position in the HTML file: <vco>
3 Add to the arbitrary tag a jwcid attribute that references a Web view component.
For example, the following jwcid attribute adds the vco:DisplayProperty component from the Orchestrator library to the Web view.
<vco jwcid="@vco:DisplayProperty">
The vco:DisplayProperty component obtains and displays the properties of an object that is in the server in the Web view.
4 Add the additional properties that the component requires to the arbitrary HTML tag.
For example, the following Web view component displays the MyVirtualMachine virtual machine Name property in a Web view.
<vco jwcid="@vco:DisplayProperty" name="Name" property="MyVirtualMachine"/> You added a reference to a Web view component to a Web page in a Web view.
Creating Tapestry Web View Components
With Orchestrator, you can create custom Tapestry Web view components to perform orchestration functions from Web pages. A Tapestry Web view component conforms to the Tapestry Framework standard version 4.0. A Tapestry Web view component must contain a component specification file and a component template.
IMPORTANT The Tapestry component template file and the component specification must have the same name.
For example, if you name a component template MyComponent.html, you must name the associated component specification MyComponent.jwc. Web view components that you use in different Web views that run in the same server must have unique names.
You must save the component files in the components folder in the Web view file structure. If you create subfolders in the components folder, you must specify the full path to a component when you set the jwcid attribute in HTML pages. For example, if you include a MyBorder component in a
<WebView_Folder>\components\layout\ subfolder, you must set the jwcid attribute, as the following example shows:
You can precede the @ character with a unique identifier. With the unique identifier, you can reuse the class throughout the HTML page, by referencing the unique identifier.
In the following example, the component is Border and the unique identifier is myBorderComponent. <div jwcid="myBorderComponent@MyBorder">
n Tapestry Component Specification File on page 27
A Tapestry component specification file is a JWC file that refers to the Tapestry DTD definition and to the Java class that specifies the behavior of the component.
n Tapestry Component Template File on page 28
A Tapestry component template file is an HTML file that defines the layout of a Web view component.
n WebviewComponent Class on page 28
The ch.dunes.web.webview.WebviewComponent class is the main class for Web view components. All Web view component specification JWC files must implement this class.
n WebviewPage Class on page 29
The ch.dunes.web.webview.WebviewPage class provides methods that you call in OGNL expressions in Web view component template HTML files.
n WebObjectComponent Class on page 31
The ch.dunes.web.webview.components.WebObjectComponent class provides methods to obtain information from objects in the Orchestrator server. The WebObjectComponent class extends WebviewComponent.
Tapestry Component Specification File
A Tapestry component specification file is a JWC file that refers to the Tapestry DTD definition and to the Java class that specifies the behavior of the component.
The JWC file can also set the initial values of the Web view component properties. Orchestrator Web views implement the following Java classes:
n ch.dunes.web.webview.WebviewComponent
n ch.dunes.web.webview.WebviewPage
n ch.dunes.web.webview.components.WebObjectComponent.html
The name of the Tapestry component specification file must match the name of the component specification JWC file.
Example: Web View Template Access.jwc File
The following example shows a component specification file that implements the WebviewComponent Java interface.
<?xml version="1.0" encoding="UTF-8"?> <!DOCTYPE component-specification PUBLIC
"-//Apache Software Foundation//Tapestry Specification 4.0//EN" "http://jakarta.apache.org/tapestry/dtd/Tapestry_4_0.dtd">
<component-specification class="ch.dunes.web.webview.WebviewComponent"> </component-specification>
Tapestry Component Template File
A Tapestry component template file is an HTML file that defines the layout of a Web view component. The name of the Tapestry component template file must match the name of the component specification JWC file.
Example: Web View Template Access.html File
The following example shows a component template file that displays the user's username and adds a
Logout link to a Web view page.
<strong>
<vco jwcid="@Insert" value="ognl:page.user.displayName" /> </strong>
<vco jwcid="@Insert" value="ognl:' (' + page.getUsername() + ')'" /> |
<a jwcid="@Any" href="ognl:page.webviewUrl + '?logout'">Logout</a>
WebviewComponent Class
The ch.dunes.web.webview.WebviewComponent class is the main class for Web view components. All Web view component specification JWC files must implement this class.
Implementing the WebviewComponent class in an Orchestrator Web view component allows you to call methods in a Web view page to perform various functions in the Orchestrator server, such as retrieving attributes, making queries, getting and setting parameters and attributes, and implementing Dojo widgets in the Web view component.
The WebviewComponent class extends the org.apache.tapestry.BaseComponent Tapestry class. The BaseComponent class provides the implementation for all Tapestry components that implement an HTML definition file.
The WebviewComponent class defines the following methods.
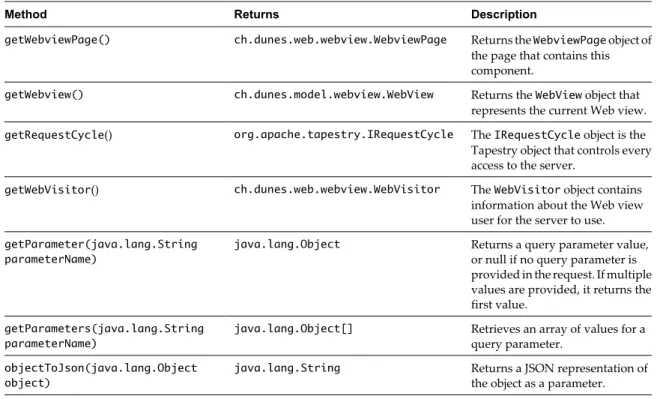
Table 6-1. Methods of the WebviewComponent class
Method Returns Description
getWebviewPage() ch.dunes.web.webview.WebviewPage Returns the WebviewPage object of the page that contains this component.
getWebview() ch.dunes.model.webview.WebView Returns the WebView object that represents the current Web view.
getRequestCycle() org.apache.tapestry.IRequestCycle The IRequestCycle object is the Tapestry object that controls every access to the server.
getWebVisitor() ch.dunes.web.webview.WebVisitor The WebVisitor object contains information about the Web view user for the server to use.
getParameter(java.lang.String parameterName)
java.lang.Object Returns a query parameter value, or null if no query parameter is provided in the request. If multiple values are provided, it returns the first value.
getParameters(java.lang.String parameterName)
java.lang.Object[] Retrieves an array of values for a query parameter.
objectToJson(java.lang.Object object)
java.lang.String Returns a JSON representation of the object as a parameter.
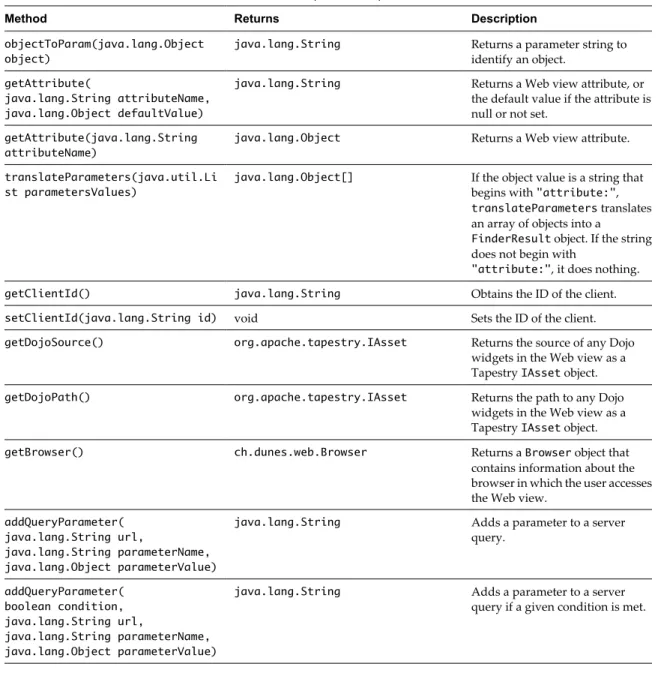
Table 6-1. Methods of the WebviewComponent class (Continued)
Method Returns Description
objectToParam(java.lang.Object object)
java.lang.String Returns a parameter string to identify an object.
getAttribute(
java.lang.String attributeName, java.lang.Object defaultValue)
java.lang.String Returns a Web view attribute, or the default value if the attribute is null or not set.
getAttribute(java.lang.String attributeName)
java.lang.Object Returns a Web view attribute.
translateParameters(java.util.Li st parametersValues)
java.lang.Object[] If the object value is a string that begins with "attribute:",
translateParameters translates an array of objects into a
FinderResult object. If the string does not begin with
"attribute:", it does nothing.
getClientId() java.lang.String Obtains the ID of the client.
setClientId(java.lang.String id) void Sets the ID of the client.
getDojoSource() org.apache.tapestry.IAsset Returns the source of any Dojo widgets in the Web view as a Tapestry IAsset object.
getDojoPath() org.apache.tapestry.IAsset Returns the path to any Dojo widgets in the Web view as a Tapestry IAsset object.
getBrowser() ch.dunes.web.Browser Returns a Browser object that contains information about the browser in which the user accesses the Web view.
addQueryParameter( java.lang.String url,
java.lang.String parameterName, java.lang.Object parameterValue)
java.lang.String Adds a parameter to a server query. addQueryParameter( boolean condition, java.lang.String url, java.lang.String parameterName, java.lang.Object parameterValue)
java.lang.String Adds a parameter to a server query if a given condition is met.
The WebviewComponent class inherits the following methods from class java.lang.Object: clone, equals, finalize, getClass, hashCode, notify, notifyAll, toString,wait, wait, wait
Constructor
public WebviewComponent()
WebviewPage Class
The ch.dunes.web.webview.WebviewPage class provides methods that you call in OGNL expressions in Web view component template HTML files.
The WebviewPage class extends the Tapestry class org.apache.tapestry.html.BasePage. The WebviewPage class defines the following methods:
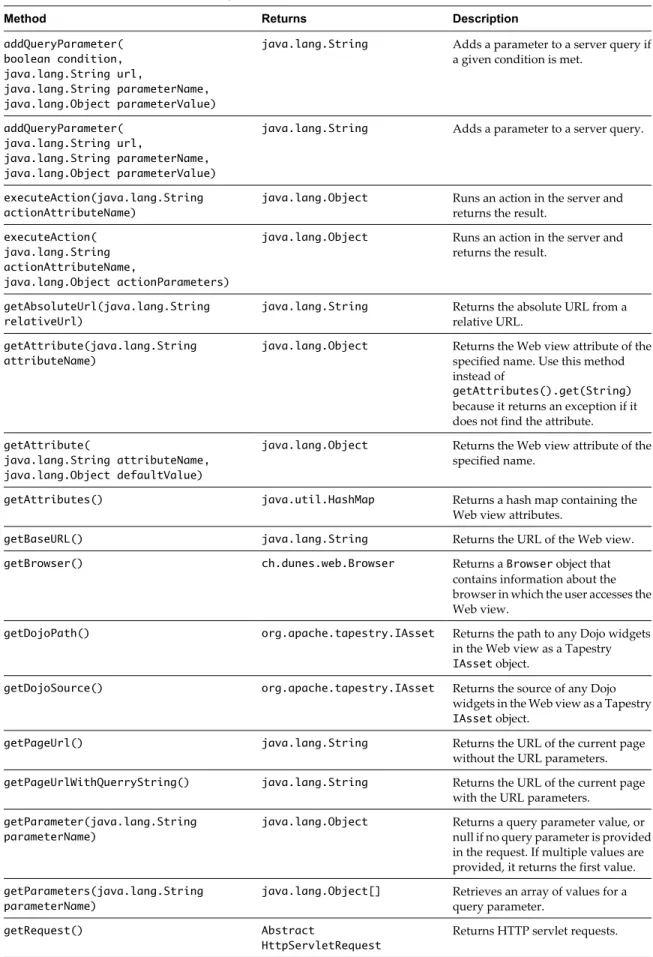
Table 6-2. Methods of the WebviewPage class
Method Returns Description
addQueryParameter( boolean condition, java.lang.String url,
java.lang.String parameterName, java.lang.Object parameterValue)
java.lang.String Adds a parameter to a server query if a given condition is met.
addQueryParameter( java.lang.String url,
java.lang.String parameterName, java.lang.Object parameterValue)
java.lang.String Adds a parameter to a server query.
executeAction(java.lang.String actionAttributeName)
java.lang.Object Runs an action in the server and returns the result.
executeAction( java.lang.String actionAttributeName,
java.lang.Object actionParameters)
java.lang.Object Runs an action in the server and returns the result.
getAbsoluteUrl(java.lang.String relativeUrl)
java.lang.String Returns the absolute URL from a relative URL.
getAttribute(java.lang.String attributeName)
java.lang.Object Returns the Web view attribute of the specified name. Use this method instead of
getAttributes().get(String)
because it returns an exception if it does not find the attribute.
getAttribute(
java.lang.String attributeName, java.lang.Object defaultValue)
java.lang.Object Returns the Web view attribute of the specified name.
getAttributes() java.util.HashMap Returns a hash map containing the Web view attributes.
getBaseURL() java.lang.String Returns the URL of the Web view.
getBrowser() ch.dunes.web.Browser Returns a Browser object that contains information about the browser in which the user accesses the Web view.
getDojoPath() org.apache.tapestry.IAsset Returns the path to any Dojo widgets in the Web view as a Tapestry
IAsset object.
getDojoSource() org.apache.tapestry.IAsset Returns the source of any Dojo widgets in the Web view as a Tapestry
IAsset object.
getPageUrl() java.lang.String Returns the URL of the current page without the URL parameters.
getPageUrlWithQuerryString() java.lang.String Returns the URL of the current page with the URL parameters.
getParameter(java.lang.String parameterName)
java.lang.Object Returns a query parameter value, or null if no query parameter is provided in the request. If multiple values are provided, it returns the first value.
getParameters(java.lang.String parameterName)
java.lang.Object[] Retrieves an array of values for a query parameter.
getRequest() Abstract
The WebviewPage class inherits the following methods from class java.lang.Object: clone, equals, finalize, getClass, hashCode, notify, notifyAll, toString,wait, wait, wait
Fields
n public static java.lang.String DEFAULT_FLASH_TYPE
n public static java.lang.String LOGIN_MESSAGE_ATTRIBUTE
n public static java.lang.String DEFAULT_LOGIN_MESSAGE
Constructor
WebviewPage()
WebObjectComponent Class
The ch.dunes.web.webview.components.WebObjectComponent class provides methods to obtain information from objects in the Orchestrator server. The WebObjectComponent class extends WebviewComponent.
You use the WebObjectComponent class in conjunction with vmo:ListPane components.
The vmo:ListPane component inserts a list of objects into a Web view. To display information about an object in the list in another Web view page or panel, the HTML file that displays that information must contain a Web view component that implements the WebObjectComponent class.
The WebObjectComponent class defines the following methods that obtain properties from objects in the Orchestrator server.
Table 6-3. Methods of the WebObjectComponent class
Method Retruns Description
get(java.lang.String name) java.lang.Object Obtains the property of the given name.
get(
java.lang.String name, java.lang.String valueIfNotFound
java.lang.Object Obtains the property of the given name.
toParam() java.lang.String Obtains the output parameter of an
Action or Workflow object.
The WebObjectComponent class inherits the following methods from class java.lang.Object: clone, equals, finalize, getClass, hashCode, notify, notifyAll, toString,wait, wait, wait
Constructor
WebObjectComponent()
Example: Using WebObjectComponent to Display Object Information
The following vmo:ListPane component displays information about the objects it lists in an HTML page called panel.html:
<p jwcid="@vmo:ListPane"
action="getVirtualMachineList" actionParameters="attribute:vmFolder" detailUrl="./panel.html"/>
The panel.html file contains a reference to a Web view component called DisplayVmInfo: <vmo jwcid="@DisplayVmInfo" urlParameter="itemId" />
The DisplayVmInfo.jwc component specification file implements the WebObjectComponent Java class: <?xml version="1.0" encoding="UTF-8"?>
<!DOCTYPE component-specification PUBLIC
"-//Apache Software Foundation//Tapestry Specification 4.0//EN" "http://jakarta.apache.org/tapestry/dtd/Tapestry_4_0.dtd">
<component-specification class="ch.dunes.web.webview.components.WebObjectComponent"> </component-specification>
The DisplayVmInfo.html component template file uses WebObjectComponent.get() methods in OGNL statements to display object properties in panel.html:
<table width="200" border="1"> <tr>
<td>Virtual machine name</td>
<td><vmo jwcid="@Insert" value="ognl:get('name')"/></td> </tr>
<tr>
<td>Object ID</td>
<td><vmo jwcid="@Insert" value="ognl:get('id')"/></td> </tr>
</table>
Orchestrator Tapestry Component Library
Orchestrator has a library of Tapestry components that you can reference in Web views. You can also use all of the components that the Tapestry Framework 4.0 standard defines.
All of the Tapestry components in the Orchestrator library have the prefix vco:, to distinguish these components from the components that the standard Tapestry framework provides.
The components in the Orchestrator Web view component library require different properties to display different types of information in the Web view. In the property tables for each component, asterisks (*) denote mandatory properties.
vco:DisplayProperty Component
The vco:DisplayProperty component displays the names and values of the properties of objects in the Orchestrator inventory.
Properties
The vco:DisplayProperty component defines the following properties.
Name Type Description
name * String Property name
property * String Property value
Example: vco:DisplayProperty Component
The following example shows how to use the vco:DisplayProperty component to display the details of a virtual machine in a Web view.
<div jwcid="@vco:DisplayProperty" name="Name" property="MyVirtualMachine"/> <div jwcid="@vco:DisplayProperty" name="Id" property="vm_89575"/>
vco:IfMemberOf Component
The vco:IfMemberOf component includes a block of content if the current user is a member of a given LDAP group.
If you pass an array of LDAP groups to this component, the Web view displays the content if the current user is a member of at least one of the groups in the list.
Properties
The vco:IfMemberOf component defines the following properties.
Name Type Description
attribute * String An attribute of the LdapGroup type, or an array of LdapGroup objects.
Example: vco:IfMemberOf Component
The following example shows how to use the vco:IfMemberOf component to add information about a user's LDAP group membership to a Web view.
<span jwcid="@vco:IfMemberOf" attribute="ognl:'adminGroup'">
You are a member of the group that the adminGroup attribute defines. </span>
<span jwcid="@Else">
You are not a member of the group that the adminGroup attribute defines. </span>
vco:IncludeJavascript Component
The vco:IncludeJavascript component inserts a <script> tag that defines a URL to a JavaScript file, to add a JavaScript function to a Web view.
You insert the vco:IncludeJavascript component in the <head> tags of a Web view page.
Properties
The vco:IncludeJavascript component defines the following properties.
Name Type Description
src String The path to a Javascript file, with or
without the .js extension
Example: vco:IncludeJavascript Component
The .js file extension is optional. The following example code lines both return the same src value. <script jwcid="@vco:IncludeJavascript" src="dojo"/>
<script jwcid="@vco:IncludeJavascript" src="dojo/dojo.js"/>
vco:IncludeStylesheet Component
The vco:IncludeStylesheet component inserts a <link> tag that links to an external CSS file in a Web view. You insert the vco:IncludeStylesheet component in the <head> tags of a Web view page.
Properties
The vco:IncludeStylesheet component defines the following properties.
Name Type Description
href or src String Name of a CSS file, with or without
the .css extension.
attribute String Name of a Web view attribute that
contains a path to the CSS files.
The href or src properties are unnecessary if you provide an attribute property. If you store CSS files in a dedicated folder in the Web view file structure, you can include the folder name in the path you provide to the href or src property.
Example: vco:IncludeStylesheet Component
The .css file extension is optional. The following example code lines both return the same href or src value. <link jwcid="@vco:IncludeStylesheet" href="default.css"/>
<link jwcid="@vco:IncludeStylesheet" href="default"/>
The following example code line references a Web view attribute that contains a path to a CSS file. You create Web view attributes in the Orchestrator client.
<link jwcid="@vco:IncludeStylesheet" attribute="cssDefault"/>
vco:IncludeWorkflowHeader Component
You use the vco:IncludeWorkflowHeader component with the vco:WebformContainer to display a Web form in a Web view.
You can insert a Web form in a Web view to request information from the user when they start a workflow, or to prompt the user for information during the workflow run.
Properties
The vco:IncludeWorkflowHeader component defines the following property.
Name Type Description
debug Boolean Set the Dojo debugging mode
You insert the vco:IncludeWorkflowHeader component in the <head> tags of a Web view page. You insert the associated vco:WebformContainer component in the <body> tags of the Web view page.
Example: vco:IncludeWorkflowHeader Component
The following example shows how to use the vco:IncludeWorkflowHeader component in a Web view. <!DOCTYPE html PUBLIC "-//W3C//DTD XHTML 1.0 Transitional//EN"
"http://www.w3.org/TR/xhtml1/DTD/xhtml1-transitional.dtd"> <html xmlns="http://www.w3.org/1999/xhtml">
<head>
<meta http-equiv="content-type" content="text/html; charset=UTF-8" /> <span jwcid="@vco:IncludeWorkflowHeader"/>
<body jwcid="@Body">
<span jwcid="@WebformContainer"/> </body> </html>
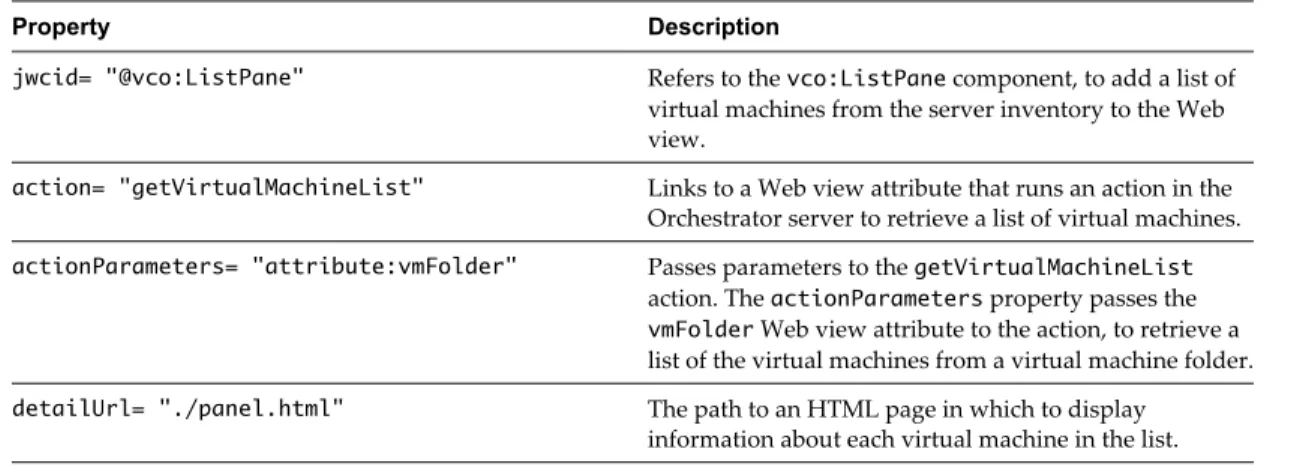
vco:ListPane Component
The vco:ListPane component displays a list of objects in a Web view, and displays an object's details when the user selects the object in the list.
Properties
The vco:ListPane component defines the following properties.
Name Type Description
attribute String A Web view attribute that references an array of objects that you define in the Orchestrator client. The array of objects appears in the vco:ListPane
component in the Web view.
action String A Web view attribute that references an action. The action must return an array of objects.
actionParameters Array of objects Array of parameters that an action requires. If the parameter is a Web view attribute, use the syntax
attribute:myAttribute.
url String The URL of the content of the list.
Returns a JavaScript Object Notation (JSON) string.
detailUrl String The URL of the HTML page in which to display the details of an object in the list. The HTML page that detailUrl refers to must include a reference to a Web view component that implements the
WebObjectComponent class.
detailParameterName String Name of the parameter that stores the ID of the item. Default is itemId.
updateFrequency Integer Time in milliseconds before the list of objects refreshes. Default is 0. If you do not set the property, the list never refreshes.
showHeader Boolean Displays the filtering table header. Default is false.
jsonIdKey String Name of the JSON ID key.
jsonStateKey String Name of the JSON state key. Default is
state.
jsonNameKey String Name of the JSON name key. Default is
name.
jsonTypeKey String Name of the JSON type key. Default is
type.
Name Type Description
sizeShare Integer Width or height of a child of a
SplitContainer. The value is relative to the sizeShare properties of other children. Default is 6, with the other columns set to 10.
showState Boolean Shows a state column if set to true. Default is false.
You must set at least one and only one of the attribute, url, or actions properties. If you do not set an attribute, url, or actions property, or if you set more than one of these properties together, the Web view returns an error.
Example: vco:ListPane Component
The following example displays a list of virtual machines in a pane of a Web view. <!DOCTYPE html PUBLIC "-//W3C//DTD XHTML 1.1//EN"
"http://www.w3.org/TR/xhtml11/DTD/xhtml11.dtd"> <html xmlns="http://www.w3.org/1999/xhtml"
version="-//W3C//DTD XHTML 1.1//EN" xml:lang="en"> <head>
<meta http-equiv="Content-Type" content="text/html; charset=utf-8"/> <title>
<span jwcid="@Insert" value="ognl:webview.name">Page Title</span> | Home
</title> </head> <body>
<div jwcid="@Border">
<h1>Virtual Machine List</h1> <div jwcid="vmList@vco:ListPane" action="getVirtualMachineList" actionParameters="attribute:vmFolder"
detailUrl="system/partials/virtual_machine.html" > Select a virtual machine on the left to display it. </div>
</div> </body> </html>
vco:Login Component
With the vco:Login component, you can customize the login page of a Web view. The login page of a Web view must adhere to the following rules.
n You must name the login page login.html.
n You must save the login page at the root of the Web view file structure.
Properties
Example: vco:Login Component
The following example code line adds a login link to a login.html page. <span jwcid="@vco:Login">login here</span>
vco:PageAccessControl Component
The vco:PageAccessControl component allows or denies users access to the Web view page that contains this component. The vco:PageAccessControl component checks the membership of the Web view user to an LDAP group.
If the user is a member of at least one group that the deny attribute defines, the Web view denies the user access to the page. If the user is not a member of a group in the deny attribute, the component checks the allow attribute. If the user is a member of at least one group that the allow attribute defines, the user can access the page. Otherwise, the Web view does not display the page.
You set the LDAP groups of users who can view the page as Web view attributes in the Orchestrator client.
Properties
The vco:PageAccessControl component defines the following properties.
Name Type Description
deny String A Web view attribute of the type
LdapGroup, or an array of LdapGroup
objects.
allow String A Web view attribute of the type
LdapGroup, or an array of LdapGroup
objects.
redirectUrl String A URL to which to redirect the user if they are not authorized to view the page. If redirectUrl is not set, the Web view returns a 403 error.
message String If redirectUrl is set and message is set, the URL of the page to which the Web view redirects the user contains a
msgquery parameter and the contents of the message property. For example
error_page.html? msg=message_content.
Example: vco:PageAccessControl Component
The following example code line allows access to a page to users who are members of the group that the adminGroup Web view attribute defines.
<span jwcid="@vco:PageAccessControl" allow="adminGroup"/>
The following example code line denies access to a page to users who are members of the group that the partnerGroup Web view attribute defines.
<span jwcid="@vco:PageAccessControl" deny="partnerGroup"/>
The following example code line redirects users who are members of the partnerGroup LDAP group to an error page. The error401.html file is at the root of the Web view file structure.
vco:TaskAction Component
The vco:TaskAction component displays the scheduled action from a Task object. A user selects the task from a list that a vco:ListPane component generates.
Properties
The vco:TaskAction component defines the following properties.
Name Type Description
stringValue String The stringValue of the task that the user selects. Every object in the Orchestrator server has a
stringValue string representation.
type String The type of the task that the user selects.
attribute String A Web view attribute. The
vco:TaskAction displays the possible actions to perform on the object that corresponds to this Web view attribute.
action String A Web view attribute of type Action. The vco:TaskAction component displays the possible actions to perform on the object that this action returns.
actionParameters List A list of parameters for the action.
object Object An object. The vco:TaskAction
component displays the possible actions to perform on this object.
urlParameter String The parameter name in the URL that represents the task the user selects.
You can only set the following parameters or combinations of parameters. Setting other combinations of parameters results in an error.
n stringValue and type n attribute
n action and actionParameters n object
n urlParameter
Example: vco:TaskAction Component
The following example code line shows how to use the vco:TaskAction component with the stringValue and type parameters, if the Java interface that your Web view component or page references defines a
getMyStringValue()method.
<div jwcid="@vco:TaskAction" type="ognl:myType" stringValue="ognl:myStringValue"/>
The following code line shows how to use the vco:TaskAction component with the object parameter, if the Java interface that your Web view component or page references defines a getMyObject()method.
vco:WebformContainer Component
The vco:WebformContainer component adds a Web form to a Web view, for users to complete when they run a workflow or to allow users to provide information to a workflow during its run.
Properties
The vco:WebformContainer component defines no properties.
You can use the vco:WebformContainer component with the vco:WorkflowLink component.
Example: vco:WebformContainer Component
To add a vco:WebformContainer component to a Web view, you must also include a
vco:IncludeWorkflowHeader component in the <head> tag of the Web view page, as the following example shows.
<!DOCTYPE html PUBLIC "-//W3C//DTD XHTML 1.0 Transitional//EN" "http://www.w3.org/TR/xhtml1/DTD/xhtml1-transitional.dtd"> <html xmlns="http://www.w3.org/1999/xhtml">
<head>
<meta http-equiv="content-type" content="text/html; charset=UTF-8" /> <span jwcid="@vco:IncludeWorkflowHeader"/>
</head>
<body jwcid="@Body">
<span jwcid="@WebformContainer"/> </body> </html>
vco:WorkflowLink Component
The vco:WorkflowLink component adds a link to a Web view to allow users to run a workflow. You can also use this component to display a link to schedule a workflow.
Properties
The vco:WorkflowLink component defines the following properties.
Name Type Description
workflow String Web view attribute of type Workflow.
action String Web view attribute of type Action.
actionParameters List A list of parameters for the action.
object Object A Workflow object.
workflowId String ID of the Workflow object.
returnUrl String URL to which to redirect the user after starting the workflow.The default is the URL of the page that contains the component.
onReturn String Run a JavaScript method when the
workflow starts. For example, to display information about the running workflow in the Web view.
Name Type Description
cancelUrl String URL to which to redirect the user if they cancel a workflow. The default is the URL of the page that contains the component.
onCancel String Run a JavaScript method if the user cancels the workflow.
isSync Boolean If true, the workflow runs in
synchronous mode. Default is false.
returnUrlAttribute String Workflow attribute containing a URL to which to redirect users after the workflow finishes its run. Default is
returnUrl.
webformPage String URL of a page that contains a
vco:WebformContainer component, to open a Web form when a user starts a workflow. Default is
system/form.html.
isDialog Boolean If true, the Web form opens in a dialog box. Default is false.
width Float Width of the dialog box. Values less
than 1 define a ratio in relation to the width of the window. Values greater than 1 define the size in pixels. Default is 0.5.
height Float Height of the dialog box. Values less
than 1 define a ratio in relation to the height of the window. Values greater than 1 define the size in pixels. Default is 0.9.
isScheduled Boolean If true, when the workflow starts, the user is prompted for a time and date at which to run the workflow. Default is
false.
isAutostart String If true, the workflow runs with preset default parameters without displaying them to the user. If set to never, the workflow never runs in autostart mode. If false, the workflow runs according to the Autostart property you set in the workflow presentation. Default is
false.
defaultValues HashMap<String, String> A hashmap of default parameter values. If isAutostart is true, these parameters are not seen by the user when the workflow runs. If
isAutostart is false, the workflow opens a parameters dialog box containing these default parameters. The key is the name of the parameter and the value is its string
representation.
The properties of the vco:WorkflowLink component must conform to the following rules: