Table of Contents
Table of Contents 2
Introduction 3
Audience 3
Prerequisites 3
Purpose 3
Application Description 4
Minimum
Requirements 4
Installation 5
1. Assign each component an IP address, host name and other appliance-based
properties 5
2. Start the Application 6
3. Exchange SSH keys for the web user with the grid controller 6
4. Configure CCP scripts 7
5. Copy licenses 8
6. Configure the CCP to access external SMTP server 8
7. Configuring SSH keys (option) 9
8. Firewall considerations 9
Welcome to the DNS Europe Cloud Control Panel (CCP) Installation Guide
Audience
CCP administrators who are responsible for installing, configuring and maintaining the CCP. An intermediate competency with Linux operating systems is required, as is an understanding of core Internet technologies like DNS and TCP/IP.
Prerequisites
Before attempting to use this manual, please ensure you have received your Welcome Mail containing the access details to your Private Cloud and your CCP license file. All DNS Europe private Clouds are provisioned with a copy of the CCP by default. If you are installing the CCP on your own Private Cloud, please ensure the CCP Application is present on your Private Cloud.
Instructions for importing the CCP application to your Private Cloud are in your Welcome Mail.
You will also need the following information & resources:
• 4 free public IP addresses for use with the four components of the CCP application • A valid hostname configured for each of the 4 IP addresses (e.g. oracle.mydomain.
com)
• Browser pop-ups disabled for your private cloud hostname or IP address of your Private Cloud
• Root access to your Private Cloud controller. By default, AppLogic 3tshell is the default login for customers. If you do not have root access, contact your grid maintainers
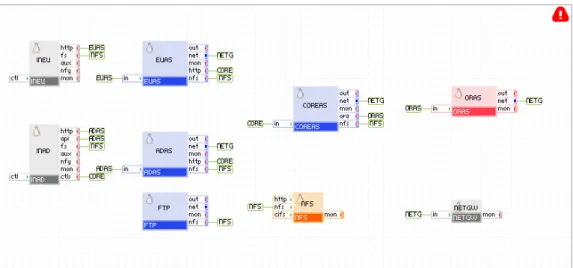
Figure 1. The architecture of the CCP application
There are four components that comprise the CCP application (ccp-xe_v3-2-0): • COREAS - The engine of the application that handles queuing, scheduling and
command execution
• EUAS - The end-user control panel interface • ADAS - The administrator control panel interface
• ORAS - The Oracle database server that powers the application
Besides those four, there are additional components that have the following functions: • INEU, which is input gateway to end-user control panel interface
• INAD, which is input gateway to administrator control panel interface • NFS, which is a storage component that
holds licenses, ssh keys etc
• NETGW, which is an output gateway for some components of the application, for their exit to Internet
• FTP, which is intended to give administrators a standard way to access their control panel for the purpose of uploading license, ssh keys, logos etc
Application Description
Minimum
Requirements
Please ensure you have the following free resources available on your private cloud:
• 1.6 CPU core • 3GB RAM • 50GB storage
1. Assign each component an IP address, host name and other
appliance-based properties
1. Open the AppLogic GUI
2. Right click on the application called “ccp-xe_v3-2-0” 3. Under the “Application” menu item, select “Configure”
4. Select the “Security” tab and add your username to the “Owner” and “Permissions” fields
5. Click OK
6. Click on the application called “ccp-xe_v3-2-0” 7. Select the “Property Values” tab
• For “ineu_ip_addr” enter a free, public IP address you want to assign to the INEU component. This is the IP address that you will use to access end-user control panel
• For “inad_ip_addr” enter a free, public IP address you want to assign to the INAD component. This is the IP address that you will use to access the Administrator’s control panel. Do not use this IP address for any other purpose
• For “netgw_ip_addr” enter a free, public IP address you want to assign to the NETGW component. This is the IP address that you will use to access content on the Internet. Do not use this IP address for any other purpose
• For “ftp_ip_address” enter one of your free, public IP address you want to assign to the FTP component. Do not use this IP address for any other purpose • For “ftp_password” enter an FTP password to be used by the FTP component.
The username is administrator
• For “netmask”, “gateway”, “dns1” and “dns2” enter the appropriate network
• For “admin_allow” enter IP addresses or networks that you wan to explicitely allow to connect to the Administrator Control Panel and ADAS component (comma separated list of IP addresses or networks). If you leave the default of 0.0.0.0/0, then everybody can access the administrator inteface of the CCP. This however would be a serious security risk.
• Click “OK”
8. Save your settings and exit
2. Start the Application
You are now ready to start the application. 1. Open the AppLogic GUI
2. Right click on the application “ccp-xe_v3-2-0” and select “Start”
3. Exchange SSH keys for the web user with the grid controller
Now we will configure the grid controller and CCP to communicate by installing the required encryption keys.
1. Open the AppLogic GUI
2. Click on the application “ccp-xe_v3-2-0” 3. Right click on the component “COREAS” 4. Select “Login”
5. This will pop up a shell prompt window 6. Issue the following commands:
• Type “su - web” and press enter
• Verify that you are in “/home/web” folder by typing “pwd”
• Type “ssh-keygen” and press “enter” 4 times without typing anything (leave all the values at default)
Copy your generated private and public keys (id_rsa, id_rsa.pub) to /mnt/coreas by typing:
• “cp /home/web/.ssh/id_rsa /home/web/.ssh/id_rsa.pub /mnt/coreas”. This will save the necessary files for future CP updates
7. Save the content of the file /home/web/.ssh/id_rsa.pub to a text file on your computer. The file should be named “id_rsa.pub”.
• Select the desired Grid and click on the “Grid Actions” drop menu on the right, select “Manage SSH Keys”
• Tick “Add SSH Kyes”
• In the “SSH Key File” browse for the file “id_rsa.pub” from the location where you saved it on your computer.
• Click the “push keys” button and wait for 30 seconds
The CCP components and the Grid controller have now exchanged keys and can communicate with each other.
You must issue following commands, to complete the certificate exchange process: • Right click to the component “COREAS” and select “Login”
• Type “su - web” and press enter
• Type “ssh root@your_controller_ip 3t app list”
• If you receive question “Are you sure you want to continue connecting (yes/ no)?” type “Yes” and press “Enter”. Copy known_hosts file by typing “cp /home/web/.ssh/known_hosts /mnt/coreas”.
You should see a list of all applications from your Private Cloud.
4. Configure CCP scripts
We now need to modify several scripts with unique information about your Private Cloud. These scripts are part of AppLogic and should be modified with great care.
1. Login to your Grid controller from Putty or Linux by issuing “ssh root@controller_ip” 2. DO NOT GO TO 3tshell
3. Edit the file: /usr/local/applogic/scripts/nfy/nfy_app_state_changed.sh and add the following line after “# *** things to do prior on an application state change should be added here ***”, before “# exit”:
/usr/bin/curl --insecure --connect-timeout 2 https://adas_public_ ip:8082/system/scripts/comp_update_status.php?$MYARGS 1>/dev/null 2>/dev/null
NOTE: “adas_public_ip” is the public IP address that you have given to your INAD component, and which you will use to access the administrators control panel. If you have set-up your DNS zone properly with this IP address, you can use the hostname instead of an IP address.
NOTE: <NAME_OF_GRID> should be replaced with correct name of the Grid that is imported in CCP.
5. Copy licenses
Now you will need to copy the CCP license (ccp-license.txt), received with your welcome mail, to the appropriate locations.
1. Use an FTP client to the FTP component, using the IP address you have previously given it. Use “administrator” as a username and the password you used in the application properties setup dialog
2. Upload your license file to the /licenses folder Your licences have now been installed.
6. Configure the CCP to access external SMTP server
In order to enable sending of notification emails from the CCP application you must configure certain SMTP mail server parameters which are located in a configuration file. To access the configuration file, login via FTP to your CCP application, change directory to: /coreas/ and open configccp.ini in your preferred text editor.
The debug section of the ini file should contain your mail server settings:
[debug]
send_debug_emails = “false” ;true|false set to true if you want to allow sending of the debug emails to the Dnseurope development team
smtp_server = “smtp.example.com” ;SMTP server host
smtp_server_port = “25” ;set the SMTP port for the server
smtp_secure_type = “” ;empty|ssl|tls
smtp_password = “” ;smtp account password if smtp_server_auth is on
smtp_from_email = “[email protected]”
7. Configuring SSH keys (option)
For secure access to both administrative panels (end-user and administrator, EUAS/ ADAS) through a web browser, you need a secure channel for communication. This is why two SSL certificates are needed, one for each of the components.
They should be regular Apache/mod_ssl type, with key size of 2048 bytes, and should be PEM encoded.
You should obtain them from a valid Certificate Authority (CA), or you can create a self-signed certificates for a test environment.
Either way, you have to create a valid certificate-signing request, which will hold the correct data for both of administrative panels, most important being the full hostname for these components, for example euas.mydomain.com and adas.mydomain.com.
If you acquire the certificates from a CA or you self-sign them, and they are two separate files, like cert.key and cert.crt, you can convert them to one PEM encoded certificate by simply appending one to another.
The CCP requires that the key for EUAS is named “EUAS.pem”, and for ADAS is named “ADAS.pem”.
Finally, when they are in proper format and have proper names, you simply upload them to the FTP component and put them in the /sslkeys folder.
For test purposes, DNSE will leave a pair of certificates already present so that you can test the control panel, but you should replace them with your own as soon as you start using the CCP in a production environment.
8. Firewall considerations
We strongly recommend that you configure your external firewall rules to restrict access with the following rule-set:
2. Attempt to log in using the default username and password (username : admin / password : admin123 )
If you have successfully installed the CCP, you should be presented with the Dashboard page. You may now proceed to configure your CCP with the Admin User Guide.
If you are unable to log in for any reason, review your steps, then contact [email protected]