Building A Web Database Using Contextual Mode
Introduction
This tutorial will walk you through the steps necessary to build a simple database that you can deploy on the Web. It is assumed that you are already familiar with creating databases in 4th Dimension. If you are new to 4D it is recommended that you complete the Quick Start Tutorial found on the 4D v6.5 Product Line CD before using this tutorial.
There are two basic ways in which a Web browser can connect to a 4th Dimension Database: Contextual and Non Contextual connections.
Context versus Non Context
When building a database that will be deployed on the Web, you need to consider how the browser will interact with 4D's Web server. When using contextual mode 4D will create a process and assign that process to handle the interaction between the browser and 4D. The contextual mode causes 4D to keep a current selection of records and variables for each browser connection. In essence, the Web server treats the browser as though it was a 4D client and tracks its navigation through the database.
When web serving using the non contextual mode, 4D's Web server acts as a traditional Web Server. It receives HTTP requests and fulfills the request without regard to
maintaining a current selection of records or tracking the browser's navigation through the database.
4D Sales Leads
Let's assume you are an inside sales representative at a company that sells life insurance specializing in high-risk policies. It is your job to generate leads for the sales people in the field. Each sales person has a laptop that they use to access their email and the Internet. Your job is difficult because you have to call or email the appropriate field representative every time you generate a new lead. Having to contact each representative is time consuming and prevents you from generating more leads. You need an efficient way to relay sales leads to the field. You decide to build a simple database that you can deploy on the Web. This will allow you to enter leads in real time and prevent you from having to contact the sales people individually.
Create The Database Structure
Step 1: Create a New Database Called "4D Sales Leads"
• Double click on the v6.5 Icon
• Select the "Create a Blank Database" option • In the save dialog, type "4D Sales Leads"
Step 2: Define the Tables and Fields for the Database
• Double click on Table 1 to get the Table Properties dialog • Rename the Table to "Leads"
• Create the following fields for the Leads table Leads Table
Field Name Data Type / Attributes
Lead_ID Long Integer / Indexed, Unique
Gen_Date Date / Indexed
Gen_Time Time / Indexed
Sales_ID Long Integer / Indexed
Name Alpha-30 / Indexed
Address Alpha-60
City Alpha-30 / Indexed
State Alpha-2 / Indexed
Zip Alpha-10 / Indexed
Phone Alpha-12 / Indexed
Email Alpha-30
Occupation Alpha-30
Contact_By Date / Indexed
• From the Structure Menu create a new table and name it "Sales Person" • Create the following field and the Sales Person table
Sales Person
Field Name Data Type / Attributes
Sales_ID Long Integer / Indexed, Unique
Name Alpha-30 / Indexed
Step 3: Define the Relation
• Draw a relation from ([Leads]; Sales_ID) to ([Sales Person]; Sales_ID)
• In the Relation Properties dialog select, "Auto assign related value in subform" The structure for 4D Sales Leads should look similar to Figure 1.
Build the Forms
Step 1: User Environment Forms
• To create simple, quick forms go to the User Environment.
• From the "Create Default Forms" dialog, select the "Yes for All" button. This will create input and output forms for both tables.
Step 2: Build the Web Forms
Due to the limitations of HTML, it's a good idea to build specific forms in 4D for deployment on the Web. The simpler the form, the better chance it will be compatible with the more popular Web browsers. Fortunately, 4D has a built-in Web Template just for this purpose.
• Create a new form for the Leads table
• In the "New Form Wizard" dialog, name the form "Web Input" • The form type should be "Detail Form"
• Choose the Web Aware template
• Select the fields, copying the order shown in figure 1 below • Click on the "Advanced" button.
• Select the "Buttons" tab
• Change the button family from "Meta Balls" to "Magnet" • The "Selected Actions" section should include in order:
1. Delete Record 2. Previous Record 3. Next Record 4. Cancel 5. OK • Click "OK"
• From the dialog select "Yes" to create a new template. • Name the template "Web Input"
Figure 2.
Now the Leads table needs a Web output form.
• Create a new form for the Leads table
• In the "New Form Wizard" dialog, name the form "Web Output" • The form type should be "List Form"
• Choose the Web Aware template
• Select the fields, copying the order shown in figure 2 below • Click on the "Advanced" button.
• Select the "Buttons" tab
• Change the button family from "Meta Balls" to "Magnet" • The "Selected Actions" section should include "Done". • Click "OK"
• From the dialog select "Yes" to create a new template. • Name the template "Web Output"
• Click "Edit"
Create a Menu Bar
Now that the forms have been created, it's time to design a menu bar that will be
displayed when a browser connects to the database. You want the sales people to be able to do two simple things.
1. View a list of all the current leads 2. Query the current leads
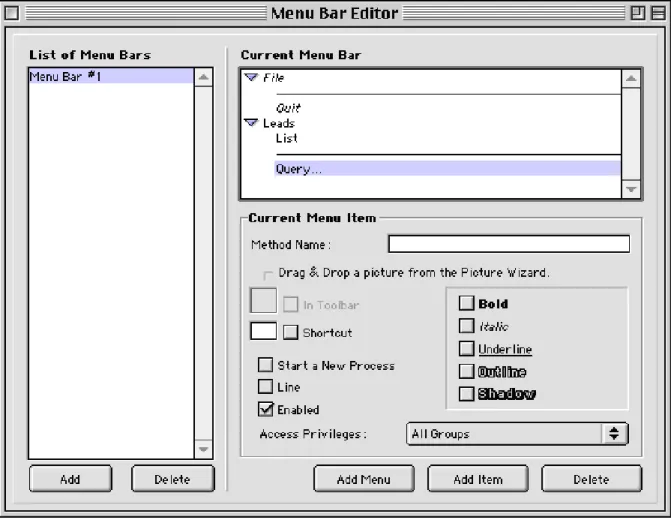
Step 1: Create the Menu Bar
• Create Menu Bar #1 from the Menu Bar Editor
• Add a separator line between the default File and Quit Menu Items • Add a Menu and name it "Leads"
• Add a Menu Item called "List" • Add a separator line
• Add a Menu Item called "QueryÉ"
Figure 4 shows what the Menu Bar Editor should look like.
Step 2: Create the Methods for the Menu Bar
• Create a method that lists the leads for a Web connection `Method: M_List
Input Form([Leads];"Web Input") Output Form([Leads];"Web Output") All Records([Leads])
Modify Selection([Leads])
• Create a method that displays 4D's built in Web query form `Method: M_Query
Input Form([Leads];"Web Input") Output Form([Leads];"Web Output") Query ([Leads])
Modify Selection([Leads])
Step 3: Assign the Methods to the Menu Items
• Drag and drop the methods to the Menu Bar Editor.
Try it out
Now that everything is in place, let's try it out. The forms are basic and will need some further work, but the functionality should be complete at this point.
Step 1: Create Some Records in the User Environment
There is no mechanism for entering leads and sales people into the database from the web. For simplicity sake, each lead and sales person record can be entered from the User Environment.
• Switch to the User Environment and enter a new record for the Sales Person table • Enter and save the information shown in Figure 5
• Create a new record for the Leads table
• Enter and save the information shown in Figure 6
Figure 6.
Step 2: Connect with a browser
Now try to connect to the database via a browser. You should see the menu bar we created.
Figure 7.
• The Web form should look similar to Figure 8
Figure 8.
*Note: 4D's display default is set to show an input form if there is only one record in the table. To see the output form you need to enter another records in the Leads table.
• Cancel the record and choose "QueryÉ" from the menu bar • Make sure the Query Editor is displayed correctly.
Summary
You've now completed a simple database that can be deployed on the Web using the contextual mode. As a lead generator, you now can enter leads into the database and let the sales people extract the leads at will. Once a sales person has contacted the lead they can delete the record.
Polishing the Database
Granted, we now have a functioning database but it lacks some formatting and reporting. Here are some ideas that will polish this database into a usable application.
• Add in the sales person name field in the Leads input form
• Rearrange the fields in the Web Input form to form a more logical grouping • Format the time field
• Format the date field
• Change the form labels to a more user friendly format • Add a status field for the Lead table