Access Database
Problem: Create a simple Access database. Part 1 Create the database and table 1. Start MS Access
2. Select File | New
3. Click the Blank database option in the task pane.
4. Save your database in My Documents using the name “My CDs”. Click on Create.
• An Access database consists of one or more tables for storing the data. To create a table, you describe the structure of the table by describing the fields within the table.
• For each field, you indicate the following:
a) Field name – each field in a table must have a unique name.
b) Data type – the type of data the field will contain, e.g. text, number, date, currency, etc. c) Description – optional detailed description about the field.
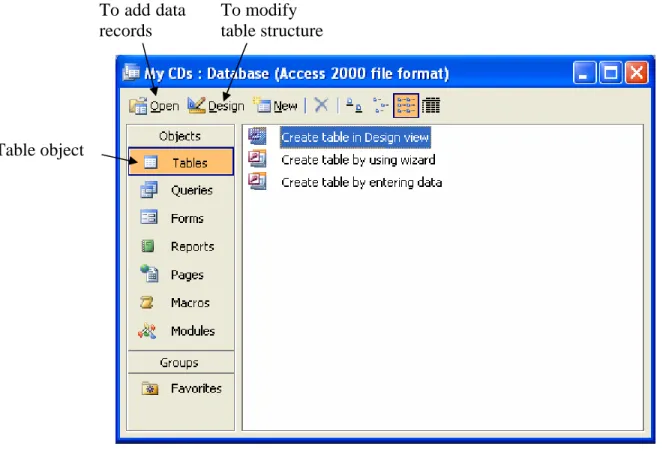
5. Select the Tables object.
6. Double-click on “Create table in Design view.”
7. For each field (row), type in the field name, data type, and optional description. Use the Tab key to move to the next column.
To add data records
To modify table structure
• For the first field, the field name is “Key”, the data type is AutoNumber, and the description is “Key index.” We also want to make this field the primary key, so click on the Primary Key button.
Primary Key button
8. Type in “UPC” for the second field name. Press the F6 key or click with the mouse to move cursor to the Field Size entry area. For the Field Size, type in 12 as the size of the UPC field. Press F6 again to return to the Data Type column. The data type for this field is “Text.”
Field size Format
9. Repeat steps 7 and 8 to make the entries for the table as shown below. Field Name Data Type Field
Size
Primary Key?
Description
Key AutoNumber Yes Key index
UPC Text 12 No UPC number of CD
CDTitle Text 70 No Title of CD
CDLabel Text 20 No Label of CD
ReleaseDate Date/Time No Date the CD was released
TotalTracks Number No Total number of tracks on the CD
TrackNumber Number No Track number
TrackTitle Text 50 No Track title
Composer Test 30 No Composer of title
Artist Text 50 No Artist of title
10.For the Release Date field, select Short Date for the Format.
11.Click the Save button to save your table. When prompt for the table name, type in CDs. Close the table window.
12.Exit Access.
13.Start Access and open your database again by double-clicking on your database file. 14.When you get the message “Do you want to block unsafe expressions?” click No. 15.In the next security warning where it asks “Do you want to open this file?” click Yes. 16.In the next security warning where it asks “Do you want to open this file?” click Open.
17.To make changes to the table structure, select the table name, and then click on Design. To open the table for entering data, you can either double-click on the table name, or select the table and click on Open.
Part 2 Create a data entry form
After creating a table, the next step is to create a form for entering data into the table. Note that for simple data entry, you can simply open the table. Using a form for data entry is only needed if you want to customize the data entry user interface, such as putting a logo and a name.
1. Select the Forms object.
2. Double-click on “Create form by using wizard.” To add data
records
To modify table structure
The CDs table you have just created
3. In the Form Wizard window, select the CDs table. Click on the double-right arrow to move all of the fields from the Available Fields column to the Selected Fields column.
4. Click on the Key field in the Selected Fields column and click on the left arrow to move the Key field back to the Available Fields column. Click Next. Select the Justified layout. Click Next.
5. Select a style that you prefer. Click Next. 6. Click Finish.
7. At this point, you should have a form that looks like the following.
8. Click on the Design button to customize the form.
Double-right arrow
Data entry fields Field labels
9. Make more space for the Form Header by dragging on the bottom edge of the Form Header divider line.
Design button Tool box
Label tool Drag here to change the height of the Form Header
Image tool
First row
10.Use the Image tool to insert a picture of a CD. Use the Label tool to type in the words “My CD Collection” and your name.
11.Space out the first row of field labels and data entry fields with the second row by selecting everything in the second row and then dragging it down.
12.Insert a space in all of the field labels with double words. 13.Your form should be similar to the sample.
14.Save your form.
Part 3 Adding data records to a table
We are now ready to open up the form to enter data into the table. 1. Select the CDs form.
2. Click on the Open button to open the form.
3. Type in the data as shown below:
UPC CD Title CD Label Release Date Total Tracks Track Number Track Title Composer Artist 724384489021 The Most Relaxing Classical Album in the World…Ever! Angel Records 03/30/1999 18 1 Air On the G String J.S. Bach Academy of St. Martin In the Fields 724384489021 The Most Relaxing Classical Album in the World…Ever! Angel Records 03/30/1999 18 3 Canon In D Pachelbel Academy of St. Martin In the Fields 724384489021 The Most Relaxing Classical Album in the World…Ever! Angel Records 03/30/1999 18 11 The Swan
Saint-Saens Pre & Ellis
886970267328 Siempre Sony 11/21/2006 10 1 Nights in White Satin
Il Divo Il Divo
886970267328 Siempre Sony 11/21/2006 10 9 Musica Il Divo Il Divo 4. Click the Save button to save your data.
Part 4 Create a report
1. We will now create a report of the data. Select the Reports Object and click on Create report by using wizard.
2. In the Report Wizard window, select the CDs table. Click on the double-right arrow to move all of the fields from the Available Fields column to the Selected Fields column. Move the Key field back to the Available Fields column. Click Next.
3. To answer the grouping levels question, select CDTitle and click on the right arrow . Click Next.
4. For the sort order, first sort by TrackNumber. Click Next.
5. Select the Stepped Layout. Click Next. 6. Select a style that you like. Click Next. 7. Click Finish.
8. View the report that you have just created. Some of the fields are too narrow so the data is hidden.
9. Select the report and click on Design. Modify the design to look like the following. Designing the report is similar to designing the form.
10.Add your name at the top of the report.
11.Adjust the fields so that all of the data is visible and the layout is nicely done. 12.Turn in a printed copy of your report.