Technologies and factors to consider for the successful deployment
of IP-based security surveillance and remote monitoring applications.
The move to open video systems—combined with the benefits of networking, digital
imaging, and camera intelligence—constitutes a far more effective means of security
surveillance and remote monitoring than has ever been reached before. Network video
provides everything that analog video offers, plus a wide range of innovative functions
and features that are only possible with digital technology.
Before setting up your own system, you need to consider what features are required.
It is equally important to consider factors such as performance, interoperability,
scalability, flexibility and future-proof functionality. This guide will walk you through
these factors, helping you to achieve a solution that fully takes advantage of the
potential of network video technology.
The best in network video
Axis is the global market leader in network video. We were first to bring the benefits of network video technology to professional video surveillance and remote monitoring applications, intro-ducing the world’s first network camera in 1996. With more than two decades of experience in networking technologies, the largest installed base of network video products, as well as strong partnerships with leading players across all continents, Axis is the partner of choice in network video.
Flexible, scalable solutions
Using open technology standards that enable easy integration and scalability, Axis offers a full range of network video solutions for surveillance and remote monitoring applications in a broad spectrum of industry segments. Our cutting-edge portfolio comprises network cameras that redefine the categories they represent, as well as video encoders that enable cost-effective migration to the best in network video technology. Our offering also includes comprehensive video management software solutions and a full range of accessories.
Welcome to the Axis technical guide
to network video
Table of contents
Network video: overview, benefits and applications 7
1.1 Overview of a network video system 7
1.2 Benefits 8 1.3 Applications 12 1.3.1 Retail 12 1.3.2 Transportation 12 1.3.3 Education 12 1.3.4 Industrial 13 1.3.5 City surveillance 13 1.3.6 Government 13 1.3.7 Healthcare 13
1.3.8 Banking and finance 14
Network cameras 15
2.1 What is a network camera? 15 2.2 Types of network cameras 16
2.2.1 Fixed network cameras 17
2.2.2 Fixed dome network cameras 17 2.2.3 PTZ cameras and PTZ dome cameras 18 2.3 Day and night network cameras 21
2.4 Megapixel network cameras 23
2.5 Guidelines for selecting a network camera 24
Camera elements 27
3.1 Light sensitivity 27
3.2 Lens elements 28
3.2.1 Field of view 28
3.2.2 Matching lens and sensor 30
3.2.3 Lens mount standards 31
3.2.4 F-number and exposure 31
3.2.5 Manual or automatic iris 32
3.2.6 Depth of field 33
3.3 Image sensors 34
3.3.1 CCD technology 34
3.3.2 CMOS technology 34
3.3.3 Megapixel sensors 35
3.4 Image scanning techniques 35
3.4.1 Interlaced scanning 35
3.4.2 Progressive scanning 36
3.5 Image processing 37
3.5.1 Backlight compensation 37
3.5.2 Exposure zones 37
3.5.3 Wide dynamic range 37
Camera protection and housings 39
4.1 Camera enclosures in general 39
4.2 Transparent covering 40
4.3 Positioning a fixed camera in a housing 40
4.4 Environmental protection 41
4.5 Vandal and tampering protection 41
4.5.1 Camera/housing design 41 4.5.2 Mounting 42 4.5.3 Camera placement 43 4.5.4 Intelligent video 43 4.6 Types of mounting 43 4.6.1 Ceiling mounts 43 4.6.2 Wall mounts 44 4.6.3 Pole mounts 44 4.6.4 Parapet mounts 44 Video encoders 45
5.1 What is a video encoder? 45
5.1.1 Video encoder components and considerations 46 5.1.2 Event management and intelligent video 47
5.2 Standalone video encoders 47
5.3 Rack-mounted video encoders 48
5.4 Video encoders with PTZ cameras and PTZ domes 48
5.5 Deinterlacing techniques 49
5.6 Video decoder 50
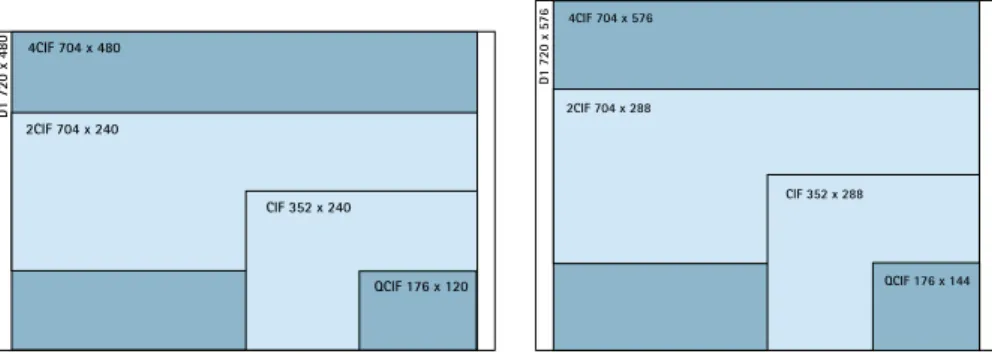
Resolutions 51
6.1 NTSC and PAL resolutions 51
6.2 VGA resolutions 52
6.3 Megapixel resolutions 53
6.4 High-definition television (HDTV) resolutions 54
Video compression 55
7.1 Compression basics 55
7.1.1 Video codec 55
7.1.2 Image compression vs. video compression 56
7.2 Compression formats 59
7.2.1 Motion JPEG 59
7.2.2 MPEG-4 60
7.2.3 H.264 or MPEG-4 Part 10/AVC 60 7.3 Variable and constant bit rates 61
7.4 Comparing standards 61
Audio 63
8.1 Audio applications 63
8.2 Audio support and equipment 64
8.3 Audio modes 65
8.3.1 Simplex 65
8.3.2 Half duplex 66
8.4 Audio detection alarm 66
8.5 Audio compression 66
8.5.1 Sampling frequency 67
8.5.2 Bit rate 67
8.5.3 Audio codecs 67
8.6 Audio and video synchronization 67
Network technologies 69
9.1 Local area network and Ethernet 69 9.1.1 Types of Ethernet networks 70
9.1.2. Switch 71
9.1.3 Power over Ethernet 73
9.2 The Internet 75
9.2.1 IP addressing 76
9.2.2 Data transport protocols for network video 80
9.3 VLANs 82
9.4 Quality of Service 82
9.5 Network Security 84
9.5.1 Username and password authentication 84
9.5.2 IP address filtering 84
9.5.3 IEEE 802.1X 84
9.5.4 HTTPS or SSL/TLS 85
9.5.5 VPN (Virtual Private Network) 85
Wireless technologies 87
10.1 802.11 WLAN standards 88
10.2 WLAN security 88
10.2.1 WEP (Wired Equivalent Privacy) 89 10.2.2 WPA/WPA2 (WiFi Protected Access) 89
10.2.3 Recommendations 89
10.3 Wireless bridges 89
Video management systems 91
11.1 Hardware platforms 91
11.1.1 PC server platform 91
11.1.2 NVR platform 92
11.2 Software platforms 93
11.2.1 Built-in functionality 93 11.2.2 Windows client-based software 93
11.2.3 Web-based software 94
11.2.4 Scalability of video management software 94 11.2.5 Open vs. vendor-specific software 94
11.3 System features 94
11.3.1 Viewing 95
11.3.2 Multi-streaming 95
11.3.3 Video recording 96
11.3.4 Recording and storage 97
11.3.5 Event management and intelligent video 97 11.3.6 Administration and management features 102
11.4 Integrated systems 104 11.4.1 Application programming interface 104
11.4.2 Point of Sale 104
11.4.3 Access control 105
11.4.4 Building management 105
11.4.5 Industrial control systems 106
11.4.6 RFID 106
Bandwidth and storage considerations 107
12.1 Bandwidth and storage calculations 107
12.1.1 Bandwidth needs 107
12.1.2 Calculating storage needs 108
12.2 Server-based storage 110
12.3 NAS and SAN 110
12.4 Redundant storage 112
12.5 System configurations 113
Tools and resources 115
Axis Communications’ Academy 117
Network video: overview, benefits and
applications
Network video, like many other kinds of communications such as e-mail, web services
and computer telephony, is conducted over wired or wireless IP (Internet Protocol)
networks. Digital video and audio streams, as well as other data, are communicated
over the same network infrastructure. Network video provides users, particularly in
the security surveillance industry, with many advantages over traditional analog CCTV
(closed-circuit television) systems.
This chapter provides an overview of network video, as well as its benefits and
appli-cations in various industry segments. Comparisons with an analog video surveillance
system are often made to provide a better understanding of the scope and potential of
a digital, network video system.
1.1
Overview of a network video system
Network video, often also called IP-based video surveillance or IP-Surveillance as it is applied in the security industry, uses a wired or wireless IP network as the backbone for transporting digital video, audio and other data. When Power over Ethernet (PoE) technology is applied, the network can also be used to carry power to network video products.
A network video system allows video to be monitored and recorded from anywhere on the net-work, whether it is, for instance, on a local area network (LAN) or a wide area network (WAN) such as the Internet.
Figure 1.1a A network video system comprises many different components, such as network cameras, video encoders and video management software. The other components including the network, storage and servers are all standard IT equipment.
The core components of a network video system consist of the network camera, the video encoder (used to connect to analog cameras), the network, the server and storage, and video management software. As the network camera and the video encoder are computer-based equipment, they have capabilities that cannot be matched by an analog CCTV camera. The network camera, the video encoder and the video management software are considered the cornerstones of an IP-Surveillance solution.
The network, the server and storage components are all standard IT equipment. The ability to use common off-the-shelf equipment is one of the main benefits of network video. Other compo-nents of a network video system include accessories, such as camera housings and PoE midspans and active splitters. Each network video component is covered in more detail in other chapters.
1.2
Benefits
The digital, network video surveillance system provides a host of benefits and advanced func-tionalities that cannot be provided by an analog video surveillance system. The advantages include remote accessibility, high image quality, event management and intelligent video capa-bilities, easy integration possibilities and better scalability, flexibility and cost-effectiveness. > Remote accessibility: Network cameras and video encoders can be configured and accessed remotely, enabling multiple, authorized users to view live and recorded video at any time and from virtually any networked location in the world. This is advantageous if users would like a third-party company, such as a security firm, to also gain access to the video. In a traditional analog CCTV system, users would need to be at a specific, on-site monitoring
AXIS Q7406Video Encoder Blade
AXIS Q7406 Video Encoder Blade
0-0- AXIS Q7900 Rack 100-240 50-50 Hz 4-2 A FNP 30 Power-one AC ACTIVITYLOOPNETWORK1 2 3 4 PS1PS2FANS POWER POWER 100-240 AC 50-50 Hz 4-2 A FNP 30 Power-one AC Computer with video management software Axis network cameras
Axis video encoders
Computer with web browser Web browser Office Home Analog cameras IP NETWORK INTERNET AUDIO I/O INOUT 1 2 3 4 5 6
location to view and manage video, and off-site video access would not be possible without such equipment as a video encoder or a network digital video recorder (DVR). A DVR is the digital replacement for the video cassette recorder.
> High image quality: In a video surveillance application, high image quality is essential to be able to clearly capture an incident in progress and identify persons or objects involved. With progressive scan and megapixel technologies, a network camera can deliver better image quality and higher resolution than an analog CCTV camera. For more on progressive scan and megapixel, see chapters 2, 3 and 6.
Image quality can also be more easily retained in a network video system than in an analog surveillance system. With analog systems today that use a DVR as the recording medium, many analog-to-digital conversions take place: first, analog signals are converted in the camera to digital and then back to analog for transportation; then the analog signals are digitized for recording. Captured images are degraded with every conversion between analog and digital formats and with the cabling distance. The further the analog video signals have to travel, the weaker they become.
In a fully digital IP-Surveillance system, images from a network camera are digitized once and they stay digital with no unnecessary conversions and no image degradation due to distance traveled over a network. In addition, digital images can be more easily stored and retrieved than in cases where analog video tapes are used.
> Event management and intelligent video: There is often too much video recorded and lack of time to properly analyze them. Advanced network cameras and video encoders with built- in intelligence or analytics take care of this problem by reducing the amount of uninteresting recordings and enabling programmed responses. Such functionalities are not available in an analog system.
Axis network cameras and video encoders have built-in features such as video motion detec- tion, audio detection alarm, active tampering alarm, I/O (input/output) connections, and alarm and event management functionalities. These features enable the network cameras and video encoders to constantly analyze inputs to detect an event and to automatically respond to an event with actions such as video recording and sending alarm notifications.
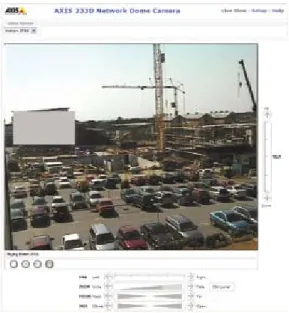
Figure 1.2a Setting up an event trigger using a network camera’s user interface.
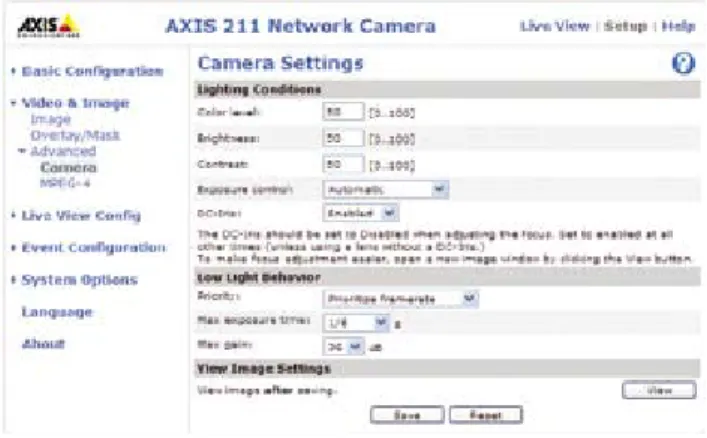
Event management functionalities can be configured using the network video product’s user interface or a video management software program. Users can define the alarms or events by setting the type of triggers to be used and when. Responses can also be configured (e.g., recording to one or multiple sites, whether local and/or off-site for security purposes; activation of external devices such as alarms, lights and doors; and sending notification messages to users). For more on video management, see Chapter 11.
> Easy, future-proof integration: Network video products based on open standards can be easily integrated with computer and Ethernet-based information systems, audio or security systems and other digital devices, in addition to video management and application software. For instance, video from a network camera can be integrated into a Point of Sales system or a building management system. For more on integrated systems, see Chapter 11.
> Scalability and flexibility: A network video system can grow with a user’s needs. IP-based systems provide a means for many network cameras and video encoders, as well as other types of applications, to share the same wired or wireless network for communicating data; so any number of network video products can be added to the system without significant or costly changes to the network infrastructure. This is not the case with an analog system. In an analog video system, a dedicated coaxial cable must run directly from each camera to a
viewing/recording station. Separate audio cables must also be used if audio is required. Net- work video products can also be placed and networked from virtually any location, and the system can be as open or as closed as desired.
> Cost-effectiveness: An IP-Surveillance system typically has a lower total cost of ownership than a traditional analog CCTV system. An IP network infrastructure is often already in place and used for other applications within an organization, so a network video application can piggyback off the existing infrastructure. IP-based networks and wireless options are also much less expensive alternatives than traditional coaxial and fiber cabling for an analog CCTV system. In addition, digital video streams can be routed around the world using a variety of interoperable infrastructure. Management and equipment costs are also lower since back-end applications and storage run on industry standard, open systems-based servers, not on proprietary hardware such as a DVR in the case of an analog CCTV system. Furthermore, Power over Ethernet technology, which cannot be applied in an analog video system, can be used in a network video system. PoE enables networked devices to receive power from a PoE-enabled switch or midspan through the same Ethernet cable that transports data (video). PoE provides substantial savings in installation costs and can increase the reliability of the system. For more on PoE, see Chapter 9.
Figure 1.2b A system that uses Power over Ethernet.
PoE-enabled switch Uninterruptible Power
Supply (UPS)
3115
Network camera with built-in PoE
Network camera without built-in PoE
Active splitter
1.3
Applications
Network video can be used in an almost unlimited number of applications; however, most of its uses fall under security surveillance or remote monitoring of people, places, property and opera-tions. The following are some typical application possibilities in key industry segments.
1.3.1 Retail
Network video systems in retail stores can significantly reduce theft, improve staff security and optimize store management. A major benefit of network video is that it can be integrated with a store’s EAS (elec-tronic article surveillance) system or a POS (point of sale) system to provide a picture and a record of shrinkage-related activities. The sys-tem can enable rapid detection of potential incidents, as well as any false alarms. Network video offers a high level of interoperability and gives the shortest return on investment.
Network video can also help identify the most popular areas of a store and provide a record of consumer activity and buying behaviors that will help optimize the layout of a store or display. It can also be used to identify when shelves need to be restocked and when more cash registers need to be opened because of long queues.
1.3.2 Transportation
Network video can enhance personal safety and overall security at air-ports, highways, train stations and other transit systems, as well as in mobile transport such as in buses, trains and cruise ships. Network video can also be used to monitor traffic conditions to reduce conges-tion and improve efficiency. Many installaconges-tions in the transportaconges-tion sector require only the best systems, involving high image quality (which can be provided by progressive scan technology in network cameras), high frame rates and long retention times. In some demand-ing environments such as on buses and trains, Axis offers network cameras that can withstand varying temperatures, humidity, dust, vibrations and vandalism.
1.3.3 Education
From daycare centers to universities, network video systems have helped deter vandalism and increase the safety of staff and students. In education facilities where an IT infrastructure is already in place, network video presents a more favorable and cost-effective solution than an analog system because new cabling is often not required. In addition, event management features in network video can generate alarms and give security operators accurate, real-time images on
which to base their decisions. Network video can also be used for remote learning; for example, for students who are unable to attend lectures in person.
1.3.4 Industrial
Network video can be used to monitor and increase efficiencies in manufacturing lines, processes and logistic systems, and for securing warehouses and stock control systems. Network video can also be used to set up virtual meetings and get technical support at a distance.
1.3.5 City surveillance
Network video is one of the most useful tools for fighting crime and protecting citizens. It can be used to detect and deter. The use of wireless networks has enabled effective city-wide deployment of network video. The remote surveillance capabilities of network video have enabled police to respond quickly to crimes being committed in live view.
1.3.6 Government
Network video products are used to secure all kinds of public build-ings, from museums and offices to libraries and prisons. Cameras placed at building entrances and exits can record who comes in and out, 24 hours a day. They are used to prevent vandalism and increase security of staff. With intelligent video applications such as people counting, network video can provide statistical information, such as the number of visitors to a building.
1.3.7 Healthcare
Network video enables cost-effective, high-quality patient monitor-ing and video surveillance solutions that increase the safety and security of staff, patients and visitors, as well as property. Authorized hospital staff can, for example, view live video from multiple loca-tions, detect activity and provide remote assistance.
1.3.8 Banking and finance
Network video is used in security applications in bank branches, headquarters and ATM (automated teller machine) locations. Banks have been using surveillance for a long time, and while most instal-lations are still analog, network video is starting to make inroads, especially in banks that value high image quality and want to be able to easily identify people in a surveillance video.
Network video is a proven technology and the shift from analog systems to IP-Surveillance is rapidly taking place in the video surveillance industry. For case studies, visit www.axis.com/ success_stories/
Network cameras
There is a wide range of network cameras to meet a variety of requirements. This
chapter describes what a network camera is and explains the different camera types.
Information is also provided about day and night, and megapixel network cameras.
A camera selection guide is included at the end of the chapter.
For more on camera
elements, see Chapter 3.
2.1
What is a network camera?
A network camera, often also called an IP camera, can be described as a camera and computer combined in one unit. The main components of a network camera include a lens, an image sensor, one or several processors, and memory. The processors are used for image processing, compression, video analysis and networking functionalities. The memory is used for storing the network camera’s firmware (computer program) and for local recording of video sequences. Like a computer, the network camera has its own IP address, is connected directly to a network and can be placed wherever there is a network connection. This differs from a web camera, which can only operate when it is connected to a personal computer (PC) via the USB or IEEE 1394 port, and to use it, software must be installed on the PC. A network camera provides web server, FTP (File Transfer Protocol), and e-mail functionalities, and includes many other IP net-work and security protocols.
Figure 2.1a A network camera connects directly to the network.
PoE switch Axis network camera
Computer with video management software
A network camera can be configured to send video over an IP network for live viewing and/or recording either continuously, at scheduled times, on an event or on request from authorized users. Captured images can be streamed as Motion JPEG, MPEG-4 or H.264 video using various networking protocols, or uploaded as individual JPEG images using FTP, e-mail or HTTP (Hyper-text Transfer Protocol). For more on video compression formats and networking protocols, see chapters 7 and 9, respectively.
In addition to capturing video, Axis network cameras provide event management and intelligent video functionalities such as video motion detection, audio detection, active tampering alarm and auto-tracking. Most network cameras also offer input/output (I/O) ports that enable connections to external devices such as sensors and relays. Other features may include audio capabilities and built-in support for Power over Ethernet (PoE). Axis network cameras also support advanced security and network management features.
Figure 2.1b Front and back of a network camera.
2.2
Types of network cameras
Network cameras can be classified in terms of whether they are designed for indoor use only or for indoor and outdoor use. Outdoor network cameras often have an auto iris lens to regulate the amount of light the image sensor is exposed to. An outdoor camera will also require an external, protective housing unless the camera design already incorporates a protective enclo-sure. Housings are also available for indoor cameras that require protection from harsh environ-ments such as dust and humidity, and from vandalism or tampering. In some camera designs, vandal and tamper-proof features are already built-in and no external housing is required. For more on camera protection and housings, see Chapter 4.
Network cameras, whether for indoor or outdoor use, can be further categorized into fixed, fixed dome, PTZ, and PTZ dome network cameras.
2.2.1 Fixed network cameras
A fixed network camera, which may come with a fixed or varifocal lens, is a camera that has a fixed field of view (normal/telephoto/wide-angle) once it is mounted. A fixed camera is the traditional camera type where the camera and the direction in which it is pointing are clearly visible. This type of camera represents the best choice in applications where it is advantageous to make the camera very visible. A fixed camera usually enables its lens to be changed. Fixed cameras can be installed in housings designed for indoor or outdoor installation.
Figure 2.2a Fixed network cameras including wireless and megapixel versions.
2.2.2 Fixed dome network cameras
A fixed dome network camera, also called a mini dome, essentially involves a fixed camera that is pre-installed in a small dome housing. The camera can be directed to point in any direction. Its main benefit lies in its discreet, non-obtrusive design, as well as in the fact that it is hard to see in which direction the camera is pointing. The camera is also tamper resistant.
One of the limitations of a fixed dome camera is that it rarely comes with an exchangeable lens, and even if it is exchangeable, the choice of lenses is limited by the space inside the dome housing. To compensate for this, a varifocal lens is often provided to enable the camera’s field of view to be adjusted.
Axis fixed dome cameras are designed with different types of enclosures such as vandal-resistant and/or IP66-rated for outdoor installations. No external housing is required. The mounting of such a camera is usually on a wall or ceiling.
Figure 2.2b Fixed dome network cameras. From left to right: AXIS 209FD and AXIS 216FD (also available in ruggedized and megapixel versions), AXIS P3301 and AXIS 225FD.
2.2.3 PTZ cameras and PTZ dome cameras
A PTZ camera or a PTZ dome camera can manually or automatically pan, tilt and zoom in and out of an area or object. All PTZ commands are sent over the same network cable as for video transmission;no RS-485 wires need to be installed as is the case with an analog PTZ camera. Some of the features that can be incorporated in a PTZ camera or a PTZ dome camera include: > Electronic image stabilization (EIS). In outdoor installations, PTZ dome cameras with zoom factors above 20x are sensitive to vibrations and motion caused by traffic or wind. EIS helps reduce the affects of vibration in a video. In addition to getting more useful video, EIS will reduce the file size of the compressed image, thereby saving valuable storage space. > Privacy masking. Privacy masking, which allows certain areas of a scene to be blocked or masked from viewing and recording, can be made available in various network video products. In a PTZ camera or PTZ dome camera, the functionality has the ability to maintain the privacy masking even as the camera’s field of view changes since the masking moves with the coordinate system.
Figure 2.2c With built-in privacy masking (gray rectangle in image), the camera can guarantee privacy for areas that should not be covered by a surveillance application.
> Preset positions. Many PTZ cameras and PTZ dome cameras enable a number of preset positions
,
normally between 20 and 100,
to be programmed. Once the preset positions have been set in the camera, it is very quick for the operator to go from one position to the next. > E-flip. When a PTZ dome camera is mounted on a ceiling and is used to follow a person in, for example, a retail store, there will be situations when a person will pass just under the camera. When following through on the person, images would be seen upside down without the E-flip functionality. E-flip electronically rotates images 180 degrees in such cases. It is performed automatically and will not be noticed by an operator.> Auto-flip. PTZ cameras, unlike PTZ dome cameras, do not normally have a full 360-degree continuous pan due to a mechanical stop that prevents the cameras from making a continuous circular movement. However, with the Auto-flip functionality, a PTZ network camera can instantly flip the camera head 180 degrees and continue to pan beyond its zero point. The camera can then continue to follow a passing person or object in any direction. > Auto-tracking. Auto-tracking is an intelligent video functionality that will automatically detect a moving person or vehicle and follow it within the camera’s area of coverage. Auto- tracking is particularly beneficial in unmanned video surveillance situations where the occasional presence of people or vehicles requires special attention. The functionality cuts down substantially the cost of a surveillance system since fewer cameras are needed to cover a scene. It also increases the effectiveness of the solution since it allows a PTZ camera or PTZ dome camera to record areas of a scene with activity.
Although PTZ cameras and PTZ dome cameras may share similar functionalities, there are dif-ferences between them:
> PTZ network cameras do not have a full 360-degree continuous pan due to a mechanical stop. It means that the camera cannot follow a person walking continuously in a full circle around the camera. Exceptions are PTZ cameras that have the Auto-flip functionality; for example, AXIS 215 PTZ Network Camera.
> PTZ network cameras are not made for continuous automatic operation or so-called guard tours where the camera automatically moves from one preset position to the next.
More on PTZ network cameras, which are available in mechanical or non-mechanical versions, and PTZ dome network cameras is provided in the next sections.
Mechanical PTZ network cameras
Mechanical PTZ cameras are mainly used indoors and in applications where an operator is employed. The optical zoom on PTZ cameras typically ranges from 10x to 26x. A PTZ camera can be mounted on a ceiling or wall.
Figure 2.2d PTZ network cameras. From left to right: AXIS 212 PTZ-V (non-mechanical), AXIS 213 PTZ, AXIS 214 PTZ and AXIS 215 PTZ.
Non-mechanical PTZ network cameras
A non-mechanical PTZ network camera, such as the AXIS 212 PTZ and its vandal-resistant version (seen above), offers instant pan, tilt, zoom capabilities with no moving parts, so there is no wear and tear. Using a wide-angle lens, it offers a wider field of view than a mechanical PTZ network camera.
Figure 2.2e Images from a non-mechanical PTZ network camera. At left, a 140-degree overview image in VGA reso-lution; at right, image when making a 3x zoom.
A non-mechanical PTZ camera uses a megapixel image sensor and allows an operator to instantly zoom in on any part of a scene without any loss in image resolution. This is achieved by presenting an overview image in VGA resolution (640x480 pixels) even though the camera captures a much higher resolution image. When the camera is instructed to zoom in on any part of the overview image, the camera uses the original megapixel resolution to provide a full 1:1 ratio in VGA resolu-tion. The resulting close-up image offers good details with maintained sharpness. With a normal
digital zoom, the zoomed-in image often loses detail and sharpness. A non-mechanical PTZ camera is ideal for discreet, wall-mounted installations.
PTZ dome network cameras
PTZ dome network cameras can cover a wide area by enabling greater flexibility in pan, tilt and zoom functions. They enable a 360-degree, continuous pan, and a tilt of usually 180 degrees. PTZ dome cameras are ideal for use in discreet installations due to their design, mounting (particularly in drop-ceiling mounts), and difficulty in seeing the camera’s viewing angle (dome coverings can be clear or smoked).
A PTZ dome network camera also provides mechanical robustness for continuous operation in guard tour mode, whereby the camera automatically moves from one preset position to the next in a pre-determined order or at random. Normally up to 20 guard tours can be set up and acti-vated during different times of the day. In guard tour mode, one PTZ dome network camera can cover an area where 10 fixed network cameras would be needed. The main drawback is that only one location can be monitored at any given time, leaving the other nine positions unmonitored. The optical zoom of a PTZ dome typically ranges between 10x and 35x. A PTZ dome is often used in situations where an operator is employed. This type of camera is usually mounted on a ceiling if used indoors, or on a pole or wall of a building in outdoor installations.
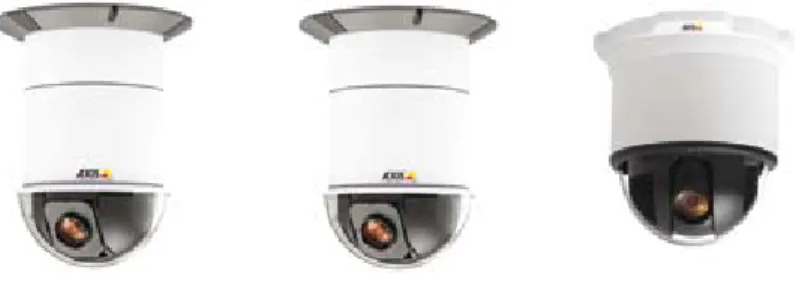
Figure 2.2f PTZ dome network cameras. From left to right: AXIS 231D+, AXIS 232D+, AXIS 233D.
2.3
Day and night network cameras
All types of network cameras—fixed, fixed dome, PTZ, and PTZ dome—can offer day and night functionality. A day and night camera is designed to be used in outdoor installations or in indoor environments with poor lighting.
A day and night, color network camera delivers color images during the day. As light diminishes below a certain level, the camera can automatically switch to night mode to make use of near-infrared (IR) light to deliver high-quality, black and white images.
Near-infrared light, which spans from 700 nanometers (nm) up to about 1000 nm, is beyond what the human eye can see, but most camera sensors can detect it and make use of it. During the day, a day and night camera uses an IR-cut filter. IR light is filtered out so that it does not distort the colors of images as the human eye sees them. When the camera is in night (black and white) mode, the IR-cut filter is removed, allowing the camera’s light sensitivity to reach down to 0.001 lux or lower.
Figure 2.3a The graph shows how an image sensor responds to visible and near-IR light. Near-IR light spans the 700 nm to 1000 nm range.
Figure 2.3b Image at left, IR-cut filter in a day/night network camera; middle, position of IR-cut filter during day-time; at right, position of IR-cut filter during nighttime.
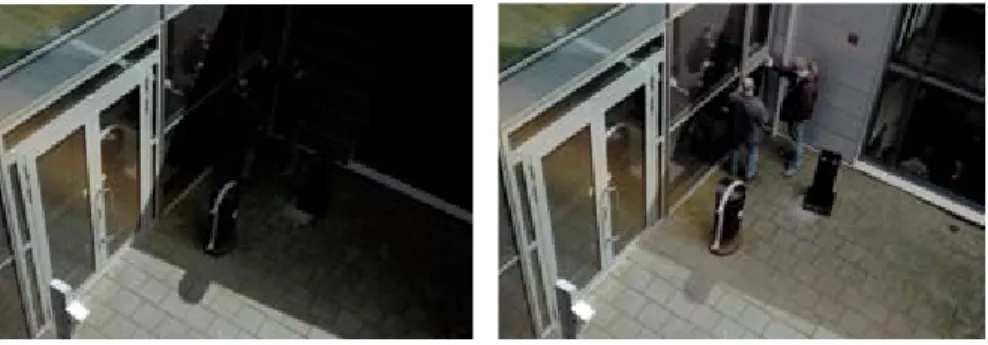
Day and night cameras are useful in environments that restrict the use of artificial light. They include low-light video surveillance situations, covert surveillance and discreet applications, for example, in a traffic surveillance situation where bright lights would disturb drivers at night. An IR illuminator that provides near-infrared light can also be used in conjunction with a day and night camera to further enhance the camera’s ability to produce high-quality video in low-light or nighttime conditions. For more information on IR illuminators, visit Axis’ website at www.axis.com/products/cam_irillum
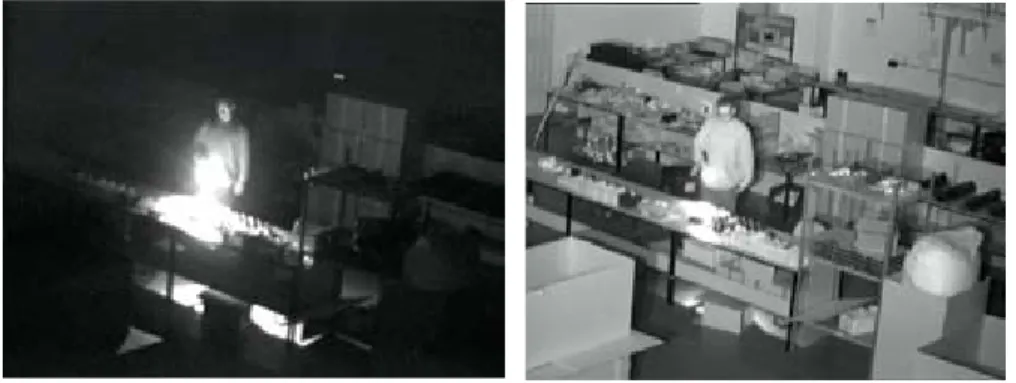
Figure 2.3c At left, image without an IR illuminator; at right, image with an IR illuminator.
2.4
Megapixel network cameras
Megapixel network cameras, available in Axis’ fixed cameras and fixed dome cameras, incorpo-rate a megapixel image sensor to deliver images with one million or more pixels. This is at least two times better pixel resolution than what can be provided by analog cameras.
A megapixel, fixed network camera can be used in one of two ways: it can enable viewers to see greater details in a higher resolution image, which would be helpful in identifying people and objects, or it can be used to cover a larger part of a scene if the image resolution is kept the same as a non-megapixel camera.
Megapixel cameras today are normally less light sensitive than a non-megapixel network camera. The higher-resolution video streams generated by a megapixel camera also put higher demands on the network bandwidth and storage space for recordings, although this can be mitigated by using the H.264 video compression standard. For more on H.264 , see Chapter 7.
2.5
Guidelines for selecting a network camera
With the variety of network cameras available, it is useful to have some guidelines when selecting a network camera.
> Define the surveillance goal: overview or high detail. Overview images aim to view a scene in general or view the general movements of people. High detail images are important for identification of persons or objects (e.g., face or license plate recognition, point-of-sales monitoring). The surveillance goal will determine the field of view, the placement of the camera, and the type of camera/lens required. For more on lenses, see Chapter 3.
> Area of coverage. For a given location, determine the number of interest areas, how much of these areas should be covered and whether the areas are located relatively close to each other or spread far apart. The area will determine the type of camera and number of cameras required.
- Megapixel or non-megapixel. For instance, if there are two, relatively small areas of
interest that are close to each other, a megapixel camera with a wide-angle lens can be used instead of two non-megapixel cameras.
- Fixed or PTZ. (In the following context, fixed cameras refer also to fixed domes
and PTZ cameras refer also to PTZ domes.) An area may be covered by several fixed cameras or a few PTZ cameras. Consider that a PTZ camera with high optical zoom capabilities can provide high detail images and survey a large area. However, a PTZ camera may provide a brief view of one part of its area of coverage at a time, while a fixed camera will be able to provide full coverage of its area all the time. To make full use of the capabilities of a PTZ camera, an operator is required or an automatic tour needs to be set up.
> Indoor or outdoor environment.
- Light sensitivity and lighting requirements. In outdoor environments, consider the use
of day and night cameras. Consider the light sensitivity of the camera required and whether additional lighting or specialized light such as IR lamps is needed. Keep in mind that lux measurements on network cameras are not comparable among different network video product vendors as there is no industry standard for measuring light sensitivity.
- Housing. If the camera is to be placed outdoors or in environments that require protec-
tion from dust, humidity or vandalism, housings are required. For more on housing, see Chapter 4.
> Overt or covert surveillance. This will help in selecting cameras, in addition to housing and mounts, that offer a non-discreet or discreet installation.
Other important feature considerations that may be required of a camera include:
> Image quality. Image quality is one of the most important aspects of any camera, but it is difficult to quantify and measure it. The best way to determine image quality is to install different cameras and look at the video. If capturing moving objects clearly is a priority, it is important that the network camera uses progressive scan technology. For more on progres- sive scan, see Chapter 3.
> Resolution. For applications that require detailed images, megapixel cameras may be the best option. For more on megapixel resolution, see Chapter 6.
> Compression. The three video compression standards offered in Axis network video products are H.264, MPEG-4 and Motion JPEG. H.264 is the latest standard and offers the greatest savings in bandwidth and storage. For more on compression, see Chapter 7.
> Audio. If audio is required, consider whether one- or two-way audio is needed. Axis network cameras with audio support come with a built-in microphone and/or an input for an external microphone and a speaker or a line out for external speakers. For more on audio, see Chapter 8.
> Event management and intelligent video. Event management functionalities are often configured using a video management software program and are supported by input/output ports and intelligent video features in a network camera or video encoder. Making recordings based on event triggers from input ports and intelligent video features in a network video product provides savings in bandwidth and storage use, and allows operators to take care of more cameras since not all cameras require live monitoring unless an alarm/event takes place. For more on event management functions, see Chapter 11.
> Networking functionalities. Considerations include PoE; HTTPS encryption for encrypting video streams before they are sent over the network; IP address filtering, which gives or denies access rights to defined IP addresses; IEEE802.1X to control access to a network; IPv6; and wireless functionality. For more on networking and security technologies, see Chapter 9.
> Open interface and application software. A network video product with an open interface enables better integration possibilities with other systems. It is also important that the product is supported by a good selection of application software, and management software that enable easy installation and upgrades of network video products. Axis products are supported by both in-house video management software and a wide variety of video management software solutions from more than 550 of its Application Development Partners. For more on video management systems, see Chapter 11.
Another important consideration, outside of the network camera itself, is the selection of the network video product vendor. Since needs grow and change, the vendor should be seen as a partner, and a long-term one. This means that it is important to select a vendor that offers a full product line of network video products and accessories that can meet the needs now and well into the future. The vendor should also provide innovation, support, upgrades and product path for the long term.
Once a decision has been made as to the required camera, it is a good idea to purchase one and test its quality before setting out to order quantities of it.
Camera elements
There are a number of camera elements that have an impact on image quality and
field of view and are, therefore, important to understand when choosing a network
camera. The elements include the light sensitivity of a camera, the type of lens, type of
image sensor and scanning technique, as well as image processing functionalities, all
of which are discussed in this chapter. Some guidelines on installation considerations
are also provided at the end.
3.1
Light sensitivity
A network camera’s light sensitivity is often specified in terms of lux, which corresponds to a level of illuminance in which a camera produces an acceptable image. The lower the lux speci-fication, the better light sensitivity the camera has. Normally, at least 200 lux is needed to illuminate an object so that a good quality image can be obtained. In general, the more light on the subject, the better the image. With too little light, focusing will be difficult and the image will be noisy and/or dark. To capture good quality images in low light or dark conditions, a day and night camera that takes advantage of near-infrared light is required. For more on day and night cameras, see Chapter 2.
Different light conditions offer different illuminance. Many natural scenes have fairly complex illumination, with both shadows and highlights that give different lux readings in different parts of a scene. It is important, therefore, to keep in mind that one lux reading does not indicate the light condition for a scene as a whole.
Table 3.1a Examples of different levels of illuminance.
Illuminance Lighting condition
100,000 lux Strong sunlight
10,000 lux Full daylight
500 lux Office light
Many manufacturers specify the minimum level of illumination needed for a network camera to produce an acceptable image. While such specifications are helpful in making light sensitivity comparisons for cameras produced by the same manufacturer, it may not be helpful to use such numbers to compare cameras from different manufacturers. This is because different manufac-turers use different methods and have different criteria for what is an acceptable image. To properly compare the low light performance of two different cameras, the cameras should be placed side by side and be viewing a moving object in low light.
3.2
Lens elements
A lens or lens assembly on a network camera performs several functions. They include: > Defining the field of view; that is, defining how much of a scene and level of detail are to be captured.
> Controlling the amount of light passing through to the image sensor so that an image is correctly exposed.
> Focusing by adjusting either elements within the lens assembly or the distance between the lens assembly and the image sensor.
3.2.1 Field of view
A consideration to take into account when selecting a camera is the field of view required; that is, the area of coverage and the degree of detail to be viewed. The field of view is determined by the focal length of the lens and the size of the image sensor; both are specified in a network camera’s datasheet.
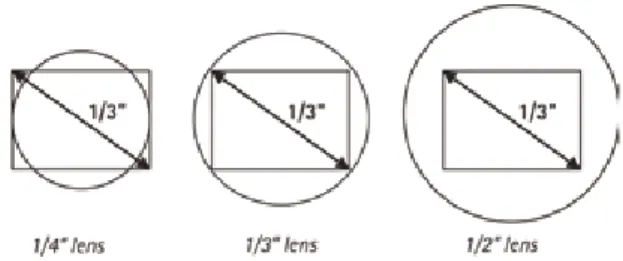
A len’s focal length is defined as the distance between the entrance lens (or a specific point in a complicated lens assembly) and the point where all the light rays converge to a point (nor-mally the camera’s image sensor). The longer the focal length, the narrower the field of view. The fastest way to find out what focal length lens is required for a desired field of view is to use a rotating lens calculator or an online lens calculator (www.axis.com/tools), both of which are available from Axis. The size of a network camera’s image sensor, typically 1/4”, 1/3”, 1/2” and 2/3”, must also be used in the calculation. (The drawback of using a lens calculator is that it does not take into account any possible geometrical distortion of a lens.)
The field of view can be classified into three types:
> Normal view: offering the same field of view as the human eye.
> Telephoto: a narrower field of view, providing, in general, finer details than a human eye can deliver. A telephoto lens is used when the surveillance object is either small or located far away from the camera. A telephoto lens generally has less light gathering capability than a normal lens.
> Wide angle: a larger field of view with less detail than in normal view. A wide-angle lens generally provides good depth of field and fair, low-light performance. Wide-angle lenses sometimes produce geometrical distortions such as the “fish-eye” effect.
Figure 3.2a Different fields of view: wide-angle view (at left); normal view (middle); telephoto (at right).
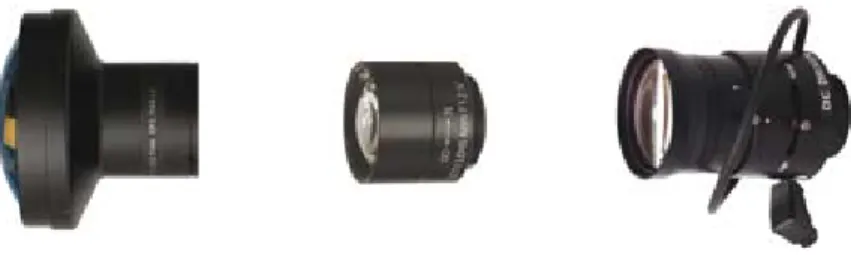
Figure 3.2b Network camera lenses with different focal lengths: wide-angle (at left); normal (middle); telephoto (at right).
There are three main types of lenses:
> Fixed lens: Such a lens offers a focal length that is fixed; that is, only one field of view (either normal, telephoto or wide angle). A common focal length of a fixed network camera lens is 4 mm.
> Varifocal lens: This type of lens offers a range of focal lengths, and hence, different fields of view. The field of view can be manually adjusted. Whenever the field of view is changed, the user has to manually refocus the lens. Varifocal lenses for network cameras often provide focal lengths that range from 3 mm to 8 mm.
> Zoom lens: Zoom lenses are like varifocal lenses in that they enable the user to select different fields of view. However, with zoom lenses, there is no need to refocus the lens if the field of view is changed. Focus can be maintained within a range of focal lengths, for example, 6 mm to 48 mm. Lens adjustments can be either manual or motorized for remote control. When a lens states, for example, 3x-zoom capability, it is referring to the ratio between the lens’ longest and shortest focal length.
3.2.2 Matching lens and sensor
If a network camera offers an exchangeable lens, it is important to select a lens suitable for the camera. A lens made for a 1/2-inch image sensor will work with 1/2-inch, 1/3-inch and 1/4-inch image sensors, but not with a 2/3-inch image sensor.
If a lens is made for a smaller image sensor than the one that is actually fitted inside the camera, the image will have black corners (see left-hand illustration in Figure 3.2c below). If a lens is made for a larger image sensor than the one that is actually fitted inside the camera, the field of view will be smaller than the lens’ capability since part of the information will be “lost” out-side the image sensor (see right-hand illustration in Figure 3.2c). This situation creates a tele-photo effect as it makes everything look zoomed in.
Figure 3.2c Examples of different lenses mounted onto a 1/3-inch image sensor.
When replacing a lens on a megapixel camera, a high quality lens is required since megapixel sen-sors have pixels that are much smaller than those on a VGA sensor (640x480 pixels). It is best to match the lens resolution to the camera resolution in order to fully use the camera’s capability.
3.2.3 Lens mount standards
When changing a lens, it is also important to know what type of lens mount the network camera has. There are two main standards used on network cameras: CS-mount and C-mount. They both have a 1-inch thread and they look the same. What differs is the distance from the lenses to the sensor when fitted on the camera:
> CS-mount. The distance between the sensor and the lens should be 12.5 mm. > C-mount. The distance between the sensor and the lens should be 17.526 mm.
It is possible to mount a C-mount lens to a CS-mount camera body by using a 5 mm spacer (C/CS adapter ring). If it is impossible to focus a camera, it is likely that the wrong type of lens is used.
3.2.4 F-number and exposure
In low-light situations, particularly in indoor environments, an important factor to look for in a network camera is the lens’ light-gathering ability. This can be determined by the lens’ f-num-ber, also known as f-stop. An f-number defines how much light can pass through a lens. An f-number is the ratio of the lens’ focal length to the diameter of the aperture or iris diameter; that is, f-number = focal length/aperture.
The smaller the f-number (either short focal length relative to the aperture, or large aperture relative to the focal length), the better the lens’ light gathering ability; i.e. more light can pass through the lens to the image sensor. In low-light situations, a smaller f-number generally pro-duces a better image quality. (There may be some sensors, however, that may not be able to take advantage of a lower f-number in low-light situations due to the way they are designed.) A higher f-number, on the other hand, increases the depth of field, which is explained in section 3.2.6. A lens with a lower f-number is normally more expensive than a lens with a higher f-number.
F-numbers are often written as F/x. The slash indicates division. An F/4 means the iris diameter is equal to the focal length divided by 4; so if a camera has an 8 mm lens, light must pass through an iris opening that is 2 mm in diameter.
While lenses with automatically adjustable iris (DC-iris) have a range of f-numbers, often only the maximum light gathering end of the range (smallest f-number) is specified.
A lens’ light-gathering ability or f-number, and the exposure time (i.e., the length of time an image sensor is exposed to light) are the two main elements that control how much light an image sensor receives. A third element, the gain, is an amplifier that is used to make the image brighter. However, increasing the gain also increases the level of noise (graininess) in an image, so adjusting the exposure time or iris opening is preferred.
Limits to the exposure time and gain can be set in some Axis cameras. The longer the exposure time, the more light an image sensor receives. Bright environments require shorter exposure time, while low-light conditions require longer exposure time. It is important to be aware that increasing the exposure time also increases motion blur, while increasing the iris opening has the downside of reducing the depth of field, which is explained in section 3.2.6 below. When deciding upon the exposure, a shorter exposure time is recommended when rapid movement or when a high frame rate is required. A longer exposure time will improve image quality in poor lighting conditions, but it may increase motion blur and lower the total frame rate since a longer time is required to expose each frame. In some network cameras, an automatic exposure setting means the frame rate will increase or decrease with the amount of available light. It is only as the light level decreases that artificial light or prioritized frame rate or image quality is important to consider.
Figure 3.2d A camera user interface with options for setting, among other things, exposure in low-light conditions.
3.2.5 Manual or automatic iris
In indoor environments where light levels may be constant, a manual iris lens can be used. This type of lens either provides a ring to adjust the iris, or the iris is fixed at a certain f-number. The latter is what Axis uses on its indoor network cameras.
A lens with automatically adjustable iris is recommended for outdoor applications and where the scene illumination is constantly changing. The iris aperture is controlled by the camera and is used to maintain the optimum light level to the image sensor if exposure and gain settings are not available or used in the network camera. The iris can also be used to control the depth of field (explained in the section below) and to obtain sharper images. Most automatic iris lenses are controlled by the camera’s processor via a direct current (DC) and are, therefore, called “DC-iris” lenses. All Axis outdoor cameras, whether fixed, fixed dome, PTZ or PTZ dome, use DC-iris or auto-iris lenses.
3.2.6 Depth of field
A criterion that may be important to a video surveillance application is depth of field. Depth of field refers to the distance in front of and beyond the point of focus where objects appear to be sharp simultaneously. Depth of field may be important, for instance, in monitoring a parking lot, where there may be a need to identify license plates of cars at 20, 30 and 50 meters (60, 90 and 150 feet) away.
Depth of field is affected by three factors: focal length, iris diameter and distance of the camera to the subject. A long focal length, a large iris opening or a short distance between the camera and the subject will limit the depth of field.
Figure 3.2e Depth of field: Imagine a line of people standing behind each other. If the focus is in the middle of the line and it is possible to identify the faces of all in front and behind the mid-point more than 15 meters (45 feet) away, the depth of field is good.
Figure 3.2f Iris opening and depth of field. The above illustration is an example of the depth of field for different f-numbers with a focal distance of 2 meters (7 feet). A large f-number (smaller iris opening) enables objects to be in focus over a longer range. (Depending on the pixel size, very small iris openings may blur an image due to diffrac-tion.)
3.3
Image sensors
As light passes through a lens, it is focused on the camera’s image sensor. An image sensor is made up of many photosites and each photosite corresponds to a picture element, more com-monly known as “pixel”, on an image sensor. Each pixel on an image sensor registers the amount of light it is exposed to and converts it into a corresponding number of electrons. The brighter the light, the more electrons are generated.
When building a camera, there are two main technologies that can be used for the camera’s image sensor:
> CCD (charge-coupled device)
> CMOS (complementary metal-oxide semiconductor)
Figure 3.3a Images sensors: CCD (at left); CMOS (at right).
While CCD and CMOS sensors are often seen as rivals, each has unique strengths and weak-nesses that make it appropriate for different applications. CCD sensors are produced using a technology that has been developed specifically for the camera industry. Early CMOS sensors were based on standard technology already extensively used in memory chips inside PCs, for example. Modern CMOS sensors use a more specialized technology and the quality of the sen-sors is rapidly increasing.
3.3.1 CCD technology
CCD sensors have been used in cameras for more than 30 years and present many advantageous qualities. Generally, they still offer slightly better light sensitivity and produce somewhat less noise than CMOS sensors. Higher light sensitivity translates into better images in low light conditions. CCD sensors, however, are more expensive and more complex to incorporate into a camera. A CCD can also consume as much as 100 times more power than an equivalent CMOS sensor.
3.3.2 CMOS technology
Recent advances in CMOS sensors bring them closer to their CCD counterparts in terms of image quality. CMOS sensors lower the total cost for cameras since they contain all the logics needed to build cameras around them. In comparison with CCDs, CMOS sensors enable more integration
possibilities and more functions. CMOS sensors also have a faster readout (which is advanta-geous when high-resolution images are required), lower power dissipation at the chip level, as well as a smaller system size. Megapixel CMOS sensors are more widely available and are less expensive than megapixel CCD sensors.
3.3.3 Megapixel sensors
For cost reasons, many megapixel sensors (i.e., sensors containing a million or more pixels) in megapixel cameras are the same size as or only slightly larger than VGA sensors that provide a resolution of 640x480 (307,200) pixels. This means that the size of each pixel on a megapixel sensor is smaller than on a VGA sensor. For instance, a megapixel sensor such as a 1/3-inch, 2-megapixel sensor has pixel sizes measuring 3 µm (micrometers/microns) each. By comparison, the pixel size of a 1/3-inch VGA sensor is 7.5 µm. So while the megapixel camera provides higher resolution and greater detail, it is less light sensitive than its VGA counterpart since the pixel size is smaller and light reflected from an object is spread to more pixels.
3.4
Image scanning techniques
Interlaced scanning and progressive scanning are the two techniques available today for reading and displaying information produced by image sensors. Interlaced scanning is used mainly in CCDs. Progressive scanning is used in either CCD or CMOS sensors. Network cameras can make use of either scanning technique. (Analog cameras, however, can only make use of the interlaced scanning technique for transferring images over a coaxial cable and for displaying them on analog monitors.)
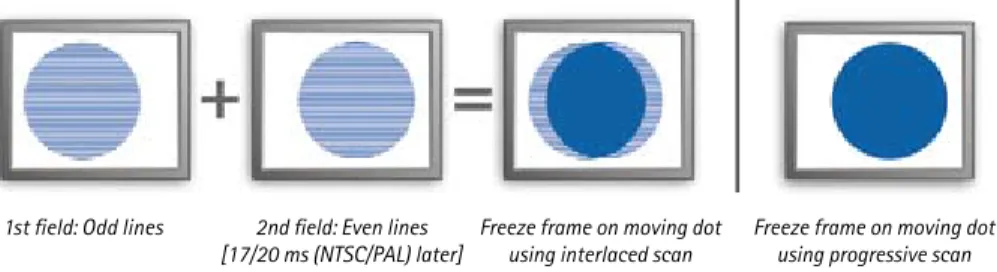
3.4.1 Interlaced scanning
When an interlaced image from a CCD is produced, two fields of lines are generated: a field displaying the odd lines, and a second field displaying the even lines. However, to create the odd field, information from both the odd and even lines on a CCD sensor is combined. The same goes for the even field, where information from both the even and odd lines is combined to form an image on every other line.
When transmitting an interlaced image, only half the number of lines (alternating between odd and even lines) of an image is sent at a time, which reduces the use of bandwidth by half. The monitor, for example, a traditional TV, must also use the interlaced technique. First the odd lines and then the even lines of an image are displayed and then refreshed alternately at 25 (PAL) or 30 (NTSC) frames per second so that the human visual system interprets them as complete images. All analog video formats and some modern HDTV formats are interlaced. Although the interlacing technique creates artifacts or distortions as a result of ‘missing’ data, they are not very noticeable on an interlaced monitor.
However, when interlaced video is shown on progressive scan monitors such as computer monitors, which scan lines of an image consecutively, the artifacts become noticeable. The arti-facts, which can be seen as “tearing”, are caused by the slight delay between odd and even line refreshes as only half the lines keep up with a moving image while the other half waits to be refreshed. It is especially noticeable when the video is stopped and a freeze frame of the video is analyzed.
3.4.2 Progressive scanning
With a progressive scan image sensor, values are obtained for each pixel on the sensor and each line of image data is scanned sequentially, producing a full frame image. In other words, captured images are not split into separate fields as with interlaced scanning. With progressive scan, an entire image frame is sent over a network and when displayed on a progressive scan computer monitor, each line of an image is put on the screen one at a time in perfect order. Moving objects are, therefore, better presented on computer screens using the progressive scan technique. In a video surveillance application, it can be critical in viewing details of a moving subject (e.g., a person running away). Most Axis network cameras use the progressive scan technique.
Figure 3.4a At left, an interlaced scan image shown on a progressive (computer) monitor. At right, a progressive scan image on a computer monitor.
Figure 3.4b At left, a full-sized JPEG image (704x576 pixels) from an analog camera using interlaced scanning. At right, a full-sized JPEG image (640x480 pixels) from an Axis network camera using progressive scan technology. Both cameras used the same type of lens and the speed of the car was the same at 20 km/h (15 mph). The background is clear in both images. However, the driver is clearly visible only in the image using progressive scan technology.
1st field: Odd lines 2nd field: Even lines
3.5
Image processing
Three features that may be supported in network cameras to improve image quality are back-light compensation, exposure zones and wide dynamic range.
3.5.1 Backlight compensation
While a camera’s automatic exposure tries to get the brightness of an image to appear as the human eye would see a scene, it can be easily fooled. Strong backlight can cause objects in the foreground to be dark. Network cameras with backlight compensation strive to ignore limited areas of high illumination, just as if they were not present. It enables objects in the foreground to be seen, although the bright areas will be overexposed. Such lighting situations can also be handled by increasing the dynamic range of the camera, which is discussed in section 3.5.3 below.
3.5.2 Exposure zones
Besides dealing with limited areas of high illumination, a network camera’s automatic exposure must also decide what area of an image should determine the exposure value. For instance, the foreground (usually the bottom section of an image) may hold more important information than the background; for example, the sky (usually the top section of an image). The less important areas of a scene should not determine the overall exposure. In advanced Axis network cameras, the user is able to use exposure zones to select the area of a scene—center, left, right, top or bottom—that should be more correctly exposed.
3.5.3 Wide dynamic range
Some Axis network cameras offer wide dynamic range to handle a wide range of lighting condi-tions in a scene. In a scene with extremely bright and dark areas or in backlight situacondi-tions where a person is in front of a bright window, a typical camera will produce an image where objects in the dark areas will hardly be visible. Wide dynamic range solves this by applying techniques, such as using different exposures for different objects in a scene, to enable objects in both bright and dark areas to be visible.
3.6
Installing a network camera
Once a network camera has been purchased, the way it is installed is just as important. Below are some recommendations on how to best achieve high-quality video surveillance based on camera positioning and environmental considerations.
> Surveillance objective. If the aim is to get an overview of an area to be able to track the movement of people or objects, make sure a camera that is suitable for the task is placed in a position that achieves the objective. If the intention is to be able to identify a person or object, the camera must be positioned or focused in a way that will capture the level of detail needed for identification purposes. Local police authorities may also be able to provide guidelines on how best to position a camera.
> Use lots of light or add light if needed. It is normally easy and cost-effective to add strong lamps in both indoor and outdoor situations to provide the necessary light conditions for capturing good images.
> Avoid direct sunlight as it will “blind” the camera and can reduce the performance of the image sensor. If possible, position the camera with the sun shining from behind the camera.
> Avoid backlight. This problem typically occurs when attempting to capture an object in front of a window. To avoid this problem, reposition the camera or use curtains and close blinds if possible. If it is not possible to reposition the camera, add frontal lighting. Cameras with support for wide dynamic range are better at handling a backlight scenario.
> Reduce the dynamic range of the scene. In outdoor environments, viewing too much sky results in too high a dynamic range. If the camera does not support wide dynamic range, a solution is to mount the camera high above the ground, using a pole if needed.
> Adjust camera settings. It may be necessary at times to adjust settings for white balance, brightness and sharpness to obtain an optimal image. In low light situations, users must also prioritize either frame rate or image quality.
> Legal considerations. Video surveillance can be restricted or prohibited by laws that vary from country to country. It is advisable to check the laws in the local region before installing a video surveillance system. It may be necessary, for instance, to register or get a license for video surveillance, particularly in public areas. Signage may be required. Video recordings may require time and date stamping. There may be rules regulating how long video should be retained. Audio recordings may or may not be permitted.