IBM Cúram Social Program Management
Cúram Deployment Guide for WebSphere
Application Server
This edition applies to version 6.0.4 of IBM Cúram Social Program Management and all subsequent releases and modifications unless otherwise indicated in new editions.
Licensed Materials - Property of IBM
Copyright IBM Corporation 2012. All rights reserved.
US Government Users Restricted Rights - Use, duplication or disclosure restricted by GSA ADP Schedule Contract with IBM Corp.
Table of Contents
Chapter 1Introduction ... 1
1.1Deployment Guide ... 1
Chapter 2Building EAR Files ... 3
2.1Introduction ... 3
2.2The Enterprise Application ... 3
2.2.1Building the Application EAR File ... 3
2.2.2Under the Hood ... 4
2.2.3Contents of Application EAR File ... 4
2.3The Online Help Application ... 6
2.3.1Building the CuramHelp.ear File ... 6
2.3.2Contents of the CuramHelp.ear File ... 6
2.4The Web Services Application ... 7
2.4.1Building the Web Services EAR File ... 7
2.4.2Under the Hood ... 7
2.4.3Contents of Web Services EAR File ... 8
2.4.4Web Service WSDL ... 9
2.5Multiple EAR files ... 9
2.6Alternative Targets ... 11
Chapter 3Application Server Configuration ... 13
3.1Introduction ... 13
3.2WebSphere Application Server Configuration ... 13
3.3Security Configuration ... 15
3.3.1Special Configuration Steps When Using Identity Only and LDAP ... 15
3.3.2WebSphere Application Server User Registry ... 17
3.3.3Logging the Authentication Process ... 18
3.3.4Establishing an Alternate Exclude Username Delimiter ... 18
3.3.5WebSphere Application Server Caching Behavior ... 18
3.3.6Security custom properties ... 18
3.3.7Security hardening measures ... 19
3.4Time Zone Configuration ... 20
3.5Starting and Stopping WebSphere Servers ... 20
3.5.1Start a WebSphere Server ... 20
3.5.2Stop a WebSphere Server ... 21
Chapter 4Deployment ... 23
4.1Introduction ... 23
4.2Deployment ... 23
4.2.1Install an Application ... 23
4.2.2Change SYSTEM Username ... 24
4.2.3Uninstall an Application ... 24
4.3Pre-compiling JSPs ... 25
4.4Testing Deployment ... 25
Appendix AManual WebSphere Application Server Configuration ... 28
A.1Introduction ... 28
A.2Manual WebSphere Application Server Configuration ... 28
A.2.1The Administrative Console ... 28
A.2.2Scripting Support ... 29
A.2.3Creating the Data Source Login Alias ... 30
A.2.4Configure DB2 Data Sources ... 31
A.2.5Configure an Oracle Data Source ... 33
A.2.6Save the Master Configuration ... 37
A.2.7Configure Administration Security ... 37
A.2.8Restart the Application Server ... 38
A.2.9Configure Users ... 38
A.2.10Set up the System JAAS Login Module ... 39
A.2.11Server Configuration ... 43
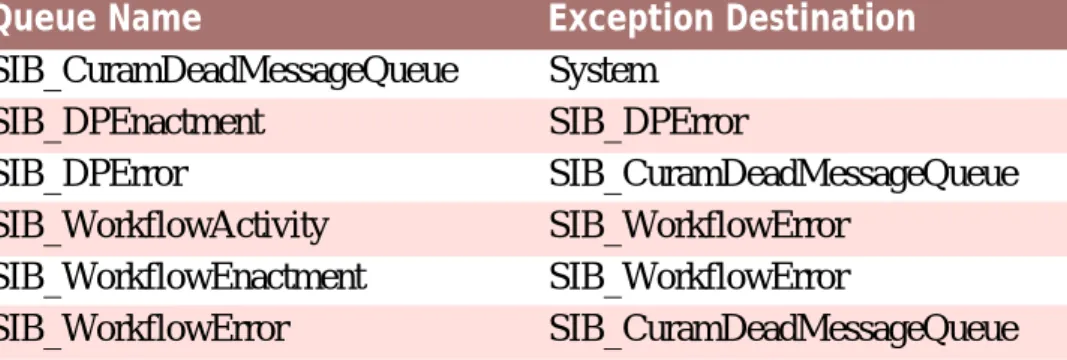
A.2.12Bus Configuration ... 47
A.2.13JMS Configuration ... 48
A.2.14Configure Historical Log Files ... 53
A.2.15Post Configuration ... 53
A.2.16Completion ... 54
A.3Manual Application Deployment ... 54
A.4WebSphere Network Deployment ... 56
A.4.1Creating the Profiles ... 57
A.4.2Federating a Node ... 57
A.4.3Configuration of Node ... 57
A.4.4Deploying on the Node ... 59
Chapter 1
Introduction
1.1
Deployment Guide
This guide discusses the steps necessary to build a IBM® Cúram Social Program Management application for deployment on the base version of IBM® WebSphere® Application Server1. The guide also details the support provided for configuring and deploying on WebSphere Application Server, and where necessary provides the manual steps required.
It is a prerequisite that the reader have knowledge of the IBM Cúram Social Program Management development environment. In other words, that they know how to develop and build a server application and web client. The guide also presumes that WebSphere Application Server is installed. For de-tails on this installation consult the Cúram Third Party Tools Installation Guide2.
Notes
1
For information on using the application with the Network Deployment edi-tion of WebSphere Applicaedi-tion Server consult Appendix A, Manual Web-Sphere Application Server Configuration.
2Refer to the installation guide that is relevant to the platform, i.e. Microsoft® Windows orUNIX.
Chapter 2
Building EAR Files
2.1
Introduction
The main step before deployment of a IBM Cúram Social Program Man-agement application is to package it into EAR (Enterprise ARchive) files. The server application (which incorporates the web client and server) and web services application are packaged into separate EAR files, and the Serv-er Development Environment (SDEJ) provides build targets that pServ-erform this task.
Before the targets described in the following section are executed, ensure that the following environment variable is set:
• WAS_HOME
This should point to the base directory of the base WebSphere Applica-tion Server installaApplica-tion. For example: d:\WebSphere\AppServer or/opt/WebSphere/AppServer.
2.2
The Enterprise Application
2.2.1
Building the Application EAR File
The following target should be executed from the root directory of the serv-er project to create the application EAR file for WebSphserv-ere Application Server:
build websphereEAR
This target will create a ready to install EAR file, <SERVER_MODEL_NAME>.ear located in <SERVER_DIR>/build/ear/WAS1.
located in <SERVER_DIR>/build/ear/WAS, provided the online help application has been created and built. For details on how to build the online help application, please refer to the Cúram Online Help System Develop-ment and DeployDevelop-ment Guide. For details on the contents of the online help file, please refer to Section 2.3.2, Contents of the CuramHelp.ear File Before executing this target, a fully built application must be available. For details on how to build a IBM Cúram Social Program Management applica-tion, please refer to the Cúram Server Developer's Guide.
Note
An EAR file cannot be built for H2 database.2
2.2.2
Under the Hood
The websphereEAR target takes a number of previously generated Java files and deployment descriptors and packages them up into an EAR file. The Java files and deployment descriptors are generated during the build process based on the existence of Business Process Object (BPO) classes, i.e., the methods of Facade classes or<<WebService>> classes and can be called by remote clients.
By default all remote calls to the server are handled by the session bean curam.util.invoke.EJBMethod, rather than a session bean per pub-licly available interface. This bean provides support for IBM Cúram Social Program Management features such as authorization, auditing and tracing. If required it is also possible to generate a Facade interface3.
2.2.3
Contents of Application EAR File
The EAR file that is produced has the following structure and contents:
• META-INF Directory
• application.xml
This file is automatically generated and lists the mapping of EJB modules to JAR files that are contained in the application.
• ibm-application-bnd.xmi
A generated WebSphere Application Server-specific extension file. • ibm-application-ext.xmi
A generated WebSphere Application Server-specific extension file. • was.policy
WebSphere Application Server security policy file that grants the
ap-plication the Java permission
java.security.AllPermission. • MANIFEST.MF
The manifest file which details the contents of the EAR file.
• Core JAR Files. The core JAR files include4: • antlr.jar
• appinf.jar
• appinf_internal.jar • coreinf.jar
• rules.jar
• jde_commons.jar • log4j.jar
• commons-pool.jar • commons-codec.jar • commons-discovery.jar • jdom.jar
• axis.jar • castor.jar • jaxrpc.jar • saaj.jar • java_cup.zip
• InfrastructureModule.jar • InvalidationModule.jar • DBtoJMS.war
• ClientModule.war
• Facade JAR Files. This is only present if facade generation has been
enabled. All facades defined in the application are packaged into one JAR file, FacadeModule.jar. This JAR file contains the bean im-plementation classes for the EJB modules that represent the facades. The JAR file contains the following files in theMETA-INFdirectory:
• ejb-jar.xml
This file is automatically generated and contains the definition of every EJB module contained in the JAR file. All the publicly avail-able methods are listed and the details of the resources availavail-able to the EJB modules.
• ibm-ejb-jar-bnd.xmi
A generated WebSphere Application Server-specific extension file. • ibm-ejb-jar-ext.xmi
A generated WebSphere Application Server-specific extension file. • Manifest.mf
The manifest file, detailing the classpath for the EJB.
• Other JAR Files. The other JAR files contain the generated and hand
crafted code from the application. These includeapplication.jar, codetable.jar, events.jar, struct.jar, messages.jar, implementation.jar and properties.jar. The proper-ties.jar file contains the Bootstrap.properties file. This is the file containing the machine specific configuration properties for ini-tially getting a connection to the database.
2.3
The Online Help Application
The IBM Cúram Social Program Management online help application is built in a separate EAR file (e.g. CuramHelp.ear). The Curam-Help.earfile automatically gets generated when the application EAR file is created. Please refer to Section 2.2.1, Building the Application EAR File for further details on building the Application EAR file. The ability to build the online help application EAR file separately is also available.
2.3.1
Building the CuramHelp.ear File
The following target should be executed from the root directory of the serv-er project to create the application CuramHelp.ear file for WebSphere Application Server:
build websphereHelpEAR
This target will create a ready to install CuramHelp.ear file, located in the <SERVER_DIR>/build/ear/WAS directory, provided the online help application has been created and built. For details on how to build the online help application, please refer to the Cúram Online Help System De-velopment and Deployment Guide.
2.3.2
Contents of the CuramHelp.ear File
TheCuramHelp.earfile that is produced has the following structure and contents:
• META-INF Directory. The META-INF Directory includes the
• application.xml
This file is automatically generated and lists the mapping of EJB modules to JAR files that are contained in the application.
• MANIFEST.MF
This file details the contents of the.earfile.
• help.war files. A help.war is a web application containing application
online help screens. A help.war will be created for each locale suppor-ted. Please refer to the Cúram Online Help System Development and De-ployment Guide for further details on online help.
2.4
The Web Services Application
Support is available for the automatic generation of Web Service Definition Language (WSDL) defined web services. Application developers can thus combine the power of the IBM Cúram Social Program Management model with the accessibility of web services to produce truly reusable software components.
2.4.1
Building the Web Services EAR File
The following target should be executed from the root directory of the project to create the EAR file for web services:
build websphereWebServices
Optional overrides are:
• prp.webipaddressis the IP address on which the server hosting the web services is listening. The default ishttp://localhost:2809; • prp.contextproviderurl is the URL of the JNDI context
pro-vider. This is the address of the server that hosts the IBM Cúram Social Program Management components being made accessible though web services. The default isiiop://localhost:2809;
• prp.contextfactorynameis the JNDI context factory name. The
default for this is
com.ibm.websphere.naming.WsnInitialContextFactor yand should rarely need to be changed.
This target will create a ready to install EAR file, <SERVER_MODEL_NAME>WebServices.ear located in <SERVER_DIR>/build/ear/WAS.
Before executing this target, a fully built IBM Cúram Social Program Man-agement application, ready for deployment, must exist.
2.4.2
Under the Hood
The websphereWebServices target takes a number of previously generated Java files and deployment descriptors and packages them up into an EAR file.
The Java files and deployment descriptors are generated during the build process (see the Cúram Server Developer's Guide) based on the web service components that have been defined in the model. BPO classes should be mapped to server components with a stereotype of<<webservice>> for this generation to occur5. Any server component with a stereotype of <<webservice>> will be treated as if it also had a stereotype of <<ejb>>. This is because Web Service interfaces are wrappers on publicly available BPOs.
2.4.3
Contents of Web Services EAR File
The EAR file that is produced has the following structure and contents: • META-INF Directory
• application.xml
This file details the core module for the web services application, which is thewebservices.warfile.
• ibm-application-bnd.xmi A generated WAS specific extension file. • ibm-application-ext.xmi
A generated WAS specific extension file. • was.policy
WAS security policy file that grants the application the Java permis-sionjava.security.AllPermission.
• MANIFEST.MF
The manifest file which details the contents of the EAR file.
• Web Service WAR File. This file contains support JAR files in the
WEB-INF/libdirectory, including: • coreinf.jar
This JAR file contains the conversion methods which are used to support the serialization of the complex types used in the interface. • axis.jar
This JAR file contains the Axis web services engine. • appwebservices.jar
This JAR file contains the wrapper classes which enable the Axis web services to connect to the IBM Cúram Social Program
Manage-ment server application session bean(s) and the classes for the com-plex types which are used in the interface to the web services.
• server-config.wsdd
This .wsdd file is located in the WEB-INF directory and contains the web service engine configuration which maps IBM Cúram Social Program Management BPOs to web services.
2.4.4
Web Service WSDL
A IBM Cúram Social Program Management web service exposes its own WSDL once it is deployed.
For instance, if there is a service at the URL:
ht-tp://localhost:9082/CuramWS/services/MyTestService the WSDL description will be at the URL:
ht-tp://localhost:9082/CuramWS/services/MyTestService? wsdl
The URL
http://localhost:9082/CuramWS/services
will return a web page that lists all web services deployed and a link to their WSDL files.
The general URL format of the locations above is
ht-tp://<web-server>:<port-number>/<ServerModelName>WS /services/<BPO-name> .
2.5
Multiple EAR files
Building an Application EAR also takes an optional file to allow for split-ting the client components into different WAR and EAR files and also to al-low for some more control of some of the EAR configuration and included modules. This file is named deployment_packaging.xmland should be placed in yourSERVER_DIR/project/configdirectory.
The format of thedeployment_packaging.xmlfile is as follows:
<deployment-config> <ear name="Curam"
requireServer="true">
<components>custom,sample,SamplePublicAccess,core</components> <context-root>/Curam</context-root>
</ear>
<ear name="CuramExternal">
<components>SamplePublicAccessExternal</components> <context-root>/CuramExternal</context-root>
<custom-web-xml>${client.dir}/custom_web_xml</custom-web-xml> </ear>
</deployment-config>
Example 2.1deployment_packaging.xml sample
Each file can have multipleear elements and results in an EAR file being produced in the SERVER_DIR/build/ear/WAS directory. The options for each element are:
• name
This option controls the name of the EAR created from the process. • requireServer
This optional attribute controls whether the server module is included in the EAR file. Valid entries are true or false. The default value is false. If deploying multiple EAR files to one application server, this attribute must be set to true for only one EAR file as only one IBM Cúram Social Program Management server module should be deployed per cluster. IfrequireServeris set totrue for multiple EAR files, then the other EAR files must be deployed in another cluster to avoid conflicts.
• components
This option controls which of the client components get placed into the EAR file. It also controls the component order for the rebuild of the cli-ent that will need to take place. Usually the core directory doesn't form part of the component order but on this occasion it is important to add this to qualify whether it should be included in a particular WAR file. Entries here should follow the typical order of components defined in the Cúram Server Developer's Guide and should be comma separated. • context-root
This option forms the Context Root of the WAR module in the ap-plication.xml deployment descriptor. Entries here should begin with a forward-slash.
• custom-web-xml
This optional element controls whether a custom web.xml file should overwrite the standard version in the WAR file. Entries here should be an Apache Ant path to the directory containing theweb.xmlfile.
It is possible to use references to environment variables as part of this path. For example, ${client.dir} can be used to point to the web client directory and${SERVER_DIR} can be used to point to the serv-er directory.
For each web client (i.e., WAR file) a separate web client component is re-quired to contain its customizations. In the case of multiple web clients,
your CLIENT_COMPONENT_ORDERenvironment variable will include all your custom components; but, separate <ear> elements will be required, one for each custom web component (and other components as needed).
As with the standard target, a fully built IBM Cúram Social Program Man-agement application must be available. For details on how to build an ap-plication, please refer to the Cúram Server Developer's Guide.
2.6
Alternative Targets
The websphereEAR target will build an IBM Cúram Social Program Man-agement application .ear file containing both the web client and applica-tion. Support is provided to build an application .ear file containing only the web application or only the server application.
These targets may be necessary where the web client and server application are required to be installed on separate servers. For example, to support se-cure access to the Cúram application for external users a new web client ap-plication can be developed. This web apap-plication can be deployed on its own and use an existing server application.6
To build an ear file containing only the web client application the follow-ing command should be used:
build websphereEAR -Dclient.only=true
To build an .ear file containing only the server application the following command should be used:
build websphereEAR -Dserver.only=true
Notes
1
SERVER_MODEL_NAME and SERVER_DIR are environment variables which specify the name of the model in the project and the root directory of the project respectively.
2For more information on H2 database consult the Cúram Third-Party Tools Installation Guide for Windows.
3
The optional build parameter-Denablefacade=trueturns on the gen-eration of facade code.
4
The version numbers are not listed for the JAR files detailed.
5Consult the Cúram Server Modelling Guide for details on assigning BPOs to server components.
6
For more information on External Access Security consult the Cúram Serv-er DevelopServ-ers Guide.
Chapter 3
Application Server Configuration
3.1
Introduction
This chapter presumes that WebSphere has already been installed. Consult the Cúram Third Party Tools Installation Guide1 for details on the installa-tion.
The configuration of WebSphere Application Server is similar on all plat-forms and the Server Development Environment for Java (SDEJ) provides a number of Ant targets to aid the configuration and management of the in-stallation. For those interested, Appendix A, Manual WebSphere Applica-tion Server ConfiguraApplica-tion details the manual steps performed by the config-uration scripts.
The configuration target provided by the SDEJ is a simple default configur-ation and may not be suitable for a production environment.
Note
The configure target will overwrite the default profile created by WebSphere Application Server unless -Dkeep.profile=true is passed to the target.
3.2
WebSphere Application Server Configuration
The configuration of WebSphere Application Server involves setting up a profile, data source, a number of servers and configuring the JMS and secur-ity settings. All these tasks can be performed by executing the configure target provided by the SDEJ.
The profile created by the configure target will take the following defaults unless specifically overridden when calling the target.
• cell.name=${node.name}Cell
The command build configure should be executed from the <SERVER_DIR> directory to invoke automatic configuration. This target requires that the files AppServer.properties and
Boot-strap.properties exist in the
<SERVER_DIR>/project/properties 2 directory. See the Cúram Server Developer's Guide for more information on the setup of a Boot-strap.properties. Example 3.1, AppServer.properties.sample shows example contents of theAppServer.propertiesfile.
## APPLICATION SERVER PROPERTIES
# Property to indicate WebSphere is installed. as.vendor=IBM
# The username and password for admin server. security.username=<e.g. websphere>
security.password=<e.g. websphere> # The name of the WebSphere Node node.name=MyNode
# The name of the server on which the application will be hosted. curam.server.name=CuramServer
curam.server.port=2809
##################################################### ## THE FOLLOWING PROPERTIES ARE FOR WebSphere ONLY ## #####################################################
# The alias that should be used for the database authorization curam.db.auth.alias=databaseAlias
# HTTP Port for the server on which the client # will be accessed
curam.client.httpport=9044
# HTTP Port for the server on which the Web services # will be accessed
curam.webservices.httpport=9082
# Property to set JVM initial and maximum heap size. curam.server.jvm.heap.size=1024
Example 3.1AppServer.properties.sample
By default the configure target establishes a Type 4 Universal Driver (XA) data source. However, you may configure a Type 2 Universal Driver (XA) data source by setting thecuram.db.type2.required property in the AppServer.propertiesfile.
Also by default the configure target sets the JVM initial and maximum heap size to "1024" MB. However, you can override the default JVM initial and maximum heap size by setting the curam.server.jvm.heap.size property in theAppServer.propertiesfile.
Note
1. The setting of the Java heap as described in the Example 3.1, AppServer.properties.sample example and set by the
configura-tion scripts is for illustrative purposes. Based on the size of your customized application, deployment strategy, etc. these settings may be too low or too high. The optimum value should be determined by monitoring the memory performance of your server.
2. Memory issues have been noticed with the WebSphere Applic-ation Server wrapped database drivers during the retrieval of large CLOBs and BLOBs (3MB+) from the database. These is-sues may be worked-around by increasing the Max Heap Size JVM parameter as appropriate on the deployed server.
3. The configure target cannot be run when H2 database is in use. 3
3.3
Security Configuration
The default security configuration of IBM Cúram Social Program Manage-ment within WebSphere Application Server involves the default file-based user registry and a JAAS Login Module. The Default Configuration for IBM WebSphere Application Server section in the Cúram Security Handbook should be referenced for further details on this.
There are a number of alternative security configurations that can be used with WebSphere Application Server. The configurations are available to support the use of alternative authentication mechanisms, such as an LDAP directory server or a single sign-on solution.
To avail of a different configuration the properties detailed in the following sections should be set in the AppServer.properties file before run-ning the configure target. Any alternative authentication mechanisms should be configured manually after running the configure target with the relevant properties set. To configure the login module for identity only authentication the curam.security.check.identity.only prop-erty should be set to true.This is to ensure that the configured alternative authentication mechanism is used.
The Identity Only Authentication section in the Cúram Security Handbook should be consulted for further details.
3.3.1
Special Configuration Steps When Using Identity Only
and LDAP
When using identity only in combination with WebSphere Application Serv-er and LDAP you may need to pServ-erform additional manual configuration steps; this is regardless of whether configuration is done via the WebSphere Application Server administrative console or the configure target. With this combination you may find that WebSphere Application Server fails to start successfully and this is due to the need to add a WebSphere Application Server-generated username to the login module exclude list property (ex-Cúram Deployment Guide for WebSphere Application Server
clude_usernames) described in Section A.2.10.1, Add the Login Mod-ule. In this case of WebSphere Application Server failing to start there will be a SECJ0270E error message in the SystemOut.log file prior to the failure.
These are the steps needed to resolve this error:
1. Identify the username that is causing WebSphere Application Server start to fail. Configure the login module trace as described in Sec-tion 3.3.3, Logging the AuthenticaSec-tion Process (in regard to the con-figuretarget) or Section A.2.10.1, Add the Login Module (in regard to configuring via the Administrative Console), and restart WebSphere Application Server. With the login module trace running, prior to the SECJ0270E error in the SystemOut.log file, the trace data will identify the failing username with a record like this:
SystemOut O Username: server:MyNodeCell_MyNode_CuramServer
Where "MyNode" is the node name, "MyNodeCell" is the cell name, and "CuramServer" is the WebSphere server name. Following the login module trace data will be the error, which will look like this:
SECJ0270E: Failed to get actual credentials.
The exception is javax.security.auth.login.LoginException: Context: MyNodeCell/nodes/MyNode/servers/CuramServer, name: curamejb/LoginHome:
First component in name curamejb/LoginHome not found.
2. Specify the failing username in the login module ex-clude_usernames property in the WebSphere Application Server configuration. Since WebSphere Application Server is failing to start you cannot make this change via the Administrative Console and you must edit the WebSphere Application Server configuration file directly. In the WebSphere Application Server configuration file system edit config\cells\MyNodeCell\security.xml, which will have three occurrences of the exclude_usernames property (one for each alias); e.g.:
<options xmi:id="Property_1301940482165" name="exclude_usernames"
value="websphere,db2admin" required="false"/>
You must modify the three occurrences to include the newly identified username from the trace entry above; e.g.:
<options xmi:id="Property_1301940482165" name="exclude_usernames"
value="websphere,db2admin,server:MyNodeCell_MyNode_CuramServer" required="false"/>
Note that in the exclude_usernames occurrences the id attribute will vary per your system configuration and the comma separator in the example value attribute represents the default curam.security.usernames.delimiter value, which may be different in your case.
3. Restart WebSphere Application Server.
3.3.2
WebSphere Application Server User Registry
By default the configured WebSphere Application Server user registry is not queried as part of authentication. When the login module is configured for identity only, the user registry is queried. It is possible to override this
de-fault behavior by setting the
curam.security.user.registry.enabledproperty. If this prop-erty is set totrue the WebSphere Application Server user registry will be queried during the authentication process, regardless of whether identity only authentication is enabled or disabled. If this property is set tofalse, the WebSphere Application Server user registry will not be queried. For ex-ample, if curam.security.check.identity.only is set to true and curam.security.user.registry.enabled is set to false, neither the IBM Cúram Social Program Management authentication verific-ations nor the WebSphere Application Server user registry will be used as part of the authentication process.
You can also control the authentication of types of external users (i.e. non-internal users) against the WebSphere Application Server user registry via use of the curam.security.user.registry.enabled.types and/or the curam.security.user.registry.disabled.types properties. These properties specify a comma-delimited list of external user types that will, or will not be, authenticated via the WebSphere Application Server user registry:
• User types specified in the
curam.security.user.registry.enabled.types list will be processed against the WebSphere Application Server user registry (e.g. LDAP) and yourExternalAccessSecurityimplementation.
• User types specified in the
curam.security.user.registry.disabled.types list will not be processed against the WebSphere Application Server user registry and the processing of your ExternalAccessSecurity implement-ation will be the authority for authenticimplement-ation.
The precedence order in processing these three properties and the Web-Sphere Application Server user or external (e.g. LDAP) registry is as fol-lows:
• By default the WebSphere Application Server user registry is not checked and application authentication is used.
• The setting of the curam.security.user.registry.enabled property totruerequires authentication by both the WebSphere Applic-ation Server, or external (e.g. LDAP), user registry and applicApplic-ation se-curity (for internal users) or your ExternalAccessSecurity im-plementation (for external users).
• An external user of a type specified in the curam.security.user.registry.enabled.types list must be authenticated by the WebSphere Application Server, or external, user registry and yourExternalAccessSecurityimplementation. • An external user of a type specified in the
curam.security.user.registry.disabled.types list is not authenticated by the WebSphere Application Server, or external, user registry and yourExternalAccessSecurityimplementation is the authority.
See Section A.2.10, Set up the System JAAS Login Module for more inform-ation on setting the resultant properties in the CuramLoginModule con-figuration.
3.3.3
Logging the Authentication Process
curam.security.login.trace is an optional property that will en-able logging for the login module. When set totruethis property results in tracing information being added to the WebSphere Application Server Sys-temOut.logfile during the authentication process.
3.3.4
Establishing an Alternate Exclude Username Delimiter
curam.security.usernames.delimiter is an optional property that will enable setting an alternate delimiter for the list of usernames in the exclude_usernames property. The property can be set to a character that will allow usernames with embedded commas such as with LDAP.3.3.5
WebSphere Application Server Caching Behavior
WebSphere Application Server caches user information and credentials in a security cache and the login module will not be invoked while a user entry is valid in this cache. The default invalidation time for this security cache is ten minutes, where the user has been inactive for ten minutes. The Web-Sphere Application Server Caching Behavior section in the Cúram Security Handbook should be consulted for further details on this.
3.3.6
Security custom properties
• com.ibm.ws.security.webChallengeIfCustomSubjectN otFound
This property determines the behavior of a single sign-on LTPA Token2 login.
When this property value is set to true, the token contains a custom cache key, and the custom Subject cannot be found, the token is used to log in directly as the custom information needs to be gathered again. A challenge occurs so that the user to login again. When this property value is set to false and the custom Subject is not found, the LTPA Token2 is used to login and gather all of the registry attributes. However, the token might not obtain any of the special attributes that downstream applications might expect.
By default the configuration script sets a WebSphere Application Server property,
com.ibm.ws.security.webChallengeIfCustomSubjectN otFound, to false to ensure that web sessions can seamlessly trans-fer between two servers in a cluster (for example, in a fail over scenario) without being asked for security credentials. This setting allows the se-curity token used by WebSphere Application Server to be validated cor-rectly, without user input.
If this behavior is not required it is possible to change this property to true, see Section A.2.10, Set up the System JAAS Login Module for more information on setting Security custom properties. If the property is set totrue, when a web session switches from one server in the cluster to another, perhaps due to the original server failing, the user will be asked for security information before being able to proceed.
3.3.7
Security hardening measures
When a user logs into the application, they provide a username & password. This is sent to the server, and if successfully authenticated, the server re-sponds with a unique token. The token, in this case, is 'LTPA token'. This token is used in all subsequent requests to recognize the user and then serves privileged content. When the user logs out, we would expect this token to become invalid. but this is not the case and there is no way to invalidate the LTPA token, which has been confirmed by IBM. IBM's recommendation
is to use two "security hardening measures" of:
1. Setting the security Requires SSL option;
2. Setting a custom property to limit LTPA cookies to SSL only.
The default configuration scripts make this change and the steps are docu-mented Section A.2.7, Configure Administration Security.
For more information see: •
ht-tp://www.ibm.com/developerworks/websphere/techjournal/1004_botzu m/1004_botzum.html?ca=drs#step19
•
ht-tp://www.ibm.com/developerworks/websphere/techjournal/1004_botzu m/1004_botzum.html?ca=drs#step29
3.4
Time Zone Configuration
If multiple server machines are used, they all must have their clocks in sync and be in the same time zone in order that the "natural" ordering of date/ times on the database accurately reflects the order that the events occurred in the real world. For example if on the database record A has a creation date/time field earlier than that on record B, then we can say for sure that A was created before B, no matter which server created either record.
The time zone of the server(s) must never change during the lifetime of the application. The reason for this that the time zone assumed when storing dates in the database is the current server's time zone; therefore if the serv-er's time zone changes then all dates entered prior to the time zone change will be out by the number of hours equal to the difference between the old and new time zones.
3.5
Starting and Stopping WebSphere Servers
A number of Ant targets are provided to aid in the starting and stopping of WebSphere servers. These targets should be executed from the <SERVER_DIR>directory and as for the configure target, they require the AppServer.properties file to be setup correctly ( Example 3.1, AppServer.properties.sample). They also require a number of extra paramet-ers to be specified and these are detailed below.
3.5.1
Start a WebSphere Server
The target for starting a WebSphere server is startserver and requires the following options:
• -Dserver.name
The name of the server to be started.
Important
Before starting the application server for the first time you must have run the database target followed by the pre-pare.application.data target. Failing to run this sequence will likely
result in transaction timeouts during first login and a failure to ini-tialize and access the application. Whenever the database target is rerun (e.g. in a development environment) the pre-pare.application.data target must also be rerun.
Example 3.2Example of Usage
3.5.2
Stop a WebSphere Server
The target for stopping a WebSphere server is stopserver and requires the following options:
• -Dserver.name
The name of the server to be stopped.
build stopserver -Dserver.name=CuramServer
Example 3.3Example of Usage
3.5.3
Restart a WebSphere Server
The target for restarting a WebSphere server is restartserver and the op-tions are the same as for the startserver target. See Example 3.2, Example of Usage for an example of usage.
Note
If the server is not already started when attempting to restart it, the stop portion of the target will not cause the restart target to fail.
Notes
1
Refer to the installation guide that is relevant to the platform, i.e Windows orUNIX.
2
It is possible to override this default location for the properties file by spe-cifying
-Dprop.file.location=<new location> when executing the
configure target.
3
For more information on H2 database consult the Cúram Third-Party Tools Installation Guide for Windows.
Chapter 4
Deployment
4.1
Introduction
The final step after packaging the IBM Cúram Social Program Management application and web services application in EAR files is to deploy them to the application server.
Before deploying, it is important to note that in WebSphere Application Server the configuration scripts provided support a simple configuration tar-geted at the single server in the Express or Base editions of WebSphere Ap-plication Server.
4.2
Deployment
The SDEJ provides targets for installing and un-installing applications on a WebSphere server. As with the startserver/ stopserver targets, the
install-app/ uninstallapp targets require that theAppServer.propertiesfile is configured correctly (see Example 3.1, AppServer.properties.sample). The targets also require a number of options to be specified and these are detailed below.
Ensure the server is started before installing an application. There is no need to restart the server after installation, as the install target will automatically start the application.
4.2.1
Install an Application
The Ant target to install an application (in the form of an EAR file) is
in-stallapp and requires the following options:
• -Dserver.name
• -Dear.file
The fully qualified name of the EAR file to install. • -Dapplication.name
The name of the application.
build installapp -Dserver.name=CuramServer -Dear.file=d:/ear/Curam.ear
-Dapplication.name=Curam Example 4.1Example of Usage
Note
The EAR file containing the server module must be deployed before installing any other (client-only) EAR files.
4.2.2
Change SYSTEM Username
It is strongly recommended that you change the username for JMS invoca-tion while deploying the applicainvoca-tion. The following properties should be set in the AppServer.properties file before deployment to modify this username:
• runas.user
The username JMS invocations should run under. • runas.password
The encrypted password associated with the username. The password should be encrypted using the encrypt target. See the Cúram Server De-velopers Guide for more information.
It is also possible to change the username once the application has been de-ployed using the WebSphere Application Server administrative console. Navigate to Applications→Application Types→WebSphere enterprise ap-plications and select the IBM Cúram Social Program Management applica-tion. Select the User RunAs roles link. Check the everyone role, enter a new username and password (note, password should be entered in the unen-crypted format here) and click the Apply button. Save the changes as de-tailed in Section A.2.6, Save the Master Configuration.
Note, if the username is changed, the new username must exist in the Users database table and this user must have a role of 'SUPERROLE'.
The SYSTEM user is the user under which JMS messages are executed.
4.2.3
Uninstall an Application
The Ant target to uninstall an application is uninstall and requires the fol-lowing options:
• -Dserver.name
The name of the server the application is installed on. • -Dapplication.name
The name of the application to uninstall (as configured during install).
build uninstallapp -Dserver.name=CuramServer -Dapplication.name=Curam
Example 4.2Example of Usage
4.3
Pre-compiling JSPs
There is one additional target available during deployment, precompilejsp, which allows for the JSPs of a client EAR to be pre-compiled before in-stalling the EAR file. Pre-compiling the JSPs before installation will speed up the display of a particular page in the web browser the first time it is ac-cessed.
The options for the precompilejsp target are:
• -Dear.file
The fully qualified name of the EAR file to be pre-compiled.
build precompilejsp -Dear.file=d:/Curam.ear Example 4.3Example of Usage
Note
While running the precompilejsp target for WebSphere Application Server, an out of memory exception may occur (or some JSPs may silently be ignored and not pre-compiled). To work around this the JspBatchCompiler.batscript in the%WAS_HOME%\bin dir-ectory should be modified to increase the maximum memory size. Change the memory consumption from -Xmx256m to at least -Xmx1024m.
4.4
Testing Deployment
When the application is installed1 on a configured WebSphere Application Server installation the next step is to start and test the application.
Ensure the relevant server is started2 and open the following page in a web browser:
https://<some.machine.com>:<port>/<context-root>
where,
<some.machine.com> identifies the the host name or IP address where Cúram Deployment Guide for WebSphere Application Server
your WebSphere Application Server is running,<port>identifies the serv-er port on which client application is deployed and <context-root>
identifies the Context Root of the WAR module (see Section 2.5, Multiple EAR files, for details).
Before the page can be opened, the browser will be directed to the login page. Log in with a valid Cúram username and password and the browser will be redirected to the requested page.
Note
The usage of EAR file nameCuram.earfor option-Dear.file and usage of application server name Curam for option -Dapplication.name in the examples of this chapter are for il-lustrative purposes. Based on your customized application and de-ployment strategy these values may change.
Notes
1
The installation of a web services application may also be required. 2
There is no need to restart the server after an application is deployed. Cúram Deployment Guide for WebSphere Application Server
Manual WebSphere Application Server
Configuration
A.1
Introduction
The sections of this chapter cover the manual steps required to configure and deploy on the Base or Express edition of WebSphere Application Server. You will have to alter these steps appropriately to deploy in a Net-work Deployment installation of WebSphere Application Server. See Sec-tion A.4, WebSphere Network Deployment for more informaSec-tion in this area.
A.2
Manual WebSphere Application Server
Configura-tion
The IBM WebSphere Application Server installation can be configured manually if required, but this is not recommended. This section details the manual steps required to configure WebSphere Application Server for in-formation purposes only.
It is worth noting that any settings entered under the Resources section of the WebSphere Application Server Administrative Console can be con-figured at multiple levels that control the JNDI scope. These include cell, node, or server. Upon selecting a Resource, the top of the main browser window shows this scope and allows the various resources in the current scope to be viewed. The scope, and in turn the location of any resources set, should be based upon planned use, i.e. if working in a cluster it may not be necessary to set the same settings on each server, so the scope may be set to cell or node.
A.2.1
The Administrative Console
the Administrative Console. To run the Administrative Console, the default server, e.g. “server1”, must be started as the Administrative Console is installed as a web application on this server.
To start “server1”, the startServer.bat, located in the pro-files/AppSvr01/bin directory of the WebSphere Application Server installation, should be used:
<WEBSPHERE INSTALL DIR>/profiles/AppSvr01/bin/startServer server1
To open the Administrative Console, a web browser should be pointed at:
http://localhost:9060/ibm/console"/>
Alternatively, the Administrative Console can be started from Start
→Pro-grams→IBM WebSphere→Application Server
V7.0→Profiles→AppSvr01→Administrative console. The Start the server and Stop the server commands can also be used from this menu to start and stop the servers.
The first time the Administration Console is opened, a username will be re-quested for login. This username can be anything! The Administration Con-sole is divided into two sections. The left hand side contains a tree hierarchy for navigating the console and the right hand side displays the information related to the current node selected in the tree. When instructed to ‘ Navig-ate to’, the tree hierarchy should be traversed to the relevant node.
A.2.2
Scripting Support
To support the execution of provided Ant scripts it is necessary to change the WebSphere Application Server property files.
sas.client.props
Open the sas.client.props file found in the profiles/AppS-vr01/properties directory of the WebSphere Application Server in-stallation. It is necessary to set the login source to retrieve the username and password from a properties file rather than having to type them in each time the scripts are run. Set or where necessary add the following properties:
com.ibm.CORBA.loginSource=properties # RMI/IIOP user identity
com.ibm.CORBA.loginUserid=websphere com.ibm.CORBA.loginPassword=websphere com.ibm.CORBA.principalName=curam
where websphere is the username and password for the Administration Console.
soap.client.props
Open thesoap.client.propsfile, also found in the profiles/AppS-vr01/properties directory of the WebSphere Application Server
stallation. It is necessary to set the login source to retrieve the username and password from a properties file rather than having to type them in each time the scripts are run. Set the following properties to be:
com.ibm.SOAP.loginUserid=websphere com.ibm.SOAP.loginPassword=websphere
where websphere is the username and password for the Administrative Console.
To avoid timeouts when installing EAR files ensure that the following is set to be at least:
com.ibm.SOAP.requestTimeout=3600
server.policy
Open the server.policy file found in the profiles/AppS-vr01/properties directory of the WebSphere Application Server in-stallation. Add the following lines to the end of this file:
grant codeBase "file:<CURAMSDEJ>/drivers/-" { permission java.security.AllPermission; };
where<CURAMSDEJ>is the SDEJ installation directory.
grant codeBase "file:${was.install.root}/ profiles/<profile.name>/installedApps/ <cell.name>/<SERVER_MODEL_NAME>.ear/
guice-2.0.jar" { permission java.lang.RuntimePermission "modifyThread"; permission java.lang.RuntimePermission "modifyThreadGroup"; };
where<profile.name>is the name of the target WebSphere Application Server profile;
where <cell.name> is the name of the target WebSphere Application Server cell;
where <SERVER_MODEL_NAME> is the name of the application (base name of the EAR file).
A.2.3
Creating the Data Source Login Alias
IBM® DB2®, IBM DB2 for z/OS®, and Oracle® Database are the data-bases supported. The Administrative Console can be used to configure a lo-gin alias for both the DB2 and Oracle data sources as follows:
1. Navigate to Security→Global security;
2. Expand the Java Authentication and Authorization Service option in the Authentication section and select the J2C authentication data op-tion;
3. Click New to open the Configuration screen; 4. Set the following fields:
Alias = dbadmin
User ID =<database username>
Password =<database password>
Description = The database security alias
where <database username> and <database password>
are set to the username and password used to login to the database; 5. Click OK to confirm the changes.
A.2.4
Configure DB2 Data Sources
Set up DB2 Environment Variable
1. Navigate to Environment→WebSphere variables;
2. Select theDB2UNIVERSAL_JDBC_DRIVER_PATHlink from the list of environment variables. This will open the configuration screen for this variable;
3. Set the Value field to point to the directory containing the Type 4/Type 2 drivers. This is normally thedriversdirectory under the SDEJ in-stallation, e.g.D:\Curam\CuramSDEJ\drivers;
4. Click OK to confirm the changes.
Set up the Database Driver Provider
1. Navigate to Resources→JDBC→JDBC providers;
2. Note: The appropriate scope where the data source is to be defined should be selected at this point.
3. Click New to add a new driver. This will open a configuration screen; 4. Select DB2 from the list in the database type drop down supplied; 5. Select the DB2 Universal JDBC Driver Provider from the list in the
Provider type drop down supplied;
6. Select the XA data source from the list in the Implementation type drop down supplied;
7. Click Next to continue;
8. Review the properties on the configuration screen that opens. There should be no need to change any of them unless you are planning to Cúram Deployment Guide for WebSphere Application Server
connect to a zOS database. If so, verify that ${DB2UNIVERSAL_JDBC_DRIVER_PATH} field is pointing at the correct directory for your system. For example, it should point at the directory containing the DB2 Connect license jar, db2jcc_license_cisuz.jar provided by IBM for zOS con-nectivity;
9. Click Next and then Finish to confirm the changes.
Set up the Database Driver DataSource
The following steps should be repeated for each of the Data Sources, substi-tuting curamdb, curamsibdb and curamtimerdb for
<DatasourceName>(without the angle brackets):
1. Select the DB2 Universal JDBC Driver Provider (XA) now displayed on the list of JDBC Providers. This will open the con-figuration screen for the provider;
2. Select the Data sources link under Additional Properties; 3. Click New to add a new data source;
4. Set the fields as follows:
Data source name:<DatasourceName>
JNDI name:jdbc/<DatasourceName>
5. Click Next to continue; 6. Set the fields as follows:
Driver type: 2 or 4 as required;
Database name: The name of the DB2 database; Server name: The name of the DB2 database server; Port number: The DB2 database server port;
Leave all other fields untouched unless a specific change is required and click Next;
7. Set the Component-managed authentication alias drop down value to:
<valid for database>;
Set the Mapping-configuration alias drop down value to: DefaultPrini-cipalMapping
Set the Container-managed authentication alias drop down value to:
<valid for database>;
where the <valid for database>alias used is the one set up in Section A.2.3, Creating the Data Source Login Alias;
Leave all other fields untouched unless a specific change is required and click Next to continue.
8. Click Finish to confirm the changes and continue;
9. Select the newly createdDatasourceNamedata source from the dis-played list;
10. Select the Custom Properties link under Additional Properties; 11. Select thefullyMaterializeLobDataentry;
12. Set thevalueto befalse; 13. Click OK to confirm the change.
A.2.5
Configure an Oracle Data Source
Set up Oracle Environment Variable
1. Navigate to Environment→WebSphere variables;
2. Select theORACLE_JDBC_DRIVER_PATHlink from the list of envir-onment variables. This will open the configuration screen for this vari-able;
3. Set the Value field to point to the directory containing the Type 4 driver. This is the drivers directory of the SDEJ installation, e.g. D:\Curam\CuramSDEJ\drivers;
4. Click OK to confirm the changes.
Setup the XA Database Driver
1. Navigate to Resources→JDBC→JDBC providers;
2. Note: The appropriate scope where the data source is to be defined should be selected at this point.
3. Click New to add a new driver. This will open a configuration screen; 4. Select the Oracle from the list in the Database type drop down
sup-plied;
5. Select the Oracle JDBC Driver from the list in the Provider type drop down supplied;
6. Select the XA data source from the list in the Implementation type drop down supplied;
7. Set the Name field to be Oracle JDBC Driver (XA), if not filled in automatically;
8. Click Next to continue;
9. Review the Class path and ensure the OR-Cúram Deployment Guide for WebSphere Application Server
ACLE_JDBC_DRIVER_PATH environment variable is correct. Click Next to continue;
10. Review the properties on the configuration screen that opens. There should be no need to change any of them;
11. Click Finish to confirm the changes.
Setup the Non-XA Database Driver
1. Navigate to Resources→JDBC→JDBC providers;
2. Click New to add a new driver. This will open a configuration screen; 3. Select Oracle from the the list in the Database type drop down
sup-plied;
4. Select Oracle JDBC Driver from the list in the Provider type drop down supplied;
5. Select the Connection pool data source from the list in the Implementa-tion type drop down supplied;
6. Set the Name field to be Oracle JDBC Driver, if not filled in automatic-ally;
7. Click Next to continue;
8. Review the Class path and ensure the OR-ACLE_JDBC_DRIVER_PATH environment variable is correct. Click Next to continue;
9. Review the properties on the configuration screen that opens. There should be no need to change any of them;
10. Click Finish to confirm the changes.
Set up the XA Database Driver DataSources
The following steps should be repeated twice, substituting
<DatasourceName>(without the angle brackets) with thecuramdband thencuramsibdb.
1. Select the Oracle JDBC Driver (XA)now displayed on the list of existing providers. This will open the configuration screen again; 2. Select the Data sources link under Additional Properties;
3. Click New to add a new data source; 4. Set the fields as follows:
Data source name:<DatasourceName>
Click Next;
5. Set the URL Value field to:
jd-bc:oracle:thin:@//serverName:port/databaseServi ceName, to connect to database using Oracle service name.
or
jdbc:oracle:thin:@serverName:port:databaseName, to connect to database using Oracle SID name.
Where,
serverNameis the name of the server hosting the database;
portis the port number the database is listening on;
databaseNameis the SID of the database; and
databaseServiceNameis the service name of the database.
Set the Data store helper class name to be Oracle 11g data store helper;
Leave all other fields untouched unless a specific change is required and click Next;
Note
Oracle recommends using the URL format jd-bc:oracle:thin:/@//serverName:port/databas eServiceName to connect to Oracle database using service name. But this URL format(extra '/' before the '@' in the URL) is not supported by the WebSphere Application Server admin console. So, the Oracle service name URL described above (without extra '/' before the '@' in the URL) should be used while configuring Oracle data source from admin console, to connect to Oracle database using service name.
6. Set the Authentication alias for XA recovery: <valid for data-base>
Set the Component-managed authentication alias drop down value to:
<valid for database>;
where the <valid for database>alias used is the one set up in Section A.2.3, Creating the Data Source Login Alias;
Leave all other fields untouched unless a specific change is required and click Next;
7. Click Finish to confirm the changes and continue.
Set up the Non-XA Database Driver DataSource
1. Select the Oracle JDBC Driver now displayed on the list of ex-isting providers. This will open the configuration screen again;
2. Select the Data sources link under Additional Properties; 3. Click New to add a new data source;
4. Set the fields as follows:
Data source name:curamtimerdb JNDI Name:jdbc/curamtimerdb Click Next;
5. Set the URL Value field to:
jd-bc:oracle:thin:@//serverName:port/databaseServi ceName, to connect to database using Oracle service name.
or
jdbc:oracle:thin:@serverName:port:databaseName, to connect to database using Oracle SID name.
Where,
serverNameis the name of the server hosting the database.
portis the port number the database is listening on.
databaseNameis the SID of the database.
databaseServiceNameis the service name of the database.
Set the Data store helper class name to be Oracle 11g data store helper;
Leave all other fields untouched unless a specific change is required and click Next;
Note
Oracle recommends to use the URL format jd-bc:oracle:thin:/@//serverName:port/databas eServiceName to connect to Oracle database using service name. But this URL format(extra '/' before the '@' in the URL) is not supported by WebSphere administrative console. So, the Oracle service name URL described above (without extra '/' be-fore the '@' in the URL) should be used while configuring Or-acle data source from admin console, to connect to OrOr-acle database using service name.
6. Set the Component-managed authentication alias drop down value to:
<valid for database>;
where the <valid for database>alias used is the one set up in Section A.2.3, Creating the Data Source Login Alias;
Leave all other fields untouched unless a specific change is required and click Next;
7. Click Finish to confirm the changes and continue.
A.2.6
Save the Master Configuration
A Save can be performed by clicking the Save link in the Message(s) box. This box is displayed only after configuration changes have been made.
A.2.7
Configure Administration Security
The default user registry used is the default WebSphere Application Server file- based user registry.
1. Navigate to Security→Global security;
2. Set the Available realm definitions to be Federated repositories and click the Configure button;
3. Set the Primary administrative username to bewebsphere; 4. Select the Automatically generated server identity radio button; 5. Select Ignore case for authorization and click OK;
6. Enter the password for the default administrative user, e.g. web-sphere, enter the confirmation and click OK to confirm the changes; 7. Set the Available realm definitions to be Federated repositories and
click the Set as current button;
8. Select Enable administrative security; 9. Select Enable application security;
10. Select Use Java 2 security to restrict application access to local re-sources and Warn if applications are granted custom permissions; 11. Click the Apply button to confirm the changes;
12. Navigate to Security→Global security; 13. Select the Custom Properties link;
14. Click New and set the name and value as follows:
com.ibm.ws.security.web.logoutOnHTTPSessio Name=nExpire
Value=true
15. Click OK to add the new property. 16. Navigate to Security→Global security;
17. Select Web and SIP Security→Single sign-on (SSO); 18. Check the Requires SSLcheck box;
19. Click OK to confirm the change. 20. Navigate to Security→Global Security; 21. Select Custom properties;
22. Add
com.ibm.ws.security.addHttpOnlyAttributeToCooki eswith valuetrue;
23. Click OK to confirm the change.
24. Save the changes to the master configuration.
A.2.8
Restart the Application Server
This step is compulsory. The server must be restarted for the security changes to take effect and to add additional required users. The server can be stopped using the stopServer.bat file in the profiles/ AppSrv01/bin directory of the WebSphere Application Server installa-tion. This is similar to starting the server described in Section A.1, Introduc-tion.
Before restarting the application server (e.g. server1), it is necessary to make the registry JAR file available to WebSphere Application Server. The registry JAR file contains classes necessary for the security configuration. Registry.jar is located in the lib directory of the SDEJ installation. Copy this file into the lib directory of the WebSphere Application Server installation. Now start the application server (e.g. server1) and open the Ad-ministrative Console to continue with the configuration steps.
Since the security configuration is complete and the scripting changes have been made, it is now possible to use the SDEJ scripts to restart the Sphere Application Server. See Section 3.5, Starting and Stopping Web-Sphere Servers for more details on restarting the server.
The Administrative Console should now be opened to continue with the con-figuration. Now that global security is enabled, you will be required to login to the console with the usernamewebsphere and passwordwebsphere
set up previously.
A.2.9
Configure Users
As detailed in Section 3.3, Security Configuration, the configured Web-Sphere Application Server user registry is used for authentication of admin-istrative users and the database user. The WebSphere adminadmin-istrative users and the database user must be manually added to the user registry as fol-lows.
• Navigate to Users and Groups→Manage Users; • Click the Create button;
• Fill in the details for the WebSphere administrative user and click the Create button.
• Repeat the steps for the database user.
Note: If WebSphere administrative security was enabled when creating the profile the administrative user may already be defined in the registry.
A.2.10
Set up the System JAAS Login Module
Application security uses a JAAS (Java Authentication and Authorization Service) Login Module for authentication. This login module must be con-figured for the DEFAULT, WEB_INBOUND and RMI_INBOUND config-urations. Repeat the below steps for each of these configconfig-urations.
Add the Login Module
1. Navigate to Security→Global security;
2. Expand Java Authentication and Authorization Service entry in the Au-thentication section and select System logins;
3. Select the relevant Alias from the list. The login module should be con-figured for the DEFAULT, WEB_INBOUND and RMI_INBOUND aliases;
4. Click New to configure a new Login Module;
5. Set the Module class name field to be
curam.util.security.CuramLoginModule; 6. Check the Use login module proxy option;
7. Select REQUIRED in the Authentication strategy field;
8. Enter into Custom properties table Name/Value pairs for any required properties as listed below, pressing New as needed.
Name Example Value Description
exclude_usernames websphere, db2admin Required. A list of usernames to be excluded from authen-tication. The default delimiter is a comma, but may be over-ridden by
ex-clude_usernames_del imiter. This list should in-clude the WebSphere admin-istration users and the data-Cúram Deployment Guide for WebSphere Application Server