User Guide
Document Control
DESCRIPTION User Guide - SecurePay Merchant Portal
CREATION DATE 02/04/2018 CREATED BY SecurePay
VERSION 1.4 DATE UPDATED 02/11/2020
CHANGES
Contents
1. SecurePay Merchant Portal ... 1
1.1Getting Started... 1
1.2 SecurePay Public Test Account ... 2
1.3 Contacting SecurePay ... 2
2. Transactions ... 2
2.1 Account Summary ... 2
2.2 Bank Reconciliation ... 3
2.3 Search ... 4
2.4 Download Daily Reports ... 4
2.5 Alipay and WeChat Pay Tax Invoices and Settlement Reports ... 5
3. Take A Payment ... 5
3.1 Cards ... 5
3.2 Bank Accounts... 7
3.3 Batch File ... 10
3.4Manage Payor List ... 11
3.5 Manage DD Agreements ... 12
3.6 Manage Future Payments ... 13
3.7 Account Verification ... 14
3.8 Preauth A Payment ... 15
3.9 Preauth Increase and Cancellation ... 16
3.10 Preauth Complete ... 17
3.11 Refund A Payment ... 17
4. SecureBill ... 18
4.1 Upload SecureBill Data File ... 18
5. Preferences... 19
6. Message Inbox ... 19
8. Roles... 21
9. Log In History ... 21
10. Merchant Login ... 22
11. Receipt Details ... 23
12. Contact Details ... 24
13. FraudGuard Settings ... 24
14. PayPal Settings ... 26
15. API Transaction Password ... 26
1 | P a g e
1. SecurePay Merchant Portal
This user guide covers the functions and features of the SecurePay merchant portal. For further assistance, please contact the SecurePay Support Team on 1300 786 756 (Option 2).
1.1 Getting Started
The SecurePay merchant portal can be accessed via SecurePay’s website. Click on Login and you will be directed to the merchant portal. You will be asked for the Merchant ID, User Name and Password to sign in. The administrator of the account should receive the login credentials via an activation email. If you haven’t received a copy of your account
credentials, please contact the SecurePay Support Team on 1300 786 756 (Option 2).
2 | P a g e
1.2 SecurePay Public Test Account
You can use the SecurePay demonstration account if you don’t have a live account. This can be accessed here:
Test Login Details: Client ID: ABC Username: test Password: abc1234!!
1.3 Contacting SecurePay
You can contact SecurePay via the Merchant Portal by: 1. Clicking on the Contact tab
2. Enter the required fields 3. Click Send
You can also reach the following SecurePay Teams on: • SecurePay Sales
Phone: 1300 786 756 (Option 1)
Email: sales@securepay.com.au • SecurePay Support
Phone: 1300 786 756 (Option 2)
Email: support@securepay.com.au • SecurePay Accounts
Phone: 1300 786 756 (Option 3)
Email: accounts@securepay.com.au
2. Transactions
2.1 Account Summary
This section is where you can view your consolidated net accounts received or net accounts paid of transactions that are processed in real time.
To view your accounts summary:
1. Click on Accounts Summary under Transactions
3 | P a g e
• Transactions processed, Start Date, End Date, Result and Currency
3. Click Search
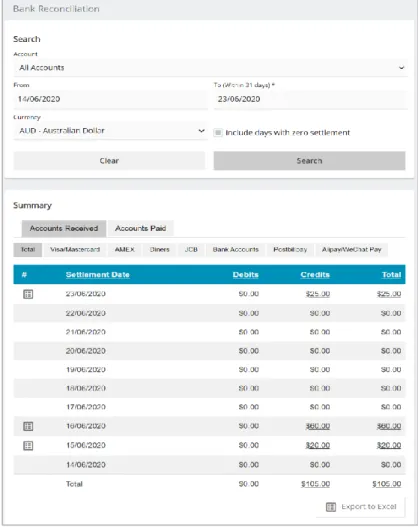
2.2 Bank Reconciliation
This section is where you can view your consolidated transactions that have settled in your bank account.
An option to export the settlement amounts in an Excel format is also available. There is an export functionality at the bottom of the page.
To view your bank reconciliation report:
1. Click on Bank Reconciliation under Transactions
2. If you want to conduct a search for a certain period, please fill in the search fields:
• Account, From, To and Currency
3. Click Search
4. Click on the Tender Type you want to view the settlements for
4 | P a g e
2.3 Search
To view your transactions:
1. Click on Search under Transactions
2. Enter as many fields that you can recall or have obtained and click Search
3. You have the option to obtain a summary of your approved or declined transactions 4. Once you have clicked on Search you have the option to export a list of transactions
in an Excel file
NOTE: All search fields are optional, and the maximum search period is 3 months at a time.
2.4 Download Daily Reports
Daily reports contain a list of transactions that can be downloaded and imported into your software/ accounting package to assist with your reconciliation. There are two default reports that can be configured in either a .txt or .csv format. If you would like to enquire about
configuring these report types please contact the SecurePay Customer Service Team on 1300 786 756 (Option 2).
Custom reporting can also be configured however there is an additional fee. If you’re wanting to enquire please contact the SecurePay Sales Team on 1300 786 756 (Option 1). Figure 3: Transaction Search
5 | P a g e
2.5 Alipay and WeChat Pay Tax Invoices and Settlement Reports
This section is where merchants who have Alipay or WeChat Pay enabled as a payment method on their SecurePay account, can view their daily Settlement report files which will assist with reconciliation. Merchants will also be able to view their monthly Tax Invoice file through this section. All daily Settlement reports and monthly Tax Invoice files can be downloaded and saved in PDF format.
If you would like to enable Alipay or WeChat Pay as a payment option, please contact the SecurePay Sales Team on 1300 786 756 (Option 1) or the SecurePay Support Team on 1300 786 756 (Option 2) for more information.
3. Take A Payment
3.1 Cards
This function allows you to take a payment from a customer’s credit card.
To take a payment:
1. Click on Cards under Take A Payment
2. If you have one SecurePay account, the account will be selected by default. If you have sub accounts, you will have to select the account via the drop-down menu 3. If the cardholder is a new payor you will need to enter in all the required details
The mandatory fields are: Figure 4: Daily report search
6 | P a g e • Payor:This is an alphanumeric field used to identify the transaction
• Card Number:14-16 digit card number
• Expiry Date: The expiry date of the credit card must be valid for the transaction to process successfully
Optional fields:
• CVV (Card Verification Value): 3-digit number located on the back of the signature strip for VISA and MasterCard. For AMEX payments it’s a 4-digit number located at the front of the card
• Name On Card: The name of the customer/cardholder
NOTE: Saving the payor details means the next time you have to process a payment for the customer you don’t have to enter their details again.
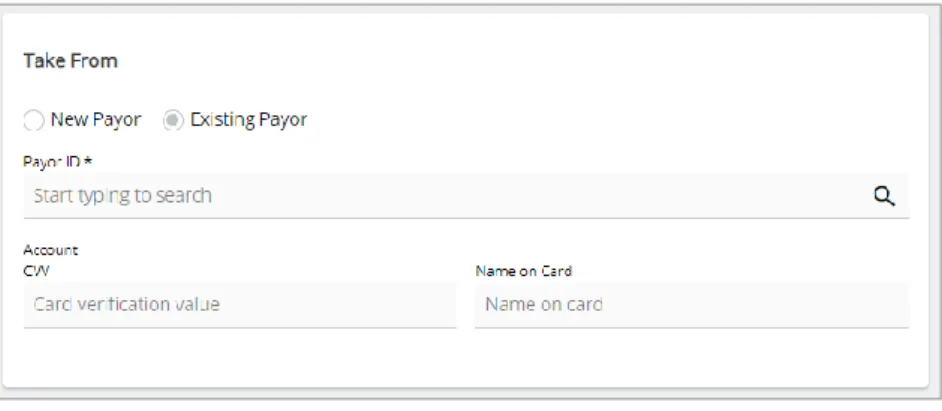
If it’s an existing payor please click on the Existing Payor radio button. Type in the payor ID and select the payor from the drop-down menu. Once selected this will generate the card number and expiry date that is attached to the payor. The CVV field and Name on Card is optional.
4. Enter the Transaction Reference for the payment: This is a unique identifier for the payment such as an invoice number
5. The Amount field must include a decimal point (e.g: $10.00 = 10.00)
6. Enter the Currency you want the payment to be processed in: AUD is the default currency for all accounts
NOTE:
• If your acquirer is NAB you have the option to process multi-currency payments, this
will have to be enabled on the banks end. Figure 5: New or existing payor
7 | P a g e
• If your acquirer is ANZ you have the option to process NZD payments, this will have
to be enabled on the banks end.
7. When:
• Now: Once off real-time payment.
• Future Date: Please enter the Schedule ID which is a mandatory field. The Schedule ID is a unique identifier for future or recurring payments. This ID may not match the saved payor name.
Pay on: Select the first date the first payment needs to be processed. • Scheduled: Allows you to setup automatic payments at particular intervals
(Weekly, Fortnightly, Monthly, Quarterly, Half- Yearly, Annual or you can state the days you require them to be scheduled for).
Enter the Schedule ID, Schedule Type (Recurring or Instalment) (if visible -new payors only), Start on, Frequency (intervals you want to set them up for) and End.
8. The Email receipt to field is optional. If you would like to send a receipt of the payment to the customer, please enter their email address in this field
9. Once you have entered all the relevant details click on Continue. Once the transaction has been processed a receipt page will be displayed
NOTE: Scheduled payments will be processed at 17:30 (AEST) of the scheduled date.
3.2 Bank Accounts
This function allows you to take a payment from a customer’s bank account. If you would like to start processing payments via this method, please contact the SecurePay Sales Team on 1300 786 756 (Option 1).
To process a payment:
1. Click on Bank Accounts under Take A Payment
2. Select your SecurePay account, if you have the one account it will be selected by default
8 | P a g e The mandatory fields are:
• Payor:This is an alphanumeric field used to identify the transaction • Account Name:Account holders name
• BSB Number: A 6-digit number
• Account Number: Amaximum9-digit number
NOTE: Saving the payor details means the next time you have to process a payment for the customer, you don’t have to enter their details again.
If it’s an existing payor please select the Existing Payor radio button. Select the payor from the drop-down menu, this will generate the account details attached to the payor.
9 | P a g e 4. Enter the Transaction Reference for the payment: This is a unique identifier for the
payment such as an invoice number
5. The Amount field must include a decimal point (e.g: $10.00 = 10.00) 6. When:
• Now: Once off real-time payment.
• Future Date: Please enter the Schedule ID which is a mandatory field. The scheduled ID is a unique identifier for future or recurring payments. This ID may not match the saved payor name.
• Pay On: Select the first date the first payment needs to be processed. • Scheduled: Allows you to setup automatic payments at particular intervals
(Weekly, Fortnightly, Monthly, Quarterly, Half- Yearly, Annual or you can state the days you require them to be scheduled for).
Enter the Schedule ID, Start on date, Frequency (intervals you want to set them up for) and End.
7. Once you have entered all the relevant details click on Continue. A receipt page will be displayed after the payment has been processed
NOTE: Scheduled payments will be processed at 16:00 (AEST) of the scheduled date. Figure 7: New or existing payor
10 | P a g e
3.3 Batch File
This function is used if you would like to process bulk payments simultaneously.
NOTE:
• You will need to follow the SecurePay batch specification guide to create a batch file.
• If you need to resubmit the credit card batch file, please do so before the cut-off time
of 17:30 that same day.
• If you’re needing to resubmit a direct debit batch file, please do so before 16:00 that
same day.
• As you can only submit one batch file per day, the second file you upload will
override the initial file.
To upload a batch file:
1. Click on Batch File under Take A Payment
2. Depending on the batch file you have created select the following: Cards or Bank Accounts
3. Select your SecurePay Account, if you have the one account it will be selected by default
4. Select the batch file you have created
5. If you would like to be notified once the batch has been processed, please enter your Email address
6. Click Upload Figure 8: Batch file upload
11 | P a g e
3.4 Manage Payor List
This function allows you to store your customer’s credit card details securely in SecurePay’s database. The payor details that are stored can be used to trigger a payment via the
merchant portal, scheduled payments, batches and XML API. Adding a payor replaces the steps of constantly entering the same customer’s credit card details.
Searching for a payor:
1. Click on Manage Payor List under Take A Payment 2. Click on the Search button
3. Enter the required details 4. Click Search
To add a payor:
1. Click on Manage Payor List under Take A Payment 2. Click on the Add Payor button
3. Complete the required fields 4. Click Save
Deleting a payor:
1. Click on Manage Payor List under Take A Payment 2. Select the payor you would like to delete
3. Click the Delete Marked button
4. Confirm if you want to delete the payor and click Delete
Exporting a payor list:
1. Click on Manage Payor List under Take A Payment
2. Click on the Export to Excel button at the bottom of the page, this will create an Excel file
12 | P a g e
3.5 Manage DD Agreements
For merchants to debit a customer’s bank account, a Direct Debit (DD) Agreement must be present. This section will allow you to view, add, delete and edit your DD agreements.
To add a Direct Debit Agreement:
1. Click on Manage DD Agreements under Take A Payment 2. Click on Add Direct Debit Agreement button
3. Complete the mandatory fields 4. Click Save
To edit a Direct Debit Agreement:
1. Click on Manage DD Agreements under Take A Payment 2. Click on the Account Name of the agreement
3. Edit the required details 4. Click Save
To delete a Direct Debit Agreement:
1. Click on Manage DD Agreements under Take A Payment
2. Tick the checkbox of the direct debit agreement you want to delete 3. Click on the Delete Marked button
4. Confirm if you want to delete the Direct Debit Authority 5. Click Delete
13 | P a g e
3.6 Manage Future Payments
This section will allow you to view your future scheduled payments. You can also delete, edit and export future payments.
To search for a Future Payment:
1. Click on Manage Future Payments under Take A Payment 2. Click on the Show Search button
3. Fill in the details of the future payment 4. Click on Search
To edit a Future Payment:
1. Click on Manage Future Payments under Take A Payment 2. Click on the Schedule ID of the future payment
3. Click Edit
4. Edit the fields that are required 5. Click Continue
To delete a Future Payment:
1. Click on Manage Future Payments under Take A Payment 2. Select the future payment record
3. Click the Delete Marked button
4. Confirm whether you want to delete the future payment and click Delete
Exporting a list of Future Payments:
1. Click on Manage Future Payments under Take A Payment
2. Click on the Export to Excel button at the bottom of the page, this will create an Excel file
14 | P a g e
3.7 Account Verification
This function allows you to verify a customer’s card details and its validity without impacting the customer’s available funds.
NOTE: This functionality only applies to Visa and Mastercard transactions and is currently available with the following acquiring banks - NAB, ANZ and Westpac Qvalent.
To process an account verification payment:
1. Click on Account Verification under Take a Payment
2.Select your SecurePay Account, if you have the one account it will be selected by default 3. If it’s a new payor please enter their details. If it’s an existing payor enter the Payor ID and select from the drop-down menu
For a new payor the mandatory fields are:
• Payor ID:This is an alphanumeric field used to identify the transaction • Card Number:14-16 digit card number
• Expiry Date: The expiry date of the credit card must be valid for the transaction to process successfully
Optional fields:
• CVV (Card Verification Value): 3-digit number located on the back of the signature strip for VISA and MasterCard.
• Name On Card: The name of the customer/cardholder.
NOTE: Saving the payor details means the next time you have to process a payment for the customer you don’t have to enter their details again.
4. Enter the Transaction Reference for the account verification payment: This is a unique identifier for the payment, such as an invoice number
5. The Amount field will always be $0 for account verification transactions 6. Currency will always be in AUD for account verification transactions
7. Once you have entered all the relevant details click Continue. Once you have confirmed the account verification payment details a receipt page will be displayed
15 | P a g e
3.8 Preauth A Payment
This function allows you to process a preauth payment against a customer’s credit card. A preauth payment is when you reserve an amount to be charged against the credit card, allowing you to complete the transaction at a later date. If you don’t choose to complete the payment the funds will be released within 5-10 business days. The exact time for the release is dependent on the card issuer.
To process a preauth payment:
1. Click on Preauth under Take A Payment
2. Select your SecurePay Account, if you have the one account it will be selected by default 3. If it’s a new payor please enter their details. If it’s an existing payor enter the Payor ID
and select from the drop-down menu
For a new payor the mandatory fields are:
• Payor ID:This is an alphanumeric field used to identify the transaction • Card Number:14-16 digit card number
• Expiry Date: The expiry date of the credit card must be valid for the transaction to process successfully
Optional fields:
• CVV (Card Verification Value): 3-digit number located on the back of the signature strip for VISA and MasterCard. For Amex payments it’s a 4-digit number located at the front of the card.
• Name On Card: The name of the customer/cardholder.
NOTE: Saving the payor details means the next time you have to process a payment for the customer you don’t have to enter their details again.
4. Enter the Transaction Reference for the preauth payment: This is a unique identifier for the payment, such as an invoice number
16 | P a g e 6. Enter the currency you want the payment to be processed in: AUD is the default
currency for all accounts
7. The Authorisation for an Initial Amount flag is used to indicate that the amount is an initial/estimated amount and can be adjusted (increased or partially/fully cancelled) at a later stage when the actual amount becomes known. This functionality is limited to certain merchants within specific industries and is currently available with the following acquiring banks - NAB, ANZ and Westpac Qvalent. To find out if you’re eligible to use this feature please refer to the FAQs document on the SecurePay website.
8. Once you have entered all the relevant details click Continue. Once the preauth payment has been processed a receipt page will be displayed
3.9 Preauth Increase and Cancellation
This feature is used when wanting to increase, fully or partially cancel a previously approved initial authorisation. The amount entered is what the current preauth amount is increased or cancelled by.
NOTE: This functionality only applies to Visa and Mastercard transactions, and is currently available with the following acquiring banks - NAB, ANZ and Westpac Qvalent.
To complete a preauth increase or preauth cancel payment:
1. Click on Preauth Increase and Cancellation under Take A Payment 2. Enter your initial authorisation details and click Search
3. Click on the Transaction Reference of the initial authorisation payment that you would like to increase or cancel
4. Select the Preauth Type (Increase, Partial Cancellation and Full Cancellation) that you would like to initiate
5. Enter the Amount which you would like to increase, partially/fully cancel the current preauth amount by
6. If you would like to proceed press Continue, once you have confirmed that the details are correct click on the Proceed with Increase or Cancellation button. Once the transaction has processed a receipt page will be displayed.
NOTE:
o For Visa, a Preauthorisation Increase, increases the amount only. It does not extend
17 | P a g e
o For Mastercard, a Preauthorisation Increase, increases the amount and extends the
validity period of the authorisation. Mastercard allows a $0 increase to extend the
validity period only. If you’re wanting more information please refer to the FAQs
document on the SecurePay website.
o The ANZ acquirer doesn’t currently support partial cancellations, only full
cancellations can be made on a previously approved Initial Authorisation transaction.
3.10 Preauth Complete
This feature is used to complete a preauth payment.
To complete a preauth payment:
1. Click on Preauth Complete under Take A Payment 2. Enter the preauth details and click Search
3. Click on the Transaction Reference of the preauth payment
4. If you want to complete the full amount leave as is and click Continue. If you want to process a partial complete, change the Amount to Complete field and click Continue. Once the complete has been processed a receipt page will be displayed
3.11 Refund A Payment
This feature is used to process a credit card refund.
To process a refund:
1. Click on Refund A Payment under Take A Payment
2. Enter the required details of the transaction you want to refund and click Search 3. Select the Transaction Reference of the payment
4. If you want to refund the full amount leave as is and click Continue. If you want to process a partial payment, change the Amount to Refund field and click Continue. A receipt page will be displayed after the refund has been processed
18 | P a g e
4. SecureBill
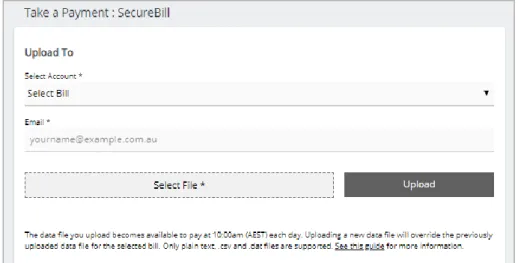
4.1 Upload SecureBill Data File
If you’re using SecureBill to process bill payments, you can also upload a data file.
Uploading a data file allows you to create a list of specific reference numbers that customers can use to pay their bills.
NOTE:
• The accepted file extensions are: .txt, .csv or .dat.
• If you need to resubmit the data file again please keep in mind it will override the
original file
• Please ensure you upload your file with enough time for it to be imported by 10:00am
(AEST)
• If you would like a SecureBill page configured, please contact the SecurePay
Support Team on 1300 786 756 (Option 2)
To upload a SecureBill Data file:
1. Once you have created your SecureBill data file that meets the specifications located in Appendix C 8.3 of the SecureBill integration guide. Click on Upload SecureBill Data File under SecureBill
2. Select the Bill
19 | P a g e 3. If you would like to receive a status update of the file you have uploaded via email,
please enter your Email Address 4. Select the data file you have created 5. Click Upload
5. Preferences
This function is used to change your user details or resetting your login password.
To change your details:
1. Click on Preferences via the Manage tab 2. Click on Change Settings
3. Edit the fields you require; you also have the option to opt in/out to receive marketing emails.
4. Click Save
To change your user password:
1. Click on Preferences via the Manage tab 2. Click on Change My Password
3. Enter your Current password, New password and retype your new password 4. Click Save
6. Message Inbox
This section is for any communications that is sent by SecurePay. The message will also appear on the homepage of your account.
7. Users
This feature allows the administrator of the account to add new users to their SecurePay account. It also allows the administrator user to edit existing users details and permissions, reset their password and delete a user.
20 | P a g e To add a user:
1. Click on Users via the Manage tab 2. Click on Add New User button
3. Enter the Username, Email Address, First Name and Last Name of the new user 4. Select the Role Name (Refer to section 8 for more on Roles)
5. Click Save
NOTE: A temporary password will be automatically sent to the new users registered email address.
To edit a user:
1. Click on Users via the Manage tab 2. Select the Username
3. Click on Edit
4. You will be able to edit the following:
• First Name
• Last Name
• Email Address
• Role Name
5. Click Save
To delete a user:
21 | P a g e 1. Click on Users via the Manage tab
2. Select the Username 3. Click Delete
4. Confirm whether you want to delete the user and click Delete
8. Roles
If you would like to restrict access to a user/s or provide them with certain permissions: 1. Click on Roles via the Manage tab
2. Click on Add New Role button 3. Enter the Name of the role
4. Enter a Description or the role (Optional)
5. Set the permissions you would like the user to have 6. Click Save
7. The role that has been created will be added as an option under Role Name
To edit a role:
1. Click on Roles via the Manage tab 2. Click on the Name of the role 3. Click Edit
4. Edit the permissions for that role 5. Click Save
To delete a role:
1. Click on Roles via the Manage tab 2. Select the Name of the role 3. Click Delete
4. Confirm whether you want to delete the role and click Delete
9. Log In History
This feature allows you to view:• Which user has logged in recently
• Whether the user was successful or not at logging in • What date and time they have logged into the system
22 | P a g e • Be able to search by date period
10. Merchant Login
Saving the payor details means the next time you have to process a payment for the
customer you don’t have to enter their details again. By enabling this feature you don’t have to manually tick the Save Payor checkbox when processing a payment.
If you want to save the Payor/Payee details by default: 1. Click on Merchant Login via the Manage tab
2. To enable the payment settings click on Change Settings 3. Tick the Save the Payor/Payee by default? checkbox 4. Click Save
23 | P a g e
11. Receipt Details
This feature allows the merchant to choose whether they would like to send a custom or default receipt to a customer if the Email receipt to field is populated.
If you would like to create a default receipt:
1. Click on Receipt Details via the Manage tab
2. Select your Merchant Account, if you have the one account it will be selected by default
3. Click on Change Settings
4. Click on Default in the Use Receipt Details field
5.
Click SaveIf you would like to create a custom receipt:
1. Click on Receipt Details via the Manage tab
2. Select your Merchant Account, if you have the one account it will be selected by default.
3. Click on Change Settings
4. Click on Custom in the Use Receipt Details field 5. Enter the Send From Email Address
6. Enter the required Contact Details 7. Click Save
24 | P a g e
12. Contact Details
The administrator of the account can amend the operational, technical and financial contact details.
To change the details:
1. Click on Contact Details via the Manage tab 2. Click on Edit
3. Amend the details that are required 4. Click Save
13. FraudGuard Settings
FraudGuard is a set of rules that assists with identifying potential fraudulent transactions and minimising the chances of chargebacks.
FraudGuard can be integrated with the following products: • XML API
• DirectPost • SecureFrame
25 | P a g e • SecureBill (Refer to section 6.1 of the SecureBill integration guide)
NOTE: If you would like to enable FraudGuard please contact the SecurePay Sales Team on 1300 786 756 (Option 1).
26 | P a g e
14. PayPal Settings
If you would like to start accepting PayPal payments you will have to enable this on your SecurePay account.
To enable PayPal settings:
1. Send a request in writing to the SecurePay Support Team
(support@securepay.com.au) stating that you would like to start accepting PayPal payments
2. Establish a business PayPal account if you don’t have one 3. Click on PayPal Settings via the Manage tab
4. Select your Merchant Account and click on Change Settings 5. Click on the Production API Credentials here link
6. Login to PayPal
7. Copy the credentials over to the PayPal settings in the merchant portal
8. Add the company logo URL which must be securely hosted and publicly accessible 9. Click Save
NOTE: The only SecurePay products that you can integrate PayPal as an additional payment choice is SecureFrame, DirectPost and SecureBill.
15. API Transaction Password
Your API transaction password is used for integrating with an ecommerce platform. If you’re currently using the following products you will be needing an API transaction password:
• XML API • DirectPost • SecureFrame
Generating a new API Transaction Password can be done via the Merchant Portal under the Manage menu option.
Note: Once you generate a new API Transaction Password you will need to also update it in your backend system. You will not be able to process live payments if the update does not occur.
27 | P a g e To change your API transaction password:
1. Click on API Transaction Password via the Manage tab
2. Select your Merchant Account, if you have the one account it will be selected by default
3. Enter your Current API transaction password 4. Enter your New API transaction password 5. Re type your New API transaction password 6. Click Change
16. Update Payment Details
This section allows you to update your payment account details that SecurePay use to take payments from for billing purposes.
28 | P a g e