Installation Guide
C o n t e n t s
B e f o r e Yo u I n s t a l l
Vantage Hardware Requirements ...2
Hardware Requirements ...2
Disk Space Requirements ...2
Operating System Requirements ...3
Vantage Web Apps ...3
Vantage Client Software ...3
Vantage Services...3
Windows XP Pro Requirements ...4
Windows Server 2003 Requirements...4
Windows Server 2008 Requirements...4
Software Requirements...6
QuickTime Requirements...6
.NET Framework Requirements...6
Anti-Virus Software Recommendations...6
Network Requirements...7
Port Requirements ...7
Database Guidelines...9
Supported Databases ...9
Guidelines for Using SQL Server Standard ...9
Guidelines for a Dedicated Database Server ...10
Dedicated Database Platform Requirements ...11
Servers Required to Host Database Services...11
System Requirements ...11
Mirror Database License Requirements...11
Vantage Installers Overview...13
Obtaining the Vantage Installer...13
Licensing Overview ...16
Obtaining a Vantage License ...16
Contents iv
I n s t a l l i n g V a n t a g e
Installing a Single-Server All-in-One Domain...20
Vantage Client Programs and Services ...22
Installing Vantage Patches ...22
Installing a Multi-Server Vantage Domain ...23
Install SQL Server 2008 Standard ...23
Installing the Vantage Database ...24
Installing Vantage Services and Client Programs ...25
Vantage Client Programs and Services ...28
Installing Vantage Patches ...28
Configuring a Multi-server Vantage Installation ...29
Enabling a Vantage License...32
Activating a Vantage License Offline ...34
Installing Workflow Portal ...38
Installing Vantage Web Apps ...39
Upgrading to Vantage 3.0 from a Previous Version ...41
Uninstalling Workflow Portal ...41
Uninstalling Update Packs...41
Uninstalling the Transcode & Analysis Engine ...41
Uninstalling Vantage Services and Clients ...42
Uninstalling the Vantage Domain Database ...42
Removing the Database...42
Upgrading Database Files ...43
Installing the New Vantage Version ...43
Moving a Vantage Database to Another Database ...44
Back up the Existing Database ...44
Remove the Vantage Database and MS SQL Server ...44
Install SQL Server 2008 Standard ...45
Installing the Vantage Database...46
Restore the Vantage Database Backup in the Management Console ...46
Permanently Uninstalling Vantage ...47
Uninstalling Vantage Web Apps...47
Uninstalling Workflow Portal ...47
Uninstalling the Transcode & Analysis Engine ...47
Uninstalling Vantage Services and Client Programs ...48
Uninstalling the Vantage Domain Database ...48
Remove the Vantage Database and MS SQL Server ...48
B e f o r e Yo u I n s t a l l
Use this topic to understand the hardware, software, database, and network requirements before performing an installation. You’ll also learn about Vantage installers, how to obtain a Vantage license, and some distributed Vantage domain planning advice – this topic is about what you need to know before you install a Vantage domain.
Installing Vantage is easiest when you plan carefully, and you have a working knowledge of Windows server administration, networking, Microsoft SQL Server, and installation and configuration of enterprise-level software. Consult your IT group for assistance as necessary.
Note: Go to
www.telestream.net/telestream-support/vantage/support.htm to browse the Vantage Web library, user’s guides, app notes, and other documents.
Topics
Vantage Hardware Requirements Operating System Requirements
Software Requirements
Network Requirements
Database Guidelines
Vantage Installers Overview
Licensing Overview
Vantage Hardware Requirements
2
V
ANTAGE
H
ARDWARE
R
EQUIREMENTS
Vantage server disk, network, and CPU requirements depend on the amount of media you plan to process and the turn around time you require. Vantage is optimized for dual quad-core Intel and Intel-compatible processors that support Windows operating systems.
Hardware
Requirements
Processor: Dual quad-core processors, 4MB cache recommended. 64-bit processor computers should be used for running Windows Server 2003 or Windows Server 2008 for best performance.
RAM: At least 4GB RAM recommended, depending on the number of concurrent translation sessions desired. More than 4GB is recommended when running a 64-bit operating system.
Ethernet/Fibre: Gigabit Ethernet (GbE / 1 GigE) minimum. (Dual Ethernet may be needed in some situations).
Note: Telestream recommends utilizing a Gigabit Ethernet or
Fibre-Channel for connecting Vantage servers and connecting to media stores to improve performance.
Numeric Processing Instruction Set: MMX, SSE, and SSE2 enabled.
Disk Space
Requirements
For Vantage single-server installation, the recommended disk space is about 500GB. It is less for installation of services or clients only. For single-server installations, disk requirements depend on incoming and outbound media stored on the server. Inbound media is typically deleted right after a job completes.
In single-server domains, a server may use its own storage system. In distributed (multi-server) installations, shared storage must be used.
Note: More disk space may be required in a single-server installation if
O
PERATING
S
YSTEM
R
EQUIREMENTS
Use the following topics to determine your operating system requirements, organized by Vantage component.
Vantage Web Apps
Vantage Web apps should only be installed and operated on the following 32-bit or 64-bit operating systems:•
Windows Server 2003 R2 (32-bit|64-bit) + IIS 6 + .NET Framework 4.0•
Windows Server 2008 R1 (32-bit|64-bit) + IIS 7 + .NET Framework 4.0•
Windows Server 2008 R2 (64-bit only) + IIS 7 + .NET Framework 4.0 IIS must be installed with ASP.NET and IIS Management Capability installed.Vantage Client
Software
Vantage client programs (Vantage Management Console, Workflow Designer, and Workflow Portal) are supported on the following 32- and 64-bit operating systems:
•
Windows Vista•
Windows 7•
Windows Server 2003 R2•
Windows Server 2008 R1 and R2•
Windows XP ProNote: To effectively operate Vantage services and their client programs
in a multi-server domain, and with other networked devices or systems, you must disable the Windows Firewall.
All operating systems must be upgraded with the latest service packs and security updates from Microsoft.
Workflow Portal Limits
The Proxy viewer in Workflow Portal does not run on 64-bit Windows Server 2003. The Proxy viewer in Workflow Portal can run on 32-bit Windows Server 2003 if you install the Windows Media Format 11 SDK.Vantage Services
Vantage services should only be installed and operated on the following 32-bit or 64-bit operating systems (64-bit recommended for performance):•
Windows Server 2008 R2 (64-bit only)•
Windows Server 2008 R1 (32-bit | 64-bit)•
Windows Server 2003 R2 (32-bit | 64-bit)•
Windows XP Pro with SP3 (Single-server Vantage installations only) Single-server Vantage installations can be installed on Windows XP Pro. However, the Vantage Enterprise system management products are not supported on XP Pro.Operating System Requirements
4
VC-1 Encoding Limits
Windows Media V9 Advanced Profile Codec
Windows Server 2003 doesn’t include the Windows Media Video V9 Advanced Profile (VC1 Advanced Profile) codec, in the Windows Media Format 11 SDK. If you plan to use Windows Media Advanced Profile codec, obtain and install the Windows Media Format 11 SDK Runtime Redistributable from Microsoft at msdn.microsoft.com/en-us/windowsmedia/bb190309.aspx. Restart the Vantage server after installation if you’ve already installed Vantage.Windows XP Pro
Requirements
Windows Installer 4.5
Windows servers hosting a Vantage database must be updated with Windows Installer 4.5, the application installation and configuration service for Windows, before installing the Vantage database. To obtain the installer, go to Microsoft’s Download Center Windows Installer 4.5 page. Review the requirements, download the appropriate installer, and install it on your server(s) before continuing.Windows Media V9 Advanced Profile Codec
Windows XP Pro doesn’t include the Windows Media Video V9 Advanced Profile (VC1 Advanced Profile) codec, which is included in Windows Media Player 11. If you plan to use the Windows Media Advanced Profile codec on Windows XP Pro, install Windows Media Player 11 from Microsoft. If Vantage is already installed, restart the server after installation.Windows Server 2003
Requirements
Windows Installer 4.5
Windows servers hosting a Vantage database must be updated with Windows Installer 4.5, the application installation and configuration service for Windows, before installing the Vantage database. To obtain the installer, go to Microsoft’s Download Center Windows Installer 4.5 page. Review the requirements, download the appropriate installer, and install it on your server(s) before continuing.Windows Server 2008
Requirements
Windows Installer 4.5
Windows servers hosting a Vantage database must be updated with Windows Installer 4.5, the application installation and configuration service for Windows, before installing the Vantage database. To obtain the installer, go to Microsoft’s Download Center Windows Installer 4.5 page. Review the requirements, download the appropriate installer, and install it on your server(s) before continuing.Desktop Experience Must be Installed.
Prior to installing Vantage, the Desktop Experience must be installed:Step 1 Click Start > Administrative Tools > Server Manager.
Step 2 In the console tree, click Features, then click Add Features.
Step 3 Check Desktop Experience and click Next.
Step 4 Follow the steps to complete Desktop Experience installation.
Step 5 When installation is complete, restart the server. (CMD: shutdown -r).
User Account Control Admin Approval Mode.
If User Account Control: Run all administrators in Admin Approval Mode is enabled, runinstallers by right-clicking the installer and selecting Run as Administrator. If this feature is disabled, you can run the installer normally.
To verify the setting value (Enabled | Disabled):
Step 1 Display the command window (Start > Command Prompt).
Step 2 In the command window, type secpol.msc and press Enter.
Step 3 In the Local Security Policy window, select Local Policies > Security Options. In the Policy column, find User Account Control: Run all administrators in Admin Approval Mode and view the Security Setting.
Computer Browser Service Must be Enabled.
Although set by default on the standard distribution of Server 2008, ensure that the Computer Browser service is enabled:Step 1 In Windows, display the Services Control Panel.
Step 2 If the Computer Browser service is set to disabled, right-click and open the Properties window.
Step 3 On the General tab > Startup type, select Automatic and click OK.
Software Requirements
6
S
OFTWARE
R
EQUIREMENTS
The following software is used by Vantage services, and must be installed separately.
Caution: If you do not install/upgrade all required software, Vantage may not operate correctly.
QuickTime
Requirements
Vantage utilizes the Telestream Transcode & Analysis Engine to
transcode files. The Transcode & Analysis Engine requires QuickTime if you plan to use QuickTime files in your workflows. Obtain the QuickTime installer or download it from www.apple.com/quicktime/win.html. Click Free Download to download and install it.
Vantage version 3.0 includes Telestream Transcode & Analysis Engine version 2011.2, which is qualified with QuickTime version 7.6.9.
Note: If you install a different version of the Telestream Transcode &
Analysis engine than is supplied with your Vantage installer, be sure to utilize the QuickTime version recommended for the Transcode & Analysis engine version you’re installing.
When the Vantage Setup installer runs, it checks for QuickTime. If it isn’t installed in the default directory, the installer advises you that QuickTime isn’t installed or up to date.
After installation, be sure to uncheck Check for Updates, so that this version is not updated without your knowledge.
After you install QuickTime, restart the server. If you don’t, encoding some formats causes the following error: “An error occurred during execution of the Transcode Task: RenderSession Configuration Error, message: Requested encoder | decoder not installed”.
.NET Framework
Requirements
Vantage requires .NET Framework 3.5 Service Pack 1 on all Vantage database, service, and client program servers.
Vantage Web apps require .NET Framework 4 on the IIS server.
To install .NET on Windows Server 2008 R2, install it directly from Server Manager > Features.
To install .NET on Windows XP, Server 2003 and 2008 R1, download .NET from Microsoft.
Anti-Virus Software
Recommendations
Telestream recommends that you do not use anti-virus software on Vantage servers. You should not enable real-time scanning, If you do use anti-virus software, you should identify Vantage as a safe or trusted application. Telestream recommends that you disable real-time file scanning, because it will impact performance and potentially lock files being processed, impacting Vantage’s ability to operate properly.
Note: Be sure to turn off anti-virus software during Vantage installation
N
ETWORK
R
EQUIREMENTS
Port Requirements
Vantage uses the following ports (default), which must be available to Vantage services and client programs hosted on the computer.Note: The ports utilized by third-party products are obviously beyond
control of Telestream; they change over time, and some are user or runtime configurable. Please contact the product’s vendor for additional port usage details.
WS-Discovery
The following port is utilized for WS-Discovery: UDP, TCP ports: 3702, 46123Mail, HTTP & FTP
The following ports are utilized for other communication: Mail: 25 FTP: 21 HTTP: 80Vantage Services
The following default ports are utilized by Vantage SOA facility services.Agility Bridge Service
HTTP: 8678 TCP: 8679Analysis Service
HTTP: 8672 TCP: 8673Catalog Service
HTTP: 8664 TCP: 8665Communicate Service
HTTP: 8662 TCP: 8663Metadata Service
HTTP: 8674 TCP: 8675Monitor Service
HTTP: 8658 TCP: 8659SDK Service
HTTP: 8676 TCP: 8677Transcode Service
HTTP: 8670 TCP: 8671Transport Service
HTTP: 8660 TCP: 8661Other Firewall
Considerations
Vantage communicates with the following systems/components, which should be considered when configuring firewall settings.
Microsoft Distributed Transaction Coordinator (DTC). User configurable; default: 3372 when TIP is enabled. See Microsoft documentation for details.
Microsoft SQL Server. TCP: 1433, UDP: 1434 – see Microsoft documentation for details.
Avid Interplay (Unity Client, Transfer Engine, Web Services).
Discovery: UDP 8321. For other ports, see Avid documents including Interplay Admin Guide and Avid Interplay Software Installation and Configuration Guide.
Agility ECS. As configured in the Vantage Management Console and in Agility ECS.
FTP. As configured in the Vantage workflow.
Grass Valley AMP. Port 3811 by default.
Network Requirements
8
Multi-Server
Installation
Guidelines
Same Subnet. In a multi-server Vantage installation, the Vantage database, Vantage services, and client programs must be hosted on servers in the same subnet to communicate with each other. Service discovery does not extend beyond a single subnet.
No Local Resources. In a multi-server Vantage installation, resources that are local to a single computer should not be created.
For example, a Vantage media store’s directory should not be identified with a local reference (C:\Input1, for example.). Instead, create a share and use a UNC share name (\\Vantage1\Input1) with a properly authenticated domain user account to access the share.
SAN/NAS client mapped drives for this type of storage are also valid.
Disable Windows Firewall. To operate Vantage services with other networked devices or systems, you must disable the Windows Firewall.
Domain User Account Must Be in Local Administrator Group. You should always create and use a single, authenticated Windows domain user account that all Vantage services run under. For example,
VantageUser. The domain user account should be added to the local administrator group so it has proper authority to run Vantage services and install Vantage software.
Authorized to Log on as a Service. The domain user account must be authorized to log on as a service (see your Windows domain
administrator), so that Vantage services can run under the domain user account.
Local Administrator Account for Installation. You can use this domain user account to install Vantage software.
User Account Access to Resources. This domain user account should have appropriate access to all resources (Windows network shares and other file systems used by Vantage services to read and write files) used by your Vantage services.
Workgroup
Guidelines
In this guide, the user account is referred to as an authenticated domain user or authenticated domain user account. If you’re a workgroup user, substitute the term workgroup for domain.
Authentication Issues
Network permissions can be defined for specific Vantage services or specific share locations.•
Service Level: By granting a Vantage service the permissions of a domain user account, the service inherits all permissions associated with the specified user. This is done by creating a domain user account with necessary permissions, and logging the service in as the user.•
Share level: Specific share locations can be granted to all Vantage ser-vices in the Vantage Management Console in the Settings & Options node under the authentication tab.D
ATABASE
G
UIDELINES
Use this topic to understand when Telestream recommends using a dedicated database server, and database server platform requirements.
Supported
Databases
Vantage is supported on the following database systems:
•
Microsoft SQL Server 2005 Express and Standard SP3•
Microsoft SQL Server 2008 Express and Standard.Guidelines for
Using SQL Server
Standard
SQL Express has the following limitations:
•
Database Size – SQL 2008 Express R2: 10 GB•
Database Size – SQL 2005 Express: 4 GB•
Maximum RAM Usage: 1 GB RAM•
Number of CPUs: 1 CPUSQL Standard has the following limitations:
•
No size limit for database•
Maximum RAM Usage: 64 GB RAM usage•
Number of CPU Threads: 4 CPUsAs a result, the decision about whether to use SQL Standard instead of Express is based primarily upon your planned maximum database size and the expected average volume of database traffic.
Database Size
The size of the database is generally related to the number of jobs in a database. Each job record stores its entire workflow history, which means that simple workflows (such as a basic transcode) require less database space for each job than complex workflows (such as those involving decision-making or multiple steps).As a rule of thumb, if you plan to store more than 500-1000 jobs in your Vantage database at the same time – either running or in job history – then you should probably use SQL Standard.
Database Traffic
Several factors affect how much database traffic is generated. There is no single rule for when you should use Standard, but the following factors may indicate that Standard is necessary:•
The number of actions running in current jobs: If you often have more than 50-100 actions running simultaneously, you may improve perfor-mance by using SQL Standard.•
Multi-node installations: Multi-node installations (such as a 3-node Vantage Array) are designed for high job throughput and may often have more than 50-100 actions running simultaneously. If your domain is tightly controlled to prevent high job volume (and thus, traffic), you may be able to use Express. SQL Standard is recommended when high volumes of media are submitted for processing at the same time.Database Guidelines
10
•
Web apps (such as Web Job Status View): If you have more than three Web app clients accessing the Vantage database simultaneously/fre-quently, or if you have more than 100 jobs in the job history view, you should consider SQL Standard to improve client performance.•
Workflow Analytics (with Vantage System Management products): Workflow analytics generally requires SQL Standard, particularly if you have more than 50-100 jobs in the database.Note: Domains with database mirroring require SQL Standard.
Database mirroring is not available when using SQL Express.
Guidelines for a
Dedicated
Database Server
If you are using an all-in-one Vantage system, the primary factor is disk access. Both transcoding actions and database operations require significant use of the hard drive. If your Vantage database is hosted on the same server where media is stored, Telestream recommends hosting the database on a separate drive from the media.
For all Vantage domains, including multi-server (distributed) domains, the primary factor to consider when hosting a database on a Vantage system is the sharing of resources between Vantage services and the database. Moving media files, analysis, and transcoding all require a significant amount of network traffic, CPU activity, and RAM. If the database is hosted on a server performing transcoding, analysis, or moving large media files, the following considerations should be made:
•
The number of concurrent Transcode/Analysis tasks on the server should be limited to ensure that adequate CPU and network resources are available for the database.•
The number of concurrent transport actions on the server should be limited to ensure that adequate network resources are available for database access in a multi-node installation•
Generally, if the services are processing large files (>1GB), consider hosting the database on a separate server.As a rule of thumb, a server hosting the database should not reach more than 75% CPU for transcoding or analysis tasks, and should not be transporting more than one large file at a time as part of a workflow. This may be accomplished by setting session limits or capacity for the Transport, Transcode and Analysis services to a low number, or by hosting the database on a separate server.
If you plan to mirror your database (which improves uptime availability), you should use separate servers for your primary and secondary database instances. Generally, Telestream recommends using a third machine for the witness server, to ensure uninterrupted operation in case of a database failover without concern for whether transcoding is
consuming too many resources on the witness server for it to perform its task in a timely manner.
Note: This guide does not provide instructions for installing a mirrored
administrator or contact your Telestream representative regarding installation service options.
Note: Installing a Vantage database on a separate server does not
require an extra Vantage license for that server.
Dedicated
Database Platform
Requirements
Dedicated database servers only operate on certain Windows operating systems and under specific Microsoft licenses.
Windows Installer 4.5
Windows servers hosting a Vantage database (dedicated, distributed, or All-in-One Vantage domains) must be updated with Windows Installer 4.5, the application installation and configuration service for Windows, before installing the Vantage database. To obtain the installer, go to Microsoft’s Download Center Windows Installer 4.5 page. Review the requirements, download the appropriate installer, and install it on your server(s) before continuing.Note: This guide does not provide instructions for installing a mirrored
database and implementing mirroring. Consult your database administrator or contact your Telestream representative regarding installation service options.
Servers Required to
Host Database
Services
One or two database servers of similar capability are required:
•
A dedicated server to host the principal database•
(Optional) a dedicated server to host the mirror database•
For mirroring, a dedicated server should be used to host the witness server.The witness database is a lightweight service which can run effectively on a low-end server, but can not be installed on a database server.
Note: The computer name of the server hosting the principal Vantage
domain database is used as the Vantage domain name. Telestream recommends providing a computer name that is appropriate to your Vantage installation. For example: Vantage or Vantage_HD.
System Requirements
System requirements for your database servers should be determined by going to msdn.microsoft.com/en-us/library/ms143506.aspx.Mirror Database
License
Requirements
Microsoft SQL Server Standard Client Access Licenses (CALs) are required for the principal and optional mirror servers. The witness server can use SQL Express, which does not require a license.
Note: CAL is an acronym for Client Access License, offered by Microsoft
for their SQL Server products. There are two types of CAL’s: A device
CAL allows any number of users to gain access to licensed server software from a particular device, and a user CAL allows a particular user gain access to licensed server software from any number of devices. For example, a customer with fifteen Vantage nodes requires one CAL per node. Additionally, if the Vantage Workflow Portal is deployed for use, a CAL for each connection is required.
Vantage Installers Overview
12
V
ANTAGE
I
NSTALLERS
O
VERVIEW
This topic describes how to obtain the Vantage installer and provides an overview of each installer and its process.
Note: The Vantage installer on CD-ROM is available on request. Contact
[email protected] to request a CD-ROM.
Obtaining the
Vantage Installer
The Vantage installer is available from Telestream’s Web site. To download the Vantage installer and unzip it, follow these steps:
Step 1 Use your Web browser to go to dynamic.telestream.net/downloads/ download-vantage.asp?prodid=vantage.
Step 2 If you don’t have a Telestream account, click Create an Account to display the Create a Telestream Account page. Fill out the form and click Create Account. You can use your user name and password immediately. Telestream will send you a confirmation email.
Step 3 On the login page, enter your authorized user name & password, then click Log In.
Step 4 On the Downloads page, click Trial Download (demo/unlicensed) or Software Download (licensed) to download the Vantage installer package. Select a folder (or desktop) destination and click Save to download and save the zip file on your computer. The zip file is named Vantage_[Version #].zip. For example: Vantage_3.0.zip.
Step 5 The Download Progress window displays as the file is downloaded to your computer. When the download is complete, close the Web browser.
Step 6 Right-click the Vantage installer zip and select Extract All. Follow the steps to extract the installers and related files:
•
VantageClient•
VantageSetup•
VantageDatabaseSetup•
VantageWebApplicationsSetup•
WorkflowPortalVantage installers include a version and build number. For example,
VantageSetup_3.0.51.75778.exe: the Vantage version is 3.0 and build number 75778 (your number may differ).
Also included:
•
A quick start guide for demo, single-server All-in-One installation.•
Vantage Patch installers as necessary•
Release Notes•
Vantage Installation Guide (this document).Vantage Installation
Package
The installation package comprises five installers.
•
VantageClient – installs only the Vantage Management Console and Workflow Designer.•
VantageDatabaseSetup – installs the Vantage database.•
VantageSetup – installs Vantage service, plus the Vantage Manage-ment Console and Workflow Designer.•
VantageWebApplicationsSetup – installs the Web apps.•
VantageWorkflowPortal – installs Vantage Workflow Portal. These installers are described in further detail below.Vantage Database
Setup Installer
When you install the Vantage database (using VantageDatabaseSetup) in a single-server configuration, the installer performs the following:
•
Installs SQL Server 2008 Express•
Creates a SQL instance named VANTAGE•
Creates the Vantage database on the VANTAGE instance.Note: If you run the database installer and a SQL instance name
Vantage Installers Overview
14
Vantage Setup
Installer
When you install Vantage client programs and services (using
VantageSetup), the installer provides the option of performing an All-in-One installation or a custom installation.
Custom installation is typically used when performing a multi-server installation so that you can control which servers host specific Vantage components (services and client programs).
The installer performs these tasks during installation:
•
Installs Intel Performance Primitives software for Intel processors•
Checks for QuickTime (only Vantage Transcode & Analysis Engine uti-lizes QuickTime, if implemented in your workflows) and advises if missing or obsolete.•
Checks for .NET 3.5 SP1 and terminates if not installed•
Creates a Telestream directory for Vantage and related files•
Installs the Telestream Transcoding & Analysis Engine•
Installs Vantage services and client programs, per your selections•
Installs sample media files: FlipDemo.wmv (48 seconds),FlipDemo_short.wmv (15 seconds), and FlipDemo.MSS (48 seconds) in the /Program Files/Telestream/Vantage/Store directory
•
Creates a Telestream > Vantage entry in the Windows Programs list and provides entries for the Vantage Management Console and the Vantage Workflow Designer•
Creates desktop shortcuts (Vantage Management Console and Van-tage Workflow Designer) on your desktop•
Creates a temporary storage directory on the local hard drive, and cre-ates a default Vantage catalog in the database. (These two items are not created during a custom install – only during an All-in-One install.)Vantage Client
Installer
When you are only installing Vantage Management Console and/or Workflow Designer client programs, you can use the VantageClient installer to simplify installation.
Vantage Web
Applications Setup
Installer
The Vantage Web app installer (using VantageWebApplicationsSetup) installs the Web Dashboard, which enables Vantage administrators to view Vantage system information from the dashboard view, and the Job Status Web app, which enables Vantage users to obtain job status information, over the Web.
Vantage Workflow
Portal Installer
The Vantage Workflow Portal Installer (VantageWorkflowPortal) installs Vantage Workflow Portal, a client program intended for operators who are defining/reviewing asset metadata, creating edit decision lists, and submitting or forwarding jobs.
L
ICENSING
O
VERVIEW
This topic describes how you can use Vantage in demo mode, and how to obtain a Vantage license.
Using Vantage in
Demo Mode
When you install Vantage without a license, most features are enabled in demo mode. Demo mode allows you to design workflows, perform transcoding with a watermark, and analyze a few seconds of video and audio. However, some features (such as broadcast server protocols) are not available in demo mode. In demo mode, Vantage can only ingest Windows Media (.wmv and .avi) files for transcoding or analysis.
Note: If you'd like to unlock the entire set of features in Vantage for a
time-limited trial, please contact your Telestream sales representative, or contact the Telestream sales team at [email protected].
Demo mode is limited to a single-server installation.
Obtaining a
Vantage License
The purpose of this task is to determine if you need a license, refer you to Telestream to determine your license requirements, and obtain it.
You must obtain, install, and activate a license to:
Test a multi-server Vantage installation in demo mode
Operate Vantage in production
Upgrade from Vantage from one version to another
Add more Vantage services (more Transcode services, for example)
Add licensed features (GraphicsFactory, for example).
Please contact your Telestream sales representative or contact the Telestream sales team at [email protected] to determine your Vantage requirements and obtain or update your license. When your license has been prepared, Telestream will email you the license as an attachment.
For Telestream contact details, go to www.telestream.net/company/ contact-telestream.htm.
When you receive the license (an XML file), save it in a safe place for installation and activation at the end of the installation process.
Planning for a Multi-Server Vantage Installation
16
P
LANNING
FOR
A
M
ULTI
-S
ERVER
V
ANTAGE
I
NSTALLATION
Prior to performing a multi-server Vantage installation, Telestream recommends that you develop a system diagram, indicating each server and the Vantage services and client programs it should host, plus the database server (and optional mirror and witness server), prior to installing the software.
Figure 1. Typical multi-server Vantage installation diagram.
The diagram should also identify which computers host client programs (Vantage Management Console, Workflow Designer, and Workflow Portal).
Additionally, document all network resources utilized by the Vantage domain (file sources and destinations).
When adding Vantage services to scale performance, Telestream generally recommends adding one or more Vantage transcoding servers, which is typically the first service to max out server capacity. Multiple transcode servers improves load balancing and speeds overall job throughput. Secondly, if you use the Vantage Analysis service heavily, consider hosting it on a dedicated server as well.
Note: Each server hosting Vantage services requires a Vantage Array or
Vantage Enterprise System Management license. Dedicated database servers do not require a special license.
Gig-E Ethernet Fibre-Channel Local Storage
Network Servers
FTP Servers
Catch Servers
Broadcast Servers
Principle Database & IIS Server
Mirror Database Server
Witness Server
Automatic Failover Vantage Analysis server
Vantage Transcode server 1
Vantage Transcode server 2
Vantage Transcode server 3
Vantage Services server Vantage Workstations
Vantage Domain Console Vantage Workflow Designer Vantage Workflow Portal
I n s t a l l i n g V a n t a g e
Use this topic to install, upgrade, or scale Vantage, and configure it for operation.
Note: Go to www.telestream.net/telestream-support/vantage/ support.htm to browse the Vantage Web library, user’s guides, app notes, and other documents.
Topics
Installing a Single-Server All-in-One Domain Installing a Multi-Server Vantage Domain
Enabling a Vantage License
Installing Workflow Portal
Installing Vantage Web Apps
Upgrading to Vantage 3.0 from a Previous Version
Moving a Vantage Database to Another Database
Installing a Single-Server All-in-One Domain
18
I
NSTALLING
A
S
INGLE
-S
ERVER
A
LL
-
IN
-O
NE
D
OMAIN
Perform these tasks to install an All-in-One (single-server) Vantage domain.
Installing the
Vantage Database
To install the Vantage database, follow these steps:
Step 1 Log on to the target server with a local administrator account, and make sure that virus-checking software and Windows Firewall is off.
Note: To effectively operate Vantage services with other networked
devices or systems, you must turn off Windows Firewall.
Step 2 Run the VantageDatabaseSetup installer (for example,
VantageDatabaseSetup_SQL2008_3.0.51.75778.exe), which extracts the components, then installs SQL Server.
When SQL Server installation completes, the installer displays the Vantage Domain Database Setup Wizard:
Step 3 Welcome. Click Next to display the license agreement and click I Accept if you agree to license terms. Click Next.
Step 4 Database Install Mode. Click Install new database and click Next.
Note: Telestream recommends that you install the database on a second
hard drive, different than the one allocated for temporary media storage.
Step 5 Destination Folder. Accept the default folder or click Change to select an alternate directory on another drive. Click Next.
Step 6 Ready to Install Vantage Domain Database. Click Install to begin database installation. This process takes a few minutes to complete.
Step 7 Completed... When installation is complete, click Finish to quit.
Installing Vantage
Services and
Client Programs
When installing Vantage services and client programs on a single server, you’ll choose All-in-One install mode, which also creates a default storage location (at Program Files\Vantage\Store) and a Vantage catalog.
Note: Vantage installers modify Windows Distributed Transaction
Coordinator (MSDTC) properties to meet the communication
requirements of Vantage services and the database as appropriate. This modification is automatic, and requires no action on your part.
Note: Telestream recommends against using anti-virus software on
Vantage servers. If you do use anti-virus software, identify Vantage as a safe/trusted application. Be sure to turn off anti-virus software during installation or install the anti-virus software after you install Vantage.
To install Vantage clients and services on your server, follow these steps:
Step 1 Log on to the server with a local administrator account. Make sure that virus-checking software and Windows Firewall is turned off.
Step 2 Run the VantageSetup installer (VantageSetup_3.0.51.75778.exe, for example). The installer extracts components, then continues. The IPP,
QuickTime, Telestream Transcode & Analysis Engine steps are silently skipped if they are already installed.
If any subsystems need installing, the Installer window (sample) displays:
Step 3 Click Install to install required software and components (you can still skip Transcode & Analysis Engine installation).
Caution: Telestream recommends that you install/upgrade all software and components or Vantage may not operate correctly.
IPP
If Intel Performance Primitives (IPP) is not present, it is installed.QuickTime
If QuickTime 7.5.5 or later is not installed, the installer displays amessage to go to Apple’s Web site (www.apple.com/quicktime/win.html), download the current version, and install it.
After installation, be sure to uncheck Check for Updates, so that QuickTime is not updated without your knowledge.
After you install QuickTime, restart the server. If you don’t, during
encoding of some formats, this error may occur: An error occurred during execution of the Transcode Task: RenderSession Configuration Error, message: Requested encoder | decoder not installed.
Step 4 When the QuickTime installer completes, exit the installer and re-run the Vantage Setup installer to continue.
Telestream Transcode
& Analysis Engine
Install the Telestream Media Transcoding and Analysis Engine.
Note: If you install a different version of the Telestream Transcode &
Analysis engine than supplied with this Vantage installer, be sure to use the QuickTime version recommended for the version you’re installing.
Step 5 When the Transcode Installer screen displays, click Install:
Step 6 Welcome Window. Click Next to display the license agreement.
Click Install
Installing a Single-Server All-in-One Domain
20
Step 7 License Agreement. Read the Vantage Software License Terms and Conditions, then click I Accept... if you agree to license terms. Click Next.
Step 8 Destination Folder. Accept the default folder or click Change to select an alternate folder. Click Next.
Step 9 Ready to Install... Click Install to begin installation of Telestream Transcoding and Analysis Engine components, which are used by Vantage services to perform decoding, analysis, and encoding of media.
Step 10 Complete... When installation is done, click Finish to close the installer.
Vantage Client
Programs and
Services
When the Vantage installer completes software component installation and Vantage Transcoder and Analysis Engine installation, it displays the Vantage Setup Welcome window:
Step 11 Welcome Window. Click Next to display the license agreement.
Step 12 License Agreement. Read the Vantage Software License Terms and Conditions, then click I Accept... if you agree to license terms. Click Next. Click All-in-One to install Vantage.
Step 13 Destination Folder. Accept the default folder or click Change to select an alternate folder. Click Next.
Step 14 Ready to Install Vantage. Click Install to begin Vantage client programs and services installation.
Note: Only for an All-in-One installation, Vantage also creates a
temporary storage area on the local hard drive, and creates a default Vantage catalog in the database.
Step 15 Complete. When installation is done, the Installation Wizard Completed window displays. Click Finish to close the installer. Vantage client programs and services installation is complete.
Installing Vantage
Patches
Updates to the current version of Vantage are periodically published by Telestream, and are available from the Telestream Web site.
Patch installers are used to replace Vantage components as necessary between upgrades (version releases).
Read the Release Notes. Always install patches based on the
instructions in the Release Notes based on your requirements, or upon recommendation by Telestream.
Be sure to reboot or re-start all Vantage services before continuing.
Enabling a License
If you are implementing Vantage in a production environment, enable your license now. See Enabling a Vantage License.Note: If you have a Team Management, Enterprise Control, or Master
Control license, the default Vantage user account is Administrator with no password. This account has administrative privileges.
I
NSTALLING
A
M
ULTI
-S
ERVER
V
ANTAGE
D
OMAIN
Perform these tasks to install a multi-server Vantage domain. Installation and configuration generally takes two to six hours, depending on the complexity of the installation.
Install SQL Server
2008 Standard
If you are installing SQL Server 2008 Standard on a server, follow these steps:
Note: This guide does not provide instructions for installing a mirrored
database and implementing mirroring. Consult your database administrator or contact your Telestream representative regarding installation service options.
Step 1 Log on to the target server with a local administrator account.
Step 2 Insert the SQL Server 2008 Standard DVD into the server and start the installer (setup.exe) if it does not run automatically.
Step 3 Program Compatibility Assistant. Check Don’t show this message again, then click Run Program to continue.
Step 4 SQL Server Installation Center. Click Installation in the left column, then select New SQL Server stand-alone installation or add features to an existing installation. Click Next.
Step 5 Product Key. Enter your product key and click Next.
Step 6 License Terms. Accept the license terms and click Next.
Step 7 Setup Support Rules. Click Install, allow the installer to complete its actions, then click Next.
Note: If Restart computer... Failed displays in the report, this is due to a bug in the SQL Server 2008 Standard R1 installer.
To correct the problem, run Regedit and navigate to this key:
Computer\HKEY_LOCAL_MACHINE\SYSTEM\CurrentControlSet\Contr ol\Session Manager\PendingFileRenameOperations. Clear the Value Data string.
After you clear the Value Data string, return to Setup Support Rules and click Re-run on the right by the status bar. The Setup Support Rules should complete successfully - click OK to continue.
Note: On SQL Server 2008 R2 only select SQL Server Feature
Installation and click Next.
Step 8 Feature Selection. Under Instance Features, check Database Engine Services, then click Next.
Step 9 Instance Configuration. Select Named instance and enter VANTAGE in the Named instance field and the Instance ID field, and click Next.
Step 10 Disk Space Requirements. Click Next to continue.
Step 11 Server Configuration. For SQL Server Agent, select NT AUTHORITY\NETWORK SERVICE, and click Next to continue. For Server Database Engine,select NT AUTHORITY\NETWORK SERVICE, and click Next to continue.
Installing a Multi-Server Vantage Domain
22
Step 12 Database Engine Configuration. Click Add Current User, select Mixed Mode and enter the Vantage sa user password (vantage12!) in the Enter Password and Confirm Password fields. Click Next to continue.
Step 13 Continue to click through the installer windows accepting the default settings to complete installation.
Step 14 Complete. Click Finish to close the installer.
Installing the
Vantage Database
The purpose of this task is to install the Vantage database instance:
Note: During this installation, SQL Server 2008 Standard is identified,
and this step is silently skipped.
Follow these steps:
Step 1 Log on to the database server with a local administrator account, and make sure that virus-checking software and Windows Firewall is off.
Note: To effectively operate Vantage services with other networked
devices or systems, you must turn off Windows Firewall.
Step 1 Locate the Vantage database installer (for example,
VantageDatabaseSetup_SQL2008_3.0.51.75778.exe), copy it to your server, or obtain the Vantage Installer CD.
Step 2 Run the Vantage database installer, which extracts the components, then continues. Component installation takes a few minutes.
During installation on a server with SQL Server 2008 Standard, the installer identifies the new VANTAGE instance:
This warning is expected, and can safely be ignored.
Step 3 Click OK to continue.
Vantage Domain
Database
When SQL Server installation completes, the installer displays the Vantage Domain Database Setup Wizard:
Step 4 Welcome. Click Next to display the license agreement.
Step 5 License Agreement. Read the Vantage Software License Terms and Conditions, then click I Accept if you agree to license terms. Click Next.
Step 6 Database Install Mode. If you’re performing a clean install, click Install new database and click Next to continue. If an old database is found, you must move, delete, or rename it to continue.
Step 7 Destination Folder. Accept the default folder or click Change to select an alternate folder. Click Next.
Step 8 Ready to Install Vantage Domain Database. Click Install to begin database installation. This process takes a few minutes to complete.
Verify DTC Service
Settings
In a multi-server Vantage installation, it is imperative that the Microsoft Distributed Transaction Coordinator service is running on each database server and each Vantage services server, or Vantage services can not communicate with the Vantage database – thus, the domain will not operate.
Step 10 In Windows, display the Services Control Panel.
Step 11 Verify that the startup type of the DTC is set to Automatic.
Step 12 If you need to change the startup type, right-click on the Distributed Transaction Coordinator service and select Properties to display the Properties window.
Step 13 Select Automatic from the Startup Type dropdown and click OK.
Step 14 Start the DTC service if it wasn’t running.
Installing Vantage
Services and Client
Programs
The purpose of this task is to install Vantage services and the Vantage Management Console and Workflow Designer client programs on multiple servers for a multi-server Vantage installation.
Note: When installing only the Vantage Management Console or
Workflow Designer, use of the VantageClient installer simplifies installation. Use this installer as appropriate, in place of the
comprehensive VantageSetup installer, as described in the tasks below. Vantage installers modify Windows Distributed Transaction Coordinator (MSDTC) properties to meet the communication requirements of Vantage services and the database as appropriate. This modification is automatic, and requires no action on your part.
Telestream recommends not using anti-virus software on Vantage servers. If you use anti-virus software, you should identify Vantage as a safe/rusted application. Be sure to turn off anti-virus software during Vantage installation or install anti-virus software after installing Vantage.
For each server on which you’re installing Vantage client programs and services, follow these steps:
Step 1 Log on to the target server with a local administrator account. Make sure that virus-checking software and Windows Firewall is turned off.
Step 2 Locate the Vantage installer (VantageSetup_3.0.51.75778.exe, for example) on a network server, copy or locate the Vantage installer on the target server, or obtain the Vantage Installer CD.
Step 3 Run the installer. The installer extracts components, then continues. The IPP, QuickTime, Telestream Transcode & Analysis Engine steps are silently skipped if they are already installed.
Installing a Multi-Server Vantage Domain
24
If software components need installing, the Installer window displays:
Step 4 Click Install to install required subsystems (you can still skip Transcode & Analysis Engine installation).
Caution: Telestream recommends that you install/upgrade all software components or Vantage may not operate correctly.
IPP
If Intel Performance Primitives (IPP) is not present, it is installed.QuickTime
If QuickTime 7.5.5 or later is not installed, the installer displays amessage to go to Apple’s Web site (www.apple.com/quicktime/win.html), download the current version, and install it.
After installation, be sure to uncheck Check for Updates, so that this version is not updated without your knowledge.
After you install QuickTime, be sure to restart the server. If you don’t restart the server, during encoding of some formats, the following error may occur: An error occurred during execution of the Transcode Task: RenderSession Configuration Error, message: Requested encoder | decoder not installed.
Step 5 When the QuickTime installer completes, exit the installer and re-run the Vantage Setup installer to continue.
Telestream Transcode
& Analysis Engine
When you are installing the Transcode service or the Analysis service, you must install the Telestream Media Transcoding and Analysis Engine.
Note: If you install a different version of the Telestream Transcode &
Analysis engine than is supplied with your Vantage installer, be sure to utilize the QuickTime version recommended for the Transcode & Analysis engine version you’re installing.
Follow these steps:
Step 6 When the Transcode Installer screen displays, click Install:
Click Install
Step 7 Welcome Window. Click Next to display the license agreement.
Step 8 License Agreement. Read the Vantage Software License Terms and Conditions, then click I Accept... if you agree to license terms. Click Next.
Step 9 Destination Folder. Accept the default folder or click Change to select an alternate folder. Click Next.
Step 10 Ready to Install... Click Install to begin installation of Telestream Transcoding and Analysis Engine components, which are used by Vantage services to perform decoding, analysis, and encoding of media.
Installing a Multi-Server Vantage Domain
26
Vantage Client
Programs and
Services
When the Vantage installer completes software component installation and Vantage Transcoder and Analysis Engine as appropriate, it displays the Vantage Setup Welcome window:
Step 12 Welcome Window. Click Next to display the license agreement.
Step 13 License Agreement. Read the Vantage Software License Terms and Conditions, then click I Accept... if you agree to license terms. Click Next.
Step 14 Click Custom install to install specific Vantage clients or services.
Step 15 Custom Setup. In the Vantage component tree, de-select those Vantage services and client programs and services that you do NOT want installed on this computer (all are selected by default).
To de-select a component, click the component’s icon and select Entire Feature Will Be Unavailable from the dropdown menu.
Note: Also be sure to uncheck the Transcode service and Analysis
service if you did not install the Telestream Transcode and Analysis Engine on this computer. The Transcode and Analysis services require the Telestream Transcode and Analysis Engine on the same server.
To de-select all Vantage clients or all Vantage services, select Entire Feature Will Be Unavailable from the group icon.
Click Next to install the selected components and services.
Step 16 Ready to Install Vantage. Click Install to begin installation.
Step 17 Completed... When installation is done, click Finish to close the installer.
Verify DTC Service
Settings
Step 18 In Windows, display the Services Control Panel.
Step 19 Verify that the startup type of the DTC is set to Automatic.
Step 20 If you need to change the startup type, right-click on the Distributed Transaction Coordinator service and select Properties to display the Properties window.
Step 21 Select Automatic from the Startup Type dropdown and click OK.
Step 22 Start the DTC service if it wasn’t running.
Installing Vantage
Patches
Updates to the current version of Vantage are periodically published by Telestream, and are available from the Telestream Web site. Patch installers are used to replace Vantage components as necessary between upgrades (version releases).
Read the Release Notes. Always install patches based on the
instructions in the Release Notes based on your requirements, or upon recommendation by Telestream.
Configuring a
Multi-server
Vantage
Installation
When installing a multi-server Vantage installation, the following Vantage and Windows components must be configured so that Vantage can operate properly in a distributed environment:
Setting Vantage Services Logon Identity (page 27)
Resource Shares (page 28)
Adding a Vantage Store (page 28)
Adding Services a Distributed Domain (page 29)
Setting Vantage
Services Logon
Identity
The logon identity (referred to as authenticated domain user) of each Vantage service in a domain must be the same. The authenticated domain user must have access to all network resources that are
accessed by the service. Also, servers hosting Vantage services and the Vantage database must be a registered server in the Windows domain. Telestream recommends that a specific authenticated domain user be defined by your network administrator for this purpose.
Perform these steps for each Vantage service on each computer in the multi-server Vantage installation:
Step 1 Log on to the target server with a local administrator account.
Step 2 In Windows, display the Services Control Panel.
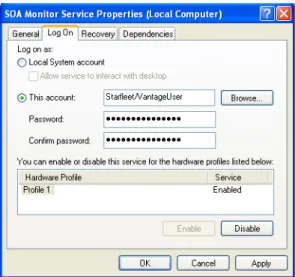
Step 3 Right-click and select Properties on the Vantage service to display the Properties window. (All Vantage services begin with the word Vantage).
Step 4 Click the Log On tab:
Installing a Multi-Server Vantage Domain
28
Step 5 Check This account and enter the authenticated domain user
(Starfleet\VantageUser for example) and password.
Step 6 Click OK to update the logon identity and close the window.
Note: In some cases; you may be required to indicate that the specified
user has been granted Logon as a service right. If the service fails to start and displays an error indicating that the identity of the service may not have the necessary permissions, consult your IT administrator to set the appropriate rights for the new account.
Step 7 You must restart the service so it logs in with its proper domain user.
Resource Shares
For each network resource that Vantage requires access to (read & write) – stores, catalogs, input directories, and destinations – you should create or identify shares and configure them correctly for read/write access by the authenticated domain user assigned to all Vantage services. To enable Vantage to access and write media in a networkedenvironment, network-accessible resources should not be identified by a letter-drive path. For example; a store or an input or output media directory should not be identified with a local reference:
C:\NightlyNewsStage2, in a distributed domain. Instead, you should create a folder, configure it as a share and use the share name for the resource (for example, (for example, \\Saturn\NighlyNewsStage2).
Adding a Vantage
Store
Vantages stores are used as a temporary location to store media files. Vantage must have at least one default store to process jobs, and in a multi-server domain it should be a network share or other universally-accessible location.
To create the share and add it as a store, follow these steps:
Step 1 Create or identify a directory, set it up as a share and configure it so that the Vantage user domain account has appropriate access to the share.
Step 2 Start the Vantage Management Console.
Note: If you have a Team Management, Enterprise Control, or Master
Control license, the default Vantage user account is Administrator with no password. This account has administrative privileges.
Step 3 If the console isn’t connected to the target Vantage domain (click on the Vantage Domain node to display the current Vantage domain), connect to the domain (the computer name of the database server.
Step 4 Open the Vantage Domain node to display all sub-nodes.
Step 5 Select Storage > Vantage Stores to display the details panel.
Step 6 Create a new store (for example, MainStore) and assign the share you set up earlier as the store.
Adding a Catalog
Vantage must have at least one default catalog.To create a new catalog, click the Catalog node in the tree. Click the New Catalog icon in the toolbar.
The console displays a new catalog in the catalog tree, with the default text selected. Type in the name of the new catalog (for example,
VantageCatalog) and click away from the catalog.
Adding Services a
Distributed Domain
In a multi-server Vantage installation, Vantage services must be specifically added to the Vantage domain after installation.
To add Vantage services to a domain, follow these steps (for step-by-step instructions, display the online help system in the console):
Step 1 If you closed the Vantage Management Console, start it again.
Step 2 If it is not connected to the target Vantage domain, connect it.
Step 3 Select Services to display the details panel.
Step 4 Click the Add Services icon to display the Select Services window. Vantage conducts a search for all Vantage services running in this subnet. There are nine Vantage services: Agility, Analysis, Catalog,
Communicate, Metadata, Monitor, SDK, Transcode, and Transport.
Step 5 Services are identified by their host. Make sure that you don’t select services that are properly attached to another domain if you have more than one (see your installation diagram to determine which servers host your domain’s services).
Step 6 Select the services to add to this domain, and click OK to add them.
Step 7 When the Management Console displays the Reassign Services window, click OK to add them to this domain.
Enabling a License
If you are implementing Vantage in a production environment, enable your license now (Enabling a Vantage License).Note: If you have a Team Management, Enterprise Control, or Master
Control license, the default Vantage user account is Administrator with no password. This account has administrative privileges.
Enabling a Vantage License
30
E
NABLING
A
V
ANTAGE
L
ICENSE
The purpose of this topic is to help you install and activate your Vantage license. If you haven’t yet obtained a license, see Licensing Overview (page 15).
Replacing | Adding
License Files
Depending on your requirements, you may obtain new license file or you may obtain updated files. Follow Telestream Sales or Customer Service instructions for adding or updating license files.
Note: You can evaluate an All-in-One Vantage installation without
installing a license. Demo mode allows you to design workflows, perform transcoding with a watermark, and analyze short video or audio clips. However, in demo mode (no license is installed), some features (such as broadcast server protocols) are disabled, and Vantage can only read Windows Media (.wmv and .avi) files for transcoding or analysis. You can’t operate a multi-server Vantage installation without a license.
Install the License
When you receive a license (an XML file), install it using these steps:Step 1 Make a copy of the license file and put it in a safe place. Always keep a backup in case you need to move the database later.
Step 2 Start the Vantage Management Console (double-click the shortcut on the desktop or click Start > Programs > Telestream > Vantage > Vantage Management Console).
Note: If you have a Team Management, Enterprise Control, or Master
Control license, the default Vantage user account is Administrator with no password. This account has administrative privileges.
Step 3 In the Management Console, make sure you are connected to the proper domain (the Vantage database server).
Step 4 View the top Vantage Domain node (left panel) – it displays the connected Vantage domain. Select this node to display the Domain details panel to select a domain and connect to it.
Note: If you can’t connect to the domain, contact Telestream Customer
Service.
Step 5 Select Licenses and click the Add License (key) icon in the toolbar to display the Add/Update License dialog.
Activate the License
Step 6 Navigate to the license directory and select the license, then click Open. If this computer has an Internet connection, the license activates automatically.
If the computer has no Internet connection, this error displays:
If you see this error, proceed to Activating a Vantage License Offline (page 32) to activate your license manually.
Configuring DEP
Note: If Vantage displays the error eSellerate can not run with Data Execution Prevention enabled, follow these steps:Step 1 Right-click My Computer to display the System Properties dialog.
Step 2 On the Advanced tab, click the Performance Settings button to display the Performance Options window.
Step 3 On the Data Execution Prevention tab, check Turn on DEP for all programs and services except those I select.
Step 4 Click Add and navigate to the location of the mmc.exe program (Normally located in C:\Windows\System32\mmc.exe).
Step 5 Click Open, and click OK to apply this change.
Step 6 Click OK to restart the computer.
Step 7 Restart your computer and activate the license.
The activated license is stored in the Vantage database for use by Vantage services in this domain.
Note: If you move your Vantage database to another server, remove
your license to deactivate it when you move to the new computer; then you can import it again, and activate it in the new database. Be sure to keep your license file (XML) as a backup.