Lars Birkholm Petersen, Sitecore Business Optimization Services
Profiling and Predictive Personalization with the
Sitecore Customer Engagement Platform
SubtitleTable of Contents
Executive Summary ... 3
Why You should use Predictive Personalization ... 4
Profiling Visitors ... 6
Getting Started with Profiling and Predictive Personalization ... 7
Terminology and Prerequisites ... 7-8 Step 1: Identify the WHO and the WHY ... 9
Step 2: Configure Profiles ... 11
Step 3: Configure Profile Cards & Personas ... 13
Step 4: Profile Content ... 16
Step 5: Configure Predefined Visitor Patterns ... 18
Step 6: Create Personalization Based on Patterns ... 21
Step 7: Adjust & Optimize ... 23
About Sitecore ... 25
3
Executive Summary
The value in using Predictive Personalization is the ability to respond in real time to changes in customer needs, building important customer insights that can be used for further optimization of digital outcomes.
Getting started with Predictive Personalization is not about configuring bits and pieces in Sitecore. It’s about having the right process guiding you through key steps, with the end goal of surfacing compelling content for specific visitors, addressing their intent and achieving your desired actions.
This guide describes a seven step process for getting started with Predictive Personalization.
Why you should use Predictive Personalization
Your customers’ digital lives consist of many different touch points across different channels, some of which are controlled by you – and others of which you aren’t even aware, like a conversation with peers in Google+.
Generating rich customer insights across touch points, analyzing patterns from customer behavior, and being able to respond in real time to signs of changing needs is more important than ever to be effective in the digital world.
However, we all experience static websites every day – and though we dislike the experience, we are so used to them that it has become the standard of what to expect when you browse for information. You look at a site, you investigate details and browse multiple pages, but when you step off that specific path (for instance, you return to the front page), the site doesn’t remember your interests and shows the same content instead of changing to become relevant towards your behavior! Predictive Personalization is all about being relevant for each unique visitor on your site, remembering and targeting them in real-time with relevant messaging
according to their specific browsing path, and obtaining a better idea of what visitors want based on their implicit and explicit site behavior.
Implicit behavior is what visitors are doing on your site, such as what type of pages/categories are they looking at, or what site path they follow.
Explicit behavior is demonstrated when visitors take action or submit data, like voting in a poll, searching for a specific keyword, or filling out a form.
In being relevant for each visitor on your site, you automatically increase the possibility of them doing business with you. Focus on removing two important obstacles between them committing to a desired action:
1. Don’t make your visitors think about how to navigate your site; make it easy
to return to information they’ve previously browsed
2. Build trust and credibility by using relevant content to show you understand
your visitors
5 Let’s say you want to buy a new TV: what could this browsing path look like, and how would Predictive Personalization be used to make content on an electronics site’s front page more relevant in your search?
Visitor behavior Static website Site with Predictive Personalization First visit:
Visitor enters site from Search result (Keyword: “40-inch LED HD TV”).
Visitor looks at Product page for 40-inch LED HD TV, and then browses other models. Visitor returns to front page.
Front page shows different products and brands.
All information on the page is static.
Call to Action: “Sign up for our newsletter.”
Front page shows
recommendations from 40-inch LED HD TV customers and reviews from trusted sources.
Call to Action: “Sign up to receive hot offers and the latest news on LED TVs.”
Second visit:
Visitor enters site from Search result (Keyword:
“BRANDNAME 40-inch LED HD TV”).
Visitor looks at Product page for 40-inch LED HD TV, checks pricing and availability for the TV, and looks again at main product page.
Visitor returns to front page.
Same as above Front page shows multiple
calls to action, focused on the Buy signals, such as “Order today and receive tomorrow in your city”, and “In stock.” The product information is displayed with highlighted reviews and
recommendations.
Third visit:
Visitor enters front page directly by typing in the site’s web address.
Same as above Front page shows very clear
Call to Action offer, such as “One day Only! Buy
BRANDNAME 40-inch LED HD TV today and get 10 free On-Demand movies.”
With Sitecore Customer Engagement Platform, building a predictive and relevant site experience is available out of the box. Simple tools that don’t require any programming make it easy to create the right profiles, listen to your audience and react to their behavior with personalized content.
This guide will explain the process for using the Sitecore Customer Engagement Platform to implement Predictive Personalization, in addition to recommendations for getting started.
Profiling Visitors
In order to classify visitors according to their onsite behavior, we can build profiles, which give us insight into their interests, their position in the buying cycle, and their preferred type of content.
The information gathered can also be stored with each unique visitor, so the site experience from the very first page is tuned to a specific user on his or her next visit. His or her profile is fleshed out in greater detail with each page view.
Profiling content is used to identify the behavior of each unique visitor, and to show relevant content according to this behavior (implicit personalization).
Personalization is a three step process: 1. You identify the visitor.
2. The visitor is classified according to which target group or persona he or she
most closely matches.
3. All or part of a web page on your site dynamically changes to show relevant
content, bringing the visitor closer to the action you would like him or her to take.
Can’t we do that using tags, click stream, or page categorization?
You can build personalization rules using data other than profiling, such as tags on pages, click stream, categorization, etc. However, this method is very difficult to maintain and keep up to date; you will be constantly adjusting to newly added or modified pages.
For example, if you create a personalization strategy based on click stream, you may have a rule that looks like this: “If visitor has viewed page x, then show content Y.” It’s a very simple rule, but if page x is changed to address another target group or a better page is added to your site, you need to adjust all related rules. More rules means more adjustments- lots of rules means a nightmare of maintenance.
By basing your personalization strategy on profiling, personalization is flexible and as new pages are added, they are profiled and begin immediately contributing to real-time personalization.
7
Getting Started with Profiling and Predictive Personalization
Terminology
Before we dive into the process, it’s important to understand the basic concepts and terminology used in Predictive Personalization.
A Profile is a category used to define the criteria by which you want to track visitor behavior (such as stage in buying cycle, main interests, skill level, etc.).
A Profile Key is an attribute related to a specific profile. For example, if the profile is designed to track visitor behavior on a camera manufacturer site, the profile could be Skill Level and profile keys could be Beginner, Semi-Professional and Professional.
A Profile Card is a preset collection of profile key values which can be applied to content, making it easier for editors to profile content as part of the content creation
process. An example of a Profile Card could be Interested in Professional Cameras,
which carries a high score in the Professional profile key.
A Profile Card –persona is a Profile Card that is used to assign profile information for personas (fictional characters/archetypes designed to be similar to real people with details describing their lives, habits, backgrounds, interests, and professions).
To profile content is when editors assign profile values to new or existing site content, using either Profile Cards or custom values.
A real-time visitor profile is the unique profile of a visitor, according to the content this visitor consumes on a site in real time.
A Pattern is predefined in Sitecore and is an easy way to recognize how similar one visitor is to other typical visitors. Patterns are used to match a visitor profile in real time with its closest Pattern, making it easier to show relevant, personalized content based on similar behavior or interests.
Prerequisites
Prerequisites for this process are:
- Clear goals for your digital channels, which are measurable and preferably
aligned with your business objectives.
- Use of the Sitecore Customer Engagement Platform.
The goal of this guide is to walk you through the process related to achieving Predictive Personalization, without focusing on the specifics of how this is configured in Sitecore.
For more on configuration, we recommend the “Marketing Operations
Cookbook”, available for download here:
http://www.sitecore.net/marketingcookbook
The Excel worksheets referenced in this document can be downloaded here:
http://mediacontent.sitecore.net/Media/Predictive Personalization worksheets.xlsx
The Steps
9
Step 1: Identify the WHO and the WHY
Predictive Personalization happens in real time to target visitors with relevant content according to their onsite behavior.
In order to have the right content appear to the right visitor at the right time, it’s important to look at each Target Group of site visitors and have a plan for:
- In which stage of the buying cycle is this Target Group?
- What actions do we want this Target Group to achieve (on a micro and macro
level)?
- What content and calls to action do we need to guide the Target Group to
take these steps?
In the early stages of the buying cycle, you may focus on getting the visitor to sign up for a newsletter, opening the doors to having a dialogue with him or her. In later stages of the buying cycle, your focus will change.
To start, create a Relevancy Map (see Figure 1 below) to map out Target Groups according to stages and for each Target Group in a given stage describe:
- Their intent
- What content needs to be presented in order to persuade them
- What action we want them to take
As a note, we strongly recommend that you turn key Target Groups into Personas; using Personas help you write better and more relevant content.
TIP! Spend one day on a “Developing Profiles, Personas and User Journeys” Workshop with your partner and/or Sitecore Business Optimization Services. Key points of this workshop include:
- Refining desired information to Profiles and Profile Keys
- Content inventory and profile mapping
- Developing Persona presets
- Creating preset Profile Cards
- Creating User Journeys mapped with Personas and Buying Cycle stages
- Mapping User Journeys and Buying Cycle stages with goals
- Roadmap for future configuration
-Contact Sitecore or your partner for more information on these workshops.
TIP! Try to limit the number of Personas, you are developing. It’s easier to develop and get to know five personas instead of twelve.
What is a persona? A Persona describes the life, habits, background, interests, and profession of a fictional character that represents real site visitors/customers/etc.
A Persona is often made up of these characteristics:
- Name
- Title and Company
- Age
- Education
- Family
- Interests
- Typical day in the life
- Environment
- Goals
- Responsibilities
- Psychographics
TIP! Start small by designing personalization for your most important Personas/Target Groups – and for those who have the most unique intent, start by creating a few stages. This will get you started quickly and once you start to see better results, you can extend into more Personas/Target Groups and Stages.
FIGURE 1. RELEVANCY MAP FOR MAPPING VISITOR TYPES WITH DIFFERENT INTENT ACROSS STAGES.
11 Homework for Step 1:
1. Identify the most important Visitor/Target groups
2. Identify five possible Personas
3. Identify your customer buying cycle and stages for visitors who aren’t
looking to buy (those looking for support, job-seekers, press, etc.)
4. Create a Relevancy Map-in each stage for identified Personas/Target groups
outline:
o Their intent
o What content needs to be presented in order to persuade them
o What action we want them to take
Step 2: Configure Profiles
Every business is unique, and the criteria by which you identify a visitor will be unique to your company. As the previous step outlined, it’s an analytical process, where you have to define how behavior can be measured implicitly to identify the visitor.
You should profile content according to your site audience’s interests, segments, roles and other criteria that matter to your business. For the next step you will translate these criteria into Profiles (categories) and Profile keys (attributes). If you are in the car dealer business, you could have a Profile called “Car Type” and have values like “Family”, “Economical”, and “Urban” as Profile keys:
- Car Type (Profile)
Profile Keys
o Urban
o Rural
o Two seats
o Family
o Economical
Using the above to profile content, you will be able to learn if a visitor is more interested in a minivan (by scoring high on the Family key) or perhaps a truck (equally high scores in Two seats and Rural keys). Demonstrated interest in particular Profiles will allow you to trigger different messages and calls to action, leading to increased conversions.
TIP! Think about what customer information helps you win business; this will give you a good idea on what Profile and Profile Keys you need.
Depending on your business, you could end up with three to five Profiles that reveal customer intent, and the customer’s likely position in the buying cycle.
Below is an example of how profile and profile keys could be configured for a car dealer:
Profile Profile Keys Scale
Car type
Urban
1 to 5 Two seats
Rural Economical Family
Persona
Practical
1 to 5 Precautious
Environmentally Conscious Boastful
Stage in Buying Cycle
Search
1 to 5 Evaluate
Decide Engage Support
In this example you have three profiles, which gives you the power to track which persona the visitor is similar to, what car type might be interesting to the visitor and his/her stage in the buying cycle.
13 Homework for Step 2:
1. Look at the identified WHOs & WHYs and determine characteristics that
could be used to tell something about the visitor, intent and stage. Be sure to have characteristics that are:
a. About the visitor (WHO)
b. Related to your products/services (WHY)
c. Related to a given stage (WHO & WHY)
2. Take the characteristics and group them into buckets based on similarity,
like one bucket with characteristics about the visitor (like Practical or Boastful), one with visitor interests towards products/services (like Luxury or Environmentally Conscious), etc.
3. Regroup characteristics until you have approximately five buckets
4. Label buckets (e.g. Persona, Stage, Intent, etc.).
5. For each bucket, sort through the characteristics and narrow them down to a
maximum of six. Label characteristics.
6. Create an Excel sheet, such as shown in the example above, and enter bucket
labels as Profiles and characteristics as Profile Keys.
7. Determine a scale for each of the profiles.
8. Configure Profile and Profile Keys in Sitecore.
Step 3: Configure Profile Cards & Personas
In order to make it easy to profile content alongside writing better and more relevant content, it’s possible to create presets of Profile Keys with predefined values, called Profile Cards.
The difference between manual profiling and using Profile Cards
The great advantage with Profile Cards is content editors won’t need to determine
correct values or manually set values on content items (Figure 2). Instead they choose a Profile Card (Figure 3) containing those preset values to apply to the content item.
It’s possible to create two types of Profile Card:
1. Profile Card - Standard
2. Profile Card - Persona
Both types of Profile Cards are defined by Profile keys values and displayed using a radar diagram.
If you aren’t using currently using Personas, then it might be good to consider doing so as part of this process to improve your personalization efforts. Personas should reflect your most important Target Groups, as determined in step 1.
Personas can be created using a Profile Card preset. Continuing the car dealership example, the foundation of our persona could look like this:
- Persona (Profile)
Profile Keys
o Practical
o Precautious
o Environmentally Cautious
o Boaster
In creating a persona such as “Lynette, the Hockey Mom,” we would assign a high
15 Homework for Step 3:
1. For each Profile list 4-6 possible presets, which can be used to define
different Personas, Products/Services interest, stage and other information that is important to the specific Profile.
2. Use the worksheet referenced above, fill in your presets and start assigning
Profile Keys values within the relevant Profile.
3. If you have any overlapping profiles, try to merge (for example, presets with
similar high Profile Key values can probably be combined).
4. Review the worksheet to identify if any important characteristics are
missing. If so, add them (you typically need one preset with a high value in each Profile Key).
5. To make it easy for content editors to use presets, we suggest that for each
preset you add:
a. Description
b. Image
6. Is there content on your site that could be of interest to more than one
persona or preset? If so, you can score the content with:
a. Multiple presets with equal weighting
b. Multiple presets with a percentage weighting, such as 75% “Hockey
Mom,” 25% “Mr. Safe”
7. Configure Profile Card presets in Sitecore
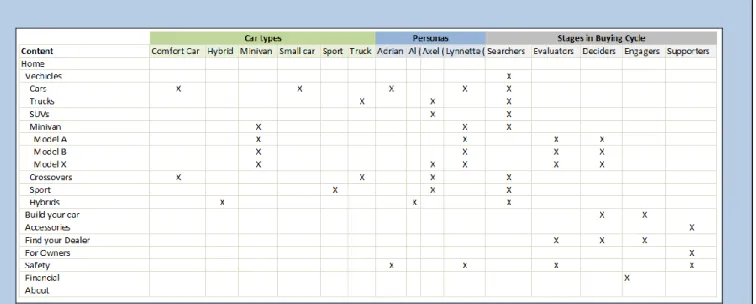
Step 4: Profile Content
Now it is time to think about how to put your plan into action and assign value to your content using the Profile Card presets completed in Step 3.
Assuming you already have a lot of content that needs to be profiled, you could
create a Profile Card preset map (see Figure 6 below) of all relevant content, where
you can see content to the left and the different Profile Card presets at the top. Use a site map or list of site content available to determine what content is relevant for each Profile Card/Persona.
If you are using multiple Profile Cards with a percentage weighting, you may also want to include the percentage weighting on the worksheet.
TIP! You can assign Profile Card presets to item Standard Values templates in Sitecore, so these presets are inherited once a content editor creates a content item using that template. This makes it even easier to profile content without manually having to choose presets for similar content items.
17 Homework for Step 4:
1. Export a site map or list of your relevant existing content that needs to be
profiled.
2. Enter the list into worksheet and enter your Profile Card presets as columns.
3. For each content item, evaluate which Profile Card could be applied. If there
are multiple cards that could apply to a content item, add those that are relevant and use percentage weighting.
4. Develop a strategy for how to profile new content and create a “Best
Practice” guide for your content editors.
5. Investigate if you have sections, where content could have same presets, if so,
map which presets should be applied.
6. Determine areas on your site where a template might always carry the same
preset. If so, consider assigning this preset to the template’s standard values.
7. Profile content in Sitecore and apply presets to the item templates where
Step 5: Configure Predefined Visitor Patterns
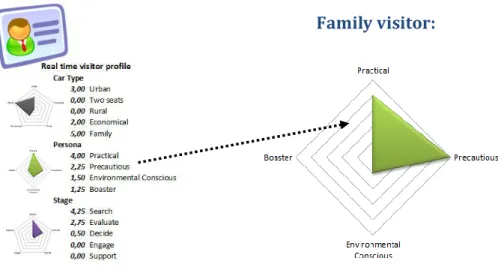
Once a visitor arrives on your site and starts consuming content, the Profile Cards applied to that content will be used to build the real-time visitor profile.
Let’s look at an example where the visitor sees three pages on a car dealer website:
the Home page, main Minivan listing page, and Minivan Model B, where Minivan and
Minivan Model B pages have been assigned profile values:
+
+
The real-time visitor profile will be calculated from the
values assigned to the two pages Minivan and Minivan
Model B.
Each visitor to your site will be profiled and have a unique real-time visitor profile, made up of
19 Notice how radar diagrams are used to display each separate profile (Car Type, Persona and Stage).
Patterns can be predefined in Sitecore and are an easy way to recognize a certain visitor profile. For example, based on the content consumed, is the visitor a closer match to a family car buyer or a sports car buyer?
The visitor profile will be matched in real time to the Pattern it most closely resembles.
In the car dealer website, we could create Patterns for each profile against which we would like the profiles of site visitors to be matched.
For the Persona profile we could create several Patterns, which represent different visitor behavior on the website. Each Pattern is defined by the same method as setting up Profile Card presets: using a radar diagram with values for each of the profile keys within the profile.
The patterns for the Persona profile could look like this:
Handy man: Family visitor: Boaster: Environmentally
Conscious:
Predictive Personalization based on Patterns is much easier and more accurate than rule-based personalization.
Ex.: Where visitor matches Pattern A instead of where visitor has more than 20 in profile
The visitor persona profile will be matched to these Patterns. In our example, the closest match is the Family visitor Pattern.
While you can create as many patterns as there are visitors, our recommendation is you only create patterns for those visitor segments that would most benefit from a personalized message (those with a high value in one or more profile keys). In order to create Patterns, you could create a worksheet (an example is supplied), where you list Profile and Profile Keys at the top and to the left list possible
Patterns. This would make it easy to fill in Profile Keys values.
FIGURE 7. EXAMPLE WORKSHEET FOR PREPARING PATTERNS.
21 Homework for Step 5:
1. For each Profile, list 4-6 possible Patterns which can be used to define
different visitor group interest, stage and other criteria important to the specific Profile.
2. Open the worksheet, add Patterns and start by giving Profile Keys values
within the relevant Profile.
3. If you have any overlapping Profiles, consider combining those with similar
high values in profile keys.
4. Review the worksheet to identify if any important characteristics are
missing. If so, add them (you typically need one preset with a high value in each Profile Key.)
5. Configure Patterns in Sitecore
Step 6: Create Personalization Based on Patterns
We have almost completed the process! Now we just need to enable personalization based on the Patterns we have defined.
Before enabling personalization, is it important that you identify areas on your website where you would like to deliver the personalized messages. This could be areas on the front page, sidebar spots on different layout templates, or similar. Identifying the areas where personalization can be enabled will direct the format of the personalized messages, whether text, video or image.
FIGURE 8. EXAMPLE OF TWO SPOTS ON A LAYOUT TEMPLATE WHICH ARE CANDIDATES FOR PERSONALIZATION.
To determine which spots should change based to certain Pattern matches, you could create a worksheet (similar to below) where the personalization spots on the right are matched to Patterns.
In the red circle we have highlighted Patterns from both the Personas and Stages profiles that could be combined to deliver a more relevant personalized message! For example, a Family visitor (Persona profile) in the Evaluate stage (Stage profile) would respond best to content related to building trust, such as customer
testimonials about security and flexibility for the family.
After you have identified the areas of the site to personalize and combinations, list all combinations for each area and for each combination note:
1. Visitor intent
2. What content do we need to present to persuade the visitor
3. What action we want them to take
This will help you in creating the right relevant and targeted content.
TIP! By mapping your customers’ buying behavior across different stages, you can use personalization steps that take the customer through the stages of the buying cycle, focusing on the goal you want them to achieve in TIP! By combining Pattern matches across Profiles, you have the possibility to deliver many targeted messages, but this also creates the need for many combinations! To keep your strategy manageable, focus on your key messages.
FIGURE 9. EXAMPLE OF A WORKSHEET WHERE PERSONALIZATION SPOTS ARE LISTED TOGETHER WITH RELEVANT PATTERNS.
23 Homework for Step 6:
1. Identify spots/areas in your site design where you would like to add
personalization based on Patterns.
2. In the worksheet, map those personalization areas with appropriate
Patterns.
3. Continuing in the worksheet, list all Pattern match combinations for each
area and, reusing work from step 1, identify:
a. Their intent
b. What content needs to be presented in order to persuade them
c. What action we want them to take
4. Configure Personalization spots content in Sitecore
5. Configure Pattern match personalization in Sitecore
FIGURE 10. EXAMPLE WORKSHEET WHERE PERSONALIZATION SPOTS ARE LISTED WITH PATTERN MATCH COMBINATIONS.
Step 7: Adjust & Optimize
Once Predictive Personalization is turned on, the process continues – you would likely add more personalization spots and potentially change your current site configuration in order to optimize outcomes.
One way to help optimize your personalization efforts is to look at segmented User
Experiences, and see how they are using your site: where are they engaged, and when are they leaving the site? Are your personalization spots communicating effectively with those users in these segments?
Data collected by Sitecore Engagement Analytics can assist you in monitoring your personalization efforts. To optimize, look at:
- Low engagement pages (segmented by profiles) – are visitors missing key steps to conversions?
- Conversions vs. traffic (segmented by profiles), which profiles are doing well and which could be improved?
It’s important to optimize for impact: the more important to your business the low
engagement page and low conversion profiles are, the more rewards you will reap from improving those pages and profiles.
When you have identified low engagement pages and low engagement profiles, go back and look at:
- Visitor intent
- What content we need to present to persuade the visitor
25
About Sitecore
Sitecore redefines how organizations engage with their customers online, powering experiences that can sense and adapt to a customer's needs to increase revenue and customer lifetime value and satisfaction. Sitecore was the first Web Content
Management system (WCM) to incorporate marketing automation, intranet portal, e-commerce, Web optimization, social media and campaign management
technologies into a cohesive, integrated open platform. Sitecore's software makes it easy for businesses to identify, serve, engage and convert new customers online. Sitecore's broad choice of capabilities enable marketing professionals, business stakeholders and information technology teams to rapidly implement, measure and manage a successful website and online business strategy. Its powerful
development platform, integrated marketing automation tools and intuitive editing workspace enables successful websites of all types.
Thousands of public and private organizations have created and now manage more than 30,000 dynamic websites with Sitecore including ATP World Tour, Austrian Airlines, CA Technologies, Ergo Insurance Group, Heineken, ISS, Lloyd's of London, Microsoft, National Suisse, Nivea, Thomas Cook and Visa Europe.
For more information about Sitecore CMS, visit www.sitecore.net.
About the Author
Lars Birkholm Petersen has 13 years of experience with Web Content
Management, including many different roles, such as web development, search engine optimization, project management and business development.
Lars has participated in over 100 different website projects and web content management system product development.
Today Lars works with Sitecore Customer Engagement Platform, as the Head of Sitecore Business Optimization Services, helping customers and partners with Online Business Optimization.
Copyright
Copyright © 2011 Sitecore. All Rights Reserved. Restricted Rights Legend
This document may not, in whole or in part, be photocopied, reproduced, translated, or reduced to any electronic medium or machine readable form without prior consent, in writing, from Sitecore. Information in this document is subject to change without notice and does not represent a commitment on the part of Sitecore.
Trademarks
Sitecore is a registered trademark of Sitecore. All other company and product names are trademarks of their respective owners.