GE T TING S TARTED
for Windows and the Mac
We at Interwrite LearningTM are proud of our family of Inter-write products. We strive to continue to bring you the best the technology has to offer. We urge you to visit our Web site, where we will post the latest information regarding any updates and changes we have made that would impact the instructions in this Getting Started document.
Click on any of the Interwrite Learning products to access product information, software downloads, documentation, and training information.
Please recycle
Table of Contents
Interwrite Board – Overview
Installation Overview
7
1. Unpack Your Interwrite Board
7
2. Mount Your Interwrite Board
8
3. Install the Interwrite Workspace Software
9
4. Connect Your Interwrite Board
9
5. Connect the Video Projector
9
6. Prepare the Electronic Interwrite Pens and
Install the Pen Charging Station
9
7. Calibrate Your Interwrite Board
9
Mount Your Interwrite Board
Mounting the Interwrite Board on the Wall
10
Attaching Floor Stand Mounting Brackets to
the Interwrite Board
12
Mounting the Interwrite Board on the Floor Stand
13
Install the Interwrite Workspace Software
Installing the Interwrite Workspace Software on Windows 14
Installing the Interwrite Workspace Software on the Mac
15
Connect Your Interwrite Board
Cable Installation
16
Bluetooth
TMWireless Installation
18
Install the BTCOM2 Module on the Interwrite Board
19
Install the Bluetooth Module on the Computer
20
Install the USB Adapter
21
Connect the Interwrite Devices
22
Connecting a Wireless Device on Windows
22
Connecting a Wireless Device on the Mac
24
Connect the Video Projector
Calibrate Your Interwrite Board
Calibrating the Interwrite Board
29
Getting Started with Interwrite Workspace
Beginning an Interwrite Workspace Session
31
The Interwrite Workspace Toolbar
32
Using the Pen Tool
33
Presentation Files
34
Distributing Presentation Files
35
Additional Interwrite Learning Resources
35
What is PRS?
35
Whiteboard Mode
36
Interwrite Accessories
BTCOM2 Communications Kit
37
The Interwrite
TMPad
37
The Rechargeable Interactive Pen and
Pen Charging Station
38
Using the Rechargeable Interactive Pen
39
Assembling the Interwrite Marker Pen
40
The Interwrite Interactive Pen
41
Installing the Mounting Clips on the
Interwrite Board and Wall
42
Attaching the Pen Tray to the Interwrite Board
43
The Interwrite Board Floor Stand
44
The Floor Stand Accessory Shelf
44
Assembling the Floor Stand
44
Assembling the Legs
45
Attaching the Crossbars to the Leg Assemblies
45
Regulatory Statements and Warranty
Regulatory Statements
46
International Interwrite Board Warnings
52
Interwrite
TM
Board
Overview
The InterwriteTM Board is central to the Interactive Classroom. These durable electronic whiteboards feature Interwrite Learning’s patented electromag-netic technology. Used alone, or in combination with InterwriteTM Pads, your Interwrite Board will provide the most effective means of facilitating and stimulating a successful interactive, collaborative environment, whether in the classroom, in the meeting room, or reaching out to participants around the world.
You will see in this Getting Started guide how versatile your Interwrite Board installation can be, accommodating every type of presentation environment. Every step of the setup and installation process for each possible configuration is described in these pages. In addition, a variety of accessories are described. Some of the Interwrite Board accessories, such as an electronic pen, are required, others are optional. In any case, we will show how they can be used to uniquely tailor your interactive environment to your requirements.
Once set up, your Interwrite Board must be able to communicate with your computer, either by means of a cable connection (serial or USB), or wirelessly, using the BluetoothTM Comm Kit. The Interwrite Workspace software
manages the communication link with your Interwrite Board, controls its operation, and provides a robust set of tools to achieve the interactive experience.
You will use Interwrite Workspace software tools to establish communica-tion with your Interwrite Board and to calibrate it. Calibracommunica-tion ensures that the cursor on the projected image is properly aligned with the tip of the electronic Interwrite Pen on the whiteboard’s surface.
The Interwrite software lets you operate your Interwrite Board in one of two primary operational modes: Whiteboard Mode and Interactive Mode. Whiteboard Mode makes it possible for you to easily capture the notes, drawings and calculations on your Interwrite Board for print and/or elec-tronic distribution. The only equipment you need to run the Whiteboard Mode is your Interwrite Board, one or more electronic Interwrite Marker Pens, and your computer.
Interactive Mode allows you to take advantage of the full power and features of the Interwrite system. Running Interactive Mode requires your Interwrite Board, an Interactive Pen or one or more Marker Pens, a computer, and a video presentation projector. The video projector is connected to the computer so it can project the image of the computer desktop onto the Interwrite Board’s surface. Once connected, your Interwrite Board communicates as an input device to the computer.
If you are going to connect your Interwrite Board using a cable, only one cable, either Serial or USB, can be used. If you are going wireless, neither cable should be used.
If your Power Supply shipped with a set of adapters, the instructions for fitting the correct adapter on the plug are described on page 17. If you are connecting your Interwrite Board using a USB cable, the Power Supply is not needed. However, the Power Supply is required if you are using a serial connection, attaching the BTCOM2 Module to the board for wireless communication, or connecting the Interactive Pen Charging Station to the board’s controller.
The Cable Guides are used to manage and guide dangling cables. The optional Mounting Clips will be used only when you are mounting your Interwrite Board on the wall. Their installation is described in the Accessories section on page 42.
The Pen Tray is an optional accessory. If you are planning to mount your Interwrite Board on the wall and you purchased a Pen Tray, it should be installed on your Interwrite Board before it is mounted on the wall. Instruc-tions for attaching the Pen Tray can be found on page 43.
Your Interwrite Board ships with one Wall Mounting Bracket. The board’s frame is designed to hang from the Mounting Bracket installed on the wall.
Installation Overview
This section describes what you will be doing and the order in which you will be doing it, to facilitate the installation of your Interwrite Board and its prepara-tion for use.
1. Unpack Your Interwrite Board
Open the shipping box and remove the Accessory Box. Leave the Interwrite Board in the box until you are ready to mount it.
In the Accessories section of this guide, you will see that a variety of Interwrite Board accessories are available to help you create the interactive environment that best suits your requirements. Following is a basic list of the Interwrite accessories likely to be included with your Interwrite Board:
Power Supply Adapters Interwrite Pens Mounting Clips
Pen Tray
Interwrite LearningTM CD This InterwriteTM Board
Getting Started Guide Wall Mounting Bracket Serial Cable
USB Cable Power Supply Cable Guides
You will need an electronic Interwrite Pen to use with your Interwrite Board. You can choose from among the Interactive Pen, the Marker Pen and the rechargeable Interactive Pen, described beginning on page 39. The optional Interwrite Interactive Pen Charging Station (page 38) is designed to attach easily to the Interwrite Board frame. Nevertheless, it can be mounted instead on the wall, although it should be close enough to the Interwrite Board’s controller so it can be plugged into the Power Connector on the top of the controller housing. (The Pen Charging Station can be plugged directly into a wall socket or power strip. The power cable with a standard power plug for such an installation is sold separately.) If you are mounting your Interwrite Board on the wall, you should attach the Pen Charging Station to the Interwrite Board before you mount it.
The Interwrite Learning CD contains the Interwrite Workspace software for both a Windows installation and a Mac installation. Interwrite Workspace must be installed on your computer before you can complete the installation of your Interwrite Board.
2. Mount Your Interwrite Board
Will this be a wall mount, or a floor stand mount? If you are mounting your Interwrite Board on a floor stand, you need to assemble the floor stand first. The instructions for assembling your floor stand are included in the floor stand shipping box. In addition, instructions for assembling your floor stand can be found on page 44 in this guide.
The type of mount will also determine which Mounting Brackets, if any, you will attach to the back of the Interwrite Board. For a floor stand mount, two Mounting Brackets are attached to the back of the Interwrite Board with supplied Phillips screws. These Mounting Brackets ship with the floor stand. For a wall mount, the Interwrite Board requires only one Mounting Bracket, which is attached to the wall. The frame of the Interwrite Board is designed to overlap the Mounting Bracket on the wall. The hardware for attaching the Mounting Bracket to the wall is not included. You will supply the hardware that is appropriate to the type of wall on which the Interwrite Board is being mounted.
WALL MOUNT
If you purchased a Pen Tray and/or an Interactive Pen Charging Station, install them before you hang the Interwrite Board on the Wall Mounting Bracket. If you plan to use the optional Mounting Clips (page 42) to stabilize your wall-mounted board, install them after you have mounted your Inter-write Board on the wall.
FLOOR STAND MOUNT
After you assemble the floor stand, attach the two Mounting Brackets to the back of the Interwrite Board using the Phillips screws provided. It requires two people, one at each end of the Interwrite Board, to mount it on the floor stand. It is attached using the Knob Screws provided. You can attach the Pen Tray and/or Pen Charging Station after the Interwrite Board is mounted on the floor stand.
3. Install the Interwrite Workspace Software
4. Connect Your Interwrite Board
Your Interwrite Board must be able to communicate with the Interwrite Workspace software on your computer. This communication link is estab-lished either by means of a physical cable (USB or serial) connection, or wirelessly between two Bluetooth communication modules—one connected to the Interwrite Board and one connected to the computer. The computer will automatically find an Interwrite Board that is connected to it by a cable, but the wireless Bluetooth Modules must be “connected” by the Interwrite Device Manager, one of the Interwrite Workspace software applications.
5. Connect the Video Projector
In order to run Interwrite Workspace in Interactive Mode, a video projector must be connected to the computer.
6. Prepare the Electronic Interwrite Pens and
Install the Pen Charging Station
The Interwrite Marker Pen must be assembled and a battery installed before use. A battery is installed in the Interactive Pen. The optional Pen Charging Station is installed on the Interwrite Board and the rechargeable Interactive Pens must be charged before they can be used. Instructions for attaching the Pen Charging Station to the Interwrite Board are on page 38. Instructions for assembling the Marker Pen and the Interactive Pen are on pages 40 and 41.
7. Calibrate Your Interwrite Board
Your Interwrite Board needs to be calibrated to ensure that the tip of the electronic Interwrite Pen is aligned with the cursor on the projected image. Any time the Interwrite Board or video projector is moved, the Interwrite Board must be re-calibrated.
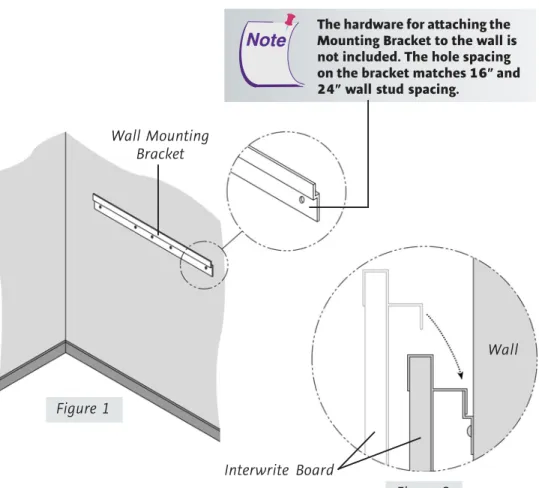
Mounting the Interwrite Board on the
Wall
The Interwrite Board Wall Mounting Bracket, found in the Accessory Box, is mounted on the wall. The Interwrite Board frame overlaps the Mounting Bracket’s lip.
Wall Mounting Bracket
Interwrite Board
Wall
Hang the Interwrite Board frame on the Wall Mounting Bracket, as shown above.
Figure 2 Figure 1
The hardware for attaching the Mounting Bracket to the wall is not included. The hole spacing on the bracket matches 16” and 24” wall stud spacing.
1 Attach the Wall Mounting Bracket to the wall (Figure 1), using hardware appropriate for the wall structure. (This hardware is not included.)
2 Hang the Interwrite Board by interlocking the Wall Mounting Bracket with the rear edge of the top part of the Interwrite Board frame, shown in Figure 2.
Two people should mount the Interwrite Board on the wall to avoid injury, or damage to the Interwrite Board.
If you are planning to use the Mounting Clips, described on page 42, in conjunction with the wall mount, install them on the back of the board and attach them to the wall after you hang the Interwrite Board.
Attaching the Floor Stand Mounting
Brackets to the Interwrite Board
After you have assembled the floor stand (instruc-tions on page 44), you will attach the Mounting Brackets that came with the floor stand to the back of the Interwrite Board.
1 Attach the Mounting Brackets to the back of the Interwrite Board frame. The Slide Slot is oriented toward the top of the Interwrite Board, the Ratchet Slots are toward the bottom, and the short side of the bracket points inward toward the center of the board.
2 Line up the holes in the bracket with the Brass Inserts on the frame. Use the two small screws
provided to attach the bracket.
Slide Slot
Ratchet Slot
Mounting Brackets
Tools Required:
Phillips screwdriver
Interwrite Board
Brass Insert Mounting
Bracket
Small Screw
Mounting the Interwrite Board
on the Floor Stand
The Interwrite Board is attached to the floor stand with the provided Knob screws—two on each side of the board.
3 With one person at each end of the Interwrite Board, position the Mounting Brackets on either side of the Floor Stand Legs. Thread the top
Knob screw through the Slide Slot in the Mounting Bracket and into the hole closest to the front edge of the Floor Stand. Screw the second Knob screw through one of the Ratchet Slots in the Mounting Bracket and into the screw hole positioned in the middle of the second, lower set of four Crossbar screws.
The position of the Interwrite Board on the floor stand can be adjusted by standing in front of the Interwrite Board, grasping the bottom of the board with both hands, and sliding it up or down, coming to rest on one of the Ratchet Slots in the Mounting Brackets.
Slide Slot
Ratchet Slot Knob
screws
Floor Stand
Knob screws
Two people should mount the Interwrite Board on the floor stand to avoid injury, or damage to the Interwrite Board.
One person can adjust the position of the Interwrite Board up or down, but be sure to stabilize the floor stand before you attempt to reposition the board. Lock down the thumb tabs on the Casters, or push the floor stand against a wall to prevent it from rolling, or put one of your feet on the Floor Stand Foot to hold it in place as you adjust the Interwrite Board’s position.
Position the floor stand on a level surface to avoid tipping.
Lower the Interwrite Board to the lowest position on the floor stand before moving the stand.
1 Log in as Administrator. Insert the Interwrite Learning CD into the CD drive on your PC. The installer will autoload. If it doesn’t, click on the Start button on the Windows Task Bar and select Run from the menu. Type X:\setup.exe (X represents the CD drive letter).
2 Select the Install Interwrite Workspace Software menu option.
3 Follow the onscreen instructions for the software installation. You will know Interwrite Workspace has installed successfully by the appearance of the Interwrite Workspace icon in the System Tray on the Windows Task Bar. If the icon does not appear, restart your computer.
Installing the Interwrite Workspace
Software on Windows
The appearance of the Interwrite Workspace icon on the Task Bar indicates that the Interwrite Device Manager is now running on your PC. Click on the Workspace icon to display the op-tions on the Device Manager Menu shown here. Device Manager, in addition to managing the Interwrite hardware devices, provides direct access to the three operational modes of the Interwrite Workspace software.
Click the Interwrite Workspace icon in the System Tray of the Windows Task Bar to display the Device Manager Menu. Select the Check for Updates option. If a new version of Workspace is available, download it now. You should periodically check for updates.
The Interwrite Workspace software must be installed on Windows by a user with Administrator privileges. Interwrite Workspace is compatible with Windows 2000, XP, and Vista.
If you are using Windows 98/Me/NT, you must use Interwrite Workspace version 5.0. For more information, contact Techni-cal Support to order an installation CD.
Installing the Interwrite Workspace
Software on the Mac
The Interwrite Workspace software must be installed on the Mac by a user with Admin privileges. Interwrite Workspace is compatible with Mac OS X version 10.4 or higher.
1 Insert the Interwrite Learning CD into the CD-ROM drive on your Mac. An Interwrite Workspace CD icon will appear on your desktop.
2 Double-click on the Interwrite icon on the desktop to display the CD’s contents. Double-click on the Install Interwrite icon.
3 Follow the onscreen instructions for the software installation.
The appearance of the Interwrite Workspace icon on the Menubar indicates that the Device Manager is now running on your Mac. It will load and run in the background every time you start up your Mac. Click on the Interwrite Workspace icon to display the options on the Device Manager Menu, shown here. Device Manager, in addition to managing the Interwrite hardware devices, provides direct access to the two operational modes of Interwrite Workspace on the Mac.
Click the Interwrite Workspace icon on the Menubar to display the Device Manager Menu. Select the Check for Updates option. If a new version of Interwrite Workspace is available, download it now. You should periodically check for updates.
Connect Your Interwrite Board:
Cable Installation
The Interwrite Board is connected to the computer either via a cable, or wirelessly. If you are not using the Bluetooth wireless communication system described next, you can connect your Interwrite Board to the computer using either the supplied USB cable, or the serial cable. Do not use both cables. Choose one or the other to connect the PC and the Interwrite Board. The Mac can be connected to the Interwrite Board only with the USB cable. The connectors and switches on the Interwrite Board Controller are shown in the graphic below. Please note that the Controller on your Interwrite Board has two power connectors, one on the top of the Controller and one on the side. Plug the Power Supply into the Power Connector on the side of the Controller. The Power Supply is not necessary if you are using a USB connection. However, if you are using a serial connection, attaching a BTCOM2 Module for wireless communication, or attaching the optional Pen Charging Station, you must connect the Power Supply. The Pen Charging Station, if you have one, is plugged into the Power Connector on the top of the Controller.
Controller Power Switch Power Connector
Serial Connector
USB Connector Pen Prox LED Power LED
2nd Power Connector
RJ12 BTCOM2 Port
Use either a Serial or a USB connection, never both.
There is only one Connector for USB. It is on the side of the Controller, as shown in the photo. The Connector located on the top of the Controller with the Power Connector is the RJ12 Connector for the BTCOM2 Module.
1 Shut down and turn off the computer.
2 Plug the square USB B connector end into the USB Connector on the Interwrite Board. Or, if you are using a PC and installing the serial cable, attach one end of the serial cable to the Serial Connector on the board’s Controller.
3 Plug the flat USB A connector into an available USB port on your computer or USB hub, or the serial cable into the serial port on the PC.
4 If necessary, attach the appropriate power plug adapter to the Power Supply plug, following these simple instructions:
a Remove and discard the Shipping Collar Insert.
b Note that each plug adapter has a lip
that fits into the recess at the top of the plug housing. Locate the lip on the plug adapter you selected and tilt it into the recess.
c Snap the lower edge of the plug adapter into the adapter well. If necessary, slide the thumb grip away from the well as you push the plug down into the well.
5 Plug the cylindrical metal end of the power cord into the Power Connector on the side of the Controller and plug the plug into a power socket.*
6 Use the supplied cable guides to manage dangling cables. Remove the protective covering to expose the adhesive surface and stick them where you want to guide the cable and power cord.
7 Toggle the Power Switch to turn on the Interwrite Board. It will beep four times and the Power LED will light up to indicate the board has power.
8 Turn on the computer. It will automatically find the cable-connected Interwrite Board.
9 The Pen Prox LED will light up and stay lit as long as the electronic Interwrite Pen is in prox of or touching the Interwrite Board surface. * The Power Supply is not necessary if you are using a USB connection. However, if you are using a serial connection, attaching a BTCOM2 Module for wireless communication, or attaching the Pen Charging Station, you must connect the Power Supply.
6 Lip
3 Recess
4 Adapter Well
1 Plug Housing
2 Shipping Collar Insert
5 Thumb Grip
Connect Your Interwrite Board:
Bluetooth
TMWireless Installation
If the computer has the Bluetooth Module built in, an external module is not needed. Most computers with a built-in Bluetooth Module will also have the Bluetooth driver software installed. Version 6.xx of the Interwrite software and version 7.0 of the new Interwrite Workspace software support the three most common Bluetooth stacks (driver software)—Toshiba, WIDCOM and Microsoft.
This section of the Interwrite Board Getting Started guide describes how to install the BTCOM2 Module on the Interwrite Board, install the Bluetooth software on the PC (it’s already installed on the Mac), and connect the Bluetooth USB Adapter to the computer.
The Interwrite Board and Interwrite Pads in an Interwrite wireless system communicate with the computer through a single Bluetooth Module con-nected to the computer. Up to seven Bluetooth-enabled Interwrite Devices— Boards and Pads—can communicate with the Bluetooth Module connected to the computer. Only one Bluetooth Module, either built-in or external, can be connected to the computer at a time.
The Interwrite Workspace system employs BluetoothTM wireless technology to estab-lish wireless communication between the Interwrite Boards and Interwrite Pads and the computer. A Bluetooth Module must be installed on each component involved in wireless communication. The Bluetooth BTCOM2 Module is installed on the Interwrite Board. Interwrite Pads have the Bluetooth Module built in, so no installa-tion is necessary.) The Bluetooth USB Adapter shown here is installed on the computer, if necessary.
Install the BTCOM2 Module on the Interwrite Board
The BTCOM2 Module allows Interwrite Boards to operate wirelessly, eliminating the need for a serial or USB cable connection between your Interwrite Board and your computer. If either cable connection is in place, disconnect it before installing your BTCOM2 Module.The BTCOM2 Module is installed on the Interwrite Board. It communicates with the external or built-inBluetooth module on the computer.
3 You will attach the BTCOM2 Module to the back of the Interwrite Board. Remove the paper covering the adhesive strip on the BTCOM2 Base. Position the Base on the back of the Interwrite Board at the top corner, on the controller housing side. Press firmly to affix the adhesive strip to the back of the Interwrite Board.
4 The BTCOM2 Module should be positioned with the Bluetooth logo facing forward. Route the RJ12 cable through the cable guide on the Base.
5 Plug the RJ12 Connector into the RJ12 Port (it looks like a phone jack) on the top side of the controller housing.
6 Attach the Power Supply, if you have not already done so. Power on your Interwrite Board. The Power LED will light up and you will hear four beeps that indicate the power is on, followed by one beep when the Interwrite Board has recognized the BTCOM2 Module.
1 Toggle the Power Switch to power off the Interwrite Board.
2 Remove the serial or USB connector from the Interwrite Board, if it is still connected.
BTCOM2 Module Base Paper Strip RJ12 BTCOM2 Connector RJ12 Port Controller Power Switch Power Connector Serial Connector USB Connector Pen Prox LED Power LED
2nd Power Connector
RJ12 BTCOM2 Port
The RJ12 Port and Power Connectors are on the top of the Controller. Do NOT attempt to plug a USB Connector into the RJ12 Port.
BTCOM2 Base Interwrite Board Frame
Connect Your Interwrite Board:
Install the Bluetooth Module
on the Computer
This section of the Interwrite Pad Getting Started guide describes how to
connect the Bluetooth USB Adapter to the computer
establish communication between the Bluetooth modules using the Interwrite Workspace software.
About Bluetooth and Workspace
The Interwrite Workspace system employs BluetoothTM wireless technology to establish wireless communication between the Interwrite Boards and Interwrite Pads and the computer. A Bluetooth Module must be installed on each component involved in wireless communication. The Bluetooth BTCOM2 Module is installed on the Interwrite Board. The Bluetooth USB Adapter shown here is installed on the computer, if necessary. The Inter-write Pads have the Bluetooth Module built in, so no installation is neces-sary.
If the computer has the Bluetooth Module built in, an external module is not needed. Most computers with a built-in Bluetooth Module will also have the Bluetooth driver software installed. Version 6.xx of the Interwrite software and version 7.0 of the new Interwrite Workspace software support the three most common Bluetooth stacks (driver software)—Toshiba, WIDCOM and Microsoft.
The Interwrite Board and Interwrite Pads in an Interwrite wireless system communicate with the computer through a single Bluetooth Module con-nected to the computer. Up to seven Bluetooth-enabled Interwrite Devices— Boards and Pads—can communicate with the Bluetooth Module connected to the computer. Only one Bluetooth Module, either built-in or external, can be connected to the computer at a time.
Windows XP with Service Pack 2, Windows Vista and Mac OS X version 10.4 or above have built-in Bluetooth support. If you are using Windows 98/2000Me/NT, contact Technical Support to order an installation Kit
.
Bluetooth Requirements
Moving the Bluetooth Adapter to Another Machine or
USB Port
The Adapter-to-USB-port and Bluetooth software installation (Windows only) must be performed by a user with Administrator privileges. If the configura-tion is changed, that is, if the Adapter is moved to another USB port on the computer, or if a different USB Adapter is installed in the USB port on that computer, the process must be managed by the Admin.
Do not install the USB Adapter behind metal enclosures, as this will limit performance. Metal serves as a shield and reduces the signal strength. Mount the Adapter so the top of the unit is positioned above the computer or monitor case. Use a USB cable extender when additional length is needed to mount the USB Adapter away from metal or other enclosures.
Keeping Track of the Bluetooth Adapter
The Velcro button in your Bluetooth Comm Kit is used to attach the USB Adapter to the side of your monitor, or to the lid of your laptop. Pull the button apart, remove the paper backing from both pieces, and stick one piece to the back of the USB Adapter and the other to the monitor or laptop lid. Use a USB extension cable to connect to the USB port.
Plug the USB Adapter into one end of the USB cable and insert the other end into one of the USB ports on your computer.
It cannot be plugged into a keyboard USB port on the Mac. The operating system will auto-detect and configure the new hardware device.
Connect the Interwrite Devices
Connecting a Wireless Device on Windows
The last step in setting up wireless communications between your Bluetooth modules on the Interwrite Board and your PC is performed by Device Manager. Make sure the Interwrite Board is powered on.
1 Click on the Interwrite Workspace icon in the System Tray on the Windows Task Bar to display the
Device Manager menu.
2 Select the Devices... menu option.
The Interwrite Workspace software component Device Manager is the driver for the Interwrite Devices—Interwrite Boards, Interwrite Pads and the Interwrite Panel. Device Manager is loaded when Interwrite Workspace is successfully installed on the computer. It automatically detects a cabled Interwrite Board or Interwrite Panel. However, the wireless Interwrite Devices need to be discovered – and, in the case of the Mac, to select a Service – before the communication connection is complete.
The following sections describe how to connect wireless Interwrite Devices, first on Windows, then on the Mac.
Once the Interwrite Devices are connected, a user with Administrator privi-leges will calibrate the Interwrite Board.
The icon is red when the Bluetooth module is not connected to the PC.
3 Click on the Find Bluetooth Devices button.
A search inquiry for all Bluetooth Devices will begin automatically. When the inquiry is completed, all Devices discovered during the search will be listed in the Find Bluetooth Devices dialog.
The Devices dialog box with the Bluetooth icon is displayed.
4 Click on the Remember checkbox next to each discovered Device you want to see listed in the
Devices List Window.
5 Click OK to return to the Devices
dialog.
Each discovered device is identified in the Devices dialog by its Name, Type, Connection, Status, Availability, and whether AutoConnect is enabled. The
Properties feature allows you to give a connected Interwrite Device the Name shown in the Devices List Window (the Inter-write Pad is given an additional Bluetooth Name) and to program its SoftKeys.
AutoConnect is a property unique to Bluetooth-enabled Interwrite Devices. When AutoConnect is enabled, the computer will scan continu-ously for this and other active, AutoConnect-enabled Bluetooth Interwrite Devices and attempt to connect them. Scanning stops once a Device is detected and connected. Therefore, if you are connecting multiple Devices, make sure they are all powered on, so all of the Devices will be detected by the scan. The Status property will tell you whether the
connection succeeded or failed. The Availability option indicates that a discovered Device is available for connec-tion. The Connect button can be used to manually con-nect discovered devices.
6 If you want the Interwrite Board to AutoConnect when it is powered on, click on the AutoConnect checkbox.
7 Select your Interwrite Board in the Devices List Window and click on the
Properties button. Give the Interwrite Board a Name. This Name is stored in the Interwrite Workspace software on this computer and will identify the Interwrite Board when it is connected to this computer.
Once connected, your Interwrite Board is available as a system pointing device. Your computer mouse can still be used as a pointing device.
The Interwrite Device Address shown here is the Radio ID and can be found on the back of the Interwrite Device.
2 Select the Devices... menu option. The Devices dialog box is displayed.
Connecting a Wireless Device on the Mac
The last step in setting up wireless communications between your Blue-tooth Interwrite Devices is performed by Device Manager. Make sure your Interwrite Board is powered on.
3 Click on the Scan Bluetooth
button.
The Select Bluetooth Service dialog box is displayed.
4 Make sure the Device Type is set to Input Devices and the Device Category is set to Discovered Devices.
5 Click on the Search button.
1 Click on the Interwrite Workspace icon on the Mac Menubar to display the Device ManagerMenu.
Every active Interwrite Board and Interwrite Pad running Bluetooth should be discovered and listed in the left column of the Select Bluetooth Service dialog box.
The Bluetooth dialog box goes away. The Interwrite Board beeps once when it is connected.
The Interwrite Board is now listed in the Bluetooth Devices section of the Devices dialog with Status Connected. By default, the Interwrite Board will automatically reconnect in the future. If you want to change that, select the Interwrite Board, click on the Device Properties button and clear the Automatically connect when device is available checkbox.
If you turn off your Interwrite Board and power it on during the current session, Device Manager will detect that the device has gone away and will change its status to Disconnected. Click on the Connect Device button to reconnect.
If the Device doesn’t connect, repeat the process—click on the Device, click on the Service, click on the Select button.
Tip: Give each Interwrite Device a Local Name so it will be distinguishable in the Bluetooth Devices list box.
6 Click on the Device in the left column. A Service is displayed in the right column. Interwrite Bluetooth Devices—Interwrite Boards and Interwrite Pads—will use either the ZV-AT Service or
InterWrite Service.
7 Click on the Service displayed in the right column. When you do, the Select button is activated.
Connect the Video Projector
The Interwrite Board is connected to the computer, either wirelessly or wired, so it can communicate with the computer as an input device. The communication between the two is governed by the Interwrite Work-space software. Interwrite WorkWork-space makes it possible to run this system in one of the Interwrite operational modes.
Whiteboard Mode is used when you want to capture notes, drawings and calculations made on the Interwrite Board using the electronic Interwrite Marker Pens. The only equipment you need to run Whiteboard Mode is an Interwrite Board, one or more Marker Pens, and the com-puter. The video projector is not used in Whiteboard Mode.
Interactive Mode and Office Mode (Windows only) require an Interwrite Board, one of the electronic Interwrite Pens (Interactive Pen, Recharge-able Interactive Pen, or Marker Pen), the computer, and a video presenta-tion projector. The projector is connected to the computer so it can project the image of the computer desktop onto the Interwrite Board surface. The electronic Interwrite Pen can then be used to run applica-tions (Mouse Mode) and to make annotations (Annotation Mode) on the projected desktop image on the Interwrite Board.
1 Turn off the computer and Interwrite Board.
2 Connect a video cable between the computer and the video projector.
3 Power on the Interwrite Board—it will beep four times to indicate it has power and then beep once to indicate it has recognized the BTCOM2 Module, if one is connected for wireless communication.
4 Turn on the computer. The Interwrite Board will beep once when the connection between the Interwrite Board and the computer has been established, assuming that the AutoConnect setting is checked.
5 Turn on the video projector.
Interwrite Board
Video Cable
Computer Video Projector
Calibrate Your Interwrite Board
Your Interwrite Board must becalibrated if you are going to be using the Interwrite system in Interactive Mode. After the hardware—computer, Interwrite Board, electronic Interwrite Pen, and video projector—has been set up and communication between the Interwrite Board and the computer has been established, calibration is the final step in the Getting Started process before you can actually use the Interwrite system. Calibration ensures that the electronic ink is properly aligned on the projected image with the Pen tip on the Interwrite
Board’s surface.
An Interwrite Board Features Menu, like the one shown here, appears on each side of the Interwrite Board. It offers a variety of Interwrite options, including the Calibration tool discussed here, that can be easily accessed no matter which side of the Interwrite Board you are positioned at.
Start Interwrite in Whiteboard Mode
Program SoftKeys to: a) perform an Interwrite function,
b) launch an application, c) run a macro, or
d) open an Internet Web site Display Keyboard Start Interwrite in Interactive Mode
Clear all annotations from current page (Click twice to clear)
Calibrate Interwrite Board Silence (Lock) all Connected Pads Activate (Unlock) all Connected Pads Save all pages (with annotations)
Select Mouse Mode Select Pen Tool Select Highlighter Tool Select Eraser Tool Create Blank Page Move to Previous Page Move to Next Page
Calibrating the Interwrite Board
1 Aim the projector at the Interwrite Board’s writing area, and size the projected desktop image to fit within the writing area. Make sure the image is properly projected on the Interwrite Board before continuing.
2 Using your electronic Interwrite Pen, click on the Calibrate icon located on either of the Interwrite Board Menus.
When calibration is complete, you are ready to begin using Interwrite Workspace to annotate captured screens and presentation pages on your Interwrite Board. The next section of this Getting Started guide gives you an overview of the Interwrite Workspace software.
A blue calibration screen with a white Calibration Point in the upper left corner will display on the projected image on the Interwrite Board.
3 Using an electronic Interwrite Pen, click on each of the Calibration Points as they appear on the Interwrite Board. A bell tone will accompany each successful click. Click the left mouse button on the Pen (Windows only) to repeat a point. Click the right mouse button (Windows only), or type the Esc key on the computer (both Windows and Mac), to abort the calibration.
Calibration Screen Calibration Point
If an error occurs during calibration, simply abort the operation and start over.
Recalibrate the Interwrite Board whenever the projector or the Interwrite Board has been moved.
The video projector should be utilized to project an image of the computer desktop on the Interwrite Board only when Interwrite Workspace is operating in Interactive Mode. The video projector should not be used when Interwrite Workspace is operating in Whiteboard Mode.
Getting Started with Interwrite Workspace
The purpose of this document is to give you a feel for the Interwrite system by showing you how to select and use a tool in Interactive Mode. The Annotation Tools of Interactive Mode consist of freehand tools, text tools and drawing tools. Of the freehand tools, the Pen tool is the most frequently used Interwrite Workspace Tool. The following pages describe how to select and configure the Pen tool.The Interwrite system is at the heart of a successful interactive collaboration, whether it is in a classroom of fourth graders studying world geography, or in a boardroom of corporate executives brainstorming a new product launch. All the tools you will need to stimulate inspiration, connection and participation can be found in the Interwrite Workspace software. Here’s a quick look at the Workspace basics to get you started.
Workspace Modes
Interwrite Workspace is run in one of three operational modes, Interactive Mode, Office Mode (Windows only), or Whiteboard Mode.
Workspace Tools have been categorized as Annotation Tools, Editing Tools, Page Tools, Presentation Tools, Multimedia Tools, Navigation Tools, File Management Tools, and Setup Tools. The Interwrite Workspace Help file describes all these tools in detail and can be accessed from the Device Manager Menu.
Whiteboard
Whiteboard Mode, available only when using an Interwrite Board with Workspace , allows you to capture and preserve notes, drawings, calcula-tions—whatever you write on the Interwrite Board with an Interwrite Marker Pen.
Office
Office Mode makes it possible to interact directly with the native files of the Microsoft Office suite of products, PowerPoint, Word and Excel.
Interactive
Interactive Mode allows you to open and run applications while in Mouse Mode, using the tip of your electronic Interwrite Pen on the Interwrite Panel screen to move the cursor. In Annotation Mode, you use the Interwrite Pen to select Interwrite Workspace Tools from the Toolbar.
Begin an Interwrite Workspace Session
1 When you are ready to begin an Interwrite Workspace session, turn on your Interwrite Board. The Interwrite Board must be active and connected. You can verify this in Session Manager, or Devices, both Device Manager Menu options.
2 You can start Workspace in Interactive Mode in one of the following ways: • Use your Interactive Pen to click on the Interactive Mode icon on
either of the Interwrite Board’s Features Menus.
• Use your Interwrite Pen on the Interwrite Board’s surface to guide the mouse cursor on the projected image to the Interwrite Workspace icon on the Windows Task Bar or the Mac’s Menubar. Click the icon to display the Device Manager Menu.
• Select Interactive Mode from the menu.
• Use your Interwrite Pen to double-click on the Interwrite Workspace icon on the desktop.
The Interwrite Workspace Toolbar
Workspace Menu Mouse Mode tool
Pen tool
Shape tool Highlighter tool
Eraser tool Selection tool
Create Blank Page
Screen Capture tool Gallery tool
Save Page Sorter tool
Toolbox PRS tool
Exit Line tool Minimize Toolbar
Text tool Undo Previous Action Clear
Create Grid Page
Previous Page Next Page
When you start up Interwrite Workspace in Interactive Mode, the Toolbar displays, along the right side of the projected desktop image, At that time, Workspace is in Mouse Mode.
Use your Interwrite Pen to select the Pen tool from the Toolbar. Select a capture option from the Capture dialog, click on the window, or click and drag to capture a portion of the screen.
Your capture is displayed in the Annotation Window. Or, you can start up Annotation Mode by select-ing one of the Page Creation Tools.
The page type you select is displayed in the Annotation Window and the Pen tool is automatically selected.
Once the Annotation Window is open, you can begin writing or drawing on the page.
Using the Pen Tool
The attributes of the Pen tool can be changed by selecting different options from the Properties Bar at the bottom of the Annotation Window.
Select the Pen tool’s Down Arrow to display its Tool Settings Menu.
Properties Bar
The Pen tool Properties Bar provides options to change line color, width, transparency, and line ends and line styles. Each attribute change is displayed in the Preview Box.
Change the Pen tool’s line color and width to determine how it will affect the look of your annotations. The best way to familiarize yourself with all the different Interwrite Workspace tools and how they can be used to enhance your presentations is to experiment with them.
Page Functions
Workspace also provides the ability to move within pages within the window. Select the functions at the bottom of the screen to pan a page, move between pages, use the PRS tool (optional), or discard annota-tions.
Line transparency
Properties Bar
Line color
Change line color
Line width Line endsDash styles Preview box
Pan page
Next
Current location Previous
Insert question (PRS)
Presentation Files
The presentation file is made up of your annotated pages. The Page Creation and Capture tools are used to create the pages in the presenta-tion file and the Annotapresenta-tion Tools are used to create the annotapresenta-tions. The presentation file is automatically saved as a .GWB file.
As soon as Interwrite Workspace goes into Annotation Mode, an untitled presentation file is created. Unless you give the file a name, it is automatically saved using today’s date as the filename. (Multiple files created today have 01, 02, 03, etc., appended to the date name.) An existing presentation file can be opened, its pages can be sorted, annotations can be added to the existing pages, and new pages can be added to the file. Your presentation will determine how each presenta-tion file evolves. For example, you can prepare a presentapresenta-tion file of blank maps ahead of time for a geography lesson. Or, you can capture and annotate each of the monthly earnings spreadsheets as you review the past fiscal year during a budget meeting. Or, you can run a Power-Point Slide Show in Office Mode (Windows only) and annotations can be added to each slide and saved in the native file.
Building the Presentation File
You can build your presentation file during your presentation, or you can pre-build it, including the screen captures, images, graphs and text pages you want to present. However you choose to do it, the process is the same. To capture a screen or window, click on the Mouse Mode tool with your Interactive Pen and arrange the desktop for capture. Select an Annotation Tool, the Pen, for example, indicate your capture preference (by clicking on either the Partial, Window, or Screen option in the dialog), and annotate the captured image. Use the Page Creation Tools to add a blank, gridded, or background image page. By default, Interwrite Workspace is in Autosave mode, so your annotated pages are automatically saved as you build your presentation file. Click on the Save tool to save the file using the default filename (today’s date), or a name you type on the pop-up Onscreen Keyboard.
Distributing Presentation Files
The Interwrite Workspace presentation files you create can be printed for local distribution, or emailed to anyone, anywhere.
Use the Page Sorter tool to review the presentation file. The pages in the presentation file can be sorted, moved, duplicated, merged, and deleted using the Page Sorter tool. When the file pages have been arranged to your satisfaction, you can use Page Sorter’s export option to export it to one of a number of file formats, or you can close Page Sorter and select an option from the Workspace File Menu.
The native file format of saved presentation files has the .GWB extension. GWB files can be read on any computer on which Interwrite Workspace is installed. For general distribution, we recommend exporting the presentation file to the PDF format using the Export PDF File tool located in the Toolbox, or by selecting the the Export PDF File option from the Workspace File Menu.
Now everyone can stay in the information loop, whether they were able to attend the presentation or not.
Additional Interwrite Learning Resources
We invite you to visit the Interwrite Learning Web site atwww.InterwriteLearning.com
where we have provided a variety of resources to help make your Interwrite Workspace experience more rewarding. We especially encourage you to visit
www.InterwriteLearning.com/support_interwrite.htm and
www.InterwriteLearning.com/erc/index.htm.
What is PRS?
Interwrite PRS is an Audience Response System—a comprehensive response system for electronically testing, polling, and surveying a group of people. It can be used in conjunction with Interwrite Workspace to take a survey of the audience response to the presentation, or to test the level of compre-hension after a lesson presentation, for example. Learn more about PRS by visiting our Web site.
Whiteboard Mode
Whiteboard Mode allows you to capture notes, drawings, calculations— whatever you write on your Interwrite Board with an Interwrite Marker Pen—for distribution. Whiteboard Mode requires only a computer, your Interwrite Board, and one or more Interwrite Marker Pens. When you select Whiteboard
Mode, a blank white screen, representing the Interwrite Board, appears on your computer monitor. As you write on the Interwrite Board with one of the uncapped Interwrite Marker Pens, whatever you write appears on the computer screen in the color of the
Marker Pen. Whenever you change Pens, the new pen color is dis-played on the computer screen.
The process for capturing what you have written on the Interwrite Board is quite simple. Using a capped Marker Pen, click on the Whiteboard Mode icon on one of the Interwrite Board Features Menus to initiate Whiteboard Mode. Uncap each Marker Pen as you use it on the Inter-write Board surface, being sure to recap it snugly to keep it from drying out when you switch to another Marker Pen. When you have finished one screen’s-worth, click the capped pen on the Save icon. Then, click twice on the Clear icon. The electronic image of the Interwrite Board on your computer will be blank. Erase the dry-erase ink from the Interwrite Board surface, and you are ready to continue on a new page in the presentation file. Unless you give the file a name, it is saved using today’s date as the name.
You can use the Page Sorter tool, described on the previous page, to prepare the presentation files created in Whiteboard Mode for distribution.
The Interwrite
TMPad
Interwrite Pads add another dimension to your Interwrite interactive experience. They can be used from anywhere in the room, allowing students to participate in the presentation and instructors to control the presentation. All the interactive functions you can perform at the Interwrite Board can be done using an Interwrite Pad.
Interwrite Accessories
BTCOM2 Communications Kit
The BTCOM2 Communications Kit outfits your Interwrite system for Bluetooth® wireless communication. The BTCOM2 Module is con-nected to your Interwrite Board and the Bluetooth USB Adapter is installed on your computer. The Bluetooth module is built into the Interwrite Pads. Wireless communication between your Interwrite Devices and your computer gives you more flexibility in setting up your classroom when the Interwrite Board and computer do not have to be cabled together.Positioning the Pens in the Pen Charging
Station
1 Each Pen snaps into one of the charging slots.
2 Position the Pen so that the Pen Tether Loop is pointing out, away from the charging slot.
3 The LED Light below each slot turns on when the Pen is positioned in the slot. The light stays on while the Pen is charging and turns off when the Pen is fully charged. Periodically, the Pen
will slowly draw current to maintain a full charge. This is known as trickle charging and, when the Pen is trickle charging, the light remains off. The rechargeable Interactive Pen will not over-charge.
Installing the Pen Charging Station
1 Unscrew the Thumb Screws andposition the Pen Charging Station on the Interwrite Board frame.
2 Tighten the Thumb Screws to lock the Pen Charging Station into place.
3 Plug the Power Plug into the Power Connector on the top of the board’s Controller.
When the Pen Charging Station is plugged into the Interwrite Board, it will have power as long as the Interwrite Board is powered by the power supply. The optional Pen Charging Station is designed to attach to the frame of the Interwrite Board just above the controller housing, so it can plug into the Power Connector on the top of the controller. It can also be hung on the wall, using the Wall Mount Hangers shown below.
The Rechargeable Interactive Pen
and Pen Charging Station
When the Pen Charging Station is plugged into either the wall socket or the Interwrite Board (which must be powered on), snap each of your recharge-able Interactive Pens into a slot to charge them. It’s a good idea to keep the Pens in the Charger when they are not being used. It’s the ideal place to store them, and you don’t have to worry about overcharging them. They will not charge beyond their capacity.
Thumb Screws
Power Plug Wall Mount Hangers
Charger LED Lights
Your Pen Charging Station can be ordered with a Power Cord if you don’t want to connect it to the Interwrite Board and have it powered by the board’s power supply.
Using the Rechargeable Interactive Pen
The rechargeable Interactive Pen is used to write and draw in Interactive Mode and functions as a mouse. It requires no assembly. You can attach a tether to the Pen, if desired. We recommend placing the rechargeable Interac-tive Pen in one of the Pen Slots on the Pen Charging Station when it is not being used. The photo below identifies the parts of the rechargeable Interac-tive Pen and describes their function.
The Pen Tip is used to apply virtual ink to the page in the Annotation Window. To use the Pen Tip as an eraser on-the-fly, without selecting the Eraser tool, hold down the left mouse button and touch the pen to the Interwrite Board’s surface. On the Mac, with the Pen Tip on the board’s surface, press the left button and hold it while erasing.
Tether Loop Pen Tip – Up or Down
Same as Left Mouse Button on Windows and Mac
Rocker Button
Left – Double-Click Mouse Button with Pen Up Windows and Mac
Right – Right Mouse Button (Windows) Ctrl-Click (Mac)
The rechargeable Interactive Pen goes into Sleep Mode after about two minutes of inactivity to conserve power. Stash the Pen in a slot in the Pen Charging Station when it is not being used.
1 Locate the pen components shown here. Separate the Marker Holder
from the Electronics Module by depressing the Clip on the underside of the Electronics Module and pulling the two apart.
2 Remove the Battery Cover on the Electronics Module by pushing forward on the thumb grip. Insert the supplied AAA battery into the battery compartment, positioning it properly to ensure the correct polarity. Replace the Battery Cover.
3 Remove the Marker’s colored cap and discard it. Replace it with one of the supplied Pen Caps.
4 Insert the Marker with the Pen Cap in place into the Marker Holder.
Assembling the Interwrite Marker Pen
The electronic Interwrite Marker Pen can be used in both Interactive Mode and Whiteboard Mode. It is used uncapped in Whiteboard Mode to apply dry-erase ink on the Interwrite Board. Whatever you write or draw with the uncapped Marker Pen is mirrored on the computer screen. The capped Marker Pen is used in Interactive Mode to apply virtual ink, in the same way the Interactive Pen does. The small felt eraser on the end of the Marker Pen will erase both the real dry-erase ink and virtual ink. Replace-ment erasers and Pen Caps are included in the Accessory Kit.
Electronics Module
Marker
Pen Cap
Marker Holder
Eraser Battery Cover Clip
Step 4
Step 5
Pen Tip – Up or Down
Same as Left Mouse Button on Windows and the Mac Left – Double-Click Mouse
Button with Pen Up
Windows and Mac Right – Right Mouse Button (Windows) Ctrl-Click (Mac)
Assembled Interwrite Marker Pen
5 Snap the Electronics Module into the Marker Holder. The LED will flash four times, indicating the pen is active.
The two buttons on the Interwrite Marker Pen function in Windows as left double-click and right-click mouse buttons, and on the Mac as left double-click and Ctrl-click mouse buttons. The capped Pen Tip acts as a left-click mouse button when Interwrite Workspace is in Mouse Mode.
In both Windows and on the Mac, the left mouse button on the Marker Pen has the same chorded function, described on the previous page, as the
Interactive Pens have when Interwrite Workspace is in Annotation Mode. It will erase the virtual ink on the projected image on-the-fly without having to select the Eraser tool.
Battery Cover LED
The Interwrite Interactive Pen
The Interwrite Interactive Pen is used exclusively in Interactive Mode. Its buttons and Pen Tip work the same as those on the rechargeable Interactive Pen and the Marker Pen. Following are the instructions for installing or replac-ing the battery.
1 Push in the clip on the battery cover to remove it.
2 Insert the supplied AAA battery into the battery compartment, positioning it properly for the correct polarity. As soon as the battery makes a connection, the LED will flash four times, indicating the pen is active.
3 Replace the Battery Cover.
The Interwrite Marker Pen goes into Sleep Mode after 10 seconds of inactivity. The LED will flash continuously when the battery needs to be replaced.
Keep the Marker capped as much as possible to prevent it from drying out. The Pen Cap enables the Marker Pen to be used in Interactive Mode to annotate a projected image on the Interwrite Board without actually applying real ink to the board.
The Interactive Pen goes into Sleep Mode after about 10 seconds of inactivity to conserve power. The LED will flash continuously when the battery needs to be replaced.
Installing the Mounting Clips
on the Whiteboard and Wall
The two Mounting Clips, found in the Accessory Kit that shipped with your Interwrite Board, can be used in conjunc-tion with a wall mount installaconjunc-tion of the board. They fasten the bottom of the Interwrite Board to the wall to prevent it from being jostled loose from the Wall Mounting Bracket. Install the Mounting Clips after the Interwrite Board is hung
from the Wall Mounting Bracket. The hardware for attaching the Mounting Clips to the wall is not included, as the type of wall on which they will be mounted varies from installation to installation.
If you are using a ceiling mount projector, be sure the Interwrite Board is aligned to the projector image before you install the Mounting Clips to avoid having to reposition the board.
Front of the Interwrite Board
Mounting Clip Back of the Interwrite Board
Mounting
Clip Interwrite Board Frame
1 Hook the Mounting Clip over the lip of the Interwrite Board frame on the back of the board. Position a Mounting Clip in each corner at the bottom of the board. 2 Mark the location of the holes in each
Mounting Clip on the wall.
3 Install suitable anchors into the wall. 4 Install screws to secure the Mounting Clips
to the wall. Use two screws per Clip. The recommended screw size is number 8 or M4.
1 Locate the predrilled screw holes for the Pen Tray in the frame of the Interwrite Board.
2 Attach the Pen Tray to the Interwrite Board using the small Phillips screws provided, one for each hole in the Pen Tray.
3 Slide the rubber bumpers, if they came with your Pen Tray, onto each end, fitting the contours of the bumper to those on the tray.
Attaching the Pen Tray to the Interwrite Board
If your Interwrite Board is going to be mounted on the wall, attach the op-tional Pen Tray before you mount the board. If the Interwrite Board is going to be mounted on a floor stand, the Pen Tray can be easily attached at any time. The Interwrite Board Pen Tray attaches to the frame. Use one of the provided Phillips screws for each attachment hole in the Pen Tray.
To avoid damage to the Interwrite Board controller located on the back of the board near the corner, do not rest the Interwrite Board on the controller housing. When handling and maneuvering your Interwrite Board, be careful not to scratch or damage the Interwrite Board’s writing surface.
Never nail or drill the Interwrite Board. Doing so will damage the unit and void your warranty.
Pen Tray
Interwrite Board
Phillips screws
Tools Required:
Phillips screwdriver
The Floor Stand Accessory Shelf
The Floor Stand Accessory Shelf provides conve-nient storage space for the equipment that moves with the Interwrite Board. The Accessory Shelf comes in black or gray.The Interwrite Board Floor Stand
If your Interwrite Board is shared, the Floor Stand gives your Interwrite Board the mobility necessary to move it easily from room to room. The Floor Stands are
model-specific, so be sure to specify your Interwrite Board model number when ordering your Floor Stand.
Assembling the Floor Stand
End Cap
End Cap End Cap
Leg
Foot
Leg
Foot
Caster Foot
Caster
Caster
Lockwasher Crossbar
Holes
1/4-20x2” flat head screw (use 4 per Foot) Leg Assembly
Tools Required:
Phillips screwdriver Wrench
5 Attach both Crossbars to one Leg assembly using 8 of the supplied flat head screws – 4 screws for each Crossbar. The screws will slide through the 4 outermost holes in each group of holes on the Leg assembly. Attach the other Leg assembly to the Crossbars in the same way.
Assembling the Legs
1 Using four of the supplied flat head screws, attach a Foot to the bottom end—the end without the Crossbar Holes—of one of the Legs.
2 Place a Lockwasher over the Caster screw and screw the Caster into the hole on the underside of the Foot – one at each end. Tighten with the wrench.
3 If they are not already in place, insert three End Caps (two on each end of the Foot and one at the top of the Leg).
4 Repeat Steps 1 through 3 for the other Foot and Leg.
Attaching the Crossbars to the Leg Assemblies
Crossbar Crossbars
Leg Assembly
Leg Assembly
(The side with more than 8 holes faces away from the crossbar.)
1/4-20x2” flat head screw (use 4 per Crossbar end)
Examine the assembled Floor Stand Legs. One side of each Leg assembly has 8 holes (2 groups of 4), and the other side has more than 8 holes. In this step, the sides with just the 8 holes must face inward toward the Crossbars.
Note: This equipment has been tested and found to comply with the limits of a Class A digital device, pursuant to Part 15 of the FCC rules.
These limits are designed to provide reasonable protection against harmful interference in a residential installation. This equipment generates, uses and can radiate radio frequency energy and, if not installed and used in accordance with the instructions, may cause harmful interference to radio communications. How-ever, there is no guarantee the interference will not occur in a particular installa-tion.
If this equipment does cause harmful interference to radio or television reception, which can be determined by turning the equipment off and on, the user is encour-aged to try to correct the interference by one or more of the following measures. • Reorient or relocate the receiving antenna.
• Increase the separation between the equipment and the receiver.
• Connect the equipment into an outlet on a circuit different from that to which the receiver is connected.
• Consult the dealer or an experienced Radio/TV technician for help.
Canada
Industry Canada Class A emission compliance statement. This Class A digital apparatus complies with Canadian ICES-003.
Avis de conformité á la réglementation d’Industrie Canada. Cet appareil numérique de classe A est conforme á la norme NMB-003 du Canada. Each device complies with Part 15 of FCC rules and with RSS-210 of Industry Canada. Operation is subject to the following two conditions: (1) The device may not cause harmful interference, and (2) The device must accept any interference received, including interference that may cause undesired operation.
The radiated output power is far below the FCC Radio Frequency exposure limits. Nevertheless, each of the devices should be used in such a manner that the potential for human contact during normal operation is minimized.
Regulatory Statements
These devices comply with part 15 of the FCC Rules. Operation is subject to the following two conditions:
1 These devices may not cause harmful interference, and
2 These devices must accept any interference received, including interference that may cause undesired operation.
The “CE“ mark on this device indicates compliance under the EMC 89// 336/EEC Directive.
Declaration of conformity according to ISO/IEC Guide 22 and EN 45014 Manufacturer’s Name: GTCO Corp. (dba Interwrite Learning) Manufacturer’s Address: 7125 Riverwood Drive
Columbia, MD 21046 U.S.A. declares, that the product
Product Name: Interwrite Board
Model Numbers: 1060, 1077, 1040, 1071, 1085 Product Options: All
conforms to the following product specifications:
EMC: EN55022:1988+A1:2001+A2:2003-Class A EN55024:1998+A1;2001+A2:2003
EN 61000-3-2:2000
EN 61000-3-2:1995+A1:2001
EN 61000-4-2:1995+A1:1998+A2002 EN 61000-4-3:2002+A1:2002
EN 61000-4-4:1995+A1:2001+A2:2001 EN 61000-4-5:1994+A1:2001
EN 61000-4-11:1994+A1:2001 ETS 300 683 (1997)
ETS 300 220 (2000-09)
Safety: EN60950-1:2002
RoHS: “-R” labelled products conform to DIRECTIVE 2002/95/EC. These products are RoHS-compliant.
Declaration of Conformity
Supplementary Information
The product herewith complies with the requirements of the Low Voltage Directive 73/23/EEC and the EMC Directive 89/336/EEC.
Scottsdale, Arizona, U.S.A. 6-1-2006 Dana Doubrava