Implementation of Wireless Sensor Networkwith
ESP-12E and Linux Raspberry Pi in Heating,
Ventilation and Air Conditioning Application
Prashant T. Khot1, Prof. Nagnath B. Hulle2 1, 2
VLSI & Embedded System GHRIET, Wagholi, India
Abstract: Internet of Things is an arising technology in this decade. According to market analysis, 50 billion devices will get connected to internet by 2020. The Heating, Ventilation and Air-Conditioning is mainly distributed sensor network. In which, Air Handling Unit Handles Air as per Temperature Requirement Zone wise. In Traditional HVAC System, all AHU are connected to Building Management System (BMS) through MODBUS or RS232. Adopting new technology of IOT in this field is the focus of this Project. ARM based Raspberry Pi 3 and Low Cost, Low power Wi-Fi module ESP-12E are key Hardware of this project. Sensors DS18B20 and DHT11 are used for measuring Temperature and Humidity. The Raspbian OS based Raspberry Pi 3 B with Apache2 is a small and efficient web server used as Central Unit whereas ESP-12E are used as wireless node which communicate with central unit through Wi-Fi. All Sensors Data is processed and stored in My SQL database. The Web-UI gives monitoring and controlling ability of Full System to User from anywhere in world.
Keywords: Embedded System, Wireless Sensor Network(WSN),Heating,Ventilation And Air-Conditioning (HVAC), Hypertext Preprocessor (PHP), Hypertext Markup language (HTML)
I. INTRODUCTION
A Wireless Sensor Network is generally described as a no. of nodes network that together sense environmental parameters and may control the one of the parameter in an environment, also gave the ability of interaction between computers or user and the environment. The process of sensing parameter from sensor, processing on received signal, and communication with low power, startup a cross layer design approach which typically requiring consideration of a distributed data/signal processing, medium access control(MAC), and various communication protocols. The Internet of Things is an network or concept where devices in our home or wherever they are, have the capability to communicate with each other via the internet. The embedded systems used in nodes or at server end depending on the application complexity. The role of an embedded system is more important in WSN for communicating with various sensors based on their communication protocol. Embedded System also used for communicating with base station as well as adjacent nodes in network. Heating, ventilation and air conditioning is the indoor comfort technology where thermal comfort as well as indoor air quality is the main goal of system. The design of HVAC system is done by calculating various factor like area under system, air pressure, minimum and maximum temperature, etc.
A. The Basic HVAC Configuration consisting of following component as shown in Fig. 1.
1) Chiller – It is a Backbone of HVAC System. A machine, which absorbs heat from a liquid via a vapor-compression or absorption cycle.
2) Boiler- is designed to turn the water into stream and uses gravity and pressure to deliver the hea 3) Condenser Water Pump
4) Cooling Tower- used to removed/disposed the unwanted heat from a chiller. They mounted at the top of Building. 5) Air Handling Unit (AHU)- regulation and circulation of air in HV
6) Heat Exchangers- used to transfer heat between two or more fluids.
Raspberry Pi is Community in United Kingdom who invented a tiny, Low Cost and high-performance single-board Computers to learn basic programming [5]. Raspberry Pi 3B is current higher-end model whose Specifications mentioned belowand Moduleis shown in Fig. 2.
[5]
Fig.2 Raspberry Pi 3 Model B
7) System On Chip: Broadcom BCM2837 8) CPU: 4× ARM Cortex-A53, 1.2GHz 9) GPU: Broadcom Video Core IV 10) RAM: 1GB LPDDR2 (900 MHz)
11) Networking: 10/100 Ethernet, 2.4GHz 802.11n wireless/Wi-Fi 12) Bluetooth H/W: Bluetooth 4.1, Bluetooth Low Energy(BLE) 13) Storage Media: micro SD
14) GPIO: 40-pin header, populated
15) Ports: HDMI, 3.5mm analogue audio-video jack, 4× USB 2.0, Ethernet, Camera Serial Interface (CSI), Display Serial Interface (DSI)Espressif’s12E is high integrated wireless SOCs, designed for power and space constrained hobbyist designers. ESP-12E provides foremost ability to use Wi-Fi capabilities in other systems or to be as standalone application, along the lowpower and low cost, and minimum space requirement [6].ESP-12Eis shown in Fig. 3.
B. The Feature of ESP-12E are
1) 32-bit RISC CPU: Tensilica XtensaL106 running at 80 MHz* 2) 64 KiB of instruction RAM, 96 KiB of data RAM
3) External QSPI flash: 512 KiB to 4 MiB* (up to 16 MiB is supported) 4) IEEE 802.11 b/g/n Wi-Fi
5) WEP or WPA/WPA2 authentication, or open networks 6) 16 GPIO pins, SPI, I²C
7) I²S interfaces with DMA (sharing pins with GPIO)
9) 10-bit ADC
[image:4.612.186.426.103.321.2][6]
Fig.3ESP-12E
II. DESIGNOFSYSTEM
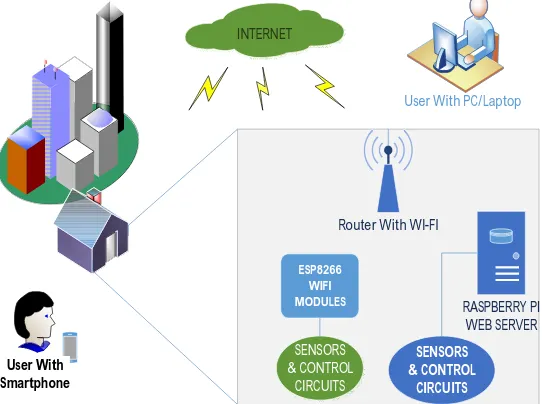
As per literature Survey, the current system uses tradition way of communication [1]. Though they are reliable from many years, Installation charges, cabling and maintenance work is not cost effective. Due to this, the Wireless node deployment in HVAC is useful as we can easily change node without changing cable from server to node and vice versa.
Router With WI-FI
RASPBERRY PI WEB SERVER INTERNET
ESP8266 WIFI MODULES
SENSORS & CONTROL
CIRCUITS
SENSORS & CONTROL
CIRCUITS User With PC/Laptop
User With Smartphone
Figure 4 Block Diagram of WSN
[image:4.612.174.445.399.601.2]III. IMPLEMENTATION
A. Raspberry Pi 3 B
For first time use of Raspberry Pi, we need to follow some step to get it boot. As Pi uses SD card for boot, we have to install OS in SD card. The Linux Based Raspbian Jessie OS can be downloaded from Raspberry Official site [5]. Using SD Formatter and Win32DiskImager software as shown in Fig.5 we prepared micro SD card for Pi.
Fig.5 SDFormatter and Win32DiskImager for Raspbian OS Installation
For OS installation, we need at least 8GB SD card. For high-end application, we can go for higher storage capacity. This SD card then inserted into Raspberry Pi SD card Slot. For first boot-up, we need to configure Pi for our application using HDMI Cable and Screen or Ethernet cable and laptop.To install Apache2 and php in Pi we needed to use below command.
1) sudo apt-get update 2) sudo apt-get upgrade
3) sudo apt-get install mysql-server php5-mysql
4) sudo apt-get install apache2 php5 libapache2-mod-php5 5) sudo apt-get install python-serial
6) sudo apt-get install python-mysqldb
Apache2 is the HTTP web server, which his used for creating Web UI. After installing Apache2, we can run localhost where we can see default index.html page as shown in Fig. 6. Apache2 is widely used in Linux system, windows, solaris, Mac OS,etc.
MySQL is lightweight Database used to store sensor data in real-time. We created database as Temp Log in which we create table for storing Sensor ID, Timestamp, and Sensor Value. We can have access to MySQL database on web through installation of phpmy admin.
We created phppage which will show temperature and humidity floor wise and controllable devices in each floor. The Apache2-MySQL-PHP-Python used to create complete WebUI of HVAC System.
B. ESP-12E
We are considered a total cost for implementation of Wireless network, so, here we use an energy efficient and Low cost ESP-12E Wi-Fi module is used for deploying Wireless Sensor Network [2]. ESP-12Emodule configure. In such a way that it should provide performance and high integration performance. When ESP is not used, we can use advance power management and Power down logic, which providesan energy efficient ESP-12E Wi-Fi based wireless sensor network. ESP-12Erequires 60uA in deep sleep mode with RTC clock still running and lesser than 1 mA to stay awake/connected to the access point (AP). The nodemcu firmware is used for ESP-12E. To program ESP-12E we used Arduino IDE as shown in Fig. 8 and related library like DHT11, DS18B20, etc. The sensor data is read from sensor and saved in node i.e.ESP-12E until main server read it. So there is no data loss and reliability is assured.
Fig.8 Arduino IDE for ESP-12E
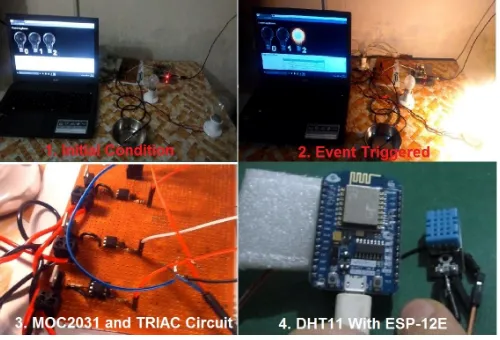
The best advantage of ESP-12E module is that we can program it over the air. Therefore, we can update firmware or program at any time even after deployment at remote location with Wi-Fi. In ESP-12E node, we used DHT11 Sensor, which will read temperature and humidity as shown in Fig. 8.
The final interface is done through HTML POST method, which is more secure than GET method. ESP-12E post data on URL whereas main server will get data from node.Then this data is stored in local MySQL database and shown on WebUI Immediately. We can also see historical reading in table format.
C. Control of System
Raspberry Pi and ESP8266 are low power devices operated on 3.3V. To control ac system, we used MOC3021 Opto-Diac and Triac Circuit as shown in Fig. 9. The Pi as well as ESP-12E works fine with this circuit diagram. The high signal from pi or ESP turn on led of MOC3021, which will trigger Diac and Diac triggers Triac to connect load with supply[4].
Fig.9 Control Circuit Diagram
The control circuit provide isolation between dc circuit and ac circuit. The snubber circuit should use if inductive load is connected. For Three-phase application, we can use same circuit to energised relay coil and then start a three phase appliances.
IV. RESULT
The following Fig. 10 shows the Web UI which runs on Apache2 web server. The Temperature, Humidity and air quality measured from all nodes is store at My SQL database and easily available on website. We can control remote node from Website through supervisory node i.e. Raspberry Pi. For security purpose, User must login first, So, there is no chances of malware function. The individual node control parameter also successfully changed from website with user authentication.
The Control Circuit is also gets triggered with set point as well as manually from website. For e.g. if temperature rises above set point of 25°C, the chiller will get started and corresponding duct will open for cold air. Therefore, the rise in temperature will again decrease for maintaining set temperature.
[image:7.612.183.433.198.368.2]The energy efficiency is better than traditional HVAC Control System. As Raspberry Pi (1.2W) and ESP-12E (max. 170mA)onsumes less power, the total power consumption moderately improved in this Implementation.
Fig. 10 Result of Project
V. CONCLUSION
In this paper, we are designing the HVAC application, sensor used in application and selection of sensor according to environment parameter. The Implementation of Wireless Sensor Network with ESP-12E and Linux Raspberry Pi in Heating, Ventilation and Air Conditioning Application is done on prototype based. The Prototype model concluded the usefulness of this system in actual field level application, as it is more cost effective and Low Power System than conventional HVAC System. However, more sensors can be added to have full control of an embedded system. This can include light sensors, smoke detector, optical/electromagnetic sensors, glass break, interior siren, miscellaneous detectors, pressure sensors, motion detector, exterior siren, and home exits, etc.
REFERENCES
[1] Sudhir G. Nikhade,”Wireless Sensor Network System using Raspberry Pi and Zigbee for Environmental Monitoring Applications” in International Conference on Smart Technolloggy and Managemnet for computing Communication, 2015
[2] Tejas Thaker, “ESP8266 based Implementation of Wireless Sensor Network with Linux Based Web-Server” in Symposium on Colossal Data Analysis and Networking( CDAN), 2016
[3] Vamsiikrishna Patchava, Hari Babu Kandala, P ravi Babu, “A Smart Home Automation Technique with Raspberry Pi using IOT” in International Conference on Smart Sensors and Systems, 2015
[4] Sanket Thakre, Akshay Shriyan, Vikas Thale, Prakash yasarp, keerthi Unni, “Implementation Of Energy Monitoring and Control Device based on IOT” 2016 [5] Raspberry Pi Foundation. http://www.raspberry.org
[6] ESP8266. Esp8266.com.