Comfort Control Panel
E
3systems control device
Installation, use and
programming manual
Revision:12/2008 Code: D-LBR514
This booklet is authored and printed by Robur S.p.A; any form of even partial reproduction of this manual is forbidden.
The original is archived at the premises of Robur S.p.A.
Any use of the manual other than for consultation purposes must be authorized in advance by Robur S.p.A.
PREFACE
The present "Comfort Control Manual (Installation and Applications)" describes the parameters, their configuration and a number of example systems using Comfort Control equipment.
This manual assumes that the reader is familiar with Robur products and with the information given in the manuals for the products to which it refers.
This manual is specifically intended for:
• designers for the design of systems using Robur series E3 modulating units controlled by Siemens Comfort Control equipment;
• electrical installation technicians for the correct installation of control and monitoring equipment and devices;
• installation technicians and Robur Technical Assistance Centres (TAC) for their correct configuration.
The descriptions given in this manual refer to:
• the RVS61 controller
• the Siemens AVS37 interface
• Robur series E3 units
• the Comfort Control Interface (CCI). Summary
The manual is divided into 9 sections and 5 annexes.
References
For requirements other than those illustrated in this manual, the user may have to
configure the Comfort Control differently. Should this be necessary, refer to the following documentation:
Comfort Control Panel - User Manual (D-LBR 523) (user’s version);
Comfort Control Interface [CCI] (D-LBR 526) (installation and service technician’s version)
Installation, user and maintenance manuals for series E3 (installation and service technician’s version)
The icons present in the margins of the manual have the following meanings:
Danger warning
WARNINGnote
Start operating procedure
Reference to another part of the manual or other manual
Summary
PREFACE ISECTION 1 GENERAL INFORMATION ... 3
SECTION 2 ASSEMBLY AND INSTALLATION ... 7
2.1 AVS37 CONTROL UNIT ... 10
2.2 EXTERNAL AMBIENT SENSOR QAC34 ... 10
2.3 ROOM UNIT QAA55 ... 12
2.4 ROOM UNIT QAA75 ... 14
2.5 RADIO COMPONENTS ... 15
2.5.1 RADIO MODULE AVS71... 16
2.5.2 ROOM UNIT QAA78 ... 17
2.5.3 RADIO CONNECTION ... 20
2.5.4 AVS13.399 EXTERNAL RADIO SENSOR... 21
2.5.5 RADIO RELAY AVS14.390 ... 23
2.6 EXPANSION MODULE ... 25
SECTION 3 ELECTRICAL CONNECTIONS ... 27
3.1 ROOM UNIT CONNECTION ... 27
3.2 TEMPERATURE SENSOR CONNECTION ... 28
3.3 WATER CIRCULATION PUMP CONNECTION ... 29
3.3.1 HEATING/CONDITIONING CIRCUIT PUMP 1 CONNECTION DIAGRAM ... 29
3.3.2 HEATING CIRCUIT PUMP 2 CONNECTION DIAGRAM ... 30
3.3.3 HEATING CIRCUIT PUMP CONNECTION DIAGRAM PUMP ... 31
3.4 MIXER/DIVERTER VALVE CONNECTION ... 32
3.4.1 DIVERTER VALVES Y28 AND PUMP PY28 CONNECTION DIAGRAM ... 32
3.4.2 DIVERTER VALVES Q3 CONNECTION DIAGRAMOUT AND K6OUT ... 33
3.4.3 MIXER VALVES Y1/Y2 AND Y5/Y6 CONNECTION DIAGRAM... 34
3.4.4 ROBUR BOILER ENABLE SIGNAL SCHEMATIC ... 35
SECTION 4 VALVE CONNECTIONS ... 37
4.1 SIEMENS DIVERTER VALVES CONNECTION ... 37
4.2 SIEMENS MIXER VALVE CONNECTION ... 42
4.3 VALVE ACTUATOR ORIENTATION DIAGRAM ... 43
SECTION 5 COMMISSIONING ... 45
5.1 PREREQUISITES ... 45
5.2 OPERATING TEST ... 46
5.3 RVS61 CONTROLLER ... 47
SECTION 6 SYSTEM BLOCKS ... 49
6.1 DESCRIPTION OF PARTS OF THE SYSTEM ... 50
6.1.1 BASE BLOCK (BP) ... 50
6.1.2 ROBUR BLOCK E3 ... 51
6.1.3 BLOCK PC (PASSIVE COOLING) ... 52
6.1.4 BLOCK DHW ... 53
6.1.5 BLOCK B ... 54
6.1.6 BLOCK C1/C2 (MIX1/MIX2 CIRCUIT) ... 55
6.1.8 BLOCK RU (ROOM UNIT) ... 57
SECTION 7 CONFIGURATION ... 59
7.1 BP - BASIC SYSTEM CONFIGURATION ... 60
7.2 E3 - ROBUR MACHINE CONFIGURATION ... 64
7.3 PC BLOCK SCHEMATIC ... 68
7.4 DHW BLOCK CONFIGURATION ... 69
7.5 B - BOILER CONFIGURATION FOR HEATING/DHW INTEGRATION TO HEAT PUMP ... 78
7.6 HEATING AND COOLING CIRCUIT CONFIGURATION ... 81
7.7 CONFIGURATION OF ROOM UNITS (RU) AND CONTROL UNITS FOR HEATING AND CONDITIONING CIRCUITS ... 106
SECTION 8 EXAMPLE INSTALLATIONS... 117
8.1 SYSTEM EXAMPLE 1... 117
8.1.1 PLUMBING DIAGRAM ... 118
8.1.2 WIRING DIAGRAM ... 119
8.1.3 UNIT BOARD CONFIGURATION ... 121
8.1.4 COMFORT CONTROL CONFIGURATION ... 121
8.1.5 SYSTEM COMPONENTS ... 121
8.1.6 CONFIGURATION OF THE COMFORT CONTROL INTERFACE [CCI] (D-LBR 526) ID:960124 8.2 SYSTEM EXAMPLE 2... 124
8.2.1 PLUMBING DIAGRAM ... 125
8.2.2 WIRING DIAGRAM ... 126
8.2.3 UNIT BOARD CONFIGURATION ... 128
8.2.4 COMFORT CONTROL CONFIGURATION ... 128
8.2.5 SYSTEM COMPONENTS ... 128
8.2.6 CONFIGURATION OF THE COMFORT CONTROL INTERFACE [CCI] (D-LBR 526) ID:960134 SECTION 9 OTHER POSSIBLE SETTINGS ... 135
APPENDIX A - LEGEND AND TECHNICAL DATA ... 137
APPENDIX B - OOTHER USEFUL OEM PARAMETERS ... 145
APPENDIX C - PARAMETERS OF USE IN TESTING THE SYSTEM: ... 147
APPENDIX D - TABLE OF ERROR CODES ... 151
SECTION 1 GENERAL INFORMATION
In a system which includes series E3 equipment, controlled by the Comfort Control system, a system such as that shown in Figure 1 is possible.
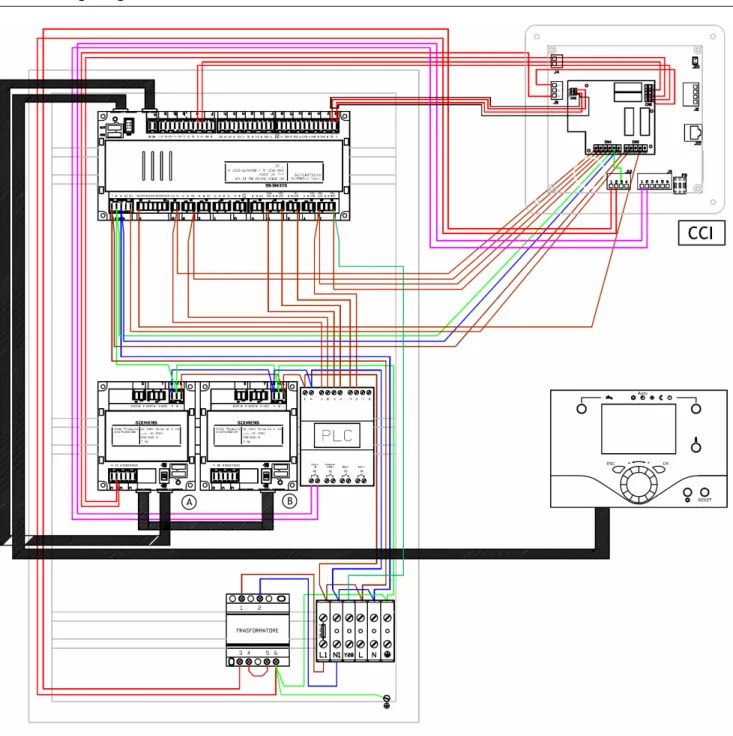
Comfort Control schematic
CCP wiring diagram
SECTION 2 ASSEMBLY AND INSTALLATION
This section explains how the equipment is to be assembled and installed.Before proceeding with the installation, make sure that the equipment is disconnected from the electrical power supply.
Electrical connections to the main power circuit and low voltage circuit must be separate (the Robur CCP has 2 different routings for the two separate circuits). The cabling must be done in safety class II, so that the sensor and power cables may not be routed in the same duct.
A single sensor may not be used for more than one input.
The CCP and its accessory equipment may be powered up only on completion of the installation. Failure to observe this precaution can short circuit the equipment.
The CCP may not be exposed to water.
The ambient and operating temperature range is 0 to 50 °C Connection to main power supply
Install_Tab_01
Use Terminal Type of connector
L 230 V AC phase L
AGP4S.03E/109 Ground
N Neutral N
E9 Low pressure Not used
K AGP4S.02J/109 E10 High pressure (DHW with heat pump load interruption)
EX1 EX1 multifunction input Not used
P AGP8S.07A/109 EX2 EX2 multifunction input Not used
EX3 EX3 multifunction input Not used EX4 EX4 multifunction input Not used EX5 EX5 multifunction input Not used EX6 EX6 multifunction input Not used EX7 EX7 multifunction input Not used E11 Overload protection 1 Not used
Q AGP8S.02E/109 K1 Level 1 compressor (Heat pump ON)
N Neutral
H AGP8S.03A/109 Ground
Q3 DHW load pump / diverter valve N Neutral
S AGP8S.03B/109 Ground
Q2 Heating circuit pump 1
Y1 Heating circuit mixer valve 1 open
T AGP8S.04B/109 N Neutral
Ground
Y2 Heating circuit mixer valve 1 close
Use Terminal Type of connector Ground
Q8 Source pump (not used) K19 Fan (No used)
N Neutral
V AGP8S.03D/109 Ground
Q9 Condensing pump (not used) QX1 Multifunction output 1 W AGP8S.04E/109 N Neutral Ground QX2 Multifunction output 2 N Neutral X AGP8S.03E/109 Ground QX3 Multifunction output 3 N Neutral Y AGP8S.03G/109 Ground QX4 Multifunction output 4 QX5 Multifunction output 5 Z AGP8S.04C/109 N Neutral Ground QX6 Multifunction output 6 Table 2 RVS61 output connections
Safe low voltage (SELV/PELV) connections
Install_Tab_02
Use Terminal Type of connector
Service tool LPB LPB -
Service tool BSB BSB -
Radio module AVS71.390 X60 -
Additional module AVS75.390 X50 AVS82.490/109
Service unit (HMI) X30 AVS82.491/109
DB LPB data bus
a AGP4S.02H/109 MB LPB ground
CL+ Room unit 3 data bus
b AGP4S.02A/109 CL- Room unit 3 ground
CL+ Room unit 2 data bus
b AGP4S.02 A /109 CL- Room unit 2 ground
CL+ Room unit 1 data bus
b AGP4S.03D/109 CL- Room unit 1 ground
G+ Optional lighting power H1 Digital input H1 / 0...10 V
e AGP4S.03G/109 M Ground
H3 Digital input H3 / 0...10 V
B81 Hot gas temperature sensor 1 (not used)
f AGP4S.02B/109 M Ground
B3 DHW temperature sensor
h AGP4S.02C/109 M Ground
B9 External temperature sensor
k AGP4S.02D/109 M Ground
B21 Heat pump delivery temperature sensor (not used)
n AGP4S.02F/109 M Ground
B1 HC1 delivery temperature sensor
P AGP4S.02G/109 M Ground
B71 Heat pump return temperature sensor
q AGP4S.02K/109 M Ground
B91 Source delivery temperature sensor
r AGP4S.02L/109 M Ground
B84 Evaporation temperature sensor
s AGP4S.02S/109 B92 Source return temperature sensor
M Ground
BX1 Multifunction input 1 sensor
t AGP4S.02M/109 M Ground
BX2 Multifunction input 2 sensor
u AGP4S.02N/109 M Ground
BX3 Multifunction input 3 sensor
w AGP4S.02P/109 M Ground
BX4 Multifunction input 4 sensor
x AGP4S.02R/109 M Ground
BX5 Multifunction input 5 sensor
y AGP4S.02T/109 M Ground
UX UX analogue multifunction output
z AGP4S.02U/109 M Ground
2.1 AVS37 control unit
Installation
Figure 4 Installation method
The AVS37.294 controller is already installed in the Robur panel (CCP) and connected to terminal X30 of the base unit via cable AVS82.491/109 (code Robur E-CVO246).
As regards its use, refer to Comfort Control Panel - User Manual (D-LBR 523).
2.2 External ambient sensor QAC34
The external sensor is essential to the operation of the Comfort Control system. If this sensor is not connected to the RVS61 controller, the system does not operate.
The sensor is used to acquire the external temperature and, for small extensions, accounts for sunlight, wind chill and the temperature of the wall to which it is mounted.
Technical characteristics Type reference Sensing element Measurement range °C Tolerance K* Time constant (min) Weight (g) Packing size Copper cable mm² /cable dia. Mm Perm. cable length (m) QAC34/101 NTC1000 Ω at 25 °C -50...70 ± 1 12 73 48 pieces individually packed in multipacks 1.5 / 7.2 120
Assembly and installation
Installation F-CC_0051
Figure 5 Installing the QAC.34 external sensor
Installation F-CC_0052
2.3 Room unit QAA55
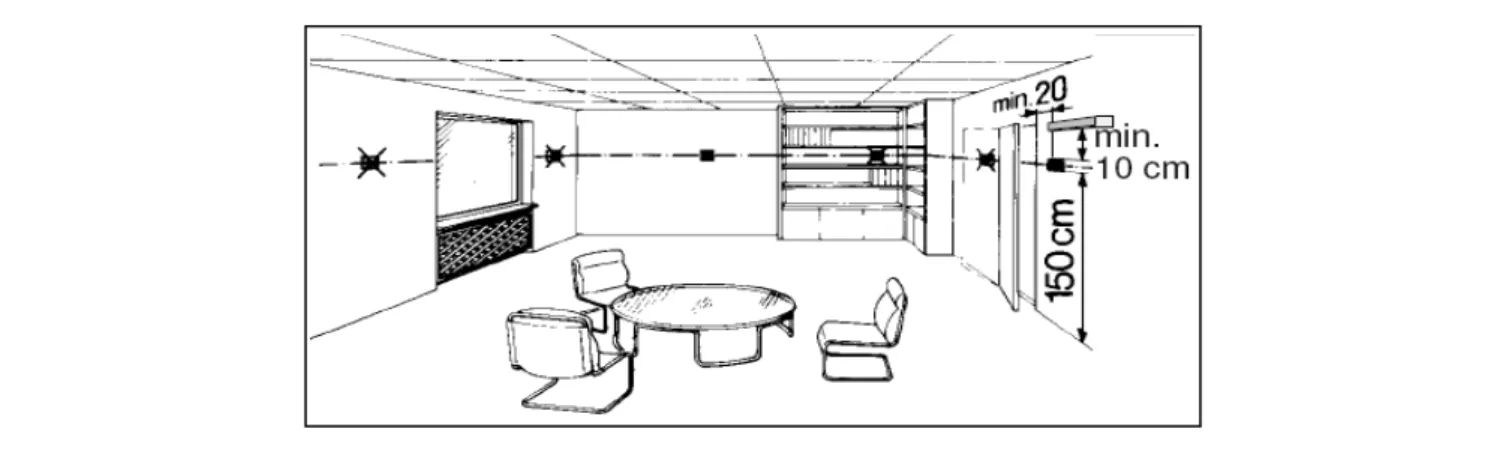
LocationFigure 7 Installation position of the QAA55 room unit.
The room unit must be located in a reference room, generally the living room, bearing in mind the following factors:
the room unit must be mounted 1.5 metres above the floor, in an area which enables the sensor to measure the ambient temperature as accurately as possible; hence, out of the way of draughts, direct sunlight and other heat sources.
If wall mounted, sufficient space must be provided above the unit for installation and removal.
The room unit, once removed from its base, is no longer powered up and hence is not operational.
Installation
Electrical connections
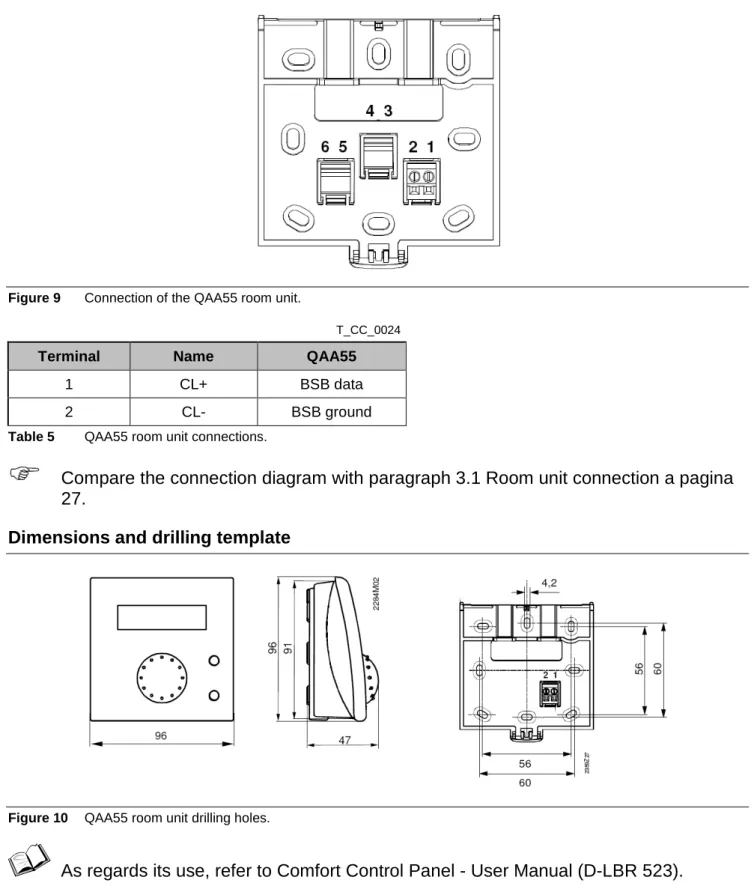
Figure 9 Connection of the QAA55 room unit.
T_CC_0024
Terminal Name QAA55
1 CL+ BSB data
2 CL- BSB ground Table 5 QAA55 room unit connections.
Compare the connection diagram with paragraph 3.1 Room unit connection a pagina 27.
Dimensions and drilling template
Figure 10 QAA55 room unit drilling holes.
2.4 Room unit QAA75
LocationFigure 11 Installation position of the QAA75 room unit.
The room unit must be located in a reference room, generally the living room, bearing in mind the following factors:
the room unit must be mounted 1.5 metres above the floor, in an area which enables the sensor to measure the ambient temperature as accurately as possible; hence, out of the way of draughts, direct sunlight and other heat sources.
If wall mounted, sufficient space must be provided above the unit for installation and removal.
The room unit, once removed from its base, is no longer powered up and hence is not operational.
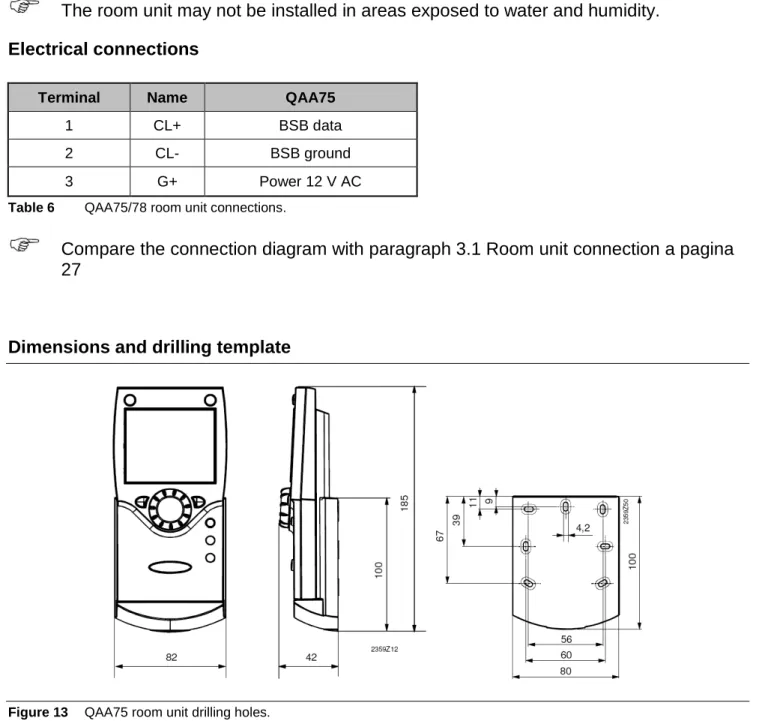
The room unit may not be installed in areas exposed to water and humidity. Electrical connections
Terminal Name QAA75
1 CL+ BSB data 2 CL- BSB ground 3 G+ Power 12 V AC Table 6 QAA75/78 room unit connections.
Compare the connection diagram with paragraph 3.1 Room unit connection a pagina 27
Dimensions and drilling template
Figure 13 QAA75 room unit drilling holes.
As regards its use, refer to Comfort Control Panel - User Manual (D-LBR 523).
2.5 Radio components
The radio components must be installed so as to be as free as possible from interference, as follows:
Away from electrical cabling, strong magnetic fields and equipment such as PC’s, TV’s, microwave ovens, etc.
Away from large metal, glass and special concrete structures
2.5.1 Radio module AVS71
The radio module expands our product range by offering the possibility of wireless communications.
With the radio module, system components such as the room unit can transmit their data wirelessly.
Installation
Figure 14 Installation of the AVS71 radio module.
Do not install the radio module inside a metal housing (e.g., inside the heat pump enclosure).
Electrical connections
The cable must be connected to regulator terminal X60.
Before making the connection, make sure the base unit is not powered up.
Button Led
Dimensions and drilling template
Figure 15 AVS71 radio module drilling holes.
2.5.2 Room unit QAA78 Location
Figure 16 Installation position of the QAA78 room unit.
The room unit must be located in a reference room, generally the living room, bearing in mind the following factors:
the room unit must be mounted 1.5 metres above the floor, in an area which enables the sensor to measure the ambient temperature as accurately as possible; hence, out of the way of draughts, direct sunlight and other heat sources.
If wall mounted, sufficient space must be provided above the unit for installation and removal.
The room unit, once removed from its base, is no longer powered up and hence is not operational.
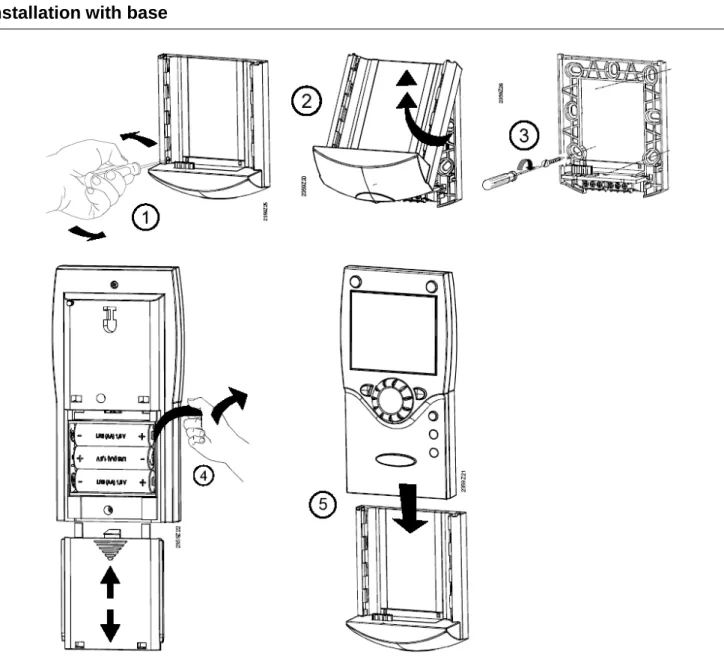
Installation with base
Installation without base
Figure 18 Installation of the QAA78 room unit.
The room unit may not be installed in areas exposed to water and humidity.
The room unit is powered by three 1.5 V AA batteries (LR06). Dimensions and drilling template
2.5.3 Radio connection
Before proceeding with the installation, connect the components to the radio module, so that after assembly, all system components are easily traceable.
The essential condition for the wireless connection is that all components must receive the signal, in other words, the radio module must be correctly connected to the base unit and the batteries fitted in the room unit.
1. Press the radio module button for at least 8 seconds, until its led starts flashing quickly.
2. To enter the programming phase, press the OK button on the room unit. 3. Hold down the Info button for at least 3 seconds, then select “initial activation”
with the programming knob and press OK. 4. Select the “Radio” menu and press OK. 5. Select “line 120”. Press OK to confirm.
6. Turn the knob to “YES” and press OK. The unit will now search for the wireless connection.
7. T The display shows the connection strength as a percentage. This can take from 2 to 120 seconds.
8. Once the connection has been established, the message “Unit ready” displays and the led stops flashing.
Radio connection test
Run the test to check the quality of the wireless connection. The test can be interrupted at any time by pressing ESC.
While the radio connection can be initiated on the heat pump itself, the test must be run in the area in which the room unit is to be installed.
Select the page “Radio” on the room unit (as explained above in steps 2 to 4) and activate Test mode on the line “Test mode” (line 121).
During the test, the numbers on the left show the number of data packets sent, while those on the left show those received. The test stops after 24 packets and is
considered passed if at least 50% of the packets have been sent and received successfully.
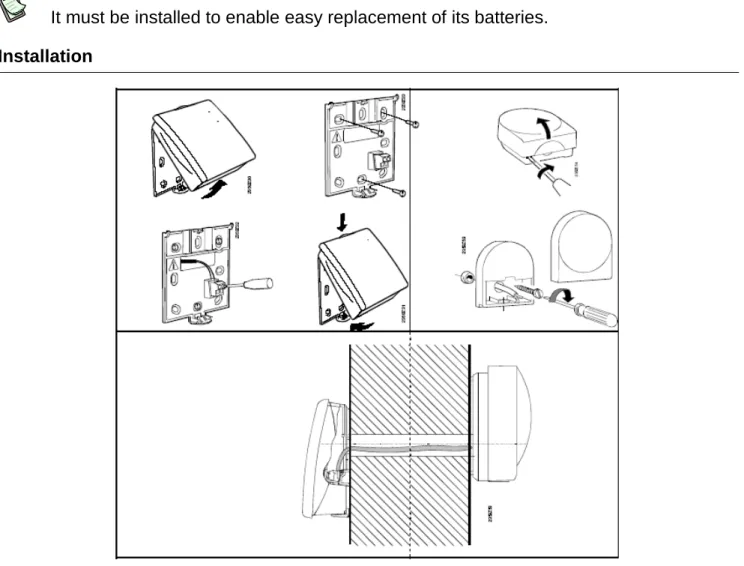
2.5.4 AVS13.399 external radio sensor
The transmitter must be installed inside the building
It must be installed to enable easy replacement of its batteries. Installation
Figure 20 Installing the external radio sensor.
Connection
Figure 21 Installing the external radio sensor.
C D
Legend:
A: Batteries
B: To remove the batteries C: Button
D: Led
B A
The units must be connected via a two wire (exchangeable) cable.
Power is supplied by two 1.5 V AAA batteries (LR03). Radio connection
1. Press the radio module button for at least 8 seconds, until its led starts flashing quickly.
2. Press the external radio sensor transmitter button for at least 8 seconds, until its led starts flashing quickly.
3. The connection has been established when the radio module led stops flashing. 4. Now press the button on the external radio sensor transmitter button briefly until
the led stops flashing. Test:
Run the test to check the quality of the wireless connection.
The test can be interrupted at any time by pressing ESC.
While the radio connection can be initiated on the heat pump itself, the test must be run in the area in which the room unit is to be installed.
1. Press button “C” Figure 21 on the external radio sensor transmitter for at most 8 seconds, until the led starts flashing slowly.
2. If radio communications are active, the radio module led lashes briefly at 10 second intervals.
3. Now press the button on the external radio sensor transmitter button briefly until the led stops flashing.
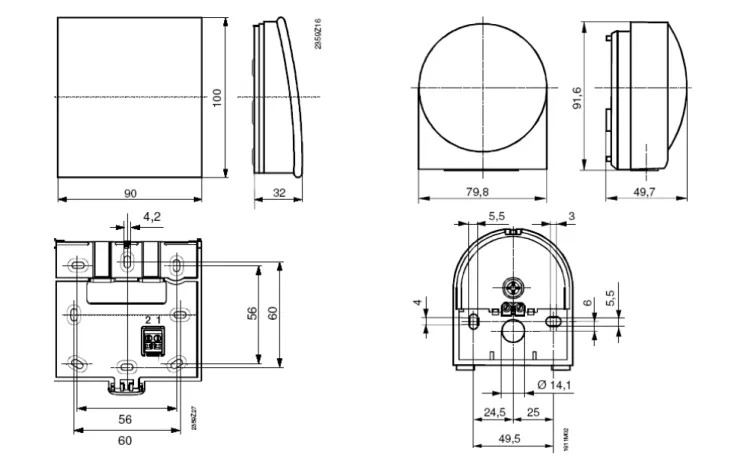
Dimensions and drilling template
Figure 22 External radio sensor drilling holes.
2.5.5 Radio relay AVS14.390
To establish the radio connection, the device must be powered up temporarily before installation.
The relay must be installed inside the building.
Installation
Connections
The consignment includes a power supply kit. The wires are interchangeable.
Radio connections
See Radio connection a pagina 22. Dimensions and drilling template
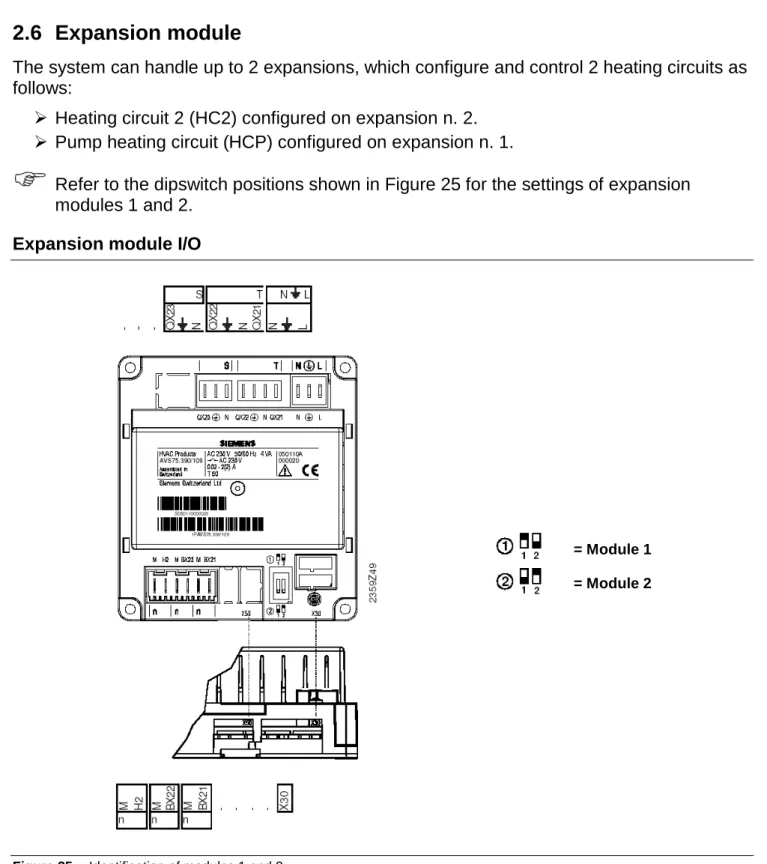
2.6 Expansion module
The system can handle up to 2 expansions, which configure and control 2 heating circuits as follows:
Heating circuit 2 (HC2) configured on expansion n. 2.
Pump heating circuit (HCP) configured on expansion n. 1.
Refer to the dipswitch positions shown in Figure 25 for the settings of expansion modules 1 and 2.
Expansion module I/O
Figure 25 Identification of modules 1 and 2
= Module 1
Connection to main power supply
Use Terminal Type of connector
L 230 V AC phase L
AGP4S.03E/109 Ground
N Neutral N
QX21 Open mixer valve
T AGP8S.04B/109 N Neutral
Ground
QX22 Close mixer valve N Neutral
S AGP8S.03B/109 Ground
QX23 Heating circuit pump
Table 7 AVS75 expansion module output connections.
Safe very low voltage connections
Use Terminal Type of connector X30 Controller / Heat pump control panel AVS82.491/109
BX21 Open mixer valve
n AGP4S.02F/109 M Ground
BX22 Open mixer valve
n AGP4S.02F/109 M Ground
H2 DC digital input 0...10 V
n AGP4S.02F/109 M Ground
SECTION 3 ELECTRICAL CONNECTIONS
3.1 Room unit connection
Room unit connection diagram
Figure 26 Example of backlighting connection on room unit (QAA75.. with backlighting)
3.2 Temperature sensor connection
Temperature sensor connection diagram3.3 Water circulation pump connection
3.3.1 Heating/conditioning circuit pump 1 connection diagram
3.3.3 Heating circuit pump connection diagram Pump
3.4 Mixer/diverter valve connection
3.4.1 Diverter valves Y28 and pump PY28 connection diagram
Brown Black Blue Blue Brown Black Blue Brown Black Blue Brown Black
3.4.2 Diverter valves Q3 connection diagramOUT and K6OUT
Figure 32 Diverter valves Q3 connectionOUT and K6OUT directly from PLC
Brown Black Blue Brown Black Blue Brown Black Blue
3.4.4 Robur boiler enable signal schematic
Figure 34 Heating/DHW supplementary boiler On/Off signal connection.
Boiler enable signal (voltage free contact)
SECTION 4 VALVE CONNECTIONS
4.1 Siemens diverter valves connection
The Siemens diverter valve body is marked with B and AB reversed from the normal markings. Thus the common way is marked B, as shown in the schematics given below.
When mounting the valve, make sure to mount it in the orientation shown in the figures given below.
The following figures give the connections for each type of valve installed.
Failure to observe these indications can compromise the initial activation of the system. Contact Robur in case of doubt.
Diverter valve Q3 connection diagramout (if DHW block present)
Figure 36 Description of direction of flow of valve n. 5 shown in Figure 35.
Diverter valves K6 connection diagramout (if B and DHW blocks present)
A B AB
5
Delivery E3 (hot side) Delivery DHW Heating delivery A B AB A B AB1
2
Delivery DHW Heating return Heating delivery DHW returnDiverter valves Y28 connection diagram (if PC block is present)
Figure 38 Description of direction of flow of valves n.3 and 4 shown in Figure 35.
Installing the Siemens I/SBC28.2 actuator
1. Rotate the valve rod (detail 1) so that the point of the arrow is opposite the side of the valve body (detail 3) marked with A, B and AB. (see Figure 39).
2. Remove the actuator bushing (I/SBSC28.2) and fit it to the rod (detail 1 of Figure 39).
3. Press the “release button” and set the actuator pointer to “Close” (see Figure 40).
4. Fit the actuator to the valve body (detail 3) and secure it to its bracket (detail 2) (see Figure 39).
If for any reason it is not possible to mount the actuator, rotate the bracket (detail 2 of Figure 39) through 90°. A B AB A B AB
4
3
Delivery E3 (cold side) PC exchanger inlet Delivery E3 / output Q3 (A) Delivery to well / acquifer Pump Y28 delivery Heating delivery to serviceI/SBC28.2 actuator installation diagram
Figure 39 Actuator mounting diagram. Detail 1: valve actuator control rod. Detail 2: actuator bracket.
Detail 3: valve body (plane view).
I/SBC28.2 actuator pointer Close Release button
A B AB
1 2 3 A B ABDIVERTER VALVE TECHNICAL DATA
VALVE BODY
Operating pressure PN16 FOR HOT WATER AT 90°C. PN 2 0 FOR COLD WATER Fluid temperature WATER 0°C…90°C
Angle of rotation 90°
VALVE ACTUATOR
Electrical power I/SBC28.2.3 230V AC, + 10% - 15% Frequency 50 HZ SUPPLY
Peak consumption 4 VA
Stroke time (open/close) 90‘‘ FOR 1¼’’ AND 180’’ FOR 1½‘’ AND 2’’ Auxiliary contact rating 250V 3A (RESISTIVE)
Admitted ambient temperature DURING OPERATION: 0…+ 50°C SHIPPING AND STORAGE: -10…+80°C Admitted ambient humidity CLASS G, DIN40040
Degree of protection IP 54
cable (with auxiliary contact) 6 x 1 mm2, length 0.8 m
Weight 0.45 KG
Diverter valves internal electrical connection (Q3out, K6out, Y28)
Figure 41 Description of diverter valves actuator connections
For the connection to the Comfort Control unit, refer to SECTION 3.
During installation, follow the actuator installation instructions illustrated in Figure 44 on page 43.
Legend:
Brown: line Black:
Connect to controller output terminal powered: valve open
not powered: valve closed Blue: neutral
Red-green:
limit switch contacts (not used) 3A - 250V AC
4.2 Siemens mixer valve connection
Mixer valves Y1/Y2 and Y5/Y6 (heating circuits C1/C2) connection diagram
Figure 42 Description of direction of flow of mixer valves
Installing the Siemens actuator
1. Turn the actuator knob counterclockwise (the servomotor will resist this), until the indicator is on the position 0 notch
2. Fit the actuator to the valve body and secure it with the locknut.
MIXER VALVE TECHNICAL DATA
VALVE BODY
Operating pressure REFERENCE DIN4747 / DIN3158 IN RANGE 1…120°C Class PN PN16 EN1333
Average temperature WATER 1°C…120°C
VALVE ACTUATOR
Electrical power 230V AC, ± 15% Frequency 50/60 HZ Peak consumption 2.5 VA Stroke time (open/close) 150’’ AT 50 HZ
Auxiliary contact rating 250V 6A (RESISTIVE); 2.5A (INDUCTIVE) Admitted ambient temperature DURING OPERATION AND STORAGE: -5…+ 50°C
A B AB C1/C2 Recirculation Delivery to service Delivery manifold
Mixer valves internal electrical connection (C1, C2)
Figure 43 Description of mixer valves actuator connections
For the connection to the Comfort Control unit, refer to SECTION 3 a pagina 27.
4.3 Valve actuator orientation diagram
The figure shown below indicates the orientation of the actuator for Siemens mixer and diverter valves.
SECTION 5 COMMISSIONING
This section explains how to quickly and easily program the RVS 61, expansion modules and room units.
These simple settings facilitate quick commissioning.
The various tunings depend on the user’s level of access to the various menus.
5.1 Prerequisites
To commission the devices cited in this manual, observe the following instructions:
correct installation, proper electrical hookup and, in case of radio connections, proper wireless connection between all auxiliary equipment.
Set all parameters regarding the system, in line with the actual solution, as instructed in Section 7.
To set the parameters, proceed as follows:
1. Enter the AVS37 control unit programming mode by pressing OK.
2. Hold down the Info button for at least 3 seconds, then select the operating level (Commissioning technician, installation technician, etc) “Installation technician” with the programming knob.
3. Press the OK button.
4. Rotate the knob and select the menu containing the parameter to be modified. 5. Press the OK button.
6. Select the desired parameter. 7. Press the OK button.
8. Modify the value of the parameter and confirm with OK. At this point one may:
9. Rotate the knob to modify other parameters in the same section
10. Press ESC to return to the previous menu level; press ESC again to return to the main screen
Run the operating test as described in paragraph 5.2 Operating test a pagina 46.
Reset the attenuated external temperature: (“User diagnostics” menu, parameter “8703: Attenuated external temperature”).
If a parameter is selected by mistake, that should not actually be changed, press ESC to void the operation. In this way the changes made are not saved.
If no interaction takes place for a period of 8 minutes, the device automatically returns to the main screen.
Certain operating rows may be hidden and this may depend on the type of device used, its configuration and the user's access level (final user, first operation technician, installation technician etc.).
You will find below the instructions to set the language used to visualize the settings on the display.
1. Move into the Siemens interface: the display is as shown in Figure 45.
Display visualization
Figure 45 The display shows the temperature in the room
If the display shows anything different, press the ESC key
2. Press the OK button.
3. use the knob to select the string Control Unit. 4. Press the OK button.
5. The row number appears in the top right hand corner, then rotate the knob and take position on the row corresponding to the parameter to be changed No. 20 (Language).
6. Press the OK button the parameter to be changed begins to flash (in the low right hand corner the possible options are shown)
7. Change the parameter by rotating the knob.
8. Press the OK key to confirm the selected language. 9. Press ESC to return to the main screen.
5.2 Operating test
To facilitate commissioning and the identification of any errors, the controller can test its own
Operating page shown on the display: “Ambient temperature”
If this is not the standard initial display press the ESC button.
Rotate the knob to modify the parameter.
If errors are detected during the test, refer to APPENDIX d - TABLE OF ERROR CODES - on page 151.
The parameter “6820: Reset log” deletes the last ten errors, along with the
corresponding operational values and setpoints, as well as the status of the output relays.
Parameter “8070: Delete log” deletes the last ten status messages and status codes, along with the corresponding operational values and setpoints, as well as the status of the output relays.
The “Status” menu can be used to check the operational status of the system.
5.3 RVS61 controller
The RVS 61.843 controller is equipped with a led (see Figure 46) to indicate its operational status
LED off: No power
LED on: Ready for operation
LED flashing: Local faults
SECTION 6 SYSTEM BLOCKS
This section, intended for designers, hydraulic and electrical installation technicians and Robur TAC, details the system components.
We show below a system including all its configurable blocks: BP, Robur E3, PC, DHW, B, C1, C2, CP, RU.
6.1 DESCRIPTION OF PARTS OF THE SYSTEM
To facilitate comprehension, each system which employs the Comfort Control system can be divided into blocks. The blocks are as follows:
6.1.1 Base block (BP)
the base block (BP) is composed of (see Figure 48):
8: storage tanks (buffers) for the primary heating/conditioning circuit water
sensor B9: external ambient temperature. The external ambient temperature, with the climatic curves and internal ambient temperature (if the RU is present), determines the setpoint for E3.
sensor B4: storage tank top section temperature
sensor B41: storage tank bottom section temperature
sensor J4: delivery temperature for control of unit E3
sensor B10: delivery temperature for control of boiler
sensor B71: heat pump return temperature Base block schematic
It is important that the temperature sensors not be influenced by external parameters, hence make sure to use dielectric paste in the sensor housings to isolate them and provide good weather protection (rain, condensate, etc.).
Compare Figure 47 to check the positions of the components of block BP in the system.
6.1.2 Robur block E3
E3 A (see Figure 49 to the left): Robur air/water heat pump
E3 GS/WS (see Figure 49 to the right): Robur water/water heat pump
14, 19, 20: variable capacity pump (controlled by unit E3)
17, 23: impurities filter
18, 24: deaerator
sensor B91: source delivery temperature, substituted by fixed resistance (equal to 22kΩ)
Robur unit block diagram
Figure 49 Components E3
It is possible to have up to three E3 units of the same type on a single system.
It is important that the temperature sensors not be influenced by external parameters, hence make sure to use dielectric paste in the sensor housings to isolate them and provide good weather protection (rain, condensate, etc.).
Compare Figure 47 to check the positions of the components of block Robur E3 in the system.
6.1.3 Block PC (Passive cooling)
Passive cooling is provided by the water drawn from the geothermal probes/wells to cool the services (C1 only) with using the E3 equipment.
Passive cooling components (see Figure 50)
valves Y28: passive cooling diverter valves. Valves used with E3 GS or E3 WS.
pump Y28: passive cooling pump. Pump used with E3 GS or E3 WS. PC block schematic
Figure 50 Passive Cooling components
Compare Figure 47 to check the positions of the components of block PC in the system.
6.1.4 Block DHW
The DHW block is composed of (see Figure 51):
7: DHW storage
sensor B3: DHW tank temperature (upper)
sensor B31: DHW tank temperature (lower)
The temperatures (B3 and B31) determine the ON/OFF status of the E3 units and the boiler (only during DHW charging). Sensor B31 is given in the Robur schematics but is optional, whereas B3 is obligatory if DHW service is required.
valve Q3OUT: DHW charging diverter valve (connected to PLC)
DHW block schematic
Figure 51 DHW components
It is important that the temperature sensors not be influenced by external parameters, hence make sure to use dielectric paste in the sensor housings to isolate them and provide good weather protection (rain, condensate, etc.).
Compare Figure 47 to check the positions of the components of block DHW in the system.
6.1.5 Block B
Block B is composed of (see Figure 52):
AY: boiler
valve K6OUT: heating/DHW integration diverter valve (connected to PLC)
Diverter valves “K6 OUT” are installed only if blocks B and DHW are present in the system
Q2OUT: boiler ON/OFF signal (connected to PLC)
27: impurities filter
28: deaerator
The water pump is a constant capacity unit (controlled by the boiler). Block B schematic
6.1.6 Block C1/C2 (mix1/mix2 circuit) Block C1/C2 is composed of (see Figure 53):
valve Y1/Y2: mix 1 circuit (C1) mixer valve
valve Y5/Y6: mix 2 circuit (C2) mixer valve
pump Q2: mix 1 circuit (C1) pump
pump Q6: mix 2 circuit (C2) pump (expansion module 2)
Sensor B1: heating/cooling mix circuit 1 delivery temperature sensor (controls mixer valve Y1/Y2)
Sensor B12: heating mix circuit 2 delivery temperature sensor (controls mixer valve Y5/Y6)
Circuit C2 does not provide cooling service. Block C1/C2 schematic
Figure 53 Mix 1 and 2 circuit components
It is important that the temperature sensors not be influenced by external parameters, hence make sure to use dielectric paste in the sensor housings to isolate them and provide good weather protection (rain, condensate, etc.).
Compare Figure 47 to check the positions of the components of block C1/C2 in the system.
6.1.7 Block CP (pump circuit)
Block CP is composed of (see Figure 54):
pump Q20: pump only circuit pump (CP) (expansion module 1)
Circuit CP does not provide cooling service.
Pump Q20 can run intermittently (ON/OFF) to restore the correct heating water temperature, depending on the temperature measured by sensor B10.
Block CP schematic
Figure 54 Pump circuit components
Compare Figure 47 to check the positions of the components of block CP in the system.
6.1.8 Block RU (room unit)
Block RU is composed of (see Figure 55):
RU1: room unit 1
If present, room unit RU1, located in a reference area served by heating circuit C1, provides information to the climatic curve of circuit C1 to determine the C1 water delivery temperature setpoint, which is maintained by mixer valve Y1/Y2. This setpoint is also required from the heat generator.
RU2: room unit 2
If present, room unit RU2, located in a reference area served by heating circuit C2, provides information to the climatic curve of circuit C2 to determine the C2 water delivery temperature setpoint, which is maintained by mixer valve Y5/Y6. This setpoint is also required from the heat generator.
RUP: room unit P
If present, room unit RUP, located in a reference area served by heating circuit CP, provides information to the climatic curve of circuit CP to determine the CP water delivery temperature setpoint.
This setpoint is also required from the heat generator.
The room units are not necessary parts of the system; if a given circuit is not equipped with a room unit, its water temperature is controlled only by the external temperature and the climatic curve;
When several heating circuits require a setpoint for the heat generator, the RVS61 controller polls the E3 units for the highest value among those requested.
Block RU schematic
Figure 55 Room unit
Compare Figure 47 to check the positions of the components of block RU in the system.
All system solutions can be obtained by adding a number of the following modules to the basic BP system:
“Robur block E3”: Robur units
“Block DHW”: Domestic Hot Water (DHW)
“Block B”: heating/DHW integration boiler
“Block C1”: heating/cooling circuit 1
“Block C2”: heating circuit 2
“Block CP”: heating circuit CP
“Block RU1”: heating/cooling circuit 1 room unit
“Block RU2”: heating circuit 2 room unit
“Block RUP”: heating circuit CP room unit
The complete configuration of each block described above is given in SECTION 7 Configuration a pagina 59.
SECTION 7 CONFIGURATION
This paragraph deals with modifications to the Robur default settings (see Table - 10 Robur basic configurations table - a pagina 155), to satisfy special installation requirements (should the type of machine and system make it necessary to modify the defaults).
All settings can be made on both the AVS37 controller and on the QAA75/QAA78 room units if present, except for the RU Block settings, which can only be done on the QAA75/QAA78 units.
All base block (BP) sensors must be connected to the RVS61 for the system to operate properly. Without these sensors the system will not operate.
The parameters given in this section are those used to implement the various system blocks and control them. For systems which use different configurations, consult the Siemens documentation (systems implemented otherwise than indicated by Robur are not supported).
Whenever the text makes reference to the boiler, note that the latter can be replaced by an electric heating element.
The configuration of the various blocks can be summarised as follows:
Pre-setting (Robur default).
Manual modification of individual parameters to satisfy special system requirements (specific inputs/outputs, etc.).
Selection of supplementary functions and precise adjustment using the functions of the various individual parameters (setting heating circuit/s, timer, etc.).
IMPORTANT
Shut off and restore power (~230V) after modifying parameters.
The units are factory configured by Robur.
The installation and commissioning technicians have a number of parameters to configure to meet the system’s specific requirements, which vary from case to case.
The configured system schematic is the result of the default settings and the connected sensors, as well as of the settings done on-site by the installation technician (activation of the various system blocks).
The sensors contained in the system schematic must be connected properly to ensure that the sensor auto-detect function does not detect a different system schematic.
A number of different functions are available for the heating circuit, some of which can be selected for each individual heating circuit.
The operating rows of the heating circuit pump are visible when a multi-function output is set as the heating circuit pump.
The parameters listed in this section must be changed from their factory settings. For each parameter we include a brief description which explains the value to be assigned for varying system requirements.
As for the electrical connections to the inputs and outputs of the devices and their settings (depending on the actual installation), refer to SECTION 3 Electrical
connections a pagina 27.
7.1 BP - BASIC SYSTEM CONFIGURATION
• Inputs:DEVICE: POSITION: NAME OF
SENSOR: TYPE OF SENSOR: RVS61 B9 - M B9 EXTERNAL SENSOR (NTC 1K) RVS61 B71 - M B71 WATER SENSOR (NTC 10K) RVS61 B91 - M B91 RESISTANCE (22 KΩ) RVS61 B92/B84 - M B92 RESISTANCE (22 KΩ) RVS61 BX1 - M B4 WATER SENSOR (NTC 10K) RVS61 BX2 - M B41 WATER SENSOR (NTC 10K) RVS61 BX3 - M B10 WATER SENSOR (NTC 10K) RVS61 H3 - M* H3 N.O. CONTACT
AVS75 H2 - M* H2 N.O. CONTACT
RVS61 E10 - N* E10 N.O. CONTACT
RVS61 EX1 - N* EX1 N.C. CONTACT
• Outputs:
DEVICE: POSITION: NAME OF
OUTPUT:
TYPE OF OUTPUT:
RVS61 K1 - N* K1 N.O. RELAY ~230V
RVS61 UX(+) - M(-)* UX ANALOGUE MULTIFUNCTION OUTPUT
* Output already cabled to Robur panel.
If you believe the Robur default settings to have been modified, check that the values in the Siemens RVS61 controller coincide with the values given in Table - 10 Robur basic configurations table - a pagina 155, which is the point of departure when adding new blocks.
The “base block” parameters given in Table - 10 Robur basic configurations table - a pagina 155 are the “default settings” in the RVS61/196 unit, if they have not been overwritten using parameter “6204”.
If you wish to return to the “default” settings, use parameter “6205: Restore defaults”. This is ONLY possible if the parameters have not been overwritten using parameter “6204”.
• Parameter “6205: Restore defaults”, enables you to restore the default values of the parameters. The following menus are not affected by this function: Date and Time, Operator Chapter, RF, and all daily programs, as well as the number of hours of operation and the various counters.
• Parameter “6204: Store parameters”, the current settings can be stored as new defaults. The following menus are not affected by this function: Date and Time, Operator Chapter, RF, and all daily programs, as well as the number of hours of operation and the various counters.
Parameter “6204” overwrites the defaults and they can no longer be restored!
Parameters useful for regulating the system “Base system
configuration”:
The base configuration includes use of the storage tank and hence sensors B4 and B41 to turn the heat/cooling source ON/OFF (passive cooling is not provided in the base
configuration; see paragraph 6.1.1 Base block (BP) on page 50).
Heating:
Parameters “4722: Temp diff buffer/HC” (default 2°C , range -20°C to +20°C) and “4721: Auto generation lock” (default 0°C, range 0°C to +20°C), define in combination the means of activation/deactivation of the heat generator as a function of the temperatures measured by sensors B4 and B41 located in the buffer. When B4 and B41 > Setpoint_heat + “4722” + “4721”, that is when both temperature values exceed the heating setpoint requested plus the sum of the values of the two parameters, he heat generator is switched off; it is switched on when B4 and B41 < Setpoint_heat + “4722” - 1°C, in other words, when both temperature
values drop below the heating setpoint plus the value of parameter “4722” minus 1°C (see Figure 56 a pagina 63).
It follows that:
the sum of the values of parameters “4722” and “4721” defines the point at which the heat generator is switched off (see Figure 56 a pagina 63) and:
• if increased, it makes it less likely that the heat pump will be switched off due to pressure drops; on the other hand, it enables the delivery temperature to exceed the requirements of the services, so that excessive increases must be avoided. • If decremented, the opposite considerations apply.
As a point of departure, the sum of the values should be > 0 and equal to a few degrees only (2 - 3 °C).
The value of parameter “4721” + 1°C defines the di fferential between switching on and off (see Figure 56 a pagina 63) and:
• if increased, it results in longer heat pump activation/deactivation cycles, which means greater efficiency; on the other hand, it permits larger oscillations of the delivery temperature, which impacts the quality of the service provided.
• If decremented, the opposite considerations apply.
As a point of departure, the value of parameter 4721 should be 0 - 1 °C.
Passive cooling:
Parameters “4723: Temp diff buffer/HC” (default 0°C , range -20°C to +20°C) and “4721: Auto generation lock” (default 0°C, range 0°C to +2 0°C), define in combination the means of activation/deactivation of cold source water pumping as a function of the temperatures measured by sensors B4 and B41 located in the buffer. When B4 and B41 < Setpoint_cond + “4723” - “4721” (see Figure 57 a pagina 63), in other words, when both temperature values drop below the cooling setpoint plus the value of parameter “4723” minus the value of
parameter “4721”, pumping is deactivated; it is reactivated when B4 and B41 >
Setpoint_cond + “4723” + 1°C, in other words, when both temperature values rise above the cooling setpoint plus the value of parameter “4723” plus 1°C (see Figure 57 a pagina 63). It follows that:
the difference (sum of the parameters 4732 < 0) between the values of parameters “4723” and “4721” defines the pumping deactivation point (see Figure 57 a pagina 63) and:
• If increased, enables the delivery temperature to drop below the point required by the services; and excessive increase must be avoided to prevent formation of condensation. To prevent problems associated with the formation of
condensation, compare also parameters 923, 924, 946, 947, 948 and 950. • If decremented, the opposite considerations apply.
As a point of departure, the sum of the values should be = 0 or slightly negative (-2 - 0 °C).
• If decremented, the opposite considerations apply.
As a point of departure, the value of parameter 4721 should be 0 - 1 °C.
Figure 56 Use of sensors B4 and B41 to turn the heat source ON/OFF
Figure 57 Use of sensors B4 and B41 to turn the cooling source ON/OFF
“4721” “4723” 1°C Setpoint_cond cooling source OFF cooling source ON “4721” “4722” 1°C Setpoint_heat heat source OFF heat source ON
7.2 E
3- ROBUR MACHINE CONFIGURATION
a)
With one and two E3 units in the system:• Inputs for use in addition to those in Table - 10 Robur basic configurations table - a pagina 155:
The E3-A, E3-WS without passive cooling and E3-GS without passive cooling do not require other inputs than those used in Table - 10 Robur basic configurations table - a pagina 155.
The E3-WS, E3-GS with passive cooling, require a hygrostat/hygrometer connection:
DEVICE: POSITION: NAME OF
SENSOR: TYPE OF SENSOR: RVS61 H1 - M HYGROSTAT / HYGROMETER • HYGROSTAT NC-NO • HYGROMETER 0-10V
See parameters “946” to “950” in paragraph 7.6 - Heating and cooling circuit configuration - a pagina 81 for the use of the hygrostat and hygrometer.
• Outputs for use in addition to those in Table - 10 Robur basic configurations table - a pagina 155:
The E3-WS and E3-GS do not require other outputs than those used in Table - 10 Robur basic configurations table - a pagina 155.
The E3-A require you to add Y22 among the outputs listed in Table - 10 Robur basic configurations table - a pagina 155.
DEVICE: POSITION: NAME OF
OUTPUT:
TYPE OF OUTPUT:
RVS61 QX5 - N* Y22 N.O. RELAY ~230V
* Output already cabled to Robur panel.
For all machines (E3-WS, E3-GS and E3-A) configure the parameters as indicated in the table given below.
MENU: PARAMETER: VALUE: CONFIGURATION 5800: HEAT SOURCE/THERMAL SOURCE • “AIR” IF E3-A • “WATER” IF E3-WS. • “GLYCOLATED WATER” IF E3-GS. CONFIGURATION 5807: COOLING SERVICE
• “OFF” IF E3-A, E3-WS WITHOUT
PASSIVE COOLING OR E3-GS WITHOUT PASSIVE COOLING.
• “4-PIPE SYSTEM” IF E3-WS OR E3-GS WITH PASSIVE COOLING.
CONFIGURATION 5895: RELAY OUTPUT QX5 • “NONE” IF E3-WS OR E3-GS. • “Y22” IF E3-A. CONFIGURATION 5950*: FUNCTION INPUT H1
• “RELATIVE HUMIDITY 10V” IF E3-A, E3 -WS OR E3-GS WITH HYGROMETER**.
• “DEWPOINT MONITOR” OR “FLOW TEMP SETP INCR HYGRO” IF E3-WS OR E3-GS WITH HYGROSTAT**.
* Leave parameter “5950” set to its default: “Relative humidity 10V”, if the hygrostat or hygrometer are not being used.
** See parameters “946” to “950” in the chapter “Heating and cooling circuit configuration” for the use of the hygrostat and hygrometer.
On completion of the system block configuration procedure, shut off and restore the ~230V power supply.
b)
With three E3 units in the system:• Inputs for use in addition to those in Table - 10 Robur basic configurations table - a pagina 155:
The E3-A, E3-WS without passive cooling and E3-GS without passive cooling, can use input H1 (for the hygrometer inTable - 10 Robur basic configurations table - a pagina 155) as an alarm input:
DEVICE: POSITION: NAME OF
SENSOR:
TYPE OF SENSOR:
RVS61 H1 - M* H1 N.O. CONTACT
*Cabling to be installed in the Robur panel using an electrical cable from terminal H3 (of the RVS61) connected to terminal H1 (of the RVS61).
The E3-WS and E3-GS with passive cooling, require a hygrostat/hygrometer connection:
DEVICE: POSITION: NAME OF SENSOR: TYPE OF SENSOR: RVS61 H1 - M HYGROSTAT / HYGROMETER • HYGROSTAT NC-NO • HYGROMETER 0-10V
See parameters “946” to “950” in paragraph 7.6 - Heating and cooling circuit configuration - a pagina 81 for the use of the hygrostat and hygrometer.
• Outputs for use in addition to those in Table - 10 Robur basic configurations table - a pagina 155:
The E3-WS and E3-GS do not require other outputs than those used in Table - 10 Robur basic configurations table - a pagina 155.
The E3-A require you to add Y22 among the outputs listed in Table - 10 Robur basic configurations table - a pagina 155:
DEVICE: POSITION: NAME OF
OUTPUT:
TYPE OF OUTPUT:
RVS61 QX5 - N* Y22 N.O. RELAY ~230V
* Output already cabled to Robur panel.
For all machines (E3-WS, E3-GS and E3-A) configure the parameters as indicated in the table given below.
MENU: PARAMETER: VALUE: CONFIGURATION 5800: HEAT SOURCE/THERMAL SOURCE • “AIR” IF E3-A • “WATER” IF E3-WS. • “GLYCOLATED WATER” IF E3-GS. CONFIGURATION 5807: COOLING SERVICE
• “OFF” IF E3-A, E3-WS WITHOUT PASSIVE COOLING OR E3-GS WITHOUT PASSIVE COOLING.
• “4-PIPE SYSTEM” IF E3-WS OR E3-GS WITH PASSIVE COOLING.
CONFIGURATION 5895: RELAY OUTPUT QX5 • “NONE” IF E3-WS OR E3-GS. • “Y22” IF E3-A. CONFIGURATION 5950: FUNCTION INPUT H1
• “ALARM/ERROR MESSAGE” IF E3-A, E3-WS WITHOUT COOLING OR E3-GS WITHOUT COOLING.
• “RELATIVE HUMIDITY 10V” IF E3-WS OR E3-GS WITH HYGROMETER**.
• “DEWPOINT MONITOR” OR “FLOW TEMP SETP INCR HYGRO” IF E3-WS OR E3-GS WITH HYGROSTAT**.
** See parameters “946” to “950” in the chapter “Heating and cooling circuit configuration” for the use of the hygrostat and hygrometer.
On completion of the system block configuration procedure, shut off and restore the ~230V power supply.
Special functions when using ROBUR heat pumps
1. Parameter “7119: Economy” (default: “Locked”; possible values: “Locked” or “Released”), in intermediate seasons the need for heat can be provided by more ecological sources, such as the sun or wood. Conventional heat generators, such as heat pumps and boilers, can then be locked out.
• “Locked” impedes activation of the “Economy” function. • “Released” enables activation of the “Economy” function.
2. Parameter (to be added to user manual) “7120: Economy Mode” (default: “Off”; possible values: “Off” or “On”), if “Economy mode” is active (“7119” = “Released”) the user can activate/deactivate the heat pump or boiler.
3. Parameter (to be added to user manual) “7141: Emergency operation” (default: “Off”; possible values: “Off” or “On”), if the heat pump should not function correctly,
emergency operation may be activated manually. “Emergency operation” runs the system with the boiler (normally used for supplementary heating service, or for recharging the DHW); while the heat pumps stay off.
• When set to “Off”, “emergency operation” is off. • When set to “On”, “emergency operation” is on.
4. Parameter “7142: Type of functioning of emergency operation” (default: “Automatic”; possible values: “Manual” or “Automatic”), if the heat pump should not function
correctly, “Type of functioning of emergency operation” may be activated. “Type of functioning of emergency operation” runs the system with the boiler (normally used for supplementary heating service, or for recharging the DHW); while the heat pumps stay off.
• When set to “Manual”, the “Type of functioning of emergency operation” can be turned on and off only manually, using the parameter “Emergency operation” (“7141”).
• When set to “Automatic” the “Type of functioning of emergency operation” turns on automatically whenever all the heat pumps are malfunctioning. It turns off again once the problem has been resolved; if necessary, reset the system.
When all the heat pumps malfunction, error code “134: General HP malfunction” displays.
7.3 PC BLOCK SCHEMATIC
• Inputs for use in addition to those in Table - 10 Robur basic configurations table – a pagina 155:
The E3 do not require other inputs than those used in Table - 10 Robur basic configurations table - a pagina 155.
The E3-WS and E3-GS with passive cooling require you to add Y28 among the outputs listed in Table - 10 Robur basic configurations table - a pagina 155:
DEVICE: POSITION: NAME OF
OUTPUT:
TYPE OF OUTPUT:
RVS61 QX6 - N Y28 N.O. RELAY ~230V
For all machines (E3-WS, E3-GS and E3-A) configure the parameters as indicated in the table given below.
MENU: PARAMETER: VALUE:
CONFIGURATION 5896:
RELAY OUTPUT QX6
• “NONE” IF E3-A, E3-WS WITHOUT PASSIVE COOLING, E3-GS WITHOUT PASSIVE COOLING.
• “Y28” IF E3-WS, E3-GS WITH PASSIVE COOLING.
7.4 DHW BLOCK CONFIGURATION
• Inputs for use in addition to those in Table - 10 Robur basic configurations table - a pagina 155:
DEVICE: POSITION: NAME OF SENSOR: TYPE OF SENSOR:
RVS61 B3 - M B3 WATER SENSOR (NTC 10K) RVS61 BX4 - M B31 • “B31” WATER SENSOR (NTC 10K) IF SENSOR B31 IS PRESENT. • “NONE” IF B31 SENSOR NOT PRESENT.
Sensor B31 is given in the Robur schematics but is optional, whereas B3 is obligatory if DHW service is required. ParagraphParameters useful for regulating the system “DHW block” a pagina 70 gives the effects of using sensor B31.
• Outputs Q3 and Q3OUT are to be used in addition to those listed in Table - 10 Robur basic configurations table - a pagina 155:
DEVICE: POSITION: NAME OF OUTPUT: TYPE OF
OUTPUT:
PLC Q3 Q3OUT N.O. CONTACT
RVS61 Q3 - N* Q3 N.O. RELAY ~230V
* Output already cabled to Robur panel.
Add “5022” and “5933” among the parameters listed in Table - 10 Robur basic configurations table - a pagina 155:
MENU: PARAMETER: VALUE:
DHW STORAGE TANK
5022: TYPE OF FILLING.
• “WITH B3/B31” IF SENSORS B3 AND B31 ARE USED FOR FILLING DHW WITH THE HEAT PUMP.
• “WITH B3” IF ONLY SENSOR B3 IS USED FOR FILLING DHW WITH THE HEAT PUMP.
CONFIGURATION 5933: SENSOR INPUT BX4 • “B31” IF SENSOR B31 IS PRESENT.
• “NONE” IF B31 SENSOR NOT PRESENT.
On completion of the system block configuration procedure, shut off and restore the ~230V power supply.
Parameters useful for regulating the system “DHW block”:
The configuration of the DHW block provides for the use of sensors B3 and B31* to switch the heat pump ON/OFF (for recharging DHW) and the legionella function (see point 1). Supplementation by the boiler (if configured) to recharge DHW and for the legionella function uses only sensor B3 (see point 1), and is activated after use of the heat pump. The
integration boiler is used to provide higher temperatures than those available with the heat pump alone.
Since the nominal or reduced DHW service (see points below) has greater priority than heating and the heat source is used exclusively for DHW or heating (except for when
recharging DHW with the boiler), when he heat source is requested for DHW the heat source is used exclusively for that service and not for heating (except for when charging DHW with the boiler).
* Sensor B31 is optional.
1. Parameter “5022: Type of charging” (default: “With B3/B31”; possible values: “With B3”, “With B3/B31” and “With B3, legio B3/B31”), determines whether, for DHW charging and the legionella function of the heat pump, only sensor B3 or both sensors are to be used.
• “With B3/B31” (default), enables using both the sensors B3 and B31 for charging DHW and for the legionella function with the heat pump.
Supplementation by the boiler (if configured) to recharge DHW and for the legionella function uses only sensor B3 even when “5022” is set to “With B3/B31”. The above configuration can be used only if the legionella function is deactivated or is done only with the heat pump (see parameters “1640”, “1645”).
If the tank has more than two sumps for housing the sensors B3 and B31, it is good practice to use those indicated in the figure below, so that B3 is not towards the upper part of the tank. This makes for more efficient DHW charging.
• “With B3” enables using sensor B3 and for charging DHW and for the legionella function, with both the heat pump and the boiler.
This configuration must be used if the legionella function is provided by the heat pump and boiler (see parameter “1640”).
B31 B3
• “With B3, legio B3/B31”
This configuration MAY NOT be used.
2. Parameter “1610: Nominal setpoint” (default 50°C , range: from the value set in the parameter “Reduced setpoint” (parameter “1612”) to the value set in the parameter “Maximum nominal setpoint TWWmax” (parameter “1614”)). During operation in “Comfort” mode, DHW recharging with the heat pump terminates (OFF) when B3 and B31 > “1610”. During operation in “Comfort” mode, boiler integration (if configured) for DHW recharging terminates (OFF) when B3 > “1610”. (See point 1).
3. Parameter “1612: Reduced setpoint” (default 40°C , range: from 8°C to the value set in the parameter “Nominal setpoint” (parameter “1610”). During operation in “Reduced” mode, DHW recharging with the heat pump terminates (OFF) when B3 and B31 > “1612”. During operation in “Reduced” mode, boiler integration (if configured) for DHW recharging terminates (OFF) when B3 > “1612”. (See point 1).
4. Parameter “1614: Maximum nominal setpoint TWWMax” (default 65°C, range: 8°C to 80°C).
5. Parameter “1620: Release” (default: “24h/day”; possible values: “24h/day”, “time programs HCs”, “time programs”), varies the DHW setpoint with the following parameters.
B3
DHW reduced setpoint DHW nominal setpoint
• “24h/day”: The temperature of the domestic hot water is controlled by the nominal setpoint (point 2), independently of the time program.
Set “1620: Release” to “24h/day” to ensure that the heat source can always be used for DHW at the “Nominal setpoint” (if requested by the service), but heating service may be compromised. To “balance” the use of the heat source for heating and DHW, use parameter “5030: Charging time limitation”.
• “Time programs HCs”: the DHW setpoint is switched according to the “Time programs” (see Comfort Control Panel - User Manual (D-LBR 523) and note below) between the “Nominal setpoint” (point 2) and the “Reduced setpoint” (point 3). The start of ignition for each phase is brought forward by one hour each time.
The “Time programs HCs” shown in the following figure is obtained by overlaying the time programs for heating circuits C1, C2 and C3 (if present).
Set “1620: Release” to “Time programs HCs” to ensure that, when operating with Comfort heating mode, the heat source can always be used for DHW at the “Nominal setpoint” (if requested by the service), but heating service may be compromised. To “balance” the use of the heat source for heating and DHW, use parameter “5030: Charging time limitation”.
Refer to “Comfort Control Panel - User Manual (D-LBR 523)” for how to set the heating time programs.
• “Time program 4 / DHW”: The DHW setpoint is switched according to “Time program 4” between the “Nominal setpoint” (point 2) and the “Reduced setpoint” (point 3).