IDL Version 7.1 May 2009 Edition
Copyright © ITT Visual Information Solutions All Rights Reserved
Medical
Imaging in IDL
The IDL®, IDL Analyst™, ENVI®, and ENVI Zoom™ software programs and the accompanying procedures, functions, and documentation described herein are sold under license agreement. Their use, duplication, and disclosure are subject to the restrictions stated in the license agreement. ITT Visual Information Solutions reserves the right to make changes to this document at any time and without notice.
Limitation of Warranty
ITT Visual Information Solutions makes no warranties, either express or implied, as to any matter not expressly set forth in the license agreement, including without limitation the condition of the software, merchantability, or fitness for any particular purpose. ITT Visual Information Solutions shall not be liable for any direct, consequential, or other damages suffered by the Licensee or any others resulting from use of the software packages or their documentation.
Permission to Reproduce this Manual
If you are a licensed user of these products, ITT Visual Information Solutions grants you a limited, nontransferable license to reproduce this particular document provided such copies are for your use only and are not sold or distributed to third parties. All such copies must contain the title page and this notice page in their entirety.
Export Control Information
The software and associated documentation are subject to U.S. export controls including the United States Export Administration Regulations. The recipient is responsible for ensuring compliance with all applicable U.S. export control laws and regulations. These laws include restrictions on destinations, end users, and end use.
Acknowledgments
ENVI® and IDL® are registered trademarks of ITT Corporation, registered in the United States Patent and Trademark Office. ENVI Zoom™ is a trademark of ITT Visual Information Solutions.
Numerical Recipes™ is a trademark of Numerical Recipes Software. Numerical Recipes routines are used by permission. GRG2™ is a trademark of Windward Technologies, Inc. The GRG2 software for nonlinear optimization is used by permission.
NCSA Hierarchical Data Format (HDF) Software Library and Utilities. Copyright © 1988–2001, The Board of Trustees of the University of Illinois. All rights reserved.
NCSA HDF5 (Hierarchical Data Format 5) Software Library and Utilities. Copyright © 1998–2002, by the Board of Trustees of the University of Illinois. All rights reserved.
CDF Library. Copyright © 2002, National Space Science Data Center, NASA/Goddard Space Flight Center. NetCDF Library. Copyright © 1993–1999, University Corporation for Atmospheric Research/Unidata. HDF EOS Library. Copyright © 1996, Hughes and Applied Research Corporation.
SMACC. Copyright © 2000-2004, Spectral Sciences, Inc. and ITT Visual Information Solutions. All rights reserved. This software is based in part on the work of the Independent JPEG Group.
Portions of this software are copyrighted by DataDirect Technologies, © 1991–2003. BandMax®. Copyright © 2003, The Galileo Group Inc.
Portions of this computer program are copyright © 1995–1999, LizardTech, Inc. All rights reserved. MrSID is protected by U.S. Patent No. 5,710,835. Foreign Patents Pending.
Portions of this software were developed using Unisearch’s Kakadu software, for which ITT has a commercial license. Kakadu Software. Copyright © 2001. The University of New South Wales, UNSW, Sydney NSW 2052, Australia, and Unisearch Ltd, Australia.
This product includes software developed by the Apache Software Foundation (http://www.apache.org/).
MODTRAN is licensed from the United States of America under U.S. Patent No. 5,315,513 and U.S. Patent No. 5,884,226. FLAASH is licensed from Spectral Sciences, Inc. under a U.S. Patent Pending.
Portions of this software are copyrighted by Merge Technologies Incorporated.
Support Vector Machine (SVM) is based on the LIBSVM library written by Chih-Chung Chang and Chih-Jen Lin
(http://www.csie.ntu.edu.tw/~cjlin/libsvm), adapted by ITT Visual Information Solutions for remote sensing image supervised classification purposes. IDL Wavelet Toolkit Copyright © 2002, Christopher Torrence.
IMSL is a trademark of Visual Numerics, Inc. Copyright © 1970–2006 by Visual Numerics, Inc. All Rights Reserved. Other trademarks and registered trademarks are the property of the respective trademark holders.
Medical Imaging in IDL 3
Contents
Chapter 1
Expanded DICOM Support in IDL
... 9
Expanded DICOM Functionality in IDL ... 10
Using DICOM Network Services ... 10
Reading and Writing DICOM Files ... 10
Platform Support and Licensing ... 11
Supported Platforms ... 11
Licensing Requirements ... 11
Compliance with the DICOM Standard ... 12
Chapter 2
Using IDL DICOM Network Services
... 13
Overview of DICOM Network Services ... 14
Network Performance and Virus Protection Software ... 15
Determining Configuration Parameters ... 16
Contents Medical Imaging in IDL
Determining TPC/IP Port Numbers ... 16
Starting the Network Services Utility ... 18
Local Versus System Configuration ... 18
Starting the DICOM Network Services Utility in Local Mode ... 19
Starting the DICOM Network Services Utility in System Mode ... 20
Completing Required Setup Tasks ... 21
Configuring Your System to Receive Files ... 22
Configuring an Application Entity ... 25
Default Application Entities ... 25
Defining a New Application Entity ... 26
Modifying an Application Entity ... 28
Deleting an Application Entity ... 29
Defining a Machine to Be Queried ... 30
Querying a Remote Machine ... 33
Configure Query SCU Service Properties ... 33
Query the Remote Node ... 34
Build or Modify a Custom Query ... 36
Retrieve Files from a Remote Node ... 38
Troubleshooting a Retrieval Operation ... 40
Sending Files to a Remote Destination ... 43
Defining the Remote Storage SCP Node ... 44
Sending Files to a Remote Machine ... 44
Troubleshooting a Send Operation ... 47
Returning Connection Status with Echo ... 48
Troubleshooting Echo Errors ... 48
About the Storage SCP Service ... 49
Storage SCP Service Permissions ... 49
Storage SCP Service Log Files ... 50
Managing the Storage SCP Service ... 51
Starting and Stopping the Service Outside the Utility ... 52
DICOM Network Services User Interface ... 53
System Mode Interface ... 53
Medical Imaging in IDL Contents
Chapter 3
IDL DICOM Reference
... 57
DICOMEX_GETCONFIGFILEPATH ... 58
DICOMEX_GETSTORSCPDIR ... 60
DICOMEX_NET ... 62
IDLffDicomEx ... 64
File Compression and Transfer Syntax Support ... 68
IDLffDicomEx Properties ... 70 IDLffDicomEx::AddGroup ... 86 IDLffDicomEx::AddPrivateGroup ... 93 IDLffDicomEx::AddPrivateSequence ... 100 IDLffDicomEx::AddSequence ... 104 IDLffDicomEx::ChangeTransferSyntax ... 108 IDLffDicomEx::Cleanup ... 114 IDLffDicomEx::Commit ... 115 IDLffDicomEx::CopyTags ... 116 IDLffDicomEx::EnumerateTags ... 121 IDLffDicomEx::GetDescription ... 127 IDLffDicomEx::GetPixelData ... 129 IDLffDicomEx::GetPrivateValue ... 136 IDLffDicomEx::GetPrivateValueCount ... 140 IDLffDicomEx::GetPrivateValueLength ... 143 IDLffDicomEx::GetPrivateVR ... 148 IDLffDicomEx::GetProperty ... 151 IDLffDicomEx::GetValue ... 152 IDLffDicomEx::GetValueCount ... 155 IDLffDicomEx::GetValueLength ... 157 IDLffDicomEx::GetVR ... 161 IDLffDicomEx::Init ... 163 IDLffDicomEx::QueryPrivateValue ... 176 IDLffDicomEx::QueryValue ... 179 IDLffDicomEx::SetPixelData ... 182 IDLffDicomEx::SetPrivateValue ... 191 IDLffDicomEx::SetProperty ... 199 IDLffDicomEx::SetValue ... 201 IDLffDicomExCfg ... 212
Contents Medical Imaging in IDL IDLffDicomExCfg Properties ... 215 IDLffDicomExCfg::Cleanup ... 216 IDLffDicomExCfg::Commit ... 217 IDLffDicomExCfg::Echo ... 218 IDLffDicomExCfg::GetApplicationEntities ... 220 IDLffDicomExCfg::GetApplicationEntity ... 222 IDLffDicomExCfg::GetServiceLists ... 223 IDLffDicomExCfg::GetServiceTypes ... 224 IDLffDicomExCfg::GetValue ... 225 IDLffDicomExCfg::Init ... 227 IDLffDicomExCfg::IsDirty ... 230 IDLffDicomExCfg::RemoveApplicationEntity ... 231 IDLffDicomExCfg::SetApplicationEntity ... 232 IDLffDicomExCfg::SetValue ... 234 IDLffDicomExCfg::StorageScpService ... 236 IDLffDicomExQuery ... 239 IDLffDicomExQuery Properties ... 242
Patient Name and Name Sub-field Properties ... 257
IDLffDicomExQuery::Cleanup ... 260 IDLffDicomExQuery::ClearProperties ... 261 IDLffDicomExQuery::GetProperty ... 262 IDLffDicomExQuery::Init ... 263 IDLffDicomExQuery::Query ... 265 IDLffDicomExQuery::QueryModelsSupported ... 270 IDLffDicomExQuery::Retrieve ... 273 IDLffDicomExQuery::SetProperty ... 282 IDLffDicomExStorScu ... 283 IDLffDicomExStorScu Properties ... 285 IDLffDicomExStorScu::Cleanup ... 289 IDLffDicomExStorScu::ClearProperties ... 290 IDLffDicomExStorScu::GetProperty ... 291 IDLffDicomExStorScu::Init ... 292 IDLffDicomExStorScu::Send ... 294 IDLffDicomExStorScu::SetProperty ... 298
Medical Imaging in IDL Contents
Appendix A
DICOM Resources
... 299
DICOM Attributes ... 300 Value Representations ... 372Appendix B
IDL DICOM Quick Reference
... 387
Alphabetical Listing ... 388
Medical Imaging in IDL 9
Expanded DICOM
Support in IDL
This chapter provides introductory information about DICOM support in IDL including general information and licensing requirements.
Expanded DICOM Functionality in IDL . . . 10
Platform Support and Licensing . . . 11
Expanded DICOM Functionality in IDL Medical Imaging in IDL
Expanded DICOM Functionality in IDL
Using DICOM Network Services
IDL DICOM Network Services supports SCU (service class user) and SCP (service class provider) network functionality including Echo SCU, Query/Retrieve SCU, Storage SCU, and Storage SCP.
Using the DICOM Network Services utility, you can:
• Query a remote machine and retrieve selected DICOM files • Build custom queries
• Send files to a remote destination
• Troubleshoot network connections using echo
See Chapter 2, “Using IDL DICOM Network Services” for complete details on using the DICOM Network Services utility. The section, “Overview of DICOM Network Services” on page 14, provides more detailed introductory information.
Reading and Writing DICOM Files
The IDLffDicomEx object, described in “IDLffDicomEx” on page 64, greatly expands IDL’s DICOM file access capabilities. Previously, read-only DICOM support was provided through the IDLffDICOM object. The IDLffDicomEx object offers the following enhancements over the IDLffDICOM object:
• Ability to read from and write to DICOM files. Using the IDLffDicomEx object, you can read, clone, or create a new DICOM file. The IDLffDICOM object only supports reading DICOM files.
• Ability to read and write both public and private attributes including sequences and sets of repeating tags within sequences (groups).
• Ability to read and write compressed DICOM files on Windows and UNIX platforms. See “File Compression and Transfer Syntax Support” on page 68 for more information.
• Additional SOP class support. See “Compliance with the DICOM Standard”
on page 12 for information about the conformance statement, which contains the most current list of supported SOP classes.
• Ability to copy DICOM attributes from one file to another, and view all the DICOM attributes contained within a file.
Medical Imaging in IDL Platform Support and Licensing
Platform Support and Licensing
Supported Platforms
See “Feature Support by Operating System” (Chapter 2, What’s New in IDL 7.1) for a current list of operating systems that support the expanded DICOM support in IDL.
Licensing Requirements
For more information about the following items, contact your ITT Visual Information Solutions sales representative or technical support. To redistribute applications that contain the DICOM Network Services utility or that use the IDLffDicomEx object functionality, an embedded license or a runtime license can be purchased for end users, or users can be instructed to purchase their own licenses. Please refer to
Chapter 23, “Distributing Runtime Mode Applications” (Application Programming) for more details about the different licensing options.
DICOM Network Services
An additional-cost license is required to access IDL’s DICOM Network Services. Your license purchase for DICOM Network Services includes the license required for DICOM Read/Write support.
DICOM Read/Write
The IDLffDicomEx object greatly expands IDL’s DICOM capabilities and requires an additional-cost license key to access the functionality.
Compliance with the DICOM Standard Medical Imaging in IDL
Compliance with the DICOM Standard
Information on the compliance of IDL’s DICOM Network Services and the IDLffDicomEx object to the DICOM standard are provided in a conformance statement. See www.ittvis.com/idl/dicom for a current DICOM Conformance Statement.
Note
IDL, the IDL DICOM toolkit, and the contents of the IDL documentation are not marketed as products with FDA Section 510(k) premarket notification nor have they been reviewed by any other regulatory agency from any other country. As is, IDL, the IDL DICOM toolkit, and the contents of the IDL documentation, are intended for educational, research, and third party application developers. If IDL and the DICOM toolkit, or information derived from them, are to be used as part of an application for clinical purposes, such as for treating or diagnosing human subjects, it is the responsibility of the LICENSEE to determine the need for and to obtain the appropriate regulatory reviews before such usage. ITT Visual
Information Solutions maintains engineering and quality control records suitable for review by a regulatory agency. We reserve the right to recover costs incurred during a regulatory review from the LICENSEE. We shall not be liable for any damages arising out of the use of IDL or the DICOM toolkit by any party for any purpose.
Medical Imaging in IDL 13
Using IDL DICOM
Network Services
This chapter provides information on how to use the DICOM Network Services utility to configure Application Entities, and how to perform query, retrieve, storage, and send operations.
Overview of DICOM Network Services . . . 14
Determining Configuration Parameters . . . . 16
Starting the Network Services Utility . . . 18
Completing Required Setup Tasks . . . 21
Configuring Your System to Receive Files . 22
Configuring an Application Entity . . . 25
Defining a Machine to Be Queried . . . 30
Querying a Remote Machine . . . 33
Sending Files to a Remote Destination . . . 43
Returning Connection Status with Echo . . 48
About the Storage SCP Service . . . 49
Managing the Storage SCP Service . . . 51
Overview of DICOM Network Services Medical Imaging in IDL
Overview of DICOM Network Services
IDL DICOM Network Services supports SCU (service class user) and SCP (service class provider) network functionality including:
• Echo SCU
• Query/Retrieve SCU • Storage SCU • Storage SCP Note
This feature requires an additional-cost license key to access the functionality. For more information, contact your ITT Visual Information Solutions sales
representative or technical support.
Three broad areas of functionality in the DICOM Network Services utility that support these services are:
• Configuration — this tab allows you to configure properties of Application
Entities (AEs), echo a remote node and manage the Storage SCP service. AEs can be configured in a local Configuration tab or a system Configuration tab. See “Local Versus System Configuration” on page 18 for important
information on the distinction.
• Query Retrieve SCU — this tab allows you to query a remote database of
files and retrieve selected files. You can also see the query/retrieve operation status, and optionally define custom query parameters. You will need to configure an Application Entity for a Query SCP node before performing a query operation. See “Defining a Machine to Be Queried” on page 30 for details.
• Storage SCU — this tab allows you to select a node to which files are sent and
select the files to send. You will need to configure an Application Entity for the remote device that supports Storage SCP. See “Sending Files to a Remote Destination” on page 43 for details.
See “DICOM Network Services User Interface” on page 53 for screen shots of each of the available tabs.
Medical Imaging in IDL Overview of DICOM Network Services Note
See “Compliance with the DICOM Standard” on page 12 for important information regarding the use of the DICOM Network Services utility for clinical research or diagnostic purposes.
Network Performance and Virus Protection Software
Transferring files over a network can be a time consuming process. To optimize file transfer speed, you may want to disable any virus scanning software whenDetermining Configuration Parameters Medical Imaging in IDL
Determining Configuration Parameters
When defining Application Entities, you will need the host name (or IP address), and port number of your machine and any remote machines you will connect to, in addition to other information. This section provides information on how to retrieve this information.
Determining the IP Address
Determine the IP address of your machine by completing the following instructions for your platform.
Windows
1. Click Start → Programs → Accessories → Command Prompt to open a DOS window.
2. At the prompt, type ipconfig. This returns the IP address of the local machine.
UNIX
At the UNIX prompt, type /sbin/ifconfig -a to return the IP (ether) address or type netstat -i to return the hostname associated with the IP address.
Mac OS X
Open Finder. Under Applications/Utilities launch Network Utility. Select the Info tab and then select the network interface from the pull down menu.
Determining TPC/IP Port Numbers
Use the information in the following section to determine available TCP/IP ports.
Windows
1. Click Start → Programs → Accessories → Command Prompt to open a DOS window.
2. At the prompt, type netstat -a. View the results to determine port availability and status.
Medical Imaging in IDL Determining Configuration Parameters
UNIX
Use the netstat -a command to return port information.
Mac OS X
Open Finder. Under Applications/Utilities launch Network Utility. Select the
Starting the Network Services Utility Medical Imaging in IDL
Starting the Network Services Utility
The DICOM Network Services utility allows you to create and store Application Entity definitions in a local configuration file or a system configuration file. This distinction is only required when you define an Application Entity associated with the Storage SCP service, or configure properties of this service. This information must be stored in the system configuration file, which requires starting the utility with a special SYSTEM keyword. Application Entities using other service types are typically defined in the local configuration file (available when the utility is started without any keywords). When started in this manner, the utility also provides access to query, retrieve and send operations. See the following section for details on local and system modes.
Local Versus System Configuration
There are two modes of configuration available; local configuration and system configuration. Underlying each set of user-defined settings is an .xml file. Changes made to Application Entities (AEs) defined in the system configuration and local configuration mode of the DICOM Network Services utility are reflected in these files.
Note
Always use the DICOM Network Services utility to make changes to the configuration files. The raw .xml files should never be modified directly. The system configuration portion of the DICOM Network Services utility corresponds to a single system configuration file that is used by the Storage SCP service. The Storage SCP service listens for incoming files and is typically started at boot time, which means the service is not associated with a specific user. The properties of the Storage SCP service can only be set when the DICOM Network Service utility is started in system configuration mode.
When you share a single installation of IDL among a number of users, changes made in the system configuration file are visible to all users. In such a network, it is likely that only system-wide configuration information will be entered in system mode, and you will enter individual Application Entity definitions in your local configuration file by starting the utility in local mode. Each user has a local configuration file.
Medical Imaging in IDL Starting the Network Services Utility It is important to understand when changes made in system configuration mode are propagated to each user's local configuration file:
• The first time the DICOM Network Services utility is accessed in IDL, the local configuration file is populated with AEs defined in the system
configuration file.
• After the first time the utility is started, the local file is only overwritten with system configuration information if the local directory is deleted. In such a case, the local configuration settings will be recreated from the system configuration settings.
If having locally configured AEs that are not duplicated in the system file is acceptable, then there is no need to modify the system file except to define Storage SCP service parameters. This must be done in the system configuration file. See
“Configuring Your System to Receive Files” on page 22 for details. Tip
You can use the DICOMEX_GETCONFIGFILEPATH function to return the location of either configuration file. See “DICOMEX_GETCONFIGFILEPATH”
on page 58 for details.
Starting the DICOM Network Services Utility in Local
Mode
Enter the following at the IDL command prompt to launch the DICOM Network
Services utility in local configuration mode:
DICOMEX_NET
This provides access to the local Configuration tab, the Query Retrieve SCU tab and the Storage SCU tab.
Note
On Windows, you can also select Start → Programs → IDL x.x → DICOM
Network Services and click the Local button to start the utility in local
configuration mode. On Macintosh, double-click DicomExNetStartup in the root IDL folder.
Starting the Network Services Utility Medical Imaging in IDL
Starting the DICOM Network Services Utility in
System Mode
Use the SYSTEM keyword to launch the DICOM Network Services utility in system configuration mode:
DICOMEX_NET, /SYSTEM
This provides access to the system Configuration tab. Note
On Windows, you can also select Start → Programs → IDL x.x → DICOM
Network Services and click the System button to start the utility in system
configuration mode. On Macintosh, double-click DicomExNetStartup in the root IDL folder.
Medical Imaging in IDL Completing Required Setup Tasks
Completing Required Setup Tasks
Before using the DICOM Network Services utility to query, retrieve or transfer files across a network, you need to define Application Entities (AEs) for the needed DICOM services. AEs define the machine characteristics where a local or remote DICOM network service exists.
The exact steps depend on the type of services you will be using. See the following for more information:
• “Configuring Your System to Receive Files” on page 22 — describes how to define an Application Entity associated with the DICOM Storage SCP service which includes setting a directory location where returned files are stored. This change requires restarting the Storage SCP Service.
• “Defining a Machine to Be Queried” on page 30 — describes how to configure and define a Query SCP node, a machine from which you will request files. • “Sending Files to a Remote Destination” on page 43 — describes how send files from your system (one that supports Storage SCU) to a remote machine (one that supports Storage SCP).
After defining the necessary Application Entities, you can select among the defined AEs, choosing one for each service. You can also test connections to remote nodes using echo, create custom queries, retrieve and send files, and manage the Storage SCP Service state.
Configuring Your System to Receive Files Medical Imaging in IDL
Configuring Your System to Receive Files
Storage is the process by which DICOM files are transferred from one DICOM device to another. In order to receive files, you need to specify a Storage SCP Application Entity for the machine that will store the files that are returned. This entity uses the Storage SCP Service, which listens at a TCP/IP port for incoming DICOM files and writes them to a defined disk directory.
Note
If you are running Windows XP service pack 2, you may need to modify your firewall settings in order to send and receive DICOM files. See “Troubleshooting a Retrieval Operation” on page 40 for details.
To configure the Storage SCP Service parameters and an Application Entity, complete the following steps:
1. Open the DICOM Network Services utility in system configuration mode: DICOMEX_NET, /SYSTEM
Note
The required Storage SCP Application Entity area is grayed out on the
Configuration tab unless you start the DICOM Network Services utility
using the SYSTEM keyword.
2. In the Storage SCP Application Entity area, configure Storage SCP settings for the machine on which the files will be stored.
Medical Imaging in IDL Configuring Your System to Receive Files Note
You must define a valid directory for Storage SCP Dir in order for the Storage SCP service to function correctly.
Application Entity Name
Accept the default value, IDL_AE_STOR_SCP or see “Defining a New Application Entity” on page 26 to configure a new Application Entity.
Storage SCP Dir
Enter the full path to the directory location where the retrieved files will be located, or click the ... button to select or create the directory.
Note - If multiple clients access a single installation of IDL, this file storage directory will be shared among all users.
Control Port
(UNIX only)
Enter the port number the Storage SCP service listens at for control messages. Typically this value is one greater than the port number used by the Storage SCP Application Entity. The default for the control port value is 2511 (this is one greater than the default port number, 2510, for the default IDL_AE_STOR_SCP Application Entity). To change this value, you must:
1. Stop the Storage SCP service by clicking Stop
Service.
2. Change the Control Port value. 3. Click Save to save the change.
4. Restart the Storage SCP Service by clicking
Start Service.
Warning - If you fail to follow these steps to change the control port value, you may not be able to stop the service from the DICOM Network
Services utility because the user interface and the
service will not be using the same control port number.
Configuring Your System to Receive Files Medical Imaging in IDL 3. Click Save to save the Application Entity and Storage SCP directory
information.
4. Stop and restart the Storage SCP Service. This step is required any time changes are made to the system configuration file. Click Stop Service and then click Start Service. You can then verify the service is running by clicking
Update Service Status.
Note
Making changes in this dialog only affects characteristics of the local Storage SCP service Application Entity. It is not possible to change characteristics of remote SCP service nodes.
Make a note of the Storage SCP Application Entity information you have just configured. You will need to add this information on the device that will be queried for files. See “Defining a Machine to Be Queried” on page 30 for instructions. Tip
You can use the DICOMEX_GETSTORSCPDIR function to return the location of the directory associated with the DICOM Store SCP service. See
“DICOMEX_GETSTORSCPDIR” on page 60 for details.
File Extension Accept the default dcm extension or enter the extension that will be appended to files.
Accept Any Application Entity
Check this box to allow the Storage SCP Service to accept files from any remote machine. Uncheck this box to accept files only from Application Entities defined in this dialog and stored in the system configuration file.
When you uncheck this box, enter Application Entity information for each remote file source machine that will be queried and will send files to the directory defined by Storage SCP Dir. This information must exist in the system configuration file. See “Configuring an Application Entity” on page 25 for information on configuring AEs.
Medical Imaging in IDL Configuring an Application Entity
Configuring an Application Entity
An Application Entity (AE) is a local or remote DICOM service. In an image archival system, common DICOM services include storage and query/retrieve. Devices (local or remote imaging equipment or computers) may support one or more services, and one or more service roles. Roles define a device as a service class user (SCU) or a service class provider (SCP). A SCU role is typically associated with a client action. A SCP role is typically associated with a server action.
Default Application Entities
The DICOM Network Services utility defines four default Application Entities: • IDL_AE_QUERY_SCU — uses the Query SCU service, which lets you ask a
device (a file source) about DICOM files contained in its database. This service works in conjunction with the Query SCP service, which allows you retrieve DICOM files from the remote node. On the file source device (the server in this instance), the Query SCP service listens for and responds to queries. It also listens for requests and sends the specified DICOM files. • IDL_AE_STOR_SCP — uses the Storage SCP service, which listens at the
defined TCP/IP port for incoming DICOM files and writes them to a local disk directory.
• IDL_AE_STOR_SCU — uses the Storage SCU service, which lets you send
local DICOM files to a remote node.
• IDL_AE_ECHO_SCU — uses the Echo SCU service, which lets you
determine if a remote SCP node is accessible.
The network characteristics of the default entities can be modified, but they cannot be deleted. You can also define new AEs. See the following section for details:
• “Defining a New Application Entity” on page 26 • “Modifying an Application Entity” on page 28 • “Deleting an Application Entity” on page 29
Replacing a Default Entity
You can use the default IDL_AE_ECHO_SCU, IDL_AE_QUERY_SCU, and IDL_AE_STOR_SCU Application Entities for echo, query and send operations without making any modifications. If you decide to define new entities to replace these, you will need to select the entity in the Configuration tab.
Configuring an Application Entity Medical Imaging in IDL After defining a new entity as described in “Defining a New Application Entity” in the following section, complete the following steps:
1. Open the DICOM Network Services utility by entering: DICOMEX_NET
2. In the upper right quadrant of the Configuration tab, select the name of the new Application Entity in the Application Entity Name droplist to indicate the entity to be associated with the Echo SCU, Query Retrieve SCU or Storage SCU services.
3. Click Save to record the changes.
Defining a New Application Entity
To define a new Application Entity for a service, complete the following steps: 1. Select the Configuration tab of the DICOM Network Services utility that has
been started in local or system configuration mode. See “Starting the Network Services Utility” on page 18 for details.
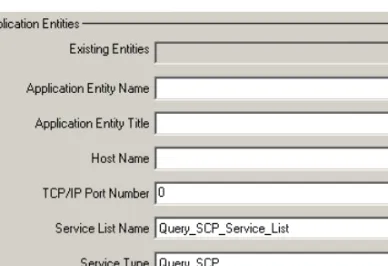
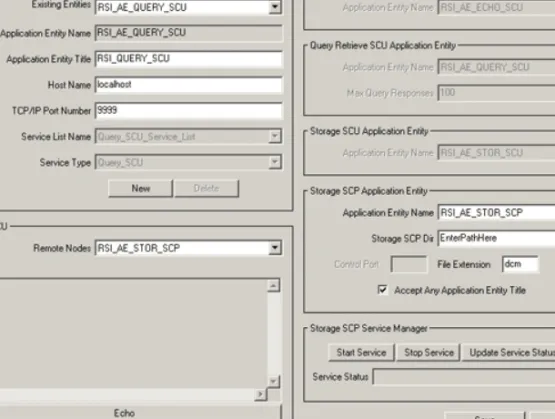
2. In the Application Entities area, click the New button to invoke Application Entity definition mode. This desensitizes other utility areas and clears fields within the Application Entities area, shown in the following figure.
Medical Imaging in IDL Configuring an Application Entity 3. Configure the properties of the Application Entity as follows:
Application Entity Name
A locally unique, descriptive identifier for the Application Entity consisting of a maximum of 30 characters.
Application Entity Title
A non-unique identifier for the Application Entity consisting of a maximum of 15 characters. An Application Entity with the same title may support more than one service (e.g. support Query SCP and Storage SCP).
Host Name The machine host name or IP address consisting of a maximum of 30 characters. The term localhost is equivalent to the host name of the machine containing the IDL installation, typically the local machine.
Note - See “Determining the IP Address” on page 16 for instructions on accessing a machine’s IP address.
TCP/IP Port Number
The valid port number of the local or remote SCP service consisting of a maximum of 5 digits. Set to 9999 for a SCU service type. The default ITT Visual Information
Solutions-defined SCP service value is 2510.
Note - See “Determining TPC/IP Port Numbers” on page 16 for information on returning port status.
Configuring an Application Entity Medical Imaging in IDL 4. Complete the Application Entity configuration. Click Save to save the
Application Entity definition in the local or system configuration file. Click
Cancel to dismiss the changes and exit Application Entity definition mode.
5. Stop and restart the Storage SCP Service any time you modify Application Entities that use the Storage_SCP service type while in system configuration mode (when you have started the DICOM Network Services utility with the SYSTEM keyword). See “Managing the Storage SCP Service” on page 51 for details.
Modifying an Application Entity
On the Configuration tab of the DICOM Network Services utility, you can modify the characteristics of default or custom application entities. For the default,
Application Entities (those listed in “Default Application Entities” on page 25), you can modify the following fields:
• Application Entity Title • Host Name
• TCP/IP Port Number
Service List Name Select the service list type from the droplist. Options are: • Query_SCP_Service_List • Query_SCU_Service_List • Storage_SCP_Service_List • Storage_SCU_Service_List • Echo_SCU_Service_List
Service Type Select the service type from the droplist. This value should correspond to the service list type selected in the previous field. Options are: • Query_SCP • Query_SCU • Storage_SCP • Storage_SCU • Echo_SCU
Medical Imaging in IDL Configuring an Application Entity For a custom Application Entity, you can modify any configurable characteristic. Complete the following steps to modify an Application Entity definition:
1. Launch the DICOM Network Services utility in local or system configuration mode if needed. See “Starting the Network Services Utility” on page 18 for details.
2. Select the Application Entity to be modified from the Existing Entities droplist on the Configuration tab.
3. Click in any available field and make the desired changes. Other areas of the dialog are desensitized while in Application Entity definition mode.
4. Complete the Application Entity modification. Click Save to save the changes to the Application Entity definition in the local or system configuration file. Click Cancel to dismiss the changes and exit Application Entity definition mode.
Deleting an Application Entity
You can delete any custom Application Entity definitions that you have defined. You cannot delete the default Application Entities (those listed in “Default Application Entities” on page 25). To delete an Application Entity, complete the following steps:
1. Select the Application Entity to be deleted from the Existing Entities droplist. 2. Click Delete.
3. Confirm the deletion by clicking Yes.
Defining a Machine to Be Queried Medical Imaging in IDL
Defining a Machine to Be Queried
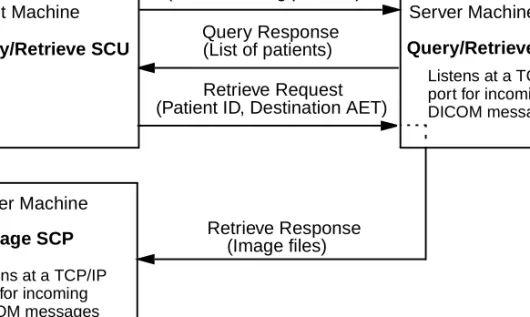
Query/Retrieve is the process by which DICOM devices request information from a database and retrieve data and images through those requests. To form an association, the local Query Retrieve SCU connects with a remote Query Retrieve SCP. The client at the Query Retrieve SCU machine sends a request to the remote Query Retrieve SCP machine. The Query Retrieve SCP machine responds with a list of patients. From this list the client requests files (identified by patient ID) be sent to a destination (identified by Application Entity title). The remote Query Retrieve SCP machine responds to the request and sends files to the file storage directory that you defined in association with the Storage SCP Application Entity. The Storage SCP service writes the incoming files to disk.
Note
The default Query Retrieve SCU Application Entity is IDL_AE_QUERY_SCU. There is no need to make any changes to this entity definition, but you can define a new Application Entity if desired. You would then select the new entity in the
Query Retrieve SCU Application Entity area of the Configuration tab in the DICOM Network Services utility and click Save.
Figure 2-3: Flow of Data in a Query Retrieve Operation Client Machine Query/Retrieve SCU Query Request Server Machine Query/Retrieve SCP Listens at a TCP/IP port for incoming DICOM messages
Server Machine
Storage SCP
(Find matching patients) Query Response (List of patients) Retrieve Request (Patient ID, Destination AET)
Listens at a TCP/IP port for incoming DICOM messages
Retrieve Response (Image files)
Medical Imaging in IDL Defining a Machine to Be Queried Before a query/retrieve operation, you need to:
• Tell the Query Retrieve SCP device (the file source) where files should be sent (the Storage SCP Application Entity information that indicates the file storage location)
• Configure a Query SCP Application Entity (for the file source) on your machine (the machine running the query)
Complete the following steps:
1. On the file source (likely a remote machine or device) that is running the Query Retrieve SCP service, enter the Storage SCP Application Entity information. This Application Entity is the one defined in “Configuring Your System to Receive Files” on page 22. You can look up the following
information in the DICOM Network Services utility by launching it with the SYSTEM keyword. (See “Starting the DICOM Network Services Utility in System Mode” on page 20 if needed).
• Application Entity Title — the default is IDL_STORE_SCP.
• Host Name — if the current value is localhost, you will instead need to
provide the machine host name or IP address. See “Determining the IP Address” on page 16 if you do not know the host name.
• Port Number — the default value is 2510.
2. Record the Application Entity title, host name or IP address, and port number of the Query Retrieve SCP service on the file source machine.
3. On your local machine, the machine from which the queries will be made, open the DICOM Network Services utility by entering:
DICOMEX_NET
4. Define an Application Entity that describes the network characteristics of the device from which files are requested, the file source. Use the information collected in step 2 to configure a local Query SCP Application Entity. For instructions on defining a new Application Entity, see “Defining a New Application Entity” on page 26.
This entity should be assigned the following:
• Service List Name — Query_SCP_Service_List
• Service Type — Query_SCP
Selecting the Query_SCP service type for this Application Entity indicates the remote device listens for and responds to queries. This service also listens for
Defining a Machine to Be Queried Medical Imaging in IDL requests and sends the specified DICOM files. The following figure shows a hypothetical Application Entity configured as a Query SCP service for the file source device.
5. Also on your local machine, make sure the Storage SCP Application Entity referenced in step 1 is listed in the Existing Entities droplist on the
Configuration tab. (This is the entity defined in “Configuring Your System to Receive Files” on page 22.) If you modified the default characteristics of the IDL_AE_STOR_SCP Application Entity or created a new Application Entity that uses the Storage SCP service while in system configuration mode, you must duplicate those settings in the DICOM Network Services utility while in local configuration mode.
See the following section, “Querying a Remote Machine” on page 33, for information on how to use the DICOM Network Services utility to query and retrieve files.
Medical Imaging in IDL Querying a Remote Machine
Querying a Remote Machine
The Query/Retrieve functionality of the DICOM Network Services utility is located on the Query Retrieve SCU tab. Once you have defined a Query SCP Application Entity for one or more file source devices (as described in “Defining a Machine to Be Queried” on page 30), you can query the remote machine. If you have also defined a Storage SCP service (defined in “Configuring Your System to Receive Files” on page 22), you can return requested files to a specified directory. This section covers topics related to configuring queries and retrieving files:
• “Configure Query SCU Service Properties” below
• “Query the Remote Node” on page 34
• “Build or Modify a Custom Query” on page 36 • “Retrieve Files from a Remote Node” on page 38 Note
The Query Retrieve SCU tab is not available if you start the DICOM Network
Services utility with the SYSTEM keyword.
Configure Query SCU Service Properties
Before querying a remote machine, select an Application Entity that supports the Query SCU service type and define the number of responses to be returned.
1. Open the DICOM Network Services utility by entering the following at the IDL command prompt:
DICOMEX_NET
2. On the Configuration tab, modify settings in the Query Retrieve SCU
Application Entity area:
• Application Entity Name — select an Application Entity from the
droplist. The default is IDL_AE_QUERY_SCU. If you have defined other Application Entities that use the Service Type of Query SCU, they will appear here.
• Max Query Responses — enter the maximum number matches to return
Querying a Remote Machine Medical Imaging in IDL
Query the Remote Node
To query a remote machine, complete the following steps:
1. Open the DICOM Network Services utility if needed by entering: DICOMEX_NET
2. Click on the Query Retrieve SCU tab.
3. In the Query Node droplist, select the Application Entity name associated with the remote machine to be queried. If this droplist is blank, you need to define an Application Entity for the remote machine as described in “Defining a Machine to Be Queried” on page 30.
4. Select the query to be performed from the droplist: • All patients — the default patient-level query
• Use current query — the last configured custom query. If you have not
built a custom query, the default is a patient-level query. Note
See “Build or Modify a Custom Query” on page 36 if you want to change the default query.
5. Click the Query button. All patient files located on the remote machine (up to the number of Max Query Responses defined on the Configuration tab) that match the query parameters will be returned.
6. View the query results in the Results section, described in “Query Results” on page 35. Status information appears in the Status window.
Note
If you have a query error, you can use the Echo SCU functionality to test the connection. See “Returning Connection Status with Echo” on page 48.
Cancelling a Query Operation
To stop a query, click the Cancel button. This sends a cancel request to the remote machine and halts the return of file information.
Medical Imaging in IDL Querying a Remote Machine
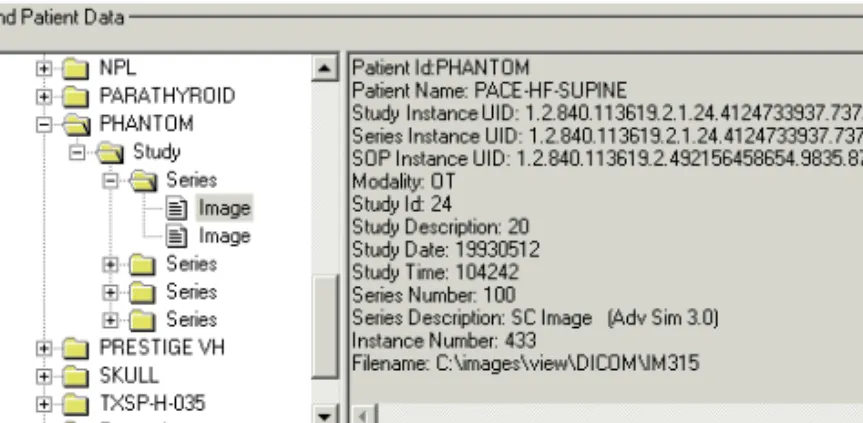
Query Results
The results of any query are shown in the Results section of the Query Retrieve
SCU tab. This area is divided into a navigation tree in the left pane and a table display
in the right pane. A subset of the Results area is shown in the following figure.
The Navigation Tree area displays the patient-study-series-image hierarchy. The Table Display area displays selected patient, study, series or image information. When you click on an item in the Navigation Tree, a sub-query returns child items. For example, clicking on a series will perform a sub-query to return all images associated with that series, up to the Maximum Query Responses value. Click the + symbol next to any previously selected item (or double-click the item) to see sub-items.
Note
For optimum performance, the initial query does not populate the Navigation Tree with all child items. Because these items are returned on request, there may be a slight delay in the display of sub-query results.
Note
Some remote machines do not return a patient ID with query results. When you perform a query by clicking the Query button, all results returned without a patient ID appear under “Unknown Patient ID” in the Navigation Tree window.
Figure 2-5: Results Area of the Query Retrieve SCU Tab
Navigation Tree Table Display
Patient
Study Series
Querying a Remote Machine Medical Imaging in IDL
Build or Modify a Custom Query
You can create a custom query to return patient or study files that match specific patient-, study-, or series-level characteristics. To create a custom query, complete the following steps:
1. Click the Build Query button on the Query Retrieve SCU tab to open the
Query Fields dialog.
2. In the Query Model area, select Patient Root or Study Root. This indicates the highest level of information that can be retrieved. For instance, if you select Study Root, you cannot retrieve the study by selecting the associated patient. You must select a study, series or image to be retrieved.
Note
To check what query models are supported by the remote node, use the Echo
SCU service on the Configuration tab. Select the Query SCP entity in the
droplist and click Echo. If the echo is successful, query model information is printed following echo results in the Status window.
3. In the Query Level area, select Patient Level, Study Level or Series Level to define patient, study or series characteristics against which files are matched. Note
Changing the query model or query level makes some query fields active and others insensitive. Any values shown in insensitive fields are not applied to the current query.
4. Click Apply to store the query or Ok to store the query and close the dialog. The specified query fields are applied to subsequent queries. If you select
Clear, the query will be performed at the Query Model level. Select Cancel to
clear changes and revert to the last used query. Click the Help button for information on using wildcards in attribute matching, and information on DICOM date formats.
Medical Imaging in IDL Querying a Remote Machine
Attribute Matching Using Wildcards
The implementation of the Query/Retrieve SCP service on the remote node
determines the quality of attribute matching. All attribute matching is performed by the remote service. In addition to case sensitivity, matching can include one or more of the following:
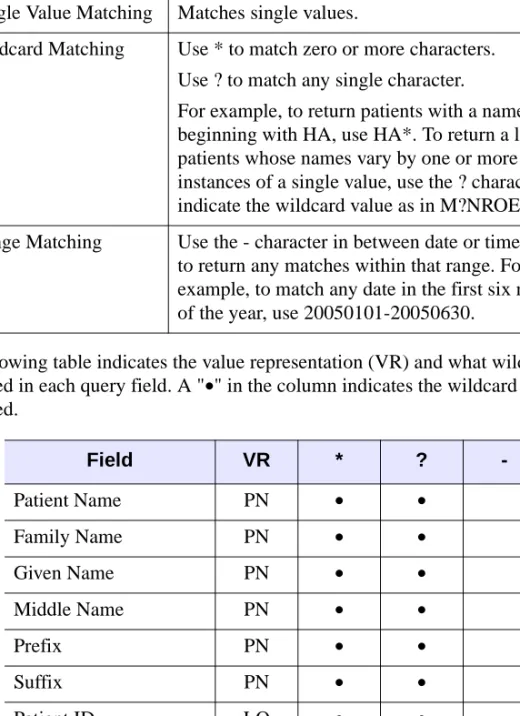
The following table indicates the value representation (VR) and what wildcards are supported in each query field. A "•" in the column indicates the wildcard is
supported.
Single Value Matching Matches single values.
Wildcard Matching Use * to match zero or more characters. Use ? to match any single character. For example, to return patients with a name beginning with HA, use HA*. To return a list of patients whose names vary by one or more instances of a single value, use the ? character to indicate the wildcard value as in M?NROE. Range Matching Use the - character in between date or time values
to return any matches within that range. For example, to match any date in the first six months of the year, use 20050101-20050630.
Field VR * ? -Patient Name PN • • Family Name PN • • Given Name PN • • Middle Name PN • • Prefix PN • • Suffix PN • • Patient ID LO • • Study Date DA •
Querying a Remote Machine Medical Imaging in IDL
Retrieve Files from a Remote Node
The DICOM Network Services utility lets you retrieve selected DICOM data from a remote machine, and store the files in the directory you associated with the Storage SCP service. To retrieve data, complete the following steps:
1. Click on the Query Retrieve SCU tab of the DICOM Network Services utility if it is not already selected.
2. Perform a query against a remote database. See “Query the Remote Node” on page 34 for instructions.
3. In the Destination Node droplist, select the Application Entity name associated with the current Storage SCP service. If there is more than one Application Entity that supports Storage SCP, you can locate the name of the current entity on the Configuration tab in the grayed out Storage SCP
Application Entity area.
4. In the Navigation Tree portion of the Results area, select the patient, study, series or image that you want to retrieve.
Note
If you have selected Study Root in the Query Model area of the Query
Fields dialog (described in “Build or Modify a Custom Query” on page 36), you cannot retrieve data at a patient level. You will need to select a study, series or image in the Navigation Tree.
5. Click Retrieve to return the selected data. This retrieves all images associated with a selected patient, study or series, or retrieves the selected image. Files are stored in the directory you associated with the Storage SCP Application Entity. The directory location is shown in the grayed out Storage SCP Application
Entity area on the Configuration tab. Retrieve status information is available
in the Status window.
Study Time TM •
Accession Number SH • •
Study ID SH • •
Modality CS
Field VR * ?
Medical Imaging in IDL Querying a Remote Machine Note
There is a Depot subdirectory located in the directory you specified when configuring the Storage SCP Application Entity. This directory is used in the process of file retrieval and can be ignored. See “About the Depot Directory”
on page 50 for details. Warning
Existing files with duplicate names are overwritten. See “About the Storage SCP Service” on page 49 for details.
Cancelling a Retrieval Operation
To halt the retrieval of data, click the Cancel button. This sends a cancel request to the remote node and halts file transfers.
Querying a Remote Machine Medical Imaging in IDL
Troubleshooting a Retrieval Operation
There are common configuration errors that can lead to retrieval problems. If one of the following errors appear in the Status window of the Query Retrieve SCU tab, consider the following possible resolutions:
Error Resolution
Move destination unknown. The remote machine does not recognize the retrieve
Destination Node. Try these steps:
1. Make sure that your current Storage SCP Application Entity is selected in this droplist. This is described in “Query the Remote Node”
on page 34.
2. Echo the Storage SCP Application Entity to verify valid network connection settings. See
“Returning Connection Status with Echo” on page 48.
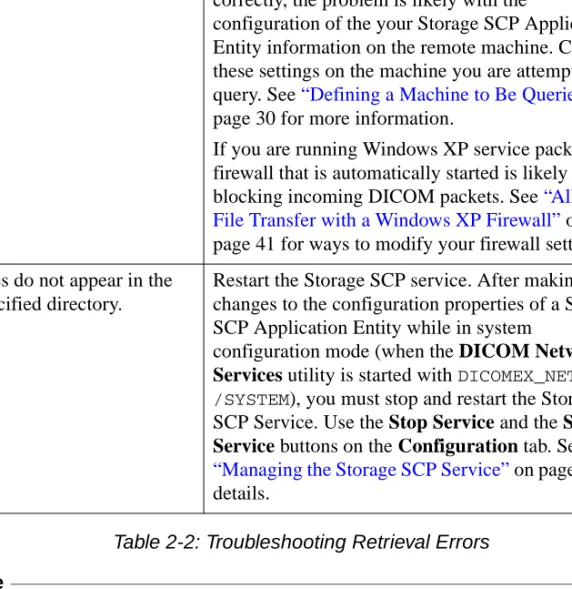
3. Try to send a file to the Storage SCP directory by selecting a local directory containing any DICOM file and sending it to yourself using the Storage SCU functionality. See “Sending Files to a Remote Destination” on page 43 for details. Table 2-2: Troubleshooting Retrieval Errors
Medical Imaging in IDL Querying a Remote Machine Note
If you are unable to retrieve files, verify that virus scanning software is not blocking the transfer. If file transfers are extremely slow, you may want to disable any virus scanning software when performing query, retrieve or send operations.
Allowing File Transfer with a Windows XP Firewall
By default, Windows XP service pack 2 automatically starts a firewall. This blocks DIOCM file packet transfer until you either modify your firewall settings or disable the firewall.
To modify your firewall settings to include the port number associated with your IDL_AE_STOR_SCP Application Entity (as defined in “Configuring Your System to Receive Files” on page 22), complete the following steps.
Unable to process error. If all of the resolutions in the previous steps work correctly, the problem is likely with the
configuration of the your Storage SCP Application Entity information on the remote machine. Check these settings on the machine you are attempting to query. See “Defining a Machine to Be Queried” on page 30 for more information.
If you are running Windows XP service pack 2, the firewall that is automatically started is likely blocking incoming DICOM packets. See “Allowing File Transfer with a Windows XP Firewall” on page 41 for ways to modify your firewall settings. Files do not appear in the
specified directory.
Restart the Storage SCP service. After making any changes to the configuration properties of a Storage SCP Application Entity while in system
configuration mode (when the DICOM Network
Services utility is started with DICOMEX_NET, /SYSTEM), you must stop and restart the Storage SCP Service. Use the Stop Service and the Start
Service buttons on the Configuration tab. See
“Managing the Storage SCP Service” on page 51 for details.
Error Resolution
Querying a Remote Machine Medical Imaging in IDL 1. Select Start → Control Panel → Windows Firewall.
2. Click on the Exceptions tab and add the port number of entity associated with your Store SCP application entity. Select Add Port and enter a name
identifying the port and the port number. If you accepted the default settings for the IDL_AE_STOR_SCP Application Entity, the port number is 2510. 3. Click OK to save the changes and OK to exit the dialog.
You also have the option to completely disable the firewall, although this should be done only if there is low risk of infection from viruses or other external attacks. To disable your firewall, select Start → Control Panel → Windows Firewall and choose Off. Click OK to save the changes and exit the dialog.
Medical Imaging in IDL Sending Files to a Remote Destination
Sending Files to a Remote Destination
The Storage SCU functionality of the DICOM Network Services utility transmits DICOM files from the local DICOM Storage SCU (Service Class User) to a remote destination that is identified as a DICOM Storage SCP (Service Class Provider). This sends a copy of the images to the file storage machine, leaving the original image data intact.
The IDL Storage SCU functionality typically sends a DICOM file using the file's current transfer syntax. IDL detects, during the association negotiation, whether or not the remote Storage SCP server can accept the file's current transfer syntax. If the remote Storage SCP cannot accept the current transfer syntax the file's transfer syntax is changed to Implicit VR or Explicit VR and then sent to the remote node. The original file on disk remains unchanged. JPEG Lossy files are not converted to Implicit VR or Explicit VR files because the user at the remote end could be mislead into thinking that the file contains lossless data.
Note
The required Storage SCU tab is not available if you start the DICOM Network
Services utility with the SYSTEM keyword.
To send files to a remote machine, see the following topics:
• “Defining the Remote Storage SCP Node” below — describes how to configure an Application Entity for the machine to which you will send files • “Sending Files to a Remote Machine” on page 44 — describes using the
DICOM Network Services utility to browse for, select and transmit files to
the remote machine
Figure 2-6: Flow of Data in a Storage Operation Client Machine
Storage SCU Store Request
Server Machine
Storage SCP
Listens at a TCP/IP port for incoming DICOM messages
Sending Files to a Remote Destination Medical Imaging in IDL
Defining the Remote Storage SCP Node
You need to configure an Application Entity for the remote machine to which you will send DICOM files. (Once an Application Entity has been defined, you do not need to re-execute the following steps.) Record the Application Entity name, host name or IP address, and port number of the remote machine’s Storage SCP service. You need this information to configure the network properties of the Application Entity as follows:
1. Open the DICOM Network Services utility by entering the following at the IDL command prompt:
DICOMEX_NET
2. Click on the Configuration tab and create a new Application Entity. Enter the network parameters for the remote machine. Additionally, this Application Entity must support:
• Service List Name — Storage_SCP_Service_List
• Service Type — Storage_SCP
See “Defining a New Application Entity” on page 26 for further instructions. Note
You can verify a connection to the remote machine using the Echo SCU functionality. See “Returning Connection Status with Echo” on page 48. Once the Application Entity has been defined, you can send files to the remote node, described in the following section.
Sending Files to a Remote Machine
You can use the Storage SCU functionality of the DICOM Network Services utility to browse for and send DICOM files to a remote machine. To do so, complete the following steps:
1. Open the DICOM Network Services utility by entering the following at the IDL command prompt if needed:
DICOMEX_NET
Medical Imaging in IDL Sending Files to a Remote Destination Note
This tab is not available if the DICOM Network Services utility is started with the SYSTEM keyword.
3. Select the Application Entity associated with the machine to which you want to send files in the Destination Node droplist. This was configured as described in “Defining the Remote Storage SCP Node” on page 44.
4. Select the files to send. You can either send files associated with the DICOM patient hierarchy (patient, study, series, image), or directly select files to send as follows:
• Send data related to the DICOM patient hierarchy. In the Send Patient Data area, click the Select Directory button and select a directory
containing DICOM files. Click in the Tree Navigation area and select a patient, study, or series to send all related images, or select a single image. Details about the selected item is displayed to the right of the Tree Navigation area. Click the Send Patient Files button to send the image(s) to the remote machine. Operation status is displayed in the Status area. The following figure shows an image selected in the Tree Navigation area.
• Send a selected file. In the Send File(s) area, click the Browse/Send Files
button. Locate the file or files you want to send. Select multiple files by
Ctrl- or Shift-clicking. Click Open to send the file(s). Operation status is
reported in the Status area, an excerpt of which is shown here. Figure 2-7: Selecting an Image to Send
Sending Files to a Remote Destination Medical Imaging in IDL Figure 2-8: Status Report of a Send Operation
Medical Imaging in IDL Sending Files to a Remote Destination
Troubleshooting a Send Operation
There are common configuration errors that can lead to problems when attempting to send files. If the following error appears in the Status window of the Storage SCU tab, consider the following possible resolutions:
Note
If your files are not arriving at the destination and you are running Windows XP service pack 2, the firewall that is automatically started is likely blocking the transfer of DICOM packets. See “Allowing File Transfer with a Windows XP Firewall” on page 41 for ways to modify your firewall settings.
Error Resolution
Failed to open an association.
The remote machine you are attempting to send images to is not recognized. Try these steps: 1. Make sure that you can connect to the remote
machine. See “Returning Connection Status with Echo” on page 48. If echo fails, see the following item.
2. Try sending files to yourself. Select the current Storage SCP entity (which appears in the grayed out Storage SCP Application Entity section of the Configuration tab) from the Destination
Node droplist. (This was configured in
“Configuring Your System to Receive Files” on page 22). Select and send yourself a file. 3. If you can send yourself a file, double-check the
network settings of the Application Entity related to the machine you are attempting to send files to. The Application Entity Title, Host Name (or IP Address), and Port Number must all match the values of the remote machine. See
“Defining the Remote Storage SCP Node” on page 44.
Returning Connection Status with Echo Medical Imaging in IDL
Returning Connection Status with Echo
The Echo SCU functionality of the DICOM Network Services utility lets you test the network connection to a remote machine that supports Query SCP or Storage SCP service types. To test the connection status of a remote node, do the following:
1. If needed, start the DICOM Network Services utility. See “Starting the Network Services Utility” on page 18 for details.
2. Select the Configuration tab.
3. In the Echo SCU area, select the Application Entity name from the Remote
Nodes droplist. The results of the echo operation appear in the Status window.
Troubleshooting Echo Errors
If the following error appears in the Status window of the Configuration tab, consider the following possible resolutions:
Error Resolution
Echo Failed:
Open Association Failed
The machine you are attempting to connect to is not available. Try these steps:.
1. Double-check the network settings of the Application Entity related to the machine you are attempting to connect to. The Application Entity Title, Host Name (or IP Address), and Port Number must all match the values of the remote machine.
2. Restart the Storage SCP service. After making any changes to the configuration properties of a Storage SCP Application Entity while in system configuration mode (when the DICOM
Network Services utility is started with DICOMEX_NET, /SYSTEM), you must stop and restart the Storage SCP Service. Use the Stop
Service and the Start Service buttons on the Configuration tab to restart the service. Table 2-4: Troubleshooting Echo Operation Errors
Medical Imaging in IDL About the Storage SCP Service
About the Storage SCP Service
The Storage SCP Service runs as a service on Windows and as a daemon on UNIX. This service listens at a specified TCP/IP port for incoming DICOM files and writes them to the directory that is specified in “Configuring Your System to Receive Files”
on page 22. Incoming files are named according to the file’s SOP Instance UID value and appended with the specified extension.
Warning
When a file with a duplicate name is retrieved, the original is overwritten. As the file name is based on the SOP Instance UID, this should only occur when retrieving the same file more than once.
For complete details regarding how to configure the characteristics of the Application Entity associated with the Storage SCP service, see “Configuring Your System to Receive Files” on page 22.
Storage SCP Service Permissions
As described in “Configuring Your System to Receive Files” on page 22, you must define a Storage SCP directory to which files are written. The Storage SCP Service requires permissions to:
• Create, read, write and delete files in the Storage SCP directory • Create a depot subdirectory in the Storage SCP directory • Create, read, write and delete files in the depot directory
• Create and write files in the bin/bin.platform/dicomex directory of the IDL installation directory where platform is the platform-specific bin directory.
When a user installs IDL with administrator or root privileges, the required
permissions are set on the dicomex directory to allow access to all users. All users can change Storage SCP service configuration parameters. However, on Windows, only users with administrator privileges have the ability to start and stop the Storage SCP service, which is required for changes to take effect.
Note
The Storage SCP service issues a “Failed. Administrator privileges may be needed.” error if a user without administrator privileges tries to start or stop the Storage SCP service.
About the Storage SCP Service Medical Imaging in IDL
About the Depot Directory
The depot directory is used to ensure that the full DICOM file is successfully transferred from a remote machine before it is made available in the defined Storage SCP directory. The depot directory is created when you first retrieve files from a remote machine.
Storage SCP Service Log Files
Service events generated by the Storage SCP Service are recorded in two log files located in the bin/bin.platform/dicomex directory of the IDL installation directory where platform is the platform-specific bin directory. These files are called storscp1.log and storscp2.log. Events are logged to one file until the size limit (250 KB) is reached. The other file is then erased (if needed) and
subsequent events are logged there.
These log files include information on four types of events: • A start event when the Storage SCP Service is started • An association event when an association is negotiated
• A write event when a file is written to the specified storage directory • An error event when a service error occurs
Note
These log files do not contain information from the DICOM Network Services utility. No utility errors or other types of information appear in the Storage SCP Service log files.