ptg
The Android
Developer’s Cookbook
Building Applications with
ptg
The Android
Developer’s Cookbook
Building Applications with
the Android SDK
James Steele
Nelson To
Upper Saddle River, NJ • Boston • Indianapolis • San Francisco New York • Toronto • Montreal • London • Munich • Paris • Madrid
ptg er was aware of a trademark claim, the designations have been printed with initial capital
letters or in all capitals.
The authors and publisher have taken care in the preparation of this book, but make no expressed or implied warranty of any kind and assume no responsibility for errors or omis-sions. No liability is assumed for incidental or consequential damages in connection with or arising out of the use of the information or programs contained herein.
The publisher offers excellent discounts on this book when ordered in quantity for bulk pur-chases or special sales, which may include electronic versions and/or custom covers and content particular to your business, training goals, marketing focus, and branding interests. For more information, please contact:
U.S. Corporate and Government Sales (800) 382-3419
For sales outside the United States, please contact:
International Sales [email protected]
Visit us on the Web: informit.com/aw
Library of Congress Cataloging-in-Publication Data Steele, James,
1971-The Android developer's cookbook : building applications with the Android SDK / James Steele, Nelson To.
p. cm.
Includes bibliographical references and index. ISBN-13: 978-0-321-74123-3 (pbk. : alk. paper) ISBN-10: 0-321-74123-4 (pbk. : alk. paper)
1. Application software—Development. 2. Android (Electronic resource) 3. Mobile computing. 4. Smartphones—Programming. 5. Operating systems (Computers) I. To, Nelson, 1976- II. Title.
QA76.76.A65S743 2011 004.1675—dc22
2010033254 Copyright © 2011 by Pearson Education, Inc.
All rights reserved. Printed in the United States of America. This publication is protected by copyright, and permission must be obtained from the publisher prior to any prohibited repro-duction, storage in a retrieval system, or transmission in any form or by any means, elec-tronic, mechanical, photocopying, recording, or likewise. For information regarding permis-sions, write to:
Pearson Education, Inc.
Rights and Contracts Department 501 Boylston Street, Suite 900 Boston, MA 02116
Fax (617) 671-3447
Images that appear with the link http://www.developer.android.com in the credit line are exact reproductions or modifications of work created and shared by the Android Open Source Project (http://code.google.com/policies.html) and are used according to terms described in the Creative Commons 2.5 Attribution License (http://creativecommons.org/ licenses/by/2.5/).
Text printed in the United States on recycled paper at RR Donnelley, Crawfordsville, Indiana. First Printing: October 2010
ptg To Wei with love.
Jim
To my dear mom.
Nelson
ptg 1 Overview of Android 1
2 Application Basics: Activities and Intents 23 3 Threads, Services, Receivers, and Alerts 51 4 User Interface Layout 79
5 User Interface Events 117 6 Multimedia Techniques 147 7 Hardware Interface 169 8 Networking 195
9 Data Storage Methods 221 10 Location-Based Services 251 11 Advanced Android Development 277 12 Debugging 303
ptg
1 Overview of Android 1
The Evolution of Android 1
The Dichotomy of Android 2
Devices Running Android 2
HTC Models 6
Motorola Models 6
Samsung Models 6
Tablets 7
Other Devices 7
Hardware Differences on Android Devices 8
Screens 8
User Input Methods 9
Sensors 9
Features of Android 10
Multiprocess and App Widgets 11
Touch, Gestures, and Multitouch 11
Hard and Soft Keyboards 11
Android Development 11
How to Use the Recipes in This Book 12
Designing Applications Well 12
Maintaining Forward Compatibility 13
Robustness 13
Software Development Kit 14
Installing and Upgrading 14
Software Features and API Level 15
Emulator and Android Device Debug 16
Using the Android Debug Bridge 18
Signing and Publishing 18
Android Market 19
End-User License Agreement 19
Improving App Visibility 19
Differentiating an App 20
Charging for an App 20
Managing Reviews and Updates 21
ptg
2 Application Basics: Activities and Intents 23
Android Application Overview 23
Recipe: Creating a Project and an Activity 24
Directory Structure of Project and Autogenerated Content 26
Android Package and Manifest File 28
Renaming Parts of an Application 30
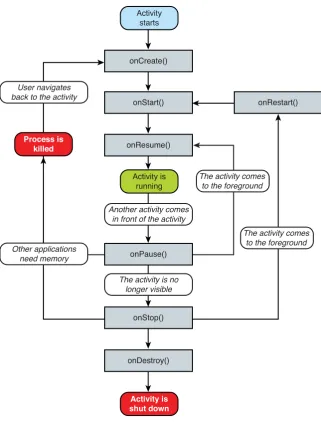
Activity Lifecycle 30
Recipe: Utilizing Other Lifecycle Functions 31
Recipe: Forcing Single Task Mode 33
Recipe: Forcing Screen Orientation 34
Recipe: Saving and Restoring Activity Information 34
Multiple Activities 35
Recipe: Using Buttons and TextView 36
Recipe: Launching Another Activity from an Event 37
Recipe: Launching an Activity for a Result Using Speech to Text 41
Recipe: Implementing a List of Choices 43
Recipe: Using Implicit Intents for Creating an Activity 44
Recipe: Passing Primitive Data Types Between Activities 46
3 Threads, Services, Receivers, and Alerts 51
Threads 51
Recipe: Launching a Secondary Thread 51
Recipe: Creating a Runnable Activity 55
Recipe: Setting a Thread’s Priority 57
Recipe: Canceling a Thread 57
Recipe: Sharing a Thread Between Two Applications 58
Messages Between Threads: Handlers 58
Recipe: Scheduling a Runnable Task from the Main Thread 59
Recipe: Using a Countdown Timer 61
Recipe: Handling a Time-Consuming Initialization 62
Services 64
ptg Adding a Broadcast Receiver 69
Recipe: Starting a Service When the Camera Button Is Pressed 70
App Widgets 72
Recipe: Creating an App Widget 72
Alerts 74
Recipe: Using Toast to Show a Brief Message on the Screen 74
Recipe: Using an Alert Dialog Box 75
Recipe: Showing Notification in Status Bar 76
4 User Interface Layout 79
Resource Directories and General Attributes 79
Recipe: Specifying Alternate Resources 81
Views and ViewGroups 82
Recipe: Building Layouts in the Eclipse Editor 83
Recipe: Controlling the Width and Height of UI Elements 86
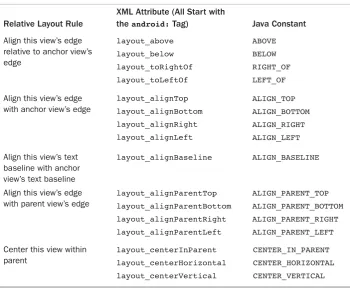
Recipe: Setting Relative Layout and Layout ID 89
Recipe: Declaring a Layout Programmatically 90
Recipe: Updating a Layout from a Separate Thread 92
Text Manipulation 94
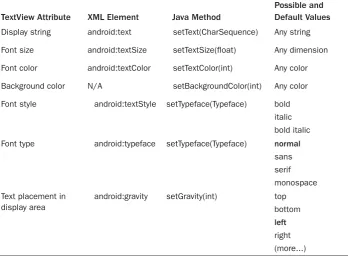
Recipe: Setting and Changing Text Attributes 95
Recipe: Providing Text Entry 98
Recipe: Creating a Form 100
Other Widgets: From Buttons to Seek Bars 101
Recipe: Using Image Buttons in a Table Layout 102
Recipe: Using Check Boxes and Toggle Buttons 105
Recipe: Using Radio Buttons 108
Recipe: Creating a Drop-Down Menu 110
Recipe: Using a Progress Bar 112
Recipe: Using a SeekBar 114
5 User Interface Events 117
Event Handlers and Event Listeners 117
Recipe: Intercepting a Physical Key Press 117
ptg Recipe: Defining Menus in XML 126
Recipe: Utilizing the SEARCH Key 127
Recipe: Reacting to Touch Events 128
Recipe: Listening for Fling Gestures 130
Recipe: Using Multitouch 133
Advanced User Interface Libraries 136
Recipe: Using Gestures 136
Recipe: Drawing 3D Images 140
6 Multimedia Techniques 147
Images 148
Recipe: Loading an Image for Manipulation 148
Audio 154
Recipe: Choosing and Playing Back Audio Files 154
Recipe: Recording Audio Files 157
Recipe: Manipulating Raw Audio 158
Recipe: Using Sound Resources Efficiently 163
Recipe: Adding Media and Updating Paths 165
Video 165
7 Hardware Interface 169
Camera 169
Recipe: Customizing the Camera 170
Other Sensors 175
Recipe: Getting a Device’s Rotational Attitude 176
Recipe: Using the Temperature and Light Sensor 179
Telephony 180
Recipe: Utilizing the Telephony Manager 181
Recipe: Listening for Phone States 183
Recipe: Dialing a Phone Number 185
Bluetooth 185
Recipe: Turning on Bluetooth 186
Recipe: Discovering Bluetooth Devices 187
Recipe: Pairing with Bonded Bluetooth Devices 188
Recipe: Opening a Bluetooth Socket 188
Recipe: Using Device Vibration 191
ptg
8 Networking 195
Using SMS 195
Recipe: Autosend an SMS Based on a Received SMS 197
Using Web Content 204
Recipe: Customizing a Web Browser 204
Recipe: Using an HTTP GET 204
Recipe: Using HTTP POST 209
Social Networking 210
Recipe: Integrating with Twitter 210
9 Data Storage Methods 221
Shared Preferences 221
Recipe: Creating and Retrieving Shared Preferences 222
Recipe: Using the Preferences Framework 222
Recipe: Changing the UI Based on Stored Data 225
Recipe: Adding a EULA 228
SQLite Database 232
Recipe: Creating a Separate Database Package 232
Recipe: Using a Separate Database Package 236
Recipe: Creating a Personal Diary 239
Content Provider 243
Recipe: Creating a Custom Content Provider 244
File Saving and Loading 249
10 Location-Based Services 251
Location Basics 251
Recipe: Retrieving Last Location 253
Recipe: Updating Location Upon Change 254
Recipe: Listing All Enabled Providers 256
Recipe: Translating a Location to Address (Reverse Geocoding) 258
Recipe: Translating an Address to Location (Geocoding) 261
Using Google Maps 263
Recipe: Adding Google Maps to an Application 265
ptg Recipe: Adding Views to a Map 271
Recipe: Marking the Device’s Current Location on a Map 274
Recipe: Setting up a Proximity Alert 274
11 Advanced Android Development 277
Android Custom View 277
Recipe: Customizing a Button 277
Android Native Components 283
Recipe: Developing a Native Component 284
Android Security 287
Recipe: Declaring and Enforcing Permissions 288
Android Inter-Process Communication 288
Recipe: Implementing a Remote Procedure Call 289
Android Backup Manager 294
Recipe: Creating a Backup of Runtime Data 294
Recipe: Backing Up Files to the Cloud 296
Recipe: Triggering Backup and Restore 296
Android Animation 298
Recipe: Creating an Animation 299
12 Debugging 303
Eclipse Built-in Debug Tools 303
Recipe: Specifying a Run Configuration 303
Recipe: Using the DDMS 304
Recipe: Debugging Through Breakpoints 306
Android SDK Debug Tools 307
Recipe: Using the Android Debug Bridge 307
Recipe: Using LogCat 307
Recipe: Using the Hierarchy Viewer 309
Recipe: Using TraceView 311
Android System Debug Tools 313
Recipe: Setting up GDB Debugging 315
ptg
Android is the fastest growing mobile operating system (OS).With over 30 smartphones introduced in the last year and over 10,000 applications (apps) being added every month, the Android ecosystem is growing as well.There is enough diversity in device features and wireless carriers to appeal to just about anyone.
Netbooks have always been a natural platform to adopt Android, but the inertia behind Android has fed the growth further into televisions and even automobiles. Many of the world’s largest corporations—from banks to fast food chains to airlines—ensure a presence in Android and offer compatible services. Android developers have many opportunities, and relevant apps reach more people than ever before, increasing the satis-faction of creating a relevant app.
Why an Android Cookbook?
The Android OS is simple to learn, and Google provides many libraries to make it easy to implement rich and complex applications.The only aspect lacking, as mentioned by many in the Android developer community, is clear and well-explained documentation. The fact that Android is open source means anyone can dive in and reverse engineer some documentation. Many developer bulletin boards have excellent examples deduced using exactly this method. Still, a book that has a consistent treatment across all areas of the OS is useful.
In addition, a clear working example is worth a thousand words of documentation. Developers faced with a problem usually prefer to do a form of extreme programming; that is, they find examples of working code that does something close to the solution and modify or extend it to meet their needs.The examples also serve as a way to see the coding style and help to shape other parts of the developer’s code.
This Android Cookbook serves to fill a need by providing many various self-con-tained recipes. As each recipe is introduced, the main concepts of the Android OS are also explained.
Who Should Read This Book?
ptg
Utilizing Recipes
In general, the code recipes in this cookbook are self-contained and include all the information necessary to run a working application on an Android device. Chapters 1 and 2 give an introduction to the overall use of Android, but feel free to jump around and start using whatever is necessary.
This book is written first as a reference, providing knowledge mostly by example with greatest benefits through implementation of the recipes of interest.The main tech-nique introduced in each recipe is specified in the section heading. However, additional techniques are included in each recipe as needed to support the main recipe.
After reading this book, a developer should
n Be able to write an Android Application from scratch.
n Be able to write code that works across multiple versions of Android.
n Be able to utilize the various Application Programming Interfaces (APIs) provided in Android.
n Have a large reference of code snippets to quickly assimilate into applications.
n Appreciate the various ways to do the same task in Android and the benefits of each.
n Understand the unique aspects of Android programming techniques.
Book Structure
Chapter 1, “Overview of Android,” provides an introduction to all aspects of Android outside of the code itself. It is the only chapter that doesn’t include recipes, but provides useful background material. Chapter 2, “Application Basics: Activities and Intents,” pro-vides an overview of the four Android components and explanation of how an Android project is organized. It also focuses on the activity as a main application building block. Chapter 3, “Threads, Services, Receivers, and Alerts,” introduces background tasks such as threads, services, and receivers, as well as notification methods for these background tasks using alerts. Chapter 4, “User Interface Layout,” covers the user interface screen layout and views, and Chapter 5, “User Interface Events,” covers the user initiated events such as touch events and gestures.
ptg
faster processing, and utilizing the Android Backup Manager. Finally, Chapter 12, “Debugging,” provides the testing and debugging framework useful throughout the development cycle.
Additional References
There are many online references for Android. A few essential ones are
n Android Source Code: http://source.android.com/
n Android Developer Pages: http://developer.android.com/
n Android Developer Forums: http://www.svcAndroid.com/
n Open Source Directory: http://osdir.com/
n Stack Overflow Discussion Threads: http://stackoverflow.com/
ptg
James Steele was doing post-doctoral work in physics at MIT when he decided to join a startup in Silicon Valley. Fifteen years later and he continues to innovate, bringing research projects to production in both the consumer and mobile market. He actively presents and participates in various Silicon Valley new technology groups.
ptg
1
Overview of Android
T
he Android operating system (OS) has come a long way since the announcement of the Open Handset Alliance in late 2007.The idea of an open source OS for embedded systems was not new, but Google aggressively backing it definitely has helped push Android to the forefront in just a few years.Many wireless carriers in multiple countries across various communication protocols have one or more Android phones available. Other embedded devices, such as tablets, net-books, televisions, set-top boxes, and even automobiles, have also adopted the Android OS.
This chapter discusses various general aspects of Android useful for a developer. It pro-vides a foundation for the creation of Android applications and a context for the recipes in the rest of this book.
The Evolution of Android
Google, seeing a large growth of Internet use and search in mobile devices, acquired Android, Inc., in 2005 to focus its development on a mobile device platform. Apple intro-duced the iPhone in 2007 with some ground-breaking ideas including multitouch and an open market for applications. Android was quickly adapted to include these features and to offer definite distinctions, such as more control for developers and multitasking. In addition, Android incorporates enterprise requirements, such as exchange support, remote wipe, and Virtual Private Network (VPN) support, to go after the enterprise market that Research In Motion has developed and held so well with its Blackberry models.
Device diversity and quick adaptation have helped Android grow its user base, but it comes with potential challenges for developers. Applications need to support multiple screen sizes, resolution ratios, keyboards, hardware sensors, OS versions, wireless data rates, and system configurations. Each can lead to different and unpredictable behavior, but test-ing applications across all environments is an impossible task.
ptg
platforms and OS updates is also a consideration.This mostly works as long as the devel-oper is well aware of this systematic approach.The generic Application Programming Interfaces (API) that Android offers and how to ensure device and OS compatibility are main threads discussed throughout this book.
Still, as with any embedded platform, extensive testing of applications is required. Google provides assistance to third-party developers in many forms as Android Develop-ment Tool (ADT) plugins for Eclipse (also as standalone tools) including real-time log-ging capabilities, a realistic emulator that runs native ARM code, and in-field error reports from users to developers of Android Market applications.
The Dichotomy of Android
Android has some interesting dichotomies. Knowing about them upfront is useful not only in understanding what Android is, but what it is not.
Android is an embedded OS that relies on the Linux kernel for core system services, but it is not embedded Linux. For example, standard Linux utilities such as X-windows and GNU C libraries are not supported.Writing applications for Android utilizes the Java framework, but it is not Java. Standard Java libraries such as Swing are not sup-ported. Other libraries such as Timer are not preferred; they have been replaced by Android’s own libraries, which are optimized for usage in a resource-constrained, embedded environment.
The Android OS is open source, which means developers can view and use any of the system source code, including the radio stack.This source code is one of the first
resources for seeing examples of Android code in action, and it helps clarify the usage when documentation is lacking.This also means developers can utilize the system in the same way as any core application and can swap out system components for their own components. However, Android devices do contain some proprietary software that is inaccessible to developers (such as Global Positioning System (GPS) navigation).
A final dichotomy of Android OS is that Google is also backing Chrome OS. Android OS is built for embedded platforms, and Chrome OS is built for cloud-based platforms. However, which is the best choice for embedded devices that live in the cloud? Net-books, which fill the gap between smart phones and laptop computers, could presumably go either way (and they have). Android has started to utilize the cloud more. Does that mean Chrome OS’s days are numbered? Google also backs a web-based market, so Chrome OS enjoys the same developer leverage that Android currently has.This points to a convergence that might have been in the cards all along.
Devices Running Android
There are more than 40 Android phones in the market from more than ten manufactur-ers. Other hardware also runs Android, such as tablets and televisions. Software can access information on the target device using the android.os.Build class, for example:
ptg
Android-supported hardware shares some common features due to the nature of the operating system.The Android OS is organized into the following images:
n Bootloader—Initiates loading of the boot image during startup
n Boot image—Kernel and RAMdisk
n System image—Android operating system platform and apps
n Data image—User data saved across power cycles
n Recovery image—Files used for rebuilding or updating the system
n Radio image—Files of the radio stack
These images are stored on nonvolatile flash memory, so they are protected when the device powers down.The flash memory is used like read-only memory (hence, some call it ROM), but can it be rewritten as necessary (for example, with over-the-air Android operating system updates).
On startup, the microprocessor executes the bootloader to load the kernel and RAMdisk to RAM for quick access.The microprocessor then executes instructions and pages portions of the system and data images into RAM as needed.The radio image resides on the baseband processor, which connects to the radio hardware.
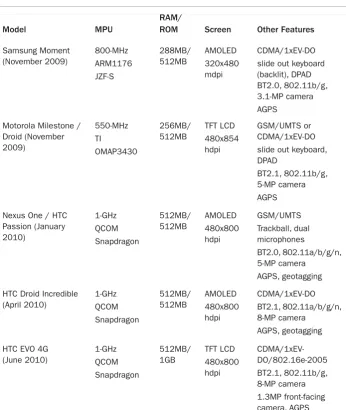
A comparison of some of the early and more recent smart phone models is shown in Table 1.1. It shows that the processing hardware architecture is similar across devices: a microprocessor unit (MPU), synchronous dynamic random access memory (SDRAM or RAM for short), and flash memory (called ROM for short).The screen size is given in pixels, but the dots per inch (dpi) vary depending on the physical screen size. For exam-ple, the HTC Magic has a 3.2-inch diagonal screen with 320x480 pixels.This equates to 180 pixels per inch, but is classified as a medium pixel density device by Android (which averages as 160 dpi). All smartphones also offer a CMOS image sensor camera, Bluetooth (BT), and Wi-Fi (802.11), although there are variations.
Table 1.1 Comparison of Some Representative Android Smartphones. Data from http://en.wikipedia.org/wiki/List_of_Android_devices and http://pdadb.net/.
Model MPU
RAM/
ROM Screen Other Features
HTC Dream / G1 (October 2008)
528-MHz QCOM MSM7201A
192MB/ 256MB
TFT LCD 320x480 mdpi
ptg
Table 1.1 Comparison of Some Representative Android Smartphones. Data from http:/ /en.wikipedia.org/wiki/List_of_Android_devices and http://pdadb.net/.
Model MPU
RAM/
ROM Screen Other Features
Samsung Moment (November 2009) 800-MHz ARM1176 JZF-S 288MB/ 512MB AMOLED 320x480 mdpi CDMA/1xEV-DO slide out keyboard (backlit), DPAD BT2.0, 802.11b/g, 3.1-MP camera AGPS
Motorola Milestone / Droid (November 2009) 550-MHz TI OMAP3430 256MB/ 512MB TFT LCD 480x854 hdpi GSM/UMTS or CDMA/1xEV-DO slide out keyboard, DPAD
BT2.1, 802.11b/g, 5-MP camera AGPS Nexus One / HTC
Passion (January 2010) 1-GHz QCOM Snapdragon 512MB/ 512MB AMOLED 480x800 hdpi GSM/UMTS Trackball, dual microphones BT2.0, 802.11a/b/g/n, 5-MP camera AGPS, geotagging HTC Droid Incredible
(April 2010) 1-GHz QCOM Snapdragon 512MB/ 512MB AMOLED 480x800 hdpi CDMA/1xEV-DO BT2.1, 802.11a/b/g/n, 8-MP camera AGPS, geotagging HTC EVO 4G
ptg
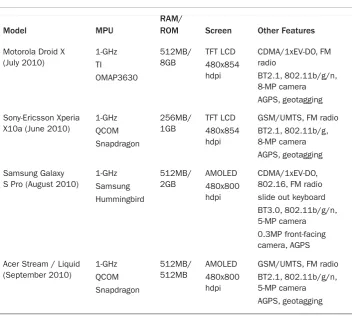
Table 1.1 Comparison of Some Representative Android Smartphones. Data from http:/ /en.wikipedia.org/wiki/List_of_Android_devices and http://pdadb.net/.
Model MPU
RAM/
ROM Screen Other Features
Motorola Droid X (July 2010) 1-GHz TI OMAP3630 512MB/ 8GB TFT LCD 480x854 hdpi CDMA/1xEV-DO, FM radio BT2.1, 802.11b/g/n, 8-MP camera AGPS, geotagging Sony-Ericsson Xperia
X10a (June 2010)
1-GHz QCOM Snapdragon 256MB/ 1GB TFT LCD 480x854 hdpi
GSM/UMTS, FM radio BT2.1, 802.11b/g, 8-MP camera AGPS, geotagging Samsung Galaxy
S Pro (August 2010)
1-GHz Samsung Hummingbird 512MB/ 2GB AMOLED 480x800 hdpi CDMA/1xEV-DO, 802.16, FM radio slide out keyboard BT3.0, 802.11b/g/n, 5-MP camera
0.3MP front-facing camera, AGPS Acer Stream / Liquid
(September 2010) 1-GHz QCOM Snapdragon 512MB/ 512MB AMOLED 480x800 hdpi
GSM/UMTS, FM radio BT2.1, 802.11b/g/n, 5-MP camera
AGPS, geotagging
Other than improved capacity and performance on newer models, another main differen-tiator is additional features. Some devices offer 4G, some have FM radio, some have slide-out keyboards, and some have a front-facing camera. Knowing the differentiators helps a developer create great applications. In addition to the built-in hardware, every Android device comes with a secure digital (SD) card slot. An SD card provides additional storage space for multimedia and extra application data. However, until Android 2.2, the apps themselves could be stored only on the internal ROM.
ptg
HTC Models
HTC is a Taiwanese company founded in 1997.The first commercially available hardware running Android was the HTC Dream (also known as the G1 with G standing for Google). It was released in October 2008. Since then, HTC has put out over ten phones running Android, including Google’s Nexus One.
The Nexus One was one of the first Android devices to use a 1-GHz microprocessor, the Snapdragon platform from Qualcomm.The Snapdragon includes Qualcomm’s own core as opposed to an ARM core, and it contains circuitry to decode high-definition video at 720p. Most smartphones that have followed also utilize a 1-GHz microprocessor. Other distinctions of the Nexus One are the use of two microphones to cancel back-ground noise during phone conversations and a backlit trackball that lights up different colors based on the notification.
HTC also released the Droid Incredible in April 2010. As seen in Table 1.1, it is similar to the Nexus One but has a CDMA instead of a GSM radio hardware and a higher pixel density camera.The HTC EVO 4G released in June 2010 produced quite a sensation as the first commercially available phone that supports WiMAX (802.16e-2005).
Motorola Models
Motorola built the first cell phone in the 1980s and has had diverse success in the cell phone market since. More recently, the wireless division was wavering for a direction until it focused efforts on Android.The release of the Motorola Droid for CDMA (also known as the Milestone for the GSM worldwide version) in November 2009 is indeed considered by many as a major milestone for Android.The Droid’s impact is apparent in that a significant fraction of Android phones accessing the Android Market are Droids.
In addition, Motorola has put out close to ten additional phone brands running Android.The Motorola Droid X has capabilities similar to the HTC Droid Incredible, including HD video capture.
Samsung Models
Samsung has been a strong force in the mobile market and is starting to come into its own with Android devices.The Samsung Moment was introduced in November 2009, but does not have hardware capability for multitouch. It will not be upgraded beyond Android 2.1. A custom version, including a Mobile TV antenna, is available in select mar-kets for receiving Mobile ATSC signals.
ptg
Tablets
With Apple’s introduction of the iPad, Android manufacturers were expected to introduce tablet computers of their own. A tablet computer is loosely defined as having a screen of 4.8 inches or larger and Wi-Fi connectivity. Because many have 3G wireless service, they tend to be more like smartphones with large screens.
Archos was one of the first to market an Android tablet in late 2009. It has a diagonal screen size of 4.8 inches and is called the Archos 5. Archos has since introduced a 7-inch model called the Archos 7.These models come with an actual hard drive for more data storage. Dell has also introduced a 5-inch tablet called the Streak with plans for both a 7-inch and a 10-7-inch screen size model. Samsung offers the Galaxy Tab with a 7-7-inch screen. One downside is the inability for many of these tablets to access the Android Mar-ket, although that should soon change. A comparison of some tablet computer models is shown in Table 1.2.
Other Devices
Given Android is a generic embedded platform, it is expected to be utilized in many other industries beyond smartphones and tablet computers.The first Android-based auto-mobile is the Roewe 350, which Shanghai Automotive Industry Corporation manufac-tures. Android is mainly used for GPS navigation but can also support web browsing.
Table 1.2 Comparison of Representative Android Tablet Computers
Model MPU
RAM/
disk Screen Other Features
ptg
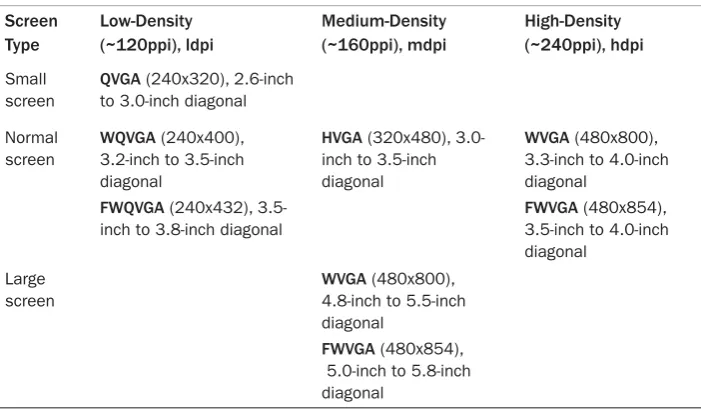
Table 1.3 Summary of Device Screens Supported by Android Screen Type Low-Density (~120ppi), ldpi Medium-Density (~160ppi), mdpi High-Density (~240ppi), hdpi Small screen
QVGA (240x320), 2.6-inch to 3.0-inch diagonal Normal
screen
WQVGA (240x400), 3.2-inch to 3.5-inch diagonal
FWQVGA (240x432), 3.5-inch to 3.8-3.5-inch diagonal
HVGA (320x480), 3.0-inch to 3.5-3.0-inch diagonal
WVGA (480x800), 3.3-inch to 4.0-inch diagonal
FWVGA (480x854), 3.5-inch to 4.0-inch diagonal
Large screen
WVGA (480x800), 4.8-inch to 5.5-inch diagonal
FWVGA (480x854), 5.0-inch to 5.8-inch diagonal
The first Android-based television, Google TV, is a joint development between Google for software, Sony for televisions, Intel for processors, and Logitech for set-top boxes. It brings the Internet to televisions in a natural way, but it also provides access to the Android Market from the television.
Hardware Differences on Android Devices
The hardware available on each Android device varies, as seen in Table 1.1. In general, most of the differences are transparent to the developer and not covered further here. However, a few hardware differences are important to understand to assist in writing device-independent code. Screens, user input methods, and sensors are discussed here.
Screens
Two technologies used for displays are liquid crystal displays (LCD) and light-emitting diodes (LED).The two specific choices in Android phones are thin-film transistor (TFT) LCDs and active-matrix organic LED displays (AMOLED). A benefit of TFT displays is a longer lifetime. A benefit of AMOLED displays is no need for backlighting and therefore deeper blacks and lower power.
ptg
User Input Methods
Touchscreens enable users to interact with the visual display.There are three types of touchscreen technology:
n Resistive—Two resistive material layers sit on top of a glass screen.When a finger, stylus, or any object applies pressure, the two layers touch together and the loca-tion of the touch can be determined. Resistive touchscreens are cost-effective, but only 75 percent of the light shows through, and until recently, multitouch was not possible.
n Capacitive—A charged material layer is overlaid on a glass screen.When a finger or any conductive object touches the layer, some charge is drawn off, changing the capacitance, which is measured to determine the location of the touch. Capacitive touchscreens allow as much as 90 percent of the light through, although accuracy can be less than resistive.
n Surface Acoustic Wave—This uses a more advanced method that sends and receives ultrasonic waves.When a finger or any object touches the screen, the waves are ab-sorbed.The waves are measured to determine the location of the touch. It is the most durable solution, but more suitable for large-scale screens such as automatic bank tellers.
All Android devices use either resistive or capacitive touchscreen technology, and with a few early exceptions, all support multitouch.
In addition, each Android device needs an alternative method to access the screen.This is through one of the following methods:
n D-pad (directional pad)—An up-down-right-left type of joystick
n Trackball—A rolling ball acting as a pointing device that is similar to a mouse
n Trackpad—A special rectangular surface acting as a pointing device
Sensors
Smartphones are becoming sensor hubs in a way, opening a rich experience for users. Other than the microphone that every phone has, the first additional sensor introduced on phones was the camera. Different phone cameras have varying capabilities, and this is an important factor for people in selecting a device.The same type of diversity is now seen with the additional sensors.
Most smartphones have at least three basic sensors: a three-axis accelerometer to meas-ure gravity, a three-axis magnetometer to measmeas-ure the ambient magnetic field, and a tem-perature sensor to measure the ambient temtem-perature. For example, the HTC Dream (G1) contains the following sensors (which can be displayed using getSensorList()as
ptg
AK8976A 3-axis Accelerometer
AK8976A 3-axis Magnetic field sensor AK8976A Orientation sensor
AK8976A Temperature sensor
The AK8976A is a single package from Asahi Kasei Microsystems (AKM) that combines a piezoresistive accelerometer, Hall-effect magnetometer, and temperature sensor. All provide 8-bit precision data.The orientation sensor is a virtual sensor that uses the accelerometer and magnetometer to determine the orientation.
For comparison, the Motorola Droid contains the following sensors:
LIS331DLH 3-axis Accelerometer AK8973 3-axis Magnetic field sensor AK8973 Temperature sensor
SFH7743 Proximity sensor Orientation sensor type LM3530 Light sensor
The LIS331DLH is a 12-bit capacitive accelerometer from ST Microelectronics. It provides much more accurate data and can sample up to 1kHz.The AK8973 is an AKM package with an 8-bit Hall-effect magnetometer and temperature sensor.
In addition, the Droid contains two more sensors.The SFH7743 is an Opto Semicon-ductor’s short-range proximity detector that turns the screen off when an object (such as the ear) is within about 40mm distance.The LM3530 is an LED driver with a program-mable light sensor from National Semiconductor that detects ambient light and adjusts the screen backlight and LED flash appropriately.
One other example of sensors available on an Android device is the HTC EVO 4G, which has the following sensors:
BMA150 3-axis Accelerometer
AK8973 3-axis Magnetic field sensor AK8973 Orientation sensor
CM3602 Proximity sensor CM3602 Light sensor
The BMA150 is a Bosch Sensortec 10-bit accelerometer which can sample up to
1.5kHz.The CM3602 is a Capella Microsystems, Inc., short distance proximity sensor and ambient light sensor combined into one.
Overall, it is important to understand each Android model has different underlying hardware.These differences can lead to varying performance and accuracy of the sensors.
Features of Android
ptg
Multiprocess and App Widgets
The Android OS does not restrict the processor to a single application at a time.The sys-tem manages priorities of applications and threads within a single application.This has the benefit that background tasks can be run while a user engages the device in a foreground process. For example, while a user plays a game, a background process can check stock prices and trigger an alert as necessary.
App Widgets are mini applications that can be embedded in other applications (such as the Home screen).They can process events, such as start a music stream or update the outside temperature, while other applications are running.
Multiprocessing has the benefit of a rich user experience. However, care must be taken to avoid power-hungry applications that drain the battery.These multiprocess features are discussed further in Chapter 3,“Threads, Services, Receivers, and Alerts.”
Touch, Gestures, and Multitouch
The touchscreen is an intuitive user interface for a hand-held device. If utilized well, it can transcend a need for detailed instructions. After a finger touches the screen, drags and flings are natural ways to interact with graphics. Multitouch provides a way to track more than one finger down at the same time.This is often used to zoom or rotate a view.
Some touch events are available transparently to the developer without the need to implement their detailed behaviors. Custom gestures can be defined as needed. It is important to try to maintain a consistent usage of touch events as compared to other applications.These touch events are discussed further in Chapter 5,“User Interface Events.”
Hard and Soft Keyboards
One feature on a pocket device that galvanizes users is whether it should have a physical (also called hard) keyboard or software (also called soft) keyboard.The tactile feedback and definite placement of keys provided by a hard keyboard tends to make typing much faster for some, whereas others prefer the sleek design and convenience offered by a soft-ware-only input device.With the large variety of Android devices available, either type can be found. A side effect for developers is the need to support both. One downside of a soft keyboard is a portion of the screen needs to be dedicated to the input.This needs to be considered and tested for any user interface (UI) layout.
Android Development
ptg
How to Use the Recipes in This Book
In general, the code recipes in this cookbook are self-contained and include all the infor-mation necessary to run a working application on an Android device. As discussed in detail in Chapter 2,“Application Basics: Activities and Intents,” there are multiple user-generated files needed to get an application working.When even one is omitted from an example, its absence impedes those unfamiliar with the Android setup.Therefore, every recipe contains the necessary files to get code working. Each file is shown as a code listing with the full filename as the title.This helps to convey where the file lives in an Android project.
At the same time, when too many files are shown, it clouds functionality.Therefore, two coding styles are slightly different than would be expected in a normal application:
n The code has limited comments.The text explains the functionality clearer than in-line comments could, and bolded code shows the main lines needed to get the particular technique working. In practice, actual code should have more comments than presented in the recipes.
n Strings are explicit and do not point to a global resource.The method of using a global resource for strings is encouraged and discussed in detail in Chapter 4,“User Interface Layout,” with multiple examples. In this book, however, when only a few strings are needed for a recipe, the strings are made explicit rather than including a whole additional file just to define them.
People just starting with Android are served well to use Eclipse for the development environment with the Android plugin. As discussed more in Chapter 2, this ensures proper Android project setup and context, and Eclipse even adds a placeholder icon fig-ure. It also helps with more advanced tasks, such as signing an application for distribution.
The emulator provided with the Android Software Development Kit (SDK) is useful, but nothing beats seeing the application run on a true Android device. It leads to faster development and more realistic testing. All code examples in this book have been tested on an actual device running Android 2.1, and as needed, Android 1.5 or Android 2.2. Some functionality (for example, Bluetooth pairing or sensor changes) is difficult and opaque when using the emulator.Therefore, it is recommended that initial testing be done with an action Android device.
Designing Applications Well
Three elements are needed for an excellent application: a good idea, good coding, and good design. Often, the last element is paid the least attention because most developers work alone and are not graphic designers. Google must realize this because it has created a set of design guidelines: icon design, App Widget design, activity and task design, and menu design.These can be found at http://developer.android.com/guide/practices/ ui_guidelines/.
ptg
are a result of the collaboration between a developer and graphic designer. A significant portion of an app’s development time should be dedicated to considering the best design for an app.
Maintaining Forward Compatibility
New Android versions are generally additive and forward compatible at the API level. In fact, a device can be called an Android device only if it passes compatibly tests with the Android APIs. However, if an application makes changes to the underlying system, com-patibility is not guaranteed.To ensure forward comcom-patibility of an application when future Android updates are installed on devices, follow these rules suggested by Google:
n Do not use internal or unsupported APIs.
n Do not directly manipulate settings without asking the user. A future release might constrain settings for security reasons. For instance, it used to be possible for an app to turn on GPS or data roaming by itself, but this is no longer allowed.
n Do not go overboard with layouts.This is rare, but complicated layouts (more than 10 deep or 30 total) can cause crashes.
n Do not make bad hardware assumptions. Not all Android devices have all possible supported hardware. Be sure to check for the hardware needed, and if it does not exist, handle the exception.
n Ensure device orientations do not disrupt the application or result in unpredictable behavior. Screen orientation can be locked, as described in Chapter 2.
Note that backward compatibility is not guaranteed with Android. It is best to declare the minimum SDK version as described in Chapter 2, so the device can load the proper compatibility settings. Utilizing other new features on older targets is also discussed at various places throughout the book.
Robustness
In the same vein as compatibility support, applications should be designed and tested for robustness. Following are a few tips to help ensure robustness:
n Use the Android libraries before Java libraries. Android libraries are constructed specifically for embedded devices and cover many of the requirements needed in an application. For the other cases, Java libraries are included. However, for cases where either can be used, the Android library is best.
ptg
n Utilize the LogCat tool for debugging and check for warnings or errors as also dis-cussed in Chapter 12.
n Test thoroughly, including different environments and devices if possible.
Software Development Kit
The Android SDK is comprised of the platform, tools, sample code, and documentation needed to develop Android applications. It is built as an add-on to the Java Development Kit and has an integrated plugin for the Eclipse Integrated Development Environment.
Installing and Upgrading
There are many places on the Internet that discuss detailed step-by-step instructions on how to install the Android SDK. For example, all the necessary links can be found on the Google website http://developer.android.com/sdk/.Therefore, the general procedure outlined here serves to emphasize the most common installation steps for reference.These steps should be done on a host computer used as the development environment.
1. Install the Java Development Kit (for example, install JDK 6.0 for use with Android 2.1 or above; JDK 5.0 is the minimum version needed for any earlier ver-sion of Android).
2. Install Eclipse Classic (for example, version 3.5.2). In the case of Windows, this just needs to be unzipped in place and is ready to use.
3. Install the Android SDK starter package (for example, version r06). In the case of Windows, this just needs to be unzipped in place and is ready to use.
4. Start Eclipse and select Help →Install New Software..., and then type https:// dl-ssl.google.com/android/eclipse/ and install the Android DDMS and Android Development Tools.
5. In Eclipse, select Window →Preferences... (on a Mac, select Eclipse → Prefer-ences) and select Android. Browse to the location where the SDK was unzipped and apply.
6. In Eclipse, select Window →Android SDK and AVD Manager →Available Packages, and then choose the necessary APIs to install (for example, Documenta-tion for Android SDK, API 8; SDK Platform Android 2.2, API 8; Google APIs by Google Inc.; and Android API 8).
7. From the same Android SDK and AVD Manager menu, create an Android virtual device to run the emulator or install USB drivers to run applications on a plugged-in phone.
ptg
Now, the environment should be configured to easily develop any Android application and run on the emulator or an actual Android device.To upgrade to a new version of the SDK, it is simply a matter of selecting Help ➞ Software Updates... in Eclipse and choosing the appropriate version.
Software Features and API Level
The Android OS periodically rolls out new features, enhancements such as improved effi-ciency, and bug fixes. A main driver in OS improvement is the increased capability of hardware on new devices. In fact, major releases of the OS are generally coordinated with new hardware roll-outs (such as Eclair’s release with Droid).
Some legacy Android devices cannot support the new version requirements and are not updated with new OS releases.This leads to a user base with a variety of different possible experiences.The developer is left with the task of checking for device capability or at least warning devices of required features.This can be done through a check of a single number: the API level.
The following summarizes the different OS releases and main features from a devel-oper’s perspective:
Cupcake: Android OS 1.5, API level 3, Released April 30, 2009
n Linux kernel 2.6.27.
n Smart virtual (soft) keyboard, support for third-party keyboards.
n AppWidget framework.
n Live Folders.
n Raw audio recording and playback.
n Interactive MIDI playback engine.
n Video recording APIs.
n Stereo Bluetooth support.
n Removed end-user root access (unless tethered to computer and using SDK).
n Speech recognition via RecognizerIntent (cloud service).
n Faster GPS location gathering (using AGPS).
Donut: Android OS 1.6, API Level 4, Released September 15, 2009
n Linux kernel 2.6.29.
n Support for multiple screen sizes.
n Gesture APIs.
n Text-to-speech engine.
n Integrate with the Quick Search Box using the SearchManager.
ptg
Eclair: Android OS 2.0, API Level 5, Released October 26, 2009 Android OS 2.0.1, API Level 6, Released December 3, 2009 Android OS 2.1, API Level 7, Released January 12, 2010
n Sync adapter APIs to connect to any backend.
n Embed Quick Contact accessible in applications.
n Applications can control the Bluetooth connection to devices.
n HTML5 support.
n Microsoft Exchange support.
n Multitouch is accessible through the MotionEvent class.
n Animated wallpaper support.
FroYo: Android OS 2.2, API Level 8, Released May 20, 2010
n Linux kernel 2.6.32.
n Just-In-Time compilation (JIT) enabled, leading to faster code execution.
n Voice dialing using Bluetooth.
n Car and desk dock themes.
n Better definition of multitouch events.
n Cloud-to-device APIs.
n Applications can request to be installed on the SD memory card.
n Wi-Fi tether support on select devices.
n Thumbnail utility for videos and images.
n Multiple language support on keyboard input.
n Application error reporting for Market apps.
Android is starting to mature in that releases are less frequent. Although possible, the over-the-air updates are logistically tricky and carriers prefer to avoid them. Hardware manufacturers also appreciate a level of stability, which does not mean the first flashed devices in stores need an immediate update. However, when a release is made, the level of additional features for developers remains high and worthwhile to utilize.
Emulator and Android Device Debug
ptg
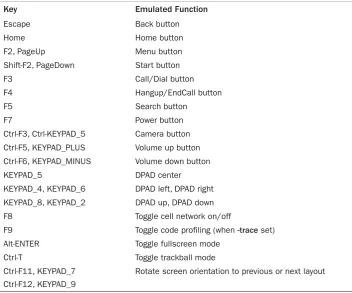
Table 1.4 Android OS Emulator Controls
Key Emulated Function
Escape Back button
Home Home button
F2, PageUp Menu button
Shift-F2, PageDown Start button
F3 Call/Dial button
F4 Hangup/EndCall button
F5 Search button
F7 Power button
Ctrl-F3, Ctrl-KEYPAD_5 Camera button Ctrl-F5, KEYPAD_PLUS Volume up button Ctrl-F6, KEYPAD_MINUS Volume down button
KEYPAD_5 DPAD center
KEYPAD_4, KEYPAD_6 DPAD left, DPAD right KEYPAD_8, KEYPAD_2 DPAD up, DPAD down
F8 Toggle cell network on/off
F9 Toggle code profiling (when -trace set)
Alt-ENTER Toggle fullscreen mode
Ctrl-T Toggle trackball mode
Ctrl-F11, KEYPAD_7 Ctrl-F12, KEYPAD_9
Rotate screen orientation to previous or next layout devices not available to the user. For example, the tablet screen size can be tried without purchasing a tablet.
Note that a target virtual device must be created before the emulator can properly run. Eclipse provides a nice method to manage Android Virtual Devices (AVD). A handy list of keyboard shortcuts for emulator functions is shown in Table 1.4.
In general, the first testing is best done with an Android phone.This ensures full function-ality and real-time issues that cannot be fully recreated with the emulator. For an Android device to be used as a developer platform, just hook it to the USB using the USB cable that came with the phone and ensure the USB driver is detected (this is automatic with a MAC; the drivers are included with the SDK for Windows; and see Google’s web page for Linux).
ptg
and MENU→Settings→Applications→Development→USB debugging to enable installation of applications through the USB cable. More details about Android debugging are provided in Chapter 12.
Using the Android Debug Bridge
It is often convenient to use the command line to access the Android device.This is possi-ble when it is connected to a computer using the USB capossi-ble.The Android Debug Bridge, which comes with the SDK, can be used to access the Android device. For example, to log into the Android device as if it were a Linux computer, type the following:
> adb shell
Then, many UNIX commands are usable on the device. Use exit to exit the shell. A
sin-gle command can be appended to this to be executed without needing to enter and exit the shell:
> adb shell mkdir /sdcard/app_bkup/
To copy files off the device, use pull and rename it as needed:
> adb pull /system/app/VoiceSearchWithKeyboard.apk VSwithKeyboard.apk
To copy a file onto the device, use push:
> adb push VSwithKeyboard.apk /sdcard/app_bkup/
To delete an application, for example com.dummy.game, from the device, type the
following:
> adb uninstall com.dummy.game
These commands are the most commonly used, but more are available. Some additional commands are introduced in Chapter 12.
Signing and Publishing
For an application to be accepted on the Android Market, it needs to be signed.To do this, a private key needs to be generated and kept in a secure place.Then, the app needs to be packaged in release mode and signed with the private key.When an application is upgraded, the same key needs to sign it to ensure a transparent update for the user.
ptg
Android Market
After an application is designed, developed, tested, and signed, it is ready to be deployed into the Android Market.To use Google’s Android Market, a Google Checkout account needs to be created. It is used not only to pay for the initial developer fee of $25, but is also used for payment back to the developer for any charged apps. Public exposure to a developer’s creation is often exciting.Within hours of upload, the application can get hundreds of views, downloads, ratings, and reviews from around the world. A few consid-erations for publication of an app are provided here for reference.
End-User License Agreement
Any original content distributed in a tangible form is automatically copyrighted in most of the world under the Berne Convention. Still, it is common practice to add a copyright with a date of publication to the content, such as © 2010.The method for adding this symbol to an Android app is discussed in Chapter 4.
This can be taken one step further in an End User License Agreement (EULA), which is a contract between the developer (or company) and the customer (or end user) provid-ing the developer a form of protection for publicly distributed software. Most EULAs contain sections such as “Grant of License,”“Copyright,” and “No Warranties.” It is com-mon practice to add a EULA to an application, especially if it is offered for sale.The method for adding a EULA to an Android app is discussed in Chapter 9,“Data Storage Methods.”
Improving App Visibility
Users find applications in three different ways. Catering to these methods helps to increase visibility for an application.
The first way users see an app is by choosing to list the “Just in” apps. Choose a good descriptive name for the application and place it in an appropriate category, such as
Games or Communication. Keep the description simple and to the point to get more views.The Games category is over laden with apps, so there are sub-categories. If the app is fun but has no score or goal, consider the Entertainment category. Even so, with over 10,000 applications uploaded to the Android Market each month, an uploaded applica-tion is pushed off the “Just in” list within a day or two.
The second way users see an app is by keyword search. Determine the essential key-words users might use and include those in either the title or description of the app. Some users might speak a different language, so including appropriate international key-words can help.
ptg
robustness. Ensure the app does not contain major bugs, does not waste excessive battery, and has a foolproof way to exit the application. Nothing turns off a potential customer more than seeing reviews that say,“This app uses all of my battery,” or,“I can’t uninstall this app.”
One side note to mention: Almost all interactions between the developer and users are done through the Android Market. Providing developer contact information or a sup-porting website is often superfluous, as people browsing the mobile market rarely use it.
Differentiating an App
Sometimes, the developer creates an application only to find a similar variant already in the Android Market.This should be treated as an opportunity rather than a discourage-ment. Differentiating the app simply through a better design, interface, or execution can quickly win over a user base. Basically, originality is nice, but it is not required.That being said, one must be careful to avoid using copyrighted material.
Charging for an App
Every time a new application or its update is uploaded to the Android Market, the devel-oper must choose whether to provide it for free or charge for it. Following are the main options:
n Provide the app for free. Everyone who can access the Android market can see and install the app.
n Provide a free app, but include advertisements. In some cases, the developer negoti-ates sponsorship for an app. More often, the developer works with a third-party aggregator. Payouts are provided for clicked ads and less often for impressions (ad views). Figure 1.1 shows an example banner ad from AdMob. Such ads require the application have permission to access the Internet and the location of the device. Consider using coarse location instead of fine location to avoid deterring some potential customers from installing the app.
n Provide the app for a charge. Google handles its charges, but takes 30 percent of the proceeds. Countries that are not set up for charges through Google Checkout can-not see or cancan-not install an app for charge. For these reasons, some developers turn to third-party app stores for distribution.
n Post a free, limited version, but charge for a full version.This gives users the oppor-tunity to try the app and if they like it, they will have less resistance to purchasing the full version. For some apps, this is a natural model (such as a game with ten free levels), but not all apps can be partitioned this way.
ptg
Figure 1.1 Example mobile banner ad from AdMob.
Free applications tend to get a lot of views. Even the most obscure and odd applications seem to be downloaded and viewed by at least 1,000 people in the first month the application is on the Market.There are some developers who explicitly say,“This app is absolutely useless,” and yet, they get over 10,000 downloads and a four-star rating. Some-what relevant free applications can get as many as 50,000 downloads, and extremely useful free applications have over 100,000 downloads. For most developers, such exposure is quite impressive.
Mobile advertisement is still in its infancy and usually does not entice enough users to click the ad. For now, monetizing apps is best done by charging on the Market. As long as the app is useful for some people, has a clear description, and has a good selection of posi-tive reviews, users purchase it. If an app is successful, it might make sense to raise the price of the app.
Managing Reviews and Updates
Most successful apps from independent developers come through a process of releasing a version and adapting to the user feedback. Users like to see a developer who is responsive. This leads to more people downloading an app, and as the number of downloads
ptg
In general, it seems about 1 in 200 people rate an application, and a small subset of those actually leaves a review. If someone takes the time to type a review, it is usually worth listening to it, especially if the review comments are constructive, such as “Doesn’t work on the HTC Hero,” or “Nice app, just wish it did so on and so forth.”
Updates that respond to user comments are seen in a positive light by new potential customers. In any case, the reason for the update should be clearly highlighted. Most users get 10 to 20 notifications a day of applications that have updates. If they do not see a good reason to upgrade, they might not.
Alternatives to the Android Market
ptg
Table 2.1 The Four Possible Components of an Android Application
Functionality Java Base Class Examples
Focused thing a user can do Activity Edit a note, play a game Background process Service Play music, update weather icon Receive messages BroadcastReceiver Trigger alarm upon event Store and retrieve data ContentProvider Open a phone contact
2
Application Basics:
Activities and Intents
E
ach Android application is represented by a single Android project. An overview of the project structure, including a brief introduction to the basic building blocks of an applica-tion, is provided as useful background information for the recipes in this book.Then the focus of this chapter turns to activities and the intents that launch them.Android Application Overview
An Android application consists of various functionalities. Some examples are editing a note, playing a music file, ringing an alarm, or opening a phone contact.These functional-ities can be classified into four different Android components, shown in Table 2.1, each of which is specified by a Java base class.
Every application is made up of one or more of these components.They are instantiated by the Android operating system (OS) as needed. Other applications are allowed to use them, too, within the specified permissions.
ptg
With the exception of ContentProvider, each component is activated by an
asyn-chronous message called an Intent.The Intent can contain a Bundle of supporting
information describing the component.This provides a method of passing information between components.
The rest of this chapter demonstrates the previous concepts using the most common component: the Activity. Because activities almost always specify an interaction with a
user, a window is automatically created with each activity.Therefore, a short introduction to the UI is also included. Of the other components, Service and BroadcastReceiver
are covered in Chapter 3,“Threads, Services, Receivers, and Alerts,” and
ContentProvider is covered in Chapter 9,“Data Storage Methods.”
Recipe: Creating a Project and an Activity
A straightforward way to create an Android project or any of its components is to use the Eclipse Integrated Development Environment (IDE).This method ensures proper setup of the supporting files.The steps to create a new Android project are
1. In Eclipse, choose File →New →Android Project.This displays a New Android Project creation screen.
2. Fill in the Project name, such as SimpleActivityExample.
3. Select a Build Target from the choices provided.These choices are based on the Software Development Kit (SDK) versions that are installed on the development computer.
4. Fill in the Application name, such as Example of Basic Activity.
5. Fill in the Package name, such as com.cookbook.simple_activity.
6. To create the main activity in the same step, be sure Create Activity is checked and fill in an Activity name, such as SimpleActivity.
All activities extend the abstract class Activity or one of its subclasses.The entry point to
each activity is the onCreate() method. It is almost always overridden to initialize the
activity, such as setting up the UI, creating button listeners, initializing parameters, and starting threads.
If the main activity is not created with the project or another activity needs to be added, the steps to create an activity are
1. Create a class to extend Activity. (In Eclipse, this can be done by right-clicking
on the project, choosing New →Class, and then specifying android.app. Activity as the super class.)
2. Override the onCreate() function. (In Eclipse, this can be done by right-clicking
ptg
3. As with most overridden functions, it must invoke the super class method, too; oth-erwise, an exception may be thrown at run-time. Here, the super.onCreate()
should be called first to properly initialize the activity, as shown in Listing 2.1.
Listing 2.1 src/com/cookbook/simple_activity/SimpleActivity.java
package com.cookbook.simple_activity;
import android.app.Activity; import android.os.Bundle;
public class SimpleActivity extends Activity {
@Override
public void onCreate(Bundle savedInstanceState) {
super.onCreate(savedInstanceState); setContentView(R.layout.main);
} }
4. If a UI is used, specify the layout in an XML file in the res/layout/ directory. Here it is called main.xml, as shown in Listing 2.2.
5. Set the layout of the activity using the setContentView() function and passing it
the resource ID for the XML layout file. Here, it is R.layout.main, as shown in
Listing 2.1.
Listing 2.2 res/layout/main.xml
<?xml version="1.0" encoding="utf-8"?>
<LinearLayout xmlns:android="http://schemas.android.com/apk/res/android" android:orientation="vertical"
android:layout_width="fill_parent" android:layout_height="fill_parent" >
<TextView
android:layout_width="fill_parent" android:layout_height="wrap_content" android:text="@string/hello"
/>
</LinearLayout>
ptg
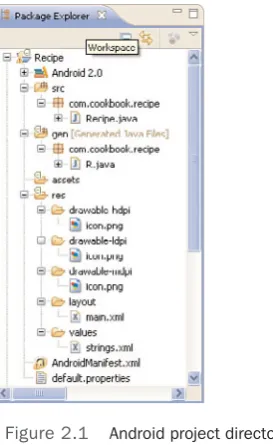
Figure 2.1 Android project directory structure, as seen in the Eclipse IDE.
Note that the string resources are defined in the strings.xml file in the res/values/
folder, as shown in Listing 2.3.This provides a central place for all strings in case text needs to be changed or reused.
Listing 2.3 res/values/strings.xml
<?xml version="1.0" encoding="utf-8"?> <resources>
<string name="hello">Hello World, SimpleActivity!</string> <string name="app_name">SimpleActivity</string>
</resources>
Now a more detailed look at the directory structure of this project and the additional auto-generated content is explored.
Directory Structure of Project and Autogenerated Content
Figure 2.1 shows an example project structure, as seen from the Eclipse Package Explorer.
ptg
User-generated files include
n src/ contains the Java packages the developer writes or imports for the application. Each package can have multiple .java files representing different classes.
n res/layout/ contains the XML files that specify the layout of each screen.
n res/values/ contains the XML files used as references by other files.
n res/drawable-hdpi/, res/drawable-mdpi/, and res/drawable-ldpi/ are directories that contain pictures the application uses.They have high, medium, and low dots-per-inch resolution, respectively.
n assets/ contains additional nonmedia files the application uses.
n AndroidManifest.xml specifies the project to the Android OS.
Autogenerated files include
n gen/ contains autogenerated code, including the generated class R.java.
n default.properties contains project settings. Although autogenerated, it should be kept under revision control.
An application’s resources include XML files describing the layout, XML files describing values such as strings, labels of UI elements, and additional supporting files such as pictures and sounds. At compile time, references to the resources are gathered into an autogenerated wrapper class called R.java. The Android Asset Packaging Tool (aapt) autogenerates this file. Listing 2.4 shows what it looks like for the “Creating a Project and an Activity” recipe.
Listing 2.4 gen/com/cookbook/simple_activity/R.java
/* AUTO-GENERATED FILE. DO NOT MODIFY. *
* This class was automatically generated by the * aapt tool from the resource data it found. It * should not be modified by hand.
*/
package com.cookbook.simple_activity;
public final class R {
public static final class attr { }
public static final class drawable {
public static final int icon=0x7f020000; }
public static final class layout {
ptg
Table 2.2 How Different Resources Are Referenced from Within Java and XML Files
Resource Reference in Java Reference in XML
res/layout/main.xml R.layout.main @layout/main
res/drawable-hdpi/icon.png R.drawable.icon @drawable/icon
@+id/home_button R.id.home_button @id/home_button
<string name="hello"> R.string.hello @string/hello }
public static final class string {
public static final int app_name=0x7f040001; public static final int hello=0x7f040000; }
}
Here, each resource is mapped to a unique integer value. In this way, the R.java class provides a way to reference external resources within Java code. For example, to reference the main.xml layout file in Java, the R.layout.main integer is used.To reference the
same within XML files, the "@layout/main" string is used.
Referencing resources from within Java or XML files is demonstrated in Table 2.2. Note that to define a new button ID called home_button, the plus sign is added to the
identifying string: @+id/home_button. More complete details on resources are given in
Chapter 4,“User Interface Layout,” but this suffices to cover the recipes in this chapter.
Android Package and Manifest File
The Android project, sometimes also referred to as an Android package, is a collection of Java packages. Different Android packages can have the same Java package names, whereas the Android package name must be unique across all applications installed on the
Android device.
For the OS to access them, each application must declare its available components in a single AndroidManifest XML file. In addition, this file contains the required permissions and behavior for the application to run. Listing 2.5 shows what it looks like for the “Cre-ating a Project and an Activity” recipe.
Listing 2.5 AndroidManifest.xml
<?xml version="1.0" encoding="utf-8"?>
<manifest xmlns:android="http://schemas.android.com/apk/res/android" package="com.cookbook.simple_activity"
android:versionCode="1" android:versionName="1.0">