Managing Linux
®Systems
PRENTICE HALL
PROFESSIONAL TECHNICAL REFERENCE
UPPER SADDLE RIVER, NJ 07458
WWW.PHPTR.COM
Managing Linux
®Systems
with Webmin
™System Administration and Module Development
Cameron, Jamie.
Managing Linux systems with Webmin / Jamie Cameron. p. cm.
ISBN 0-13-140882-8
1. Linux. 2. Operating systems (Computers). I. Title. QA76.76.O63 C3545 2003
005.4’32—dc22
2003016330
Editorial and production services: TIPS Technical Publishing, Inc. Cover design director: Jerry Votta
Cover design: Nina Scuderi
Manufacturing buyer: Maura Zaldivar Executive Editor: Jill Harry
Editorial assistant: Brenda Mulligan Marketing manager: Dan DePasquale
© 2004 by Jamie Cameron
Published by Pearson Education, Inc.
Publishing as Prentice Hall Professional Technical Reference Upper Saddle River, New Jersey 07458
This material may be distributed only subject to the terms and conditions set forth in the Open Publication License, v1.0 or later (the latest version is presently available at http://www.opencontent.org/openpub/).
Prentice Hall PTR offers excellent discounts on this book when ordered in quantity for bulk purchases or special sales.þ For more information, please contact: U.S. Corporate and Government Sales, 1-800-382-3419, [email protected]. For sales outside of the U.S., please contact: International Sales, 1-317-581-3793, [email protected].
Company and product names mentioned herein are the trademarks or registered trademarks of their respective owners.
Printed in the United States of America
First Printing
ISBN 0-13-140882-8
Pearson Education LTD.
Pearson Education Australia PTY, Limited Pearson Education Singapore, Pte. Ltd. Pearson Education North Asia Ltd. Pearson Education Canada, Ltd.
Pearson Educación de Mexico, S.A. de C.V. Pearson Education—Japan
Contents at a Glance
I INTRODUCTION
1 Introduction to Webmin ...1
2 Installing Webmin ...6
3 Securing Your Webmin Server ...14
II SYSTEM MODULES 4 Users and Groups ...19
5 Disk and Network Filesystems ...39
6 NFS File Sharing ...53
7 Disk Quotas ...60
8 Partitions, RAID, and LVM ...68
9 Bootup and Shutdown ...84
10 Scheduled Commands ...93
11 Process Management ...99
12 Software Packages...105
13 System Logs ...113
14 Filesystem Backups ...121
15 Internet Services ...129
16 Network Configuration...144
17 Network Information Service ...154
18 PPP Server Configuration...165
19 Firewall Configuration ...173
20 Setting the Date and Time ...191
21 Boot Loader Configuration...195
22 Printer Administration ...205
23 Voicemail Server Configuration...215
24 Remote Shell Login ...220
25 Running Custom Commands...224
26 Webmin’s File Manager ...232
27 Perl Modules...244
28 Status Monitoring with Webmin ...250
III SERVER MODULES 29 Apache Web Server Configuration ..264
30 DNS Server Configuration ...315
31 CVS Server Configuration ...354
32 DHCP Server Configuration...361
33 Downloading Email with Fetchmail ...378
34 Managing Majordomo Mailing Lists ...388
35 The MySQL Database ...405
36 The PostgreSQL Database...428
37 Configuring Sendmail ...448
38 Configuring Qmail ...476
39 Analyzing Log Files ...491
40 The ProFTPD Server ...500
41 The WU-FTPD Server...525
42 SSH Server Configuration...544
43 Windows File Sharing with Samba ...554
44 Configuring the Squid Proxy Server...577
45 Filtering Email with Procmail ...605
46 Creating SSL Tunnels ...615
47 Usermin Configuration...620
IV CLUSTER MODULES 48 Cluster Software Management ...643
49 Cluster User Management ...649
50 Cluster Webmin Configuration ...660
V WEBMIN MODULES 51 Webmin Configuration...669
52 Webmin Access Control...688
53 Webmin Servers ...700
54 Logging in Webmin...707
VI DEVELOPER’S GUIDE 55 Webmin Module Development ...710
56 Advanced Module Development...721
57 Inside the Scheduled Cron Jobs Module...734
58 Creating Webmin Themes...741
59 Inside the MSC Theme...747
Contents
I
I
NTRODUCTION1
Introduction to Webmin
1
What is Webmin? 1
Who Should Use Webmin? 2 How and Why Was it Developed? 3 What is this Book About? 4 Who Should Read this Book? 4 Conventions Used in this Book 5 Acknowledgments 5
2
Installing Webmin
6
Downloading Webmin for Your System 6 Installing the RPM Package 7
Installing the tar.gz Package 8 Installing the Solaris Package 10 The Webmin User Interface 10 Uninstalling Webmin 13 Summary 13
3
Securing Your Webmin Server
14
Network Security 14 SSL Encryption 15
Requesting a Valid SSL Certificate 17 Summary 18
II
S
YSTEMM
ODULES4
Users and Groups
19
Introduction to UNIX Users and Groups 19 The Users and Groups Module 20
Creating a New User 21 Editing an Existing User 23 Deleting a User 24
Creating a New Group 25 Editing an Existing Group 26 Deleting a Group 27
Viewing Recent and Current Logins 27 Reading Users’ Email 28
Creating Users from Batch Files 28 Configuring the Users and Groups
Module 30
Before and After Commands 34 Module Access Control 34 Other Operating Systems 37 Summary 38
5
Disk and Network Filesystems
39
Introduction to Filesystems 39 The Disk and Network Filesystems
Module 40
Mounting an NFS Network Filesystem 40 Mounting an SMBFS Windows
Networking Filesystem 43
Mounting a Local ext2 or ext3 Hard Disk Filesystem 44
Mounting a Local Windows Hard Disk Filesystem 45
Adding Virtual Memory 46 Automounter Filesystems 47 Editing or Removing an Existing
Filesystem 48
Listing Users of a Filesystem 48 Module Access Control 49 Configuring the Disk and Network
Filesystems Module 50
A Comparison of Filesystem Types 50 Other Operating Systems 51
Summary 52
6
NFS File Sharing
53
Introduction to File Sharing with NFS 53 The NFS Exports Module 54
Exporting a Directory 54
Editing or Deleting an NFS Export 55 NFS on Solaris 56
NFS on BSD, MacOS X and OpenServer 57
NFS on Irix 59 Summary 59
7
Disk Quotas
60
Setting Quotas for a User or Group 63 Copying Quotas to Multiple Users 63 Setting Grace Times 64
Setting Default Quotas for New Users 65 Other Operating Systems 66
Configuring the Disk Quotas Module 66 Module Access Control 66
Summary 67
8
Partitions, RAID, and LVM
68
Introduction to Hard Disk Partitions 68 The Partitions on Local Disks Module 69 Adding and Formatting a New Partition 70 Creating a New Filesystem 70
Partition Labels 71
Deleting or Changing a Partition 72 Module Access Control 73
Other Operating Systems 74 Introduction to RAID 74 The Linux RAID Module 75 Introduction to LVM 77
The Logical Volume Management Module 78
Creating a New Volume Group 79 Adding and Removing a Physical
Volume 80
Creating and Deleting a Logical Volume 80
Resizing a Logical Volume 81 Creating a Snapshot 82 Summary 83
9
Bootup and Shutdown
84
Introduction to the Linux Boot Process 84 The Bootup and Shutdown Module 85 Configuring an Action to Start at
Bootup 85
Starting and Stopping Actions 86 Adding a New Action 87
Rebooting or Shutting Down Your System 89
Configuring the Bootup and Shutdown Module 89
Other Operating Systems 89
The SysV Init Configuration Module 91 Summary 92
10 Scheduled Commands
93
Introduction to Cron Jobs 93 The Scheduled Cron Jobs Module 93 Creating a New Cron Job 94 Editing a Cron Job 95
Controlling Users’ Access to Cron 96 Module Access Control Options 96 Configuring the Scheduled Cron Jobs
Module 96
Other Operating Systems 97
The Scheduled Commands Module 97 Creating a New Scheduled Command 98 Summary 98
11 Process Management
99
Introduction to Processes 99 The Running Processes Module 99 Viewing, Killing, or Reprioritizing a
Process 101
Searching for Processes 102 Running a Process 103
Module Access Control Options 103 Other Operating Systems 104 Summary 104
12 Software Packages
105
Introduction to Packages 105 The Software Packages Module 107 Installing a New Package 107 Finding and Removing a Package 109 Updating on Debian Linux 110 Updating on Red Hat Linux 111 Other Operating Systems 111 Summary 112
13 System Logs
113
Contents ix
14 Filesystem Backups
121
Introduction to Backups with Dump 121 The Filesystem Backup Module 121 Adding a New Backup 122
Making a Backup 124
Editing or Deleting a Backup 125 Restoring a Backup 125
Configuring the Filesystem Backup Module 126
Other Operating Systems 128 Summary 128
15 Internet Services
129
Introduction to Internet Services 129 The Internet Services and Protocols
Module 130
Enabling an Internet Service 133 Creating Your Own Internet Service 133 Creating and Editing RPC Programs 135 Configuring the Internet Services and
Protocols Module 136 Other Operating Systems 138 The Extended Internet Services
Module 139
Enabling or Editing an Extended Internet Service 140
Creating an Extended Internet Service 141 Editing Default Options 142
Summary 143
16 Network Configuration
144
Introduction to Linux Networking 144 Viewing and Editing Network
Interfaces 146
Adding a Network Interface 147 Configuring Routing 149
Changing the Hostname or DNS Client Settings 150
Editing Host Addresses 151 Module Access Control 152 Other Operating Systems 153 Summary 153
17 Network Information Service
154
Introduction to NIS 154 Becoming an NIS Client 155
Setting Up an NIS Master Server 157 Editing NIS Tables 159
Securing Your NIS Server 160 Setting Up an NIS Slave Server 163 Configuring the NIS Client and Server
Module 163 NIS on Solaris 163 Summary 164
18 PPP Server Configuration
165
Introduction to PPP on Linux 165 Configuring a PPP Server 166 Managing PPP Accounts 169 Restricting Access by Caller ID 171 Module Access Control 172 Summary 172
19 Firewall Configuration
173
Introduction to Firewalling with IPtables 173
The Linux Firewall Module 175 Allowing and Denying Network
Traffic 177
Changing a Chain’s Default Action 181 Editing Firewall Rules 182
Creating Your Own Chain 182 Setting Up Network Address
Translation 183
Setting Up a Transparent Proxy 184 Setting Up Port Forwarding 185 Firewall Rule Conditions 186 Configuring the Linux Firewall
Module 189 Summary 189
20 Setting the Date and Time
191
The System Time Module 191 Changing the System Time 192 Change the Hardware Time 192 Synchronizing Times with Another
Server 193
21 Boot Loader Configuration
195
Introduction to Boot Loaders 195 The Linux Bootup Configuration
Module 196
Booting a New Kernel with LILO 197 Booting Another Operating System with
LILO 198
Editing Global LILO Options 199 The GRUB Boot Loader Module 200 Booting a New Linux Kernel or BSD with
GRUB 201
Booting Another Operating System with GRUB 202
Editing Global GRUB Options 202 Installing GRUB 203
Configuring the GRUB Boot Loader Module 203
Summary 203
22 Printer Administration
205
Introduction to Printing on Linux 205 The Printer Administration Module 206 Adding a New Printer 206
Editing an Existing Printer 209 Managing Print Jobs 210
Configuring the Printer Administration Module 211
Module Access Control 212 Other Operating Systems 213 Summary 214
23 Voicemail Server Configuration 215
The Voicemail Server Module 215 Configuring Your System as an Answering
Machine 216
Listening to Recorded Messages 218 Setting a Greeting Message 219 Summary 219
24 Remote Shell Login
220
The SSH/Telnet Login Module 220 Configuring the SSH/Telnet Login
Module 220
The Command Shell Module 222
The Shell In A Box Module 223 Summary 223
25 Running Custom Commands
224
The Custom Commands Module 224 Creating a New Command 225 Parameter Types 227
Creating a New File Editor 229 Module Access Control 230
Configuring the Custom Commands Module 231
Summary 231
26 Webmin’s File Manager
232
The File Manager Module 232 Navigating Directories and Viewing
Files 232
Manipulating Files 234 Creating and Editing Files 234 Editing File Permissions 235 Creating Links and Directories 236 Finding Files 237
Editing EXT File Attributes 237 Editing XFS File Attributes 238 Editing File ACLs 239
Sharing Directories 240 Module Access Control 242 Summary 243
27 Perl Modules
244
Introduction to Perl Modules 244 Perl Modules in Webmin 245 Installing a Perl Module 245
Viewing and Removing a Perl Module 247 Configuring the Perl Modules Module 248 Summary 248
28 Status Monitoring with Webmin 250
The System and Server Status Module 250 Adding a New Monitor 252
Monitor Types 253
Setting Up Scheduled Monitoring 260 Module Access Control 262
Configuring the System and Server Status Module 262
Contents xi
III S
ERVERM
ODULES29 Apache Web Server
Configuration
264
Introduction to Apache 264
The Apache Webserver Module 265 Starting and Stopping Apache 268 Editing Pages on Your Web Server 268 Creating a New Virtual Host 269 Setting Per-Directory Options 273 Creating Aliases and Redirects 276 Running CGI Programs 279 Setting Up Server-Side Includes 282 Configuring Logging 284
Setting Up Custom Error Messages 287 Adding and Editing MIME Types 288 Password Protecting a Directory 289 Restricting Access by Client Address 293 Encodings, Character Sets, and
Languages 294
Editing .htaccess Files 297
Setting Up User Web Directories 299 Configuring Apache as a Proxy Server 301 Setting Up SSL 304
Viewing and Editing Directives 308 Module Access Control 310 Configuring the Apache Webserver
Module 311 Summary 314
30 DNS Server Configuration
315
Introduction to the Domain Name System 315
The BIND DNS Server Module 318 Creating a New Master Zone 321 Adding and Editing Records 322 Record Types 325
Editing a Master Zone 330 Creating a New Slave Zone 332 Editing a Slave Zone 334
Creating and Editing a Forward Zone 336 Creating a Root Zone 337
Editing Zone Defaults 338
Configuring Forwarding and Transfers 340 Editing Access Control Lists 341
Setting Up Partial Reverse Delegation 342 Using BIND Views 344
Module Access Control 346 Configuring the BIND DNS Server
Module 347
The BIND 4 DNS Server Module 347 Summary 353
31 CVS Server Configuration
354
Introduction to CVS 354 The CVS Server Module 354 Setting Up the CVS Server 355 Using the CVS Server 356 Adding and Editing Users 356 Limiting User Access 358 Configuring the CVS Server 359 Browsing the Repository 359
Configuring the CVS Server Module 359 Summary 360
32 DHCP Server Configuration
361
Introduction to the Dynamic Host Configuration Protocol 361 The ISC DHCP Server 362 The DHCP Server Module 363 Adding and Editing Subnets 365 Viewing and Deleting Leases 369 Editing Global Client Options 370 Adding and Editing Fixed Hosts 370 Adding and Editing Shared Networks 372 Adding and Editing Groups 373
Module Access Control 374
Configuring the DHCP Server Module 375 Summary 377
33 Downloading Email with
Fetchmail
378
Introduction to Fetchmail 378
The Fetchmail Mail Retrieval Module 379 Adding a New Mail Server to Check 381 Downloading Email 384
Running the Fetchmail Daemon 384 Editing Global Settings 385 Module Access Control 386
Configuring the Fetchmail Mail Retrieval Module 386
34 Managing Majordomo Mailing
Lists
388
Introduction to Mailing Lists and Majordomo 388
The Majordomo List Manager Module 389 Using Other Mail Servers 391
Creating a Mailing List 391 Managing List Members 392
Editing List Information, Headers, and Footers 393
Editing Subscription Options 395 Editing Forwarded Email Options 396 Editing List Access Control 397 Moderating and Maintaining a Mailing
List 398
Deleting a Mailing List 399 Creating a Digest List 399 Editing Digest Options 400
Editing Global Majordomo Options 401 Module Access Control 401
Configuring the Majordomo List Manager Module 402
Summary 402
35 The MySQL Database
405
Introduction to MySQL 405
The MySQL Database Server Module 406 Creating a New Database 407
Creating a New Table 408 Adding and Editing Fields 409 Field Types 412
Viewing and Editing Table Contents 412 Deleting Tables and Databases 416 Executing SQL Commands 417
Backing Up and Restoring a Database 417 Managing MySQL Users 419
Managing Database, Host, Table, and Field Permissions 421
Module Access Control 423
Configuring the MySQL Database Server Module 424
Summary 427
36 The PostgreSQL Database
428
Introduction to PostgreSQL 428 The PostgreSQL Database Server
Module 429
Creating a New Database 431 Creating a New Table 431 Adding and Editing Fields 433 Deleting a Field 433
Field Types 434
Viewing and Editing Table Contents 436 Deleting Tables and Databases 436 Executing SQL Commands 437
Backing Up and Restoring a Database 437 Managing PostgreSQL Users 439
Managing PostgreSQL Groups 441 Restricting Client Access 441 Editing Object Privileges 442 Module Access Control 443
Configuring the PostgreSQL Database Server Module 444
Summary 447
37 Configuring Sendmail
448
Introduction to Internet Email 448 The Sendmail Configuration Module 449 Editing Local Domains and Domain
Masquerading 451
Managing Email Aliases 452 Configuring Relaying 455
Managing Virtual Address Mappings 456 Configuring Domain Routing 457 Editing Global Sendmail Options 458 Viewing the Mail Queue 460 Reading Users’ Email 461
Adding Sendmail Features with M4 463 Creating Autoreply Aliases 465 Creating Filter Aliases 466
Sendmail Module Access Control 468 Configuring the Sendmail Configuration
Module 469 Summary 475
38 Configuring Qmail
476
Introduction to Qmail 476
The Qmail Configuration Module 477 Editing Local Domains 478
Contents xiii
Configuring Relaying 480 Managing Virtual Mappings 481 Configuring Domain Routing 483 Editing Global Qmail Options 484 Editing Mail User Assignments 484 Viewing the Mail Queue 486 Reading Users’ Email 486
Configuring the Qmail Configuration Module 488
Summary 490
39 Analyzing Log Files
491
The Webalizer Logfile Analysis Module 491
Editing Report Options 492
Generating and Viewing a Report 496 Reporting on Schedule 496
Adding Another Log File 497 Editing Global Options 498 Module Access Control 498 Summary 499
40 The ProFTPD Server
500
Introduction to FTP and ProFTPD 500 The ProFTPD Server Module 501 Running ProFTPD from inetd or
xinetd 503
Using the ProFTPD Server Module 504 Creating Virtual Servers 505
Setting Up Anonymous FTP 506 Restricting Users to Their Home
Directories 507
Limiting Who Can Log In 508 Setting Directory Listing Options 510 Message and Readme Files 511 Setting Per-Directory Options 512 Restricting Access to FTP Commands 514 Configuring Logging 517
Limiting Concurrent Logins 519 Restricting Clients by IP Address 520 Limiting Uploads 521
Manually Editing Directives 523 Configuring the ProFTPD Server
Module 523 Summary 524
41 The WU-FTPD Server
525
Introduction to WU-FTPD 525 The WU-FTPD Server Module 526 Limiting Who Can Log In 528 Setting Up Anonymous FTP 529 Managing User Classes 531 Denying Access to Files 532 Setting Up Guest Users 534 Editing Directory Aliases 535 Message and Readme Files 536 Configuring Logging 538 Limiting Concurrent Logins 540 Restricting Clients by IP Address 541 Restricting Access to FTP Commands 541 Configuring the WU-FTPD Server
Module 542 Summary 543
42 SSH Server Configuration
544
Introduction to SSH 544 The SSH Server Module 545
Restricting Access to the SSH Server 545 Network Configuration 547
Authentication Configuration 549 Editing Client Host Options 551 Setting Up SSH for New Users 552 Configuring the SSH Server Module 553 Summary 553
43 Windows File Sharing with
Samba
554
Introduction to SMB and Samba 554 The Samba Windows File Sharing
Module 556
Accessing SWAT from Webmin 573 Module Access Control 573
Configuring the Samba Windows File Sharing Module 574
Summary 576
44 Configuring the Squid Proxy
Server
577
Introduction to Proxying and Squid 577 The Squid Proxy Server Module 578 Changing the Proxy Ports and
Addresses 580
Adding Cache Directories 581
Editing Caching and Proxy Options 583 Introduction to Access Control Lists 584 Creating and Editing ACLs 586
Creating and Editing Proxy Restrictions 592
Setting Up Proxy Authentication 593 Configuring Logging 595
Connecting to Other Proxies 596 Clearing the Cache 598
Setting Up a Transparent Proxy 599 Viewing Cache Manager Statistics 599 Analyzing the Squid Logs 600 Module Access Control 601 Configuring the Squid Proxy Server
Module 601 Summary 604
45 Filtering Email with Procmail
605
Introduction to Procmail 605
The Procmail Mail Filter Module 606 Setting Up Sendmail 606
Creating and Editing Actions 608 Creating and Editing Variable
Assignments 611
Conditional Blocks and Include Files 612 Filtering Spam with SpamAssassin 613 Configuring the Procmail Mail Filter
Module 614 Summary 614
46 Creating SSL Tunnels
615
Introduction to SSL and STunnel 615 The SSL Tunnels Module 616 Creating and Editing SSL Tunnels 617
Configuring the SSL Tunnels Module 618 Summary 619
47 Usermin Configuration
620
Introduction to Usermin 620
The Usermin Configuration Module 621 Starting and Stopping Usermin 621 Restricting Access to Usermin 622 Changing the Port and Address 623 Configuring the Usermin User
Interface 623
Installing Usermin Modules 624 Changing the Default Language 625 Upgrading Usermin 625
Configuring Authentication 626 Editing Categories and Moving
Modules 628
Changing and Installing Themes 629 Turning on SSL 630
Configuring Usermin Modules 631 Restricting Access to Modules 632 Limiting Who Can Log In 636 About the Usermin Modules 638 Configuring the Usermin Configuration
Module 641 Summary 642
IV C
LUSTERM
ODULES48 Cluster Software Management
643
Introduction to Webmin Clustering 643 The Cluster Software Packages
Module 644
Registering a Server 645 Installing a Package 646 Searching for Packages 646 Deleting a Package 647
Exploring and Removing a Server 647 Refreshing the Package List 648
Configuring the Cluster Software Packages Module 648
Summary 648
49 Cluster User Management
649
The Cluster Users and Groups Module 649 Registering a Server 650
Contents xv
Editing an Existing User 652 Deleting a User 653
Creating a New Group 654 Editing an Existing Group 654 Deleting a Group 656
Refreshing User and Group Lists 656 Synchronizing Users and Groups 656 Listing and Removing a Server 658 Configuring the Cluster Users and Groups
Module 659 Summary 659
50 Cluster Webmin Configuration
660
The Cluster Webmin Configuration Module 660
Registering a Server 661
Creating a New Webmin User 662 Editing or Deleting a Webmin User 662 Creating a New Webmin Group 664 Editing or Deleting a Webmin Group 664 Editing the User or Group ACL for a
Module 665
Installing a Module or Theme 666 Viewing and Deleting a Module or
Theme 667
Refreshing User and Module Lists 667 Listing and Removing a Server 668 Configuring the Cluster Webmin
Configuration Module 668 Summary 668
V
W
EBMINM
ODULES51 Webmin Configuration
669
The Webmin Configuration Module 669 Restricting Access to Webmin 669 Changing the Port and Address 670 Setting Up Logging 671
Using Proxy Servers 672 Configuring the Webmin User
Interface 672
Installing and Deleting Webmin Modules 673
Cloning a Webmin Module 674
Changing Your Operating System 675 Editing the Program Path and Environment
Variables 676
Changing Webmin’s Language 676 Editing Main Menu Settings 677 Upgrading Webmin 678
Installing Updates to Webmin 679 Configuring Authentication 681 Editing Categories and Moving
Modules 682
Changing and Installing Themes 683 Referrer Checking 684
Allowing Unauthenticated Access to Modules 685
Turning on SSL 686
Setting Up a Certificate Authority 686 Summary 687
52 Webmin Access Control
688
Introduction to Webmin Users, Groups, and Permissions 688
The Webmin Users Module 689 Creating a New Webmin User 689 Editing a Webmin User 691 Editing Module Access Control 692 Creating and Editing Webmin Groups 694 Requesting a Client SSL Key 695 Viewing and Disconnecting Login
Sessions 697
Module Access Control 697 Configuring the Webmin Users
Module 698 Summary 699
53 Webmin Servers
700
The Webmin Servers Index Module 700 Adding a Webmin Server 701
Editing or Deleting a Webmin Server 703 Using Server Tunnels 703
Broadcasting and Scanning for Servers 704 How RPC Works 704
Module Access Control 705
Configuring the Webmin Servers Index Module 706
54 Logging in Webmin
707
Introduction to Logging 707
The Webmin Actions Log Module 708 Displaying Logs 708
Summary 709
VI D
EVELOPER’
SG
UIDE55 Webmin Module Development
710
Introduction 710 Required Files 711 Module CGI Programs 712 Module Configuration 715 Look and Feel 717 Design Goals 718 Online Help 718 Module Packaging 719
Summary and Learning More 720
56 Advanced Module Development 721
Module Access Control 721 User Update Notification 723 Internationalization 723 File Locking 725 Action Logging 726
Pre- and Post-Install Scripts 728 Functions in Other Modules 728 Remote Procedure Calls 730 Creating Usermin Modules 732 Summary 733
57 Inside the Scheduled Cron Jobs
Module
734
Module Design and CGI Programs 734 The cron-lib.pl Library Script 735 Module Configuration Settings 737 The lang Internationalization
Directory 738
The acl_security.pl Access Control Script 738
The log_parser.pl Log Reporting Script 739
The useradmin_update.pl User Synchronization Script 740 Summary 740
58 Creating Webmin Themes
741
Introduction to Themes 741
Overriding Images and Programs 743 Theme Functions 744
Summary 746
59 Inside the MSC Theme
747
Theme Design and Graphics 747 The index.cgi Program 748 The theme_header Function 748 The theme_footer Function 749 Summary 750
60 The Webmin API
751
API Functions 751 Summary 765
1
P
ART
II
NTRO
DU
CTIO
N
C
H A P T E R
1
Introduction to
Webmin
his chapter explains what Webmin is, why it was written, and what you
can expect from this book.
1.1 What is Webmin?
Webmin is a program that simplifies the process of managing a Linux or UNIX system. Tradi-tionally, you have needed to manually edit configuration files and run commands to create accounts, set up web servers, or manage email forwarding. Webmin now lets you perform these tasks through an easy-to-use web interface, and automatically updates all of the required config-uration files for you. This makes the job of administering your system much easier.
Some of the things that you can do with Webmin include:
• Creating, editing, and deleting UNIX login accounts on your system • Exporting files and directories to other systems with the NFS protocol
• Setting up disk quotas to control how much space users can take up with their files • Installing, viewing, and removing software packages in RPM and other formats • Changing your system's IP address, DNS settings, and routing configuration
• Setting up a firewall to protect your computer or give hosts on an internal LAN access to the Internet
• Creating and configuring virtual web sites for the Apache Web server
• Managing databases, tables, and fields in a MySQL or PostgreSQL database server • Sharing files with Windows systems by configuring Samba
These are just a few of the available functions. Webmin lets you configure almost all of the com-mon services and popular servers on UNIX systems using a simple web interface. It protects you
from the syntax errors and other mistakes that are often made when editing configuration files directly, and warns you before potentially dangerous actions.
Because Webmin is accessed though a web browser, you can log in to it from any system that is connected to yours through a network. There is absolutely no difference between running it locally and running it remotely, and it is much easier to use over the network than other graphical configuration programs.
Webmin has what is known as a modular design. This means that each of its functions is con-tained in a module that can generally be installed or removed independently from the rest of the program. Each module is responsible for managing some service or server, such as UNIX users, the Apache Web server, or software packages.
If you have been manually configuring your system up till now, any existing settings will be recognized by Webmin. It always reads the standard configuration files on your system and updates them directly, instead of using its own separate database. This means that you can freely mix Webmin, manual configuration, and other programs or scripts that work in the same way.
Even though this book is written for Linux users, Webmin can be used on many other flavors of UNIX as well, such as Solaris, FreeBSD, and HP/UX. One of its biggest strengths is its under-standing of the differences between all these operating systems and the way it adjusts its user inter-face and behavior to fit your OS. This means that it can often hide the underlying differences between each UNIX variant and present a similar or identical interface no matter which one you are using.
Webmin on its own is not particularly useful though—it is only a configuration tool, so you must have programs installed for it to configure. For example, the Apache module requires that the actual Apache Web server be installed. Fortunately, all of the services and servers that Webmin manages are either included with most Linux distributions as standard, or can be freely down-loaded and installed.
1.2 Who Should Use Webmin?
Webmin was written for use by people who have some Linux experience but are not familiar with the intricacies of system administration. Even though it makes the process of creating UNIX users or managing the Squid proxy server easy, you must first have some idea of what a UNIX account is and what Squid does. The average Webmin user is probably someone running it on their Linux system at home or on a company network.
The program assumes that you are familiar with basic TCP/IP networking concepts, such as IP addresses, DNS servers, and hostnames. It also assumes that the user understands the layout of the UNIX filesystem, what users and groups are, and where user files are located. If you use Webmin to manage a server like Apache or Sendmail, you should first have an idea of what they can do and what kind of configuration you want completed.
How and Why Was it Developed? 3
Even though it can be used on a system with no connection to the Internet, Webmin does ben-efit if your Linux system is on a network. It can download new software packages, Perl modules, or even new versions of Webmin for you, if connected. A permanent high-speed connection is best, but even a dial-up connection is good enough for most purposes.
Because Webmin runs with root privileges, you must be able to log in to your system as
root to install and start it. This means that it cannot be used on a system on which you have only a normal UNIX account, such as a virtual web server that is shared with other people. You might, however, be able to get your system administrator to install and configure it for you.
If you are already an experienced UNIX system administrator, Webmin may not feel like the tool for you because using it is generally slower than directly editing configuration files and run-ning commands. However, even the experts can benefit from its automatic syntax checking and the actions that it can perform automatically.
It is also possible to give different people different levels of access to Webmin, so that an expe-rienced administrator can use it to safely delegate responsibility to less-skilled subordinates. For example, you might want someone to be only able to manage the BIND DNS server and nothing else, while giving yourself full access to the system and all of Webmin's functions.
1.3 How and Why Was it Developed?
Webmin, the program, was designed and created by me, Jamie Cameron—the author of this book. I started it back in 1997 and released the first version (0.1) in October of that year. Since that time, its user interface, features, and appearance have changed dramatically, and almost all of the code has been re-written. The basic concept of a web-based administration tool, however, has been the same since that very first release.
I started writing it when I was the administrator for a system running a DNS server and was spending a lot of time updating the server's configuration files to add new host records requested by users. Giving them the root password was not an option—they did not have the experience to properly edit the zone files and re-start the server. The solution was a simple web interface that would display existing DNS records and allow them to be edited, created, and deleted. Users could then safely be given access to this interface to make the changes that they needed.
DNS management was just the start though. Once I saw the possibilities for simplifying the configuration of a UNIX system though a web interface, I started adding other features to the pro-gram and putting them into modules. Next came modules for UNIX users, Samba, mounting file-systems, NFS, and Cron jobs. I thought up the name Webmin, made it available for anyone to download, and announced it on a few mailing lists. The initial feedback was good, so I kept on writing.
1.4 What is this Book About?
This book explains how to install Webmin, how to use almost all of its modules, and how to write your own. The book focuses on the standard modules that come with the Webmin package, not those written by other people. Not all of the 83 standard modules are covered, however, as some are not very useful to the average administrator.
Although this book is written primarily for Linux users, the program behaves almost identi-cally on other operating systems. Each chapter also lists any differences between Linux and other UNIX variants in their “Other Operating Systems” sections. This means that it is still very useful if you are running Webmin on FreeBSD, Solaris, MacOS X, or some other variety of UNIX.
Each chapter in the book covers the use of Webmin for managing a particular service or server, such as NFS exports, Sendmail, or the ProFTPD FTP server. Most chapters only discuss a single module, but some cover two or three that have similar or related purposes. Each chapter is pretty much self-contained, so there is no need to read through the entire book in sequence if you just want to find out how to configure one server. Chapters 2, 3, and possibly Chapter 52, however, should be read first as they explain how to install Webmin, how to secure it, and how to limit what other users can do with a module, respectively.
Each chapter is broken up into sections, and most sections explain how to perform a specific task. A section will generally contain an introduction to the task explaining why you might want to do it, followed by a list of steps to follow in the Webmin user interface to carry it out. At the begin-ning of each chapter are sections that introduce the server being configured and the concepts behind it, and list the underlying configuration files that get modified when you use the module covered in that chapter.
Chapters 55 to 60 cover the development of your own Webmin modules and themes, and therefore have a different style. The average user does not need to read them, but if you have an idea for a module that is not currently available, they provide all the information that you need to implement it.
1.5 Who Should Read this Book?
This book should be read by anyone wanting to use Webmin to manage their Linux or UNIX systems. It was written for readers with a basic knowledge of UNIX commands and concepts— people who have installed Linux and have used it for a while.
Each chapter starts with an introduction to the service being configured so that readers have some idea of what the DNS protocol is for or how a firewall works. Even so, a complete novice should not try to set up a server until he understands how it works and what he wants it to do. The best way to learn is to use the service on some other system as a user. For example, if you have used a proxy server before on some other network, then you will have the background knowledge needed to use this book to set up the Squid proxy on your own system.
Conventions Used in this Book 5
1.6 Conventions Used in this Book
The following special text styles are used in this book:
Bold Used for text that appears in Webmin itself, such as error messages, icon names, buttons, and field labels.
Fixed width This style is used for the names of shell commands, UNIX users,
directories and files. Also used for text in configuration files, program code and API functions.
Italics Used to indicate example input entered by the user into Webmin, example commands, or directories. Also used in Chapter 60 “The Webmin API” for the names of parameters to functions.
1.7 Acknowledgments
6
Installing Webmin
his chapter explains how to download the appropriate Webmin
pack-age for your operating system, how to install it, and what you will see
after logging in for the first time.
2.1 Downloading Webmin for Your System
The latest version of Webmin can always be downloaded from www.webmin.com/. At the time of writing, the latest release was Version 1.100, but new versions come out frequently. All of the instructions below, however, will use Version 1.100 for the filenames. If you download a later release, the version number in all the filenames and paths will have changed.
Some Linux distributions, such as Mandrake and Caldera, include Webmin as a standard fea-ture, so it may already be installed on your system. The version that they include, however, may not be the latest official version that is available for download. If you are happy with the release that you already have, however, you can skip this chapter.
Other Linux distributions, like Debian and Gentoo, include Webmin as a package that can be downloaded and installed automatically. On Debian, the command apt-get install webmin
will install the latest version available in the Debian APT repository. This can sometimes be a few versions behind the newest official release, however, so you may want to download from
www.webmin.com/ instead. On Gentoo Linux, the command emerge webmin will install the latest version from the Gentoo Portage repository, which should be the same as the newest official release.
If you are upgrading from an older Webmin version, the process is exactly the same as install-ing for the first time. Any changes that you have made to the configuration of Webmin itself, or to other servers like Apache or Sendmail, will be left unharmed by the upgrade.
While Webmin supports a wide variety of UNIX variants, it does not cover all of them. Because it deals with system configuration files that differ in location and format between different
Installing the RPM Package 7
kinds of UNIX operating systems, it has been written to behave differently depending on the type of operating system that it is running on. To see a complete list of supported operating systems, visit the web page www.webmin.com/support.html. If your operating system is not on the list, you cannot use Webmin.
Before downloading Webmin for installation on your system, you have to choose a package format in which to download it. The available formats are:
RPM If you are running Red Hat, SuSE, Mandrake, Caldera, MSC, or any other Linux distribution which supports the RPM packaging format, then the RPM package is your best choice.
tar.gz The tar.gz packaged version of Webmin will work on any operating system, but is slightly harder to install than the RPM and Solaris packages.
Solaris package If you are running Solaris on Sparc or x86, then this is the package format for you.
For instructions on installing your chosen package type, see Section 2.2 “Installing the RPM Package” below.
2.2 Installing the RPM Package
In the top-right corner of every Webmin website page is a link for the RPM package. A link can also be found on the page www.webmin.com/download.html. Once you have downloaded it, you should have a file on your Linux system named something like
webmin-1.1.100-1.noarch.rpm. To install, run the following command as root:
rpm –U webmin-1.1.100-1.noarch.rpm
The RPM install can only fail if you do not have Perl installed, or if Webmin cannot identify your operating system. If that occurs and your Linux distribution is on the list of supported operat-ing systems, you should install the tar.gz version instead. Because all Linux distributions are slightly different, the Webmin install process has to positively identify the exact distribution and version that you are running, such as Red Hat 7.3. This can fail if one of the files that contain the distribution name (such as /etc/issue) has been modified.
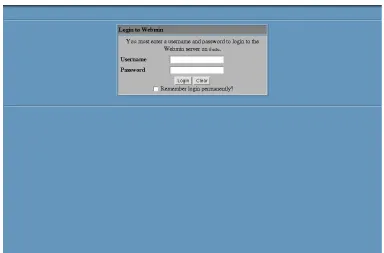
Assuming the RPM install successfully completes, you will be able to login to Webmin imme-diately. Open a web browser, and go to the URL http://localhost:10000/ if you are running the browser on the same Linux system on which Webmin was installed, or
http://your-systems-host-name:10000/ if the browser is being run on another PC. Either way, a web form will appear
prompting for a username and password, as shown in Figure 2.1.
You should be able to login as root, using the same password as the root UNIX user on your Linux system. If the password is changed using the command-line passwd command or the Users and Groups module, your Webmin password will change too.
2.3 Installing the tar.gz Package
In the top-right corner of every Webmin website page there is a link for the tar.gz package. A link can also be found on the page www.webmin.com/download.html. Once you have down-loaded it, you should have a file on your system named something like
webmin-1.1.100.tar.gz. To install the package, follow these steps:
1. Login to your system as root.
2. Choose a directory under which you want Webmin installed. This is usually /usr/
local, but can be /opt or any other location that you prefer. The instructions below will
use /usr/local for simplicity.
3. Copy the webmin-1.1.100.tar.gz file to the /usr/local directory.
4. Run the following commands to uncompress and extract the tar.gz file and run the fol-lowing setup script:
cd /usr/local
gunzip webmin-1.1.100.tar.gz tar xf webmin-1.1.100.tar cd webmin-1.1.100
./setup.sh
5. After running the setup.sh script, you will be asked a series of questions that control the installation process. The questions and their meanings are:
[image:24.612.111.495.142.395.2]Installing the tar.gz Package 9
Config file directory [/etc/webmin] This is the directory in which
Webmin will store all of its own configuration files. It is best just to hit Enter to accept the default of /etc/webmin. If this directory already exists from an older version of Webmin that you are upgrading from, this is the only question that will be asked.
Log file directory [/var/webmin] This is the directory in which
Webmin’s log and process ID files will be stored. Just hit Enter to accept the default of /var/webmin for this one as well.
Full path to perl This is the location of the Perl executable on your system. If
it is at /usr/bin/perl or /usr/local/bin/perl, then you can just type enter to accept the default. Otherwise, you must enter the full path to the Perl interpreter.
Operating system This question will only be asked if Webmin cannot
automatically identify your operating system. You must enter the number next to one of the operating system names that appears in the list before the question.
Version Like the question above, this will only be asked if Webmin cannot
identify your operating system. Again, you must enter the number next to one of the version numbers displayed.
Web server port (default 10000) This is the HTTP port on which
Webmin listens. It is best to stick with the default, unless you are running some other network server on port 10000.
Login name (default admin) This is asking for the username that you will
use for logging into Webmin. admin is the traditional username, but anything can be used.
Login password This is the password that must be entered along with the
username. You must enter this twice, to verify that you haven’t accidentally made a mistake.
Use SSL (y/n) This question will only be asked if you have already installed
the OpenSSL and Net::SSLeay libraries on your system, as explained in Chapter 3. If you enter y, Webmin will use SSL right from the start. If you enter n now, however, you can still turn it on later.
Start Webmin at boot time (y/n) This question controls whether
Webmin will be starting when your system boots up, which means that you do not have to re-start it yourself manually every time you reboot. If you want to have it started at boot, just enter y. If not, enter n.
6. After all the questions have been answered, the install process will finish, and a message showing the URL that you can use to log in will appear. You can now delete the old
webmin-1.1.100.tar file if you no longer need it. Do not delete the /usr/local/
webmin-1.1.100 directory that was created when the tar file was extracted, however.
This contains all the scripts that Webmin needs to run.
Now that the package has been installed, you can open a web browser, and go to the URL http://
localhost:10000/ if you are running the browser on the same Linux system on which Webmin
PC. Either way, a web form will appear prompting for a username and password as shown in Figure 2.1. Log in using the username and password that you chose before in response to the
Login name and Login password questions.
If you answered yes to the SSL question, you should use a URL starting with https:// instead of http:// to connect. If Webmin detects a non-SSL connection when it is in SSL mode, it will dis-play a page with a link to the correct URL.
2.4 Installing the Solaris Package
The Solaris version of Webmin is only available for download from
www.webmin.com/down-load.html. Once you have downloaded it, you should have a file on your Solaris system named
something like webmin-1.1.100-1.pkg.gz. To install, run the following commands as root:
gunzip webmin-1.1.100.pkg.gz
pkgadd –d webmin-1.1.100.pkg.gz WSwebmin
The Solaris package can only fail if you already have Webmin installed, or if you do not have the Perl executable at /usr/local/bin/perl. If you have Perl installed somewhere else on your sys-tem, you should create a symbolic link from /usr/local/bin/perl to the real location.
Assuming the Solaris package install completes successfully, you will be able to log in to Webmin immediately. Open a web browser, and go to the URL http://localhost:10000/ if you are running the browser on the same Linux system on which Webmin was installed, or http://your-sys-tems-hostname:10000/ if the browser is being run on another PC. Either way, a web form will appear prompting for a username and password, as shown in Figure 2.1.
You should be able to login as root, using the same password as the root UNIX user on your Solaris system. If you change the UNIX root password down the road, however, the Webmin
root user will not change. This is because the package install just copies the current password from the /etc/shadow file.
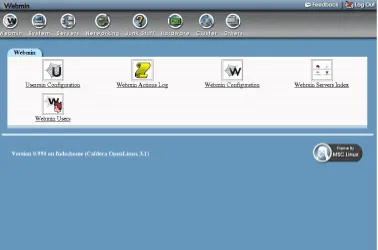
2.5 The Webmin User Interface
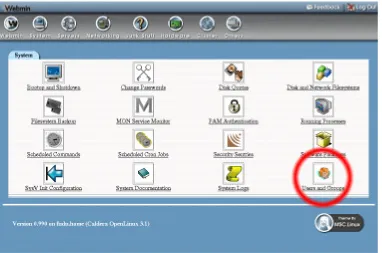
Assuming the installation process and login were successful, your browser should show the Web-min main menu with the WebWeb-min category selected, as shown in Figure 2.2. You can switch to other categories by clicking on the icons along the top of the page, such as System, Servers, or Others. Every module is a member of one category, and a table of icons for each module in the selected category will appear in the body of the page. To enter a module, just click on its icon.
To log out of Webmin, just click on the Logout link that appears in the top-right corner of every page. To send feedback to the author (that’s me), click on the Feedback link that is next to the Logout button. To visit www.webmin.com/, click on the Webmin logo in the top-left corner of any page.
The Webmin User Interface 11
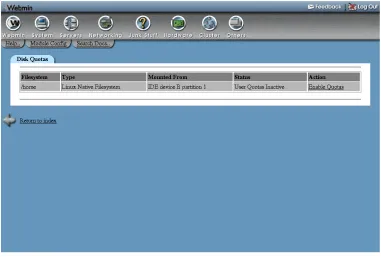
All Webmin modules have a common layout and user interface, in order to make navigation easier. When you click on a module icon from the main menu, the main page of the module will appear. For example, Figure 2.3 shows the main page of the Disk Quotas module.
At the top are the category icons that appear on every Webmin page, so that you can easily switch to another module. Below are links for Help, Module Config, and Search Docs. Not every module will display all of these links, but where they appear they have common purposes:
Help This link opens a pop-up window containing an overview of the module and the options available on the main page.
Module Config This link displays a form containing configurable options for the current module. See Figure 2.4 for an example of the options available in the Disk Quotas module. Each module has its own set of options, but all use a similar interface for editing them. In most cases, you will not need to change any of these configuration options for normal use of a module.
Search Docs This link displays a list of UNIX man pages, package documentation, HOWTO files, and websites related to the server or program that the module is configuring. This can be useful for finding out additional information about the underlying configuration files and commands that Webmin is using.
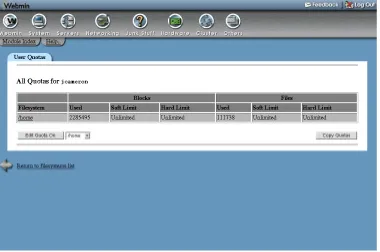
Other pages below the first page in each module also have a common layout. Figure 2.5 shows a sample page from the Disk Quotas module. Below the list of category icons is a link labeled Module Index, which will always return you to the module’s main page. This can be found on almost every page of every module. Next to it is another Help link that pops up a window
[image:27.612.116.494.148.398.2]Figure 2.3 The Disk Quotas module main page.
[image:28.612.114.496.427.672.2]Uninstalling Webmin 13
playing information on the current page. Not all pages have online help, so this link will not always appear. Finally, at the bottom of the page is a link, whose label starts with Return to, that will take you back one level in the module’s hierarchy of pages.
2.6 Uninstalling Webmin
If, for some unimaginable reason, you want to remove Webmin from your system, you can just log in as root and run the command:
/etc/webmin/uninstall.sh
This command will ask if you are sure you want to uninstall, and if you do it will delete the Webmin scripts and configuration directories. This means that any configuration you have done to Webmin itself, such as changing IP access control, switching themes, or creating new Webmin users will be lost. There will, however, be no harm done to the configuration of other servers such as Apache or Sendmail, even if they were done using Webmin.
2.7 Summary
[image:29.612.116.496.148.400.2]After reading this chapter, you should understand how to install Webmin for the first time on a server, or upgrade an existing installation to the latest release. You should also know the differ-ences between the three package formats, and which one is suitable for your operating system. Because this entire book is about Webmin, it should definitely be installed before reading on!
14
Securing Your
Webmin Server
his chapter covers the necessary steps for adding additional security to
Webmin on your system once it has been installed. It explains both IP
address restrictions and the use of SSL.
3.1 Network Security
Unless you are running Webmin on a system that is never connected to any other network, it is a wise idea to restrict which client network addresses are allowed to log in. Because Webmin is so powerful, anyone who manages to log in will have total control over your system—as though they had root shell access. Even though a username and password is always required to log in, it is always good to have an additional layer of security in case an attacker guesses (or somehow discovers) your password. IP access control also protects you from any bugs in Webmin that may show up in future that will allow an attacker to log in without a password—some older releases have had just this problem.
To restrict the IP addresses and networks from which Webmin will accept connections, follow these steps:
1. In the Webmin category, click on the icon for the Webmin Configuration module. 2. Click on the icon for IP Access Control. The form shown in Figure 3.1 will appear for
restricting client IP addresses.
3. Select the option Only allow from listed addresses, and enter the IP addresses or host-names of client systems in the text box from which you will allow access. If you want to allow access from an entire IP network, enter the address of the network with 0 for the final octet. For example, if you wanted to allow all clients with IP addresses from
192.168.1.0 up to 192.168.0.255, you would enter 192.168.1.0.
SSL Encryption 15
Networks can also be entered in the standard network/netmask format, like
192.168.1.0/255.255.255.0. You can also grant access from an entire domain by
entering a wildcard hostname like *.foo.com, assuming that reverse IP address resolution has been set up for that domain.
4. When done, click the Save button to apply your changes. Webmin will warn you if the restrictions will prevent the client system on which you are currently running your browser from logging in so you do not accidentally lock yourself out!
3.2 SSL Encryption
If you are accessing your Webmin server over an untrusted network such as the Internet, you should be aware that, by default, an attacker can capture your login and password by listening in on network traffic. This is particularly easy if you are using a non-switched Ethernet network shared by people that you do not fully trust, such as those in offices or universities.
Fortunately there is a solution that is relatively easy to set up—switching Webmin to use SSL so that all network traffic between your web browser and the server is encrypted. The RPM pack-age of Webmin will run in SSL mode by default if the OpenSSL library and Net::SSLeay Perl module are installed. Most systems, however, do not meet these requirements so you will need to follow the steps below to enable SSL:
1. Install the OpenSSL library, if you do not already have it. Most recent Linux distribu-tions will include it as standard, but you may have to install it from your distribution CD.
If there are separate packages for openssl and openssl-devel, make sure both are installed. If your operating system does not come with OpenSSL, you can download it from www.openssl.org/ instead.
2. Install the Net::SSLeay Perl module, if it is not already installed. If your system is con-nected to the Internet, the easiest way to do this is to enter the Perl Modules module of Webmin (under the Others category), enter Net::SSLeay into the From CPAN field and click the Install button.
After the Perl module has finished downloading, click on Continue with install to have Webmin automatically compile and install it.
3. Once both are installed, go to the Webmin Configuration module and click on SSL Encryption. The form shown in Figure 3.2 will appear.
4. On the top part of the page, change the Enable SSL if available? option to Yes, and click Save. If all goes well, Webmin will be switched to SSL mode and your browser will connect to it securely.
5. If this is the first time you have connected to Webmin in SSL mode, your browser will display a warning about the certificate being invalid. For now, you can ignore this warn-ing and choose to accept the certificate. For more details, see Section 3.3 “Requestwarn-ing a Valid SSL Certificate”.
6. From now on, when logging into Webmin you must use a URL starting with https:// instead of just http://. Once in SSL mode, it will no longer accept insecure connections. 7. Go back to the SSL Encryption page and scroll down to the second form. If a warning
starting with Because you are currently using the default Webmin SSL key… is dis-played, you definitely should continue following these steps to create your own private SSL certificate and key. If, however, it does not appear, then a private key was created at installation time and there is no need to go on reading.
8. If your system is always accessed using the same hostname in the URL, enter it into the Server name in URL field, such as www.example.com. This will cause the generated certificate to be associated only with that hostname. Otherwise select Any hostname to allow the certificate to be used with any URL hostname. This is more convenient, but slightly less secure.
9. In the Email address field, enter your email address—such as [email protected]. 10. If appropriate, fill in the Department field with the name of the department or group
within the organization to which this system belongs, such as Network Engineering. This can be left blank if inappropriate, such as on a home system.
11. In the Organization field, enter the name of the company or organization that owns this system, such as Foo Corporation. Again, this can be left blank if it makes no sense. 12. In the State field, enter the name of the state that your system is in, such as California. 13. In the Country code field, enter the two-letter code for the country in which the system
resides, such as US.
14. Leave the Write key to file field unchanged, and the Use new key immediately field set to Yes.
15. Hit the Create Now button to generate a new key and certificate, write them to /etc/
webmin/miniserv.pem and immediately activate them. Your browser will probably
Requesting a Valid SSL Certificate 17
Older versions of Webmin just used a fixed SSL key that was included as part of the package. This, however, was completely useless for securing network traffic because anyone with a copy of that key can decrypt the data that is supposedly protected with SSL! For this reason, recent Webmin versions create a new private key at installation time if possible, and warn you if the old fixed SSL key is being used.
3.3 Requesting a Valid SSL Certificate
If you want to use a valid SSL certificate and do not have one for your hostname, it is possible to generate one using the openssl command and a certificate authority. A valid certificate is one that is recognized by all browsers because it was signed by a recognized authority. Those created by Webmin itself, by following the steps in Section 3.2 “SSL Encryption”, do not meet this crite-ria and will trigger a warning in all browsers when they connect to the Webmin server.
Unfortunately, certificate authorities charge money for signing and verifying that the owner of the server in the hostname actually matches the company details in the certificate. For this reason, most people do not bother to use a signed certificate with Webmin, as there is no real advantage in security once you have accepted an unsigned certificate into your browser for the first time.
If you do want to obtain a real valid certificate, however, the steps to follow are:
1. At the shell prompt, run the openssl genrsa -out key.pem 1024 command. This will create the key.pem file, which is your private key.
2. Run the openssl req -new -key key.pem -out req.pem command. When it asks for the common name, be sure to enter the full hostname of your server as used in the URL, like www.yourserver.com. This will create the req.pem file, which is the cer-tificate signing request (CSR).
3. Send the CSR to your certificate authority by whatever method they use. They should send you back a file that starts with —BEGIN CERTIFICATE— which can be put in the
cert.pem file.
4. In Webmin, enter the Webmin Configuration module and click on SSL Encryption. 5. In the SSL Encryption form (shown in Figure 3.2), enter the path to your key.pem file
into the Private key file field, and the path to your cert.pem file into the Certificate file field.
6. Click the Save button to switch to the new certificate.
From now on, your browser should no longer display a warning when connecting to Webmin in SSL mode.
3.4 Summary
19
P
ART
II
S
YSTEM
M
ODULES
C
H A P T E R
4
Users and Groups
his chapter is devoted to the Users and Groups module, which allows
you to create and manage UNIX user accounts and UNIX groups.
4.1 Introduction to UNIX Users and Groups
On Linux and other UNIX operating systems, a user is a person who can login to the system via SSH, telnet, FTP or at the console. Users can also receive email and own files on the server's local filesystems. Each user has a login name, a password, and a home directory in which all its files are stored. Users also have several additional attributes, such as a real name, shell (the pro-gram that is run when the user logs in), and expiry date.
Each user is a member of at least one group, called a primary group. In addition, a user can be a member of an unlimited number of secondary groups. Group membership can be used to control the files that a user can read and edit. For example, if two users are working on the same project you might put them in the same group so they can both edit a particular file that other users cannot access.
Every system will have several standard user accounts like root and nobody that are created when the system is installed—although most of these (except for root) cannot be used to login. If your server will be used by more than one person, you will need to create an additional user account for each person to keep their files and email separate. Even if you are the only person who uses your machine, it is a good idea to create a user account for yourself that you use to login with instead of using the root account.
Depending on your operating system, user and group information will be stored in different files in the /etc directory. On modern versions of Linux, /etc/passwd and /etc/shadow are used to store user details, and /etc/group for group details. The Users and Groups module works by directly editing those files, not by calling any external programs or functions. This means that if you are using NIS or storing users in an LDAP server, this module is not for you.
4.2 The Users and Groups Module
The Webmin module Users and Groups that is found under the System category (as shown in Figure 4.1) can be used to create, edit, and delete all the UNIX users and groups on your system. You should always be careful when using this module to edit existing system users like root
and daemon because changing or deleting them could stop your system from working. Some
users have their home directory set to / (the root directory). Deleting such a user would cause all the files on your system to be deleted!
In addition to managing the UNIX users on your system, this module can also affect user set-tings in other modules. For example, Samba has its own list of users and passwords that should be kept in sync with the UNIX password list. Webmin can handle this for you automatically using the other modules option that appears on the user creation, editing, and deletion forms. You must, however, enable this in every other module that you want automatically updated. The module also
has options for synchronizing UNIX groups in a similar way, such as with Samba groups. How-ever, since this feature only works with Samba 3.0, which is still under development, it is not cov-ered in this chapter.
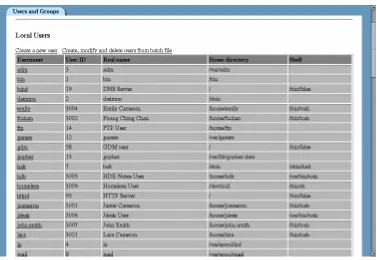
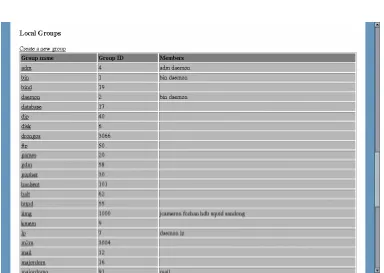
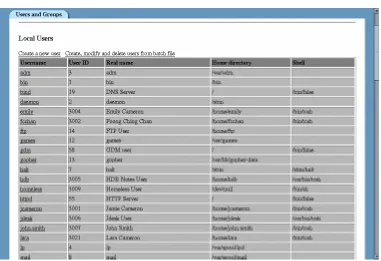
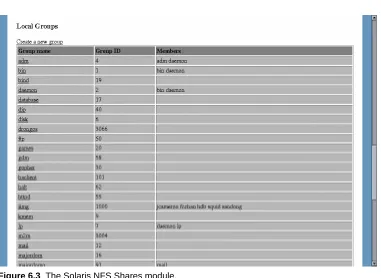
Once you enter the module, the main page lists all the users that currently exist on your system in one table (Figure 4.2), and all the groups in another (Figure 4.3). If there are too many users or groups to sensibly display in a table, then a small form allowing you to search for a user or group will be displayed instead.
Creating a New User 21
4.3 Creating a New User
To create a new UNIX user, complete the following steps:
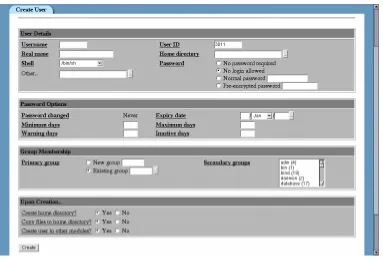
1. Click on the Create a new user link above or below the table of existing users. A form for entering the details of the new user will appear, as shown in Figure 4.4.
2. At this point you have to decide on a username for the new user, which should be some-thing simple without spaces in it—like jcameron or jamie—and not used by any other user. If your server is receiving email, the username determines the part of the user’s email address to the left of the @. Enter your choice in the Username field.
3. The User ID field should generally be left unchanged, as it is worked out for you by Webmin. If you set it to the same user ID as another user, they will be able to access each other’s files. This is generally not a good idea.
4. In the Real name field, you should enter the user’s full name, such as Jamie Cameron. 5. Every user has a home directory, in which the user stores his personal documents and
preference files. In the Home directory field, you should enter a directory that does not exist yet, such as /home/jcameron. When the user is created, this directory will be created and its ownership granted to the new user.
If Webmin on your system offers an Automatic option for the home directory, it is generally best to stick with that.
6. The user's shell is a program that is run when he makes a text mode login of some kind (via SSH, for example), or opens a shell prompt after logging in graphically at the
sole. The shell is responsible for running the commands that you type (such as ls and
cat), running scripts on login and logout, and providing an interface for command edit-ing. Shells like bash and tcsh are easier for users to use, because they allow the up and down arrows to be used to scroll through previous commands, and the tab key to auto-complete commands and filenames.
In some cases, you might not want a user to be able to make a shell login at all, as in when the user is only meant to be able to read and send email. In that case, his shell should be set to /bin/false, which is a program that does nothing and exits immediately.
You should select whatever shell you want the user to have from the list in the Shell field. If your choice is not on the list, select the Other option and enter the path to the shell in the field below.
7. For the Password field, you have four choices:
No password required The user can login without needing to enter any password.
No login allowed The user can never login.
Normal password You get to enter the user’s password.
Pre-encrypted password You must enter a password that is already encrypted, such as one taken from the /etc/shadow file on another system.
Generally you will want to use the Normal password option. Note that on many operating systems, only the first eight characters of the password are actually used.