Rochester Institute of Technology
RIT Scholar Works
Theses
5-1-2016
Scottsville
Soheil Khosravinejad
Follow this and additional works at:
https://scholarworks.rit.edu/theses
This Thesis is brought to you for free and open access by RIT Scholar Works. It has been accepted for inclusion in Theses by an authorized administrator of RIT Scholar Works. For more information, please [email protected].
Recommended Citation
SCOTTSVILLE
by
Soheil Khosravinejad
A THESIS SUBMITTED IN PARTIAL FULFILLMENT OF THE REQUIREMENTS FOR THE DEGREE OF MASTER OF FINE ARTS
IMAGING ARTS/COMPUTER ANIMATION
SCHOOL OF FILM AND ANIMATION COLLEGE OF IMAGING ARTS AND SCIENCES
ROCHESTER INSTITUTE OF TECHNOLOGY ROCHESTER, NEW YORK
Committee Approval:
Tom Gasek
Interim Thesis Chair
Associate Professor
School of Film and Animation
Date
________________
Mark Reisch
Committee Advisor
Lecturer
School of Film and Animation
Table of Contents
Abstract 1
Pre-visualization 7
1. Story Development 2
2. Storyboard and Animatics 2
3. Design Concept 3
4. Character Design 4
Production 7
1. Modeling 7
a) Environment 7
b) Log cabin 9
c) Snow - baking the log cabin and the props into the scene 11
d) Character 12
2. Texturing 14
a) Environment and Props 14
b) Character 16
3. Rigging 20
4. Lighting 22
4. Animation and Rendering 23
Post-production 24
1. Composting 24
2. Soundtrack 24
Title (Naming) 25
Screening Experience 26
Thank you! 27
Appendix A:Original Proposal 28
Abstract
“Scottsville” is a 3D animated Graduate thesis film, which is a mix of personal experiences and stories
that I have heard from my friends over time.
The film has a three-dimensional computer-generated imagery (3D CGI) look with a stylized classic
soundtrack, but no dialogue.
The story is about a schlimazel person who tries to get into his log cabin on a cold winter night. The
location is in the middle of a quiet pine forest. As the character tries to get into the cabin, he realizes that
he does not have the keys. He tries different ways, and finally, he breaks into the cabin through the
window. As he is fixing the broken window, he notices a black crow biting his bicycle seat outside in the
snow. He runs out of the cabin to curse at the crow, but locks himself out again. This time besides the
keys, he does not have his clothes on!
The film has a solo character and hangs entirely on the shoulders of an unfortunate chubby character. I
tried to focus more on the visual aspects of the film to tell the story.
This paper is a short outline of an extensive process that I employed in making the film. It starts with the
Pre-visualization
1.
Story Development
I would consider the story’s development stage as the most challenging part of the whole production
process. Before starting my Fall thesis semester, I remember thinking and sketching out different ideas
the entire summer. Early in Fall 2012, I came up with a couple of ideas, however, none of them were
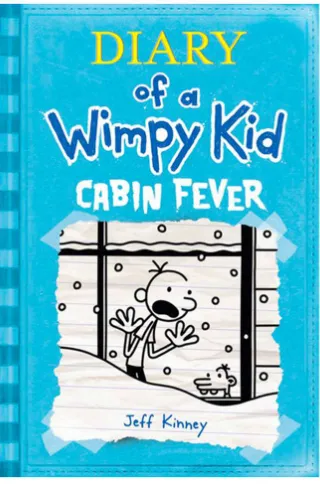
qualified. One day while I was in the early stages of pitching my idea, I accidently saw a book in the Java
Café’s store at RIT: Diary of a Wimpy Kid by Jeff Kinney. The illustration on the book cover was like a
sparkle in my brain. It was about a miserable guy who is locked out in the snow! The story was totally
different from what I expected, and it was about the kid who was stuck in the cabin because of the snow.
[image:6.612.227.387.338.580.2]The book cover was helpful enough for me to start a fresh idea.
Figure 1 - The book cover of Diary of a Wimpy Kid
2.
Storyboard and Animatics
After a few meetings with my advisor and committee members concerning the new idea, I came up with
some general concepts about the story and film theme. The next step was to put everything together and
I finished a draft version of the story, but in order to do the timing and figure out the length of the film, I
immediately started to draw some storyboards. Besides timing, the storyboard helps to convert the written
story into visual elements, and it will be easier to share the idea with other people to get more feedback on
it.
The next step after finishing the storyboard was to create an animatic movie file from the storyboard
frames. A nice and clean animatic gives you a better idea about timing and animation of the film, and will
be a helpful key element later on during the production process. After finishing the storyboard, I put all
the images together with the expected timing, and added some simple character animations where needed.
The 2D animatic was helpful for general purposes. However, to get closer to the final version of the film
with all the cameras and compositions, I needed a better 3D version of the animatic. In terms of the
timeline, I wasn’t able to have the props and rigged character ready for this stage. Therefore, I used
simple geometry to represent the cabin and other props, plus a free rigged character to wrap up the 3D
animatic.
The 3D animatic process was a little time consuming. It took me a few weeks to finish the final version.
During that time, the story was tweaked a lot. However, the final version of the 3D animatic was almost
90 percent close to the final production in terms of the timing and animations.
3.
Design Concept
The idea behind the design of the film was to create a detailed cartoony 3D animation look for the film. I
[image:7.612.73.539.525.658.2]was looking for a bluish cold theme for outdoors, and a warm, yellow cozy look for the interior shots.
Before starting any other steps, and in order to develop the concept that I had in my mind, I spent a
specific amount of time researching movies, illustrations, and paintings with similar types of designs.
Throughout the research process, I collected a good amount of references: everything from the color
pallet to the details of the character’s clothing. The pictures below show some screen shots of the film
“Frozen”, which I used as a lighting reference. Some models and character lightings were used in the
process of modeling and lighting the character. Later, in the following sections of this paper, I will
represent some of the collected references that were used during the production, for example: the
[image:8.612.72.542.246.492.2]references I used to design the assets, the log cabin, and the character’s clothing.
Figure 3 - Artwork reference screenshots
4.
Character Design
I had a solo character film, and the general idea about this type of animation is that you have less work to
do because you are working on just one character. I partially disagree with this idea because I think that
while you are working on a solo character story, you need to pay attention to the specific essentials. The
types of essentials that are less bold are in stories with more than one character. Here are some examples:
When you have one character, there is no excuse for any mistakes. It is the only character that is
going to be shown throughout the entire film, so it needs to be designed, modeled, and textured
You need to avoid the boring side of the film. Therefore, you need to pay more attention to the
details in the movements and animations of the character to be able to catch the audience’s
attention, and to keep them engaged for a good deal of time.
The character does not have any partner in the film in which to interact. You need to challenge
yourself more in the storyboarding and editing steps to keep the flow and the rhythm of the story.
For example, to show that the character does not have his keys, I needed to use five short cuts in
less than 10 seconds. In the first cut, the character is standing in front of the door. The second cut
is a close-up of his hand grabbing the doorknob. The third cut is a close-up of his pocket while he
moves his hand to his pocket. In the fourth cut, there is a close-up of his fist, which opens empty
in front of the camera. For the fifth cut, the character’s close-up searches his jacket with a stunned
facial expression. In being able to get all these close-ups on the screen, I required a detailed
character model with textures.
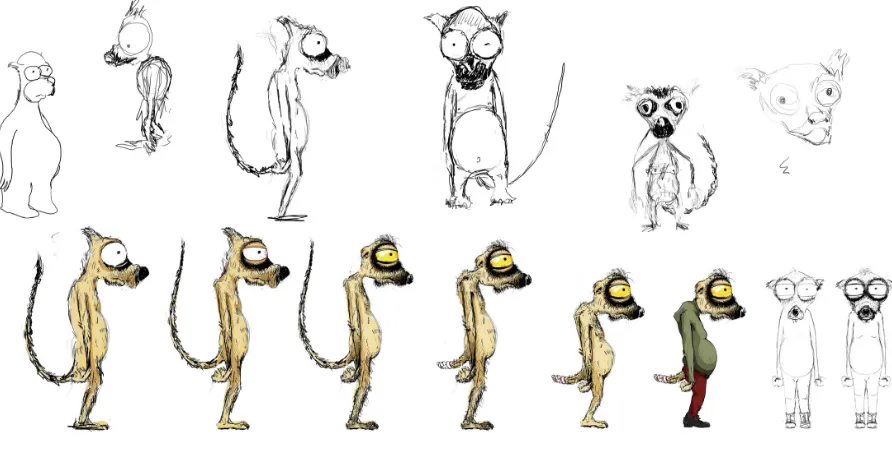
Considering all the mentioned elements, I went through different designs for the character. As a matter of
interest and knowledge in animals, I decided to start designing around a lemur character. I needed an
[image:9.612.80.526.387.618.2]exhausted-face character with an indolent and dumpy personality.
Figure 4 – Lemur character sketches
After the early sketches, I found the lemur character so close to what I was looking for, however, it did
not end up to be the character for the film. I changed the idea about the character when I accidently found
one of my friends with some characteristics closer to what I was looking for. After I discovered more
production steps, I also used him as an inspiration to do the expressions and movement of the character.
For example, the way he opens his mouth wide and moves his eyebrows when he gets shocked, excited,
and sad; or behaviors like scratching his back when he is thinking, leaving everything behind when he
wants to grab some other things, or walking naked in the house!
Sadly, I could not get my friend’s approval to use his photos in this paper. However, to explain a little
more about his characteristics, the first thing that caught my eye was the fact that he locked himself out a
number of times, and the way he solves problems are mostly not seen to be the best way. He has the type
[image:10.612.84.535.264.395.2]of personality that gets excited for simple solutions and becomes so sad facing problems.
Production
After coming up with the basic concept about the story, environment, and the character, I started to
convert the ideas into visual 3D elements. The process began with environment and prop modeling, and
continued with modeling of the log cabin. After I modeled the entire scene and placed everything
together, I started to fill up the entire environment with the stylized snow. The process continued with
polishing, modeling, and rigging the character, as well as texturing, lighting the scene, and more
challenging workflow that I will explain further in the following sections.
1.
Modeling
a) Environment:
Since the first time I saw the Diary of a Wimpy Kid book cover, I have had a concept about the entire
environment in my head. I was planning to develop an environment in a believable way for my audience
to show that the character has been living there for a long time. By saying this, I mean that I tried to stay
away from giving an unnatural-computer-animation feeling of the film to the audience. To reach the idea,
I needed to work more on the details in all aspects, such as designing, modeling, and texturing.
Listed below are a few general and simple solutions that I utilized to keep the idea alive:
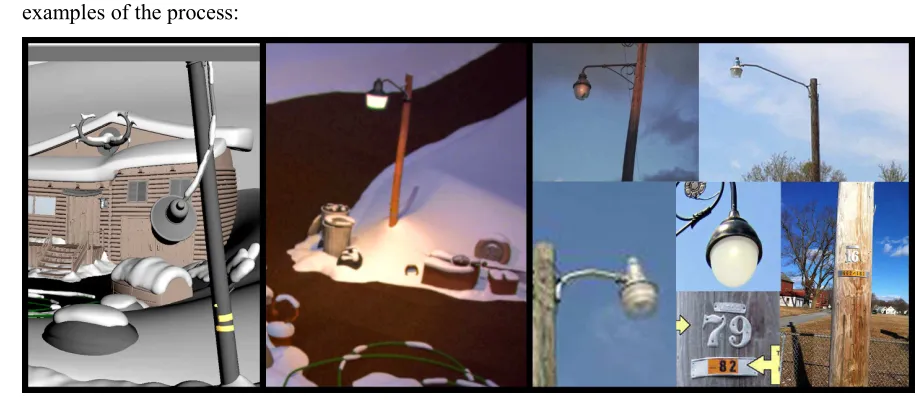
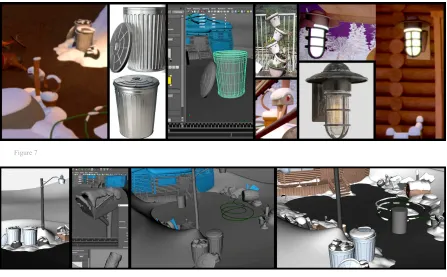
Using real object references for modeling the props: I used the reference photos that I collected
earlier to make the design and modeling of the props closer to real life. The pictures below are a few
[image:11.612.79.538.483.685.2]examples of the process:
Figure 7
Figure 8
Randomness: I tried to use less duplication in the modeling and placing process. For instance, I
designed four different trees for the forest
environment and placed them in the scene with
different scales and rotation axes. For more detail,
even the wood pieces that I used to model the
balcony of the cabin are deformed randomly, and
none of them look alike. As a simpler example, I
can mention the trashcans, which are placed in a
way to look less identical.
Avoid tiling the textures: As a solution to get detailed textures for the objects in your own renders,
you can tile and repeat the texture maps. However, not using it cautiously can cause noticeable
artifacts in your renders. The alternative way to achieve detailed textures is to use 3D or procedural
texturing techniques. The procedural texturing techniques are not only helpful in getting the details,
but also will dramatically decrease the render time.
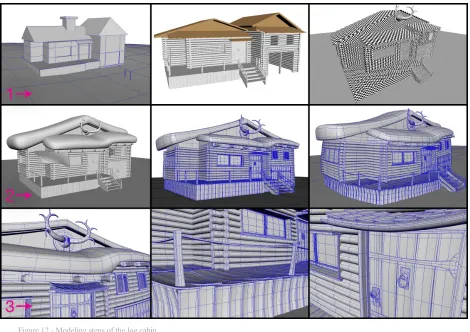
[image:12.612.332.540.407.533.2]b) Log cabin
While I was working on the animatic and finalizing the character animations and camera positioning, I
came up with a triangular action idea, which shows that almost all of the main actions in the film happen
[image:13.612.167.447.172.351.2]in one of the triangle corners—one after theother.
Figure 10 - Triangular action
Based on that triangular system, I needed the cabin to be designed in a way that is not only visually
interesting, but also allows the character to be clearly integrated.
For the visual aspect of the cabin, some parts like the doorknob, window lock, and window frame needed
to be detailed, as there were some high close-up cameras for these areas in the storyboard. I used the
deformers after finishing the modeling of the cabin to match the design of the cabin more with the
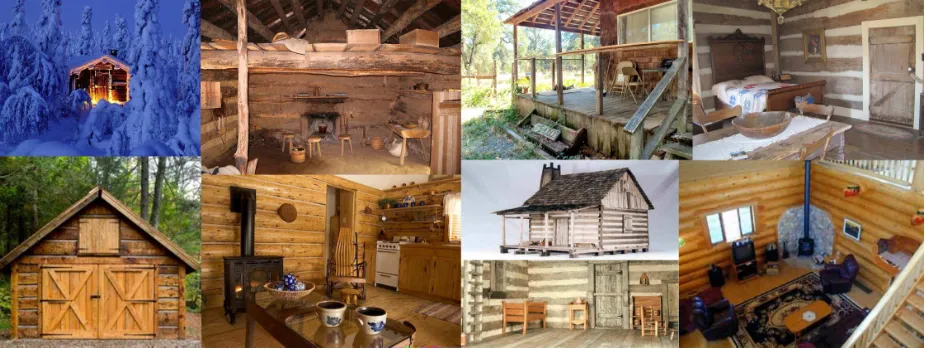
character’s round shapes. Pictures below are some of the references that I used to design and model the
cabin, and a few steps of the modeling process:
[image:13.612.77.540.525.700.2]Figure 12 - Modeling steps of the log cabin
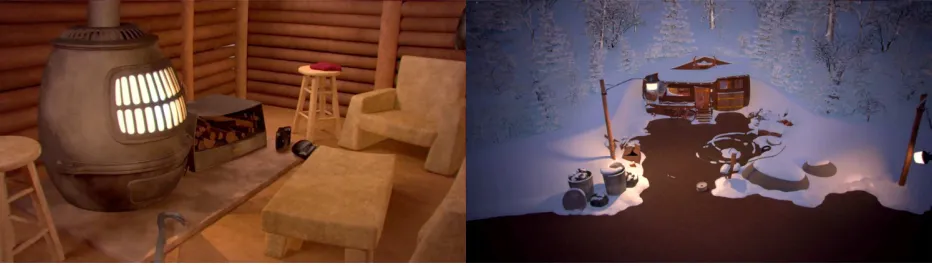
The most common prop in every log cabin in a cold climate is a stove, which gives a cozy warm mood to
its environment. Besides the feeling that the stove gives to the interior shots, I had a few close-up shots of
the stove; therefore, it was listed as one of the assets that I needed to create with details. I was looking for
[image:14.612.75.543.493.736.2]c) Snow—merging the log cabin and the props with the scene
After finishing all the modeling and placing the props into the scene, I needed to find a solution for
adding the snow. In the outdoor shots, the snow was playing an important role in the visuals as it
interacted with all the objects in the scene. In my opinion, the snow worked like a chain around all the
objects in the outdoor environment and grouped them in a family. As a mutual element, it kind of merged
the entire environment, props, and cabin together.
I could use the particles system in Maya to build the snow geometries around the scene. However,
through the practices and researches that I did along the process, I realized that this was not the most
efficient way to approach. The outdoor scene was huge, and going through the particles could make the
scene too heavy to render and work. Also, the final look was not close to the design I was looking for.
After researching more about the possible ways to solve the problem, I found an open source free script
for Maya called Snow Factory that was scripted by a man named Ruchit Bhatt vimeo.com/ruchitbhatt.
The idea behind the script was so simple because it was just emerging geometries out of the polygons
surfaces, yet it worked perfectly for my original purpose. Basically, I used the script to create the primary
random geometries for the snow, and I used the Maya modeling tools to smooth out the shapes in the
[image:15.612.74.540.411.637.2]way they needed to be. The picture below shows the changes after adding the snow geometries.
Figure 14 – Scenes with and without snow
The snow factory script started to speed up the process; however, it was not friendly until the end. In
some corners, it was not possible to get the right geometry shape straight out of the Snow Factory
idea to use the spheres as a simple base in the corners, and emerge the snow out of the sphere’s surface
[image:16.612.74.541.120.384.2]instead of the actual objects.
Figure 15 - Snow Factory process samples
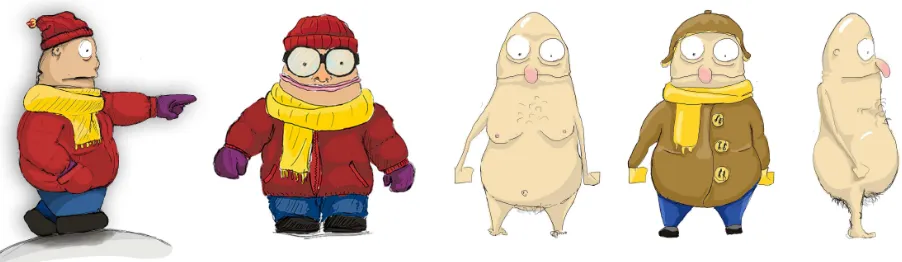
d) Character
Developing the character for my film was one of the other time consuming steps during the entire
production process. I tweaked and polished the character a lot over time before rigging it. Based on the
story I had one character, but in reality, I needed to develop two different versions of it. I needed one
version with clothes for the outdoor shots, and another without clothes for the interior shots.
The character was designed in a way to have a round silhouette. The idea was to keep this shape
throughout the entire animation, no matter how the character was acting in the scenes. To reach the idea,
I needed to have the right topology and edge flow to be able to slide it to the rigging step. I believe there
is a strong edge flow behind any successfully animated character!
Every 3D polygon model is made of individual faces. The edge flow is how the edges of these faces are
or animated. To keep the surface smooth under the deformations, it is necessary to model the character
with quad faces and keep away from triangle faces, or faces with more angles than four. Also, in the
process of modeling a face, a shoulder, or any other part of a character body, there are some areas where
the faces from different parts of the character are meeting in one point, in which there will be five, six, or
seven different edges meeting together. These points should be pushed away to the areas where there will
be less deformation like the chin or cheeks, and the number of the edges that are meeting together at
these points, shouldn’t exceed five. The picture below shows the character development over the time,
[image:17.612.110.503.232.690.2]from the first draft to the final version:
[image:17.612.113.498.485.705.2]Figure 16 - Character development process
2.
Texturing
I think of texturing as one of the important steps in production. It is a key role player in the render time,
and one of the most effective elements in the final look of the film.
There are three different approaches to texture and create materials in Maya:
1) Painting a 2D map—which works based on the UVs. This method is a fast way to get the details of
your textures as you paint the maps, however, tweaking the painted texture later in the production may be
more time consuming than a procedural technique. Also, using high resolution maps will always increase
your render time, and there are limitations on how close you can get the camera to render a 2D
paint-textured object. You may see the pixilation in the object texture if you get too close to the object.
2) Using 3D nodes—which are based on the XYZ dimensions. They need a UVW to define the
geometries; however, they ignore the UV stretching. As 3D noises are vector-based and the result of
computer calculation, there is no limitation on how close you can get to render the object. They are also
good approaches to avoid the tiling artifacts that you get in your renders while repeating 2D textures. The
weakness of using the 3D shaders in Maya is that you cannot use them easily if you have deformation in
your object. Mainly, it is a good way to texture the environment and props without deformation. The 3D
shading technique in Mental Ray is not recommended for elements like an animated character.
3) Using a mixture of 2D and 3D nodes—in this case you have the ability to add details through the 3D
nodes and separate the materials within the painted 2D mattes.
Depending on needs, I used both 2D painting and 3D Maya procedural texturing techniques to create the
materials for the film.
a) Environment and Props
As I had lots of long shots and high detailed close-up shots in the film, I needed to build the textures and
materials in a way to be rendered from any distance. I started the texturing process by creating four
fundamental high detail procedural materials: snow, wood, metal, and asphalt. Creating these four
materials procedurally in Maya cost me months of hard work, including research and studies. The best
feeling about that was when I did the texturing for the entire environment of the film with all the texture
variations in just one day. The process was fast because I designed the materials in a way where I was
was just assigning the materials to the objects, tweaking some numbers, changing the colors—and the
object was ready to be rendered. As I was using the Maya calculations to create the materials, I didn’t
need to worry about how the object would look like in different angles or distances, or how I can I use
smaller maps to render them faster.
The pictures below are examples of tweaked wood material. Materials on the cabin walls, seats, bar stool,
[image:19.612.79.540.221.343.2]floor, the wood on the window, and the door are all made from same base material.
Figure 18 - Procedural wood material samples, still frames from the film
Below are few more procedural material samples from the film:
[image:19.612.74.541.417.684.2]b) Character
For texturing the character, I first started with the no clothes character version, so I could have his face
ready and textured while I am texturing the version with clothes.
I was looking for a stylized skin look with lots of small red pimples, moles, and freckles. Using 2D Maya
noises procedurally was one of the ways to approach the skin texture; however, it could be a little tricky
to achieve an acceptable result. The other way was to paint the skin on a 2D map through a 3D
environment. I used the second way as I found it more stable for this specific case. After properly
unwrapping the UV of the character, I painted all different required layers of mattes for the character,
[image:20.612.73.537.268.718.2]Figure 21 – 1) Overall color map, 2) Diffuse map, 3) Mid-level map, 4) Deep level map
To have a nice skin material, we need to first get a closer look at human skin. What we see as human skin
is the reflection of a few different layers through the lighting. The human body has a thin layer of skin on
top of a thicker layer of fat, and there are two more layers under the skin and fat layers, which are the
reddish blood vessel layers, and under that are no transmittance layers of bone. Different parts of a human
body have different levels of these layers, which is the reason why some parts of the body look more
translucent under the lighting, such as ears, and some parts that are not translucent—like the head. Also,
there is an oil layer on top of the skin layer, which affects the secularity of the skin and has almost no
The picture on the right is a graphical demonstration of the human skin
layers; it also shows how Maya calls each one of these layers in its
attributes.
To simulate the same reaction as the human body does under the light, we
need to give the same layers of information about our character skin to
Maya, so that the software knows how the skin materials react under different lighting.
The picture below shows how I used the different maps that I created through Mudbox to simulate a
[image:22.612.74.537.258.528.2]realistic skin effect for the character.
Figure 22 - Skin shader setup in Maya
Continuing to the version of the character with clothes, I did the entire materials for the clothing part
using 2D Maya shaders. However, by using 2D Maya noises, I still needed to UV out all the different
parts of the character’s clothes. This gave me the ability to get detailed close-ups of the character without
affecting the quality. The pictures below are some of the references that I used to create the clothing
19
[image:23.612.71.540.253.748.2]3.
Rigging
Rigging the character was one of the trickiest parts of the production. I had a character with the round
shapes around his entire body. As mentioned, I wanted to keep the silhouette no matter how the character
moves, or how his facial expression changes.
After a few tests with a basic joint rig for the body, and blendshapes for facial deformation, I realized that
the basic method of rigging would not provide me with the desired result—neither for the body nor for the
face. The body was losing its natural shapes with the character movements. For instance, when the
character was leaning forward, his entire round stomach was getting so small and pushed inside, so that
the part of the stomach that was covering the front part of the legs was not reacting naturally when the
legs were moving. I had the same type of issue with the blendshapes for the facial rig. I wanted him to
have extreme facial expressions without losing the default look on his face. As the character had a
detailed face model, it was difficult and time consuming to get the expressions straight out of the
blendshapes.
I knew that with my rigging knowledge at the time, I would not be able to solve the problems I mentioned
above, so I started to research and learn more advance methods of facial rigging. Through my research, I
was intrigued by a method of facial rigging, which used joints to deform the character facial model in
order to create different expressions.
After investing a few weeks into this and learning enough about the facial joint rig method, I came up
with the idea to use the same method to polish the body rig. Before explaining how I used the technique
to polish the body rig, let me give you a brief demonstration about the technique and the way I used it to
solve the facial expression issue.
The general idea about this method of rigging is to use joints in order to move different parts of the face
geometry. As a requirement for this method, you need to implant a sheet of individual joints into the face
of the character. Step 1 of the picture below shows how I implanted joints into my character’s face. For
the facial rig, I had about 130 individual joints implanted into the face. After placing the joints in the
desired position, you need to give each individual joint a unique name, so you can call them more easily
later when you want to assign the controllers. For the next step, as you can see in the picture (step 2), you
need to parent a locator to each individual joint to be able to move them later. After placing the locators,
you need to name them, the same way you named the joints. You definitely need a script to do all the
corner of left eyelid up, down, in, or out attributes. After creating the controls and their attributes, based
on the desired deformation, you need to move the joints around the face. For each individual move, as
you found the right place for each joint, the position of the joint needs to be registered as a value for the
[image:25.612.71.543.159.305.2]attribute of the control for that specific move.
Figure 25 - Samplesteps of joint rig for facial expression
Throughout the entire process of this method of rigging, you need to go back and repaint the weight of
each individual joint over the face geometry to get a clean and smooth move for all the movements.
Joints in the facial deformations through the joints technique alone are not able to provide a desired
smooth and round shapes for the base geometry, and we need to help them out with the blendshapes. The
next step after creating all of the moves and controls and painting the weight of the joints is to create
blend shapes in order to polish and smooth out the deformations. I had about 150 different blendshapes
for the character, as you can see in the picture below.
Figure 26 - Blendshapes for the facial rig
As mentioned earlier, after feeling comfortable with using the individual joints technique to move the
geometries, I used the same method to keep the body volume. As another example of the stomach, I
added a bunch of individual joints around the stomach geometry, which were influenced by the entire
main neighbor joint controller—such as the legs and chest control. So depending on the movement of the
[image:25.612.74.544.501.607.2]Figure 27 - Sample stills of the rigged character
To rig the version of the character with clothes, the body shape was close to the version with no clothes,
so the rigging process was straightforward. I used the same skeleton that I used before, with all its
controls. The only challenge was to tweak the influence weight of each individual joint on the character
model, as the geometries of the two versions had different topology.
4.
Lighting
To speed up the rendering time and get less noise and artifacts later in the animation process, I lit most of
the scenes with the direct lighting technique.
For the exterior shots, I used three streetlights and one outdoor wall light at the cabin entrance for the
warm tone lights, and a cold tone huge spotlight to represent the moonlight. Although, placing the five
Figure 28 - Still frame samples of the outdoor shots
The interior scene set up was so simple. Basically, everything was happening in a cube with a
non-reflective object, except the window and the character’s clothes. Also compared to the entire film, it has
shorter timing, so I could retouch the frames in case of any noises. Considering the mentioned factors, I
used the indirect global illumination system to light the interior scene.
Further, I used the stove as a main warm source of lighting, and placed a cold tone area light behind the
window to simulate the night effect from outside.
5.
Animation and Rendering
In order to get the idea about the required animation, poses, and cameras in each shot, I started the
animation process by going back to my 3D animatic file. For the next step, I started a blocking animation,
which basically moves the character in the scene without too many in between frames. The idea about
blocking animation is to get better timing before spending too much time on smoothing the animation and
movements. After I finished the blocking animation and the timing tweaks for the entire four minutes of
the film, I started to smooth out all the movements of the character. The entire animation process took
about four weeks, and the fact that I had no particle or cloth animation involved sped up the process.
The challenging part of the animation, besides the facial expressions, was the walk cycle of the character.
While I was working on the storyboard and animatic, I tried to have less walk cycle animation in the film,
with the help of the cuts and camera angles. That not only sped up the animation process, but also helped
me with the timing of the film. With all the efforts in the pre-production process, there was no way to stay
away from the remaining shots of the walk cycles. I used some reference videos from the Internet to get
the idea about the timing of the walk cycle. After that, I started to do a block pose of the character with
the right timing, then as a final step, I started to ease in and ease out of the movement of each part of the
character was breaking the window glass. As you see in Figure 29, I used the footage of a man breaking
the widow of a car to get the right amount of stretch in and out—and anticipation. For most of the other
part of the animation, and also for the part that was inspired by my friend, I couldn’t get the chance to use
more reference videos. For those shots with no reference videos, I needed to spend more time on the
[image:28.612.77.541.177.303.2]blocking step to get the right timing for the movements.
Figure 29 - Reference video and final animation comparison
It took about 18 months to design, research, and technically prepare all the shots of the film in a way to
have peace of mind while working on the rendering and other postproduction steps. I rendered out the
entire four-minute length of the film in less than three days, using the RIT render farm system. Ninety
percent of the shots came out the way I expected without any re-rendering.
Post-production
1.
Compositing
For the compositing, similar to the rendering step, I did not have too much work to do. I spent most of the
compositing time for color corrections, retouching some of the interior frames because of the GI lighting,
and creating some real camera lens effects throughout the entire film to make the renders feel more
natural.
2.
Soundtrack
During the entire production, I was thinking about the soundtrack for the film, but I never came up with
any good ideas even about the type of sound track. I think that happened first, because I do not have
work with. In addition, as I have not had good samples for the soundtrack, I wanted to give the composer
freedom to choose a soundtrack based on what he gets from watching the animation.
I talked for the first time to the composer, Stephen Joshua Bullen, about my film one year before
screening my thesis at the end-of-semester screening day at RIT. I was so impressed with his work while I
was watching student films at the screening. Right after the screening, when I went to congratulate him on
his great work, I asked him if he would be able to work on the soundtrack for my film. He kindly
accepted my request and we exchanged contacts.
Stephen is a talented composer and a SOFA student at RIT when I met him at the screening. However,
when I got back to Rochester to finalize the last steps of my film, I realized that he left school to continue
his profession in music. After contacting him through email, I was lucky to have him in Rochester. While
I was working on the final steps of the film, I was able to show him a more complete version of the film,
and talk to him more about the theme of the film in person. After a few days, while I was expecting to
hear from him with some samples that I could listen to in order to get an idea, I got an email from him
with an attached well-synchronized soundtrack. I loved the soundtrack since the first time I played it. It
completely followed the rhythm of the film, and the tracks switched perfectly with the different moods of
the film—such as the opening of the film to sadness and excitement. The soundtrack was a composition of
four different classic tracks, which were all royalty free under YouTube’s creative commons license.
Below is the list of the tracks:
-Prokofiev—Dance of The Knight
-Beethoven—Egmont Overture
-Paganini—Caprice no. 24
-Debussy—Prélude à l'après midi d'un Faune
Title (Naming)
The interesting part for me about the name and the idea of the film is that they both came up at the last
minute by accident! Initially, the name of the film was “Ascending”, and it was a better fit for the early
pitch of the story. After the tweaks that we made during the production process, the name no longer fit the
film.
The day I came up with the name of the film, I was checking my mail when I noticed a school alert
to RIT, where I lived for a year when I first started at RIT). Reading the e-mail while I was thinking about
my thesis reminded me of all the hard times, the black winter we experienced that year, and the memories
of living in Scottsville. After thinking more about the incident, I noticed how close the design of the
environment was to the place I used to live. Therefore, in the memory of my life experience there, I
named the film “Scottsville”.
Screening Experience
The final version of my film was screened on December 2014 at the School of Film and Animation. After
the screening, I received various feedbacks from the audience. The film was mostly criticized from the
animation side. Apparently, I was not able to make the character movements smooth enough to be
matched with other steps of the production. Besides the critiques of my film, which I think are essential to
polish the film and are useful to make a better product in the future—I am glad that the audience was able
to see the details I employed in my film. I heard positive comments about the design, the details of my
editing, and the camera angels. Also as predicted, I got positive feedback on the soundtrack that I used for
the film.
Comparing myself today with the person who I was before starting my MFA at RIT, I think the
achievement is beyond what I expected. During my study, I had the opportunity to work on one live
action, one 2D animation, and two 3D animation short films. Learning theoretically about filmmaking is
essential, but you will not be able to rely on your knowledge until you experience it in the production
process. Working on four short films at RIT was a great opportunity for me to make mistakes and learn
from my mistakes. Being a SOFA student at RIT also opened my way to film production and television
podcasters like Blue Sky Studios and ESPN.
Based on the feedback that I received from my film, and based on my personal understanding, I think my
knowledge about filmmaking is in a good shape, yet not enough. I need to spend more time on my
animation skills, and that is all about more experience and practice. Although I have a long way in front
of me to achieve the higher standards in the industry, I believe the entire experience and challenge that I
Thank you!
To conclude, I want thank you, the Chair of the SOFA Department, Thomas “Tom” Gasek and my
committee members: Carl “Skip” Battaglia, Mark Reisch, and David Halbstein for their inspirations,
guidance, and support. Over the semesters when I was researching and learning more about the technical
aspect of my thesis, I had a less direct process to show my film. Thank you again for trusting me and
Appendix A: Original Proposal
Ascending
(Working Title)
by
Soheil Khosravinejad
MFA Imaging Art / Computer Animation
SCHOOL OF FILM AND ANIMATION
ROCHESTER INSTITUTE OF TECHNOLOGY
ROCHESTER, NEW YORK
MAY 2012
Approved for submission by:
____________________________________________
Skip Battaglia, Chair
Professor
School of Film and Animation
Committee:
Mark Reisch
Professor
School of Film and Animation
David Halbstein
Professor
Title:
Ascending
(Working Title)Producer:
Soheil Khosravinejad
Advisor:
Skip Battaglia
Budget:
$1,100
Start Date:
May 2012
End Date:
May 2013
Running Time:
3
– 4 Minutes
Release Format:
DVD
Synopsis
This is a 3D animated movie about an unlucky character that faces with problems at a cold winter night.
Description
At a cold winter night, we see the shadow of a guy cycling so hard on an abandoned road. The front tire of
his bicycle goes flat by an accident and he falls down to the ground. With a long shot of the scene we see
him smashed on the ground in front of a wood cabin. The wood cabin is in the middle of a dark forest, and
everywhere is covered in snow. He stands up and carries the bicycle to the side of the staircase at the cabin
entrance. He goes toward the main cabin entrance. As he gets close to the door, he slides on the icy stairs
and falls down. He gets up and get to the front door. As he wants to open the door he pauses for a second
and gets a shocked facial expression. He starts to search his pockets nervously. After few seconds of
searching he stops and hits on his head with the right hand. He looks at the doorknob, grabs it and turns it
to left and right, then pushes forward and backward. After he fails to open the locked door, he runs toward
a window next to the main entrance. He cleans ice crystals on the window glass and stares at a couch in
front of fireplace for a while. It seems he is dreaming about something. As he come backs to reality, he
notices that his nose is stuck to the glass. He tries to pull his head backward with forces but as the nose gets
He picks up a crowbar and tries to break the window glass but the glass is too hard to be broken. He goes
back to the main entrance and puts the crowbar in between the door gap to break the lock. By pushing and
pulling the crowbar after a few times, the crowbar gets bended through the force.
He tries to break the door by running toward and hitting the door by his shoulder, but no result. He tries
again, and on his third attempt a pile of snow falls down from the roof and buries him.
He is back in the yard area and for saving his life he tries to collect some wood. He takes out a matchbox
out of his pocket and tries to start a fire out of the collected wood. The matches are looking wet and none
of them get lit. He grabs the last match and drags it on the box and finally he lit the match. He smiles with
tears in the eyes. He is staring to the lit match that a breeze wipes out the fire. He starts teeth shaking and
sits on the ground holding his knees against chest. He lies down slowly, while he is still holding his knees
and his eye get closed gently.
A spiral zooms back from the character’s sad face to the whole scene. Snowflakes fall down on his still
body. Suddenly! The camera and snowflakes frees! A warm, yellow spotlight beam hits the body coming
from the sky. A transparent version of the character detaches from his body and stands up. Two small
wings blow up from his back and also a golden ring from the top of his head. He is happy. He doesn’t seem
to feel cold. He takes a deep breath and tears of his clothes. He does not seem to care about the lock
anymore. He flies around the place, and as he passes by the top of the entrance door, he sees a shiny golden
key on top of the door. He starts to fly toward the key. His hand gets so close to the key, but not close
enough to reach it. He tries to grab the key with more force. His skin tone goes red but he cannot move
further and at this point he gets sucked up to the sky.
Approach
This film will be produced in 3D computer Animation. The primary software would be Maya, After Effect
and Photoshop. The purpose of the film is to be able to experiment more about CG texturing, animation,
and character design. I am going to utilize my lighting, modeling, and cinematography skills to create
Fall
Winter
Spring
Weeks
1 2 3 4 5 6 7 8 9 10 1 2 3 4 5 6 7 8 9 10 1 2 3 4 5
6
7
8
9 10
script
Character Design and
Modeling
Story Board
Rigging
Animatic
Blocking and Animation
Texture & Light
SFX Rec & Comp
Music
Composition
Rendering
FinalCompositing
ReComp.
Budget
Sound
SFX
$100
Composer
$300
Visual
Animators
$400
Release
Blueray discs + regular
DVDs + cases
$50
Print DVD Covers
$50
Print Promtional Cards
$100
Submissions
Festivals
$100