I
NTELLIGENTS
YSTEMSE
NGENEERINGI
NTELLIGENTS
YSTEMSE
NGENEERING 1 PREFACE1.1 Disclaimer ☁
1.1.1 Acknowledgment 1.1.2 Extensions
1.2 Contributors ☁
2 SYLLABUS
2.1 e222: Intelligent Systems Engeneering II ☁
2.1.1 Teaching and learning methods 2.1.2 Representative bibliography 2.1.3 Grading
2.1.4 Incomplete
2.1.5 Other classes I423, I523, I524, B649, E516, E616 2.1.6 Communication
2.1.6.1 How to take this class 2.1.7 Covered Topics
2.1.7.1 Week 1. Overview of this Class
2.1.7.2 Week 1 and 2. Review of Python for Intelligent Systems Engineering
2.1.7.3 Week 2. Review of Linux shell for OSX, Linux, and Windows 2.1.7.4 Week 3. Introduction to REST
2.1.7.5 Week 4. Introduction to Scientific Writing 2.1.7.6 Week 5 to 9. Introduction to Cloud Computing 2.1.7.7 Week 10: Lecture Free Time
2.1.7.8 Week 11. Introduction to Cloud Platforms
2.1.7.9 Week 12 to 16. Review of AI for AI-Cloud Computing Integration
2.1.7.10 Cloud Edge Computing 2.1.7.11 Alternative Projects
2.2 Assignments ☁
2.2.1 Account Creation
2.2.2 Sections, Chapters, Examples 2.2.3 Project
2.2.4 Alternate Project: Virtual Cluster
2.2.5 Alternative Project: 100 node Raspberry Pi cluster 2.2.6 Submission of sections and chapters and projects 3 PYTHON
3.1 Introduction to Python ☁
3.1.1 References
3.2 Python 3.7.4 Installation ☁
3.2.1 Hardware
3.2.2 Prerequisits Ubuntu 19.04 3.2.3 Prerequisits macOS
3.2.3.1 Installation from Apple App Store 3.2.3.2 Installation from python.org
3.2.3.3 Installation from Hoembrew 3.2.4 Prerequisits Ubuntu 18.04
3.2.5 Prerequisite Windows 10 3.2.5.1 Linux Subsystem Install 3.2.6 Prerequisit venv
3.2.7 Install Python 3.7 via Anaconda
3.2.7.1 Download conda installer
3.2.7.2 Install conda
3.2.7.3 Install Python 3.7.4 via conda
3.3 Interactive Python ☁
3.3.1 REPL (Read Eval Print Loop) 3.3.2 Interpreter
3.3.3 Python 3 Features in Python 2
3.4 Editors ☁
3.4.1 Pycharm
3.4.2 Python in 45 minutes
3.5 Language ☁
3.5.1 Statements and Strings 3.5.2 Comments
3.5.3 Variables 3.5.4 Data Types
3.5.4.1 Booleans 3.5.4.2 Numbers
3.5.5.2 The from … import Statement 3.5.6 Date Time in Python
3.5.7 Control Statements 3.5.7.1 Comparison 3.5.7.2 Iteration 3.5.8 Datatypes
3.5.8.1 Lists 3.5.8.2 Sets
3.5.8.3 Removal and Testing for Membership in Sets 3.5.8.4 Dictionaries
3.5.8.5 Dictionary Keys and Values 3.5.8.6 Counting with Dictionaries 3.5.9 Functions
3.5.10 Classes 3.5.11 Modules
3.5.12 Lambda Expressions 3.5.12.1 map
3.5.12.2 dictionary 3.5.13 Iterators
3.5.14 Generators
3.5.14.1 Generators with function 3.5.14.2 Generators using for loop
3.5.14.3 Generators with List Comprehension 3.5.14.4 Why to use Generators?
3.6 LIBRARIES
3.6.1 Python Modules ☁
3.6.1.1 Updating Pip
3.6.1.2 Using pip to Install Packages 3.6.1.3 GUI
3.6.1.3.1 GUIZero 3.6.1.3.2 Kivy
3.6.1.4 Formatting and Checking Python Code 3.6.1.5 Using autopep8
3.6.1.6 Writing Python 3 Compatible Code 3.6.1.7 Using Python on FutureSystems 3.6.1.8 Ecosystem
3.6.1.8.2 Alternative Installations 3.6.1.9 Resources
3.6.1.9.1 Jupyter Notebook Tutorials 3.6.1.10 Exercises
3.6.2 Data Management ☁
3.6.2.1 Formats 3.6.2.1.1 Pickle 3.6.2.1.2 Text Files 3.6.2.1.3 CSV Files
3.6.2.1.4 Excel spread sheets 3.6.2.1.5 YAML
3.6.2.1.6 JSON 3.6.2.1.7 XML 3.6.2.1.8 RDF 3.6.2.1.9 PDF 3.6.2.1.10 HTML
3.6.2.1.11 ConfigParser 3.6.2.1.12 ConfigDict 3.6.2.2 Encryption 3.6.2.3 Database Access 3.6.2.4 SQLite
3.6.2.4.1 Exercises
3.6.3 Plotting with matplotlib ☁
3.6.4 DocOpts ☁
3.6.5 Cloudmesh Command Shell ☁
3.6.5.1 CMD5
3.6.5.1.1 Resources
3.6.5.1.2 Installation from source 3.6.5.1.3 Execution
3.6.5.1.4 Create your own Extension 3.6.5.1.5 Bug: Quotes
3.6.6 cmd Module ☁
3.6.6.1 Hello, World with cmd 3.6.6.2 A More Involved Example 3.6.6.3 Help Messages
3.6.6.4 Useful Links
3.6.7.1 Overview 3.6.7.2 Installation
3.6.7.3 A Simple Example 3.6.7.3.1 Loading an image 3.6.7.3.2 Displaying the image 3.6.7.3.3 Scaling and Rotation 3.6.7.3.4 Gray-scaling
3.6.7.3.5 Image Thresholding 3.6.7.3.6 Edge Detection 3.6.7.4 Additional Features
3.6.8 Secchi Disk ☁
3.6.8.1 Setup for OSX
3.6.8.2 Step 1: Record the video
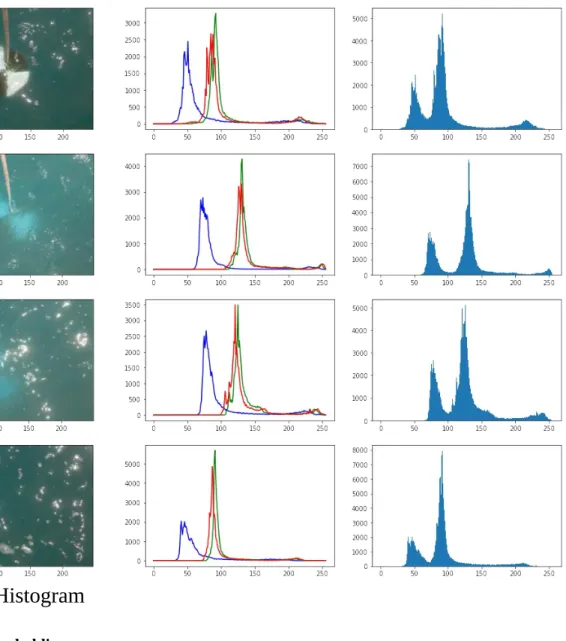
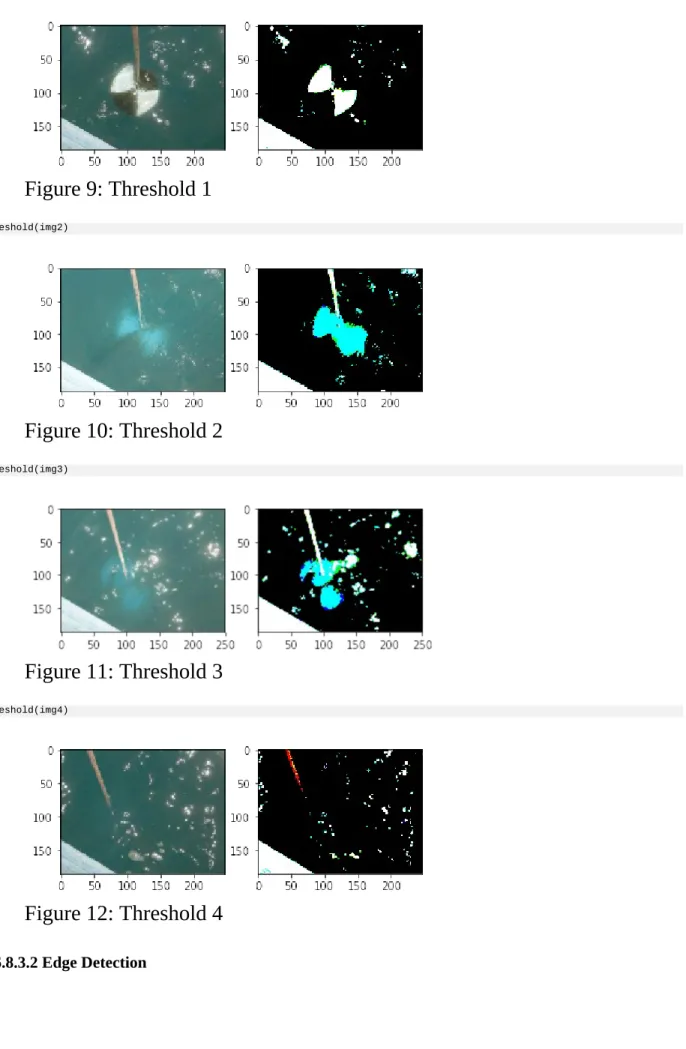
3.6.8.3 Step 2: Analyse the images from the Video 3.6.8.3.1 Image Thresholding
3.6.8.3.2 Edge Detection 3.6.8.3.3 Black and white 3.7 DATA
3.7.1 Data Formats ☁
3.7.1.1 YAML 3.7.1.2 JSON 3.7.1.3 XML
3.7.2 MongoDB in Python ☁
3.7.2.1 Cloudmesh MongoDB Usage Quickstart 3.7.2.2 MongoDB
3.7.2.2.1 Installation
3.7.2.2.1.1 Installation procedure 3.7.2.2.2 Collections and Documents
3.7.2.2.2.1 Collection example 3.7.2.2.2.2 Document structure 3.7.2.2.2.3 Collection Operations 3.7.2.2.3 MongoDB Querying
3.7.2.2.3.1 Mongo Queries examples 3.7.2.2.4 MongoDB Basic Functions
3.7.2.2.4.1 Import/Export functions examples 3.7.2.2.5 Security Features
3.7.2.2.6 MongoDB Cloud Service 3.7.2.3 PyMongo
3.7.2.3.1 Installation 3.7.2.3.2 Dependencies
3.7.2.3.3 Running PyMongo with Mongo Deamon 3.7.2.3.4 Connecting to a database using MongoClient 3.7.2.3.5 Accessing Databases
3.7.2.3.6 Creating a Database
3.7.2.3.7 Inserting and Retrieving Documents (Querying) 3.7.2.3.8 Limiting Results
3.7.2.3.9 Updating Collection 3.7.2.3.10 Counting Documents 3.7.2.3.11 Indexing
3.7.2.3.12 Sorting 3.7.2.3.13 Aggregation
3.7.2.3.14 Deleting Documents from a Collection 3.7.2.3.15 Copying a Database
3.7.2.3.16 PyMongo Strengths 3.7.2.4 MongoEngine
3.7.2.4.1 Installation
3.7.2.4.2 Connecting to a database using MongoEngine 3.7.2.4.3 Querying using MongoEngine
3.7.2.5 Flask-PyMongo 3.7.2.5.1 Installation 3.7.2.5.2 Configuration
3.7.2.5.3 Connection to multiple databases/servers 3.7.2.5.4 Flask-PyMongo Methods
3.7.2.5.5 Additional Libraries 3.7.2.5.6 Classes and Wrappers
3.7.3 Mongoengine ☁
3.7.3.1 Introduction
3.7.3.2 Install and connect 3.7.3.3 Basics
3.8 CALCULATION
3.8.1 Word Count with Parallel Python ☁
3.8.1.3 Serial Implementation Using map and reduce 3.8.1.4 Parallel Implementation
3.8.1.5 Benchmarking 3.8.1.6 Excersises 3.8.1.7 References
3.8.2 NumPy ☁
3.8.2.1 Installing NumPy 3.8.2.2 NumPy Basics
3.8.2.3 Data Types: The Basic Building Blocks 3.8.2.4 Arrays: Stringing Things Together 3.8.2.5 Matrices: An Array of Arrays 3.8.2.6 Slicing Arrays and Matrices 3.8.2.7 Useful Functions
3.8.2.8 Linear Algebra 3.8.2.9 NumPy Resources
3.8.3 Scipy ☁
3.8.3.1 Introduction 3.8.3.2 References
3.8.4 Scikit-learn ☁
3.8.4.1 Introduction to Scikit-learn 3.8.4.2 Installation
3.8.4.3 Supervised Learning 3.8.4.4 Unsupervised Learning
3.8.4.5 Building a end to end pipeline for Supervised machine learning using Scikit-learn
3.8.4.6 Steps for developing a machine learning model 3.8.4.7 Exploratory Data Analysis
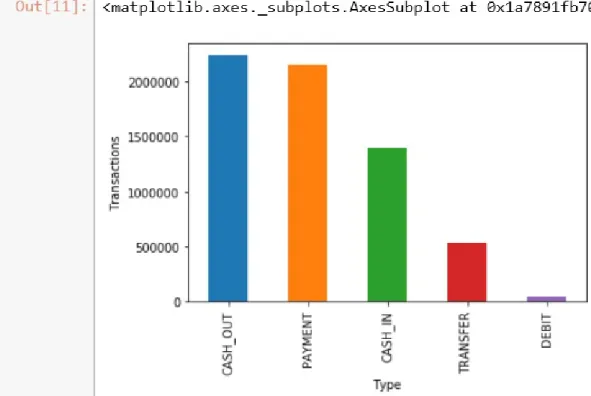
3.8.4.7.1 Bar plot
3.8.4.7.2 Correlation between attributes
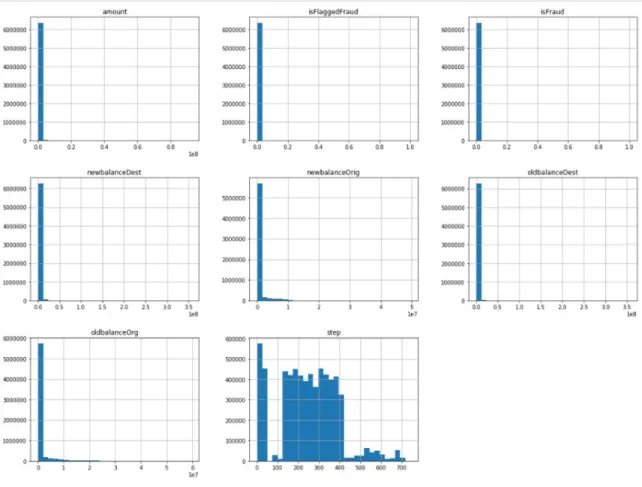
3.8.4.7.3 Histogram Analysis of dataset attributes 3.8.4.7.4 Box plot Analysis
3.8.4.7.5 Scatter plot Analysis
3.8.4.8 Data Cleansing - Removing Outliers 3.8.4.9 Pipeline Creation
3.8.4.9.1 Defining DataFrameSelector to separate Numerical and Categorical attributes
3.8.4.10 Creating Training and Testing datasets
3.8.4.11 Creating pipeline for numerical and categorical attributes 3.8.4.12 Selecting the algorithm to be applied
3.8.4.12.1 Linear Regression 3.8.4.12.2 Logistic Regression 3.8.4.12.3 Decision trees 3.8.4.12.4 K Means
3.8.4.12.5 Support Vector Machines 3.8.4.12.6 Naive Bayes
3.8.4.12.7 Random Forest 3.8.4.12.8 Neural networks
3.8.4.12.9 Deep Learning using Keras 3.8.4.12.10 XGBoost
3.8.4.13 Scikit Cheat Sheet 3.8.4.14 Parameter Optimization
3.8.4.14.1 Hyperparameter optimization/tuning algorithms
3.8.4.15 Experiments with Keras (deep learning), XGBoost, and SVM (SVC) compared to Logistic Regression(Baseline)
3.8.4.15.1 Creating a parameter grid
3.8.4.15.2 Implementing Grid search with models and also creating metrics from each of the model.
3.8.4.15.3 Results table from the Model evaluation with metrics. 3.8.4.15.4 ROC AUC Score
3.8.4.16 K-means in scikit learn. 3.8.4.16.1 Import
3.8.4.17 K-means Algorithm 3.8.4.17.1 Import
3.8.4.17.2 Create samples 3.8.4.17.3 Create samples 3.8.4.17.4 Visualize 3.8.4.17.5 Visualize
3.8.5 Parallel Computing in Python ☁
3.8.5.1 Multi-threading in Python 3.8.5.1.1 Thread vs Threading
3.8.5.1.2 Locks
3.8.5.2.2 Pool
3.8.5.2.2.1 Synchronous Pool.map()
3.8.5.2.2.2 Asynchronous Pool.map_async()
3.8.5.2.3 Locks
3.8.5.2.4 Process Communication 3.8.5.2.4.1 Value
3.8.6 Dask - Random Forest Feature Detection ☁
3.8.6.1 Setup 3.8.6.2 Dataset
3.8.6.3 Detecting Features 3.8.6.3.1 Data Preparation 3.8.6.4 Random Forest
3.8.6.5 Acknowledgement 4 DEVOPS TOOLS
4.1 Refcards ☁
4.2 Virtual Box ☁
4.2.1 Installation 4.2.2 Guest additions 4.2.3 Exercises
4.3 Vagrant ☁
4.3.1 Installation 4.3.1.1 macOS 4.3.1.2 Windows 4.3.1.3 Linux 4.3.2 Usage
4.4 Linux Shell ☁
4.4.1 History 4.4.2 Shell
4.4.3 The command man
4.4.4 Multi-command execution 4.4.5 Keyboard Shortcuts
4.4.6 bashrc, bash_profile or zprofile 4.4.7 Makefile
4.4.8 chmod 4.4.9 Exercises
4.5 Secure Shell ☁
4.5.2 ssh-add
4.5.3 SSH Add and Agent
4.5.3.1 Using SSH on Mac OS X 4.5.3.2 Using SSH on Linux
4.5.3.3 Using SSH on Raspberry Pi 3/4 4.5.3.4 Accessing a Remote Machine 4.5.4 SSH Port Forwarding
4.5.4.1 Prerequisites
4.5.4.2 How to Restart the Server 4.5.4.3 Types of Port Forwarding 4.5.4.4 Local Port Forwarding 4.5.4.5 Remote Port Forwarding 4.5.4.6 Dynamic Port Forwarding 4.5.4.7 ssh config
4.5.4.8 Tips
4.5.4.9 References
4.5.5 SSH to FutureSystems Resources ☁
4.5.5.1 Testing your FutureSystems ssh key
4.5.6 Exercises ☁
4.6 Github ☁
4.6.1 Overview 4.6.2 Upload Key 4.6.3 Fork
4.6.4 Rebase 4.6.5 Remote 4.6.6 Pull Request 4.6.7 Branch 4.6.8 Checkout 4.6.9 Merge 4.6.10 GUI 4.6.11 Windows
4.6.12 Git from the Commandline 4.6.13 Configuration
4.6.14 Upload your public key
4.6.15 Working with a directory that will be provided for you 4.6.16 README.yml and notebook.md
4.6.17.1 Stay up to date with the original repo 4.6.17.2 Resources
4.6.18 Exercises 4.6.19 Github Issues
4.6.19.1 Git Issue Features 4.6.19.2 Github Markdown
4.6.19.2.1 Task lists
4.6.19.2.2 Team integration
4.6.19.2.3 Referencing Issues and Pull requests 4.6.19.2.4 Emojis
4.6.19.3 Notifications 4.6.19.4 cc
4.6.19.5 Interacting with issues 4.6.20 Glossary
4.6.21 Example commands
4.6.21.1 Local commands to version contril your files 4.6.21.2 Interacting with the remote
4.7 Git Pull Request ☁
4.7.1 Introduction
4.7.2 How to create a pull request 4.7.3 Fork the original repository 4.7.4 Clone your copy
4.7.5 Adding an upstream 4.7.6 Making changes
4.7.7 Creating a pull request
4.8 Tig ☁
5 Introduction to Cloud Computing and Data Engineering for Cloud
Computing and Machine Learning ☁
5.1 A. Summary of Introduction to Cloud Computing & Data Engineering 5.2 B. Defining Clouds I
5.3 C. Defining Clouds II 5.4 D. Defining Clouds III 5.5 E. Virtualization
5.10 J Cloud Software
5.11 K. Cloud Applications I 5.12 L Cloud Applications II 5.13 M Cloud Applications III
5.14 N. Clouds and Parallel Computing 5.15 O. Storage
5.16 P. HPC and Clouds
5.17 Q. Comparison of Data Analytics with Simulation 5.18 R. Jobs
5.19 S. The Future I
5.20 T. The Future and other Issues II 5.21 U. The Future and other Issues III 6 REST
6.1 Introduction to REST ☁
6.1.0.1 Collection of Resources 6.1.0.2 Single Resource
6.1.0.3 REST Tool Classification
6.2 OpenAPI REST Services with Swagger ☁
6.2.1 Swagger Tools
6.2.2 Swagger Community Tools
6.2.2.1 Converting Json Examples to OpenAPI YAML Models
6.3 OpenAPI 2.0 Specification ☁
6.3.1 The Virtual Cluster example API Definition 6.3.1.1 Terminology
6.3.1.2 Specification 6.3.2 References
6.4 OpenAPI 3.0 REST Service via Introspection ☁
6.4.1 Verification 6.4.2 Swagger-UI 6.4.3 Mock service 6.4.4 Exercise
6.5 OpenAPI REST Service via Codegen ☁
6.5.1 Step 1: Define Your REST Service
6.5.2 Step 2: Server Side Stub Code Generation and Implementation 6.5.2.1 Setup the Codegen Environment
6.5.3 Step 3: Install and Run the REST Service: 6.5.3.1 Start a virtualenv:
6.5.3.2 Make sure you have the latest pip:
6.5.3.3 Install the requirements of the server side code: 6.5.3.4 Install the server side code package:
6.5.3.5 Run the service
6.5.3.6 Verify the service using a web browser: 6.5.4 Step 4: Generate Client Side Code and Verify
6.5.4.1 Client side code generation:
6.5.4.2 Install the client side code package:
6.5.4.3 Using the client API to interact with the REST service 6.5.5 Towards a Distributed Client Server
6.6 Flask RESTful Services ☁
6.7 Rest Services with Eve ☁
6.7.1 Ubuntu install of MongoDB 6.7.2 macOS install of MongoDB
6.7.3 Windows 10 Installation of MongoDB 6.7.4 Database Location
6.7.5 Verification
6.7.6 Building a simple REST Service 6.7.7 Interacting with the REST service 6.7.8 Creating REST API Endpoints
6.7.9 REST API Output Formats and Request Processing 6.7.10 REST API Using a Client Application
6.7.11 Towards cmd5 extensions to manage eve and mongo
6.8 HATEOAS ☁
6.8.1 Filtering
6.8.2 Pretty Printing 6.8.3 XML
6.9 Extensions to Eve ☁
6.9.1 Object Management with Eve and Evegenie 6.9.1.1 Installation
6.9.1.2 Starting the service
6.9.1.3 Creating your own objects
6.10 Django REST Framework ☁
6.11 Github REST Services ☁
6.11.2 Exercise 7 MAPREDUCE
7.1 Introduction to Mapreduce ☁
7.1.1 MapReduce Algorithm
7.1.1.1 MapReduce Example: Word Count 7.1.2 Hadoop MapReduce and Hadoop Spark
7.1.2.1 Apache Spark
7.1.2.2 Hadoop MapReduce 7.1.2.3 Key Differences 7.1.3 References
7.2 Hadoop ☁
7.2.1 Hadoop and MapReduce 7.2.2 Hadoop EcoSystem 7.2.3 Hadoop Components
7.2.4 Hadoop and the Yarn Resource Manager 7.2.5 PageRank
7.3 Installation of Hadoop ☁
7.3.1 Releases 7.3.2 Prerequisites
7.3.3 User and User Group Creation 7.3.4 Configuring SSH
7.3.5 Installation of Java 7.3.6 Installation of Hadoop
7.3.7 Hadoop Environment Variables
7.4 Hadoop Virtual Cluster Installation Using Cloudmesh ☁
7.4.1 Cloudmesh Cluster Installation 7.4.1.1 Create Cluster
7.4.1.2 Check Created Cluster 7.4.1.3 Delete Cluster
7.4.2 Hadoop Cluster Installation 7.4.2.1 Create Hadoop Cluster 7.4.2.2 Delete Hadoop Cluster 7.4.3 Advanced Topics with Hadoop
7.4.3.1 Hadoop Virtual Cluster with Spark and/or Pig 7.4.3.2 Word Count Example on Spark
7.5 SPARK
7.5.1.1 Motivation for Spark 7.5.1.2 Spark RDD Operations 7.5.1.3 Spark DAG
7.5.1.4 Spark vs. other Frameworks
7.5.2 Installation of Spark ☁
7.5.2.1 Prerequisites
7.5.2.2 Installation of Java
7.5.2.3 Install Spark with Hadoop 7.5.2.4 Spark Environment Variables 7.5.2.5 Test Spark Installation
7.5.2.6 Install Spark With Custom Hadoop 7.5.2.7 Configuring Hadoop
7.5.2.8 Test Spark Installation
7.5.3 Spark Streaming ☁
7.5.3.1 Streaming Concepts
7.5.3.2 Simple Streaming Example
7.5.3.3 Spark Streaming For Twitter Data 7.5.3.3.1 Step 1
7.5.3.3.2 Step 2 7.5.3.3.3 Step 3 7.5.3.3.4 Step 4 7.5.3.3.5 step 5 7.5.3.3.6 step 6
7.5.4 User Defined Functions in Spark ☁
7.5.4.1 Resources
7.5.4.2 Instructions for Spark installation 7.5.4.2.1 Linux
7.5.4.3 Windows 7.5.4.4 MacOS
7.5.4.5 Instructions for creating Spark User Defined Functions 7.5.4.5.1 Example: Temperature conversion
7.5.4.5.1.1 Description about data set
7.5.4.5.1.2 How to write a python program with UDF 7.5.4.5.1.3 How to execute a python spark script 7.5.4.5.1.4 Filtering and sorting
7.6.1 Amazon EMR (Elastic Map Reduce) ☁ 7.6.1.1 Why EMR?
7.6.1.2 Understanding Clusters and Nodes 7.6.1.2.1 Submit Work to a Cluster 7.6.1.2.2 Processing Data
7.6.1.3 AWS Storage
7.6.1.4 Create EMR in AWS 7.6.1.4.1 Create the buckets 7.6.1.4.2 Create Key Pairs
7.6.1.4.2.1 Create Key Value Pair Screen shots 7.6.1.5 Create Step Execution – Hadoop Job
7.6.1.5.0.1 Screen shots 7.6.1.6 Create a Hive Cluster
7.6.1.6.1 Create a Hive Cluster - Screen shots 7.6.1.7 Create a Spark Cluster
7.6.1.7.1 Create a Spark Cluster - Screenshots
7.6.2 Twister2 ☁
7.6.2.1 Introduction 7.6.2.2 Twister2 API’s
7.6.2.2.1 TSet API 7.6.2.2.2 Task API 7.6.2.3 Operator API
7.6.2.3.1 Resources
7.6.3 Twister2 Installation ☁
7.6.3.1 Prerequisites
7.6.3.1.1 Maven Installation 7.6.3.1.2 OpenMPI Installation 7.6.3.1.3 Install Extras
7.6.3.1.4 Compiling Twister2 7.6.3.1.5 Twister2 Distribution
7.6.4 Twister2 Examples ☁
7.6.4.1 Submitting a Job
7.6.4.2 Batch WordCount Example
7.6.5 HADOOP RDMA ☁
7.6.5.1 Launching a Virtual Hadoop Cluster on Bare-metal InfiniBand Nodes with SR-IOV on Chameleon
7.6.5.3 Extra Initialization when Launching Virtual Machines
7.6.5.4 Important Note for Tearing Down Virtual Machines and Deleting Network Ports
8 CONTAINER
8.1 Introduction to Containers ☁
8.1.1 Motivation - Microservices
8.1.2 Motivation - Serverless Computing 8.1.3 Docker
8.1.4 Docker and Kubernetes 8.2 DOCKER
8.2.1 Introduction to Docker ☁
8.2.1.1 Docker Engine 8.2.1.2 Docker Architecture 8.2.1.3 Docker Survey
8.2.2 Running Docker Locally ☁
8.2.2.1 Instillation for OSX 8.2.2.2 Installation for Ubuntu 8.2.2.3 Installation for Windows 10 8.2.2.4 Testing the Install
8.2.3 Dockerfile ☁
8.2.3.1 Specification 8.2.3.2 References
8.2.4 Docker Hub ☁
8.2.4.1 Create Docker ID and Log In 8.2.4.2 Searching for Docker Images 8.2.4.3 Pulling Images
8.2.4.4 Create Repositories 8.2.4.5 Pushing Images 8.2.4.6 Resources 8.3 DOCKER AS PAAS
8.3.1 Docker Swarm ☁
8.3.1.1 Terminology
8.3.1.2 Creating a Docker Swarm Cluster
8.3.1.3 Create a Swarm Cluster with VirtualBox
8.3.1.4 Initialize the Swarm Manager Node and Add Worker Nodes 8.3.1.5 Deploy the application on the swarm manager
8.3.2.1 Getting Access
8.3.2.2 Creating a service and deploy to the swarm cluster 8.3.2.3 Create your own service
8.3.2.4 Publish an image privately within the swarm cluster 8.3.2.5 Exercises
8.3.3 Hadoop with Docker ☁
8.3.3.1 Building Hadoop using Docker 8.3.3.2 Hadoop Configuration Files 8.3.3.3 Virtual Memory Limit
8.3.3.4 hdfs Safemode leave command 8.3.3.5 Examples
8.3.3.5.1 Statistical Example with Hadoop 8.3.3.5.1.1 Base Location
8.3.3.5.1.2 Input Files 8.3.3.5.1.3 Compilation
8.3.3.5.1.4 Archiving Class Files 8.3.3.5.1.5 HDFS for Input/Output
8.3.3.5.1.6 Run Program with a Single Input File 8.3.3.5.1.7 Result for Single Input File
8.3.3.5.1.8 Run Program with Multiple Input Files 8.3.3.5.1.9 Result for Multiple Files
8.3.3.5.2 Conclusion 8.3.3.6 Refernces
8.3.4 Docker Pagerank ☁
8.3.4.1 Use the automated script 8.3.4.2 Compile and run by hand
8.3.5 Apache Spark with Docker ☁
8.3.5.1 Pull Image from Docker Repository 8.3.5.2 Running the Image
8.3.5.2.1 Running interactively 8.3.5.2.2 Running in the background 8.3.5.3 Run Spark
8.3.5.3.1 Run Spark in Yarn-Client Mode 8.3.5.3.2 Run Spark in Yarn-Cluster Mode
8.3.5.4 Observe Task Execution from Running Logs of SparkPi 8.3.5.5 Write a Word-Count Application with Spark RDD
8.3.5.5.2 Program in Scala
8.3.5.5.3 Launch PySpark Interactive Shell 8.3.5.5.4 Program in Python
8.3.5.6 Docker Spark Examples 8.3.5.6.1 K-Means Example 8.3.5.6.2 Join Example 8.3.5.6.3 Word Count 8.3.5.7 Interactive Examples
8.3.5.7.1 Stop Docker Container
8.3.5.7.2 Start Docker Container Again 8.3.5.7.3 Remove Docker Container 8.4 KUBERNETES
8.4.1 Introduction to Kubernetes ☁
8.4.1.1 What are containers? 8.4.1.2 Terminology
8.4.1.3 Kubernetes Architecture 8.4.1.4 Minikube
8.4.1.4.1 Install minikube
8.4.1.4.2 Start a cluster using Minikube 8.4.1.4.3 Create a deployment
8.4.1.4.4 Expose the servi 8.4.1.4.5 Check running status 8.4.1.4.6 Call service api
8.4.1.4.7 Take a look from Dashboard
8.4.1.4.8 Delete the service and deployment 8.4.1.4.9 Stop the cluster
8.4.1.5 Interactive Tutorial Online
8.4.2 Using Kubernetes on FutureSystems ☁
8.4.2.1 Getting Access 8.4.2.2 Example Use 8.4.2.3 Exercises 8.5 SINGULARITY
8.5.1 Running Singularity Containers on Comet ☁
8.5.1.5 Downloading & Installing Singularity 8.5.1.5.1 Download & Unpack Singularity 8.5.1.5.2 Configure & Build Singularity 8.5.1.5.3 Install & Test Singularity 8.5.1.6 Building Singularity Containers
8.5.1.6.1 Upgrading Singularity 8.5.1.7 Create an Empty Container
8.5.1.8 Import Into a Singularity Container 8.5.1.9 Shell Into a Singularity Container 8.5.1.10 Write Into a Singularity Container 8.5.1.11 Bootstrapping a Singularity Container 8.5.1.12 Running Singularity Containers on Comet
8.5.1.12.1 Transfer the Container to Comet 8.5.1.12.2 Run the Container on Comet
8.5.1.12.3 Allocate Resources to Run the Container 8.5.1.12.4 Integrate the Container with Slurm
8.5.1.12.5 Use Existing Comet Containers 8.5.1.13 Using Tensorflow With Singularity 8.5.1.14 Run the job
8.6 Exercises ☁
9 NIST
9.1 NIST Big Data Referenece Architecture ☁
9.1.1 Pathway to the NIST-BDRA
9.1.2 Big Data Characteristics and Definitions 9.1.3 Big Data and the Cloud
9.1.4 Big Data, Edge Computing and the Cloud 9.1.5 Reference Architecture
9.1.6 Framework Providers 9.1.7 Application Providers 9.1.8 Fabric
9.1.9 Interface definitions 10 AI
10.1 Artificial Intelligence Service with REST ☁
10.1.1 Unsupervised Learning 10.1.2 KMeans
10.1.5 Machine Learning and Cloud Services 10.1.5.1 Introduction and Regression
10.1.5.2 K-means Clustering 10.1.5.3 Visulization
10.1.5.4 Clustering Examples
10.1.5.5 General Clustering with Examples 10.1.5.6 In Depth Example with four centers 10.1.5.7 Parallel Computing and K-means 10.1.6 Example Project with SVM
1 PREFACE
Sat Nov 23 05:18:45 EST 2019 ☁
1.1 D
ISCLAIMER☁
This book has been generated with Cyberaide Bookmanager.
Bookmanager is a tool to create a publication from a number of sources on the internet. It is especially useful to create customized books, lecture notes, or handouts. Content is best integrated in markdown format as it is very fast to produce the output.
Bookmanager has been developed based on our experience over the last 3 years with a more sophisticated approach. Bookmanager takes the lessons from this approach and distributes a tool that can easily be used by others.
The following shields provide some information about it. Feel free to click on them.
pypi
pypi v0.2.28v0.2.28 LicenseLicense Apache 2.0Apache 2.0 pythonpython 3.73.7 formatformat wheelwheel statusstatus stablestable buildbuild unknownunknown
1.1.1 Acknowledgment
If you use bookmanager to produce a document you must include the following acknowledgement.
“This document was produced with Cyberaide Bookmanager
developed by Gregor von Laszewski available at
https://pypi.python.org/pypi/cyberaide-bookmanager. It is in the responsibility of the user to make sure an author acknowledgement section is included in your document. Copyright verification of content included in a book is responsibility of the book editor.”
The bibtex entry is
1.1.2 Extensions
We are happy to discuss with you bugs, issues and ideas for enhancements. Please use the convenient github issues at
https://github.com/cyberaide/bookmanager/issues
Please do not file with us issues that relate to an editors book. They will provide you with their own mechanism on how to correct their content.
1.2 C
ONTRIBUTORS☁
Contributors are sorted by the first letter of their combined Firstname and Lastname and if not available by their github ID. Please, note that the authors are identified through git logs in addition to some contributors added by hand. The git repository from which this document is derived contains more than the documents included in this document. Thus not everyone in this list may have directly contributed to this document. However if you find someone missing that has contributed (they may not have used this particular git) please let us know. We will add you. The contributors that we are aware of include:
Anand Sriramulu, Ankita Rajendra Alshi, Anthony Duer, Arnav, Averill Cate, Jr, Bertolt Sobolik, Bo Feng, Brad Pope, Brijesh, Dave DeMeulenaere, De’Angelo Rutledge, Eliyah Ben Zayin, Eric Bower, Fugang Wang, Geoffrey C. Fox, Gerald Manipon, Gregor von Laszewski, Hyungro Lee, Ian Sims, IzoldaIU, Javier Diaz, Jeevan Reddy Rachepalli, Jonathan Branam, Juliette Zerick, Keith Hickman, Keli Fine, Kenneth Jones, Mallik Challa, Mani Kagita, Miao Jiang, Mihir Shanishchara, Min Chen, Murali Cheruvu, Orly Esteban, Pulasthi Supun, Pulasthi Supun Wickramasinghe, Pulkit Maloo, Qianqian Tang, Ravinder Lambadi, Richa Rastogi, Ritesh Tandon, Saber Sheybani, Sachith Withana, Sandeep Kumar Khandelwal, Sheri Sanders, Shivani Katukota, Silvia Karim, Swarnima H. Sowani,
title = {{Cyberaide Book Manager}}, howpublished = {pypi},
month = apr, year = 2019,
url={https://pypi.org/project/cyberaide-bookmanager/}
Tharak Vangalapat, Tim Whitson, Tyler Balson, Vafa Andalibi, Vibhatha Abeykoon, Vineet Barshikar, Yu Luo, ahilgenkamp, aralshi,
azebrowski, bfeng, brandonfischer99, btpope, garbeandy,
2 SYLLABUS
2.1
E222: I
NTELLIGENTS
YSTEMSE
NGENEERINGII
☁
In this undergraduate course students will be familiarized with different specific applications and implementations of intelligent systems and their use in desktop and cloud solutions.
Piazza: Link
Registrar: Link
Lecture Notes: ePub
Indiana University
Faculty: Geoffrey C. Fox Credits: 3
Hardware: You will need a computer to take this class, a phone, tablet, or chrome book is not sufficient.
Prerequisite(s): Knowledge of a programming language, the ability to pick up other programming languages as needed, willingness to enhance your knowledge from online resources and additional literature. You will need access to a modern computer that allows using virtual machines and/or containers. If such a system is not available to you can also use IU computers or cloud virtual machines. The later have to be requested.
Course Description: Link
This is an introductory class. In case you like to do research and more advanced topics, consider taking an independent study with Dr. Fox or Dr. von Laszewski. An introduction video is available at:
222 Class Introduction and Management
2.1.1 Teaching and learning methods
Lectures
Final project
2.1.2 Representative bibliography
1. Cloud Computing for Science and Engineering By Ian Foster and Dennis B. Gannon
https://mitpress.mit.edu/books/cloud-computing-science-and-engineering
2. (This document) Handbook of Clouds and Big Data, Gregor von Laszewski, Geoffrey C. Fox, and Judy Qiu, Fall 2017, https://tinyurl.com/vonLaszewski-handbook
3. Use Cases in Big Data Software and Analytics Vol. 1, Gregor von Laszewski, Fall 2017, https://tinyurl.com/cloudmesh/vonLaszewski-i523-v1.pdf
4. Use Cases in Big Data Software and Analytics Vol. 2, Gregor von Laszewski, Fall 2017, https://tinyurl.com/cloudmesh/vonLaszewski-i523-v2.pdf
5. Use Cases in Big Data Software and Analytics Vol. 3, Gregor von Laszewski, Fall 2017, https://tinyurl.com/vonLaszewski-projects-v3
6. Big Data Software Vol 1., Gregor von Laszewski, Spring 2017,
https://github.
com/cloudmesh/sp17-i524/blob/master/paper1/proceedings.pdf
7. Big Data Software Vol 2., Gregor von Laszewski, Spring 2017,
https://github.com/cloudmesh/sp17-i524/blob/master/paper2/proceedings.pdf
8. Big Data Projects, Gregor von Laszewski, Spring 2017,
https://github.com/cloudmesh/sp17-i524/blob/master/project/projects.pdf
9. Gregor von Laszewski, Geoffrey C. Fox, Cloud Computing and Big Data
http://cyberaide.org/papers/vonLaszewski-bigdata.pdf
10. Introduction to Python for cloud Computing
https://laszewski.github.io/book/python/
Grade Item Percentage
Assignments 30% Final Project 60% Participation 10%
2.1.4 Incomplete
Please see the university regulations for getting an incomplete. However, as this class uses state-of-the-art technology that changes frequently, you must expect that an incomplete may result in significant additional work on your behalf as your project may need significant updates on infrastructure, technology, or even programming models used. It is best to complete the course within one semester.
2.1.5 Other classes I423, I523, I524, B649, E516, E616
IU offers other undergraduate classes in this topic area such as I423. If you are interested in taking it, please see when they are taught. Additional graduate level classes related which can also be taken only by special permission including:
CSCI B-649 Cloud Computing is the same as E516 but for computer science students.
I524 is the same as E516 but for Data Engineering Students
E516 Introdcustion to CLoud COmputing and CLoud Engeneering
All of these classes are project based and require a significant and consistent effort of time on your side.
2.1.6 Communication
To ask for help use piazza:
Piazza Resources Piazza Questions
2.1.6.1 How to take this class
This class is an undergraduate class that contains two sections that you must attend.
In this document we will introduce you theoretically to some concepts that are important for this class. This is done either through lectures, written material, or pointers to Web resources. You are responsible to
1. listen to the online lectures and understand them.
2. identify additional material that may help you in understanding the lectures. This could include additional resources on the internet
3. Contribute to the material by correcting errors and updates you may find. Please note that we try to keep the material up to date with your help. However, in our field software and documentation changes quickly and if you identify updated material we expect that you help us fixing it. You will get credit doing so.
To allow you to be most flexible in taking this class, we certainly allow you to work ahead. Thus you can use all but the in person lectures ahead of time. The Syllabus will clearly identify which material is available. Note that the book may include sections that are not marked in the syllabus. You do not have to read such sections.
Please note that this class does not have small assignments and any assignment is likely to take you a significant amount of time. Thus it is advisable that you start your assignments early and make sure you do not do them in the last week before the assignment is due. This contrasts other undergraduate classes, that may focus on the assignment of a number of toy exerises. Instead we will work throughout the entire semester towards a project you will conduct. In order to make it earlier for you, we will introduce graded checkpoints of all large assignments. The grades for these checkpoints are final and can not be improved by work done later. Also here please be advised that some may take several weeks to conduct and it is your responsibility to devote enough time to these activities.
directory (that we will create for you) in which you will update your weekly progress. If you miss a lecture, it is in your responsibility to inform yourself what was being taught. Attendance and participation will be graded as well as the update to notebook.md will be graded.
In the following calendar we put in the last day of the week when the assignments are typically due
2.1.7 Covered Topics
As part of this class you will have to explore the following topics. These topics are either included in this document, or we are pointing you within this document to other documents with the information.
If we forgot anything let us know. The order of the lectures and the lecture material are subject to change as we see fit.
This weekly Agenda will be updated every week. Yo are required to check in every week for updates. At this time we have included an approximate weekly agenda.
To see the differences to previous versions of this document, you can look at:
https://github.com/cloudmesh-community/book/commits/master/chapters/e222-syllabus.md
To see if checkins succeed you can look at:
https://circleci.com/gh/cloudmesh-community/book
Currently, the topics covered in the class include the following.
2.1.7.1 Week 1. Overview of this Class
Logistic: Get familiar with the class structure.
Read: Preface; Class Overview; Start reviewing your python knowledge
Assignment Accounts: Find a computer you can do the class programming on (tablet and chrombook will not suffice). Get an account on piazza.com with your
??? name Get an account on github.com (This is NOT the IU github) and apply there for a github username. Post the username into a form that will be send to you. Make sure that the account you send us is your github.com account. This is a graded assignment that must be completed in the first week of class
This must be completed in the first week by Friday. (Survey will be posted on Piazza).
Assignment notebook: Once you get your github directory, update the file
notebook.md. Mind the spelling notebook is lowercase. Use simple markdown bullet
lists to record your activities.
Assignment Development Environment: (Multiweek assignment, to be completed
in the firts month) It is important that you have a development environment to conduct the class assignments. We recommend that you use virtual box and use ubuntu. We have provided an extensive set of material for you to achieve this in this document. Please consult additional resources form the Web and utilize the Lab hours.
2.1.7.2 Week 1 and 2. Review of Python for Intelligent Systems Engineering
Theory: basic Python Language Theory: pyenv, setup.py, modules Practice: Living without anaconda Python specific topics include:
Assignment: Install Python and use it throughut the semester Why not anaconda?
Language Numpy Scipy OpenCV ScikitLearn
Report: Create an empty report based on our template in github. The TAs may do this with you in the Lab.
Github Pull Requests: Find a spelling error in the class material and create a pull request to correct it.
2.1.7.3 Week 2. Review of Linux shell for OSX, Linux, and Windows
Theory: Basic Linux Shell Practice: SSH
Assignment: ssh key generation on your computer, upload to github.com
2.1.7.4 Week 3. Introduction to REST
Theory: Overview of REST, Eve, OpenAPI Practice: develop a REST service with OpenAPI
Theory: Learn about REST services and use Swagger OpenAPI to create a rest
service that returns the CPU information about your computer
We will be starting the class with introducing you to REST services that provide a foundation for setting up services in the cloud and to interact with these services. As part of this class we will be revisiting the REST services and use them to deploy them on a cloud as well as develop our own AI based rest services in the second half of the class.
Focus on OpenAPI example posted in the NIST github repository
more than one person the sum of the deliverables must be larger than what one team member can achieve. It is an advantage to work in a team as you can check each other.
If a team member does not contribute to the project, the team has the right to exclude the non working team member with consultation of the instructors. We will have a joint meeting with the team to identify the best path forward. Chose your team members wisely. Ideally you should make this decision in the first 3 weeks.
2.1.7.5 Week 4. Introduction to Scientific Writing
Theory: Scientific writing with markdown and bibtex
Practice: Contribute a significant chapter to the book (as a group) Practice: Project Report (as a group)
Practice: Introduction to Emacs Practice: Introduction to jabref
See the separet ePub for more information: Link
Assignment Scientific Writing: Learn about markdown. See our class notes and internet resources. Note that we use pandoc markdown that may not render properly in github, especially when it comes to figure captions, references, and bibliography. (You have till the end of the month). Install and use jabref.
Report: Learn bibtex and create references in report.bib that you use in report.md. Make sure that you do only one report per team and update your README.yml file accordingly. Check in the Lab with the TAs if you have done it correct.
Project Idea due: A one page formal document that summarizes the project. This is not a proposal. The workds I and project, report must not be used. It is essentially a snapshot of your final report. Discuss with the TAs in the Lab how to define a project.
Github: make sure your team mates have access to your project directory.
Theory:
Introduction - Part A
Introduction - Part B - Defining Clouds I Introduction - Part C - Defining Clouds II Introduction - Part D - Defining Clouds III Introduction - Part E - Virtualization
Introduction - Part F - Technology Hypecycle I Introduction - Part G - Technology Hypecycle II Introduction - Part H - IaaS I
Introduction - Part I - IaaS II
Introduction - Part J - Cloud Software Introduction - Part K - Applications I Introduction - Part M - Applications III Introduction - Part N - Parallelism
Introduction - Part O - Storage Released
Introduction - Part P - HPC in the Cloud Released
Introduction - Part Q - Analytics and Simulation Released Introduction - Part R - Jobs Released
Introduction - Part S - The Future Released Introduction - Part T - Security Released Introduction - Part U - Fault Tolerance
Practice: Manage virtual machines with Virtualbox Practice: Manage virtual machines with Cloudmesh v4 Practice: Manage a container with Docker
Theory: Containers
Week 5: Project Update due: A two page formal document that summarizes
the project. This is not a proposal. The words I and project, report must not be used. It is essentially a snapshot of your final report.
Week 7: Project Update due: A multi-paragraph description about the data
that you use for your project is to be added to your report. This includes details about the data. IN a documented program you show cases how you down load the data with python request in an automated fashion.
a REST service to obtain data for your analysis. Identify how to do benchmarks and time the execution of your project. Add planed benchmarks to tour report. Do not use the word plan or will write it in such a form as if it were done. Instead put a on benchmarks that you will that you wrok on
Week 9: Project update: Study matplotlib and bokeah and identify how to
visualize other aspects of your projects. Your are also allowed to use D3.js and add ons to it. You are not allowed to use tablaeu.
2.1.7.7 Week 10: Lecture Free Time
March 10 - 17 Lecture free time, no class support. A god week to work ahead on your project.
2.1.7.8 Week 11. Introduction to Cloud Platforms
We will introduce you to the concept of Map reduce. We will discuss systems such as Hadoop and Spark and how they differ. You will be deploying via a container hadoop on your machine and use it to gain hands on experience. We start with using cloudmesh on your computer to manage virtual machines that you may be able to use during your test developments.
Background about Hadoop, Spark and Twister Theory: Background to Cloudmesh
Theory: Background to Hadoop Theory: Background to Spark Theory: Background to Twister
Week 11 Project update: Identify analysis algorithms for your project and apply them. Experiment with what you can do with the data
2.1.7.9 Week 12 to 16. Review of AI for AI-Cloud Computing Integration
Practice: Develop a non trivial AI REST service See #sec:ai
Overview of AI for this class Theory
Unsupervised Learning Deep Learning
Forecasting
Week 12: Project update: Identify analysis algorithms for your project and apply them. Experiment with what you can do with the data
Week 13: Project update: Identify analysis algorithms for your project and apply them. Experiment with what you can do with the data. Start benchmarks.
Week 14: Project update: Focus on your project report and finalize it. The project report must include references in bibtex format. Double-check integration in proceedings.
Week 15: Apr 19 - Project due date.
As the Project will take time to grade all projects are due two weeks (yes, you read correctly) before the semester ends. The project will have the following artifacts:
completed project report completed project code
completed instructions on you to replicate your project on someone else’s computer or a cloud service
any other outstanding task.
Week 16: Apr 26
Make sure your project report is showing up correctly in the proceedings
2.1.7.10 Cloud Edge Computing
If time allows we may in addition also cover. Theory: Raspberry PI as Platform
2.1.7.11 Alternative Projects
if you are interested the following could be chosen by you as project. Participation in these projects need to be approved by Dr. von Laszewski. The project starts in thsi case in week 2 or 3.
Project (if elected): Document the build a 100 node Raspberry PI Cluster Project: Environmental Robot Boat
2.2 A
SSIGNMENTS☁
For more details see the course syllabus and overview pages. We give here just some summary.
2.2.1 Account Creation
As part of the class you will need a number of accounts piazza.com
github.com
Optional accounts include (only apply for them if you know you need them. Note that applying for some accounts may take 1 - 2 weeks to complete, you should have identified before the middle of the semester if you need some of them.
aws.com (optional) google.com (optional) azure.com (optional)
watson from IBM (optional) google Iaas (optional)
In our piazza we have details how to submit them to us. We split the submission in multiple sub-assignments as the github.com and piazza.com are needed within the first week.
2.2.2 Sections, Chapters, Examples
As part of the class, we expect you to get familiar with topics related to intelligent systems engeneering. Thos that like to go for an A+ are also expected to contribute significantly to this document or have a truly outstanding project. This is done in Sections, Examples, and Chapters, or excelent Project reports and code.
Section:
A section is a small section that explains a topic that is not yet in the handbook or improves an existing section significantly. It is typically multi-paragraphs long and can even include an example if needed. Example sections that have been provided are for example the Lambda section in the python chapter
Sample of student contributed sections include:
Project Natic
Lambda Expressions
please fix links
Chapter:
for a chapter.
You will be contributing a significant chapter that can be used by other students in the class and introduces the reader to a general topic related to the topic of the class. In addition it is expected if applicable to develop a practical example demonstrating how to use a technology. The chapter and the practical example can be done together. We do not like to use the term tutorial in our writeup but sometimes we refer to it in our assignments as such. Chapters that focus on theory may not have an example and it can be substituted by a longer text.
A sample of a student contributed chapter is * GraphQL.
Example:
An example is a document that showcases the use of a particular technology. Typically it is a console session or a program. Examples augment chapters and Sections.
It is expected from you that you self identify a section or a chapter as this shows competence in the area of cloud computing. If however you do not know what to select, you must attend an online hour with us in which we identify sections and chapters with you. The emphasize here is that we do not decide them for you, but we identify them with you.
Sample Topics that could form a section or chapter are clearly marked with a . There are plenty in the handbook, but you are welcome to define your own contributions. Discuss them with us in the online hours.
A list of topics identified by students is maintained in a spreadsheet.
See https://piazza.com/class/jgxybbf5rnx5qd?cid=201 for details.
2.2.3 Project
Project:
We refer with the term project to the major activity that you chose as part of your class. The default case is an implementation project that requires a
project report and project code. License:
All projects are developed under an open source license such as Apache 2.0 License. You will be required to add a LICENCE.txt file and if you use other software identify how it can be reused in your project. If your project uses different licenses, please add in a README.md file which packages are used and which license these packages have.
Project Report:
A project report is an enhanced topic paper that includes not just the analysis of a topic, but an actual code, with benchmark and demonstrated application use. Obviously it is longer than a term paper and includes descriptions about reproducibility of the application. A README.md is provided that describes how others can reproduce your project and run it. Remember tables and figures do not count towards the paper length. The following length is required:
4 pages, one student in the project 6 pages, two students in the project 8 pages, three students in the project
We estimate that a single page is between 1000-1200 words. Please note that for 2018 the format will be markdown, so the word count will be used instead. How to use figures is explained in the Notation of the handbook. We use bibtex for bibliographies. Please be reminded that images and tables as well as code is excluded from the page length. Make sure that your text is mostly developed by midterm time.
This is the documented and reproducible code and scripts that allows a TA do replicate the project. In case you use images they must be created from scratch locally and may not be uploaded to services such as dockerhub. You can however reuse vendor uploaded images such as from ubuntu or centos. All code, scripts, and documentation must be uploaded to github.com under the class specific github directory.
Data:
Data is to be hosted on IUs google drive if needed. If you have larger data, it should be downloaded from the internet. It is in your responsibility to develop a download program. The data must not be stored in github. You will be expected to write a python program that downloads the data.
Work Breakdown:
This is an appendix to the document that describes in detail who did what in the project. This section comes in a new page after the references. It does not count towards the page length of the document. It also includes explicit URLs to the git history that documents the statistics to demonstrate not only one student has worked on the project. If you can not provide such a statistic or all check-ins have been made by a single student, the project has shown that they have not properly used git. Thus points will be deducted from the project. Furthermore, if we detect that a student has not contributed to a project we may invite the student to give a detailed presentation of the project.
Bibliography:
2.2.3.1 Project Deliverables
The objective of the project is to define a clear problem statement and create a framework to address that problem as it relates to cloud computing. In this class it is especially importnat to address the reproducibility of the deployment. A test and benchmark possibly including a dataset must be used to verify the correctness of your approach. Projects related to NIST focus on the specification and implementation. The report here can be smaller, but the contribution must be includable in the specification document.
In general any project must be deployable by the TA. If it takes hours to deploy your project, please talk to us before final submission.
You have plenty of time to make execute a wonderful project.
The deliverables include but need to be updated according to your specific project, for example if you do Edge Computing some deliverabl;es will be different:
Provide benchmarks.
Take results in two different cloud services and your local PC (ex: Chameleon Cloud, echo kubernetes). Make sure your system can be created and deployed based on your documentation.
Each team member must provide a benchmark on their computer and a cloud IaaS, where the cloud is different from each team member.
Create a Makefile with the tags deploy, run, kill, view, clean that deploys your environment, runs application, kills it, views the result and cleans up after wards. You are allowed to have different makefiles for the different clouds and different directories. Keep the code and directory structure clean and document how to reproduce your results.
For python use a requirements.txt file also For docker use a Dockerfile also
Abstract Introduction Design
Architecture Implementation
Technologies Used Results
Deployment Benchmarks Application Benchmarks (Limitations)
Conclusion
(Work Breakdown)
Your paper will not have a Future Work section as this implies that you will do work in future and your paper is incomplte, instead you can use an optional “Limitations” section.
2.2.3.2 Project Topic
As part of this class you will be developing a OpenAPI based Artificial Intelligence REST service and demonstrate its use. YOu will be developing a documentation and a report that showcases the use of the service. The OpenAPI service must be non trivial, e.g. you shoudl show upload of data, sbmission of parameters including the function to be executed, potential development of a GUI for the service.
We will work with you to solidify the project throughout the semester.
2.2.4 Alternate Project: Virtual Cluster
https://github.com/cloudmesh-community/cm
The residential students have been assigned this task, but online students can join and contribute.
2.2.5 Alternative Project: 100 node Raspberry Pi cluster
In this project you will be developing a 100 node Raspberry PI cluster. THis includes putting the hardware together, and developing software that allows to uses all 100 nodes as a cluster. Software is to be use to make management easiy. It is not sufficient to just install the software but to develop a framework that allows us to easily share this resource with other users.
A documentation has to be written for this project so others can replicate your cluster build. A good start for this is to look at our cm-burn command that creates
Raspberry PI OS based on manipulation of the file system
https://github.com/cloudmesh/cm-burn
https://github.com/cloudmesh-community/cm
Substantial contributions are expected beyond the hardware build. We also like to design a case with a Laser cutter for the 100 nodes. Building the cluster would take place in MESH and transportation to and from it is provided by the university. You will be able to work in an office there to put the cluster together. A weekly meeting with Gregor von Laszewski or the TAs is needed to showcase progress.
2.2.6 Submission of sections and chapters and projects
Sections and subsections are to be added to the book github repo. Do a pull
request. The headline of the section needs to be marked with a if you still work on it, marked with a if you want it to be graded. and have all hids for people that contribute to that section.
Please look at https://github.com/cloudmesh-community/fa18-516-18 and
https://raw.githubusercontent.com/cloudmesh-community/fa18-523-62/master/README.yml for an examples. Please note that in case you work in a
group the code and report is supposed to be only stored in the first hid mentioned in the group field. If you store it in multiple directories your project will be rejected.
You MUST run yamllint on the README.yml file. YAML errors will give point deductions.
section:
- title: title of the section 1
url: https://github.com/cloudmesh-community/book/chapters/... - title: title of the section 2
url: https://github.com/cloudmesh-community/book/chapters/... - title: title of the section 3
url: https://github.com/cloudmesh-community/book/chapters/... chapter:
- title: title of the chapter
url: https://github.com/cloudmesh-community/fa18-516-18/blob/master/chapter/whatever.md group: fa18-523-62 fa18-523-69
keyword: whatever project:
- title: title of the project
url: url in your hid space or that of your partner group: fa18-523-62 fa18-523-69
keyword: kubernetes, NIST, Database code: the url to the code
other:
3 PYTHON
3.1 I
NTRODUCTION TOP
YTHON☁
Learning Objectives
Learn quickly Python under the assumption you know a programming language
Work with modules
Understand docopts and cmd
Contuct some python examples to refresh your python knpwledge Learn about the map function in Python
Learn how to start subprocesses and rederect their output
Learn more advanced constructs such as multiprocessing and Queues Understand why we do not use anaconda
Get familiar with pyenv
Portions of this lesson have been adapted from the official Python Tutorial
copyright Python Software Foundation.
Python is an interpreted, dynamic, high-level programming language suitable for a wide range of applications.
The philosophy of python is summarized in The Zen of Python as follows: Explicit is better than implicit
Simple is better than complex Complex is better than complicated Readability counts
The main features of Python are:
Use of indentation whitespace to indicate blocks Object orient paradigm
Dynamic typing Interpreted runtime
Garbage collected memory management a large standard library
a large repository of third-party libraries
Python is used by many companies and is applied for web development, scientific computing, embedded applications, artificial intelligence, software development, and information security, to name a few.
The material collected here introduces the reader to the basic concepts and features of the Python language and system. After you have worked through the material you will be able to:
use Python
use the interactive Python interface understand the basic syntax of Python write and run Python programs
have an overview of the standard library
install Python libraries using pyenv for multipython interpreter development.
noteworthy features, and will give you a good idea of the language’s flavor and style. After reading it, you will be able to read and write Python modules and programs, and you will be ready to learn more about the various Python library modules.
In order to conduct this lesson you need A computer with Python 2.7.16 or 3.7.4 Familiarity with command line usage
A text editor such as PyCharm, emacs, vi or others. You should identity which works best for you and set it up.
3.1.1 References
Some important additional information can be found on the following Web pages.
Python Pip
Virtualenv NumPy SciPy Matplotlib Pandas pyenv PyCharm
Python module of the week is a Web site that provides a number of short examples on how to use some elementary python modules. Not all modules are equally useful and you should decide if there are better alternatives. However for beginners this site provides a number of good examples
Python 2: https://pymotw.com/2/
Python 3: https://pymotw.com/3/
Learning Objectives
Learn how to install python.
Find additional information about Python. Make sure your Computer supports Python.
In this setion we explain how to install python 3.7.4 on a computer. Likely much of the code will work with earlier versions, but we do the development in Python on the newest version of python available at https://www.python.org/downloads
.
3.2.1 Hardware
Python does not require any special hardware. We have installed Python not only on PC’s and Laptops, but also on Raspberry PI’s and Lego Mindstorms. However, there are some things to consider. If you use many programs on your desktop and run them all at the same time you will find that in up-to-date operating systems you will find your self quickly out of memmory. This is especially true if you use editors such as PyCharm which we highly recommend. Furthermore, as you likely have lots of disk access, make sure to use a fast HDD or better an SSD.
A typical modern developer PC or Laptop has 16GB RAM and an SSD. You can certainly do python on a $35 Rapbperry PI, but you probably will not be able to run PyCharm. There are many alternative editors with less Memory footprint avialable.
3.2.2 Prerequisits Ubuntu 19.04
Python 3.7 is installed in ubuntu 19.04. Therefore, it already fulfills the prerequisits. However we recommend that you update to the newest version of python and pip. However we recommend that you update the the newest version of python. Please visit: https://www.python.org/downloads
3.2.3.1 Installation from Apple App Store
You want a number of useful tool on your macOS. They are not installed by default, but are available via Xcode. First you need to install xcode from
https://apps.apple.com/us/app/xcode/id497799835
Next you need to install macOS xcode command line tools:
3.2.3.2 Installation from python.org
The easiest instalation of Python for cloudmesh is to use the instaltion from
https://www.python.org/downloads. Please, visit the page and follow the
instructions. After this install you have python3 avalable from the commandline
3.2.3.3 Installation from Hoembrew
An alternative instalation is provided from Homebrew. To use this install method, you need to install Homebrew first. Start the process by installing the python 3 using homebrew. Install homebrew using the instruction in their web page:
Then you should be able to install Python 3.7.4 using:
3.2.4 Prerequisits Ubuntu 18.04
We recommend you update your ubuntu version to 19.04 and follow the instructions for that version instead, as it is significantly easier. If you however are not able to do so, the following instructions may be helpful.
We first need to make sure that the correct version of the Python3 is installed. The default version of Python on Ubuntu 18.04 is 3.6. You can get the version with:
$ xcode-select --install
$ /usr/bin/ruby -e "$(curl -fsSL https://raw.githubusercontent.com/Homebrew/install/master/install)"
$ brew install python
If the version is not 3.7.4 or newer, you can update it as follows:
You can then check the installed version using python3.7 --version which should be 3.7.4.
Now we will create a new virtual environment:
The edit the ~/.bashrc file and add the following line at the end:
now activate the virtual environment using:
now you can install the pip for the virtual environment without conflicting with the native pip:
3.2.5 Prerequisite Windows 10
Python 3.7 can be installed on Windows 10 using:
https://www.python.org/downloads
For 3.7.4 can go to the download page and download one of the different files for Windows.
Let us assume you choe the Web based installer, than you click on the file in the edge browser (make sure the account you use has administrative priviledges). Follow the instructions that the installer gives. Important is that you select at one point “[x] Add to Path”. There will be an empty checkmark about this that you will click on.
Once it is installed. chose a terminal and execute
$ sudo apt-get update
$ sudo apt install software-properties-common $ sudo add-apt-repository ppa:deadsnakes/ppa
$ sudo apt-get install python3.7 python3-dev python3.7-dev
$ python3.7 -m venv --without-pip ~/ENV3
alias ENV3="source ~/ENV3/bin/activate"
ENV3
$ source ~/.bashrc
$ curl "https://bootstrap.pypa.io/get-pip.py" -o "get-pip.py"
However, if you have installed conda for some reason you need to read up on how to install 3.7.4 python in conda or identify how to run conda and python.org at the same time. We see often others giving the wrong installation instructions. An alternative is to use python from within the Linux Subsystem. But that has some limitations and you will need to explore how to exxess the file system in the subssytem to have a smooth integration between your Windows host so you can for example use PyCharm.
3.2.5.1 Linux Subsystem Install
To activate the Linux Subsystem, please follow the instructions at
https://docs.microsoft.com/en-us/windows/wsl/install-win10
A suitable distribution would be
https://www.microsoft.com/en-us/p/ubuntu-1804-lts/9n9tngvndl3q? activetab=pivot:overviewtab
However as it uses an older version of python you will ahve to update it.
3.2.6 Prerequisit venv
This step is highly recommend if you have not yet already installed a venv for
python to make sure you are not interfering with your system python. Not using a venv could have catastrophic consequences and a destruction of your operating system tools if they realy on Python. The use of venv is simple. For our purposes we assume that you use the directory:
Follow these steps first:
First cd to your home directory. Then execute
python --version
~/ENV3
You can add at the end of your .bashrc (ubuntu) or .bash_profile (macOS) file the line
so the environment is always loaded. Now you are ready to install cloudmesh. Check if you have the right version of python installed with
To make sure you have an up to date version of pip issue the command
3.2.7 Install Python 3.7 via Anaconda
3.2.7.1 Download conda installer
Miniconda is recommended here. Download an installer for Windows, macOS, and Linux from this page: https://docs.conda.io/en/latest/miniconda.html
3.2.7.2 Install conda
Follow instructions to install conda for your operating systems:
Windows. https://conda.io/projects/conda/en/latest/user-guide/install/windows.html
macOS. https://conda.io/projects/conda/en/latest/user-guide/install/macos.html
Linux. https://conda.io/projects/conda/en/latest/user-guide/install/linux.html
3.2.7.3 Install Python 3.7.4 via conda
It is very important to make sure you have a newer version of pip installed. After you installed and created the ENV3 you need to activate it. This can be done
$ source ~/ENV3/bin/activate
$ python --version
$ pip install pip -U
$ cd ~
$ conda create -n ENV3 python=3.7.4 $ conda activate ENV3
with
If you like to activate it when you start a new terminal, please add this line to your .bashrc or .bash_profile
If you use zsh please add it to .zprofile instead.
3.3 I
NTERACTIVEP
YTHON☁
Python can be used interactively. You can enter the interactive mode by entering the interactive loop by executing the command:
You will see something like the following:
The >>> is the prompt used by the interpreter. This is similar to bash where
commonly $ is used.
Sometimes it is convenient to show the prompt when illustrating an example. This is to provide some context for what we are doing. If you are following along you will not need to type in the prompt.
This interactive python process does the following:
read your input commands
evaluate your command
print the result of evaluation
loop back to the beginning.
This is why you may see the interactive loop referred to as a REPL: R
ead-Evaluate-Print-Loop.
3.3.1 REPL (Read Eval Print Loop)
$ conda activate ENV3
$ python
$ python
Python 3.7.1 (default, Nov 24 2018, 14:27:15) [Clang 10.0.0 (clang-1000.11.45.5)] on darwin
Type "help", "copyright", "credits" or"license" for more information.
There are many different types beyond what we have seen so far, such as
dictionariess, lists, sets. One handy way of using the interactive python is to get the type of a value using type():
You can also ask for help about something using help():
Using help() opens up a help message within a pager. To navigate you can use the spacebar to go down a page w to go up a page, the arrow keys to go up/down line-by-line, or q to exit.
3.3.2 Interpreter
Although the interactive mode provides a convenient tool to test things out you will see quickly that for our class we want to use the python interpreter from the commandline. Let us assume the program is called prg.py. Once you have written
it in that file you simply can call it with
It is important to name the program with meaningful names.
3.3.3 Python 3 Features in Python 2
In this course we want to be able to seamlessly switch between python 2 and python 3. Thus it is convenient from the start to use python 3 syntax when it is supported also in python 2. One of the most used functions is the print statement that has in python 3 parentheses. To enable it in python 2 you just need to import this function:
The first of these imports allows us to use the print function to output text to the screen, instead of the print statement, which Python 2 uses. This is simply a
>>> type(42)
<type 'int'> >>> type('hello')
<type 'str'> >>> type(3.14)
<type 'float'>
>>> help(int)
>>> help(list)
>>> help(str)
$ python prg.py