Microsoft Press
A Division of Microsoft Corporation One Microsoft Way
Redmond, Washington 98052-6399
Copyright © 2004 by Carl S. Chatfield and Timothy D. Johnson
All rights reserved. No part of the contents of this book may be reproduced or transmitted in any form or by any means without the written permission of the publisher.
Library of Congress Cataloging-in-Publication Data Chatfield, Carl S.,
1964-Microsoft Office Project 2003 Step by Step / Carl Chatfield and Timothy Johnson. p. cm. -- (Step by step)
Includes bibliographical references and index. ISBN 0-7356-1955-7
1. Microsoft Project. 2. Project management--Computer programs. I. Johnson, Timothy D., 1962- II. Title. III. Step by step (Redmond, Wash.)
HD69.P75.C463 2003
658.4'04'02855369--dc22 2003058832
Printed and bound in the United States of America. 1 2 3 4 5 6 7 8 9 QWE 8 7 6 5 4 3 Distributed in Canada by H.B. Fenn and Company Ltd.
A CIP catalogue record for this book is available from the British Library.
Microsoft Press books are available through booksellers and distributors worldwide. For further informa-tion about internainforma-tional ediinforma-tions, contact your local Microsoft Corporainforma-tion office or contact Microsoft Press International directly at fax (425) 936-7329. Visit our Web site at www.microsoft.com/mspress. Send comments to [email protected].
Active Directory, Microsoft, Microsoft Press, the Office logo, Outlook, PowerPoint, SharePoint, Visio, Visual Basic, Windows, and Windows Server are either registered trademarks or trademarks of Microsoft Corporation in the United States and/or other countries. Other product and company names mentioned herein may be the trademarks of their respective owners.
The example companies, organizations, products, domain names, e-mail addresses, logos, people, places, and events depicted herein are fictitious. No association with any real company, organization, product, domain name, e-mail address, logo, person, place, or event is intended or should be inferred.
Contents
What’s New in Microsoft Office Project 2003 Getting Help
Getting Help with This Book and Its CD-ROM Getting Help with Microsoft Office Project 2003 Using the Book’s CD-ROM
What’s on the CD-ROM System Requirements Installing the Practice Files Using the Practice Files Uninstalling the Practice Files Conventions and Features
Quick Reference
Chapter 1 Getting Started with Project Chapter 2 Creating a Task List
Chapter 3 Setting Up Resources
Chapter 4 Assigning Resources to Tasks Chapter 5 Formatting and Printing Your Plan Chapter 6 Tracking Progress on Tasks Chapter 7 Fine-Tuning Task Details
ix xi xi xi xiii xiii xiii xiv xv xvi xvii xix xix xx xxi xxii xxiii xxiv xxvi Chapter 8 Fine-Tuning Resource and Assignment Details xxviii
Chapter 9 Fine-Tuning the Project Plan xxx
Chapter 10 Organizing and Formatting Project Details xxxi
Chapter 11 Printing Project Information xxxii
Chapter 12 Publishing Project Information Online xxxiii Chapter 13 Sharing Project Information with Other Programs xxxiv Chapter 14 Tracking Progress on Tasks and Assignments xxxv Chapter 15 Viewing and Reporting Project Status xxxv Chapter 16 Getting Your Project Back on Track xxxvii
Chapter 17 Applying Advanced Formatting xxxvii
Chapter 18 Customizing Project xxxviii
Chapter 19 Measuring Performance with Earned Value Analysis xxxix Chapter 20 Consolidating Projects and Resources xl
Chapter 22 Tracking Work with Project Server xliii Chapter 23 Managing Risks, Issues, and Documents with Project Server xliv
I Managing a Simple Project
1
Getting Started with Project
2
Managing Your Projects with Project Starting Project Standard
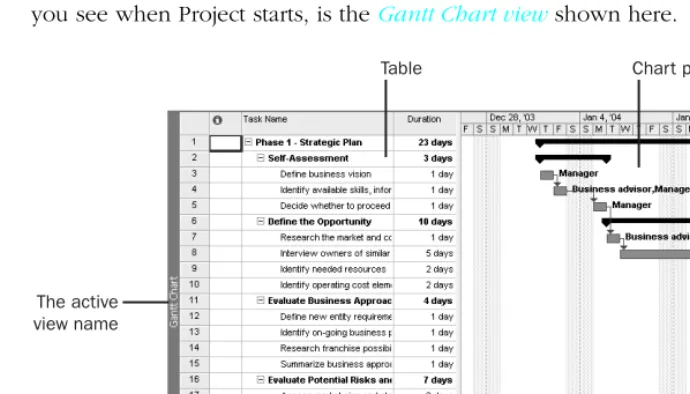
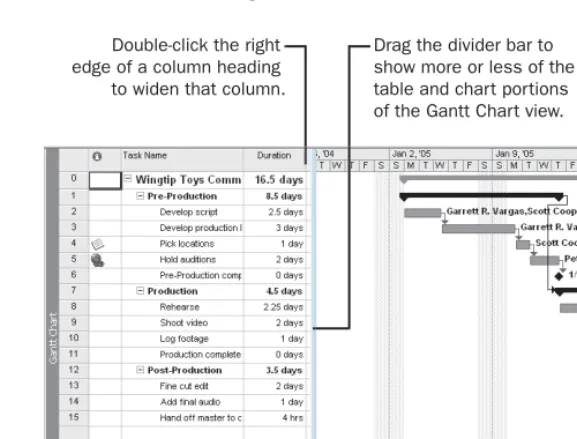
Starting Project Professional Exploring Views
Exploring Reports
Creating a New Project Plan Setting Nonworking Days Entering Project Properties
4 6 10 15 21 23 26 29
2
Creating a Task List
32
Entering Tasks Estimating Durations Entering a Milestone
Organizing Tasks into Phases Linking Tasks
Documenting Tasks
Checking the Plan’s Duration
33 36 40 41 43 48 51
3
Setting Up Resources
54
Setting Up People Resources 55
Setting Up Equipment Resources 60
Setting Up Material Resources 62
Entering Resource Pay Rates 64
Adjusting Working Time for Individual Resources 66
Documenting Resources 69
5
Formatting and Printing Your Plan
84
Creating a Custom Gantt Chart View 86
Drawing on a Gantt Chart 92
Formatting Text in a View 94
Formatting and Printing Reports 99
6
Tracking Progress on Tasks
106
Saving a Project Baseline 108
Tracking a Project as Scheduled 111
Entering a Task’s Completion Percentage 112
Entering Actual Values for Tasks 114
II Advanced Project Scheduling
7
Fine-Tuning Task Details
122
Adjusting Task Relationships Setting Task Constraints
Viewing the Project’s Critical Path Interrupting Work on a Task
Adjusting Working Time for Individual Tasks Changing Task Types
Entering Deadline Dates Entering Fixed Costs Setting Up a Recurring Task
Fine-Tuning Resource
123 128 133 135 138 140 144 147 148and Assignment Details
154
Entering Multiple Pay Rates for a Resource Setting Up Pay Rates to Apply at Different Times
Setting Up Resource Availability to Apply at Different Times Delaying the Start of Assignments
Applying Contours to Assignments
Applying Different Cost Rates to Assignments Entering Material Resource Consumption Rates
155 157 159 161 163 166 167
9
Fine-Tuning the Project Plan
172
Examining Resource Allocations over Time 173
Manually Resolving Resource Overallocations 180
Leveling Overallocated Resources 184
Examining Project Costs 190
Checking the Project’s Finish Date 192
10
Organizing and Formatting Project Details 196
Sorting Project Details 197
Grouping Project Details 202
Filtering Project Details 206
Customizing Tables 210
Customizing Views 214
11
Printing Project Information
220
Printing Your Project Plan 221
Printing Views 228
Printing Reports 234
12
Publishing Project Information Online
240
Copying Project Information as a GIF Image 242
Saving Project Information as a Web Page 245
Changing the Look of a Project Web Page 249
13
Sharing Project Information
with Other Programs
254
Copying and Pasting with Project 256
Generating a Project Summary Report for Word, PowerPoint, or Visio 259
Opening Other File Formats in Project 264
Saving to Other File Formats from Project 270
14
Tracking Progress on
Tasks and Assignments
276
Updating a Baseline 278
Tracking Actual and Remaining Values for Tasks and Assignments 282
Tracking Timephased Actual Work for Tasks and Assignments 290
Examining Resource Costs 313
Reporting Project Cost Variance with a Stoplight View 317
16
Getting Your Project Back on Track
322
Troubleshooting Time and Schedule Problems 324
Troubleshooting Cost and Resource Problems 330
Troubleshooting Scope-of-Work Problems 334
III Special Subjects
17
Applying Advanced Formatting
342
Formatting Bar Styles in a Gantt Chart View 343
Formatting the Network Diagram View 350
Formatting the Calendar View 353
18
Customizing Project
358
Working with the Organizer 359
Recording Macros 365
Editing Macros 369
Customizing a Toolbar 374
19
Measuring Performance
with Earned Value Analysis
380
Viewing Earned Value Schedule Indicators 382
Viewing Earned Value Cost Indicators 385
20
Consolidating Projects and Resources
390
Creating a Resource Pool
Viewing Assignment Details in a Resource Pool Updating Assignments in a Sharer Plan
Updating a Resource’s Information in a Resource Pool Updating All Projects’ Working Times in a Resource Pool Linking New Project Plans to a Resource Pool
Opening a Sharer Plan and Updating a Resource Pool Working with Consolidated Projects
Creating Dependencies Between Projects
IV Introducing Project Server
21
Planning Work with Project Server
418
Understanding the Key Pieces
of Enterprise Project Management 420
Building a New Plan from an Enterprise Template 421
Staffing an Enterprise Project with Resources 427
Publishing a Plan to Project Server 436
22
Tracking Work with Project Server
440
Reporting Actual Work Through Project Web Access 441
Reporting Actual Work Through Outlook 446
Handling Actuals from Resources 450
Keeping Stakeholders Informed 455
23
Managing Risks, Issues, and
Documents with Project Server
462
Managing Risks 464
Managing Issues 467
Managing Documents 469
V Appendixes
A
A Short Course in Project Management
475
Understanding What Defines a Project 475
The Project Triangle: Seeing Projects in Terms of Time, Cost, and Scope 476
Time, Cost, and Scope: Managing Project Constraints 478
Managing Your Projects with Project 481
B
What’s Next?
483
Joining a Project Learning Community
Joining a Project Management Learning Community Final Words
What’s New in Microsoft
Office Project 2003
You’ll notice some changes as soon as you start Project 2003. The toolbars and menu bar have a new look, and there are some new task panes available on the left side of your screen. But the features that are new or greatly improved in this version of Project go beyond just changes in appearance. Some changes won’t be apparent to you until you start using the program.
To help you quickly identify features that are new or greatly enhanced with this version, this book uses the icon in the margin whenever new features are discussed or shown.
The following new or improved features are available in Project Standard and Project Professional:
The following new or improved features are available in a Project Server–based enter-prise project management system:
To learn how to Using this new feature See
Connect to the Microsoft Web site for assistance
Office Online service Chapter 1, page 8
More easily print a view Project Guide Chapter 11, page 233
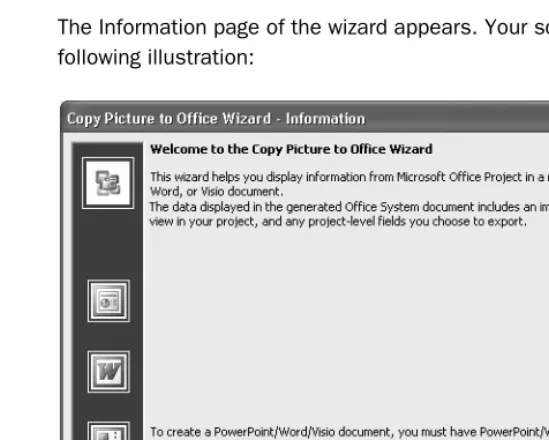
Create a project summary report for an Office application
Copy Picture to Office Wizard
Chapter 13, page 259
To learn how to Using this new feature See
Develop a new plan Enterprise template Chapter 21, page 423
Replace generic resources with work resources
Resource Substitution Wizard
Chapter 21, page 429
Report progress on assignments directly in Outlook
Outlook integration add-in for Project Server
Chapter 22, page 448
Identify risks to projects or tasks
WSS Risks integration with Project Server
Chapter 23, page 466
New in
Office 2003
New in
Office 2003
To learn how to Using this new feature See
Create and delegate issues WSS Risks integration with Chapter 23, page 469 relating to projects or tasks Project Server
Upload documents relevent to WSS Risks integration with Chapter 23, page 472
projects or tasks Project Server
Getting Help
Every effort has been made to ensure the accuracy of this book and the contents of its CD-ROM. If you do run into problems, please contact the appropriate source for help and assistance.
Getting Help with This Book and Its CD-ROM
If your question or issue concerns the content of this book or its companion CD-ROM, please first search the online Microsoft Press Knowledge Base, which provides support information for known errors in or corrections to this book, at the following Web site:
http://www.microsoft.com/mspress/support/search.asp
If you do not find your answer at the online Knowledge Base, send your comments or questions to Microsoft Press Technical Support at
Getting Help with Microsoft Office Project 2003
If your question is about a Microsoft software product, including Project, and not about the content of this Microsoft Press book, please search the Microsoft Knowledge Base at
http://support.microsoft.com
In the United States, Microsoft software product support issues not covered by the Microsoft Knowledge Base are addressed by Microsoft Product Support Services. The Microsoft software support options available from Microsoft Product Support Services are listed at
http://support.microsoft.com
Outside the United States, for support information specific to your location, please refer to the Worldwide Support menu on the Microsoft Product Support Services Web site for the site specific to your country:
Using the Book’s CD-ROM
The CD-ROM inside the back cover of this book contains all the practice files you’ll use as you work through the exercises in the book. By using practice files, you won’t waste time creating samples and typing schedule data—instead, you can jump right in and concentrate on learning how to use Microsoft Office Project 2003.
What’s on the CD-ROM
In addition to the practice files, the CD-ROM contains the following:
■ 60-day trial of Microsoft Office Project 2003 Standard Edition
■ Microsoft Office Project Standard 2003 demonstration video
■ Enterprise Project Management Solution demonstration video
■ Microsoft Office Project 2003 Step by Step in eBook format ■ Insider’s Guide to Microsoft Office OneNote 2003 in eBook format ■ Microsoft Office System Quick Reference in eBook format
■ Introducing the Tablet PC in eBook format
■ Microsoft Computer Dictionary, Fifth edition, in eBook format
■ 25 business-oriented templates for use with the programs in the Microsoft Office System
■ 100 pieces of clip art
System Requirements
To use this book, along with Project Standard 2003, you will need
Computer/Processor
Computer with a Pentium 133-megahertz (MHz) or higher processor
Operating System
Microsoft Windows 2000 with Service Pack 3 (SP3) or Microsoft Windows XP or later operating system
Memory
Hard Disk
Hard disk space requirements will vary depending on configuration; custom installa tion choices may require more or less hard disk space.
■ 105 MB of available hard disk space with 70 MB on the hard disk where the operating system is installed.
■ An additional 9 MB of hard disk space is required for installing the practice files.
■ An additional 237 MB of hard disk space is required for installing the 60-day trial version of Microsoft Office Project 2003 Standard Edition.
Drive
CD-ROM drive
Display
Super VGA (800×600) or higher-resolution monitor with 256 colors or higher
Peripherals
Microsoft Mouse, Microsoft IntelliMouse, or compatible pointing device
Note
Project Professional, Project Server, and Project Web Access are not required to complete the chapters in this book but are illustrated in Chapters 21 through 23. You can see the system requirements of these products here:http://www.microsoft.com/office/project/evaluation/sysreqs.asp
Installing the Practice Files
You need to install the practice files on your hard disk before you use them in the chapters’ exercises. Follow these steps to prepare the CD’s files for your use:
1
Insert the CD-ROM into the CD-ROM drive of your computer.The Step by Step Companion CD End User License Agreement appears. Follow the onscreen directions. It is necessary to accept the terms of the license agreement in order to use the practice files. After you accept the license agreement, a menu screen appears.
1 2 3 4 5 6 7 8
4
If you want to install the practice files to a location other than the default folder (\My Documents\Microsoft Press\Project 2003 Step by Step), click the Change Folder button, select the new drive and path, and then click OK.5
Click Next on the Choose Destination Location screen, click Next on the Select Fea-tures screen, and then click Next on the Start Copying Files screen to install the practice files.6
After the practice files have been installed, click Finish.Within the installation folder are subfolders for each chapter in the book.
7
Close the Step by Step Companion CD window, remove the CD-ROM from theCD-ROM drive, and return it to the envelope at the back of the book.
Using the Practice Files
Each topic in the chapter explains how and when to use any practice files. The file or files that you’ll need are indicated at the beginning of the procedure in blue type, as shown here:
BE SURE TO: Start Microsoft Office Project 2003 if it’s not already open.
OPEN: Parnell Aerospace Promo 18a and Wingtip Toys Commercial 18b from the \My Documents\ Microsoft Press\Project 2003 Step by Step\Chapter 18 Customizing folder. You can also access the practice files for this book by clicking Start, All Programs, Microsoft Press, Project 2003 Step by Step, and then selecting the chapter folder of the file you want to open.
The following table lists each chapter’s practice files.
Chapter Folder Files
Chapter 1 Getting Started (no practice file)
Chapter 2 Simple Tasks Wingtip Toys Commercial 2a Chapter 3 Simple Resources Wingtip Toys Commercial 3a Chapter 4 Simple Assignments Wingtip Toys Commercial 4a Chapter 5 Simple Formatting Wingtip Toys Commercial 5a, Logo Chapter 6 Simple Tracking Wingtip Toys Commercial 6a Chapter 7 Advanced Tasks Short Film Project 7a Chapter 8 Advanced Resources Short Film Project 8a and Assignments
Chapter Folder Files
9 Chapter 9 Advanced Plan Short Film Project 9a
10 Chapter 10 Advanced Formatting Short Film Project 10a
11 Chapter 11 Printing Short Film Project 11a
12 Chapter 12 Publishing Online Short Film Project 12a
13 Chapter 13 Sharing Short Film Project 13a, Letter To Client,
Sample Task List
14 Chapter 14 Advanced Tracking Short Film Project 14a, Short Film Project 14b, Short Film Project 14c, Short Film Project 14d
15 Chapter 15 Reporting Status Short Film Project 15a
17 Chapter 17 Advanced Formatting Parnell Film 17a 16 Chapter 16 Getting Back on Track Short Film Project 16a
18 Chapter 18 Customizing Parnell Aerospace Promo 18a, Wingtip
Toys Commercial 18b
19 Chapter 19 Earned Value Short Film Project 19a
20 Chapter 20 Consolidating Wingtip Toys Commercial 20a, Parnell Aerospace Promo 20b
21 (no practice folder) (no practice file)
22 (no practice folder) (no practice file)
23 (no practice folder) (no practice file)
Uninstalling the Practice Files
After you finish working through this book, you should uninstall the practice files to free up hard disk space.
1
On the Windows taskbar, click the Start button, and then click Control Panel.2
In Control Panel, click Add or Remove Programs.3
In the list of installed programs, click Microsoft Office Project 2003 Step by Step, and then click the Remove or Change/Remove button.)New in
Office 2003
Conventions and Features
You can save time when you use this book by understanding how the Step by Step series shows special instructions, keys to press, buttons to click, and so on.
Convention Meaning
New in
This icon indicates a new or greatly improved feature inOffice 2003
Microsoft Office Project 2003.This icon indicates a reference to the book’s companion CD.
BE SURE TO Following these words are instructions for actions you should take before beginning an exercise.
OPEN Following this word are instructions for opening the practice files you’ll need to use for an exercise.
CLOSE Following this word are the names of practice files you should close before moving on to another topic in the book.
1
Numbered steps guide you through hands-on exercises in2
each topic.● A round bullet indicates an exercise that has only one step.
Tip
This section provides a helpful hint or shortcut that makes working through a task easier.Important
This section points out information that you need to know to complete the procedure.Troubleshooting
This section shows you how to fix a common problem. The first time a button is referenced in a topic, a picture of the button appears in the margin area with a label.Save
J+D
A plus sign (+) between two key names means that youmust press those keys at the same time. For example, “Press
J+D
” means that you hold down the Alt key while you press Tab.Convention Meaning
Boldface type Program features that you click or press are shown in black boldface type.
Blue boldface type Text that you are supposed to type appears in blue boldface type.
Quick Reference
Chapter 1
Getting Started with Project
Page 6 To start Project Standard1
On the Windows taskbar, click the Start button.2
On the Start menu, point to All Programs (in Microsoft Windows XP) or Programs (in previous versions of Windows), point to Microsoft Office, and then click Microsoft Office Project 2003.10 To start Project Professional and work offline
1
On the Windows taskbar, click the Start button.2
On the Start menu, point to All Programs (in Microsoft Windows XP) or Programs (in previous versions of Windows), point to Microsoft Office, and then click Microsoft Office Project 2003.3
If the Project Server Security Login dialog box appears, click Cancel.4
In the Project Server Accounts dialog box, under Choose account select My Com puter, and then click Work Offline.13 To create a project plan from a template
1
In the Getting Started task pane, click Create a new project.2
In the New Project task pane, under Template, click On my computer.3
In the Templates dialog box, click the Project Templates tab.4
Click the template you want, and then click OK.16 To switch to a different view
1
On the View menu, click the name of the view you want.2
If the view is not listed, click More Views, and in the More Views dialog box, click the name of the view you want, and click the Apply button.21 To view a report in the Print Preview window
1
On the View menu, click Reports.2
Click a report category, or to see all reports, click Custom, and then click the Select button.23 To create a new project plan using the Project Guide
1
On the File menu, click New.2
In the New Project task pane, under New, click the Blank Project link.3
In the Tasks pane, click the Set a date to schedule from link (in Project Standard) or the Define the project link (in Project Professional).4
In the Date box, enter the project’s start date.5
At the bottom of the pane, click Done (in Project Standard) or the Save and go to Step 2 link (in Project Professional).26 To set nonworking days using the Project Guide
1
On the Project Guide toolbar, click the Tasks button.2
In the Tasks pane, click the Define general working times link, and then follow the instructions that appear on your screen.29 To enter properties about a Project plan
1
On the File menu, click Properties.2
In the Properties dialog box, click the Summary tab, and then enter the information you want.Chapter 2
Creating a Task List
Page 34 To enter tasks using the Project Guide
1
On the Project Guide toolbar, click the Tasks button.2
In the Tasks pane, click the List the tasks in the project link, and then follow the instructions that appear on your screen.38 To enter task durations
1
In the Gantt Chart view, click a cell in the Duration column.2
Type the task duration, and then pressF
.40 To enter a milestone
1
On the Entry table, enter a name for the milestone, and then pressD
.2
In the Duration field, type 0d, and then pressF
.41 To organize tasks into phases using the Project Guide
43 To link tasks using the Project Guide
1
On the Project Guide toolbar, click the Tasks button.2
In the Tasks pane, click the Schedule tasks link, and then follow the instructions that appear on your screen.48 To enter task notes and hyperlinks using the Project Guide
1
On the Project Guide toolbar, click the Tasks button.2
In the Tasks pane, click the Link to or attach more task information link, and then follow the instructions that appear on your screen.51 To check a project plan’s duration and other statistics
1
On the Project menu, click Project Information.2
In the Project Information dialog box, click the Statistics button.52 To see an entire project plan in the timescale in the Gantt Chart view
1
On the View menu, click Zoom.2
Click Entire project, and then click OK.Chapter 3
Setting Up Resources
Page 56 To set up people and equipment resources using the Project Guide
1
On the Project Guide toolbar, click the Resources button.2
In the Resources pane, click the Specify people and equipment for the project link, and then follow the instructions that appear on your screen.56 To set up people and equipment resources
1
On the View menu, click Resource Sheet.2
In the Resource Name field, enter the resource’s name.3
In the Type field, click Work.4
In the Max. Units field, type or click the maximum capacity of this resource to accomplish any task.5
Enter whatever other resource information would be useful to your project.6
Repeat steps 2 through 5 for each resource.62 To set up material resources
1
On the View menu, click Resource Sheet.4
In the Material Label field, enter the unit of measure you want to use for this resource. For example, you might measure cement in pounds or tons.5
In the Std. Rate field, enter the cost per unit of measure for this material resource.6
Enter whatever other resource information would be useful for your project.7
Repeat steps 2 through 6 for each resource.64 To enter resource pay rates
1
On the View menu, click Resource Sheet.2
In the Std. Rate field, enter the resource’s pay rate, including the duration of a pay period.3
If the resource should accrue overtime pay, enter his or her overtime pay rate in the Ovt. Rate field.4
If the resource accrues a per-use cost, enter that amount in the Cost/Use field.5
In the Accrue At field, click the method by which the resource accrues cost.6
Repeat steps 2 through 5 for each resource.66 To adjust working time for individual resources
1
On the Tools menu, click Change Working Time.2
In the For box, click the name of the resource whose working time you want to change.3
In the calendar below the Select Date(s) label, click the date range or day(s) of the week for which you want to adjust working time.4
Under Set selected date(s) to, click the options you want.69 To document resources with resource notes
1
Switch to a resource view such as the Resource Sheet view.2
Click the name of the resource for which you want to create a note.3
On the Standard toolbar, click the Resource Notes button.4
In the Resource Information dialog box, type the note you want associated with this resource.Chapter 4
Assigning Resources to Tasks
73 To assign resources using the Assign Resources dialog box
1
On the Standard toolbar, click Assign Resources.2
In the Gantt Chart view, click the name of the task to which you want to assign a resource.3
In the Resource Name column of the Assign Resources dialog box, click a resource, and then click the Assign button.78 To control how Project schedules the work on a task after assigning an additional resource
1
Assign an additional resource to a task.2
Click the Smart Tag Actions button, and choose the action you want.82 To assign material resources to tasks
1
On the Standard toolbar, click Assign Resources.2
In the Gantt Chart view, click the name of the task to which you want to assign a resource.3
In the Resource Name column of the Assign Resources dialog box, click a resource, and in the Units column, enter the number of units of the material resource you want to assign.4
Click the Assign button.Chapter 5
Formatting and Printing Your Plan
Page 86 To create a custom view1
On the View menu, click More Views.2
In the More Views dialog box, do one of the following:■ To create a view, click the New button. Click Single view or Combination view in the Define New View dialog box, and then click OK.
■ To redefine a view, click the view's name, and then click the Edit button. ■ To create a new view based on another view, click the view's name, and
then click the Copy button.
3
In the View Definition dialog box, choose the options you want.89 To format Gantt bars with the Gantt Chart Wizard
92 To draw a text box on a Gantt chart
1
On the View menu, point to Toolbars, and then click Drawing.2
On the Drawing toolbar, click the Text Box button, and then drag a small square any-where on the chart portion of a Gantt Chart view.3
In the square you just drew, type the text you want.94 To format a category of text in a view
1
On the Format menu, click Text Styles.2
In the Item to Change list, click the type of text you want to format.3
Select the font and other formatting options you want.97 To format selected text in a view
1
Click the cell that contains the text you want to format.2
On the Format menu, click Font.3
Select the font and other formatting options you want.102 To edit a report’s header
1
On the View menu, click Reports.2
Click a report category, or to see all reports, click Custom, and then click the Select button.3
Select the report you want, and then click the Select or Preview button.4
On the Print Preview toolbar, click the Page Setup button.5
In the Page Setup dialog box, click the Header tab, and select the options you want.Chapter 6
Tracking Progress on Tasks
Page 108 To save a baseline using the Project Guide
1
On the Project Guide toolbar, click the Track button.2
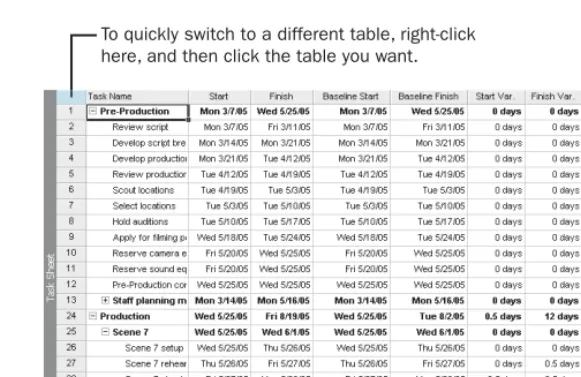
In the Track pane, click the Save a baseline plan to compare with later versions link, and then follow the instructions that appear on your screen.110 To display the Variance table in the Task Sheet view
111 To track a project as scheduled
1
On the Tools menu, point to Tracking, and click Update Project.2
In the Update Project dialog box, make sure the Update work as complete through option is selected. In the adjacent date list, type or click the date you want, and click OK.112 To enter a task’s percent complete using the Project Guide
1
On the Project Guide toolbar, click the Track button.2
In the Track pane, click the Prepare to track the progress of your project link.3
Click the Save and go to Step 2 link.4
Click Always track by entering the Percent of Work Complete, and then click the Save and Finish link at the bottom of the Setup Tracking pane.5
In the Track pane, click the Incorporate progress information into the project link.6
In the % Work Complete field for a task, type or click the percent complete valueyou want, and then press
F
.114 To enter actual values for tasks using the Project Guide
1
On the Project Guide toolbar, click the Track button.2
In the Track pane, click the Prepare to track the progress of your project link.3
Click the Save and go to Step 2 link.4
Click Always track by entering the Actual Work Done and Work Remaining, and then click Save and Finish.5
In the Track pane, click the Incorporate progress information into the project link.6
In the Actual Work field for a task, type or click the actual work value you want, andthen press
F
.116 To enter actual start dates and durations of tasks
1
Click the task for which you want to enter actual values.2
On the Tools menu point to Tracking, and then click Update Tasks.3
In the Start field in the Actual box on the left side of the Update Tasks dialog box, type or click the start date you want.Chapter 7
Fine-Tuning Task Details
Page 126 To change task relationships1
Click the successor task whose predecessor relationship you want to change.2
On the Standard toolbar, click the Task Information button.3
In the Task Information dialog box, click the Predecessors tab, and then select the options you want.126 To enter lead and lag time between predecessor and successor tasks
1
Click the successor task whose lead or lag time with a predecessor you want to change.2
On the Standard toolbar, click the Task Information button.3
In the Task Information dialog box, click the Predecessors tab.4
In the Lag field for a predecessor task, enter the value you want (enter a positive value for lag time, or a negative value for lead time).127 To change the task relationship between tasks
1
Click the successor task whose relationship with a predecessor you want to change.2
On the Standard toolbar, click the Task Information button.3
In the Task Information dialog box, click the Predecessors tab.4
Click in the Type column for a predecessor task, and click the type of task relation-ship you want.131 To apply a constraint to a task using the Project Guide
1
On the Project Guide toolbar, click the Tasks button.2
Click the Set deadlines and constrain tasks link, and then follow the instructions that appear on your screen.133 To view a project’s critical path
1
On the View menu, click More Views.2
In the More Views dialog box, click Detail Gantt, and then click the Apply button.136 To interrupt work on a task
139 To create a new base calendar
1
On the Tools menu, click Change Working Time.2
In the Change Working Time dialog box, click the New button.3
In the Name box, type a name for the base calendar.4
Click Create new base calendar, or click Make a copy of and then choose the base calendar on which you want to base the new calendar.5
Click OK.6
In the Selected Date(s) box, click the days of the week for which you want to change working and nonworking time.7
Under Set selected date(s) to, click Nonworking time for those days you want to mark as nonworking time.8
For working days, in the From and To boxes, enter the working time you want.140 To apply a task calendar to a task
1
In the Gantt Chart view, click a task.2
On the Standard toolbar, click the Task Information button.3
In the Task Information dialog box, click the Advanced tab.4
In the Calendar box, choose the task calendar you want to apply.5
If you want the task calendar to override resource calendar settings, click the Scheduling ignores resource calendars box.140 To change a task type
1
In the Gantt Chart view, click a task.2
On the Standard toolbar, click the Task Information button.3
In the Task Information dialog box, click the Advanced tab.4
In the Task Type box, click the task type you want.145 To enter a deadline date using the Project Guide
1
On the Project Guide toolbar, click the Tasks button.2
In the Tasks pane, click the Set deadlines and constrain tasks link, and then follow the instructions that appear on your screen.148 To enter a fixed cost
1
On the View menu, point to Table: Entry, and then click Cost.1
2
3
4
5
6
149 To create a recurring task
1
In the Gantt Chart view, click the task above which you want to insert a recurring task.2
On the Insert menu, click Recurring Task.3
In the Recurring Task Information dialog box, select the options you want.Chapter 8
Fine-Tuning Resource and Assignment Details
Page 156 To create multiple pay rates for a resource1
Switch to a resource view such as the Resource Sheet view.2
Click the name of the resource for whom you want to create an additional pay rate.3
On the Standard toolbar, click the Resource Information button.4
In the Resource Information dialog box, click the Costs tab.5
Under Cost rate tables, the resource’s initial pay rate information appears on tab A. Click one of the other tabs, and then enter the rate information you want.6
To apply different cost rate tables, pick the one you want in the Cost Rate Tables field when you are in a usage view.158 To create multiple pay rates that apply at different times
Switch to a resource view such as the Resource Sheet view.
Click the name of the resource for whom you want to create an additional pay rate. On the Standard toolbar, click the Resource Information button.
In the Resource Information dialog box, click the Costs tab. Click the tab of the rate you want to edit.
In the second or later row of the Effective Date column, enter the date the new pay rate is to take effect.
7
In the Standard Rate column (and, if applicable, the Overtime Rate or Per Use Cost columns), enter either a dollar amount or a positive or negative percentage of the existing pay rate. If you enter a percentage value, Project will calculate the new pay rate amount.159 To customize a resource’s availability over time
4
In the Resource Information dialog box, click the General tab.5
In the Resource Availability grid, enter the date ranges and unit values you want.161 To delay the start of an assignment
1
On the View menu, click Task Usage or Resource Usage.2
Click the assignment you want to delay.3
On the Standard toolbar, click the Assignment Information button.4
In the Assignment Information dialog box, click the General tab.5
In the Start box, type or click the date on which you want the selected resource to start work on the assignment, and then click OK.163 To apply a contour to an assignment
1
On the View menu, click Task Usage or Resource Usage.2
Click the assignment for which you want to contour to an assignment.3
On the Standard toolbar, click the Assignment Information button.4
In the Assignment Information dialog box, click the General tab.5
In the Work Contour box, click the contour you want, and then click OK.166 To apply a different cost rate to an assignment
1
On the View menu, click Task Usage or Resource Usage.2
Click the assignment for which you want to apply a different cost rate table.3
On the Standard toolbar, click the Assignment Information button.4
In the Assignment Information dialog box, click the General tab.5
In the Cost Rate Table box, type or click the rate table you want to apply to this assignment, and then click OK.168 To enter a material resource consumption rate on an assignment
1
In the Gantt Chart view, click the name of the task to which you want to assign a material resource.2
On the Standard toolbar, click the Assign Resources button.3
In the Assign Resources dialog box, in the Units field for the material resource, type the consumption rate you want in the format quantity/time period. For example, to specify 20 feet per hour, type 20/hr.Chapter 9
Fine-Tuning the Project Plan
Page 174 To view resource allocations over time using the Project Guide
1
On the Project Guide toolbar, click the Report button.2
In the Report pane, click the See how resources’ time is allocated link, and then fol-low the instructions that appear on your screen.180 To manually resolve resource overallocations by changing assignment units
1
On the View menu, click More Views, click Resource Allocation, and then click the Apply button2
In the Resource Name column, click the name of an assignment for the resource you want to work with.3
On the Standard toolbar, click the Assignment Information button.4
In the Assignment Information dialog box, click the General tab.5
In the Units box, enter the unit value you want, and then click OK.186 To level overallocated resources
1
On the Tools menu, click Level Resources, and then choose the leveling options you want.2
Click Level Now.191 To examine project costs and display the project summary task
1
On the View menu, click More Views, click Task Sheet, and then click the Apply button.2
On the Tools menu, click Options.3
In the Options dialog box, click the View tab.4
Under the Outline options for label, select the Show project summary task check box, and then click the OK button.5
On the View menu, point to Table: Entry, and click Cost.193 To check a project’s finish date
1
On the Project menu, click Project Information.Chapter 10
Organizing and Formatting Project Details
Page 198 To sort data in a view1
Switch to the view or table you want to sort.2
On the Project menu, point to Sort, and then click the field by which you want to sort the view. To specify a custom sort, click Sort By, and in the Sort dialog box, choose the options you want.202 To group data in a view
1
Switch to the view or table you want to group.2
On the Project menu, point to Group By: No Group, and then choose the criteria by which you want to group the view. To specify different grouping options, click Customize Group By, and then choose the options you want in the Customize Group By dialog box.207 To turn AutoFilter on or off
● On the Formatting toolbar, click the AutoFilter button.
207 To filter data in a view
1
Switch to the view you want to filter.2
On the Project menu, point to Filtered For, and click More Filters.3
In the More Filters dialog box, choose the filter you want, and then click the Apply button.208 To create a custom filter
1
On the Project menu, point to Filtered For: All Tasks (for task views) or All Resources (for resource views), and then click More Filters.2
In the More Filters dialog box, click the New button.3
In the Filter Definition dialog box, select the options you want.210 To remove a filter
211 To create a custom table
1
On the View menu, point to Table: Entry, and then click More Tables.2
In the More Tables dialog box, do one of the following:■ To create a new table, click the New button.
■ To redefine a table, click the table's name, and then click the Edit button. ■ To create a new table based on another table, click the table's name, and
then click the Copy button.
3
In the Table Definition dialog box, choose the options you want.215 To create a custom view
1
On the View menu, click More Views.2
In the More Views dialog box, do one of the following:■ To create a view, click the New button. Select the Single view or Combina tion view option in the Define New View dialog box, and then click OK. ■ To redefine a view, click the view's name, and then click the Edit button. ■ To create a new view based on another view, click the view's name, and
then click the Copy button.
3
In the View Definition dialog box, choose the options you want.Chapter 11
Printing Project Information
Page 225 To see the page setup options for views1
Switch to a view you want.2
On the File menu, click Page Setup.226 To see the page setup options for reports
1
On the View menu, click Reports.2
In the Reports dialog box, click Custom, and then click the Select button.3
In the Custom Reports dialog box, click a report, and then click the Setup button.229 To preview a view before printing
229 To work in the Print Preview window
1
On the File menu, click Print Preview.2
Do one of the following:■ To navigate between pages of a multi-page print job, click a page naviga-tion button.
■ To zoom out to see all pages of a print job, click the Multiple Pages button. ■ To change page setup options such as header or legend text, click the
Page Setup button, and choose the options you want.
■ To display the Print dialog box and set other options, or to print what you see in the Print Preview window, click the Print button.
■ To exit the Print Preview window, click the Close button.
234 To print a predefined report
1
On the View menu, click Reports.2
In the Reports dialog box, click the category of report you want, and then click the Select button.3
In the dialog box that appears next, click the specific report you want to print, and click the Select button.4
In the Print Preview window, click Print.234 To edit a predefined report
1
On the View menu, click Reports.2
In the Reports dialog box, click the category of report you want, and then click the Select button (or for custom reports, click the Preview button).3
In the dialog box that appears next, click the specific report you want to edit, and then click the Edit button.4
In the dialog box that appears next, choose the options you want.Chapter 12
Publishing Project Information Online
Page 242 To save a snapshot of a view as a GIF image1
Set up the view with the specific details (such as the table, filter, or group) you want.3
Under the Render Image label, click To GIF image file, and then specify the file name and location you want.4
Select whatever other options you want, and click OK.246 To customize how Project saves a Web page
1
On the File menu, click Save As Web Page.2
Specify the file name and location you want, and click the Save button.3
In the Export Wizard, select the options you want.Chapter 13
Sharing Project Information with Other Programs
Page 256 To copy text from a Project table to the Windows Clipboard1
Set up the table to display only the data you want to copy—for example, apply a fil-ter or insert or hide columns.2
Select the range of data you want to copy.3
On the Edit menu, click Copy Cell, Copy Task, or Copy Resource.258 To copy a snapshot of a view to the Windows Clipboard
1
Set up the view with the specific details (such as tables, filters, or groups) you want.2
On the Standard toolbar, click Copy Picture.3
In the Copy Picture dialog box, click either For screen, to optimize the snapshot for online viewing, or For printer, to optimize it for printing.4
Select whatever other options you want, and then click OK.260 To create a new Project summary report for Word, PowerPoint, or Visio
1
On the View menu point to Toolbars, and click Analysis.2
On the Analysis toolbar, click the Copy Picture to Office Wizard button, and then fol-low the instructions that appear on your screen.265 To open a file in a different format in Project
1
On the File menu, click Open.2
In the Files of type box, click the file format you want.271 To save a Project file in a different format
1
On the File menu, click Save As.2
In the Save As dialog box, click the location, and enter the file name you want.3
In the Save as type box, click the format you want, and then click the Save button.4
Follow the instructions that appear on your screen in the Export Wizard.Chapter 14
Tracking Progress on Tasks and Assignments
Page 279 To update a baseline1
On the Tools menu, point to Tracking, and then click Save Baseline.2
In the Save Baseline dialog box, select the baseline you want to update.3
Under For, click either Entire project or Selected tasks.283 To enter task-level or assignment-level actual work values
1
On the View menu, click Task Usage.2
On the View menu, point to Table: Usage, and then click Work.3
Enter the actual work values you want for a task or assignment in the Actual column.283 To enter daily (or other time period’s) actual work values per task or assignment
1
On the View menu, click Task Usage.2
Click the name of the task or assignment for which you want to enter actual values.3
On the Standard toolbar, click the Go To Selected Task button.4
On the Format menu, point to Details, and click Actual Work.5
In the timescale grid, enter the task or assignment value you want in the Act. Work field.297 To reschedule uncompleted work
1
On the Tools menu, point to Tracking, and then click Update Project.2
Click Reschedule uncompleted work to start after, and in the date box type or click the date you want.Chapter 15
Viewing and Reporting Project Status
Page 303 To identify tasks that have slipped in a view305 To filter for tasks that have slipped
1
On the Project menu, point to Filtered For: All Tasks, and then click More Filters.2
In the More Filters dialog box, click Slipping Tasks, and then click the Apply button.306 To see schedule variance
● On the View menu, point to Table: Entry, and then click Variance.
309 To see task costs in a view
1
On the View menu, click More Views.2
In the More Views dialog box, click Task Sheet and then click Apply.3
On the View menu, point to Table: Variance, and click Cost.312 To see task costs and overbudget tasks using the Project Guide
1
On the Project Guide toolbar, click the Report button.2
In the Report pane, click the See project costs link.3
In the Project Costs pane under Apply a filter, click Cost Overbudget.314 To sort resources by cost
1
On the View menu, click Resource Sheet.2
On the View menu, point to Table: Entry and click Cost.3
On the Project menu, point to Sort, and click Sort By.4
In the Sort dialog box, in the Sort By box, click Cost, and then select the Descending option.5
Make sure the Permanently renumber resources check box is cleared, and then click the Sort button.315 To sort resources by cost variance
1
On the View menu, click Resource Sheet.2
On the View menu, point to Table: Entry and click Cost.3
On the Project menu, point to Sort and click Sort By.4
In the Sort dialog box, in the Sort By box, click Cost Variance.Chapter 16
Getting Your Project Back on Track
Page 330 To edit resource assignments’ work values1
On the View menu, click Resource Usage.2
In the Work column, edit the values you want.332 To replace one resource with another
1
On the View menu, click Task Usage.2
Click the Task Name column heading.3
On the Standard toolbar, click the Assign Resources button.4
In the Assign Resources dialog box, in the Resource Name column, click the name of the resource you want to replace, and then click the Replace button.5
In the Replace Resource dialog box, click the name of the replacement resource, and click OK.334 To filter for critical tasks
● On the Project menu, point to Filtered For: All Tasks, and then click Critical.
335 To enter overtime work values in the Task Form
1
On the View menu, click Gantt Chart.2
On the Window menu, click Split.3
Click anywhere in the Task Form, on the Format menu, point to Details, and then click Resource Work.4
In the Ovt. Work column for the resource to which you want to assign overtime work, enter the number of hours of overtime work you want.Chapter 17
Applying Advanced Formatting
Page 344 To format bar styles in a Gantt chart view1
On the Format menu, click Bar Styles.2
In the Bar Styles dialog box, select the options you want.349 To display horizontal gridlines on the chart portion of a Gantt chart view
1
On the Format menu, click Gridlines.354 To format bars in the Calendar view
1
On the View menu, click Calendar.2
On the Format menu, click Bar Styles.3
In the Bar Styles dialog box, select the options you want.Chapter 18
Customizing Project
Page 361 To copy a custom element from one project plan to another through the Organizer
1
First open the project plan that contains the custom element (such as a custom table), and then open the project plan to which you want to copy the custom element.2
On the Tools menu, click Organizer.3
Click the tab name that corresponds to the type of custom element you want to copy.4
In the <Custom Elements> available in drop-down list on the left side of the Organizer dialog box, click the name of the project plan that contains the custom element.5
Click the Copy button.365 To record a macro
1
On the Tools menu, point to Macro, and then click Record New Macro.2
In the Macro name box, enter a name for the macro (no spaces allowed).3
In the Store macro in box, click This Project to store the macro in the active project plan, or Global File to store it in the global template.4
Click OK.5
Perform the actions you want recorded in the macro.6
On the Tools menu, point to Macro, and then click Stop Recorder.368 To run a macro
1
On the Tools menu, point to Macro, and then click Macros.2
In the Macro name box, click the name of the macro you want to run, and then click the Run button.1
2
3
4
5
6
3
In the Visual Basic Editor, edit the macro.4
On the File menu in the Visual Basic Editor, click Close and Return to Microsoft Project.374 To create a custom toolbar
1
On the Tools menu, point to Customize, and then click Toolbars.2
Click the Toolbars tab.3
Click the New button.4
In the Toolbar Name box, type the toolbar name you want, and then click OK.375 To add a command to a custom toolbar
1
On the Tools menu, point to Customize, and then click Toolbars.2
Click the Commands tab.3
In the Categories list, click the category you want.4
Drag the command you want from the Commands list to the custom toolbar.377 To edit the graphic image and text that appears on a custom toolbar button
On the Tools menu, point to Customize, and then click Toolbars. Click the Commands tab.
Click the custom button you want to modify on the custom toolbar. Click the Modify Selection button, and then point to Change Button Image. In the list of images that appears, click the image you want.
Click Modify Selection, and in the Name box, type the text you want for the custom button name.
Chapter 19
Measuring Performance with Earned Value Analysis
Page 383 To set the project status date1
On the Project menu, click Project Information.2
In the Project Information dialog box, in the Status Date box, type or click the status date you want, and click OK.383 To view earned value schedule indicators
1
On the View menu, click More Views.2
In the More Views dialog box, click Task Sheet and then click Apply.3
On the View menu, point to Table: Entry, and click More Tables.1
2
3
4
5
6
385 To view earned value cost indicators
1
On the View menu, click More Views.2
In the More Views dialog box, click Task Sheet and then click Apply.3
On the View menu, point to Table: Entry, and click More Tables.4
In the More Tables dialog box, click Earned Value Cost Indicators, and click the Apply button.Chapter 20
Consolidating Projects and Resources
Page 393 To create a resource poolCreate a new project plan.
Save the new project plan that will become a resource pool. Open one of the project plans you want to make a sharer plan.
On the Tools menu, point to Resource Sharing, and click Share Resources. Under Resources for <Sharer Plan Name>, click Use resources.
In the From list, click the name of your resource pool, and click OK to close the Share Resources dialog box.
7
If you have more than one sharer plan, open another sharer plan.8
Repeat steps 3 through 7 for the other sharer plans.397 To view assignment details in the resource pool
1
On the View menu, click Resource Usage.2
In the Resource Name column, click the name of a resource.3
On the Window menu, click Split to display the Resource Form.400 To update a resource’s working time in the resource pool
1
Open the resource pool as read-write.2
On the View menu, click Resource Usage.3
In the Resource Name column of the Resource Usage view, click the name of the resource whose working time you want to change, and click the Resource Informa tion button.6
Click the dates you want to designate as nonworking time.7
Under Set selected date(s) to, click Nonworking time, and click OK to close the Resource Information dialog box.402 To update working time for all sharer plans from the resource pool
1
Open the resource pool as read/write.2
On the Tools menu, click Change Working Time.3
In the Change Working Time dialog box, in the For box, click the base calendar you want to change, for example Standard (Project Calendar).4
In the calendar below the Select Date(s) label, drag the vertical scroll bar or click the up or down arrow buttons until the month and year you want appears, and then click the specific days you want to make nonworking time.5
Under Set selected date(s) to, click Nonworking time.6
Click OK to close the Change Working Time dialog box.404 To link new project files to the resource pool
1
Open the resource pool as read/write.2
On the Standard toolbar, click the New button.3
On the Tools menu, point to Resource Sharing, and click Share Resources.4
In the Share Resources dialog box, under Resources for <File Name>, click Useresources.
5
In the From list, click the name of the resource pool, and click OK to close the Share Resources dialog box.6
Save the sharer plan and resource pool.406 To edit a sharer plan and update the resource pool
1
Open a sharer plan.2
When prompted, open the resource pool.3
In the sharer plan, make changes to assignments.4
On the Tools menu, point to Resource Sharing, and click Update Resource Pool.410 To create a consolidated project plan
1
On the Standard toolbar, click the New button.2
Save the new project plan.4
In the Insert Projects dialog box, locate and click the project plan you want to insert into the consolidated project plan. To select multiple plans, hold down theH
key while you click the name of each plan.5
Click the Insert button.413 To create task dependencies between projects
1
Open the two project plans between which you want to create a task dependency.2
Switch to the project plan that contains the task you want to make the successortask.
3
On the View menu, click Gantt Chart.4
Click the name of the task you want to make the successor task.5
On the Standard toolbar, click the Task Information button.6
Click the Predecessors tab.7
In the ID column, click the next empty cell below any other predecessor tasks, and enter the name of the predecessor task from the other project file in this format: Filename\Task ID.8
PressF
, and click OK to close the Task Information dialog box.Chapter 21
Planning Work with Project Server
Note
These procedures require Project Professional with access to Project Server.Page 422 To create a new plan based on a template (project manager activity)
1
In Project Professional, on the File menu click New.2
In the New Project pane, under Templates click On my computer.3
In the Templates dialog box, click the Project Templates tab, and double-click the template you want.427 To run the Resource Substitution Wizard (project manager activity)
1
In Project Professional, open an enterprise project plan that contains generic or work resources that you want to replace.2
On the Tools menu, click Substitute Resources437 To publish a project plan to Project Server (project manager activity)
1
In Project Professional, develop a project plan to the point that you are ready to publish it to Project Server.2
On the Collaborate menu point to Publish, and then click All Information.3
To republish updated information, on the Collaborate menu point to Publish, andthen click New and Changed Assignments.
Chapter 22
Tracking Work with Project Server
Note
These procedures require Project Professional or Project Web Access with access to Project Server, or Outlook with the Outlook integration add-in installed from Project Server.Page 442 To report task changes through Project Web Access (resource activity)
1
Log in to Project Web Access.2
Click the Tasks tab to display the Tasks Center.3
In the Tasks Center, record the actual work, percent complete, or other task status you want.4
Click Update All.442 To report upcoming nonworking time through Project Web Access (resource activity)
1
Log in to Project Web Access.2
Click the Tasks tab to display the Tasks Center.3
Click the Notify your manager of time you will not be available for project work in the pane on the left.4
Record the type of nonworking time you want to report, and then click Submit.446 To manage tasks through the Outlook calendar (resource activity)
1
Start Outlook and display the calendar.2
Do one of the following:■ To import new or updated task assignments, click the Import New Assign ments button on the Project Web Access toolbar.
451 To accept task changes from resources (project manager activity)
1
Log in to Project Web Access.2
Click the Updates tab to display the Updates Center.3
For the task changes you want to accept, click in the Accept? column and in the drop-down list that appears click Accept.4
Click Update.5
After Project Server updates the affected plans in Project Professional, evaluate the impact of the task changes on the overall schedule.456 To see multi-project status and drill into a specific project (executive or other stake-holder activity)
1
Log in to Project Web Access.2
Click the Projects tab to display the Project Center.3
Change the display options or active view to see the projects published to Project Server.4
To display information for a specific project, in the Project Name column click the name of the project you’d like to see.Chapter 23
Managing Risks, Issues, and Documents with Project Server
Note
These procedures require Windows SharePoint Services integrated with Project Server.Page 464 To create a new risk (executive, project manager, or resource activity)
1
Log in to Project Web Access.2
Click the Resources tab, and then select a project with which you want to associate a risk.3
Enter the risk information you want.467 To create a new issue (executive, project manager, or resource activity)
1
Log in to Project Web Access.2
Click the Issues tab, and then select a project with which you want to associate an issue.470 To upload a document (executive, project manager, or resource activity)
1
Log in to Project Web Access.2
Click the Documents tab, and then select a project with which you want to associ-ate a document.I
Work with reports, page 21
1
Getting Started
with Project
In this chapter you will learn to:
✔ Understand the family of Microsoft Office Project 2003 products. ✔ Understand what a good project management tool can help you do.
✔ Start Project Standard or Project Professional, and identify the major parts of the Project window.
✔ Use views to work with project plan details in different ways. ✔ Use reports to print project plan details.
✔ Create a project plan and enter a project start date. ✔ Set the working and nonworking time for a project. ✔ Enter a project plan’s properties.
Project management is a broadly practiced art and science. If you’re reading this book, there’s a good chance that either you’re seriously involved in project manage ment, or you want to be.
At its heart, project management is a toolbox of skills and tools that help you predict and control the outcomes of endeavors your organization undertakes. Your organization might do other work apart from projects. Projects (such as a film project) are distinct from ongoing operations (such as payroll services) in that projects are temporary endeav ors undertaken to create some sort of unique deliverable or end result. With a good project management system in place, you should be able to answer such questions as
■ What tasks must be done to produce the deliverable of the project? ■ Who will complete these tasks?
■ What’s the best way to communicate project details to people who have an interest in the project?
■ When should each task be performed?
■ How much will it cost?