MICROSOFT
OFFICE
OUTLOOK
®
2010
QuickSteps
New York Chicago San Francisco
Lisbon London Madrid Mexico City
Milan New Delhi San Juan
Seoul Singapore Sydney Toronto
CAROLE MATTHEWS
MARTY MATTHEWS
ISBN: 978-0-07-163495-3
MHID: 0-07-163495-9
The material in this eBook also appears in the print version of this title: ISBN: 978-0-07-163496-0, MHID: 0-07-163496-7.
All trademarks are trademarks of their respective owners. Rather than put a trademark symbol after every occurrence of a trademarked name, we use names in an editorial fashion only, and to the benefi t of the trademark owner, with no intention of infringement of the trademark. Where such designations appear in this book, they have been printed with initial caps.
McGraw-Hill eBooks are available at special quantity discounts to use as premiums and sales promotions, or for use in corporate training programs. To contact a representative please e-mail us at [email protected].
Information has been obtained by McGraw-Hill from sources believed to be reliable. However, because of the possibility of human or mechanical error by our sources, McGraw-Hill, or others, McGraw-Hill does not guarantee the accuracy, adequacy, or completeness of any information and is not responsible for any errors or omissions or the results obtained from the use of such information.
TERMS OF USE
This is a copyrighted work and The McGraw-Hill Companies, Inc. (“McGrawHill”) and its licensors reserve all rights in and to the work. Use of this work is subject to these terms. Except as permitted under the Copyright Act of 1976 and the right to store and retrieve one copy of the work, you may not decompile, disassemble, reverse engineer, reproduce, modify, create derivative works based upon, transmit, distribute, disseminate, sell, publish or sublicense the work or any part of it without McGraw-Hill’s prior consent. You may use the work for your own noncommercial and personal use; any other use of the work is strictly prohibited. Your right to use the work may be terminated if you fail to comply with these terms.
7
6
5
4
3
2
1
Chapter 1
Stepping into Outlook
...1
Start and exit Outlook; upgrade from Outlook Express; use the Navigation pane, toolbars, and menus; get help; customize Outlook
Chapter 2
Receiving and Handling E-mail
... 31
Set up e-mail, use Hotmail, receive and read e-mail, filter spam and junk mail, set rules, find and print messages, manage attachments
Chapter 3
Creating and Sending E-mail
... 51
Create, address, and edit messages; use stationery; attach files; sign and forward messages; check spelling; use custom signatures; set priority and request receipts
Chapter 4
Managing Contacts
... 75
Create, edit, and copy contacts; create a distribution list; find, arrange, flag, and phone contacts; use print a map or contact information; mail-merge e-mail
Chapter 5
Scheduling and the Calendar
... 103
Set up, navigate, use, customize, share, and print the calendar; create appointments, events, and meetings; use reminders; respond to invitations
Chapter 6
Using Tasks
... 133
Use and customize the Tasks folder; create, change, assign, manage, and monitor tasks; create status reports; use the To-Do bar
Chapter 7
Using a Journal and Making Notes
... 153
Set up and use a journal; add, change, delete, move, and print journal entries; set up, use, change, share, and print notes
Chapter 8
Managing Files and Folders
... 171
Create, copy, rename, share, and delete folders; create search folders; create, view, group, sort, and import and export files; secure e-mail
Chapter 9
Using Forms, Labels, and Mail Merge
... 187
Create, modify, use, and publish forms; create templates; prepare for and carry out a mail merge
Chapter 10
Using Outlook in Other Ways
... 211
Set up and use instant messaging, work with RSS feeds, use the Clipboard, use Microsoft Office Word features
Index ... 235
8
10
Acknowledgments.. ... x
Introduction ...xi
Chapter 1
Stepping into Outlook
...1
Starting Outlook in Other Ways ...2
Start Outlook ...2
Use the Start Menu to Start Outlook ...2
Use the Startup Wizard ...3
Upgrade to Outlook ...4
Exit Outlook ...5
Reviewing Versions of Office 2010 ...6
Explore Outlook ...6
Explore the Outlook Window ...6
Become Familiar with the Ribbon ...9
Use Tabs and Menus ...10
Change Views ...10
Use the Navigation Pane ...11
Customize the To-Do Bar ...12
Use Outlook Today ...13
Personalize and Customize Outlook ...14
Work with File View ...15
Customize the Ribbon ...15
Customize the Quick Access Toolbar ...18
Get Help ...20
Obtain Help ...20
Find a Message ...21
Customize Outlook ...25
Setting Preferences ...25
Update Outlook ...30
Chapter 2
Receiving and Handling E-mail
... 31
Set Up E-mail ...31
Getting a Gmail Account ...32
Get Online ...33
Receive E-mail ...34
Check for E-mail ...35
Read E-mail ...36
Download Sender and Subject Information Only ...36
Filter Junk Mail ...39
Handle E-mail Messages ...41
Mark Messages as Read or Unread ...41
Change the Time for Being Read ...41
Flag Your Messages for Follow-up ...42
2
Manipulating the Rules ...46
Delete Messages ...46
Manage Attachments ...47
Archiving Messages ...48
Print Messages ...48
Chapter 3
Creating and Sending E-mail
... 51
Write Messages ...52
Create a Message ...52
Address a Message ...52
Use a Contact Group ...55
Add Carbon and Blind Copies ...55
Edit a Message ...56
Formatting Messages ...58
Use Stationery ...58
Including Hyperlinks ...61
Attach Files ...61
Sign Messages ...64
Using Signatures ...65
Use Digital Signatures ...65
Check Spelling ...67
Send Messages ...68
Reply to Messages ...68
Forward Messages ...70
Set Message Priority ...71
Request Receipts ...71
Sending Messages ...72
Delay Delivery with a Rule ...72
Chapter 4
Managing Contacts
... 75
Create Contacts ...75
Add a New Contact ...78
Editing Contacts ...81
Copy Contacts from E-mail ...81
Create a Contact Group ...81
Remove a Name from a Contact Group ...83
Use Contacts ...84
Add Contacts to E-mail ...84
Arrange Contacts ...85
Working with Color Categories ...86
Manage Your Contact Views ...87
Find a Contact ...91
Print Contact Information ...93
Phone a Contact ...96
See a Map for a Contact’s Address ...97
Using Keyboard Shortcuts with Contacts ...99
Create a Mail-Merged E-mail ...99
3
6
Explore the Calendar ...105
Navigating the Calendar ...106
Customize the Calendar ...106
Using the Navigation and Reading Panes ...109
Customize Calendar Views ...109
Set Up the Calendar ...114
Maintain Multiple Calendars ...117
Share a Calendar ...119
Understanding Internet Calendars ...121
Use the Calendar ...121
Entering Dates and Times ...122
Create Appointments ...122
Enter Recurring Appointments ...125
Move Appointments ...126
Use Reminders ...127
Print Calendars ...127
Plan Meetings and Request Attendance ...129
Schedule a Meeting ...129
Respond to an Invitation ...131
Chapter 6
Using Tasks
... 133
Use the Task Window ...134
Explore the Tasks Window ...134
View Tasks ...134
Customizing Task Settings ...139
Create Tasks ...139
Create a New Task from the Ribbon ...139
Set Recurring Tasks ...141
Categorize a Task ...142
Assign a New Task ...144
Accepting or Declining a Task Assignment ...146
Make a Task Private ...146
Manage Tasks ...146
Mark a Task as Complete ...146
Choose to Not Display a Completed Task ...147
Delete a Task ...148
Rename a Task ...148
Linking a Task to a Contact ...149
Create Status Reports ...149
Work with Follow-up Flags ...150
Add a Flag to an Existing Task ...151
Set a Quick Click Flag ...151
Work with the To-Do Bar ...152
Set the To-Do Bar to Show Only Tasks ...152
Chapter 7
Using a Journal and Making Notes
... 153
Explore the Journal ...153
Locate the Journal Icon ...154
Explore the Journal ...154
Change a Journal Entry ...157
Delete a Journal Entry ...158
Move a Journal Entry in the Timeline ...158
Attach Contacts to Journal Entries ...158
Viewing Journal Entries ...159
Assign a Category to a Journal Entry ...159
Print Journal Entries ...160
Make Notes ...162
Find the Notes Folder ...162
Create Notes in Another Outlook View ...163
Add Notes in the Notes View ...164
Change the Note Icon Size ...164
Setting Up Notes ...165
Delete a Note ...165
Categorize Notes ...165
Using Notes in Other Outlook Areas ...166
Organize Notes by Category/Color ...167
Forward a Note ...167
View Notes ...168
Print Notes ...170
Chapter 8
Managing Files and Folders
... 171
Work with Folders ...171
Create a Normal Folder ...172
Create a Search Folder ...172
Copying and Moving Folders ...173
Rename Folders ...174
Delete Folders ...174
Set Folder Properties ...174
Manipulate Files ...175
Copying and Moving Files ...176
Delete Files ...176
Group Files ...176
Viewing Files ...177
Sort Files ...177
Import and Export Files ...178
Make Outlook Secure ...180
Set Security and Privacy Options ...180
Secure E-mail ...181
Protecting Against Viruses ...184
Manage Add-ins ...184
Chapter 9
Using Forms, Labels, and Mail Merge
... 187
Use Forms ...187
Explore Outlook Forms in the Developer Tab ...188
Modify a Standard Form ...189
Create a Custom Form ...190
Use the Control Toolbox ...194
Change the Tab Order ...196
8
Perform a Mail Merge ...200
Prepare Contacts ...201
Prepare a Mail Merge Document in Word ...202
Perform a Mail Merge ...204
Print Labels ...206
Print Envelopes ...208
Chapter 10
Using Outlook in Other Ways
... 211
Use Instant Messaging with Outlook ...211
Set Up Instant Messaging ...212
Respond to an Instant Message and Chat ...215
Implement RSS Feeds ...216
Locate and Subscribe to RSS Feeds ...217
Read and Work with RSS Articles ...220
Organizing RSS Articles ...223
Transfer RSS Feeds ...223
Cancel an RSS Feed ...225
Use Other Extensions of Outlook ...226
Use the Office Clipboard ...226
Using Microsoft Word Features ...229
Create Electronic Business Cards ...230
Index ...235
This book is a team effort of truly talented people. Among
them are:
Roger Stewart
, sponsoring editor, believed in us enough
to sell the series and continues to stand behind us as we go
through the third edition. Thanks, Roger!
Joya Anthony
, acquisitions coordinator, always a friendly
and positive voice from McGraw-Hill, has made sure that
the manuscript and art are intact and people have what they
need. Joya is often the silent hand that makes things happen.
Thanks, Joya!
Janet Walden
, editorial supervisor, and
Harleen Chopra
,
project manager, greased the wheels and straightened the
track to make a very smooth production process. Thanks,
Janet and Harleen!
Lisa McCoy
, copy editor, added greatly to the readability
and understandability of the book while always being a joy
to work with. Thanks, Lisa!
Madhu Prasher
, proofreader, has carefully gone through
each page, catching errors no one else could see, always
keeping the integrity of the book intact. Thank you, Madhu!
Valerie Perry
, indexer, who adds so much to the usability
of the book, and does so quickly and at the last moment.
Thanks, Valerie!
Carole
and
Marty Matthews
have been connected to
computers for over 35 years. During that time, they have
been on all sides of software products: as programmers
and systems analysts, and as managers and founders and
co-owners of a software company. They have authored or
co-authored more than 70 books. Titles include
Windows 7
QuickSteps, Microsoft Offi ce Word 2010 QuickSteps, Dynamic
Web Programming: A Beginner’s Guide, Photoshop CS4
QuickSteps
, and
Microsoft Offi ce PowerPoint 2010 QuickSteps
.
Carole and Marty live on an island in Puget Sound in
Washington State with a very old cat. They have one son,
Michael.
Bobbi Sandberg
has been involved with computers and
accounting for fi ve decades. Her extensive background
combined with her ability to explain complex concepts in
plain language has made her a popular instructor, speaker,
and consultant. Bobbi has been a CPA and was a geek long
before it was popular. She is the co-author of
Quicken 2007
QuickSteps
books are recipe books for computer users. They
answer the question, “How do I...” by providing a quick
set of steps to accomplish the most common tasks with a
particular operating system or application.
The sets of steps are the central focus of the book. QuickSteps
sidebars show how to quickly perform many small functions
or tasks that support the primary functions. QuickFacts
sidebars supply information that you need to know about a
subject. Notes, Tips, and Cautions augment the steps; they
are presented in a separate column so as not to interrupt the
fl ow of the steps. The introductions are minimal rather than
narrative, and numerous illustrations and fi gures, many with
callouts, support the steps.
QuickSteps
books are organized by function and the tasks
needed to perform that function. Each function is a chapter.
Each task, or “How To,” contains the steps needed for
accomplishing the function, along with the relevant Notes,
Tips, Cautions, and screenshots. You can easily fi nd the tasks
you need through:
•
The table of contents, which lists the functional areas
(chapters) and tasks in the order they are presented
•
A How To list of tasks on the opening page of each
chapter
•
The index, which provides an alphabetical list of the
terms that are used to describe the functions and tasks
•
Color-coded tabs for each chapter, or functional area,
with an index to the tabs in the Contents at a Glance
section (just before the table of contents)
in this Book
Microsoft Offi ce Outlook 2010 QuickSteps
uses several conventions
designed to make the book easier for you to follow:
•
A
or a
in the table of contents and in the How
To list in each chapter references a QuickSteps or
QuickFacts sidebar in a chapter.
•
Bold type
is used for words or objects on the screen
that you are to do something with—for example,
“click the
File
button, and click
.”
•
Italic type
is used for a word or phrase that is being
defined or otherwise deserves special emphasis.
•
Underlined type is used for text that you are to type
from the keyboard.
•
SMALL CAPITAL LETTERS are used for keys on thekeyboard, such as
ENTERand
SHIFT.
•
When you are expected to enter a command, you
10
9
8
7
6
5
4
3
2
How to…
Starting Outlook in Other Ways
• Use the Start Menu to Start
Outlook
• Use the Startup Wizard
• Upgrade
to
Outlook
• Exit
Outlook
Reviewing Versions of
Office 2010
• Explore the Outlook Window
• Become Familiar with the
Ribbon
• Use Tabs and Menus
• Change
Views
• Use the Navigation Pane
• Customize the To-Do Bar
• Use Outlook Today
• Work with File View
• Customize the Ribbon
• Customize the Quick
Access Toolbar
• Obtain
Help
• Find a Message
• Set
Preferences
• Update
Outlook
Chapter 1
Stepping into Outlook
When someone mentions Outlook, the first thought is
generally the sending and receiving of e-mail. Outlook does
handle e-mail quite competently, but it also does a lot more,
including managing contacts, scheduling activities, tracking
tasks, keeping a journal, and using notes. Outlook also
provides the means to collaborate with others, it can be used
with and from other applications, and can link to and synch
up with both a team Web site using Windows SharePoint
Services, and with a smart cell phone or PDA (personal
digital assistant).
2
3
4
5
6
7
8
9
2
3
4
5
6
7
8
9
2
3
4
5
6
7
8
9
Start Outlook
How you start Outlook depends on how it was installed and what has happened
to it since its installation. In this section you’ll see a way to start Outlook and
some alternatives; you’ll see how to use the Startup Wizard and how to upgrade
from several other e-mail packages. You’ll also see how to exit Outlook.
Use the Start Menu to Start Outlook
If there are no other icons for or shortcuts to Outlook available on your desktop,
you can always start Outlook using the Start menu.
1.
Start your computer if it is not already running, and log on to Windows if necessary.2.
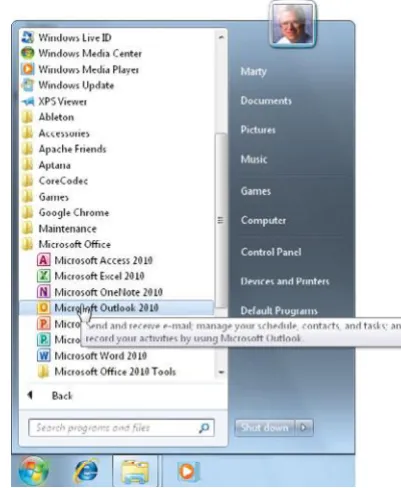
Click Start . Click All Programs, scroll down and click Microsoft Office, and clickMicrosoft Outlook 2010, as shown in Figure 1-1.
UICK
STEPS
STARTING OUTLOOK IN
OTHER WAYS
In addition to using All Programs on the Start menu, there are several other ways to start Outlook.
USE THE START MENU
After you have used Outlook once or twice, you should see it on the Start menu. The more you use it, the higher up on the menu it will be; but if you don’t use it for a while, it will disappear. To combat this, you can permanently “pin” Outlook to the Start menu.
Click Start, right-click the Outlook option on the Start menu, and click Pin To Start Menu. The Outlook option will move up near the top of the Start menu with other applications that are pinned there.
If you don’t see Outlook on the Start menu, click All Programs, scroll down and click Microsoft Office, right-click Microsoft Outlook 2010, and click Pin To Start Menu. Once the Outlook icon is on Start menu, you need only to open the Start menu and click the Outlook icon to start it.
[image:15.713.436.637.267.511.2]10
9
8
7
6
5
4
3
2
Use the Startup Wizard
The first time you start Outlook on either a new computer with Office 2010 or a
new installation of Office 2010, the Outlook 2010 Startup Wizard will open with
the Outlook 2010 Startup screen.
1.
Click Next. Accept the default response of Yes to configure an e-mail account, and click Next.2.
Type your name, e-mail address, and password. Then retype the password. Click Next.3.
E-mail configuring will take several minutes. Click Next for both an encrypted accountand one that is unencrypted. If necessary, click Manually Configure Server Settings, click Next, click Internet E-mail, click Next, enter the information provided by your Internet mail provider, and click Next.
4.
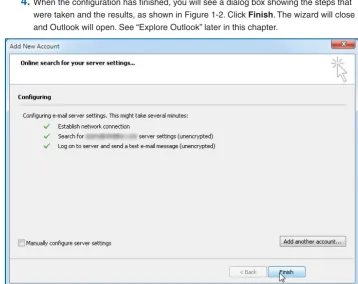
When the configuration has finished, you will see a dialog box showing the steps that were taken and the results, as shown in Figure 1-2. Click Finish. The wizard will close and Outlook will open. See “Explore Outlook” later in this chapter.UICK
STEPS
STARTING OUTLOOK IN
OTHER WAYS
(Continued)CREATE A SHORTCUT TO START OUTLOOK
An easy way to start Outlook is to create a shortcut icon on the desktop, and then double-click it to start the program. Click Start, click All Programs, click Microsoft Office, right-click Microsoft Outlook 2010, click Send To, and click Desktop (Create Shortcut).
USE THE TASKBAR
Depending on the version of Windows that you have, you can place an Outlook shortcut on the taskbar at the bottom of your screen in two different ways. In Windows XP and Vista, you can place the Outlook shortcut in the Quick Launch toolbar, or in Windows 7 you can pin the shortcut to the taskbar itself.
USE THE QUICK LAUNCH TOOLBAR
In Windows XP and Vista, the Quick Launch toolbar is a small area on the taskbar next to the Start button. You can add an Outlook icon on the Quick Launch toolbar and use it to start Outlook. If your Quick Launch toolbar is not visible, open it and add an Outlook icon there. 1. If you don’t see a Quick Launch toolbar, right-click
a blank area of the taskbar, click Toolbars, and click Quick Launch. The Quick Launch toolbar is displayed.
2. Click Start, click All Programs, click Microsoft Office, and drag the Microsoft Office Outlook 2010 icon to where you want it on the Quick Launch toolbar.
To start Outlook, click the icon on the Quick Launch toolbar.
Figure 1-2: You will see this message when your e-mail setup has successfully completed.
[image:16.713.263.622.233.517.2]2
3
4
5
6
7
8
9
2
3
4
5
6
7
8
9
2
3
4
5
6
7
8
9
5.
If you have been using another e-mail program, you’ll be asked if you want to make Outlook 2010 your default e-mail program. If you do (this is recommended), click Yes.6.
If you are asked if you want to add an Outlook Connector account and you have a Web-based e-mail account on Google mail, Hotmail, or Yahoo!, click Next; enter your e-mail address, password, and name you want to use; and click OK.Upgrade to Outlook
If you have been using Outlook 2003 or 2007, Outlook 2010 should automatically
locate your previous message and contact files and move them over to it. You
cannot have two versions of Outlook on your computer, so Outlook 2010 will
uninstall your previous version and pick up your old files.
If you have been using Outlook Express, Windows Mail, or Windows Live Mail
and you install Office 2010, you may be asked if you want to upgrade from your
previous program. If you choose to upgrade, you will be asked if
you want to import your e-mail messages and addresses. Click
Yes
,
and you will see the progress as the files are being imported and
a summary upon completion.
If you have been using one of these programs and were not asked by the
Outlook 2010 Startup Wizard if you want to upgrade, you can still import your
e-mail files into Outlook.
1.
Start Outlook in one of the ways described earlier in this chapter.2.
Click the File tab, clickOpen, and click Import. The Import And Export Wizard will open.
3.
Click Import Internet Mail And Addresses, and clickNext.
UICK
STEPS
STARTING OUTLOOK IN
OTHER WAYS
(Continued)PIN OUTLOOK TO THE TASKBAR
In Windows 7, you can pin an Outlook icon to the taskbar where it will remain to be restarted after you have shut the program down. You may have noticed in pinning Outlook to the Start menu that you could also choose to pin it to the taskbar. Another way to accomplish this is after you have started Outlook.
1. Start Outlook in any of the ways already described. Once Outlook is running, its icon will appear on the taskbar.
2. Right-click the Outlook icon on the taskbar, and click Pin This Program To Taskbar. Outlook is started by clicking the icon on the taskbar.
NOTE
If you have been running another e-mail program such as Outlook Express, Windows Mail, or Windows Live Mail, and then install Outlook, you may see a message when you run the Outlook 2010 Startup Wizard asking if you want to upgrade from your other e-mail program and if you want to import your messages and addresses. See “Upgrade to Outlook.”
TIP
10
9
8
7
6
5
4
3
2
4.
Click Outlook Express (which includes Windows Mail), and make sure that theImport Mail andImport Address Book check boxes are selected.
5.
Click Next, choose how you want to handle duplicates, and then click Finish.You will be told the progress as the files are being imported and will see a
summary upon completion.
Exit Outlook
When you are done using Outlook, you can exit the program.
•
Click the File tab, and click Exit. –Or–•
Click Close on the right of the title bar. –Or–•
PressALT+F4.NOTE
If you want to import Outlook Express, Windows Mail, or Windows Live Mail files from another computer, locate the files by starting the program on the other computer, click the Tools menu (if you don’t see the Tools menu, pressALT), choose Options, click the Advanced tab (the Maintenance tab in Outlook Express), click the
Maintenance button (skip this in Outlook Express), and click Store Folder. Drag across the entire address line, pressCTRL+C, and click OK to close the Store Location dialog box. Then click Start, click Computer, click the computer icon at the left end of the address bar, press
CTRL+V to copy the contents into the address bar, and click the Go To button or press ENTER. This will show you the e-mail files. Copy these e-mail files
to the new computer, import them into your previous e-mail program on that computer, and then use the instructions under “Upgrade to Outlook” to import the files into Outlook.
TIP
If you are still having problems importing from Outlook Express, Windows Mail, or Windows Live Mail after reviewing all the previous steps or the Note in this section, start your other e-mail program, click File, click Export, click Messages, click Microsoft Exchange, click Next, and click OK. Select All Folders and click OK. You will see a message that your messages are being exported and their progress. When it is done, click Finished. In Outlook, click File, click Open, click Import, select Import From Another Program Or File, and click Next. Select
2
3
4
5
6
7
8
9
2
3
4
5
6
7
8
9
2
3
4
5
6
7
8
9
Explore Outlook
Outlook uses a wide assortment of windows, ribbons, toolbars, menus, and
special features to accomplish its functions. Much of this book explores how
to find and use all of those items. In this section you’ll see the most common
features of the default Outlook window, including the parts of the window, the
buttons on the principal toolbars, and the major menus. Also, you’ll see how to
use the Navigation pane and Outlook Today.
Explore the Outlook Window
The Outlook window takes on a different appearance depending on the
function you want Outlook to perform. The initial view when you first start
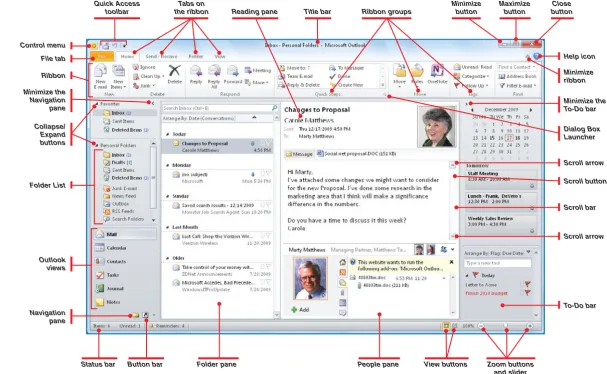
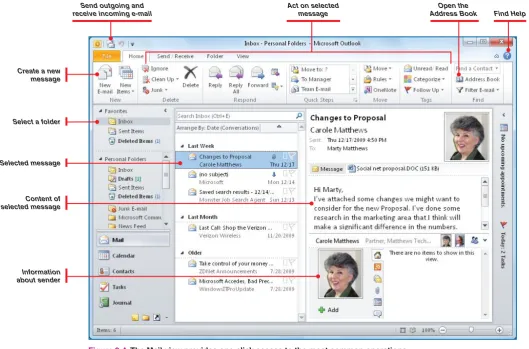
Outlook is for handling mail, as shown in Figure 1-3. However, this view
changes as soon as you start to do anything else, even create e-mail, as you’ll see
in this chapter. Other functions are described in their corresponding chapters.
The principal features of the Outlook window are described in Table 1-1.
QUICK
FACTS
REVIEWING VERSIONS OF
OFFICE 2010
Office 2010 has a newly expanded set of versions and platforms upon which Office will run. Office is now available on three separate platforms:
•
Office 2010 is a resident program running on the user’s desktop or laptop computer, as available for many years, generally referred to as the “desktop platform,” although it also runs on laptops•
Office Web Apps accessed through a Web browser such as Internet Explorer or Firefox, which is a newly available platform with Office 2010•
Office Mobile accessed through a mobile device, such as a smart phone, is another newly available platformOffice 2010 on the desktop platform is available in four versions:
•
Office Starter 2010 is available preinstalled on a new computer, includes Word and Excel, has reduced functionally, and is paid for with advertising. It can be directly upgraded to one of the following full versions of Office 2010 through a product key card purchased from a retail outlet.•
Office Home & Student 2010 is available to be installed from a DVD or via Click-To-Run over the Internet, and contains the full versions of Word, Excel, PowerPoint, and OneNote.•
Office Home & Business 2010 is available to be installed from a DVD or via Click-To-Run over the Internet, and contains Word, Excel, PowerPoint, OneNote, and Outlook.Continued . . .
OUTLOOK
FEATURES DESCRIPTION
Ribbon Contains the primary controls for Outlook.
File tab Opens the File menu and File views for opening, saving, and printing documents, and setting the options for Outlook itself.
Control menu Contains controls for the window itself.
Quick Access toolbar Contains the tools you most often use.
Tabs on the ribbon Provide access to the sets of tools and features shown on the ribbon.
Reading pane Displays the contents of the selected message in the open folder.
Title bar Name of the open folder; contains the Control menu for the window.
10
9
8
7
6
5
4
3
2
QUICK
FACTS
REVIEWING VERSIONS OF
OFFICE 2010
(Continued)•
Office Professional 2010 is available to be installed from a DVD or via Click-To-Run over the Internet, and contains Word, Excel, PowerPoint, OneNote, Outlook, Access, and Publisher. There are also two enterprise editions and one academic edition available through a volume (multicopy) license. Office Standard 2010 adds Publisher to Office Home & Business, and Office Professional Plus 2010 adds SharePoint Workspace, InfoPath, and Communicator to Office Professional. Office Professional Academic 2010 is the same as Office Professional.This book, which covers the full version of Outlook 2010, is applicable to all the editions with a full version of Outlook.
OUTLOOK
FEATURES DESCRIPTION
Minimize button Minimizes the window to an icon on the taskbar.
Maximize button Maximizes the window to fi ll the screen. When maximized, this becomes the Restore button; clicking it returns the window to its previous size.
Close Exits Outlook and closes the window.
Help icon Opens the Help window with information on using Outlook.
Minimize ribbon Reduces the size of the ribbon so only the tabs show.
Minimize To-Do bar Reduces the size of the To-Do bar to a half-inch wide summary.
Dialog Box Launcher Opens a dialog box related to the group it is in.
Scroll arrow Moves the contents of the pane in the direction of the arrow.
Scroll button Moves the contents of the pane in the direction it is dragged.
Scroll bar Moves the contents of the pane in the direction it is clicked.
To-Do bar Contains the current month’s calendar, appointments, and tasks.
Zoom buttons Controls the magnifi cation of the reading pane.
View buttons Closes and opens the To-Do bar.
People pane Displays social media and other information about the sender or receiver of e-mail, including their recent messages.
Folder pane Displays the contents of the selected folder.
Navigation pane Contains the means for selecting what you want to do and look at.
Status bar Displays information about what is selected.
Button bar Additional Outlook components not in Outlook views.
Outlook views Allows selection of the major Outlook components or views.
Folder List Contains the folders within the selected view.
Collapse/Expand buttons
Minimizes or expands the current list, whatever it might contain.
Minimize Navigation pane
Reduces the size of the Navigation pane to a half-inch wide summary.
2
3
4
5
6
7
8
9
2
3
4
5
6
7
8
9
2
3
4
5
6
7
8
9
Figure 1-3: The default Outlook window is used for handling mail.
Control menu
Quick Access toolbar
Tabs on
the ribbon Reading pane Title bar Ribbon groups
Minimize button
Maximize button
Close button
Help icon
Minimize ribbon
Minimize the To-Do bar
Dialog Box Launcher
Scroll arrow
Scroll button
Scroll bar
Scroll arrow
To-Do bar
Zoom buttons and slider View buttons
People pane Folder pane
Navigation pane
Status bar Button bar Outlook
views Folder List Collapse/ Expand buttons Minimize the
[image:21.713.69.676.63.436.2]10
9
8
7
6
5
4
3
2
Become Familiar with the Ribbon
The familiar toolbars and menus from versions of Outlook prior to 2010 are
gone. The original menu structure used in earlier Office products (File, Edit,
View, Tools, Help, and others) was designed to accommodate fewer tasks and
features. That menu structure has simply outgrown its usefulness. Microsoft’s
solution to the increased number of features is the
ribbon
, the container now
at the top of all Office program windows that holds the tools and features you
are most likely to use (see Figure 1-3). The ribbon collects tools for a given
function into
groups
—for example, the Respond group provides the options
for responding to a message. Groups are then organized into tabs for working
on likely tasks. For example, the Send/Receive tab contains groups for various
sending and receiving tasks. Each Office program has a default set of tabs, with
additional
contextual
tabs that appear as the context of your work changes.
For instance, when you select a picture, a Format tab containing shapes and
drawing tools that you can use with the particular graphic object appears
beneath the defining tools tab; when the object is unselected, the Format tab
disappears.
The ribbon contains labeled buttons you can click to use a given command or
tool. Depending on the tool, you are then presented with additional options in
the form of a list of commands, a dialog box, or galleries of choices that reflect
what you’ll see in your work. Groups that contain several more tools than
can be displayed in the ribbon include a Dialog Box Launcher icon that takes
you directly to these other choices. The ribbon also takes advantage of Office
features, including a live preview of many potential changes (for example, you
can select text and see it change color as you point to various colors in the Font
Color gallery without finalizing the color selection).
At the left end of the ribbon is the File tab, and above the left end of the ribbon
is the Quick Access toolbar. The File tab provides access to the File menu and
File view, which lets you work
with
your document (such as saving it), as
TIP
2
3
4
5
6
7
8
9
2
3
4
5
6
7
8
9
2
3
4
5
6
7
8
9
opposed to the ribbon, which centers on working
in
your document (such as
editing and formatting). The Quick Access toolbar provides an always-available
location for your favorite tools. It starts out with a small default set of tools,
but you can add to it. See the accompanying sections and figures for more
information on the ribbon and the other elements of the Outlook window.
Use Tabs and Menus
Command tabs are displayed at the top of the ribbon or in a dialog box. Menus
are displayed when you click a down arrow on a button on the ribbon, a dialog
box, or a toolbar. You can use tabs and menus in the following ways:
•
To open a tab or menu with the mouse, click the tab or menu.•
To open a tab or menu with the keyboard, press ALT and the letter that appears in a small box for the object, tab, or menu name. For example, press ALT+F to open the File view.•
To select a command on a tab or menu, click the tab or menu to open it, and then click the command.•
The ribbon command may have a small arrow on the icon indicating that a menu exists for that option. That menu’s options may contain their own submenus as well. To open them, simply move the mouse pointer over the options you want and the submenus will open with their own options.Change Views
The view you will have on the main Outlook window can be changed,
depending on what you want to see. Typically, as shown earlier in Figure 1-3,
you will see the Navigation pane, Folder pane, Reading pane, and To-Do bar,
with the middle two related to the mail component. You may change these by
clicking another Outlook view. For example, clicking Calendar view in the lower
part of the Navigation pane will replace the Folder pane, Reading pane, and
To-Do bar with the current day’s calendar. Alternatively, in Mail view, clicking the
Reading view button on the right of the status bar closes the Navigation pane
and the To-Do bar to provide a lot more room to read an e-mail message.
TIP
To gain working space in the document pane, you can minimize the size of the ribbon. To do this, click the
10
9
8
7
6
5
4
3
2
Use the Navigation Pane
There are three main areas of the Navigation pane, as shown in Figure 1-4:
•
Folder List, at the top, is where you can select the folder you want to open.•
Outlook views, in the middle, are where you can select the view in which to work.•
Button bar, at the bottom, lets you access views not available in the Outlook views.SELECT A VIEW
The Outlook view determines which area of Outlook you will work in—for
example, Mail, Calendar, or Contacts. To select a view:
•
Click the appropriate Outlook view. –Or–•
Click the appropriate button in the button bar (see Figure 1-4).OPEN A FOLDER
The folder that is open determines which specific documents you will work on,
for example, incoming messages in the Inbox folder or notes in the Notes folder.
To open a folder:
•
Click the appropriate folder in the Folder List. –Or–•
Click the related Outlook view or button in the button bar.DISPLAY OUTLOOK VIEWS
The number of Outlook views displayed depends on the size of the Outlook
window and the size of the pane dedicated to these views. To change the
number of views displayed:
•
Drag the bottom window border up or down. –Or–•
Drag the handle between the top view and the bottom of the Folder List. Figure 1-4: The Navigationpane provides the primary control over which area and which folder you are working with.
Folder List
Outlook views
Button bar with views not shown
Notes Folder List
Shortcuts
2
3
4
5
6
7
8
9
2
3
4
5
6
7
8
9
2
3
4
5
6
7
8
9
DISPLAY BUTTONS
The buttons in the button bar are just an extension of Outlook views. When you
reduce the number of view bars, the options become buttons on the button bar.
To change the buttons on the button bar, in addition to changing the number of
Outlook views that are displayed:
1.
Click the Configure button on the right of the button bar.2.
Click Add Or Remove Buttons, and then click the button you want to add or remove.REORDER NAVIGATION PANE BUTTONS
To change the buttons or the order of the button in the Navigation pane:
1.
Click the View tab, click Navigation Pane, and click Options. The Navigation Pane Options dialog box will appear.2.
Check the buttons you want on the Navigation pane.3.
Highlight a button, and click Move Up or Move Down to reorder the list. Click OK twice.MINIMIZE THE NAVIGATION PANE
If you need more room to display a folder and its contents, you can close the
Navigation pane.
•
Click the Minimize button at the top of the Navigation pane to reduce its size. Click it again (now the Expand button) to restore the Navigation pane to its regular size.–Or–
•
Click the View tab, click Navigation Pane, and click Minimize. To restore the Navigation pane, repeat the process, clicking Normal so that a check mark is in the check box.Customize the To-Do Bar
To customize the To-Do bar and determine what is displayed in it:
1.
Click the View tab, click To-Do Bar, and click Options. –Or–10
9
8
7
6
5
4
3
2
MINIMIZE THE TO-DO BAR
If you need additional room for the Reading pane, you can minimize the To-Do bar.
•
Click the Minimize button at the top left of the To-Do bar. Click it again (now the Expand button) to restore the To-Do bar to its regular size.–Or–
•
Click the View tab, click To-Do Bar, and click Minimized. To restore the Navigation pane, repeat the process, clicking Normal so that a check mark is in the check box.Use Outlook
Today
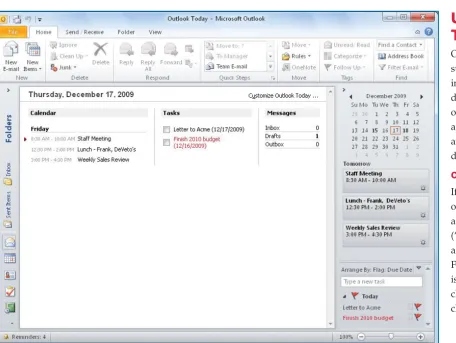
Outlook Today gives you a
summary of the information
in Outlook for the current
day. You can see a summary
of your messages, your
appointments and meetings,
and the tasks you are slated to
do, as shown in Figure 1-5.
OPEN OUTLOOK TODAY
If the Navigation pane is
open, click
Personal Folders
at the top of the Folders List
(“Personal Folders” might
also be called “Outlook Data
File”). If the Navigation pane
is not open, click the
View
tab,
click
Navigation Pane
, and
[image:26.713.43.499.170.512.2]click
Normal
.
2
3
4
5
6
7
8
9
2
3
4
5
6
7
8
9
2
3
4
5
6
7
8
9
CHANGE OUTLOOK TODAY
Click
Customize Outlook Today
in the
upper-right corner of the Outlook Today
folder. Customize Outlook Today will open,
as shown in Figure 1-6.
MAKE OUTLOOK TODAY YOUR DEFAULT PAGE
To display Outlook Today by default when
you open Outlook:
1.
In the Customize Outlook Today pane, opposite Startup, click When Starting, Go Directly To Outlook Today.2.
Click Save Changes.Personalize and
Customize Outlook
You can personalize Outlook, or make it
your own, by changing the settings Outlook
has for options such as the layout and
contents of the ribbon, the tools available
on the Quick Access toolbar, or your user
name and initials. You can customize Outlook by changing the general default
settings with regard to editing, proofing, display, and other options. Many
of these options are discussed in the other chapters. Here, we will look at
customizing the ribbon, the Quick Access toolbar, the display, and other options.
We’ll begin by looking at Office 2010’s new File view.
[image:27.713.88.475.62.393.2]10
9
8
7
6
5
4
3
2
Work with File View
Outlook 2010 shares with the other Office
2010 programs an improved way that you
can easily do many of the customization
tasks, as well as access tasks that affect a total
document, such as opening, closing, printing,
and saving from one screen, thus avoiding
the need to open several dialog boxes. This
all-encompassing view is called the File view
(also sometimes called the “Backstage view”)
since it handles many file-related tasks like
saving or opening a file, an example of which
is shown in Figure 1-7.
To display the File view:
1.
Open Outlook using one of the methods described in “Start Outlook” and “Exit Outlook” earlier in this chapter.2.
Click the File tab, and then click one of the areas of interest on the left of the window. For example, clicking Print provides a document preview and options for printing your work.3.
When finished, click the File tab again (or any other tab) to return to the Outlook window.Customize the Ribbon
2
3
4
5
6
7
8
9
2
3
4
5
6
7
8
9
2
3
4
5
6
7
8
9
You can remove groups from the
existing Main tabs, create new tabs
and groups, and populate your
new groups from a plethora of
available commands and tasks.
To customize the ribbon:
1.
Click the File tab, and in the left pane, click Options. In the Outlook Options dialog box, also in the left pane, click Customize Ribbon. –Or–Right-click any tool on the ribbon, and click Customize The Ribbon.
2.
In either case, click the ChooseCommands From drop-down arrow, and click All Commands. The Customize The Ribbon view, shown in Figure 1-8, displays the list of available commands, tasks, and tools on the left and a hierarchy of tabs and groups on the right.
REARRANGE TABS AND GROUPS
You can easily change the order
in which your tabs and groups
appear on the ribbon.
NOTE
10
9
8
7
6
5
4
3
2
1.
On the Customize The Ribbon view, click the Customize The Ribbon down arrow on the right, and select the type of tabs (Main or Tool) that contain the groups you want to work with.2.
To rearrange tabs, select the tab whose position on the ribbon you want to change, and click the Move Up andMove Down arrows on the right side of the tabs list to reposition the tab. (The topmost items in the list appear as the leftmost on the ribbon.)3.
To rearrange groups, click the plus sign next to the tab name to display its groups. Select the group to be moved, and then click the Move Up and Move Down arrows to the side of the tabs list to reposition the group.4.
When finished, click OK to close the Outlook Options dialog box.CREATE NEW TABS AND GROUPS
You can create new tabs and groups to collect your most often used tools.
To add a new tab from within the Outlook Options dialog box, Customize
Ribbon option:
1.
Click New Tab at the bottom of the tabs list. A new custom tab and group is added to the list.2.
Select the new tab, and move it where you want it (click the up and down arrows on the right as described in the previous section “Rearrange Tabs and Groups”).3.
Rename the new tab and new group by selecting the item and clicking Rename at the bottom of the tabs list.–Or–
Right-click the tab or group, and click Rename.
4.
In either case, type a new name, and click OK.To add a new group:
1.
Select the tab where you want to add a new group, and then click New Group at the bottom of the tabs list. The list of all groups in that tab appears with a new custom group at its bottom.2.
Rename and rearrange the group within the tab as previously described (with Rename Group, you can also select an icon to represent the group).3.
When finished, click OK to close the Outlook Options dialog box.TIP
2
3
4
5
6
7
8
9
2
3
4
5
6
7
8
9
2
3
4
5
6
7
8
9
ADD OR REMOVE COMMANDS AND TOOLS
Once you have the tabs and groups created, named, and organized, you can add
the tools you want to your custom groups. You can’t add tools to an existing group.
1.
On the Customize The Ribbon view, click the Choose Commands From down arrow. You will see a menu of categories of commands and tabs, such as Commands Not In The Ribbon or Tool Tabs. Choose a category of commands or tabs, or choose All Commandsto see the full list. Select (highlight the tool by clicking it) the first tool you want to add to a custom group.2.
In the tabs list on the right, select the custom group to which you want to add the tool.3.
Click Add between the lists of commands and tabs. The command or tool is added under your group.4.
Repeat steps 1 through 3 to populate your groups with all the tools you want.5.
If you make a mistake, remove a tool from a custom group by selecting the tool and clicking Remove.6.
Use the Move Up and Move Down arrows to the right of the tabs list to organize the added tools within your groups, and click OK when finished.Customize the Quick Access Toolbar
The Quick Access toolbar can become a “best friend” if you modify it so that it
fits your personal way of working.
ADD TO THE QUICK ACCESS TOOLBAR
The Quick Access toolbar should contain the commands you most commonly
use. The default tools are Send/Receive and Undo. You can add commands to it
if you want.
1.
Click the down arrow to the right of the Quick Access toolbar, and select one of the commands on the drop-down menu to add it to the toolbar.–Or–
Click the Quick Access toolbar down arrow, and click More Commands to view a more expansive list of Outlook tools.
–Or–
Click the File tab, click Options, and click Quick Access Toolbar.
TIP
You can create a file that captures your customizations to the ribbon and the Quick Access toolbar so that you can use them on other computers running Outlook 2010. In the Outlook Options dialog box, click either Customize Ribbon or Quick Access Toolbar, click Import/Export
in either view, and then click Export All Customizations. To use a previously created customization file, click
10
9
8
7
6
5
4
3
2
In either of the last two cases, the Outlook Options dialog box appears with the Quick Access toolbar customization options, as displayed in Figure 1-9.
2.
Open the Choose Commands From drop-down list, and select the source of the commands you want from the available options.3.
In the leftmost list box, find and click the command you want to add to the toolbar, and then click Add to move its name to the list box on the right. Repeat this for all the commands you want in the toolbar.4.
Click OK when you are finished.Figure 1-9: You can customize the Quick Access toolbar by adding to and removing from it commands for easy and quick access.
Select tools from tabs and lists
Available tools in a selected list
Add and remove tools
Change a tool’s position on the toolbar
Save or apply a customization file Change where the
toolbar appears
NOTE
You can add a command to the Quick Access toolbar from the ribbon by right-clicking the button and choosing
2
3
4
5
6
7
8
9
2
3
4
5
6
7
8
9
2
3
4
5
6
7
8
9
MOVE THE QUICK ACCESS TOOLBAR
You can display the Quick Access toolbar at its default position (above the
ribbon) or directly below the ribbon using one of the following methods:
•
Right-click a tool on the Quick Access toolbar or on the ribbon, and click Show Quick Access Toolbar Below The Ribbon (once located below the ribbon, you can move it above the ribbon in the same manner).–Or–
•
Right-click a tool in the Quick Access toolbar, and click CustomizeQuick Access Toolbar to open the Customize The Ribbon pane. Click the Show Quick Access Toolbar Below The Ribbon check box in the lower-left area, and click
OK (to return the toolbar above the ribbon, open the pane and clear the check box).
REARRANGE TOOLS ON THE QUICK ACCESS TOOLBAR
You can change the order in which tools appear on the Quick Access toolbar.
1.
In the Customize The Quick Access Toolbar pane, select from the list on the right the tool whose position you want to change.2.
Click the Move Up or Move Down arrows to the right of the list to move the tool. Moving the tool up moves it to the left in the on-screen toolbar; moving it down the list moves it to the right in the on-screen toolbar.3.
Click OK when finished.Get Help
Microsoft provides substantial assistance to Outlook users. Outlook tailors
much of the assistance offered, depending on whether you are working online
or offline. If you are offline, you will get quick but more limited help. If you are
or can be online, it will be slower but more comprehensive.
Obtain Help
You can obtain help in Outlook using one of the following techniques.
DISPLAY OUTLOOK HELP
10
9
8
7
6
5
4
3
2
contact information, and late-breaking news on Outlook. To display the Outlook
Help window:
•
Click the Microsoft Office Outlook Help icon on the tab bar. –Or–•
PressF1.Either of these commands will open the Help window shown in Figure 1-10.
You can also click
File
and click
Help
for a different Help window (see “Access
Other Help Options” below). There, if you click
Microsoft Office Help
, you
will see the window shown in Figure 1-10.
ASK A QUESTION
You can quickly ask a question about Outlook using the Outlook Help window.
1.
Type your question in the text box at the top of the Help window.2.
PressENTER or click Search. The Outlook Help dialog box will appear, as you can see in Figure 1-11. Click one of the search results, and Microsoft Office Outlook Help will open and display the requested information.ACCESS OTHER HELP OPTIONS
Click the
File
tab, and click
Help
. The Support window will open, as you can
see in Figure 1-12, with these options:
•
Microsoft Office Help, is the same as clicking the Help icon, described previously.•
Getting Started connects to the Microsoft Web site and provides information onwhat’s new in Outlook 2010, along with tips on the basics of Outlook.
•
Contact Us connects to the Microsoft Web site and provides suggestions on how you can contact solution centers and computer manufacturers.•
Options opens Outlook Options discussed in several places in this chapter.•
Check For Updates allows you to check for and download updates for MicrosoftWindows and Outlook, as described in “Update Outlook” at the end of this chapter.
Find a Message
No matter how many messages your e-mail folders contain, Outlook can help
you find a specific one. You can perform instant searches for large files, related
Figure 1-11:From the Outlook Help dialog box, you can2
3
4
5
6
7
8
9
2
3
4
5
6
7
8
9
2
3
4
5
6
7
8
9
messages, or messages from a particular sender. You can further qualify the
search by having Outlook search only certain folders, or by specifying content
for which you’re searching.
PERFORM INSTANT SEARCHES
10
9
8
7
6
5
4
3
2
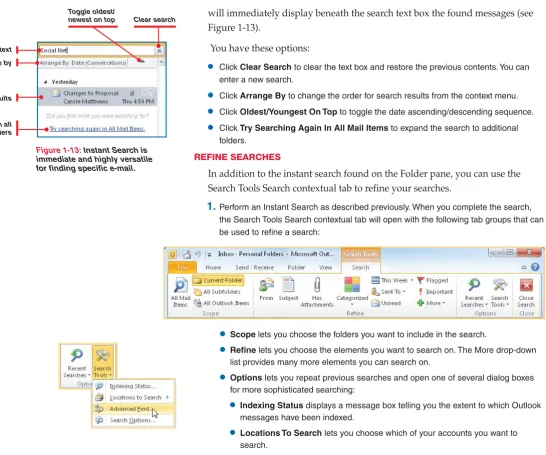
will immediately display beneath the search text box the found messages (see
Figure 1-13).
You have these options:
•
Click Clear Search to clear the text box and restore the previous contents. You can enter a new search.•
Click Arrange By to change the order for search results from the context menu.•
Click Oldest/Youngest On Top to toggle the date ascending/descending sequence.•
Click Try Searching Again In All Mail Items to expand the search to additionalfolders.
REFINE SEARCHES
In addition to the instant search found on the Folder pane, you can use the
Search Tools Search contextual tab to refine your searches.
1.
Perform an Instant Search as described previously. When you complete the search, the Search Tools Search contextual tab will open with the following tab groups that can be used to refine a search:•
Scope lets you choose the folders you want to include in the search.•
Refine lets you choose the elements you want to search on. The More drop-down list provides many more elements you can search on.•
Options lets you repeat previous searches and open one of several dialog boxes for more sophisticated searching:•
Indexing Status displays a message box telling you the extent to which Outlook messages have been indexed.•
Locations To Search lets you choose which of your accounts you want to search.Figure 1-13:Instant Search is immediate and highly versatile for finding specific e-mail.
Clear search Toggle oldest/
newest on top
Search all Outlook folders
[image:36.713.77.624.55.510.2]