Moulds, Methods and Materials
Cindy N.V. Hill
This paper has been written as a part of the final year
requirennents for the degree of BACHELOR OF ARTS (VISUAL), GLASS WORKSHOP, CANBERRA INSTITUTE OF THE ARTS.
" To take sand and ashes and, by submitting them to the
TABLE OF CONTENTS
INTRODUCTION 1 A BRIEF HISTORY OF PATE DEVERRE 2
GLASSES 3 Glass recipe: Canberra School of Art 4
Perrler bottle glass 5 Bottle glass A: composition of analysis 1 5
Bullseye glass 6 Lennox Crystal 6 BULLSEYE GLASS BASIC FIRING SCHEDULE 7
BASIC LENNOX CRYSTAL FIRING SCHEDULE 9 PROCESS DESCRIPTION OF LOST WAX CASTING AND PATE DE VERRE 1 0
MAKING A MOULD FROM START TO FINISH 1 1 Plaster (technical) 1 1 Model 1 1 2
Methods 12 Turning on the lathe 1 5
Shaping the plaster 1 6 Finishing the model 1 6
PIECE MOULDS 17 One piece mould 1 7
Two piece mould 1 8 Making a wax 'blank' 2 0
Cleaning a wax 'blank' 21 REFRACTORY MOULD FOR CASTING 2 2
REFRACTORY MOULD FOR PATE DEVERRE 2 3 MATERIALS 2 4 LOST WAX METHOD 2 5 CRUSHING GRADING AND WASHING GLASS 2 6 APPUCATION OF PATE DEVERRE 2 7 Firing In the kiln 2 9 Removing the mould 2 9 Cleaning and polishing 3 0
HEALTH AND SAFETY 3 1
GLOSSARY 32 BIBUOGRAPHY 3 4
INTRODUCTION
This thesis provides a comprehensive guide to the mould mailing processes and l<iln-formlng techniques I have employed whilst studying in the Glass Workshop of the Canberra Institute of the Arts. Information relevant to students who wish to explore some of these 'p&te de verre' methods, and the process employed in finishing these moulded glass pieces Is also included.
There are many who refer to the solid caste glass pieces, made by a process similar to that of lost wax casting in bronze, as 'pSte de verre' - even though there is no paste of glass at any stage of the manufacture, during or after the process is complete. I prefer to use the term 'cast', for glass moulded in this way.
My research however, has also involved the literal process of pSte de verre. A paste of crushed glass powder and particles, mixed with an adhesive binder, applied to a mould and fired to a temperature which sinters the glass.
A BRIEF HISTORY OF PATE DE VERRE
P&te de verre (glass paste) is a French term applied to this process since the 1800's. However, the term has had and often still has a much broader interpretation which has lead to some confusion. For example, in the late nineteenth Emille Galle referred to his blown glass as pSte de verre, embracing anything made of coloured glass under this one ambiguous term. In contrast artists such as Jena Sala, during the same period used the more literal translation and there are many artists today who worl< literally with glass-paste, as I do.
Unfortunately there is still confusion wrought by the term and the type of glass it is applied to. The account of the technique encompasses such a wide scope in glass history, that it is impossible to answer the fundamental question of its origin. It is known to have been practised at around 2000 BC in ancient Egypt, where crushed glasses of different colours were fused together in layers and formed around iron wire as a means of making beads, amulets, inlays and other items. There is also evidence of these p&te de verre processes being used in Ancient Greece and Rome.
GLASSES
Although glass has been used for thousands of years, we have made small use of it in terms of all possibilities. There are thousands of glasses, organic and inorganic. For example; Barley Sugar and obsidian are basic organic glass like structures although not glass as we perceive it. As we approach the 21 st Century the world has seen many changes in the development from these naturally occurring glasses, to those we know, and accept that are man made. For example, bottle glasses are basically very simple soda-lime glasss, to which lead is added to modify the structure of the glass. The studio glass movement (as it is known) concentrates on using primarily soda-lime glasses and secondarily lead crystal glasses. Although lead crystal is a glass with more clarity and a lesser tendency to de-vitrify than soda glasses, it Is also heavier and more expensive than most other readily available glasses. Some methods of producing lead glass are more toxic than that of soda lime glasses, which have relatively few hazardous components.
Glass recipe: Canberra School of Art 1991
INGREDIENTS (%) USE S O F C E 72.12% Silica (SiOz)
13.48% Soda (NaaO) 4.24% Potash (K2O) 4.22% Lime (CaO)
Flux Flux Modifier
(affects annealing point)
Quartz sand Natron Kali
limestone
*3.5% Lead bisilicate (PbO.SiOa) Prolongs workability (65% Lead, 32% Silica. 2% Alumina)
1.05% Borax (B2O3) 1.01% Alumina (AI2O3)
Accelerates melting process durability
0.36% Antimony trioxide (SbaOs) fining (Alternative to arsenic)
Positive Aspects;
It is possible to cast using only lead bisilicate. However, it produces a yellow coloured glass, a result of the lead oxide, and is expensive.
Negative Aspects:
Perrier bottle g l a s s
Recipe not available.
Positive Aspects;
Compatibility with itself is ensured due to all glass being produced in a seven year furnace of one batch. Cost free.
Negative Aspects:
Devitrlfies readily, difficult to find in large supply. Is bright green in colour.
This glass was also unsuitable for casting as it appeared to devitrify more each time the l<iln is opened to reload the crucible (terra-cotta pot). Will work well for open/pre-packed moulds and pSte de verre, if green, is a suitable colour. It may be possible to recolour the glass with oxides, such as cobalt, that would also soften the glass.
Although the Perrier recipe is not available, the following recipe Is for a typical green bottle glass, and as such would have a similar composition.
Bottle G l a s s A : Composition of Analysis i .
JNGBEDIENTS <%)
62.5 % Silica (SiOz)
8.3 % Soda (NajO)
0.4 % . Potash (KzO)
5.1 % Magnesium Oxide (f^gO)
18.2 % Lime (CaO)
2.7 % Alumina (AI2O3)
2.3 % Iron (FezOj)
Bullseye Glass
A Soda lime glass produced in the U.S.A, with suppliers in Australia. Recipe not available.
Positive Aspects:
Large range of colours. Offcuts of larger sheets can be used for casting or pSte da verre at a cost of approximately $4 per kg.
Negative Aspects:
Must be obtained from U.S.A. Has a high content of iron which tints the clear glass blue-green. It is also difficult to obtain several sheets of exactly the same tint or clarity, when working on larger pieces where more glass is required. Tends to devitrify around casting temperature. Expensive when bought in sheet form (approximately $7 per kg).
Compatibility and availability make this glass suitable for casting and pSte de verre. The density and the various range of colours available in Bullseye, are significant assets in casting glass of various thickness.
Lennox crystal
Produced in the U.S.A with suppliers in Australia. Recipe not available.
Positive Aspects:
Low melting point. Readily available. Compatible with imported Zimmerman colour. Very cheap (approximately $3 per kg).
Negative aspects:
None-so-far.
This glass contains 24% PbO. Therefore, it is less likely to devitrify and is most suitable for pSte de verre as I have practiced the process.
using an E.M.C* controller from New Zealand. All cycles depend on the scale of the work and Its thickness, colouring agents etc.
* Electrical Measurement Controller . A 3 stage/ 9 step Kiln controller with automatic lime clock functions which is incredibly versatile and reliable.
BULLSEYE GLASS BASIC FIRING SCHEDULE
FUSING FIRING SCHEDULE
RAt^P: (Top speed kiln will climb to temperature) TEMPERATURE: 860° C
HOLD: 30 minutes
Crack kiln open until 600° C Close Kiln
RAMP: Off
TEMPERATURE: 480° C anneal by holding HOLD: 30 minutes
Switch off kiln
PATE DE VERRE FIRING SCHEDULE
RAMP: 100° C TEMPERATURE: 600° C RAMP: Hold 4 hours RAMP: Off
RAMP: Off
TEMPERATURE: 480° C anneal
HOLD: 45 minutes
Off
FRITTING GLASS FIRING SCHEDULE
RAMP: Off
TEMPERATURE: 850° C+
Off
When kiln reaches top temperature remove glass and immerse it in cold water. Sudden stress and thermal shock shatter the glass into small pieces.
Casting
RAMP: 50° C
TEMPERATURE: 200° C
HOLD: 2 hours until physical moisture is removed from mould RAMP: 100° C
TEMPERATURE: 600° C HOLD: 1 hour
RAMP: off
TEMPERATURE: 850° C Top temperature
HOLD: 6 hours approximately- soak, load, soak, then crack to 600° C Cand close the kiln
RAMP: off
TEMPERATURE: 480° C anneal HOLD: 5 hours
RAMP: 10° C
TEMPERATURE: 300° C HOLD: 2 hours RAMP: 20° C
TEMPERATURE: 200° C HOLD: 1 hour
OFF.
BASIC LENOX CRYSTAL FIRING SCHEDULE
Pate de verre
RAMP: 100° C TEMPERATURE: 200° C
HOLD: 2 hours to allow physical moisture to escape from mould RAMP: 100° C
TEMPERATURE: 600° C HOLD: 1 hour
RAMP: off
TEMPERATURE: 750° 0 HOLD: 1 minute
RAMP: Off, crack the kiln open and cool to 600° C Close kiln
TEMPERATURE: 430° C HOLD: 1 hour, anneal. OFF.
Casting
RAMP: 50° C
TEMPERATURE: 200° C
HOLD: 2 hours to allow physical moisture to evaporate RAMP: 100° C
TEMPERATURE: 600° C HOLD: 1 hour
RAMP: off
TEMPERATURE: 830° C HOLD: 6 hours, soak, load, soak RAMP: off-crack to 600° C TEMPERATURE: 430° C HOLD: 4 hours RAMP: 10° C
TEMPERATURE: 300° C HOLD: 2 hours RAMP: 20° C
TEMPERATURE: 200° C HOLD: 1 hour
1 0
PROCESS DESCRIPTION OF LOST WAX CASTING AND PATE DE VERRE
Step 1: Design.
Step 2: Make a model from plaster, clay or other suitable material. Step 3: Make a negative mould in straight plaster.
Step 4: Make a positive wax blank/ model. Step 5: Invest in refractory mould material. Step 6: Steam out wax.
Step 7: Remove excess water from refractory mould by drying in a warm, dry place ie. a drying cabinet.
Step 8: Pack mould with prepared glass if using pSte de verre process or a pre-packed open mould cast, and then heat mould and glass simultaneously.
Step 8: (Alternative) Heat mould in kiln and load glass through crucible. Follow set firing programme as outlined on pages 6 and 7.
MAKING A MOULD: FROM START TO FINISH Plaster ( t e c h n i c a l )
The ratio of water to plaster affects the setting time, strength and absorbency of set
plaster after it has dried. A ratio of 1 part water to 2 parts plaster powder gives a
strong plaster with about 35% absorbency and a setting time of approximately 5
minutes.
A fresh plaster should give 3-6 minutes pouring time. Stale plaster (plaster which
has absorbed water from the atmosphere) may only allow one minute from sitting to
setting. This time allowance may also be retarded or accelerated by other factors (See
Table below).
borax crystalline salts (e.g. potassium sulphate, chloride n i t r a t e ) .
gelatine Hot water (40+° C)
alum Pre-set plaster (1% will reduce pouring time
sulphuric acid from 5 minutes to 30 seconds)
luke warm water (20-30° C)
As plaster sets, crystals form and interlock. Expansion occurs for a period of 24
hours. Heat is generated as the crystals form and reaches a maximum temperature of
35° C within 30 minutes after mixing. At maximum temperature the plaster should
1 2
Model 1
When making a model for pate de verre, it is easier if it is wider at the top edge than the base. This provides easy access when layering or packing the glass into the final mould. It is also advisable to leave extra height on the model, thus protecting the rim of the pate de verre when it is in the final mould.
[image:15.404.7.394.15.530.2]For this form my initial model was made of plaster and turned on the lathe to the required form. (Fig. 1).
Figure 1. Plaster model.
Methods
1 3
f>Mic. hutktf
f>enret:/ plaskr
det^ seal
IKM sows
[image:16.404.7.397.23.438.2]wooden hitx. glisc
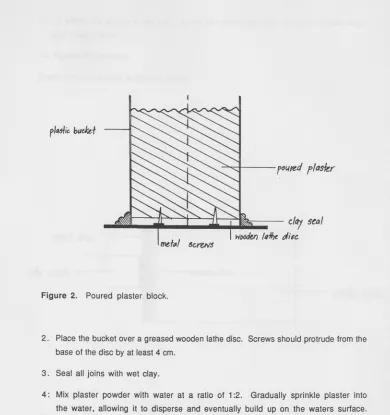
Figure 2. Poured plaster block.
2. Place the bucket over a greased wooden lathe disc. Screws should protrude from the
base of the disc by at least 4 cm.
3. Seal all joins with wet clay.
4 : Mix plaster powder with water at a ratio of 1:2. Gradually sprinkle plaster into
the water, allowing it to disperse and eventually build up on the waters surface.
The build up indicates that the water content has 'filled' and no more plaster powder
is needed.
5 : Mix plaster to a smooth consistency (takes approximately 3-6 minutes).
6 : Tap the sides of the mixing bucket to release trapped air bubbles.
7 : Gently pour plaster mix onto greased wooden disc.
8 : Although plaster sets in approximately 5 minutes, leave the plaster block to cure
1 4
9: To attach the plaster to the lathe, screw the metal lathe disc onto the wooden disc
and plaster block.
10: Tighten ALL screws.
Steps 1-10 are shown in figure 3 below.
[image:17.404.7.397.8.595.2]f>laskr yiook
1 5
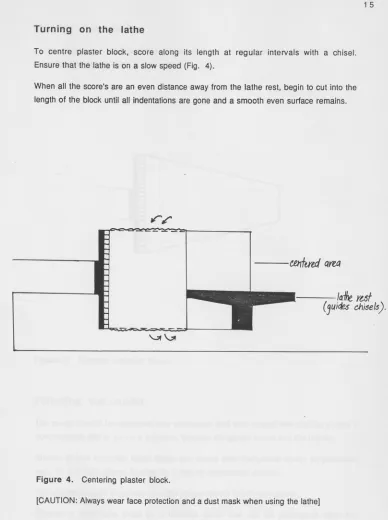
Turning on the lathe
To centre plaster block, score along its length at regular intervals with a chisel.
Ensure that the lathe is on a slow speed (Fig. 4).
When all the score's are an even distance away from the lathe rest, begin to cut into the
length of the block until all indentations are gone and a smooth even surface remains.
emkrecl mA
[image:18.404.10.398.12.532.2]. Idemf^^ chisels)
Figure 4. Centering plaster block.
1 6
Shaping the plaster
Carve off excess plaster from block using a chisel. Use callipers, a ruler and template as measuring tools (Fig
[image:19.404.7.396.13.453.2]5.)-1
Figure 5. Shaping a plaster block.
Finishing the model
The model should be smoothed with sandpaper, and then coated with shellac to seal it from moisture and to act as a separator between the plaster model and the mould. Shellac (insect secreted resin) flakes are mixed with methylated spirits (approximate ratio of 500-700 grams Shellac to 1 litre of methylated spirits).
The shellac lacquer is painted onto the plaster model in 2-3 even coats.
PIECE MOULDS
A piece mould is sometimes made so that waxes of the model can be reproduced. Due to the shape of my models, and their absence of undercuts, only a one piece mould was needed. In most cases, it is necessary to make a mould with numerous sections or 'pieces'. In this Instance a hand built mould instead of poured was preferred.
One piece mould
1. Secure and seal model to a sheet of glass or perspex using clay.
2. Grease the model with a releasing agent such as Vaseline or castor oil. Avoid using vegetable oil as It tends to be too thin.
3. Make a thin plaster mix as a first layer. Flick the plaster onto the model. This method of applying a thin first layer ensures that air bubbles are not trapped between the model and the mould.
4. Mix a thicker plaster, apply it to the model, spiralling from the base to the top. This also pushes the air bubbles up and out of the plaster-mould mix.
1 8
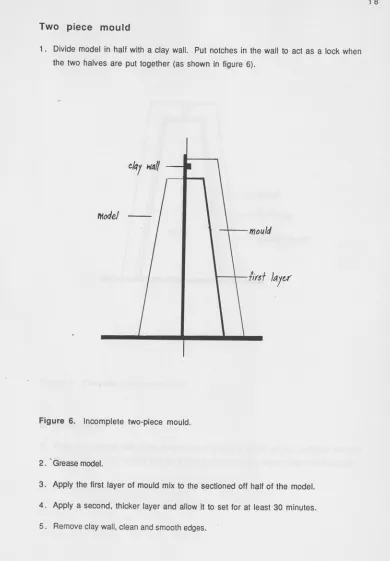
Two piece mould
1. Divide model in half with a clay wall. Put notches in the wall to act as a lock when
the two halves are put together (as shown in figure 6).
modeJ
mould
[image:21.404.6.396.14.575.2]^irsf kji 'cr
Figure 6. Incomplete two-piece mould.
2. ~ Grease model.
3. Apply the first layer of mould mix to the sectioned off half of the model.
4. Apply a second, thicker layer and allow it to set for at least 30 minutes.
1 9
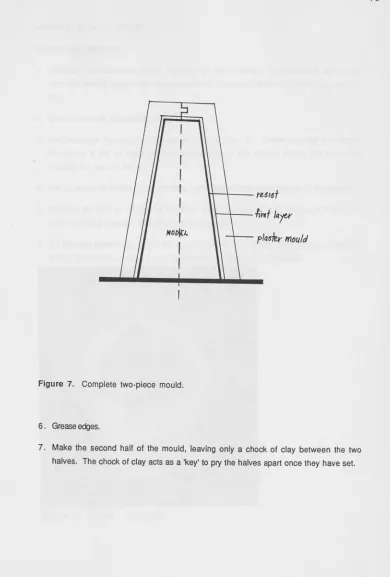
Figure 7. Complete two-piece mouid.
6. Grease edges.
Making a wax 'blank'
Intermediate positivR
1. Pre-soak the two-piece mould in water for 30 minutes. This releases all the air from the mould, stops wax from sticking to the mould and aids in cooling the hot wax.
2. Seal all joins in the mould with clay.
3. Melt and pour the wax into the soaked mould (Fig. 8). (Make sure the wax is not too hot or it will be absorbed into the surface of the mould, ruining the mould by causing the wax to stick).
4. Let the wax cool in the mould, forming a skin around the edge and lop of the mould. 5. Remove the skin on the top of the wax. Pour out excess wax, leaving a 1 cm thick
skin within the mould. This skin is the wax blank.
[image:23.404.7.394.14.581.2]6. As the wax blank cools inside the mould it will shrink slightly and release. Once the wax is completely cooled it can be removed without risk of distortion.
Cleaning a wax 'blank'
A clean wax blank is an Important aspect of making a mould. Any marks or clay residue remaining on the wax when it is embedded within a refractory mould will affect the final glass surface.
1. Wash the wax.
2. Carve back excess wax with a razor blade.
3. Smooth off the bumps using a kidney shaped ceramics tool or a similar implement. Final methods for finishing a wax include;
1. Rub the wax with wet and dry sandpaper dipped in mineral turpentine.
2. Linlsh the surface using an old linisher belt. Build up of wax can be removed by washing the belt in hot water.
3. Glaze or smooth the surface of the wax model by gently heating it with a hand held gas torch.
REFRACTORY MOULD FOR CASTING ^^
1. Secure a clean wax blank to a glass or perspex sheet using a clay block. In this
process, the space left by the clay block once it is removed becomes the reservoir
for glass during firing.
2. Spray the wax blank with a releasing agent (e.g. WD-40) to prevent air bubbles
being trapped between the surface of the mould and the blank.
3 . Prepare a small amount of mould mixture for the inner mould.
Mould mixture 1
2 parts plaster
1 part silica flour
1 part Alumina hydrate
1 part luto (finely crushed)
Sprinkle the dry mould material mixture into warm water at a ratio of 1 part water to
2 parts mould material and mix well.
Apply this mould mixture as a first layer, flicking it on with your fingers while it is
still runny. Ensure the mixture penetrates all surfaces.
4. Prepare a second mixture for the next layer.
Mould mixturR 2
3 kg Plaster
3 kg Silica flour
300 g Vermiculite (5% dry weight of all other materials)
4 handfuls of brick dust to add strength
Pat this mixture on, over the first layer. This second mixture is a stronger
composition than the first and is effective In reinforcing the mould. This extra
strengthening is required when there is considerable pressure on the mould from the
weight of the glass being used to make the caste. Caste glass is generally heavier,
thicker and more solid In appearance than paste glass (Pate de verre)
5 . To further secure the mould bind it with nicrome wire and a final layer of the
second mould mixture applied to complete the refactory mould.
Note: Plaster based refractory mould recipes modified to withstand higher
temperatures and contain the glass, behave differently, and set faster than straight
REFRACTORY MOULD FOR PATE DE VERRE
1. Secure a clean wax blank to a sheet of glass or perspex and seal the join with clay.
2. Spray the wax with a releasing agent to prevent air bubbles being trapped between the surface of the mould and the blank.
3. Mix a small amount of mould mixture 1 (see page 20, casting process). Apply this mould mixture as a first layer, flicking It on while it Is still runny. Ensure the mixture penetrates all surfaces (a hard bristle brush may help).
4. Apply a thicker layer, patting it on over the first layer until it is at least 3 cm thick all over.
5. Leave to set firmly.
6. Remove wax from mould using the steaming method for Lost Wax (see page 25,figure 10).
mx klank
claj SMI
fersi>t)( sheit
MATERIALS
Gypsum plaster (No1 Pottery Plaster/flour mesh 200)
Chemical component: semi-h^draXed calcium sulphate (2CaS04.H20).
Funcf/on; binder/low duty refractory.
Positive aspects: Hydraulic lx)nd.
Negative aspects: Adds stress to the mould due to particle shrinkage. Decomposes at approximately 700° C.
Silica (flour mesh 200)
Chemical component: Silica dioxide/SiOa.
Function: refractory.
Positive aspects: Withstands high temperatures without altering chemically. Resists sticking to hot glass.
Negative aspects: Tends to stick to hot glass slightly more than Alumina.
Alumina hydrate (325-350 mesh)
Chemical component: AI2O3
Function: refractory.
Positive aspects: Alumina's larger mesh size combined with the small (flour) particles of Silica and Plaster aids bonding and thus resists thermal shock and
expansion. Excellent surface reproduction. Withstands high temperatures.
Luto/ludo (recycled refractory mould material)
Function: modifier
Positive aspects: Aids drying and is an inert filler.
Vermiculite (clay mineral)
Function: modifier.
LOST WAX METHOD
Steaming Method
[image:28.404.11.400.13.559.2]Boil water in a pressure cool<er with a length of hose running from the cooker to the reservoir in the mould. As the steam enters the mould it melts the wax. The wax then runs out of the mould (fig. 10).
Figure 10. Steaming wax from mould.
This method is used in preference to the more common approach of burning or melting out the wax, because of:
1. hazardous fumes released from the wax as it melts 2. waste of materials in the melting process 3. the effect onthe kiln
4. the effect on the mould by this vitual pre-firing
CRUSHING, GRADING AND WASHING GLASS
The simplest method to crush glass into the appropriate size particles for pSte de verre, is to first frit the glass (see page 6 ). Remaining larger particles may then be crushed to 40, 60 or 80 mesh, by wrapping them In newspaper and hitting them repeatedly with a hammer.
The glasss is then graded by sieving it through various mesh sizes of sieves and •^onarated (fiaure 11).
Figure 11: Grading glass.
Washing the glass by placing it In a large bowl, water is then added and agitated. The dust and dirt contained in the glass rises to the surface and can be poured off. This action must be repeated several times until the water in the bowl is crystal clear. (Figure 12).
[CAUTION: Wear a dust mask and eye protection at all times.]
hc^l
ckan ^kss
[image:29.404.14.396.34.590.2]APPLICATION OF PATE DE VERRE
The introduction of glass paste to a refractory mould is the most time consuming area
of the pate de verre process. When using colour it is at this stage that it is introduced
to the glass. Some of the common colouring agents include oxides, coloured glass
powders, ceramic, glass, metal enamels.
The colouring agents may be applied in various ways, either combined with the glass
paste or mixed with a binder and adhered to the refractory mould surface as a paint.
Step 1: Soak the refractory mould in water, for at least 20 minutes. This releases all
air trapped within the mould and makes it easier to apply the glass paste. This also
allows a longer working time as all the liquid from the glass paste will not be
immediately absorbed into the mould.
Step 2: Let any excess water drain from the mould by sitting it on a dry cloth. Any
water that collects in the base of the mould will be absorbed.
Step 3: Wrap the mould in a damp cloth to prevent it from drying out.
Step 4: Before applying the glass paste, ensure that the glass has been crushed,
washed and sieved thoroughly (see page 27).
[CAUTION: If the glass has not been washed to remove the finest dust size particles
(those passing through 100 mesh sieve), this can lead to devitrification which can
result in an opaque rather than a translucent glass quality. This is the result of a
molecular structure of the small particles and air, which create a more conducive
environment for crystallisation to occur.
Step 5: Add a small amount of binder (Polycell Wallpaper Paste is used because it is
readily available, cheap.easy to use and does not leave any residue on the glass after
firing). To prepare the paste, add 1 teaspoon of the powder to 500 ml of water and stir
vigorously and leave for at least 2 hours to thicken and dissolve before use.
Step 6: Add the required colouring agents to the glass. Agitate so that the smaller
particles float to the surface and drain of excess liquid (fig. 13).
Step 7: Apply a very fine layer of the glass paste to the mould surface, beginning at
the base of the mould and spiralling upward to the rim.
Step 8: Press the glass particles firmly into the surface of the mould using an
appropriate tool (e.g. a small spoon).
Step 9: Apply a second layer of glass paste.
Step 10: Repeat step's 7 and 8 until the paste is securely in place and of a consistent
thickness. Approximately 4 mm for my pieces.
Step 11: Before firing remove the damp cloth and leave the 'packed' mould to dry (figure 14), in a drying cabinet or kiln (at 100° C) until the paste is hard. This is the beginning of the removal of all moisture from the mould and glass.
koHl
—txixss lmidlaif\d
&ohun/]j 'MCrtT.
[image:31.404.7.392.53.600.2]•ihssand
cehuyina
Figure 13. Clouring glass.
Firing the kiln
The refractory mould and the glass are fired simultaneously. To avoid a fire polish on the inner surface ( the surface not in contact with the mould) and to provide extra support, the mould is packed with talc. This will produce a more uniform, with Inner and outer surfaces almost the same.
A kiln shelf is then set up in the kiln, on 3 props placed in a triangular formation. The mould is then positioned in the kiln as required. All vents and elements are checked and the kiln computer programmer is programmed as described In the firing schedules on pages 6 and 7 (Fig. 15).
[image:32.404.8.395.15.502.2]J1
Figure 15. Firing in the kiln. Removing the mould
Cleaning and polishing
Once dry, the pieces may have a whitish coat. The coat may be removed using acid/etching cream, wet and dry sandpaper or the linisher. These methods may also be used to smooth or polish the surface.
HEALTH AND SAFETY
The most Hazardous materials used in casting and pSte de verre, are the refractory dusts and colouring agents. The most essential protection , Includes a dust mask and gloves when in contact with any of the hazardous materials. Protective clothing, such as overalls, are also recommended. Any protective clothing worn in contact with hazardous materials should not be worn out of that environment and should be washed regularly.
Eye protection is necessary when working with polishing equipment, hot wax and Irritant dusts. When looking into a hot kiln, didymium glasses are needed to cut out infra red light rays. These glasses protect the lens of the eye and guard against cataracts. Didymium glasses did not reduce ultra violet rays optometric testing.
Hazardous chemicals contained in many of the colouring agents and mould materials can be absorbed in a variety of ways, such as, through the skin, ingested or Inhaled. Although small doses of these chemicals may not be harmful immediately, prolonged contact can reach toxic levels as most are cumulative.
The following information provides insight into a few of the hazardous chemicals, the ways they are introduced to the body and their effects on health and well-being. Lead compounds: cumulative poison; Small doses by ingestion, inhalation and absorption through skin, may cause death or permanent injury.
Cadmium compounds: cumulative poison; Ingestion and inhalation may cause irritation, damage to the liver, kidneys and bone marrow. Massive doses are fatal. Cobalt: Ingestion, inhalation and absorption through skin can cause irritation and allergies.
M a n g a n e s e : Ingestion and inhalation can cause symptoms similar to Parkinsons disease.
Silica: Inhalation of silica dust causes the pulmonary disease, silicosis. T a l c : Inhalation causes a form of pulmonary fibrosis.
Glass dust and alumina: Inhalation causes irritation to the upper respiratory tract.
GLOSSARY
ALUMINA: occurs naturally as the mineral Corundum. In hydrated form, Alumina occurs as bauxite, gibbsite and diaspora. These are crushed to produce a white powder, which acts as a refractory opener and hinders the loosening of silica molecular chains. ANNEALING: controlled, gradual cooling of hot glass to remove internal stress. APPLIED DECORATION: relief ornamentation, colour in or on the surface or substance. BINDER: cementing substance, fulany adhesives are suitable as a binding agent in pSte de verre, such as gum arable, gum tragocanth, P.V.A. glues etc. Much more research has been done on suitable binders and wall-paper paste (which consists mainly of carboxy methyl cellulose) and has proved one of the most successful.
BLANK: plain surfaced object, before adornment. CALCINED: to purify using heat - water driven off. CANE: glass rods of various thickness.
CASTING: glass kiln-forming technique, involving the introduction of glass to a mould to produce a specific form..
'CRACK' THE KILN: to leave kiln door ajar during firing and allow heat or moisture to escape.
CRYSTAL: fine quality clear glass: contains a minimum amount of lead oxide by legal regulation.
DEVITRIFICATION: To deprive of vitreous quality. If glass cools too quickly or too slowly it may become finely crystalline, which accompanies loss of transparency, becomes milky in appearance and the glass is no longer workable.
ENAMELS: finely powdered glass or metal oxides, (high in lead or other fluxes) with a very low melting point.
FIBRE FRAX: synthetic mineral fibre used as an insulator in kilns, furnaces and mould making.
FRIT: small glass particles.
HYDRATED: contains chemically combined water.
MESH: holes per square inch or centimetre,(e.g. 200 mesh sieve) in this case inches. NICROME WIRE: Is a heat resistant wire, able to withstand prolonged high temperature firings. This term has also been applied to other processes, as mentioned In the Introduction to this paper on page 1.
OXIDES: A chemical combination of oxygen and another element. There are metal oxides and non-metal oxides. Metal oxides are great In number and are used as colours and fluxes (e.g. manganese and cobalt). Non-metal oxides are less in number and are used as glassformers.
PATE DE CRYSTAL: powdered glass of finer quality translucency than pSte de verre. PATE DE VERRE: Literal translation 'glass paste'. Crushed glass of sugar sized particles. Objects made in pSte de verre,are produced by layering glass paste within a mould to be fused or sintered in a kiln. Varied colour is obtained by positioning colouring agents within the mould before firing.
PLASTER: The first references to the use of plaster was in France (hence Plaster of Paris) in the early 18th century. The plaster was used as a pottery mould material. Between 1745 and 1750, the method of making plaster moulds was exported to England and replaced previous materials such as alabaster, copper and wood. A plaster was also used by the Greeks and Romans, probably as a stiffener In clay.
REFRACTORY: Resists high and changing temperatures.
SILICA: Occurs naturally as a major component in many sandstones, beach sand, quartz and flint etc. The addition of silica renders a mould more refractory. Silica also alters the amount of contraction in cooling and firing.
SILICOSIS: Occupational disease associated with refractory materials. Disturbance of lung function, resulting In shallow breathing which worsens until it results in heart failure.
BIBLIOGRAPHY
Hammer, F.
Olivie, J . L
Mehlmen, F.
Morey
Mclinton, K.M.
Newman, H.
Synthetic Mineral Fihrns
Australian Government Publishing Sen/ice, Canberra 1990
The Potter's Dictionarv of Materials anrl Tenhnigr.P^
A & C Black, London, 1975
Toward a History of Pate fio Vprrp
Ceramic and Glass Revue, No 6. Sept-Oct 1983
The Illustrated Guide to RIasg
Peerage Books, London, 1985
Properties of Glass
The Antique Traders Annual of Articles pp 184-185
An Illustrated D ictionarv nf Glass
Thames and Hudson Ltd, London, 1977
SUGGESTED READING TIT! F?
Bohm-Parr, J. Pate De Verre 1989
Champion, J. The World of the Enyptians 1971.
Dennis, R. The Glass of Fmile OaliP
Grose, D.F. Early Ancient Glass
Hudson Hill Press, New York, 1989.
Glass EnQineerino Handbook 2nd Ed.
Leperlier, A.E. The Technique of Pals ris Vfirrf; France Lundstrome, B. Glass Fusing Book1.
Schwoerer Vitreous Publications, U.S.A 1983
Lundstrome, B. Glass Casting and Mould -Making: Glass Fusing Book 3.
Vitreous Publications 1989
Silverman, A. Frederick Carder. Artist and Glass Technologist The American Bulletin of Ceramic Society, Vol 18, No 9 Sept 1939, p 343