E=mc
2
1
A
Uploaded By
$am$exy98
theBooks
∑
This eBook is downloaded from
www.PlentyofeBooks.net
PlentyofeBooks.net is a blog with an aim
of helping people, especially students,
who cannot afford to buy some costly
books from the market.
For more Free eBooks and educational
material visit
A John Wiley and Sons, Ltd, Publication
NODE.JS
JAVASCRIPT EVERYWHERE
This edition first published 2012 © 2012 Guillermo Rauch
Registered office
John Wiley & Sons Ltd, The Atrium, Southern Gate, Chichester, West Sussex, PO19 8SQ, United Kingdom
For details of our global editorial offices, for customer services and for information about how to apply for permission to reuse the copyright material in this book please see our website at www.wiley.com.
The right of the author to be identified as the author of this work has been asserted in accordance with the Copyright, Designs and Patents Act 1988.
All rights reserved. No part of this publication may be reproduced, stored in a retrieval system, or transmitted, in any form or by any means, electronic, mechanical, photocopy-ing, recording or otherwise, except as permitted by the UK Copyright, Designs and Patents Act 1988, without the prior permission of the publisher.
Wiley also publishes its books in a variety of electronic formats. Some content that appears in print may not be available in electronic books.
Designations used by companies to distinguish their products are often claimed as trademarks. All brand names and product names used in this book are trade names, service marks, trademarks or registered trademarks of their respective owners. The publisher is not associated with any product or vendor mentioned in this book. This publication is designed to provide accurate and authoritative information in regard to the subject matter covered. It is sold on the understanding that the publisher is not engaged in rendering professional services. If professional advice or other expert assistance is required, the services of a competent professional should be sought.
Trademarks: Wiley and the John Wiley & Sons, Ltd. logo are trademarks or registered trademarks of John Wiley & Sons, Inc. and/or its affiliates in the United States and/or other countries, and may not be used without written permission. All other trademarks are the property of their respective owners. John Wiley & Sons, Ltd. is not associated with any product or vendor mentioned in the book.
A catalogue record for this book is available from the British Library.
ISBN 978-1-119-96259-5 (paperback); ISBN 978-1-119-96311-0 (emobi); 978-1-119-96309-7 (epdf); 978-1-119-96310-3 (epub)
Set in 10/12 Minion Pro
PUBLISHER’S ACKNOWLEDGEMENTS
Some of the people who helped bring this book to market include the following:
Editorial and Production
VP Consumer and Technology Publishing Director: Michelle Leete Associate Director–Book Content Management: Martin Tribe Associate Publisher: Chris Webb
Assistant Editor: Ellie Scott
Development Editor: Brian Herrmann Copy Editor: Chuck Hutchinson Technical Editor: Goddy Zhao Editorial Manager: Jodi Jensen Senior Project Editor: Sara Shlaer Editorial Assistant: Leslie Saxman
Marketing
Associate Marketing Director: Louise Breinholt Senior Marketing Executive: Kate Parrett
Composition Services
Compositor: Andrea Hornberger Proofreader: Linda Seifert Indexer: Potomac Indexing, LLC
ABOUT THE AUTHOR
Guillermo Rauch (San Francisco, CA) is CTO and co-founder of San Francisco-based
CONTENTS
PART I: GETTING STARTED: SETUP AND CONCEPTS
5
Chapter 1: The Setup 7
Installing on Windows 8
Installing on OS X 8
Installing on Linux 8
Compiling 9
Ensuring that it works 9
The Node REPL 9
Executing a file 10
NPM 10
Installing modules 11
Defining your own module 12
Installing binary utilities 13
Exploring the NPM registry 14 Summary 14
Chapter 2: JavaScript: An Overview 15
Introduction 15
Basic JavaScript 16
Types 16
Type hiccups 16
Functions 18 this, Function#call, and Function#apply 18
Function arity 19
Closures 19 Classes 20 Inheritance 20
try {} catch {} 21
v8 JavaScript 22
Object#keys 22 Array#isArray 23
Array methods 23
String methods 24
v
C O N T E N T S
Function#name 24
_proto_ (inheritance) 25
Accessors 25 Summary 26
Chapter 3: Blocking and Non-blocking IO 27
With great power comes great responsibility 28 Blocking-ness 29
A single-threaded world 31
Error handling 33
Stack traces 35
Summary 37
Chapter 4: Node JavaScript 39
The global object 40
Useful globals 40
The module system 41
Absolute and relative modules 41
Exposing APIs 44
Events 45 Buffers 47 Summary 48
PART II: ESSENTIAL NODE APIS
49
Chapter 5: CLI and FS APIs: Your First Application 51
Requirements 52
Writing your first program 52
Creating the module 53
Sync or async? 54
Understanding streams 55
Input and ouput 57
Refactoring 59
Interacting with the fs 61
Exploring the CLI 63
Argv 63
Working directory 64
Environmental variables 65
Exiting 65 Signals 65
ANSI escape codes 66
Exploring the fs module 66
vi
C O N T E N T SChapter 6: TCP 69
What are the characteristics of TCP? 70
Connection-oriented communication
and same-order delivery 70
Byte orientation 70
Reliability 71
Flow control 71
Congestion control 71
Telnet 71
A TCP chat program 74
Creating the module 74
Understanding the net.server API 74
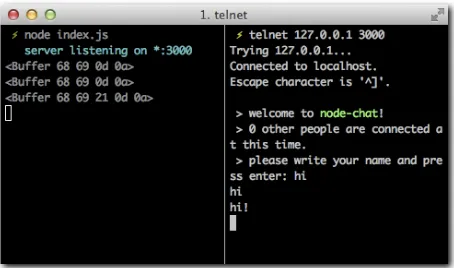
Receiving connections 76
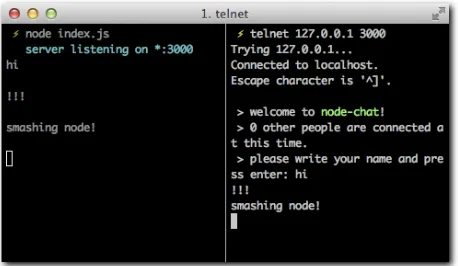
The data event 77
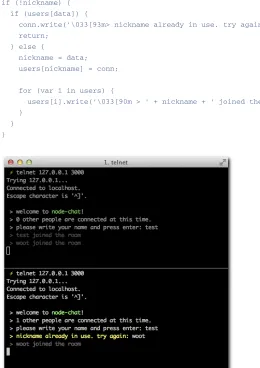
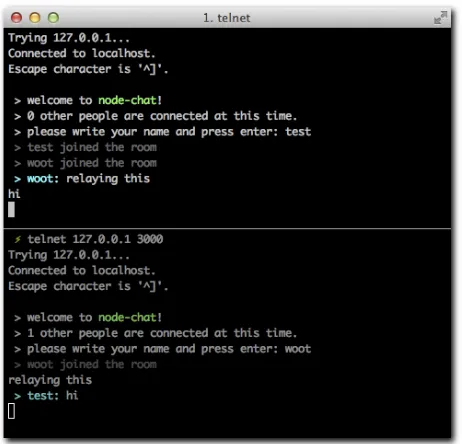
State and keeping track of connections 79
Wrap up 81
An IRC Client program 83
Creating the module 83
Understanding the net#Stream API 84
Implementing part of the IRC protocol 84 Testing with a real-world IRC server 85 Summary 85
Chapter 7: HTTP 87
The structure of HTTP 88
Headers 89 Connections 93
A simple web server 94
Creating the module 95
Printing out the form 95
Methods and URLs 97
Data 99
Putting the pieces together 102
Bullet-proofing 103
A Twitter web client 104
Creating the module 104
Making a simple HTTP request 104
Sending a body of data 106
Getting tweets 107
A superagent to the rescue 110
Reloading HTTP servers with up 111
C O N T E N T S
vii
PART III: WEB DEVELOPMENT
113
Chapter 8: Connect 115
A simple website with HTTP 116
A simple website with Connect 119
Middleware 121
Writing reusable middleware 122
Static middleware 127
Query 128 Logger 129
Body parser 131
Cookies 134 Session 134
REDIS sessions 140
methodOverride 141 basicAuth 141 Summary 144
Chapter 9: Express 145
A simple express app 146
Creating the module 146
HTML 146 Setup 147
Defining routes 148
Search 150 Run 152 Settings 153
Template engines 154
Error handling 155
Convenience methods 155
Routes 157 Middleware 159
Organization strategies 160
Summary 162
Chapter 10: WebSocket 163
AJAX 164
HTML5 WebSocket 166
An Echo Example 167
Setting it up 167
Setting up the server 168
Setting up the client 169
Running the server 170
Mouse cursors 171
Setting up the example 171
viii
C O N T E N T SSetting up the client 174
Running the server 176
The Challenges Ahead 177
Close doesn’t mean disconnect 177
JSON 177 Reconnections 177 Broadcasting 177 WebSockets are HTML5: Older browsers don’t support them 177
The solution 178
Summary 178
Chapter 11: Socket.IO 179
Transports 180
Disconnected versus closed 180
Events 180 Namespaces 181
A chat program 182
Setting up the program 182
Setting up the server 182
Setting up the client 183
Events and Broadcasting 185
Ensuring reception 190
A DJ-by-turns application 191
Extending the chat 191
Integrating with the Grooveshark API 193 Playing 196 Summary 201
PART IV: DATABASES
203
Chapter 12: MongoDB 205
Installation 207 Accessing MongoDB: A user authentication example 208
Setting up the application 208
Creating the Express app 208
Connecting to MongoDB 212
Creating documents 214
Finding documents 215
Authentication middleware 217
Validation 218 Atomicity 219
Safe mode 219
Introducing Mongoose 220
Defining a model 220
Defining nested keys 222
C O N T E N T S
ix
Setting up indexes 222
Middleware 223
Inspecting the state of the model 223
Querying 224
Extending queries 224
Sorting 224
Making Selections 224
Limiting 225 Skipping 225
Populating keys automatically 225
Casting 225
A mongoose example 226
Setting up the application 226
Refactoring 226
Setting up models 227
Summary 229
Chapter 13: MySQL 231
node-mysql 232
Setting it up 232
Th e Express app 232
Connecting to MySQL 234
Initializing the script 234
Creating data 238
Fetching data 242
sequelize 244
Setting up sequelize 245
Setting up the Express app 245
Connecting sequelize 248
Defining models and synchronizing 249
Creating data 250
Retrieving data 253
Removing data 254
Wrapping up 256
Summary 257
Chapter 14: Redis 259
Installing Redis 261
The Redis query language 261
Data types 262
Strings 263 Hashes 263 Lists 265 Sets 265
Sorted sets 266
Redis and Node 266
x
C O N T E N T SPART V: TESTING
277
Chapter 15: Code Sharing 279
What can be shared? 280
Writing compatible JavaScript 280
Exposing modules 280
Shimming ECMA APIs 282
Shimming Node APIs 283
Shimming browser APIs 284
Cross-browser inheritance 284
Putting it all together: browserbuild 285
A basic example 286
Summary 288
Chapter 16: Testing 289
Simple testing 290
Th e test subject 290
Th e test strategy 290
Th e test program 291
Expect.JS 292
API overview 292
Mocha 294
Testing asynchronous code 295
BDD style 297
TDD style 298
Exports style 298
Taking Mocha to the browser 299
FOREWORD
MOST WEB APPLICATIONS have both a client side and a server side. Implementing the server side has traditionally been complex and cumbersome. Creating a simple server required expert knowledge about multi-threading, scalability, and server deployment. An additional complication is that web client software is implemented using HTML and JavaScript whereas server code most often is implemented using more static programming languages. This split forces the programmer to use multiple programming languages and make early design decisions about where certain program logic should reside.
A few years ago, it would have been unthinkable to implement server software in JavaScript. Poor runtime performance, toy-like memory management, and lack of operating system integration all had to be fixed before JavaScript could be considered as a viable solution for servers. As part of Google Chrome, we designed the new V8 JavaScript engine to tackle the first two problems. V8 is available as an open source project with a simple API for embedding.
Ryan Dahl saw the opportunity in bringing JavaScript to the server side by embedding V8 into an OS integration layer that featured asynchronous interfaces to the underlying operating system. That was the inception of Node.JS. The benefits were obvious. Programmers could now use the same programming language on both client and server side. The dynamic nature of JavaScript made it trivial to develop and experiment with server code freeing the
programmer from the traditional slow tool-heavy programming model.
Node.JS became an instant success, spawning a vibrant open source community, supporting companies, and even necessitating its own conference. I would attribute this success to a combination of simplicity, improved programming productivity, and high performance. I’m pleased V8 played a small part in this.
This book will take the reader through all steps of creating the server side of a web application on top of Node.JS including how to organize asynchronous server code and interface to databases.
Enjoy the book,
INTRODUCTION
Late in 2009, Ryan Dahl announced a technology named Node.JS (http://nodejs.org/) at a JavaScript conference in Berlin. Interestingly, and to the surprise of the attendees, this technology wasn’t designed to run in the browser, the land that JavaScript had conquered and that many developers thought it would always be confined to.
This technology was about running JavaScript in the server. That simple phrase immediately sparked the imagination of the audience, which celebrated the announcement in standing ovation.
If done right, we could write web applications in just one language.
That was, undoubtedly, the first thought in everyone’s minds. After all, to produce a rich and modern web application, one must be proficient with JavaScript, but server technologies are varied and require specialization. As an example, Facebook recently revealed that its codebase has four times the number of lines of JS than PHP, its back-end language of choice.
But what Ryan was interested in showing went beyond that simple yet powerful premise. Ryan showed that the “hello world” program of Node.JS creates a web server:
var http = require(‘http’);
var server = http.createServer(function (req, res) { res.writeHead(200);
res.end(’Hello world’); });
server.listen(80);
It so happens this webserver is not just a toy, but a high-performance web server that happens to fare just as well (or even better) than established and tested software like Apache and Nginx in a multitude of scenarios. Node.JS was presented as a tool specifically aimed to design network applications the right way.
Node.JS owes its incredible speed and performance to a technique called the event loop and the fact that it runs on top of V8, the JavaScript interpreter and virtual machine that Google created to make their Chrome web browser run impossibly fast.
2
I N T R O D U C T I O NTaking back control of the web server, as you’ll see, resulted in a new category of applications being developed on top of Node.JS: real time web apps. Very fast data streaming between a server and thousands of concurrent clients is common currency in Node. This means that not only are you going to be creating more efficient programs, but you’ll be part of a community that’s pushing the boundaries of what we thought was achievable in the web world.
With Node, you are in charge. And with that capability comes a set of new challenges and responsibilities that this book carefully examines.
APPROACH
First and foremost, Smashing Node.JS is a book about JavaScript. Your knowledge of JavaScript is absolutely required, and therefore I dedicate an initial chapter to the concepts of JavaScript that, in my opinion and experience, matter most.
As you learn later, Node.JS strives to create an environment where the browser developer feels comfortable. Common expressions that are not part of the language specification but were added by browsers instead, such as setTimeout and console.log, are still available in
Node.JS to this end.
After you make it past the “memory refreshing” phase, you go right into Node. Node comes with a lot of useful modules as part of its core, and a revolutionarily simple package manager called NPM. This book teaches you to build things leveraging only the Node core modules, and then a selection of the most useful abstractions the community has built on top of it, that you can install with NPM.
Before we jump into a module designed for solving a specific problem, I usually try to go through the hurdles of solving the same problem without them first. The best way to under-stand a tool is to underunder-stand why the tool exists in the first place. Therefore, before you learn about a web framework, you’ll learn why it’s better than using Node.JS HTTP primitives. Before you learn how to build an app with a cross-browser real time framework like Socket. IO, you’ll learn the limitations of barebones HTML5 WebSockets.
This book is all about examples. Every step of the way you’ll be building a small application or testing out different APIs. You can execute all the code examples in this book with the node
command, which you can use in two different ways:
◾ Through the node REPL (Read-Eval-Print Loop). In the same spirit as the Firebug or
Web Inspector JavaScript consoles, this approach allows you to type in some JavaScript code, press Enter, and get it executed, right from your operating system’s command-line interface.
◾ As files that are run through the node command. This approach requires that you use a
I N T R O D U C T I O N
3
In most cases, you’ll be writing the code examples step-by-step, reproducing the way it was built the first time around. I’ll guide you through different challenges and refactors. When you hit important milestones, I usually include a screenshot of what you should be seeing, either in your terminal or in a browser window, depending on what you’re developing.
Sometimes, no matter how much thought went into the construction of these examples, problems are inevitable. I put together a collection of resources that can aid you.
RESOURCES
Should you get stuck on any part of the book, there are a few ways you can get help.
For general Node.JS support, check out the following:
◾ The Node.JS mailing list (http://groups.google.com/group/nodejs) ◾ On the irc.freenode.net server, the #nodejs channel
For help related to specific projects, such as socket.io or express, check out the official
support channels or, if none are available, general forums such as Stack Overflow (http:// stackoverflow.com/questions/tagged/node.js) certainly prove helpful.
The majority of Node.JS modules are hosted on GitHub. If you’re certain you’ve found a bug, locate their GitHub repository and contribute a test case.
Try your best to identify whether your problem is Node.JS or JavaScript related. It’s usually best to keep your Node.JS help requests strictly Node related.
PA R T
I
GETTING
STARTED:
SETUP AND
CONCEPTS
Chapter 1:
The Setup
Chapter 2:
JavaScript: An Overview
Chapter 3:
Blocking and Non-blocking IO
This chapter describes the installation process for Windows, OS X, and Linux systems. For the latter, you’re going to ensure that you have the correct dependencies and compile it from the source.
INSTALLING NODE.JS IS a painless process. Since its conception, one of its goals has been maintaining a small number of dependencies that would make the compilation or installation of the project very seamless.
THE SETUP
8
PA R T I • Getting Started: Setup and ConceptsNote: When you see lines prefixed with $ in the code snippets in the book, you should type these expressions into your OS shell.
INSTALLING ON WINDOWS
On Windows, go to http://nodejs.org and download the MSI installer. Every release of node has a corresponding MSI installer that you need to download and execute.
The filename follows the format node-v?.?.?.msi. Upon executing it, simply
follow the instructions in the setup wizard shown in Figure 1-1.
To ensure that the installation worked, open the shell or command prompt by running
cmd.exe and typing $ node –version.
The version name of the package you just installed should display.
INSTALLING ON OS X
On the Mac, similarly to Windows, you can leverage an installer package. From the Node.JS website, download the PKG file that follows the format node-v?.?.?.pkg. If you want to
compile it instead, ensure you have XCode installed and follow the Compilation instructions for Linux.
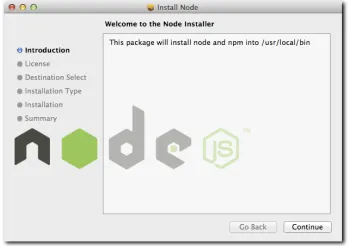
Run the downloaded package and follow the simple steps (see Figure 1-2).
To ensure installation was successful, open the shell or terminal by running Terminal. app (you can type in “Terminal” in Spotlight
to locate it) and type in $ node –version.
The version of Node you just installed should be outputted.
INSTALLING ON LINUX
[image:23.531.291.466.135.270.2]Compiling Node.JS is almost just as easy as installing binaries. To compile it in most *nix systems, simply make sure a C/C++ compiler and the OpenSSL libraries are available.
Figure 1-1: The Node.JS setup wizard.
[image:23.531.293.468.420.543.2]C H A P T E R 1 • The Setup
9
Most Linux distributions come with a package manager that allows for the easy installation of these.
For example, for Amazon Linux, you use
> sudo yum install gcc gcc-c++ openssl-devel curl
On Ubuntu, the installation is slightly different; you use
> sudo apt-get install g++ libssl-dev apache2-utils curl
COMPILING
From your OS terminal, execute the following commands:
Note: Replace ? with the latest available version of node in the following example.
$ curl -O http://nodejs.org/dist/node-v?.?.?.tar.gz $ tar -xzvf node-v?.?.?.tar.gz
$ cd node-v?.?.? $ ./configure $ make $ make test $ make install
If the make test command aborts with errors, I recommend you stop the installation and
post a log of the ./configure, make, and make test commands to the Node.JS mailing
list.
ENSURING THAT IT WORKS
Launch a terminal or equivalent, such as XTerm, and type in $ node –version.
The version of Node you just installed should be outputted.
THE NODE REPL
To run the Node REPL, simply type node.
Try running some JavaScript expressions. For example:
> Object.keys(global)
10
PA R T I • Getting Started: Setup and ConceptsThe REPL is one of my favorite tools for quickly verifying that different Node or vanilla JavaScript APIs work as expected. While developing larger modules, it’s often useful to check a certain API works exactly the way you remember it when unsure. To that end, opening a separate terminal tab and quickly evaluating some JavaScript primitives in a REPL helps immensely.
EXECUTING A FILE
Like most scripted programming languages, Node can interpret the contents of a file by appending a path to the node command.
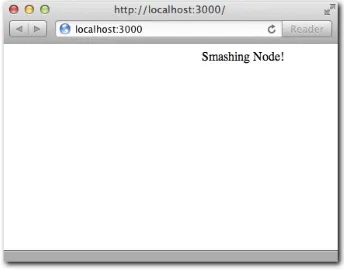
With your favorite text editor, create a file called my-web-server.js, with the following
contents:
var http = require(‘http’);
var serv = http.createServer(function (req, res) { res.writeHead(200, { ’Content-Type’: ’text/html’ }); res.end(’<marquee>Smashing Node!</marquee>’); });
serv.listen(3000);
Run the file:
$ node my-web-server.js
Then, as shown in Figure 1-3, point your web browser to http://localhost:3000.
In this code snippet, you’re leveraging the power of Node to script a fully compliant HTTP server that serves a basic HTML document. This is the traditional example used whenever Node.JS is being discussed, because it demonstrates the power of creating a web server just like Apache or IIS with only a few lines of JavaScript.
NPM
The Node Package Manager (NPM) allows you to easily manage modules in projects by downloading packages, resolving dependencies, running tests, and installing command-line utilities.
[image:25.531.294.466.353.488.2]Even though doing so is not essential to the core functionality of the project, you truly need to work efficiently on projects that rely on other pre-existing modules released by third parties.
C H A P T E R 1 • The Setup
11
NPM is a program written in Node.JS and shipped with the binary packages (the MSI Windows installer, and the PKG for the Mac). If you compiled node from the source files, you want to install NPM as follows:
$ curl http://npmjs.org/install.sh | sh
To ensure successful installation, issue the following command:
$ npm --version
The NPM version should be displayed.
INSTALLING MODULES
To illustrate the installation of a module with NPM, install the colors library in the
direc-tory my-project and then create an index.js file:
$ mkdir my-project/ $ cd my-project/ $ npm install colors
Verify that the project was installed by ensuring the path node_modules/colors was
created.
Then edit index.js with your favorite editor:
$ vim index.js
And add the following contents:
require(‘colors’);
console.log(‘smashing node’.rainbow);
The result should look like Figure 1-4.
12
PA R T I • Getting Started: Setup and ConceptsDEFINING YOUR OWN MODULE
To define your own module, you need to create a package.json file. Defining your own
module has three fundamental benefits:
◾ Allows you to easily share the dependencies of your application with others, without
sending along the node_modules directory. Because npm install takes care of
fetching everything, distributing this directory wouldn’t make sense. This is especially important in SCM systems like Git.
◾ Allows you to easily track the versions of the modules you depend on that you know
work. For example, when you wrote a particular project, you ran npm install colors and that installed colors 0.5.0. A year later, due to API changes, perhaps the
latest colors are no longer compatible with your project, and if you were to run npm install without specifying the version, your project would break.
◾ Makes redistribution possible. Did your project turn out fine and you want to share it
with others? Because you have a package.json, the command npm publish.
publishes it to the NPM registry for everyone to install.
In the directory created earlier (my-project), remove the node_modules directory and
create a package.json file:
$ rm -r node_modules $ vim package.json
Then add the following contents:
{
“name”: “my-colors-project” , “version”: “0.0.1”
, “dependencies”: { “colors”: “0.5.0” }
}
Note: The contents of this file must be valid JSON. Valid JavaScript is not enough. This means that you must make sure, for example, to use double quotes for all strings, including property names.
The package.json file is the file that describes your project to both Node.JS and NPM. The
only required fields are name and version. Normally, modules have dependencies, which is an object that references other projects by the name and version they defined in their package. json files.
C H A P T E R 1 • The Setup
13
$ npm install
$ node index # notice that you don’t need to include “.js”!
In this case, the intention is to create a module for internal use. If you wanted, NPM makes it really easy to publish a module by running:
$ npm publish
To tell Node which file to look for when someone calls require(‘my-colors-project’)
we can specify the main property in the package.json:
{
“name”: “my-colors-project” , “version”: “0.0.1”
, “main”: “./index” , “dependencies”: { “colors”: “0.5.0” }
}
When you learn how to make modules export APIs, the main property will become a lot
more important, because you will need it to define the entry point of your modules (which sometimes are comprised of multiple files).
To learn about all the possible properties for the package.json file, run:
$ npm help json
Tip: If you never intend to publish a certain project, add “private”: “true” to your package.json. This prevents accidental publication.
INSTALLING BINARY UTILITIES
Some projects distribute command-line tools that were written in Node. When that’s the case, you need to install them with the -g flag.
For example, the web framework you’re going to learn in this book called express contains an executable utility to create projects.
$ npm install -g express
Then try it out by creating a directory and running “express” inside:
14
PA R T I • Getting Started: Setup and ConceptsTip: If you want to distribute a script like this, include a flag “bin”: “./path/ to/script” pointing to your executable script or binary when publishing.
EXPLORING THE NPM REGISTRY
Once you get comfortable with the Node.JS module system in Chapter 4, you should be able to write programs that leverage any module in the ecosystem.
NPM has a rich registry that contains thousands of modules. Two commands are instrumen-tal in your exploration of the registry: search and view.
If you want to search for plugins related to realtime, for example, you would execute the
following:
$ npm search realtime
This will search all the published modules that contain MySQL in their name, tags, and description fields.
Once you find a package that interests you, you can see its package.json and other
properties related to the NPM registry by running npm view followed by the module name.
For example:
$ npm view socket.io
Tip: If you want to learn more about a certain NPM command, type “npm help <command>.” For example, “npm help publish” will teach you more about how to publish modules.
SUMMARY
After this chapter, you should now have a working Node.JS + NPM environment.
In addition to being able to run the node and npm commands, you should now have a basic
understanding of how to execute simple scripts, but also how to put together modules with dependencies.
You now know that an important keyword in Node.JS is require, which allows for module
and API interoperability, and which will be an important subject in Chapter 4, after quickly reviewing the language basics.
In addition, most of the code you’ll write is in compliance with the “good parts” of JavaScript that Douglas Crockford enounced in his famous book, JavaScript: The Good Parts.
This chapter is divided into two parts:
◾ Basic JavaScript. The fundamentals of the
language. They apply everywhere: node, browser, and standards committee.
◾ v8 JavaScript. Some features used in v8 are
not available in all browsers, especially Internet Explorer, because they’ve recently been standardized. Others are nonstandard, but you still use them because they solve fundamental problems.
In addition, the next chapter covers the language extensions and features exclusively available in Node.
INTRODUCTION
JAVASCRIPT IS A prototype-based, object-oriented, loosely-typed dynamic scripting language. It has powerful features from the functional world, such as closures and higher-order functions, that are of special interest here.
JavaScript is technically an implementation of the ECMAScript language standard. It’s important to know that with Node, because of v8, you’ll be primarily dealing with an implementation that gets close to the standard, with the exception of a few extra features. This means that the JavaScript you’re going to be dealing with has some impor-tant differences with the one that earned the language its bad reputation in the browser world.
JAVASCRIPT:
AN OVERVIEW
16
PA R T I • Getting Started: Setup and ConceptsBASIC JAVASCRIPT
This chapter assumes that you’re somewhat familiar with JavaScript and its syntax. It goes over some fundamental concepts you must understand if you want to work with Node.js.
TYPES
You can divide JavaScript types into two groups: primitive and complex. When one of the primitive types is accessed, you work directly on its value. When a complex type is accessed, you work on a reference to the value.
◾ The primitive types are number, boolean, string, null, and undefined. ◾ The complex types are array, function, and object.
To illustrate:
// primitives var a = 5; var b = a; b = 6;
a; // will be 5 b; // will be 6
// complex
var a = [‘hello’, ‘world’]; var b = a;
b[0] = ‘bye’;
a[0]; // will be ’bye’ b[0]; // will be ‘bye’
In the second example, b contains the same reference to the value as a does. Hence, when you
access the first member of the array, you alter the original, so a[0] === b[0].
TYPE HICCUPS
Correctly identifying the type of value a certain variable holds remains a challenge in JavaScript.
Because JavaScript has constructors for most primitives like in other languages with object-oriented features, you can create a string in these two ways:
var a = ‘woot’;
C H A P T E R 2 • JavaScript: An Overview
17
If you use the typeof and instanceof operators on these two variables, however, things
get interesting:
typeof a; // ‘string’ typeof b; // ‘object’
a instanceof String; // false b instanceof String; // true
However, both are definitely strings that have the same prototypical methods:
a.substr == b.substr; // true
And they evaluate in the same way with the == operator but not with ===:
a == b; // true a === b; // false
Considering these discrepancies, I encourage you to always define your types in the literal way, avoiding new.
It’s important to remember that certain values will be evaluate to false in conditional
expressions: null, undefined, ‘’, 0:
var a = 0; if (a) {
// this will never execute }
a == false; // true a === false; // false
Also noteworthy is the fact that typeof doesn’t recognize null as its own type:
typeof null == ‘object’; // true, unfortunately
And the same goes for arrays, even if defined with [], as shown here:
typeof [] == ‘object’; // true
You can be thankful that v8 provides a way of identifying an array without resorting to hacks. In browsers, you typically inspect the internal [[Class]] value of an object: Object. prototype.toString.call([]) == ‘[object Array]’. This is an immutable
property of objects that has the benefit of working across different contexts (for example, browser frames), whereas instanceof Array is true only for arrays initialized within that
18
PA R T I • Getting Started: Setup and ConceptsFUNCTIONS
Functions are of utmost importance in JavaScript.
They’re first class: they can be stored in variables as references, and then you can pass them around as if they were any other object:
var a = function () {}
console.log(a); // passing the function as a parameter
All functions in JavaScript can be named. It’s important to distinguish between the function name and the variable name:
var a = function a () {
‘function’ == typeof a; // true };
THIS, FUNCTION#CALL, AND FUNCTION#APPLY
When the following function is called, the value of this is the global object. In the browser,
that’s window:
function a () {
window == this; // true; };
a();
By using the .call and .apply methods, you can change the reference of this to a
different object when calling the function:
function a () {
this.a == ‘b’; // true }
a.call({ a: ‘b’ });
The difference between call and apply is that call takes a list of parameters to pass to the
function following, whereas apply takes an array:
function a (b, c) { b == ‘first’; // true c == ‘second’; // true }
C H A P T E R 2 • JavaScript: An Overview
19
FUNCTION ARITY
An interesting property of a function is its arity, which refers to the number of arguments that the function was declared with. In JavaScript, this equates to the length property of a
function:
var a = function (a, b, c); a.length == 3; // true
Even though less common in the browser, this feature is important to us because it’s leveraged by some popular Node.JS frameworks to offer different functionality depending on the number of parameters the functions you pass around take.
CLOSURES
In JavaScript, every time a function is called, a new scope is defined.
Variables defined within a scope are accessible only to that scope and inner scopes (that is, scopes defined within that scope):
var a = 5;
function woot () { a == 5; // true
var a = 6;
function test () { a == 6; // true }
test(); };
woot();
Self-invoked functions are a mechanism by which you declare and call an anonymous function where your only goal is defining a new scope:
var a = 3;
(function () { var a = 5; })();
a == 3 // true;
20
PA R T I • Getting Started: Setup and ConceptsCLASSES
In JavaScript, there’s no class keyword. A class is defined like a function instead:
function Animal () { }
To define a method on all the instances of Animal that you create, you set it on the
prototype:
Animal.prototype.eat = function (food) { // eat method
}
It’s worth mentioning that within functions in the prototype, this doesn’t refer to the global
object like regular functions, but to the class instance instead:
function Animal (name) { this.name = name; }
Animal.prototype.getName () { return this.name;
};
var animal = new Animal(‘tobi’); a.getName() == ‘tobi’; // true
INHERITANCE
JavaScript has prototypical inheritance. Traditionally, you simulate classical inheritance as follows.
You define another constructor that’s going to inherit from Animal:
function Ferret () { };
To define the inheritance chain, you initialize an Animal object and assign it to the Ferret. prototype.
// you inherit
Ferret.prototype = new Animal();
You can then define methods and properties exclusive to your subclass:
C H A P T E R 2 • JavaScript: An Overview
21
To override methods and call the parent, you reference the prototype:
Ferret.prototype.eat = function (food) { Animal.prototype.eat.call(this, food); // ferret-specific logic here
}
This technique is almost perfect. It’s the best performing across the board (compared to the alternative functional technique) and doesn’t break the instanceof operator:
var animal = new Animal(); animal instanceof Animal // true animal instanceof Ferret // false
var ferret = new Ferret(); ferret instanceof Animal // true ferret instanceof Ferret // true
Its major drawback is that an object is initialized when the inheritance is declared (Ferret. prototype = new Animal), which might be undesirable. A way around this problem is
to include a conditional statement in the constructor:
function Animal (a) { if (false !== a) return; // do constructor stuff }
Ferret.prototype = new Animal(false)
Another workaround is to define a new, empty constructor and override its prototype:
function Animal () { // constructor stuff }
function f () {};
f.prototype = Animal.prototype; Ferret.prototype = new f;
Fortunately, v8 has a cleaner solution for this, which is described later in this chapter.
TRY {} CATCH {}
try/catch allows you to capture an exception. The following code throws one:
> var a = 5; > a()
22
PA R T I • Getting Started: Setup and ConceptsWhen a function throws an error, execution stops:
function () {
throw new Error(‘hi’);
console.log(‘hi’); // this will never execute }
If you use try/catch, you can handle the error and execution continues:
function () { var a = 5; try { a(); } catch (e) {
e instanceof Error; // true }
console.log(‘you got here!’); }
V8 JAVASCRIPT
So far you’ve looked at the JavaScript features that are most relevant to dealing with the language in most environments, including ancient browsers.
With the introduction of the Chrome web browser came a new JavaScript engine, v8, which has been quickly pushing the boundaries by providing us with an extremely fast execution environment that stays up-to-date and supports the latest ECMAScript features.
Some of these features address deficiencies in the language. Others were introduced thanks to the advent of client-side frameworks like jQuery and PrototypeJS, because they provided extensions or utilities that are so frequently used it’s now unimaginable to consider the JavaScript language without them.
In this section you’ll learn about the most useful features that you can take advantage of from v8 to write more concise and faster code that fits right it with the style of code that the most popular Node.JS frameworks and libraries adopt.
OBJECT#KEYS
If you wanted to obtain the keys for the following object (a and c)
var a = { a: ‘b’, c: ‘d’ };
Then normally iterate as follows:
C H A P T E R 2 • JavaScript: An Overview
23
By iterating over the keys, you can collect them in an array. However, if you were to extend the Object.prototype as follows:
Object.prototype.c = ‘d’;
To avoid getting c in the list of keys you would need to run a hasOwnProperty check:
for (var i in a) {
if (a.hasOwnProperty(i)) {} }
To get around that complication, to get all the own keys in an object, in v8 you can safely use
var a = { a: ‘b’, c: ‘d’ }; Object.keys(a); // [‘a’, ‘c’]
ARRAY#ISARRAY
Like you saw before, the typeof operator will return “object” for arrays. Most of the
time, however, you want to check that an array is actually an array.
Array.isArray returns true for arrays and false for any other value:
Array.isArray(new Array) // true Array.isArray([]) // true Array.isArray(null) // false Array.isArray(arguments) // false
ARRAY METHODS
To loop over an array, you can use forEach (similar to jQuery $.each):
// will print 1 2 and 3
[1, 2, 3].forEach(function (v) { console.log(v);
});
To filter elements out of an array, you can use filter (similar to jQuery $.grep)
[1, 2, 3].forEach(function (v) { return v < 3;
}); // will return [1, 2]
To change the value of each item, you can use map (similar to jQuery $.map)
[5, 10, 15].map(function (v) { return v * 2;
24
PA R T I • Getting Started: Setup and ConceptsAlso available but less commonly used are the methods reduce, reduceRight, and lastIndexOf.
STRING METHODS
To remove space in the beginning and ending of a string, use
‘ hello ‘.trim(); // ‘hello’
JSON
v8 exposes JSON.stringify and JSON.parse to decode and encode JSON, respectively.
JSON is an encoding specification that closely resembles the JavaScript object literal, utilized by many web services and APIs:
var obj = JSON.parse(‘{“a”:”b”}’) obj.a == ‘b’; // true
FUNCTION#BIND
.bind (equivalent to jQuery’s $.proxy) allows you to change the reference of this:
function a () {
this.hello == ‘world’; // true };
var b = a.bind({ hello: ‘world’ }); b();
FUNCTION#NAME
In v8, the nonstandard property name of a function is supported:
var a = function woot () {}; a.name == ‘woot’; // true
This property is used internally by v8 in stack traces. When an error is thrown, v8 shows a
stack trace, which is the succession of function calls it made to reach the point where the error occurred:
> var woot = function () { throw new Error(); }; > woot()
Error
C H A P T E R 2 • JavaScript: An Overview
25
In this case, v8 is not able to assign a name to the function reference. If you name it, however, v8 will be able to include it in the stack traces as shown here:
> var woot = function buggy () { throw new Error(); }; > woot()
Error
at buggy ([object Context]:1:34)
Because naming significantly aids in debugging, I always recommend you name your functions.
_PROTO_ (INHERITANCE)
__proto__ makes it easy for you to define the inheritance chain:
function Animal () { } function Ferret () { }
Ferret.prototype.__proto__ = Animal.prototype;
This is a very useful feature that removes the need to:
◾ Resort to intermediate constructors, as shown in the previous section.
◾ Leverage OOP toolkits or utilities. You don’t need to require any third-party modules to
expressively declare prototypical inheritance.
ACCESSORS
You are able to define properties that call functions when they’re accessed (__define Getter__) or set (__defineSetter__).
As an example, define a property called ago that returns the time ago in words for a Date
object.
Many times, especially in the software you create, you want to express time in words relative to a certain point. For example, it’s easier for people to understand that something happened three seconds ago than reading the complete date.
The following example adds an ago getter to all the Date instances that will output the
distance of time in words to the present. Simply accessing the property will execute the function you define, without having to explicitly call it.
// Based on prettyDate by John Resig (MIT license) Date.prototype.__defineGetter__(‘ago’, function () {
26
PA R T I • Getting Started: Setup and Conceptsreturn day_diff == 0 && ( diff < 60 && “just now” || diff < 120 && “1 minute ago” ||
diff < 3600 && Math.floor( diff / 60 ) + “ minutes ago” || diff < 7200 && “1 hour ago” ||
diff < 86400 && Math.floor( diff / 3600 ) + “ hours ago”) || day_diff == 1 && “Yesterday” ||
day_diff < 7 && day_diff + “ days ago” || Math.ceil( day_diff / 7 ) + “ weeks ago”; });
Then you simply refer to the ago property. Notice that you’re not executing a function, yet it’s
still being executed transparently for you:
var a = new Date(‘12/12/1990’); // my birth date a.ago // 1071 weeks ago
SUMMARY
Understanding this chapter is essential to getting up to speed with the quirks of the language and handicaps of most environments the language has traditionally been run in, such as old browsers.
Due to JavaScript evolving really slowly and being somewhat overlooked for years, many developers have invested significant amounts of time in developing techniques to write the most efficient and maintainable code, and have characterized what aspects of the language don’t work as expected.
v8 has done a fantastic job at keeping up to date with the recent editions of ECMA, and continues to do so. The Node.JS core team of developers always ensures that when you install the latest version of Node, you always get the most recent version of v8. This opens up a new panorama for server-side development, since we can leverage APIs that are easier to under-stand and faster to execute.
perform really well in comparison to other mainstream solutions, provided that they understand the tradeoffs and what makes Node programs perform well.
MUCH OF THE DISCUSSION about Node.JS is centered around its capabilities to handle a lot of concurrency. In simple terms, Node is a framework that offers developers a powerful way to design networking applications that will
BLOCKING AND
NON-BLOCKING IO
28
PA R T I • Getting Started: Setup and ConceptsWITH GREAT POWER COMES GREAT RESPONSIBILITY
Node introduces a complexity to JavaScript that you’re probably not really used to managing much in the browser: shared-state concurrency. As a matter of fact, this complexity is also inexistent in traditional models for making web applications like Apache and mod_php or
Nginx and FastCGI.
In less technical terms, in Node you have to be careful about how your callbacks modify the variables around them (state) that are currently in memory. Thus, you need to be especially careful about how you handle errors that can potentially alter this state in unexpected ways and potentially render the entire process unusable.
To fully understand this, imagine the following function, which gets executed every time the user makes a request to the URL /books. Imagine also that the “state” is a collection of books
that you’ll ultimately use to return an HTML list of books.
var books = [ ‘Metamorphosis’ , ‘Crime and punishment’ ];
function serveBooks () {
// I’m going to serve some HTML to the client
var html = ‘<b>’ + books.join(‘</b><br><b>’) + ‘</b>’;
// I’m evil, and I’m going to change state! books = [];
return html; }
The equivalent PHP code is
$books = array( ‘Metamorphosis’ , ‘Crime and punishment’ );
function serveBooks () {
$html = ‘<b>’ . join($books, ‘</b><br><b>’) . ‘</b>’; $books = array();
return $html; }
Notice that in the serveBooks functions of both examples, you reset the books array.
Now imagine a user who requests /books twice in a row to the Node server and twice in a
C H A P T E R 3 • Blocking and Non-blocking IO
29
◾ Node handles the first request and returns the books. The second request returns no books. ◾ PHP returns books in both cases.
The difference lies in the fundamental schemes. Node is a long-running process, whereas Apache spawns multiple threads (one per request), which start with a fresh state every time. In PHP, the next time the interpreter runs, the variable $books gets repopulated, whereas in
Node, the function serveBooks gets called again, and the scope variable is not affected.
+---+ | APACHE | +-+---+---+-+ | | | +---+ | +---+ +----+----+ +----+----+ +----+----+ | PHP | | PHP | | PHP | | | | | | | | THREAD | | THREAD | | THREAD | +----+----+ +----+----+ +----+----+ | | | +---+ +---+ +---+ | REQUEST | | REQUEST | | REQUEST | +---+ +---+ +---+
With great power comes great responsibility.
+---+ | | | | | NODE.JS | | | | PROCESS | | | | | | | +----+---+---+----+ | | | +---+ +---+ +---+ | REQUEST | | REQUEST | | REQUEST | +---+ +---+ +---+
Keeping this in mind at all times is essential for writing solid Node.JS programs that don’t experience problems during their executions.
An equally important aspect is understanding what is meant by blocking and non-blocking IO.
BLOCKING-NESS
30
PA R T I • Getting Started: Setup and Concepts// PHP
print(‘Hello’);
sleep(5);
print(‘World’);
And this Node example:
// node
console.log(‘Hello’);
setTimeout(function () { console.log(‘World’); }, 5000);
The difference is not merely syntactic (Node.JS uses a callback) because these examples epitomize the distinction between blocking and non-blocking code. In the first example, PHP sleep()
blocks the thread of execution. While the program is sleeping, it’s not doing anything else.
Node.JS, on the other hand, leverages the event loop here, so setTimeout is non-blocking.
This means that if you introduce a console.log statement immediately after the setTimeout, it is called immediately:
console.log(‘Hello’);
setTimeout(function () { console.log(‘World’); }, 5000);
console.log(‘Bye’);
// this script will output: // Hello
// Bye // World
What does it mean to leverage the event loop? Essentially, Node registers events and then runs an infinite loop to poll the kernel to know whether these events are ready to be dispatched. When they are, the associated function callbacks are fired, and it moves on. If no events are polled, Node just keeps going until new events are ready.
In contrast, in the PHP world, when sleep is executed, the execution is blocked for however
long you specified, and no other instructions are executed until said time elapses, which means it’s synchronous. setTimeout, instead of blocking, just registers an event for the
future and lets the program continue to run, therefore being asynchronous.
C H A P T E R 3 • Blocking and Non-blocking IO
31
perform. In the same fashion that internally Node loops and triggers a notification when the timeout is complete, it uses the event loop to trigger notifications about file descriptors.
File descriptors are abstract handles that reference open files, sockets, pipes, and so on. Essentially, when Node gets an HTTP request from a browser, the underlying TCP connec-tion allocates a file descriptor. If the client then sends data to the server, Node gets a notifica-tion about this and fires a callback in your JavaScript code.
A SINGLE-THREADED WORLD
It’s important to note that Node uses a single thread of execution. It’s not possible, without the help of third-party modules, to change this fact.
To illustrate what this means and how it relates to the event loop, consider the following example:
var start = Date.now();
setTimeout(function () {
console.log(Date.now() - start);
for (var i = 0; i < 1000000000; i++){} }, 1000);
setTimeout(function () {
console.log(Date.now() - start); }, 2000);
These two timeouts print how many seconds elapsed from the moment they’re set to the moment the functions are called. The output in my computer looks like Figure 3-1.
Figure 3-1: This program shows the elapsed time when each setTimeout is executed, which doesn’t correlate to the values in the code.
What happens internally is that the event loop is blocked by the JavaScript code. When the first event is dispatched, the JavaScript callback is run. Because you are doing a lot of intense computation (a very long for loop), by the time the next iteration of the event loop is
32
PA R T I • Getting Started: Setup and ConceptsThis behavior is, of course, undesirable. As I explained previously, the event loop is the foundation of all IO in Node. If a timeout can be delayed, so can an incoming HTTP request or other forms of IO. That means the HTTP server would handle fewer requests per second and not perform efficiently.
For this reason, the great majority of modules available for node are non-blocking and perform tasks asynchronously.
If you have only one thread of execution, which means that as a function is running no others can be executed concurrently, how is Node.JS so good at managing a lot of network concur-rency? For example, in a normal laptop, a simple HTTP server written in Node is able to handle thousands of clients per second.
For this to happen, you must first understand the concept of call stacks.
When v8 first calls a function, it starts what is commonly known as a call stack or execution stack.
If that function calls another function, v8 adds it to the call stack. Consider the following example:
function a () { b();
}
function b(){};
The call stack in this example is composed of “a” followed by “b”. When “b” is reached, v8 doesn’t have anything left to execute.
Return to the HTTP server example:
http.createServer(function () { a();
});
function a(){ b(); };
function b(){};
In this example, whenever an HTTP client connects to Node, the event loop dispatches a notification. Eventually, the callback function is executed, and the call stack becomes “a” > “b”.
Since Node is running in a single thread, while that call stack is being unrolled no other client or HTTP request can be handled.
C H A P T E R 3 • Blocking and Non-blocking IO
33
The key is that you don’t need to handle more than one at the same given instant, provided that the call stack executes really fast. And that’s why v8 coupled with non-blocking IO are so good together: v8 is really fast at executing JavaScript, and non-blocking IO ensures the single thread of execution doesn’t get hung up on external uncertainties, like reading a database or hard disk.
A real-world example of the utility of non-blocking IO is the cloud. In most cloud deploy-ments like the Amazon cloud (“AWS”), operating systems are virtualized and hardware resources are shared between tenants (since you are essentially “renting hardware”). What this means is that if the hard drive, for example, is spinning to seek a file for another tenant, and you are trying to seek, the latency will increase. Since the IO performance for the hard drive is very unpredictable, if we blocked our thread of execution when we’re reading a file, our program could behave very erratically and slowly.
A common example of IO in our applications is getting data from databases. Imagine a situation where you need to get some data from the database to respond to a request.
http.createServer(function (req, res) { database.getInformation(function (data) { res.writeHead(200);
res.end(data); });
});
In this case, once a request comes in, the call stack is just composed of the database call. Since the call is non-blocking, it’s up to the event loop once again to initiate a new call stack when the database IO completes. But after you tell Node “let me know when you have the database response,” Node can continue to do other things. Namely, handling more HTTP clients and requests!
A topic covered throughout the book that very much has to do with the way Node is archi-tected is error handling, described next.
ERROR HANDLING
First and foremost, as you saw earlier in the chapter, Node applications rely on big processes with a lot of shared state.
If an error occurs in a particular callback of a particular HTTP request, for example, the whole process is compromised:
var http = require(‘http’);
http.createServer(function () {
34
PA R T I • Getting Started: Setup and ConceptsBecause that exception isn’t caught, the moment you try to access the web server, the process crashes, as shown in Figure 3-2.
Figure 3-2: You can see the call stack from the event loop (IOWatcher) all the way to the callback.
Node behaves this way because the state of the process after an uncaught exception is uncer-tain. Things might or might not work normally afterward, and if the error is left unhandled, things might continue to fail in ways that are unexpected or can’t be debugged.
This behavior changes if you add an uncaughtException handler. The process doesn’t
exit, and you are in charge of things afterward:
process.on(‘uncaughtException’, function (err) { console.error(err);
process.exit(1); // we exit manually });
This behavior is consistent with APIs that emit error events. For example, consider the
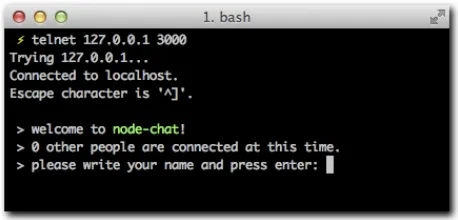
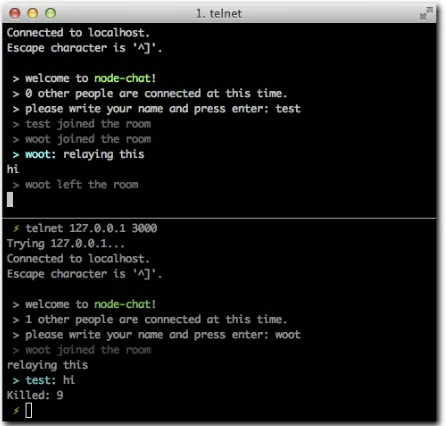
following example, where you make a TCP server and connect to it with the telnet utility:
var net = require(‘net’);
net.createServer(function (connection) { connection.on(‘error’, function (err) { // err is an Error object
});
}).listen(400);
Throughout Node, many of the native modules such as http and net emit error events. If
these events go unhandled, an uncaught exception is thrown.
Aside from the uncaughtException and error events, most of the asynchronous Node
C H A P T E R 3 • Blocking and Non-blocking IO
35
var fs = require(‘fs’);
fs.readFile(‘/etc/passwd’, function (err, data) { if (err) return console.error(err);
console.log(data); });
Handling errors every step of the way in your code is essential because it allows you to write safe programs and also not lose context of where errors originate.
STACK TRACES
In JavaScript, when an error occurs, you can see the series of function calls that lead up to the error. This is called a stack trace. Consider the following example:
function c () { b();
};
function b () { a();
};
function a () {
throw new Error(‘here’); };
c();
Run it now to obtain a stack trace like the one in Figure 3-3.
36
PA R T I • Getting Started: Setup and ConceptsIn this figure, you can see the clear succession of calls that lead to the error. Now try the same thing when the event loop is involved:
function c () { b();
};
function b () { a();
};
function a () {
setTimeout(function () { throw new Error(‘here’); }, 10);
};
c();
When this code is executed (as in Figure 3-4), valuable information is missing from the stack trace.
Figure 3-4: The call stack begins with the entry point of the event loop.
By the same token, catching an error of a function that’s deferred so that it is called in the future is not possible. This yields an uncaught exception and the catch block doesn’t execute:
try {
setTimeout(function () { throw new Error(‘here’); }, 10);
} catch (e) { }
C H A P T E R 3 • Blocking and Non-blocking IO
37
It’s important to mention that in future versions of Node, machinery will be in place to make errors thrown by asynchronous handlers easier to track down.
SUMMARY
You now understand how all the actors involved—the event loop, non-blocking IO, and v8—work efficiently together to give developers interfaces to write very fast networked applications.
You understand that Node offers great simplicity to the programmer by having a single thread of execution, but also that this architecture makes it unwise to perform blocking IO when you’re trying to write network applications. You also understand that all the state is main-tained in a single memory space for that thread, which means you need to be extra careful when writing programs.
conceived in its specification, but that both Node and browsers have. But more importantly, you will also go through the core Node.JS additions that are considered, as the title of this chapter implies, “Node JavaScript.”
The first difference you’ll look at pertains to the global object.
WRITING JAVASCRIPT FOR Node.JS and the browser is a remarkably different experience. Node.JS takes the basic language, and just like browsers did, adds different APIs on top of it to ensure writing code that’s meant to power networked applications feels as natural as possible.
Throughout this chapter you will examine certain APIs that are not part of the language as it was
NODE
JAVASCRIPT
40
PA R T I • Getting Started: Setup and ConceptsTHE GLOBAL OBJECT
In the browser, window is the global object. Anything that you define in window becomes
available to all parts of your code. For example, setTimeout is in reality window. setTimeout, and document is window.document.
Node has two similar objects that provide a cleaner separation:
◾ global: Just like window, any property attached to global becomes a variable you can
access anywhere.
◾ process: Everything that pertains to the global context of execution is in the process
object. In the browser, there’s only one window, and in Node, there’s only one process at any given time. As an example, in the browser, the window name is window.name, and
in Node, the name of the process is process.title.
Later chapters dig deeper into the process object because it provides broad and interesting
functionality, especially pertaining to command-line programs.
USEFUL GLOBALS
Some functions and utilities available in the browser are not part of the language specification but rather are useful things that browsers added on top, which today are generally considered to be JavaScript. These are often exposed as globals.
For example, setTimeout is not part of ECMAScript, but a function that browsers deemed
important to implement. As a matter of fact, even if you tried, you wouldn’t be able to rewrite that function in pure JavaScript.
Other APIs are in the process of being introduced to the language (and are at the proposal stage), but Node.JS adds them because they’re needed for us to write our programs effectively. An example of this is a the setImmediate API, which in Node.JS it finds its equivalent in process.nextTick
This function allows you to schedule the execution of a function at the next iteration of the event loop:
console.log(1);
process.nextTick(function () { console.log(3);
});
console.log(2);
Imagine it as something similar to setTimeout(fn, 1) or “call this function in the most
C H A P T E R 4 • Node JavaScript
41
A similar example is console, which was originally implemented by Firebug, the Firefox
plugin to aid development. As a result, Node includes a global console object with useful
methods, such as console.log and console.error.
THE MODULE SYSTEM
JavaScript, in its pure form, is a world of globals. All the APIs that are normally used in the browser setTimeout, document, and so on are globally defined.
When you include third-party modules, the expectation is that they also expose a global variable (or many). For example, when you include <script src=”http://code. jquery.com/jquery-1.6.0.js”> in an HTML document, you later refer to this module
through the global jQuery object:
<script>
jQuery(function () { alert(‘hello world!’); });
</script>
The fundamental reason for this is that in its specification, JavaScript doesn’t describe an API for module dependency and isolation. As a result, including multiple “modules” in this way results in a pollution of the global namespace and potential naming collisions.
Node ships with a lot of useful modules that are the fundamental toolkit for building out modern applications; they include http, net, fs, and many more. And as you saw in
Chapter 1, “The Setup,” especially with the help of NPM, you can easily install hundreds more.
Instead of defining a number of globals (or evaluating a lot of code that you might not use), Node decided to introduce a simple yet extremely powerful module system, the roots of which are three globals: require, module, and exports.
ABSOLUTE AND RELATIVE MODULES
I use the term absolute modules for the ones that Node finds by internally inspecting the
node_modules directory, or modules that Node ships within its core, like fs.
As you saw in Chapter 1, if you have a colors module installed, its path becomes ./node_modules/colors.
Therefore, you can require that module by its name without pointing to any directory: