“Makers”) of this book (“the Work”) do not guarantee or warrant the results to be obtained from the Work. There is no guarantee of any kind, expressed or implied, regarding the Work or its contents. The Work is sold AS IS and WITHOUT WARRANTY. You may have other legal rights, which vary from state to state. In no event will Makers be liable to you for damages, including any loss of profi ts, lost savings, or other incidental or consequential damages arising out from the Work or its contents. Because some states do not allow the exclusion or limitation of liability for consequential or incidental damages, the above limitation may not apply to you.
You should always use reasonable care, including backup and other appropriate precautions, when working with computers, networks, data, and fi les.
Syngress Media®, Syngress®, “Career Advancement Through Skill Enhancement®,” “Ask the Author UPDATE®,” and “Hack Proofi ng®,” are registered trademarks of Elsevier, Inc. “Syngress: The Defi nition of a Serious Security Library”™, “Mission Critical™,” and “The Only Way to Stop a Hacker is to Think Like One™” are trademarks of Elsevier, Inc. Brands and product names mentioned in this book are trademarks or service marks of their respective companies.
PUBLISHED BY Syngress Publishing, Inc. Elsevier, Inc.
30 Corporate Drive Burlington, MA 01803
Live Response, Forensic Analysis, and Monitoring
Copyright © 2007 by Elsevier, Inc. All rights reserved. Printed in the United States of America. Except as permitted under the Copyright Act of 1976, no part of this publication may be reproduced or distributed in any form or by any means, or stored in a database or retrieval system, without the prior written permission of the publisher, with the exception that the program listings may be entered, stored, and executed in a computer system, but they may not be reproduced for publication.
Printed in the United States of America 1 2 3 4 5 6 7 8 9 0
ISBN 13: 978-1-59749-173-0
Publisher: Andrew Williams Page Layout and Art: SPi Technical Editor: Dave kleiman Copy Editor: Judy Eby
Harlan Carvey (CISSP), author of the acclaimed Windows Forensics and Incident Recovery, is a computer forensics and incident response consultant based out of the Northern VA/Metro DC area. He currently provides emergency incident response and computer forensic analysis services to clients throughout the U.S. His specialties include focusing specifi cally on the Windows 2000 and later platforms with regard to incident response, Registry and memory analysis, and post-mortem computer forensic analysis. Harlan’s background includes positions as a consultant performing vulnerability assessments and penetration tests and as a full-time security engineer. He also has supported federal government agencies with incident response and computer forensic services.
Harlan holds a bachelor’s degree in electrical engineering from the Virginia Military Institute and a master’s degree in electrical engineering from the Naval Postgraduate School.
Harlan would like to thank his wife, Terri, for her support, patience, and humor throughout the entire process of writing his second book.
Harlan wrote Parts I and II.
Author
Dave Kleiman (CAS, CCE, CIFI, CEECS, CISM, CISSP, ISSAP, ISSMP, MCSE, MVP) has worked in the Information Technology Security sector since 1990. Currently, he runs an independent Computer Forensic company DaveKleiman.com that specializes in litigation support, computer forensic investigations, incident response, and intrusion analysis. He developed a Windows Operating System lockdown tool, S-Lok, which surpasses NSA, NIST, and Microsoft Common Criteria Guidelines. He is frequently a speaker at many national security conferences and is a regular contributor to security-related newsletters, websites, and Internet forums. Dave is a member of many professional security organizations, including the Miami Electronic Crimes Task Force (MECTF), International Association of Computer Investigative Specialists (IACIS), International Information Systems Forensics Association (IISFA), the International Society of Forensic Computer Examiners (ISFCE), Information Systems Audit and Control Association (ISACA), High Technology Crime Investigation Association (HTCIA), Association of Certifi ed Fraud Examiners (ACFE), High Tech Crime Consortium (HTCC), and the International Association of Counter Terrorism and Security Professionals (IACSP). He is also the Sector Chief for Information Technology at the FBI’s InfraGard.
Dave was a contributing author for Microsoft Log Parser Toolkit (Syngress Publishing, ISBN: 1932266526), Security Log Management: Identifying Patterns in the Chaos (Syngress Publishing, ISBN: 1597490423) and, How to Cheat at Windows System Administration (Syngress Publishing ISBN: 1597491055). Technical Editor for Perfect Passwords: Selection, Protection, Authentication (Syngress Publishing, ISBN: 1597490415), Winternals Defragmentation, Recovery, and Administration Field Guide (Syngress Publishing, ISBN: 1597490792), Windows Forensic Analysis: Including DVD Toolkit (Syngress Pub-lishing, ISBN: 159749156X), The Offi cial CHFI Study Guide (Syngress PubPub-lishing, ISBN: 1597491977), and CD and DVD Forensics (Syngress Publishing, ISBN: 1597491284). He was Technical Reviewer for Enemy at the Water Cooler: Real Life Stories of Insider Threats (Syngress Publishing ISBN: 1597491292).
Technical Editor
Jeremy Faircloth (Security+, CCNA, MCSE, MCP+I, A+, etc.) is an IT Manager for EchoStar Satellite L.L.C., where he and his team architect and maintain enterprisewide client/server and Web-based technologies. He also acts as a technical resource for other IT professionals, using his expertise to help others expand their knowledge. As a systems engineer with over 13 years of real-world IT experience, he has become an expert in many areas, including Web development, database administration, enterprise security, network design, and project management. Jeremy has contributed to several Syngress books, including Microsoft Log Parser Toolkit (Syngress, ISBN: 1932266526), Managing and Securing a Cisco SWAN (ISBN: 1932266917), C# for Java Programmers (ISBN: 193183654X), Snort 2.0 Intrusion Detection (ISBN: 1931836744), and Security+ Study Guide & DVD Training System (ISBN: 1931836728).
Jeremy wrote Part III.
Contributing Author
Contents
Preface . . . xiii
Author Acknowledgements . . . xxiii
Part I Perl Scripting and Live Response . . . 1
Built-in Functions . . . 2
Win32.pl . . . 2
Pclip.pl . . . 3
Running Processes . . . 4
Netstat1.pl . . . 5
Netstat2.pl . . . 6
Netstat3.pl . . . 7
Accessing the API . . . 8
Getsys.pl . . . 10
WMI . . . 14
Fw.pl . . . 15
Nic.pl . . . 20
Ndis.pl . . . 24
Di.pl . . . 28
Ldi.pl . . . 32
Accessing the Registry . . . 36
Bho.pl . . . 36
Uassist.pl . . . 38
ProScripts . . . 44
Acquire1.pl . . . 44
Final Touches . . . 47
Part II Perl Scripting and Computer Forensic Analysis . . . 49
Log Files . . . 50
Parsing Binary Files . . . 51
Lslnk.pl . . . 52
Registry . . . 58
SAMParse.pl . . . 60
SECParse.pl . . . 68
Recentdocs.pl . . . 71
UAssist.pl . . . 75
Event Logs . . . 80
Evt2xls.pl . . . 80
Parsing RAM Dumps . . . 87
Lsproc.pl . . . 88
Lspi.pl . . . 94
ProScripts . . . 105
Uassist.pl . . . 106
SysRestore.pl . . . 110
Prefetch.pl . . . 117
Parsing Other Data . . . 122
Cc-sort.pl . . . 128
Final Touches . . . 128
Part III Monitoring Windows Applications with Perl . . . 131
In This Toolbox . . . 132
Core Application Processes . . . 132
Monitoring System Key Performance Indicators . . . 133
Monitoring System CPU Utilization . . . 133
Monitoring System Memory Utilization . . . 139
Monitoring System Network Utilization . . . 141
Monitoring a Core Application Process . . . 145
Monitoring Process Availability a Specifi c Process . . . 145
Monitoring CPU Utilization for a Specifi c Process . . . 149
Monitoring Memory Utilization for a Specifi c Process . . . 152
Setting and Using Thresholds . . . 154
Loading an XML Confi guration File . . . 155
Evaluating Thresholds . . . 158
Taking Action . . . 163
Putting it all Together . . . 168
Core Application Dependencies . . . 173
Monitoring Remote System Availability . . . 174
Monitoring Available Disk Space . . . 175
Monitoring Remote Disk Availability . . . 177
Monitoring Remote Databases . . . 179
Monitoring Other Dependencies . . . 180
Web Services . . . 181
Monitoring Web Service Availability . . . 181
Monitoring Web Service Functionality . . . 183
Building a Monitoring System . . . 185
Summary . . . 192
Preface
About the Book
I decided to write this book for a couple of reasons. One was that I’ve now written a couple of books that have to do with incident response and forensic analysis on Windows systems, and I used a lot of Perl in both books. Okay … I’ll come clean … I used nothing but Perl in both books! What I’ve seen as a result of this is that many readers want to use the tools, but don’t know how … they simply aren’t familiar with Perl, with interpreted (or scripting) languages in general, and may not be entirely comfortable with running tools at the command line.
Another reason for writing this book is that contrary popular belief, there is no single application available that does everything or provides every function an incident responder could possibly need. By “popular”, I’m primarily referring to those folks who don’t perform incident response on a regular basis, as well as those who hire and have contracts with fi rms that provide incident responders and other consultants. Many times, incident responders (such as myself ) will show up on-site will a pelican case full of equipment, CDs and DVDs full of tools and code, all of which provides a base capability. From there, what data to retrieve and how to view, manipulate, and present that data is dependant upon the customer … and no two are alike. In the years that I have been performing incident response and computer forensics, while I have had customers with similar requirements, no two engagements have been identical. Talking to other consultants, I have heard the same thing. There simply is no such thing as an application
that will read Event Log fi le, web and FTP server log fi les, or perhaps entire images, and simply give you your answer (was the system compromised, by whom, and when) at the push of a button. Signifi cant amounts of data collection, review, reduction, analysis, and presentation are required, and many times I fi nd myself writing Perl scripts to perform one or more of those functions. In fact, I have found these scripts to be useful enough that for some, I have documented them, cleaned them up a bit, and provided them for public consumption.
I really need to point out that this book is not about computer forensic analysis. The purpose of this book is to show what can be (and has been) done, using Perl, to perform incident response,computer forensic analysis, and application monitoring on Windows systems. This book is about using Perl to complete computer incident response, forensic analysis tasks, and application monitoring, not about the tasks themselves, or the actual analysis.
Who Should Read this Book
This book is intended for anyone who has an interest in useful Perl scripting, in particular on the Windows platform, for the purpose of incident response, and forensic analysis, and application monitoring. While a thorough grounding in scripting languages (or in Perl specifi cally) is not required, it helpful in fully and more completely understanding the material and code presented in this book. This book contains information that is useful to consultants who perform incident response and computer forensics, specifi cally as those activities pertain to MS Windows systems (Windows 2000, XP, 2003, and some Vista). My hope is that not only will consultants (such as myself) fi nd this material valuable, but so will system administrators, law enforcement offi cers, and students in undergraduate and graduate programs focusing on computer forensics.
Getting Started
What is Perl?
Perl is an interpreted language, which means that once you’ve written your source code fi le, you don’t need to compile the code into a standalone executable fi le, the way you do with other programming languages such as C or C++. Rather, you launch the interpreter, telling it to run your script, further passing any additional arguments that may be necessary. The interpreter checks and translates your code into something the operating system can use and understand, and then executes the commands in the script. This is a high-level view of things, of course, but my goal with this book isn’t to teach you the philosophy of interpreted programming languages, but instead to give you something you can use.
Technical descriptions and the design of the programming language aside, Perl is a powerful tool for just about anyone involved with computers. Perl is extremely versatile, and can be used to perform a wide variety of tasks, some of which we’ll be looking at in this book.
Why use Perl?
Why use Perl? That’s a great question.
One reason to use Perl is that it is fairly ubiquitous. There are a great number of platforms that have a version or distribution of Perl available. While our sole concern in this book is the Windows platform, Perl runs on Linux and Mac OS/X, as well as other platforms. What this means is that an examiner is not restricted to a specifi c platform on which to perform forensic analysis using Perl. With some care, Perl scripts can be written to run multiple platforms. I’ve written Perl scripts on a Windows system running on Intel hardware that ran equally well and produced identical output (given the same input fi le) on a Mac PowerPC system. This may be a concern where an examiner has a preference for her examination platform, or has some unique tools that are specifi c to that platform that she prefers to use for her analysis. Another concern may be when performing static analysis of Windows portable executable (PE) fi les or other potentially malicious code. On a Linux or Mac OS/X system, for example, the examiner won’t suffer any ill effects if the executable fi le being examined is accidentally launched.
but you’re going to need some method of manipulating, correlating, and presenting that data in a manner that is required by the customer.
I’ve conducted examinations involving MS Outlook PST fi les, and where one
examination required that I list the attachments by name, another required that I correlate emails and attachments found based on a keyword search against fi lenames within the acquired image that were founding during a search using the same list of keywords.
The point of this is that you’re rarely going to fi nd a commercial or freeware application that you can use during your examination, where all you have to do is click a button and the output will be exactly what you need, or (if you’re a consultant) what your customer is asking for. Most available applications allow you to view the raw data in some form, and may assist you in doing a modicum of correlation, if any at all. Beyond that, however, it’s up to the examiner to perform any additional correlation and presentation of the data that has been found. Sometimes this may require that the examiner translate binary data into something human-readable using a template or guide, or parsing through hundreds (or even thousands) of lines of log entries to extract those that are relevant, or perhaps correlate data between multiple fi les. Being able to produce a utility to perform this function in fairly short order can be of great benefi t to an examiner as well as to her investigation.
Another example that comes to mind is running searches (for keywords, credit card numbers, social security numbers, etc.) across an acquired image and getting massive amounts of data, on the order of tens (or hundreds) of thousands of hits. These may need to be managed by fi lename path, credit card type, etc., and having to do this by hand can take several examiners days or even weeks to perform. However, with some programming ability, just-in-time utilities can be written to effi ciently and accurately perform highly repetitive tasks, freeing the examiner to focus on other tasks.
As you can see, Perl has a number of advantages, but those advantages could apply to other languages, as well.
How is Perl Used Within the Computer
Security Community?
Perl is used extensively within the computer security community. (Not bad for an opening sentence, eh?)
… it was originally designed to be a CGI script, so it was in one BIG Perl fi le …
Further, the description for The Sleuthkit includes, “ … The Sleuth Kit is written in C and Perl…”.
The Metasploit Project (http://www.metasploit.org) makes use of Perl. HD Moore wrote the PEX, or Perl Exploit Library, a Perl module that “provides an object-oriented interface into common exploit development routines.”
ProDiscover, the incident response and computer forensic analysis application from Technology Pathways (http://www.techpathways.com) uses Perl as its programming language. ProDiscover allows a forensic examiner to acquire images of systems, and then open those images for analysis. The ProDiscover graphical user interface (GUI) is fairly straightforward and intuitive, but Perl, implemented as ProScripts, can be used to automate tasks within the loaded project. The ProDiscover installation routine includes the ActiveState (http://www.activestate.com) ActivePerl distribution, as well as the ProScript.pm Perl module that provides the interface so that Perl can be used to interact with images loaded into ProDiscover projects. The Incident Response edition of ProDiscover also allows the responder to automate tasks such as distributing and connecting the PDServer agents, collecting volatile information, acquiring live images, and then disconnecting from the agent.
Getting Up and Running
Installing Perl
The fi rst thing you need to do in order to get started using Perl is to install a distribution for your platform. Perl has been ported to a number of platforms, as shown on the Ports page at the Comprehensive Perl Archive Network, or CPAN (http://www.cpan.org/ports). The Perl distribution used throughout this book is the ActivePerl distribution available from ActiveState. Once you’ve downloaded the most recent distribution of Perl, go ahead and install it. I usually install Perl into the “C:\Perl” directory, but you can install it into whichever directory you fi nd most useful.
Adding Modules
Perl ships with quite a number of installed modules. Modules are libraries of code that people have written that make repetitive tasks easier. Rather than constantly rewriting the code you use from scratch (say, to open sockets and connect to a server on the Internet) you can access the functionality you need in any one of a number of available modules. To see what modules were installed with Perl, you can click your way through the Start menu until you get to the ActivePerl Documentation page, which opens in your web browser.
Another way to manage Perl modules is to use the Perl Package Manager, or “ppm” that ships with ActivePerl. You access ‘ppm’ via the command line; simply open a command prompt, change directories to your Perl directory, and type “ppm /?” to get a list of commands you can use.
If you’re not entirely comfortable with the command line, you can type “ppm” at the command prompt (with nothing else) and the ppm graphical user interface (GUI)1
will open, as illustrated in Figure 1.
Perl Editors
[image:20.612.105.521.105.484.2]When writing Perl scripts, you need an editor of some kind. Back in my early days of graduate school (1994), those of us in the Electrical and Computer Engineering curriculum would write HTML pages using Notepad as our editor. You can use Notepad to write Perl scripts, as well, but I’ve found that using Notepad can make writing and troubleshooting Perl scripts a bit harder than it needs to be. When using an editor, the things I look for are syntax highlighting or color-coding, automating indenting (following curly brackets, etc.), and line numbering. These attributes make it easier to recognize my errors before I try running my code, and tracking them down when an error actually occurs.
There are a number of editors available for Perl. My personal favorite is UltraEdit.2
Not only is UltraEdit an excellent Perl editor, but I use it to edit and view a variety of other formats, to include binary and hexadecimal. UltraEdit is a very versatile and useful tool.
The Perl Code Editor3 (PCE) is a free integrated development environment (IDE)
for Perl. Like UltraEdit, PCE includes syntax highlighting, line numbering, and auto-indenting, as well as a number of other features.
There are a number of other freely available Perl editors and IDEs, such as the Open Perl IDE,4 Perl Express,5 and PerlEdit.6 Personally, when I look for a Perl
editor or IDE, I look for a couple of things. I like line numbering (making it easy to fi nd my mistakes), syntax highlighting (letting me catch my mistakes), and auto-indenting (code is automatically indented inside curly brackets, etc.), among other things. There are other nice-to-have features, but those are my three big ones. Take the opportunity to try some of the editors and IDEs that have been mentioned, or Google for others and fi nd one that you like.
Learning to Program
There are a number of ways that you can learn to program Perl (or any other programming language, for that matter), and it really depends on your own personal preference. One way is to take a class and learn through formal instruction. I had programming classes in graduate school … I was required to take C, for example, and when I was much younger, I took courses in BASIC, and even took Pascal in high school. There are number of ways to obtain formal instruction of this nature, to include through a local community college. However, some may fi nd this type of instruction too structured, teaching only some of the very basic uses of the programming language, such as how to do relatively trivial things like open fi les.
If you’re so inclined, you can teach yourself, simply by diving in and doing it. There are a number of excellent resources available at of all places, your local library. By reading books and following the examples, you can learn to program quite quickly, picking up the basics before progressing on to more complex and useful tasks.
2 http://www.ultraedit.com/ 3 http://www.perlvision.com/pce/ 4 http://open-perl-ide.sourceforge.net/ 5 http://www.perl-express.com/
An additional resource that is available is code that others have written. Some folks learn to program by looking at the steps others have taken to accomplish a task, and adding on to it, or modifying it in some other way to meet their needs. There are a number of resources available, through web sites, blogs, user forums, etc. There are number of resources that provide archives for code others have written and submitted, and there are folks out there who are willing to help, and provide assistance and advice (provided, of course, you’re making an effort to perform the task yourself and not asking someone to do your homework for you).
Writing Your Own Code
You’ll see in the code throughout this book and on the accompanying DVD that I have my own programming style … there are certain ways that I do certain things in my code, and for me, that makes the code stand out. My hope is that it makes it easier for others to read and use, as well. Others have their own style, particularly in formatting. What’s that joke about lawyers and opinions? Well, put fi ve Perl programmers in a room with a task to accomplish, and as long as that task is beyond a simple “print” statement, you’ll likely get fi ve different versions of code as a result. Then, let them each look at the others and you’ll likely get more. I mention this because I don’t want you to think that my way of coding is THE way; it’s simply A way. Many times, I will break certain tasks down into separate lines or sections of code, with documentation, where a single line may have been more elegant. I do this so that someone else, perhaps without as much background in either the problem or in Perl can then look at the code and have an easier time understanding what I did. There are also times where that “someone else” is me, six months or a year later. Sometimes elegance and speed have to give way to understandability and the ability to use the code again at a later date.
Running Perl Scripts
Perhaps the biggest issue I have had with my fi rst two books and Perl scripts is the inevitable emails that I get … “I double-clicked the Perl script and a black box fl ashed on the screen … what do I do?” Questions like this come from simply being (a) far too familiar and comfortable with GUI tools, and (b) unfamiliar with scripts of any kind (to include batch fi les) and the command prompt.
parameters or arguments with the command; in essence, additional instructions which the script will process based on its code, and hopefully give you the desired result.
Organization of the Book
Part I
Part I addresses the use of Perl when working with live systems, as when an administrator is troubleshooting an issue, or when responding to an incident.
Part II
Part II covers the use of Perl when performing forensic analysis of fi les after an image has been acquired of the system.
Part III
In Part III we will be focusing on monitoring the core application processes, the core application dependencies, network connectivity, Web services, and log fi les.
Download the Code
I’d like to take this opportunity to acknowledge the efforts of a couple of folks who were instrumental to this book being written. First, I’d like to acknowledge God for blessing me, and my family for supporting me through the process of writing this book, as well as the others. I’d like to thank Dave Roth for his inspiration that started back in 1999, and for all of his assistance along the way. Dave provided support as I attempted to use his Perl modules, and even provided the drive to get me to present at my fi rst conference. I’d like to thank Dave Schultz, whom I met while working for Trident Data Systems, for being patient as I fumbled, and for providing me with some useful programming hints that I still use today. I’d like to thank Jesse Kornblum, Andreas Schuster, and Didier Stevens for their drive and desire to push the envelope in the area of forensic analysis.
I’d like to thank the members of law enforcement who have asked for my help, and then acknowledged it. In a community that seems to harbor the expectation of free tools and tech support, it’s a wonderful feeling when someone thanks you for your time and assistance.
There may be others that I’m missing, but I’d like to send out a heartfelt “thank you” to all those who chided (dare I say, “made fun of ”) me for using Perl in the fi rst place … I know that some of you were kidding, while some of you were serious. Hopefully, folks that did both are reading these words.
Author Acknowledgements
1
Part I
Perl Scripting and
Live Response
Solutions for this Part:
■ Built-in Functions
■ Running Processes
■ Accessing the API
■ WMI
■ Accessing the Registry
This Part focuses on the use of Perl when extracting data from a live system, as part of live response. “Live response” is a general term used to describe activities that are performed when information is needed from a system while it is still running. This most often involves collecting volatile data from a system, or data that is only available when the system is powered on and running. Live response activities can include something as simple as an administrator troubleshooting an issue on a system, or collecting process and network connection information from a system prior to powering the system down and acquiring an image of the system’s hard drive. These activities can also include inventory control (determining who’s logged into a system, what software is installed on a system, and so forth), and can be performed locally (while the administrator is sitting at the console) or remotely, over the network.
Built-in Functions
ActiveState Perl comes with several built-in Windows (i.e., Win32) functions that allow you to access and retrieve specifi c information from a Windows system. For example, you can determine the current working directory (Win32::GetCwd() ), the system architecture, and type of CPU of the system (Win32::GetArchName() and Win32::GetChipName(), respectively), as well as a number of other very useful pieces of information. All of these functions are simply interfaces into the appropriate
Windows application program interface (API) function calls, and allow the programmer to quickly retrieve the information they’re looking for.
Win32.pl
Demonstrates the use of some of the Perl Win32 built-in functions: use strict;
use Win32;
On my test system the output from this script appears as follows: C:\Perl>win32.pl
Architecture : x86
Chip : 586
Perl Build : 819
Node Name : WINTERMUTE Login Name : Harlan OS Name : WinXP/.Net Service Pack 2 5 1 2600 2
As you can see, some of this information can be quite useful during incident response. Check the ActiveState Perl documentation for a complete list of Win32 functions.
Pclip.pl
While not a built-in function, ActiveState Perl ships with several Perl modules that are specifi c to the Windows platform. For example, the Win32::Clipboard module allows you to set or retrieve the contents of the Windows Clipboard.
use strict;
use Win32::Clipboard;
my $clip = Win32::Clipboard(); my $clipboard;
if ($clipboard = $clip->Get() ) { print “Clipboard Contents\n”; print “-” Χ 20,“\n”;
print $clipboard.“\n”; }
else {
print “Error retrieving clipboad contents: ”.Win32::FormatMessage(Win32::GetLastError() ).“\n”; }
As an example, I was looking up some directions to a location that I needed to visit, and that I had to provide to a friend. I found the street address of the location and selected it in one Web page window, copied it, and pasted it into the e-mail that I was preparing to send. Afterward, I ran pclip.pl and this is what I got back:
Clipboard Contents –––––––––––––––––––– 123 Fake Street
Imagine what people copy into their clipboards throughout the day, many without really understanding what happens. I suggest that just as an experiment, you should go around an offi ce or a school, or you can even do this at home, and simply open a Notepad window, place the cursor anywhere within the window, and press Ctrl-V. Whatever is in the clipboard will be pasted into Notepad. Pclip.pl allows you to automate this collection process.
Running Processes
When performing live response, we are working with and interacting with a live, running system. Many times, when responding to an incident, a user may still be logged into the system. In some cases, such as employee workstations within an organization, this user may be the employee themselves. In others, such as in server rooms and data centers, this user will most likely be a system administrator. Often, an incident will occur and we will need to log into the system ourselves (as a consultant, I always have the system administrator do that) in order to obtain information from a system. The point is that in order to collect information from a live system, there has to be an account logged into the system, either at the console (via the keyboard) or over the network.
As the system is live and running, there are processes running, threads being executed, and code being processed. This is how we interact with the system; we “ask” the system for information by running processes ourselves. Our Perl scripts may be processes, but many times it is simply much easier to run external, third-party tools, or even tools that are native to the system itself, in order to get the information we need. For example, let’s say that we’d like to get a list of open network connections from a system. The fi rst thing that comes to mind as a means of requesting this information from the system is the native utility, netstat.exe.
tool or utility in a Perl script (or batch fi le), we have a form of self-documentation. Documentation is a very important aspect of incident response. Second, many of the tools we may want to run on systems have a number of command-line arguments, and I don’t know about you, but sometimes in the heat of the moment, I may not be able to keep that information straight, particularly at 2:30 a.m. when I’m trying to collect information from systems’ that may have been compromised. So, by including the tool or utility in a Perl script, I have a degree of automation that prevents me from making mistakes, particularly through repetition. Finally, it’s not often that I deal with only one system, or one tool or utility. Most often, I’m responding to 10, 50, or 100 systems, and I’m running a number of different tools on each of those systems. Using a Perl script, I’m able to put everything into a single command so that when the situation changes, I’m prepared. That way, if something happens further down the road and someone asks me what I did, I can refer back to the Perl script and the copies of the tools I ran.
So, there are a couple of ways that we can run programs on a system. Using netstat.exe, we’ll take a look at several of them. Do not think that these are the only ways to address this particular issue. One of the strengths of Perl is that there is usually more than one way to complete a task. What I’m going to do here is show you some of what I have come up with, but this does not mean that these methods or Perl scripts are the only way to do things.
Netstat1.pl
Perhaps the simplest way to launch external programs in Perl is to use the system() function. The system() function simply forks a child process from a parent process, which waits for the child process to complete, and then exits. A very simple use of the system() function, using netstat.exe as our example, is as follows:
use strict;
my @args = (“netstat”, “-ano”); system(@args);
While this could have been much simpler in only a single line, simplicity or elegance isn’t the issue here. What happens when we run this code is that the output of our command appears at the console, or standard output (i.e., STDOUT). So all we’ve really done here is added a layer of abstraction and not really bought ourselves anything useful. In order to save the output of the command, for example, we’d still need to use the redirection operator at the command prompt:
That’s really no different from not using Perl at all: C:\>netstat –ano > netstat.log
So, a bit of extra effort, but it would appear that we really haven’t bought ourselves anything. Now, this might be different if we were using this script to run multiple commands; after all, wouldn’t we then be benefi ting from automation? During incident response, you’re usually under pressure, either from your boss or the clock, or you’re tired because it’s 3:00 a.m., and the fi rst thing that will happen is that you’ll forget a command or mistype a command or something that will be frustrating under those conditions. By linking the commands together into a script, we can now type in a single command, a couple of short keystrokes, and have everything run for us. However, at this point, we really don’t have anything much more than a batch fi le contained in a Perl script. We haven’t taken full advantage of the power of Perl to make our jobs easier.
Netstat2.pl
Another way to run external commands through Perl is to use backticks. Backticks are not the single quote operator on your keyboard; rather the backticks are the slanted single quote operator. Using the backtick operator, you can access system commands or even external commands (replace netstat.exe with your program of choice, ensuring that it is located in the PATH). For example, let’s call the following code “netstat2.pl”: #! c:\perl\bin\perl.exe
use strict;
my @netstat = ‘netstat -ano’; map{print “$_”}@netstat;
Now we’re at the point where we’re making our jobs a little easier. For example, I can fi lter through the output, looking for a particular Internet Protocol (IP) address, or skipping lines that contain the loopback address (127.0.0.1). I can minimize the output, showing only the things I want to see, rather than showing me everything. I can fi lter the data, showing only those network connections that are in a particular state, such as LISTENING, TIME_WAIT, or ESTABLISHED. The point is, we’re now making our jobs easier by running a command of our choosing and being able to manage the output of that command.
Netstat3.pl
The Win32::Job module provides a bit more granularity of control when creating and running processes, as shown in netstat3.pl below.
#! c:\perl\bin\perl.exe use strict;
use Win32::Job; eval {
my $job = Win32::Job->new();
my $result = $job->spawn(“netstat.exe”,“netstat.exe -ano”); die “Value is undefi ned. ”.$^E.“\n” unless (defi ned $result); my $ok = $job->run(60);
};
print $@.“\n” if ($@);
Master Craftsman
Extending the Use of Backticks
You can use the backticks to not only launch applications on the system, or even applications and programs external (i.e., not native) to the system, but also to access native commands, such as “dir.” “Dir” doesn’t exist as an executable fi le on a system, but it is an accessible command.
When we run netstat3.pl, we get the same sort of output we would expect to see if we were running the netstat –ano command from the command line; however, in this case, we are able to use the Win32::Job module to do things such as limit the amount of time that the process runs. In netstat3.pl, we limit that time to 60 seconds, which is a long time, and probably more time than we need in most cases. However, I have seen simple command-line tools (such as netstat.exe) hang when run on some systems, or simply take an inordinate amount of time to run (due to high processing overhead from other processes, and so forth). In such cases, we may want to limit how long the process runs, and that’s where Win32::Job comes in.
There are a couple of other functions within the Win32::Job module that may be of use, depending upon what you’re doing and the level of control of the process you wish to achieve. For example, you can use the spawn() function to redirect STDOUT and STDERR messages to log fi les, or you can use the watch() function to provide a handler for the process, in order to achieve an even more granular level of control over the process. Check the POD for the Win32::Job module and for the Win32:: Process module, for other ideas on how to run external processes from within Perl code.
Also notice the use of the eval{} block. This allows us to tell Perl to evaluate the code, and trap any errors that may occur. One of the big ones that occurred when I was writing and testing the above code was that I had misspelled the name of the executable (i.e., “nestat.exe” instead of “netstat.exe”). While this is not an error that would cause a major application crash, the error was trapped, nonetheless. The eval{} block is useful for trapping such errors, and even allowing your code to progress in the event of an error that you simply wish to recover from (and not have your entire script bomb out!).
Accessing the API
When performing live response or perhaps even analyzing fi les retrieved from a system during live response, you may want to access the Windows API. The Windows API can provide some useful functionality, already partially built. Fortunately, Microsoft exposes a good portion of the public API via the Microsoft.com Web site, and in addition, there are books available that describe other API functions that are accessible, albeit not fully documented.
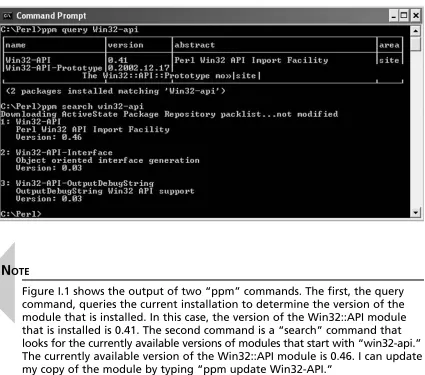
Figure I.1 illustrates the output of this command on my system.
Figure I.1 Querying for the Win32::API Module
You’ll notice in Figure I.1 that when I ran my query for “win32-api,” all of the modules that began with that name were returned. What is this module named “Win32-API-Prototype1”? This is a module created by Dave Roth that encapsulates
the Win32::API module and makes the Win32::API module easier to use.
N
OTEFigure I.1 shows the output of two “ppm” commands. The fi rst, the query command, queries the current installation to determine the version of the module that is installed. In this case, the version of the Win32::API module that is installed is 0.41. The second command is a “search” command that looks for the currently available versions of modules that start with “win32-api.” The currently available version of the Win32::API module is 0.46. I can update my copy of the module by typing “ppm update Win32-API.”
Getsys.pl
When performing incident response, some of the information you may want to get from the live system includes things such as the current system time and the uptime of the system. All of these pieces of information can be retrieved via the Windows API. To do so, we’ll use Dave’s Win32::API::Prototype module to access a couple of Windows API calls:
#! c:\perl\bin\perl.exe
#–––––––––––––––––––––––––––––––––––––––––––––––––––––––––––––––––––––––––––––––– # getsys.pl
# This script demonstrates the use of the Win32::API::Prototype # module to retrieve time-based information from the local system #
# The only required module is Win32::API::Prototype:
# ppm install http://www.roth.net/perl/packages/win32-api-prototype.ppd #
# Usage: [perl] getsys.pl #
# Copyright 2001–2007 H. Carvey
#–––––––––––––––––––––––––––––––––––––––––––––––––––––––––––––––––––––––––––––––– use strict;
use Win32::API::Prototype;
my @month = qw/Jan Feb Mar Apr May Jun Jul Aug Sep Oct Nov Dec/; my @day = qw/Sun Mon Tue Wed Thu Fri Sat/;
T
IPTo install the Win32::API::Prototype module, type the following command: C: \perl>ppm install http://www.roth.net/perl/packages/win32-api-prototype.ppd
N
OTE# Meanings of the following constants can be found here: # http://msdn.microsoft.com/library/default.asp?url #
=/library/en-# us/sysinfo/base/gettimezoneinformation.asp
my @tz = qw/TIME_ZONE_ID_UNKNOWN TIME_ZONE_ID_STANDARD TIME_ZONE_ID_DAYLIGHT/; ApiLink(‘kernel32.dll’,
‘VOID GetSystemTime(LPSYSTEMTIME lpSystemTime)’) || die “Cannot locate GetSystemTime()”;
ApiLink(‘kernel32.dll’,
‘DWORD GetTimeZoneInformation(
LPTIME_ZONE_INFORMATION lpTimeZoneInformation)’) || die “Cannot locate GetTimeZoneInformation()”; # The return value is the number of milliseconds that # have elapsed since the system was started. # This value rolls over to zero after 49.7 days ApiLink(‘kernel32.dll’,
‘DWORD GetTickCount()’)
|| die “Cannot locate GetTickCount()”; # Get the system time
# Ref: http://msdn.microsoft.com/library/default.asp?url= # /library/en-us/sysinfo/base/getsystemtime.asp my $lpSystemTime = pack(“S8”, 0);
GetSystemTime($lpSystemTime); my $str = sys_STR($lpSystemTime); print “System Time : $str\n”;
my ($day,$hour,$min,$sec) = getUpTime();
print “System Uptime: $day days, $hour hours, $min min, $sec sec.\n”; print “\n”;
my $lpTimeZoneInformation = pack ‘lA64SSSSSSSSlA64SSSSSSSSl’,
0, ‘ ’ Χ 64, 0, 0, 0, 0, 0, 0, 0, 0, 0, ‘ ’ Χ 64, 0, 0, 0, 0, 0, 0, 0, 0, 0; my $bias;
my $standardName; my $standardBias; my $dayLightName; my $dayLightBias; my @c;
my @f;
my $ret = GetTimeZoneInformation($lpTimeZoneInformation);
$dayLightBias) = unpack ‘lA64SSSSSSSSlA64SSSSSSSSl’, $lpTimeZoneInformation; print “Return code => ”.$tz[$ret].“\n”;
# The bias is the difference, in minutes, between UTC time and local time. # Convert to hours for presentation
# UTC = local time + bias
print “Bias => “.$bias.” minutes\n”; if (1 == $ret) {
print “Standard Bias => “.$standardBias.” minutes\n”; }
elsif (2 == $ret) {
print “Daylight Bias => “.$dayLightBias.” minutes\n”; }
else { # do nothing }
$standardName =~ s/\00//g; $dayLightName =~ s/\00//g;
print “StandardName => “.$standardName.”\n”; print “DaylightName => “.$dayLightName.”\n”; # Convert returned SystemTime into a string sub sys_STR {
my $lpSystemTime = $_[0];
my @time = unpack(“S8”, $lpSystemTime);
$time[5] = “0”.$time[5] if ($time[5] =~ m/^\d$/); $time[6] = “0”.$time[6] if ($time[6] =~ m/^\d$/);
my $timestr = $day[$time[2] ].“ ”.$month[$time[1]-1].“ ”. $time[3].“ ”.$time[4].“:”.$time[5].“:”.$time[6].“ ”. $time[0];
return “$timestr”; }
sub getUpTime {
my $count = GetTickCount(); my $sec = 1000;
my $min = $sec * 60; my $hour = $min * 60; my $day = $hour * 24; my ($temp,$d,$h,$m,$s); if ($count > $day) {
$h = (split(/\./,($temp/$hour),2) )[0]; $temp = $temp%$hour;
$m = (split(/\./,($temp/$min),2) )[0]; $temp = $temp%$min;
$s = (split(/\./,($temp/$sec),2) )[0]; }
elsif ($count > $hour) { $d = 0;
$h = (split(/\./,($count/$hour),2) )[0]; $temp = $count%$hour;
$m = (split(/\./,($temp/$min),2) )[0]; $temp = $temp%$min;
$s = (split(/\./,($temp/$sec),2) )[0]; }
elsif ($count > $min) { $d = 0;
$h = 0;
$m = (split(/\./,($count/$min),2) )[0]; $temp = $count%$min;
$s = (split(/\./,($temp/$sec),2) )[0]; }
elsif ($count > $sec) { $d = 0;
$h = 0; $m = 0;
$s = (split(/\./,($count/$sec),2) )[0]; }
return ($d,$h,$m,$s); }
Running the script returns the following information from my system: C:\Perl>getsys.pl
System Time : Fri Aug 31 22:57:38 2007 System Uptime: 0 days, 12 hours, 6 min, 35 sec. Return code => TIME_ZONE_ID_DAYLIGHT Bias => 300 minutes Daylight Bias => −60 minutes
Retrieving information from a Windows system via the API can be useful, but it can also lead to problems. Many times, APIs will change between versions of Windows (such as between Windows 2000 and XP), or they may even change when a Service Pack is installed or updated. As such, direct use of the Windows API to collect some information from systems should be thoroughly tested before being deployed on a widespread basis.
WMI
The Windows Management Instrumentation (WMI) is a great way to obtain information from live Windows systems. WMI is really nothing more than many of the hard-core details of accessing the Windows API that have been encapsulated and made easier to use. Instead of having to write code that accesses a system to determine what version of Windows it is and then take appropriate steps based on that version, an administrator can write code that will work (in most cases) consistently across Windows 2000 all the way through Vista. This means that an administrator or incident responder can request a list of the active processes from systems from across the enterprise, either locally on the host systems or remotely from a centrally located management console, and use the same code to get the same results, regardless of the version of Windows being queried. The advantage of this is that during incident response, many times some tools work better on some systems than on others and some tools simply do not work at all.
Master Craftsman
Getting Even More Information
You can extend the getsys.pl script to get things such as the current system time, the current Universal Coordinated Time (UTC) (UTC is analogous to Greenwich Mean Time [GMT]), the system name, the name of the logged on user, and so forth. For example, to get the system name, you might use the GetComputerNameA2 API function, and to get the name of the logged on
user, you might use the GetUserNameA3 API function.
Another advantage of WMI is that it provides a cleaner, easier to use interface to some (albeit not all) of what you can access via the Win32::API and Win32::API:: Prototype modules. For example, you can access information about the microprocessor, physical memory, hard drives, and other devices on the systems.
The Win32::OLE module provides the interface through which you can use Perl to access the WMI classes. The WMI classes provide access to operating system classes4,
such as classes that provide access to information pertaining to fi les, processes, drivers, networking, operating system settings, and so forth. The computer system hardware classes5 provide access to information about devices on the system, such as the
processor(s), hard drivers, batteries, fans, and so forth.
Fw.pl
While one advantage of the WMI classes is that they provide a common interface to certain aspects of the Windows platform regardless of the operating system version, one disadvantage is that some versions of Windows have functionality that others do not. For example, Windows XP Service Pack 2 and Windows 2003 have a built-in fi rewall that is part of the Security Center, something neither Windows NT 4.0 (WMI classes were installed as a separate download for Windows NT) nor Windows 2000 have.
#! c:\perl\bin\perl.exe
#–––––––––––––––––––––––––––––––––––––––––––––––––––––––––––––––––––––––––––––––– # fw.pl
# Use WMI to get info about the Windows fi rewall, as well as # information from the SecurityCenter
#
# Usage: fw.pl [-bsph] [-app] [-sec] #
# copyright 2006–2007 H. Carvey [email protected]
#–––––––––––––––––––––––––––––––––––––––––––––––––––––––––––––––––––––––––––––––– use strict;
use Win32::OLE qw(in); use Getopt::Long; my %confi g = ();
4 http://msdn2.microsoft.com/en-us/library/aa392727.aspx
5 http://msdn.microsoft.com/library/default.asp?url=/library/en-us/wmisdk/wmi/
Getopt::Long::Confi gure(“prefi x_pattern=(-|\/)”); GetOptions(\%confi g, qw(b s sec p app help|?|h) ); # if -h, print syntax info and exit
if ($confi g{help}) { \_syntax(); exit 1; }
# some global hashes used throughout the code my %proto = (6 => “TCP”,
17 => “UDP”); my %ipver = (0 => “IPv4”, 1 => “IPv6”, 2 => “Any”);
my %type = (0 => “DomainProfi le”, 1 => “StandardProfi le”);
print “[“.localtime(time).”] Checking Windows Firewall on “.Win32::NodeName().”. . .\n” unless ($confi g{sec});
# Create necessary objects
my $fwmgr = Win32::OLE->new(“HNetCfg.FwMgr”)
|| die “Could not create fi rewall mgr obj: ”.Win32::OLE::LastError().“\n”; my $fwprof = $fwmgr->LocalPolicy->{CurrentProfi le};
if (! %confi g || $confi g{b}) {
# Profi le type: 0 = Domain, 1 = Standard
print “Current Profi le = ”.$type{$fwmgr->{CurrentProfi leType} }.“ ”; if ($fwprof->{FirewallEnabled}) {
print “(Enabled)\n”; }
else {
print “(Disabled)\n”; exit(1);
}
($fwprof->{ExceptionsNotAllowed}) ?(print “Exceptions not allowed\n”): (print “Exceptions allowed\n”);
($fwprof->{Notifi cationsDisabled})?(print “Notifi cations Disabled\n”): (print “Notifi cations not disabled\n”);
($fwprof->{RemoteAdminSettings}->{Enabled}) ? (print “Remote Admin Enabled\n”) : (print “Remote Admin Disabled\n”);
print “\n”; }
if (! %confi g || $confi g{app}) {
foreach my $app (in $fwprof->{AuthorizedApplications}) { if ($app->{Enabled} == 1) {
print $app->{Name}.“ - ”.$app->{ProcessImageFileName}.“\n”;
print “IP Version = “.$ipver{$app->{IPVersion} }.”; Remote Addrs = ” .$app->{RemoteAddresses}.“\n”;
print “\n”; }
} }
if (! %confi g || $confi g{p}) {
print “[Globablly Open Ports]\n”;
foreach my $port (in $fwprof->{GloballyOpenPorts}) { if ($port->{Enabled} == 1) {
my $pp = $port->{Port}.“/”.$proto{$port->{Protocol} };
printf “%−8s %−35s %−20s\n”,$pp,$port->{Name},$port->{RemoteAddresses}; }
}
print “\n”; }
if (! %confi g || $confi g{s}) { print “[Services]\n”;
foreach my $srv (in $fwprof->{Services}) { if ($srv->{Enabled}) {
print $srv->{Name}.“ (“.$srv->{RemoteAddresses}.”)\n”; foreach my $port (in $srv->{GloballyOpenPorts}) { if ($port->{Enabled} == 1) {
my $pp = $port->{Port}.“/”.$proto{$port->{Protocol} };
printf “ %−8s %−35s %−20s\n”,$pp,$port->{Name},$port->{RemoteAddresses}; }
}
print “\n”; }
} }
# Check the SecurityCenter for additional, installed, WMI-managed FW and/or AV software
# Some AV products are not WMI-aware, and may need a patch installed if ($confi g{sec}) {
my $server = Win32::NodeName();
my $objWMIService = Win32::OLE->GetObject(“winmgmts:\\\\$server\\root\\ SecurityCenter”) || die “WMI connection failed.\n”;
# Alternative method
# my $locatorObj = Win32::OLE->new(‘WbemScripting.SWbemLocator’) || die # “Error creating locator object: ”.Win32::OLE->LastError().“\n”; # $locatorObj->{Security_}->{impersonationlevel} = 3;
# my $objWMIService = $locatorObj->ConnectServer($server,‘root\ SecurityCenter’,“”,“”)
# || die “Error connecting to $server: ”.Win32::OLE->LastError().“\n”; my $fwObj = $objWMIService->InstancesOf(“FirewallProduct”);
if (scalar(in $fwObj) > 0) { foreach my $fw (in $fwObj) {
print “Company = ”.$fw->{CompanyName}.“\n”; print “Name = ”.$fw->{DisplayName}.“\n”; print “Enabled = ”.$fw->{enabled}.“\n”; print “Version = ”.$fw->{versionNumber}.“\n”; }
} else {
print “There do not seem to be any non-MS, WMI-enabled FW products installed.\n”;
}
my $avObj = $objWMIService->InstancesOf(“AntiVirusProduct”); if (scalar(in $avObj) > 0) {
foreach my $av (in $avObj) {
print “Company = ”.$av->{CompanyName}.“\n”; print “Name = ”.$av->{DisplayName}.“\n”; print “Version = ”.$av->{versionNumber}.“\n”;
print “O/A Scan = ”.$av->{onAccessScanningEnabled}.“\n”; print “UpToDate = ”.$av->{productUptoDate}.“\n”;
} } else {
print “There do not seem to be any WMI-managed A/V products installed.\n”; }
}
sub _syntax { print>> “EOT”; fw [-bsph] [-app]
-b ...Basic info about Windows fi rewall only
-app ...Display authorized application info for the Windows fi rewall (enabled only)
-s ...Display service info for the Windows fi rewall (enabled only) -p ...Display port info for Windows fi rewall (enabled only)
-sec ...Display info from the SecurityCenter (other managed FW and/or AV)
-h ...Help (print this information)
Ex: C:\\>fw -s >server> -u >username> -p >password> copyright 2006–2007 H. Carvey
EOT }
There are a couple of things you’ll notice about the fw.pl Perl script. One is the use of the Getopt::Long module in order to allow for the use of command-line arguments in the script. This allows us to program different functionality into a single script, rather than writing separate scripts to do slightly different things. For example, if you look at the content of the _syntax() function from the script, you’ll see that you can use command-line arguments and switches to modify the output of the script and show different bits of information. This way, we can have one script with a complete set of functionality, rather than half a dozen different scripts. If I run the fw.pl script on my own system with just the “-b” switch, I get the following output: C:\Perl>fw.pl -b
[Fri Aug 31 17:29:47 2007] Checking Windows Firewall on WINTERMUTE. . . Current Profi le = StandardProfi le (Enabled)
Exceptions allowed
Notifi cations not disabled Remote Admin Disabled
Running the script with just the “-s” switch to see the service information for the fi rewall, I get:
C:\Perl>fw.pl -s
[Fri Aug 31 17:31:41 2007] Checking Windows Firewall on WINTERMUTE. . . [Services]
File and Printer Sharing (LocalSubNet)
UPnP Framework (LocalSubNet)
1900/UDP SSDP Component of UPnP Framework LocalSubNet 2869/TCP UPnP Framework over TCP LocalSubNet
Using just the “-sec” switch to check the SecurityCenter6 settings, I get:
C:\Perl>fw.pl -sec
[Fri Aug 31 17:32:57 2007] Checking SecurityCenter on WINTERMUTE . . . There do not seem to be any non-MS, WMI-enabled FW products installed. There do not seem to be any WMI-managed A/V products installed.
Now, had I had a WMI-enabled antivirus product installed on this system, it would show up in the output of the script. I would also be able to get some setting information from the system regarding an installed WMI-enabled fi rewall, if there is one, as in the following output taken from another system:
D:\Programs\Perl>fw.pl -sec
[Thu Sep 6 15:23:15 2007] Checking SecurityCenter on A1 . . . Company = Check Point, LTD.
Name = ZoneAlarm Pro Firewall Enabled = 1
Version = 7.0.337.000 Company = GRISOFT Name = AVG 7.5.485 Version = 7.5.485 O/A Scan = 1 UpToDate = 1
As you can see, this system has the ZoneAlarm Pro Firewall and Grisoft AVG anti-virus (AV) applications installed (and more importantly, enabled), and the AV product appears to be up-to-date and enabled.
Nic.pl
The Perl script nic.pl allows you to retrieve information about network interface cards (NICs) through the Win32_NetworkAdapterConfi guration7 WMI class. The
script allows you to collect information from either the local system, or from a remote system. While the class, like many other WMI classes, provides functions or methods for modifying information on the system, during incident response we’re most interested in collecting information, so we’ll stick to simply querying the system and retrieving the information that we need, and avoid modifying anything.
6 http://support.microsoft.com/kb/883792
#! c:\perl\bin\perl.exe
#–––––––––––––––––––––––––––––––––––––––––––––––––––––––––––––––––––– # nic.pl
# Use WMI to get information about active network interface cards # on a system
#
# Usage: [perl] nic.pl #
# Copyright 2004–2007 H. Carvey [email protected]
#–––––––––––––––––––––––––––––––––––––––––––––––––––––––––––––––––––– use strict;
use Win32::OLE qw(in); use Getopt::Long; my %confi g = ();
Getopt::Long::Confi gure(“prefi x_pattern=(-|\/)”);
GetOptions(\%confi g, qw(server|s=s user|u=s passwd|p=s csv|c help|?|h) ); if ($confi g{help}) {
\_syntax(); exit 1; }
if (! %confi g) {
$confi g{server} = Win32::NodeName(); $confi g{user} = “”;
$confi g{passwd} = “”; }
$confi g{user} = “” unless ($confi g{user}); $confi g{passwd} = “” unless ($confi g{passwd});
my $locatorObj = Win32::OLE->new(‘WbemScripting.SWbemLocator’) || die “Error creating locator object: “.Win32::OLE->LastError().”\n”; $locatorObj->{Security_}->{impersonationlevel} = 3;
my $serverObj = $locatorObj->ConnectServer($confi g{server},‘root\cimv2’,$confi g{user} ,$confi g{passwd})
|| die “Error connecting to $confi g{server}: ”.Win32::OLE->LastError().“\n”; foreach my $nic (in $serverObj->InstancesOf(“Win32_NetworkAdapterConfi guration”) ) { if (defi ned($nic->{IPAddress}) ) {
print “\tIP Enabled\n” if ($nic->{IPEnabled}); print “\t”.$nic->{MACAddress}.“\n\n”;
} }
sub _syntax { print<< “EOT”;
nic [-s system] [-u username] [-p password] [-c] [-h]
Collect network interface information from a local or remote system -s system . . . Name of the system to scan (default: localsystem) -u username. . . . Username used to connect to the remote system (usually an Administrator)
-p password. . . . Password used to connect to the remote system -h. . . Help (print this information)
Ex: C:\\>nic -s >server> -u >username> -p >password> copyright 2004–2007 H. Carvey
EOT }
Running the script on my local system, you can see the information that the script returns:
C:\Perl>nic.pl
Dell Wireless 1390 WLAN Mini-Card - Packet Scheduler Miniport 192.168.1.13
IP Enabled
00:16:CE:74:2C:B3
VMware Virtual Ethernet Adapter for VMnet1 192.168.184.1
IP Enabled
00:50:56:C0:00:01
VMware Virtual Ethernet Adapter for VMnet8 192.168.239.1
IP Enabled
00:50:56:C0:00:08
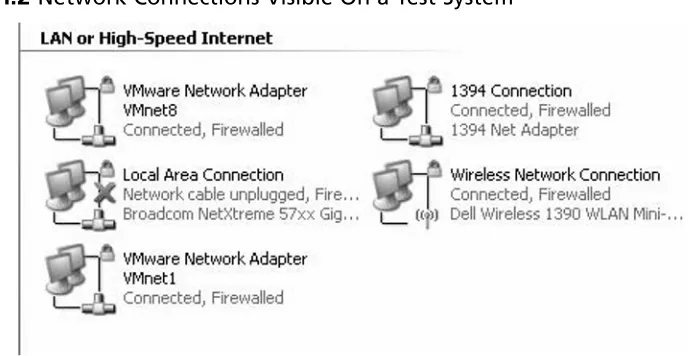
RJ-45 jack on my computer, is not enabled. Figure I.2 illustrates this information clearly via the Network Connections from the Settings menu on the test system.
Figure I.2 Network Connections Visible On a Test System
Using scripts such as nic.pl, we can preserve the state of the live system at a point in time, either prior to shutting it down, or simply to document which network connections were enabled and functioning at a specifi c moment. This information may not be readily available to us during a follow-on (i.e., “post-mortem”) investigation after an image has been acquired from the system, and will most likely be extremely valuable to our investigation.
Swiss Army Knife
Learning More About NICs
Ndis.pl
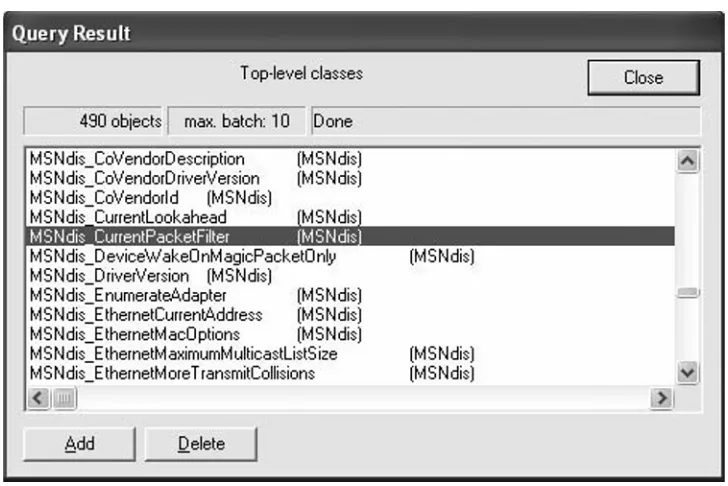
WMI also provides access to Windows drivers through the Windows Driver Model (WDM). Figure I.3 demonstrates a dialog box that results from the use of the WBEMTest8
[image:48.612.115.479.230.473.2]tool, where I’ve listed the WDM classes available on my Windows XP SP 2 system. The highlighted class, MSNdis_CurrentPacketFilter, for example, provides us with access to the current fi lters for the NIC (note that a reference link is embedded in the comments at the beginning of the script).
Figure I.3 Viewing Classes via the WMI Tester Interface (ch1-msndis.tif)
The ndis.pl script appears as follows: #! c:\perl\bin\perl.exe
#––––––––––––––––––––––––––––––––––––––––––––––––––––– # ndis.pl - Perl script to determine settings of NIC; # Checks for promiscuous mode
#
# usage: C:\>[perl] ndis.pl #
# Copyright 2007 H. Carvey [email protected]
#–––––––––––––––––––––––––––––––––––––––––––––––––––––
use strict;
use Win32::OLE qw(in);
# OID_GEN_CURRENT_PACKET_FILTER values defi ned in ntddndis.h
# http://msdn.microsoft.com/library/default.asp?url=/library/en-us/ # wceddk5/html/wce50lrfoidgencurrentpacketfi lter.asp
my %fi lters = (”NDIS_PACKET_TYPE_DIRECTED” => 0x00000001, “NDIS_PACKET_TYPE_MULTICAST” => 0x00000002,
“NDIS_PACKET_TYPE_ALL_MULTICAST” => 0x00000004, “NDIS_PACKET_TYPE_BROADCAST” => 0x00000008, “NDIS_PACKET_TYPE_SOURCE_ROUTING” => 0x00000010, “NDIS_PACKET_TYPE_PROMISCUOUS” => 0x00000020, “NDIS_PACKET_TYPE_SMT” => 0x00000040,
“NDIS_PACKET_TYPE_ALL_LOCAL” => 0x00000080, “NDIS_PACKET_TYPE_GROUP” => 0x00000100,
“NDIS_PACKET_TYPE_ALL_FUNCTIONAL” => 0x00000200, “NDIS_PACKET_TYPE_FUNCTIONAL” => 0x00000400, “NDIS_PACKET_TYPE_MAC_FRAME” => 0x00000800); my $server = Win32::NodeName();
my %nic = ();
my $locatorObj = Win32::OLE->new(‘WbemScripting.SWbemLocator’) || die “Error creating locator object: ”.Win32::OLE->LastError().“\n”; $locatorObj->{Security_}->{impersonationlevel} = 3;
my $serverObj = $locatorObj->ConnectServer($server,‘root\wmi’,“”,“”) || die “Error connecting to \\root\\wmi namespace on $server: “. Win32::OLE->LastError().“\n”;
foreach my $ndis (in $serverObj->InstancesOf(“MSNdis_CurrentPacketFilter”) ) { if ($ndis->{Active}) {
my $wan = “WAN Miniport”;
next if ($ndis->{InstanceName} =~ m/^$wan/i);
my $instance = (split(/-/,$ndis->{InstanceName}) )[0]; $instance =~ s/\s$//;
# $nic{$instance} = 1; my @gpf = ();
foreach my $f (keys %fi lters) {
push(@gpf,$f) if ($ndis->{NdisCurrentPacketFilter} & $fi lters{$f}); }
$nic{$instance}{fi lter} = join(‘,’,@gpf); }
foreach (keys %nic) { print “$_\n”;
my @fi lt = split(/,/,$nic{$_}{fi lter}); foreach my $f (@fi lt) {
($f eq “NDIS_PACKET_TYPE_PROMISCUOUS”) ? (print “\t--> $f <--\n”) : (print “\t $f\n”); }
print “\n”; }
Again, when looking at the ndis.pl Perl script, we are most interested in the highlighted class, MSNdis_CurrentPacketFilter. This class provides us with visibility into the settings and fi lters for the adapter itself. This is important during incident response, because as in some cases, an intruder may have installed a network sniffer and placed the network adapter in “promiscuous” mode. This means that all of the packets that go by on the wire are read by the network adapter, not just the ones that are addressed to that system.
Running ndis.pl on my test system, I see: Dell Wireless 1390 WLAN Mini
NDIS_PACKET_TYPE_MULTICAST NDIS_PACKET_TYPE_DIRECTED NDIS_PACKET_TYPE_BROADCAST
This output is to be expected. I would be concerned if I saw the following included in the output:
NDIS_PACKET_TYPE_PROMISCUOUS
This would tell me that the network adapter is in promiscuous mode and is most likely being used for network sniffi ng.
Scripts using WMI can be run remotely against other managed systems, such as those within a domain, or those which the system administrator has local credentials on the system. For example, take a look at a line of code from ndis.pl:
my $serverObj = $locatorObj->ConnectServer($server,‘root\wmi’,“”,“”)
credentials within the script. Also, you’ll notice that earlier in the script, we populated the $server variable with the following code:
my $server = Win32::NodeName();
Win32::NodeName(), if you remember, is one of the built-in Win32 functions. Again, using this function we get the name of the local system. However, if the system administrator wanted to reach out to other managed Windows 2000, XP, and 2003 systems within his or her domain, all he or she would have to do is include the name or IP address of the remote system, and the proper credentials. In fact, with an accurate list of all systems within the domain, he or she could run this script against all systems (some minor modifi cations to the script are required, of course, but those will be left to the reader) and display only those found to have NICs in promiscuous mode.