• Table of
Contents
• Index
Adobe® Acrobat® 7 TIPS and TRICKS THE 150 BEST
By Donna L. Baker
Publisher: Peachpit Press
Pub Date: January 24, 2005
ISBN: 0-321-30530-2
Pages: 416
Sure, you know how to read PDFs with it, but do you know how to add comments to documents or embed 3D objects in your PDFs or establish level security settings? With its staggering array of document-enhancing features and supported formats, Adobe Acrobat 7 offers a world of functionality just waiting to be tappedwhich means that figuring out how to do just one specific task with it can be somewhat daunting. In these pages, veteran author Donna Baker solves that problem by presenting each Acrobat task as a stand-alone unit. If, for example, you want to find out how to search for a word or a phrase in a PDF file, you can do just thatat the same time picking up a couple of tips about refining your searches. Organized in three major sectionsInput, Output, and Internal Acrobat Processesthis self-contained guide is all you need to get going fast with Acrobat 7.
• Table of
Contents
• Index
Adobe® Acrobat® 7 TIPS and TRICKS THE 150 BEST
By Donna L. Baker
Publisher: Peachpit Press
Pub Date: January 24, 2005
ISBN: 0-321-30530-2
Pages: 416
• Table of
Contents
• Index
Adobe® Acrobat® 7 TIPS and TRICKS THE 150 BEST
By Donna L. Baker
Publisher: Peachpit Press
Pub Date: January 24, 2005
ISBN: 0-321-30530-2
Pages: 416
Copyright
Acknowledgements
Chapter ONE. Getting Started
TIP 1: Getting Around the Interface
TIP 2: Assistance, Please
TIP 3: Helping Yourself
TIP 4: Making Room on the Screen
TIP 5: See What You Want to See
TIP 6: Work Those Windows
TIP 7: What Do You Prefer?
Chapter TWO. Organizing, Searching, and Cataloging
TIP 8: Getting Organized
TIP 9: Staying Organized
TIP 10: Finding Words
TIP 11: Conducting Searches
TIP 12: Searching for PDF Files on the Internet
TIP 13: Advanced Search Techniques
TIP 14: Using Custom Search and Category Options
TIP 15: Designing an Index
TIP 16: Building and Applying an Index
TIP 17: Archiving Outlook Messages
Chapter THREE. Creating PDF Files Outside Acrobat
TIP 18: Creating PDF Files from Source Programs
TIP 19: Printing with the Adobe PDF Printer
TIP 20: Using PDFMaker in Word
TIP 21: Choosing PDFMaker Conversion Settings in Word
TIP 22: Producing PDF Files in Excel, Access, and Project
TIP 23: Generating PDF Documents in PowerPoint and Publisher
TIP 24: Converting Layered Visio Documents
TIP 25: Organizing Layers
TIP 26: Using Photoshop PDF
TIP 27: Exporting a PDF from InDesign CS
TIP 28: Making PDF Documents from Web Pages
TIP 29: Working with Acrobat Distiller
Chapter FOUR. Creating PDF Files in Acrobat
TIP 31: Creating a PDF from a File in Acrobat
TIP 32: Creating a PDF from Multiple Files in Acrobat
TIP 33: Creating a PDF from Web Pages in Acrobat
TIP 34: Creating a PDF from a Scan in Acrobat
TIP 35: Creating a PDF from a Clipboard Image
TIP 36: Attaching Source Files to a PDF
TIP 37: Managing Attached Files
TIP 38: Using Attachments in Earlier Versions of Acrobat
Chapter FIVE. Saving and Exporting
TIP 39: Finding Information about Your Document
TIP 40: Deciding What Your Reader Sees First
TIP 41: Exporting PDF Documents in Other Formats
TIP 42: Saving a PDF as a Word or RTF File
TIP 43: Exporting as HTML, XML, or Text
TIP 44: Saving a PDF as an Image
TIP 45: Exporting all the Images in a Document
Chapter SIX. Printing
TIP 46: Choosing Print Settings
TIP 47: Print Troubleshooting 101
TIP 48: Choosing and Using Fonts
TIP 49: Previewing Fonts in Acrobat
TIP 50: Print Production
TIP 51: Basic Preflighting
TIP 52: Making a Document PDF/X Compliant
TIP 53: Managing PDF/X Documents
Chapter Seven. Enhancing PDF Accessibility
TIP 54: Navigating a Document Using Keys
TIP: 55 Choosing Document Colors
TIP 56: Using the Accessibility Wizard
TIP 57: Read-Aloud Features
TIP 58: Articles
TIP 59: Basic Document Tagging
TIP 60: Reporting on and Repairing a Document
TIP 61: Using Document Tags
TIP 62: Reflow
Chapter EIGHT. Working with Acrobat Forms
TIP 63: Getting Started with Forms
TIP 64: Building a Form in Acrobat
TIP 65: Configuring Form Fields
TIP 66: Creating Forms That Make Sense
TIP 67: Testing and Tweaking Your Forms
TIP 68: Sending Form Data Automatically
TIP 69: Handling Field Contents
TIP 70: Completing a Form and Using Auto-Complete
TIP 71: Collecting Form Data
TIP 72: Starting an Adobe Designer Project.
TIP 73: Customizing a Form in Adobe Designer 7
Chapter NINE. Transforming a PDF Document
TIP 75: Extracting Content
TIP 76: Replacing Pages
TIP 77: Cropping and Rotating Pages
TIP: 78 Configuring the Pages Pane
Chapter TEN. Touching Up and Modifying a Document
TIP 79: Adding Page Numbers
TIP 80: Applying Headers and Footers
TIP 81: Adding Watermarks and Backgrounds
TIP 82: Selecting Text in a PDF
TIP 83: Reusing Images
TIP 84: Editing Text in a PDF
TIP 85: Modifying Text Attributes
TIP 86: Reusing Table Information
TIP 87: Object TouchUps
TIP 88: Touching Up Reading Order
TIP 89: Round-trip Editing an Image
Chapter ELEVEN. Drawings and Layers
TIP 90: Using the AutoCAD PDFMaker
TIP 91: Using Grids and Guides for Assistance
TIP 92: Measuring Objects
TIP 93: Drawing and Marking Up Shapes in Acrobat
TIP 94: Working with a Layered Document
TIP 95: Bookmarking a Layered Document
Chapter TWELVE. Controlling Documents with Links and Buttons
TIP 96: Linking Content in a Document
TIP 97: Drawing a Button
TIP 98: Customizing a Button's Appearance
TIP 99: Editing Actions
TIP 100: Activating Menu Items
TIP 101: Positioning a Series of Links on a Page
TIP 102: Creating Batches of Buttons
TIP 103: Fun with Buttons
Chapter THIRTEEN. Bookmarking a Document
TIP 104: Creating Bookmarks in a Source Document
TIP 105: Adding Bookmarks in Acrobat
TIP 106: Organizing a Bookmark Hierarchy
TIP 107: Modifying Bookmark Appearance
TIP 108: Using Tagged Bookmarks
TIP 109: Modifying Content with Tagged Bookmarks
TIP 110: Applying Actions to Bookmarks
Chapter FOURTEEN. Commenting and Marking Up Documents
TIP 111: Using the Commenting Toolbar
TIP 112: Adding Notes and Highlighting Comments
TIP 113: Setting Commenting Preferences
TIP 114: Working with Text Edit Comments
TIP 115: Using the Stamp Tools
TIP 116: Creating and Managing Stamps
TIP 117: Exporting Comments to a Word Document (Windows)
TIP 118: Choosing Which Comments to Export
Chapter FIFTEEN. Reviewing and Collaboration
TIP 120: Starting a Review Process
TIP 121: Using a Browser-Based Review
TIP 122: Tracking a Review
TIP 123: Working with the Comments List
TIP 124: Organizing Comments in the Comments List
TIP 125: Setting Comment Status and Creating Summaries
Chapter SIXTEEN. Working with Multimedia
TIP 126: Using Media in Documents
TIP 127: Adding Movies to a Document
TIP 128: Tweaking a Movie
TIP 129: Controlling the Action
TIP 130: Making Your Document Responsive
TIP 131: Creating a Presentation with Page Transitions
TIP 132: Using Photoshop Album Slideshows and Picture Tasks
TIP 133: Downloading and Reading Digital Editions
TIP 134: Organizing and Managing Your Digital Editions Collection
Chapter SEVENTEEN. Becoming an Acrobat Power User
TIP 135: Using a Batch Sequence
TIP 136: Creating and Using a Printing Droplet
TIP 137: Watching Folders
TIP 138: Optimizing Your PDF Documents
TIP 139: Creating Editable Text from an Image PDF
Chapter EIGHTEEN. Making Your Documents Secure
TIP 140: Choosing a Security Method
TIP 141: Using Security Levels and Passwords for a Document
TIP 142: Creating a Digital ID Profile
TIP 143: Certifying a Document
TIP 144: Adding a Signature Field and Signing a Document
TIP 145: Sharing and Importing Digital IDs
TIP 146: Comparing Documents
TIP 147: Creating Security Policies
TIP 148: Using and Managing Security Policies
TIP 149: Using Secure ePaper
TIP 150: Troubleshooting Security
Appendix A. Other Sources of Information
Adobe Sites
Information Sites
Appendix B. System Requirements and Installation
Installation Requirements
Copyright
Adobe Press books are published by Peachpit
Peachpit
1249 Eighth Street Berkeley, CA 94710 510/524-2178 800/283-9444 510/524-2221 (fax)
Peachpit is a division of Pearson Education
To report errors, please send a note to [email protected]
For the latest on Adobe books, go to www.adobepress.com
Copyright © 2005 by Donna L. Baker
Credits
Editors: Kristin Kalning, Becky Morgan, Judy Ziajka
Production Editor: Becky Winter
Copyeditor: Liz Welch
Compositor: Danielle Foster
Indexer: Rebecca Plunkett
Cover design: Maureen Forys
Interior design: Maureen Forys
This book was designed and laid out in Adobe InDesign.
Notice of Rights
All rights reserved. No part of this book may be reproduced or transmitted in any form by any means, electronic, mechanical, photocopying, recording, or otherwise, without the prior written permission of the publisher. For information on getting permission for reprints and excerpts, contact
Notice of Liability
liability to any person or entity with respect to any loss or damage caused or alleged to be caused directly or indirectly by the instructions contained in this book or by the computer software and hardware
products described in it.
Trademarks
Adobe Acrobat is a registered trademark of Adobe Systems Incorporated in the United States and/or other countries. All other trademarks are the property of their respective owners.
Throughout this book, trademarks are used. Rather than put a trademark symbol in every occurrence of a trademarked name, we state that we are using the names in an editorial fashion only and to the benefit of the trademark owner with no intention of infringement of the trademark.
9 8 7 6 5 4 3 2 1
Printed and bound in the United States of America
Dedication
Acknowledgements
I would like to thank my editors at PeachpitBecky Morgan, Kristin Kalning, Judy Ziajka, and Liz Welchand the rest of the super editorial and development team. Thanks to my family for their support, and to my agent, Matt Wagner, for keeping me on track.
Chapter ONE. Getting Started
Adobe Acrobat has become a workhorse program. Whether you are a graphic designer or a Web designer, whether you work with business systems or run a small office, Acrobat can assist you in a wide range of tasks, and it handles information and content in mind-boggling ways.
Acrobat isn't like "ordinary" software in that you can't define its purpose in a single word as you can with a spreadsheet, word processing, or image-manipulation program. It's not that simple.
Successful users of Acrobat understand both the program's capabilities and what Acrobat can do for them. For example, did you know that with Acrobat 7 Professional you can create a multimedia presentation? Or create a complex document that incorporates a range of other types of material such as spreadsheets or Web pages along with PDF files? Or test and evaluate the output of a document before sending it to your print provider? Or set up and monitor a system of reviewing your shared documents? Or add security to a document to control access and changes to the work? Or…?
Clearly the program's scope is wide, which is probably why Adobe describes it as a "tool for the new work."
In this book, I have assembled a collection of tips that will show you what Acrobat can do, and how you can integrate the power of the program into your daily work life. As you read the tips, consider how the information can help you do your job smarter and faster.
TIP 1: Getting Around the Interface
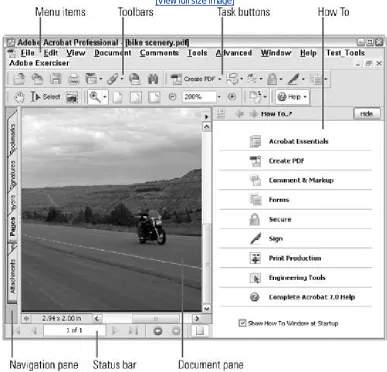
[image:10.612.101.488.258.630.2]When you open Acrobat 7 Professional, the default program includes several elements (Figure 1). You can configure the Acrobat layout in a variety of ways by adjusting the panel groupings and settings.
Figure 1. Acrobat 7 Professional's interface is made up of several
components.
What's Your Status?
You can navigate between pages using the navigation controls, or change the viewing layout. You can also choose a viewing method, such as full-screen. Special features of the document, such as layers or security, are indicated by icons at the left of the Status bar.
The Main menu. The Main menu across the top of the program contains common headings like File and Edit, as well as Acrobat 7 Professional headings such as Advanced and Document.
Toolbars. Acrobat contains a wide variety of toolbars; most items found in toolbars are available as menu commands as well. An icon with a pull-down arrow to the right indicates that a subtoolbar is available.
Task buttons. You can access a variety of tasks and functions for a specific type of work such as creating a PDF or signing a document using the task buttons.
Look Before You Touch
You can modify the screen displaytoolbars, Navigation pane tabs, and so on. But before you do, familiarize yourself with the contents. Click the pull-down arrows to see what's in a subtoolbar, for example. Click a tab in the Navigation pane to see its contents and click its Options menu to learn what you can do in the pane. Checking out Acrobat's default offerings may help you as you learn to work with the program.
Navigation pane. The tabs along the left side of the program window make up the Navigation pane. The options on these tabs let you manage and control the content of your PDF document.
Document pane. An open PDF document displays in the Document pane. The document's page size and scroll bars frame the bottom and right side of the Document pane.
Status bar. Below the Document pane you see the number of the visible page as well as the total page count and controls for moving between pages.
TIP 2: Assistance, Please
How To… or Not
Some people like to work in the midst of menus and dialogs to make it easier to access commands and tools. Others prefer a more minimal approach, showing and hiding panes as necessary. The How To pane is displayed by default, but if you prefer, you can hide it and use other options to access the information when you need to:
Click Hide to close the pane.
In the default toolbar setup, click the How To task button to reopen the pane, which always opens at the same screen location.
Choose Help > How To to display the same How To list of topics. Click an option to display its content in the How To pane.
In the General Preferences, deselect Show How To Window at Startup. From then on, your program opens without the pane displayed, and you can open it from the toolbar's task buttons or the Help menu if required.
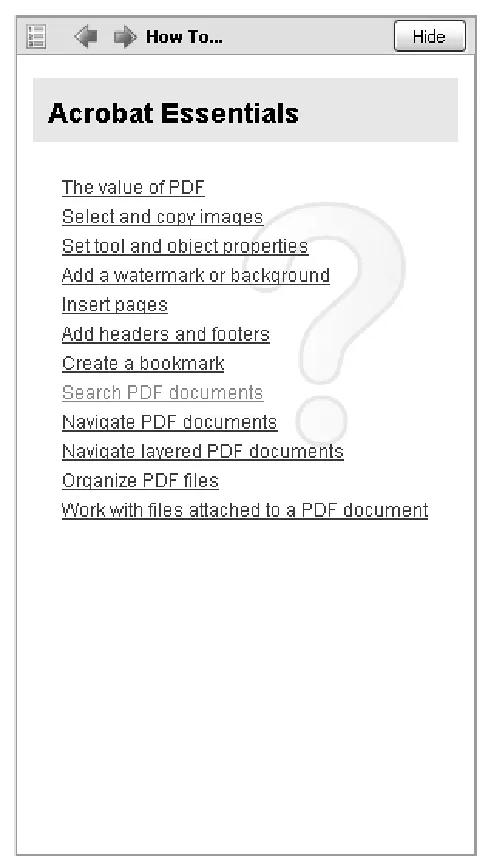
The How To pane contains a list of the most common tasks you are likely to perform in Acrobat 7 (Figure 2a) and includes specific groupings of tools for special purposes such as examining and measuring
engineering drawings and preparing a document for print production. For example, click Create PDF to open a list of topics. Follow these pointers to make your way through the How To topics:
How To How To…
If you modify the toolbar layout, you probably won't include the How To toolbar. You can still access the contents using the Help menu. Click Help > How To and choose a topic title. The How To pane reopens, displaying the main topic area.
[image:13.612.173.413.42.471.2]A list of the main topics appears in the How To pane (Figure 2b). Click a link to the particular task you are trying to accomplish.
Use the navigation buttons at the top of the How To pane to control your view. Clicking the active arrow (it is blue in the program) moves you back and forth through pages you have viewed.
TIP 3: Helping Yourself
Help Is Close at Hand
Sometimes you need to refer to a page in the Help file over and over. Instead of closing the window and then reopening and finding the page again, minimize the window. The content stays as you last viewed it. If you need step-by-step direction, arrange both the program and Help windows on your screen.
The How To pane is fine for step-by-step instructions on basic program functions and tasks. If you need more in-depth information, use the main Help feature:
Choose Help > Complete Acrobat 7.0 Help or press the F1 key. The Help program opens in a separate window.
Use the navigation options at the top left of the window to make your way through the file (Figure 3a). The blue left- and right-facing arrows take you back and forth between pages you've visited. Click the Printer icon to print the topic displayed in the main pane of the Help window. The plus (+) and minus (-) icons let you zoom in or zoom out of the document window.
Figure 3a. Use the navigation controls to make your way through the
Help files
You can choose from three types of search optionsContents, Search, or Indexdepending on what you are looking for and on your preferred method of working. You can choose from the Contents, Index, or Search tabs to locate information.
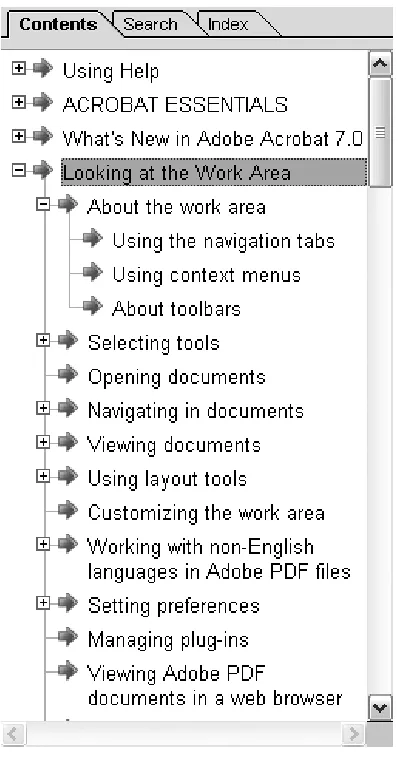
The Help menu shows the Contents tab (Figure 3b) when it opens. The content is arranged in a
hierarchy. Each + next to a topic means subtopics are available. Click + to open a nested item list. When a topic name displays a - sign, that means it has nested content that is already displayed. Click an item to display its contents in the main pane of the Help window.
Help Using Help
Pay attention to the way you work. If you are a very systematic person, the Contents tab will guide you from general to specific topics. Use the Search tab if you are familiar with the program and want to locate a specific topic. If you aren't sure what you are looking for, type a related term in the Index tab and watch the headings that displayyou may find a heading triggers a mental connection to the precise topic you need.
[image:16.612.197.396.52.434.2]Click Search to open the Search tab. Type the search word and then click Search. The topics that contain the search term appear in the left pane of the Help window (Figure 3c) and the first entry containing the search term displays in the main pane of the Help window. Click a topic to display the content in the main pane; each instance of the search term is highlighted. If the highlighting is distracting, click the main pane of the Help window to deselect the highlights.
[View full size image]
TIP 4: Making Room on the Screen
Button It Up
You can further control your use of screen real estate by setting how the labels are displayed. Choose View > Toolbars > Show Button Labels and then select the Default, All, or No button label options.
One of the best ways to save space, and your eyesight, is to control what tools you display on the screen. It is possible to open enough toolbars to fill a good portion of the screen, leaving very little room for the actual document. These tips help you "unclutter" your screen:
If you have opened a number of toolbars and want to return to the default set, choose View >
Toolbars > Reset Toolbars. Acrobat closes the extras and the layout reverts to the default toolbars in the default locations.
Even using only the default toolbars and task buttons, you may find it confusing to figure out what you have to work with. Move your pointer over the hatched vertical line at the left edge of a toolbar to display the toolbar's name (Figure 4a).
Figure 4a. Display the name of a toolbar in a tip.
Tool tips can show you task button names. If the button is large enough to display both the icon and text, you don't learn anything new. However, if you move your pointer over the icon, you see the task button's name (Figure 4b).
Move your pointer over the hatched vertical line and drag to pull a toolbar from its docked position. When you release the mouse, the toolbar is floating on the screen. Drag the toolbar back to the toolbar area and release the mouse to dock it again.
Task buttons work slightly differently. You can't drag an individual task button off the Task Bar (as you can with individual tools on toolbars); if you try, you'll remove the entire Task Button toolbar. Choose View > Task Buttons, and select or deselect the buttons as you require.
Locking Toolbars
When you close and reopen a program, the arrangement of toolbars and task buttons is maintained. If you like a particular arrangement of toolbars, you can lock it. When you get to the point when you are "one with the program," you can select tools and keep working without searching for a tool. Choose View > Toolbars > Lock Toolbars. The separator bars between the individual toolbars disappear. Floating toolbars don't lock, and they can't be docked with a locked toolbar.
Rather than using the Main menu, save one step when changing toolbars. Right-click or Control-click the toolbar to display the same options available from the Toolbars submenu (Figure 4c).
TIP 5: See What You Want to See
Acrobat offers the same sort of Zoom In and Zoom Out tool functionality as that in other Adobe products that you have grown to know and love; you can switch from one tool to the other by pressing the Control (Command) key with either the Zoom In or Zoom Out tools active.
Outline Your Overlay
Change the color for both the Loupe and Pan & Zoom tools' outline rectangles to see the overlay on the document more clearly. In both windows, click the colored rectangle to open a Color Picker and select a different color.
Acrobat 7 offers more than that. You can use the Dynamic Zoom or Pan & Zoom feature (which works much like the Navigator feature in other Adobe programs), or you can use the Loupe tool to zero in on important information on a page.
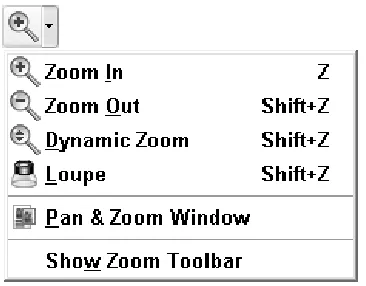
[image:21.612.206.389.486.629.2]Click the pull-down arrow to the right of the Zoom tool displayed on the Zoom toolbar to open the menu shown in Figure 5a. Select the tool you want to use for viewing the document. The selected tool is displayed on the Zoom toolbar.
Figure 5a. Choose from several specialized viewing tools from the Zoom
submenu
Tip
Use the Dynamic Zoom tool to quickly move the magnification higher and lower without having to use any keys or choose alternate zoom tools.
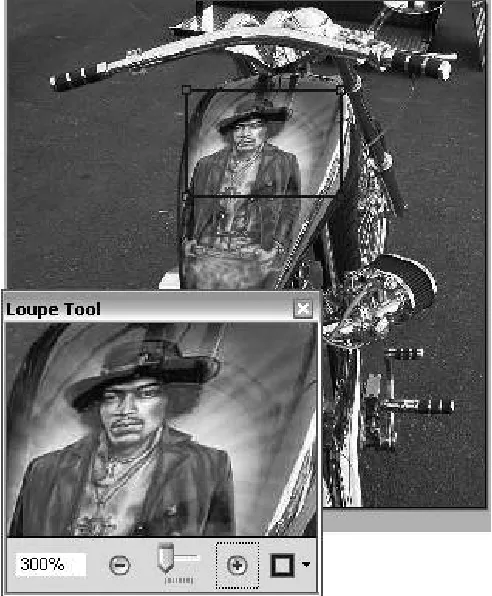
Use the Loupe tool to zero in on a specific region of the document without losing sight of the overall image or page. Click the document with the Loupe tool to activate a small window; this window shows the area identified by the rectangle on the Document pane (Figure 5b). You can drag the edges of the
[image:22.612.173.419.270.568.2]rectangle to change the content and magnification of the display; you can also click the + and - buttons or drag the slider below the magnified image shown in the Loupe tool's window.
Figure 5b. Zoom in or out of a page to view content close up with the Loupe
tool
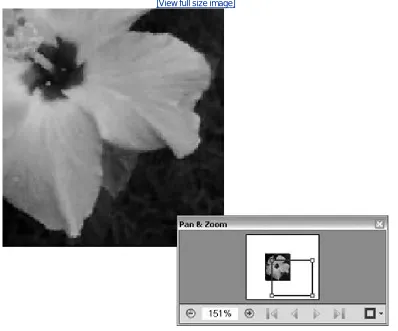
Double Vision
For a quick scan of a document's contents close up, click the Pan & Zoom Window option on the Zoom tool's pull-down menu. A small secondary window displays over the main program window (Figure 5c). Drag the Pan & Zoom box around the page to show you sections close up. Use the + and - buttons to change the magnification, type a value in the field, or drag the handles on the rectangle overlaying the image that identifies the area displayed in the Document pane. Use Pan & Zoom when you want to check several items in a multipage document; click the navigation control arrows below the thumbnail image to move forward and backward through your document.
Figure 5c. The Pan & Zoom tool lets you check out different details on
different pages in a document.
TIP 6: Work Those Windows
Acrobat provides several options for working with windows; some are used for specific purposes, while others are options you can choose depending on your preferred method of working.
Laying Tile
When you use the Add Window command each copy is sized the same as the original. Then you can use the Tile commands to arrange the windows in the Acrobat program window. Depending on the size of the original window, use either Horizontal or Vertical tiles.
If you decrease the size of the Acrobat program window, the tiled copies along the edges you resized are cut off. Choose Window > Tile and the vertical or horizontal tiling option again to resize the windows to fit the new program window's size.
Open several copies of the same document if you want to see multiple pages at the same time. Choose Window > New Window. Acrobat adds a number to the original document's name, e.g., MyDog is renamed MyDog:1; each time you add a new window a number is appended incrementally, such as MyDog:2 and MyDog:3. For each copy of the document, use the controls at the bottom of the Document pane to show a different page of the document. The Window > Tile options let you arrange the windows for easy viewing. When you close copies, the remaining copies are renumbered; when only the original remains, the
document's name loses its appended number(I wonder if that would hurt?) and the name is restored.
Choose Window > Split to divide the program window into two equal displays, both of which show the active document. You can use the Zoom tools on each individual display, giving you different views of the same content.
Choose Window > Spreadsheet View. The window is automatically split into four sections (Figure 6). You can drag the content in each view in any direction with the Hand tool. This view is handy for comparing multiple columns of information.
Figure 6. Use the Spreadsheet view to display segments of a page that can
be moved independently.
TIP 7: What Do You Prefer?
You can define a number of preferences that help you get to work faster. Some preferences get you into the program faster; others show you what you are working with more quickly.
Settings for All Seasons
The settings you choose are not specific to a particular document but apply to the program in general. Each time you open Acrobat 7, the program uses your preferences until you change them again.
Settings you choose in the program can also apply to the Help menu. For example, if you deselect text smoothing in the program preferences, the text in the Help menu is also affected.
Choose Edit > Preferences (Acrobat > Preferences) to open the Preferences dialog. You see a long list of options in the left pane of the dialog; clicking an option displays a range of settings in the right pane of the dialog. Click Startup in the list at the left of the Preferences dialog to display the Startup options in the right pane of the dialog (Figure 7a). The Opening Documents preferences are listed at the top of the window.
If you work with more than five documents on a regular basis, change the value shown in the Maximum documents in most-recently used list from its default of 5. When you click the File menu heading, you see the list at the bottom of the menu and can quickly select the document you want to open.
See the control Reopen Documents to Last Viewed Page. The default setting is Digital Editions, which means that only digital media (formerly known as eBooks) reopens at the page last displayed in the document. Click the pull-down arrow and choose the Marked Files and Digital Editions Only option when working with a number of documents containing comments; select All Files when you are working in long sessions with multiple files. As you open closed documents, you are automatically shown the last location you viewed in the open document.
Tip
The display feature works only during a single session; if you close and then reopen Acrobat 7, and then the document, it displays according to its document settings, usually showing the top of the first page.
you are ready to view it. Pages load faster, and the faster load time is particularly noticeable if you are working with image-intensive or interactive documents.
Figure 7a. Customize the Startup preferences to change how the program
starts and runs.
[View full size image]
Click Page Display in the options listed in the left pane of the Preferences dialog. You can set some page preferences to get up to working speed faster:
Deselect the Display large images option (Figure 7b) if your computer has a slow redraw speed. On older computers, images take a lot of time to draw on the screen. Each time you move the image means more time waiting for the image to redraw again.
Figure 7b. Changing some Page Display settings can change how quickly
your documents are displayed.
Deselect the smoothing preferencestext, line art, and imagesstext, if your computer is particularly slow. Deselecting the smoothing may save some time in displaying your documents, although you sacrifice some of the clarity and crispness of the content for display speed.
[image:28.612.117.505.49.317.2]Click the Use greek text below xx pixels option to make the text on a page smaller than the value specified (the default value is 8 pixels) appear as gray lines (Figure 7c). Selecting this option speeds up redraw time as well.
Figure 7c. Substitute gray lines for very small text to display pages more
quickly.
Set Your Autosave
Click the automatically save document changes to temporary file field to set the
autosave time. By default, Acrobat saves document changes every five minutes. If you are working on a very large document, the autosave can take some time away from your work; you may want to increase the duration between autosaves.
Figure 8d. Change how often Acrobat saves your document, and how you
access open documents using General preferences.
[View full size image]
Click Show documents in taskbar to display a button for each open document on the Windows taskbar. This way you don't have to open Acrobat's Window menu to select an open document.
Chapter TWO. Organizing, Searching, and
Cataloging
One of Acrobat's strongest features is its ability to help you manage your documents. New in Acrobat 7 is the Organizer, a separate window used to organize, sort, and filter the PDF files in your computer. You can organize the files in a number of ways based on date, location, and other characteristics. You can also define a number of characteristics for the files that you can in turn use for searching and organizing.
As if organizing weren't enough, you can also assemble collections of your PDF documents. You'll learn some tips about collections in this chapter.
Searching PDF documents is an amazing way to draw common concepts and terms from a broad range of documents. See how to save time and zero in on what you need to find. You can use different tools of varying complexity for your searching, ranging from a simple toolbar to a full-blown index.
TIP 8: Getting Organized
Acrobat 7 contains a nifty new feature called the Organizer. Use the Organizer toyou guessed itorganize
your PDF files. Click the Organizer button on the File toolbar or choose File > Organizer > Open Organizer.
Things to Do in the Organizer Window
Above the Pages pane are several commands you can choose to work with the selected file or files. For example, you can open, email, or start a document containing multiple PDF files, or even start a review cycle right from the Organizer window.
The Organizer opens in a separate window and displays three frames (Figure 8). You can drag the splitter bars between the frames to resize each frame as you are working. Click an option in the
Categories pane to display its list of PDF files in the Files pane; click a file in the Files pane to display its content in the Pages pane.
Figure 8. Organize and control your PDF files using the Organizer.
The Categories pane uses a hierarchy of folders. There are three types of categories: History, your computer's folders (to which you can add favorites), and Collections.
History works like the History function on your Web browser. Select a time frame from the History listing to show the PDF files you have opened during that time frame in the Files pane. To clear the history, select the item in the History listing and click the Clear History button at the bottom of the Files pane.
To add a Favorite Place , click Add a Favorite Place at the bottom of the Organizer Window. Locate the folder you want to add in the resulting dialog, and click OK. You'll see that your selected folder has been added to the Favorite Places list.
To add a collection, right-click/Control-click the Collections label and follow the prompts to name the collection and add files. Right-click/Control-click an existing collection to add or delete files.
In the Files pane, information displayed about each listed document includes basic information. An unprotected document shows a thumbnail; a document containing security shows only a PDF document icon. The default listing is by filename; you can click the pull-down arrow to choose other sorting options such as keywords, the document's title, or the author.
TIP 9: Staying Organized
When you have organized your files, you can access your documents from the program's interface rather than reopening the window.
Collecting Logically
Use Collections to organize your content in ways you find logical. For example, if you are working with a set of files that are to become a single PDF at some point in your workflow, add them to a collection. Right-click or Control-click the Collection label in the Organizer and choose Add Files. Locate and select the files you want to add in the Browse for Folder dialog and click OK. Click the collection's name and show your working files in the Files pane or the main program window.
Regardless of where you access the Organizer's information, here are a few tips to help you stay organized:
Take care when clearing the History. If you choose a History setting such as Last 12 Months or Last Week, all history listings of shorter duration, such as Today or Yesterday, are also cleared.
Name your collections to keep track of your work.
Delete a collection when you have finished working on a project. You can always rebuild a collection if need be.
Organizing content into collections makes it easier to access your working documents from the main program window. Click the pull-down arrow to the right of the Organizer button on the File menu to open a menu; click Collections, then the name of the collection, and the file you want to use (Figure 9).
Figure 9. Select files from your collections from the pull-down menus.
Ditto for the History, also available from the Organizer button's pull-down menu. The History listing uses the same set of time frames as listed in the Organizer window.
Choose File > Organizer > Collections to access your collections' contents from the main program menu.
TIP 10: Finding Words
One feature we all use at one time or another is the dependable Search function. Acrobat 7 offers two ways to do a searcheither through a Find toolbar or using the Search pane.
Widening Your Search
If you need to expand the search to additional documents or want to use more complex search terms, select Open Full Acrobat Search from the pull-down menu.
New in Acrobat 7 is the Find toolbar (Figure 10). Use it to quickly search an open document. To access the toolbar, use the Ctrl+F/Command+F shortcut keys; choose View > Toolbars > Find; or choose Edit > Find.
Figure 10. Use the Find toolbar to locate words or phrases in an open
document.
Type in the field the word or phrase you want to search for, and then click Find Next to show the first match on the visible page. Each time you click the button, the next match is highlighted in the document. Use the Find Next or Find Previous button to move back and forth among matches.
Here are some hints for using the Find toolbar:
The hits include hyphenated returnsfor example a search for the term "book-mark" is returned as a hit for the term "bookmark."
Click the pull-down arrow next to the Find label to open a menu that allows you to choose search parameters. For example, if you are looking for a term such as Bookmarks, if you choose the case sensitive option, only those matches using the same capitalization are identified.
TIP 11: Conducting Searches
The Find toolbar works well for searching a single document, but if you need to track down words or phrases through all the PDF files in a folder, another drive, or even on the Internet, use the Search
function. Click the Search button on the File toolbar choose Edit > Search or use the
[image:37.612.179.414.300.610.2]Shift+Ctrl+ F/Shift+Command+F shortcut keys to open the Search pane at the right of the Document pane (Figure 11a).
Zeroing In on Your Searches
Use the customization options when possible to cut down on the number of search hits. The Case-Sensitive option can be used with a string of text. For example, "Rock and Roll" returns only those files containing the exact words in that exact sequence with the same
capitalization. Searching for "rock" returns the text, but can also return hits for "rockabilly."
Just a warning, thoughsearching for "Rock And Roll" (with an uppercase A in "And") provides no returns if your document uses a lowercase "and."
Type the word or words you want to find in the first field. You can't search using wildcards such as (*) or (?). Next select the file or folder you want to search. Click the first radio button to search the currently active file; click the second radio button to search in multiple files. Then, click the pull-down arrow and select the folder and drive location.
Choose search options by clicking the check boxes. Click to select whole words, or case-sensitive results, and to search in bookmarks and comments as well as document text.
Click Search. When the search is finished, the results and their locations appear by filename in the Search PDF Results pane (Figure 11b).
Taking a Shortcut
Shortcut keys allow you to work quickly through a long list of search results. In Windows, open the first document, and then press F3 to jump to the next and subsequent hits. Press Ctrl+] to go to the next document; press Ctrl+[ to go to the previous document. In a document, press Ctrl+G to go to the next result; press Ctrl+Shift+G to go to the previous result.
You can see the number of instances of the word occurring in the set of files you searched, along with the number of documents containing the word. Click the box to the left of the file path to open a list of the results' locations and then mouse over a result listing to display the document page number.
Click a result in the Search PDF Results pane. Acrobat obligingly loads the document you selected (if it is not already displayed in the Document pane) and highlights the term on the document for you.
TIP 12: Searching for PDF Files on the Internet
With one mouse click, Acrobat can take the hassle out of searching for a PDF file on the Internet. Click Search the internet using Yahoo (or Google, depending on the preference you choose) from the Search pane's list of options shown in Figure 11a.
Start Your Engine
The default search engine in Acrobat is Yahoo. If you are a Google person, you can choose Google as your default search engine in Acrobat. Choose Edit > Preferences or Acrobat > Preferences, and click Search in the left pane of the dialog to display the Search preferences. Click the Search provider for searching PDFs on the Internet pull-down arrow and choose Google. Click OK to close the preferences. The Search toolbar displays the Google icon
, and it is shown as the search engine on the Search pane.
If you don't have the Search pane displayed, click Search the Internet on the Search the Internet toolbar to open the Search pane, ready for an Internet search. Right-click/Control-click the toolbar well to display the toolbar list, and click Search the Internet to open the toolbar. Type the terms you wish to search, and define how precise you want the search to be (Figure 12). Click the pull-down arrow and specify whether you want to search for all the words, for the exact phrase, or for any of the words. You can narrow your search to only PDF documents by clicking Search only in PDF Files.
Multiple Searches
When you are on a quest for information, you might need to do several searches in a row. After you have done more than one search, notice that the blue left and right arrows at the top of the Search pane are activated; click an arrow to move backward and forward through the searches you have carried out. You can hide the Search pane, but as long as you haven't closed and reopened Acrobat, the searches are still available.
Click Search the Internet to start your search. Your browser opens to Yahoo (or Google if you've changed your default search engine) with the results displayed in a list. When you click a result, the PDF document opens in Adobe Reader within your Web browser. Close the browser to terminate the search.
TIP 13: Advanced Search Techniques
You can fine-tune a search using the Advanced Search options, or search for content such as keywords or metadata. Click the Use Advanced Search Options link at the bottom of the basic Search pane (shown earlier in Figure 11a) to display additional searching parameters.
To search the text in the document, you can choose from matching the exact phrase, or some of the words, or you can use a Boolean query.
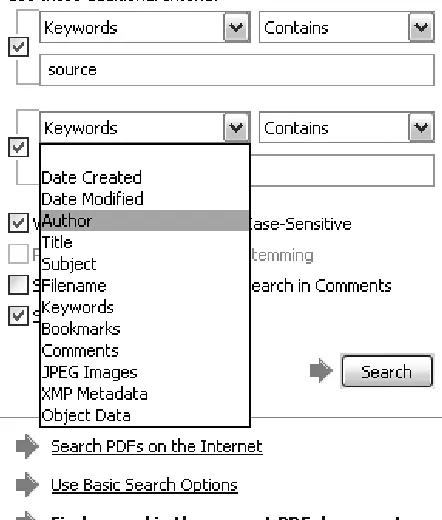
[image:42.612.185.406.363.623.2]Fewer search options are available if you are searching one document than if you are searching multiple documents. Figure 13 shows the Search pane for a search done on a folder, and the search is based on keywords rather than text in the document. You can use up to three additional search parameters.
Figure 13. Use Advanced Search features for pinpointing precise results or
searching for content other than text.
Click the Search button to search the document properties for the files in the selected folder. Acrobat returns results that contain all additional search criteria only. You can remove criteria by clicking the green checkmark to deselect it.
Saving Searching Time Using Preferences
You can spend a lot of time sifting through documents, and in some cases, such as building an annual report, you may have to repeat searches several times. Save yourself time and headaches by setting Search Preferences:
If your documents contain diacritics or accents, be sure to check the Ignore Diacritics and Accents option. That way if your work includes both premiere and premi\'e8re, for example, you can find both terms.
Select the Always use advanced search option if you are likely to do only complex searches to save a couple of mouse clicks expanding the options in the Search pane.
When searching enormous collections, set the preference for the Maximum number of returned documents. The default is 100; set it higher if necessary, but remember that searching so many documents will require more processing time.
If you use Proximity searching a lot, modify the preference. The range of words for Proximity searches is 900; tinker with the value according to the contents of your documents. Proximity searching is an advanced search technique used with multiple documents or indexes, and needs the Match Exact word or phrase option selected from the Return results containing pull-down arrow on the Advanced Search pane. Type two or more words to search for in the documents. Any occurrence of the search terms within 900 words of each other are returned.
TIP 14: Using Custom Search and Category Options
Beyond regular text searches, Acrobat offers other ways for you to organize, search, and catalog the PDF documents you work with. For example, in an enterprise environment, searching for a document author's name may be useful. Searching PDF photos using metadata, the data stored within the images such as camera settings or edit history, may get you results quicker (Figure 14a).
Figure 14a. You can search using metadata added to the source files,such as
Photoshop XMP data.
Properties in Windows
If you are working in Windows, you can right-click the name of the file from the desktop or Windows Explorer and select Properties from the shortcut menu. Add properties and custom values as desired. When you open the PDF in Acrobat, the properties are included.
When you create a PDF, technical data that is part of the source document is converted along with the text and images you see on the page. You can also add many types of data from within Acrobat by modifying the Document Properties.
Open the document you want to alter, and then choose File > Document Properties, or use the shortcut Ctrl+D (Command+D) (Figure 14b).
Develop a System
If you are working with hundreds of documents or PDF images, developing a system before embarking on a document properties adventure is the smart thing to do. Decide if a term is used as a subject or a keyword, not both. If you search using a subject term and have used it as a keyword in some documents, your search results are limited.
If you want to use an author's name, decide beforehand if the first name, first name and initial, or full name of the author is to be used. This way, anyone working with the files
understands your properties system. Unless you create a naming and description system that is understandable to all using the documents, it's a waste of time to make the effort to
Enter the additional information you want to use for searching and organizing in the appropriate fields. If you are working with images, clicking the Additional Metadata button opens the Document Metadata for [filename] dialog to add further information about the image.
Click OK to close the Document Properties dialog. Save the document to save the information you added in the dialog.
TIP 15: Designing an Index
The Acrobat Search function is a highly developed tool and very useful for general searches. However, if you are working with hundreds of documents, building an index and including it with the documents it indexes will make searching much quicker. You can build indexes in Acrobat that work in much the same way as a book's index, although their functions are much more advanced than a paper index.
Add a Helping Hand
If you are designing a number of document collections, include a Readme text file so your users understand what they can search for and how to use the index.
Here are some tips for preparing documents for indexing:
Move or copy the files you want to use into a separate folder. Acrobat adds indexing files and folders (Figure 15). Keeping everything all in one place prevents indexing errors.
The PDF/ A Standard
PDF/A, a standard for archiving documents in Acrobat, is designed to ensure the content in multipage documents is preserved and available.
To comply with the PDF/A standard, the document:
Can include only text, raster images, and vector objects
Can't include scripts
Must have all fonts embedded
Can't contain security options such as passwords or other types of encryption
Make sure all the information required in the individual documents is complete. This includes bookmarks, links, special document properties such as keywords, and so on. If you later add additional information to a document, it won't be included in the index.
Break a large document into chunks. For example, create PDF files from individual chapters of a manual. The indexed searches will be faster.
TIP 16: Building and Applying an Index
Assembling material for an index takes more time than generating the index itself. Assemble and prepare the documents you want to use (see Tip 15), and then choose Advanced > Catalog to open the Catalog dialog.
Fixing Indexes
You need to rerun the Catalog process if you make changes to the content of the documents contained within the index, or move or rename the documents. Instead of building from scratch, click Rebuild to repair and reconfigure the index. If you want to delete an index, select it in the Catalog dialog. Click Build to open the Build dialog, and then click Purge.
Click New Index and add information to the dialog box to name and describe the index, and define the folders you want to include (as well as any subfolders you want to exclude).
Click Options to display ways to either add or remove content from the index in the Options dialog
(Figure 16a). Consider using stop wordswords that are excluded from the index, such as and, if, or, and so on by clicking Stop Words on the Options dialog to open a Stop Words dialog, also shown in Figure 16a. You can exclude up to 500 case-sensitive words, which can result in faster search returns. In the Options dialog you can click Do not include numbers to exclude numbers from your index.
Figure 16a. Add optional parameters to the index; make sure to include
these options in your index's Readme file.
If you use stop words in an index, or any other sort of custom option, include details in the index's Readme file so your index users can work with the index more effectively. When you use stop words, the index user can't search for "around the house", for example, if "the" has been excluded.
When you have finished making your selections, click Close to dismiss the Options dialog and then click the Build button in the Index Definition dialog. The Index Definition dialog closes, and results appear in the Build dialog. Click Close to dismiss the Build dialog. Several files are added to the index's folder, including a log file and the index.pdx file, which is the index's database file. There is also an additional folder containing two more indexing files. Don't delete or move any of the indexing folders or files, or you will corrupt the index.
Power Indexing
If you are responsible for creating indexes on a regular basis, and find you always choose the same options, save some time by setting preferences. Choose Edit > Preferences or Acrobat > Preferences and click Catalog in the left pane of the dialog to show the Catalog
[image:50.612.104.488.48.345.2]preferences. You can choose from the same list of indexing customizations as those shown in
Figure 16a in the Options dialog. Click OK to close the Preferences dialog. The next time you
build an index, any options you chose in the preferences, such as stop words, is automatically applied to the index.
Figure 16b. Attach an index or indexes through the advanced settings in the
Search pane.
TIP 17: Archiving Outlook Messages
Acrobat 7 lets you archive your Outlook email messages, which you can then index and search or add to other PDF documents. There are two ways to archive your email messages. You can create a PDF file from a single email message and add to it, or you can select a folder of messages and create a PDF document from its contents.
Archiving Tips
To create an Outlook archive, be aware that:
You can only use the process when one of the New Mail, Discussion, Reply, or Forward windows are active.
You can't use Outlook 2000 if Word is the email editor selected for Outlook.
To start an archive, select the first email in Outlook list and then click Create PDF From Selected Messages
. The Save Adobe PDF File As dialog opens. Browse to the location where you want to save the file. Type a name for the file, and click Save. You can add a file to an existing archived message as well. Select the file you want to add from the Outlook messages and then click Convert and append selected
messages to an existing Adobe PDF. Again the Save Adobe PDF File As dialog opens. Select the file you want to add the additional document to. Click Open to close the Save As dialog box; the file is processed and added to the selected PDF file.
Planning Archival Names
Some organizations such as governments require that all emails be saved. Archiving emails using PDF is a terrific way to organize material for storage. Regardless of the reason why you need to archive email, it pays to take a few minutes to organize a method for naming the archives. For a graphic designer, consultant, or engineer, it may be useful to archive
according to project name, for instance. In other circumstances, it may be useful to archive by sender's name; you might want to select files and track correspondence regarding purchases by product name if you are involved in a retail business.
In Acrobat, a number of bookmarks are added to the file (Figure 17). You can locate the contents of the archive based on sender, date, or subject.
Chapter THREE. Creating PDF Files Outside
Acrobat
There are many ways you can create a PDF file from within other applications, and these capabilities have expanded with each revision of Acrobat. After you install Acrobat, you find new menus and toolbars in most Microsoft Office programs, such as Word, Excel, PowerPoint, and Outlook. The menus and toolbar make up PDFMaker 7, which you use to configure settings and create PDF content right from your Office program. Other programs, such as those in Adobe Creative Suite, contain internal commands and settings for generating PDF files.
Acrobat also installs the Adobe PDF printer driver, which lets you print PDF documents from many
programs, as well as Adobe Distiller, a program that converts PostScript or Encapsulated PostScript (EPS) files, such as those created in Illustrator, to PDF format.
TIP 18: Creating PDF Files from Source Programs
PDFMaker is a set of tools that Acrobat installs into Microsoft Office programs in addition to a main menu item called Adobe PDF. The contents of the Adobe PDF menu vary according to the program, but typically the menu offers the commands Convert to Adobe PDF, Convert to Adobe PDF and Email, Convert to Adobe PDF and Send for Review, and Change Conversion Settings (Figure 18). Installation of PDFMaker in Office XP for Mac doesn't include the Convert to Adobe PDF or Send for Review options.
Figure 18. The PDFMaker 7.0 toolbar and menu heading are installed into
Microsoft Office programs automatically.
Easy Loading
In earlier versions of Acrobat, if you installed an Office program that used PDFMaker after Acrobat was already installed, you had to reinstall Acrobat to add PDFMaker to the Office program. The sequence in which you load programs doesn't matter in Acrobat 7. If you install an Office program after Acrobat has already been installed in your system, choose Help > Detect and Repair from the Acrobat menu. Acrobat finds the Office program sans PDFMaker and automatically installs it for you.
The four basic types of PDF conversion that you use for most circumstances can be chosen through Acrobat Distiller or from a PDFMaker's Conversion Settings dialog:
Standard The default set used for basic business document conversion and viewing. Standard settings use a printing resolution of 600 dpi.
High Quality Print Used for high-quality output; prints to a higher image resolution but includes only a limited amount of coded information about the document's fonts. High Quality Print sets the printing resolution to 2400 dpi.
fonts used in the document.
Smallest File Size Creates the smallest file size possible; used for distributing content for the Web, email, or onscreen viewing. Images are compressed and their resolution is decreased. Fonts are not embedded.
Before you convert a document to PDF format, be sure to:
Check spelling and grammar, and make sure the finished content is how you want it to appear in the PDF format. Although you can certainly edit content in Acrobat, it is much simpler to ensure that the original document is complete.
Decide how the document is to be used. You choose different conversion settings for an online document, for example, than for one intended for high-quality printing.
Check links and other hidden content such as comments if you plan to convert them for PDF use.
Check the conversion option's settings. For example, you may choose a Standard conversion option but require changes in the graphic conversion settings.
Converting a Group of Documents
If you are converting a large number of documents, convert one and check that it meets your needs before converting the others. This will save you valuable error-checking time.
Several other options are available for converting documents according to PDF standards both for printing and archiving:
PDF/A archival standard Used for documents intended for long-term storage and use. (See Tip 15 in
Chapter 2 for information on the PDF/A standard).
TIP 19: Printing with the Adobe PDF Printer
If you can print a file in a program, you can usually generate a PDF file. The key is the printer driver called Adobe PDF, named Adobe PDF 7.0 in Mac OS. You don't have to install the driver independently; it is included as part of the Acrobat 7 installation process.
Convenient File Naming
Get into the habit of setting up a system of filenames when you are converting files from one format to another. When you print or generate a PDF using the Adobe PDF printer driver or other PDF conversion methods, by default the folder containing the source document opens and the file is assigned the source document's name and the .pdf extension. Using the same naming structure saves time, and you can track which documents have been converted to PDF more easily.
To create a PDF file from a source program, open your program and the document you want to convert to a PDF. Choose File > Print to open the Print dialog box. Click the pull-down arrow and choose Adobe PDF from the printer list (Figure 19a).
Figure 19a. Use the Adobe PDF printer driver to convert many types of
documents to PDF format.
You can select from a number of options for printing from the Print what pull-down list at the lower left of the dialog. Printing choices include the entire document, of course, or you can specify components such as document properties, markups (for reviewing), or styles.
Click OK to process the file, choose a name and storage location depending on the program's print
command process, and click Save. The file saves to PDF, rather than to your printer, and you have a PDF version of the source file.
Click Options at the bottom of the Print dialog to open a secondary Print dialog. Here you can choose additional print options, such as draft printing or printing PostScript over text. You can choose to include content such as document properties or XML tags. If your document is a form, you can even select an option to print the form content only. Click OK to dismiss the secondary Print dialog; you return to the main Print dialog.
[image:58.612.103.491.47.342.2]You can modify preferences and settings for the Adobe PDF printer driver. In the Print dialog, click Properties to open the Adobe PDF Document Properties dialog. Choose default conversion settings (Figure 19b shows the Standard selection), security, an output folder, and a page size.
Figure 19b. You can configure settings for the Adobe PDF printer driver in
the dialog accessed from the main Print dialog.
Save yourself some time and future problems by reviewing the check boxes at the lower part of the dialog:
If you are printing to save the document for future use, deselect View Adobe PDF results to prevent the file from opening in Acrobat.
Leave the Add Document Information option selected; the information can be later used in Acrobat for searching, indexing, and identification.
Deselect the Do not send fonts to "Adobe PDF" if you are planning to use the document later in Acrobat or in Acrobat Distiller. Distiller requires embedded fonts, and you often use font embedding to prepare a document for distribution.
Leave the Delete log files for successful jobs option selected. You don't need to troubleshoot a document that converts successfully.
TIP 20: Using PDFMaker in Word
One of the most common programs used in conjunction with Acrobat is Microsoft Word. You can use the PDFMaker that Acrobat automatically installs into Word to quickly generate a PDF version of the
document.
Converting Word Files Using Mac OS X
When you install Acrobat 7 on a Mac on which Microsoft Office with SR1, SR2, or SR3 is running, you'll find a two-button toolbar added to Word, consisting of the Convert to PDF and Convert to PDF and Email icons.
The Convert to PDF icons launch Distiller and let you define conversion settings, unlike when you're working in Windows, where PDFMaker maintains the settings within the Office
program.
Choose the conversion settings you want to use; the options include Standard, Press Quality, High Quality Print, and Smallest File Size in addition to the options used for standards-compliant versions
The Standard conversion setting, the default used by PDFMaker, produces a PDF file that is both suitable for printing and small enough for easy distribution. Once you specify the settings, they remain until you adjust them again. Converting a Word document to a PDF is a one-click process.
When your document is ready for conversion, save it and then click Convert to PDF on the PDFMaker 7.0
toolbar or choose Adobe PDF > Convert to Adobe PDF. Using the default PDFMaker settings, a Save As dialog opens displaying the same name as your Word document; change the file's name and location if necessary and then click Save to close the dialog and convert the file.
To view the settings, choose Adobe PDF > Change Conversion Settings to open the dialog (Figure 20).
Figure 20. Choose the basic conversion settings from the Conversion dialog.
The dialog displays four tabs: Settings, Security, Word, and Bookmarks. The default settings for
PDFMaker are shown in Figure 20. Click the Conversion Settings pull-down arrow and choose an alternate group of settings. Regardless of the options you select, the basic Settings tab selections remain the same.
What's the Use?
Select or deselect the Application Settings depending on the intended use of the document. If your document contains links that you would like to convert with the document, for example, make sure the Add Links to Adobe PDF option is selected. You can also attach the original document to the converted PDF version. Click the option to select it; it is included in the Attachments pane in Acrobat. (Learn more about attachments in Chapter 9.).
Here are some tips for working with the basic conversion options:
The Settings tab of the Conversion Settings dialog is divided into two sections. The PDFMaker
Deselect View Adobe PDF result if you want to convert the file but don't need to work with it in Acrobat immediately. By default, a converted document is automatically displayed in Acrobat. If you are converting a very large document or using a slow computer, deselecting this option can prevent some processing errors.
If you consistently convert documents using the same name as the source Word document, deselect the Prompt for Adobe PDF file name option. Deselecting this option saves a step.
Leave the Convert Document Information option selected because you may need to use the
information in Acrobat. It doesn't affect the processing time or file size appreciably and can save you time later.
TIP 21: Choosing PDFMaker Conversion Settings in Word
Each PDFMaker installed into the various Microsoft Office programs includes different settings that vary according to the program's features. In Word you can convert content such as bookmarks and comments, as well as text.
What About Security?
The Conversion Settings dialog contains the Security tab, used to add password protection to a file. If your document is being converted for further use in Acrobat, don't add security at this point. Wait until the document is processed in Acrobat and then apply security settings. Otherwise, each time you open the converted PDF document you have to input passwords.
Chapter 18 discusses using passwords and other forms of security.
Choose Adobe PDF > Change Conversion Settings to open the dialog. Click the Word tab to display Word-specific options (Figure 21a):
To preserve comments in your converted Word documents, click Convert displayed comments to notes in the PDF. (See Chapter 14 for information on using comments.) Comments in the source document are listed in the Word tab, as shown in Figure 21a. Click the X to select or deselect comments you want to convert with the document. Click Notes open to display the comments' contents in the PDF, select the color icon to choose your note color. After conversion, the Word comment displays as a note comment in the PDF document at the same page location.
If your document contains cross-references or a table of contents, you can preserve your work and transfer it to the PDF document by choosing Convert cross-references and table of contents to links. You can also preserve footnotes and endnotes in a converted Word document by selecting Convert footnote and endnote links.
Your Own Style
You can convert bookmarks based on either word headings or styles. Which option you choose depends on how the document is created. If you use the default Word Template to create headings, then use the headings option. If you're using a custom template, choose the styles you used for the headings in your document.
[image:64.612.103.491.48.268.2]The Word PDFMaker gives you two choices for generating bookmarks, depending on your document's structure. Bookmarks are created from document styles or from headings you select from the default template. Open the Conversion Settings dialog and click the Bookmarks tab (Figure 21b).