Theses
12-2014
re÷belief
Raymond McCarthy Bergeron
Follow this and additional works at:https://scholarworks.rit.edu/theses
This Thesis is brought to you for free and open access by RIT Scholar Works. It has been accepted for inclusion in Theses by an authorized administrator of RIT Scholar Works. For more information, please [email protected].
Recommended Citation
re÷
belief
A Short, Experimental Film by Raymond McCarthy Bergeron
Submitted in partial Fulfillment of the requirements for the degree of Master of Fine Arts
School of Film and Animation – College of Imaging Arts and Sciences Rochester Institute of Technology
December 2014
Stephanie Maxwell [ Committee Chair ] Professor, Animation Program Chair School of Film and Animation
Marla Schweppe [ Committee Advisor ] Professor
School of 3D Digital Graphics
Mark Reisch [ Committee Advisor ] Lecturer
Table of Contents | ii
Title Page ... i
Table of Contents ... iv
Table of Figures ... v
Acknowledgements ...viii
Abstract... ix
Introduction ... 1
Backstory... 2
Building a Foundation ... 2
Maturing Responsibilities ... 3
A Severe Mistake ... 4
From Darker to Enlightened ... 5
A Fish Chasing A Fish ... 6
A Gift of Humanity ... 7
Cyclical & Experimental Story Development ... 8
Why 3D Printed vs. Rendered Zoetropes ... 9
Experimental Inspiration ...10
Sculpture & Animation ...11
Film vs. Installation ...13
Iterative Production Cycle ...13
Planned Production vs. Actual Production ...14
A Number of 3D Printing Solutions ...14
Locating a 3D Printing Service ...16
Initial Timeline vs. Actual Timeline ...20
Pre-Production ... 22
Character Concepts & Design ...22
re÷belief [ MFA Thesis Paper ]
Table of Contents | iii
Motif Choices ...25
Proof of Concept: Virtual Zoetrope Prototyping ...26
Modeling, Texturing & Rigging Prep for Zoetropes ... 28
Characters ...28
UV Unwrapping & Texturing ...29
Rigging ...31
Motifs & Environments ...34
Fish Rig ...35
House Rig ...36
Fern Rig ...37
Test Prints in Various Materials ...38
Zoetrope Design & Printing ... 41
Initial & Actual Manufacturing Strategy ...41
Sculptural vs. Staged Set ...42
MEL Scripting ...43
Design Choices & Strategies per Zoetrope ...47
Considerations for 3D Printing Preparation ...47
Zoetrope 1 ...51
Zoetrope 2 ...54
Zoetrope 3 ...57
Zoetrope 4 ...60
Zoetrope 5 ...63
Zoetrope 6 ...66
Zoetrope 7 ...69
Zoetrope 8 ...75
Zoetrope 9 ...81
Filming of Zoetropes ... 82
Building the Zoetrope Pedestal ...82
Camera Selection ...87
Previsualization ...91
Table of Contents | iv
Post-Production ... 95
Editing While Filming...95
Compositing ...96
Titles & Credits ...97
Music Composition ...99
Voice Overs ... 101
Sound Mixing ... 102
Public Release & Reaction ... 104
RIT Screening Reaction ... 104
Initial Wife’s Reaction ... 105
Public & Media Reaction... 106
Conclusion & Experience ... 109
Appendix A : Original Approved Thesis Proposal ... A–1
Synopsis... A–1
Story Concept ... A–1
Rationale ... A–1
Appendix B : Proposed & Actual Timeline ... B-1
Appendix C : Original & Actual Budget ... C-1
Appendix D : Screening Respondent – Shaun Foster ... D-1
Appendix E : Response – RIT Screening ... E-1
Appendix F : Response – Michael Starobin ... F-1
Appendix G : Response – Publicity & Media ... G-1
Conferences & Presentations ... G-1
Installations ... G-1
News & Mentions ... G-1
Table of Figures | v
Table of Figures
Figure 1: Cover Art for The Moon and the Son: An Imagined Conversation . ... 8
Figure 2: One of Copenhagen Cycle's zoetopes, created using paper cutouts. ... 9
Figure 3: 3D Printed and hand painted "Volcano" from Bellows March. ...11
Figure 4: Example of The Feral Fount built in 1996. ...12
Figure 5: MakerBot Replicator 2X Desktop 3D Printer with examples of dual extrusion models. ....15
Figure 6: Material examples printable through Shapeways. ...17
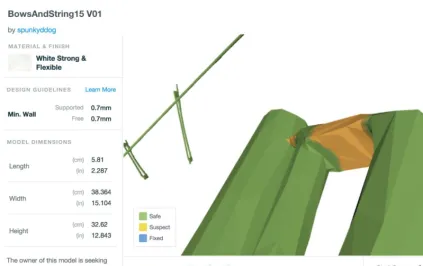
Figure 7: Example of wall fixing tool through Shapeways backend designer’s site. ...18
Figure 8: Example polyamide pricing for cubes of varying densities. ...19
Figure 9: Easter Island Moai Heads. ...22
Figure 10: Character Sketches. ...23
Figure 11: Refined Character Sketches. ...24
Figure 12: Final Character Designs. ...24
Figure 13: 3D Printed Heart. ...25
Figure 14: 3D Printed Cross. ...25
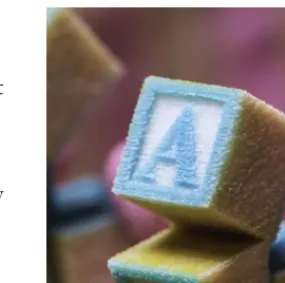
Figure 15: 3D Printed Block. ...26
Figure 16: 3D Printed Fish. ...26
Figure 17: Old Zoetrope example with replaceable animation strips. ...27
Figure 18: Maya rig of Male Adult with Controls. ...29
Figure 19: 3DCoat’s UV display shows high pixel density in red and low pixel density in blue. ...30
Figure 20: Texture map with male adult colors on the left and female adult colors on the right. ...31
Figure 21: Rig displaying joint chain structure with controls. ...31
Figure 22: Mesh with texture within Mudbox showing layers of blendshape controls. ...32
Figure 23: Blendshapes arranged in Maya to be bound to rig on far left. ...33
Figure 24: The same rig referenced twice to make both the female (left) and male (right). ...34
Figure 25: Fish rig and controls. ...35
Table of Figures | vi
Figure 27: Fern rig and controls. ...37
Figure 28: Fish sizes in relation to inch side of ruler and a penny for visual reference. ...38
Figure 29: Material Resolution - Nylon (upper left), Sandstone (right), Acrylic (bottom left). ...39
Figure 30: Examples of M.C. Escher's tessellated works. ...42
Figure 31: Zoetrope ring rig used to for duplication script and spatial reference. ...44
Figure 32: Zoetrope Object Duplication Procedure. ...45
Figure 33: Example Duplication Procedure Call. ...46
Figure 34: MeshLab example of decimation - 2605404 faces (Left) to 950000 (Right)...48
Figure 35: netfabb progression of detecting repair needs, fix, and resolved geometry (left to right). .49 Figure 36: Zoetrope 1 virtual render with grid lines for size reference. ...52
Figure 37: Broken Zoetrope 2 due to material weight and shipping. ...54
Figure 38: Zoetrope 2 virtual render with grid lines for size reference. ...55
Figure 39: Zoetrope 3 virtual render with grid lines for size reference. ...58
Figure 40: Gluing and clamping the four 3D Printed pieces together. ...60
Figure 41: Zoetrope 4 virtual render with grid lines for size reference. ...61
Figure 42: Broken zoetrope due to lack of packaging materials for protection and stabilization. ...63
Figure 43: Zoetrope 5 virtual render with grid lines for size reference. ...64
Figure 44: Zoetrope 6 virtual render with grid lines for size reference. ...67
Figure 45: Slices of watch layers prepped for printing. ...70
Figure 46: Assembly and gear tests prior to painting. ...71
Figure 47: Tests of movable parts after painting prior to final assembly. ...72
Figure 48: Zoetrope 7 virtual render with grid lines for size reference. ...73
Figure 49: Figures re-broken to correct a Shapeways’ Technician’s bad fix. ...76
Figure 50: Figures arranged after fern was painted using printed registration points. ...77
Figure 51: Setup to adjust and register strings using a contrasting backdrop. ...78
Figure 52: Zoetrope 8 virtual render with grid lines for size reference. ...79
Figure 53: Zoetrope 9 virtual render with grid lines for size reference. ...81
Figure 54: Initial plate design – deviated changes thickened the plate to 0.25 inches. ...82
Figure 55: Original prototype setup for spinning zoetropes using a DC Motor. ...83
re÷belief [ MFA Thesis Paper ]
Table of Figures | vii
Figure 57: Arduino setup with prototyping board utilizing programmable buttons. ...84
Figure 58: Code for Zoetrope Pedestal using a 1.8° Stepper Motor...86
Figure 59: Setup to fine-tune code for proper registration of rotation at angles of 15 degrees. ...87
Figure 60: Frame by frame example of recording a moving image with a rolling shutter. ...89
Figure 61: Examples of distortion when recording zoetropes with a Canon 6D CMOS sensor. ...90
Figure 62: Various staged setups when recording scenes for the film. ...92
Figure 63: Setup for theater scene using micro-LEGO dolly. ...94
Figure 64: New Zealand night sky. ...96
Figure 65: Double exposure technique used in George Méliès’ L'homme à La Tête De Caoutchouc. ...97
Figure 66: Progression of title and design. ...98
Figure 67: Example of a bird and cage thaumatrope. ...98
Acknowledgements | viii
Amongst all those who made this film possible, I want to thank my thesis advisor and good friend, Stephanie Maxwell, at the School of Film and Animation. She is the reason why I pursued an MFA at RIT, introducing me to the idea that there is more to animation than Pixar and Disney. If it were not for her open-mind, guidance and experience, this film would have never seen the day of light. Skip Battaglia deserves a nod as well for not only taking over Stephanie’s position as chair while she was on sabbatical, but he, like Stephanie, was supportive and open-minded about my crazy, bizarre process.
I would also like to thank my thesis committee, Mark Reisch and Marla Schweppe, for asking the simplest questions that gave me the most complex answers I could find. Tom Gasek contributed much effort in making sure I was squared away in my responsibilities while living remotely from RIT campus. I would like to thank Eric Dyer for being a genius who blew my mind and inspired much of this project. I would like to thank John
Canemaker for encouraging me through his film, The Moon and the Son: An Imagined
Conversation, to tell a very personal story. To those who were willing to work and collaborate with me on my film: Stephen J. Bullen, Brett Wilson, Gloria Arteaga, Maria Mejía-Yepes, Colleen Horan and Alex Bone – you all rock.
Many thanks to my talented friends, faculty and peers in SOFA who have inspired me through screenings, their personal stories and experiences, especially talented Meghdad Asadi Lari, Vijay Kumar Madurai Chandrasekhar and Ihab Mardini. Much appreciation goes to Shapeways who made the printing possible and a special nod to Andrew Thomas who made the process effortless. Thank you to Ann DeMarle for believing in me and for pointing me in the right directions. Thank you to my family who was always there for me, regardless of the situation.
Abstract | ix
Abstract
re÷belief, is a 3D Printed, hand crafted, zoetropic short-film that asks if recalling memories can break a cycle. re÷belief is a graduate student produced animated thesis, completed for the MFA in the School of Film and Animation at Rochester Institute of Technology. Much of this film is a personal story that recalls nine very specific instances of my life. These are memories that have repeatedly haunted me throughout my youth and adulthood. The memories regularly reflected times of bliss mixed with sullen, miserable moments.
Ultimately, the story thread focuses on cycles, and choosing 3D printed zoetropes as the metaphor and medium within a short film seemed perfect to share a story about childhood, religion and relationships. After all, Zoe translates as 'life' and trope is a reoccurring motif. 3D Printing, handcrafting and manufacturing these zoetropes are physical representations that impart a physicality within this film.
Introduction | 1
The creation of my graduate thesis film, re÷belief, began in May 2012 and continued to completion at the very end of May 2014 to satisfy the production requirement for the Masters in Fine Arts in the School of Film and Animation at the Rochester Institute of Technology. My thesis committee was chosen carefully for their expertise and diverse backgrounds. Stephanie Maxwell was my Committee Chair with a focus in experimental filmmaking. Mark Reisch was an Advisor with a focus in the technical aspects of 3D
Animation and Modeling as well as a curiosity in new tech. Marla Schweppe was an Advisor who has a focus in Digital Graphics, Projection and New Media technologies.
For this thesis film, I had several goals I wanted to achieve during this production. My first goal was to learn more about 3D Printing technology. My hive-like-mind would buzz with curiosity in the process of what makes a virtual object physical. I wanted to explore the limitations of what was possible, and to create dynamic sculptures that could tell stories on their own, ones that would be enhanced through movement.
My second goal was to attempt an experimental process in filmmaking and storytelling. Considering that the 3D Printing industry was in a hot bed of exciting developments when I first looked into it in 2010, particularly in terms of materials and what people were doing to push the medium, 3D Printing had not been explored much in filmmaking. I wanted to be one of the pioneers to experiment, discover and share the results of this new-age
opportunity.
My third goal was to successfully tell a very personal, dramatic story. Considering my prior films and preferences favored comedy, I wanted to understand and challenge myself in leaving people touched and meditative after experiencing my work. More importantly, I wanted to make a film that could potentially be universally appreciated. A film that people could find something to connect to, in a non-direct way.
re÷belief [ MFA Thesis Paper ]
Introduction | 2
discovered production cycle, while unique and new, had many insights, challenges and setbacks that will be explored in more detail within this thesis document.
One of the biggest challenges was trying to complete this film within the originally planned year timeline. The production faced many necessary and unexpected life interruptions, such as moving due to my wife’s promotion and our relocation, funding loss and surgery to remove a tumor from my ankle. However, it not only required me to push the originally anticipated finish date forward from May 2013 (see Table 1) to May 2014 (see Table 3), it challenged me to consolidate ideas, find creative solutions to complex problems and brave the trust needed for those willing to help in a pinch on my production.
Backstory
As noted in my goals within the Introduction, I wanted to create a narrative that focused on a more personal, dramatic story. This challenged me to find something relatable as well as something with a much more mature context, tone and feel. For re÷belief, I focused on one thread of many chronological sets of events that lead from my childhood to where I am today and celebrates what my relationship with Corinn – my wife – has taught me.
BUILDING A FOUNDATION
I was one of three kids with a father and mother who loved us greatly. Being the oldest, but only a year apart from my brother, and two from my sister, I had the slight privilege and appreciation of being more aware of the family dynamics growing up. My father worked as a Civil Engineer and my mother worked many jobs to help out with finances while taking care of us three kids. As a young child, this was the natural order. This was what I naïvely expected for the rest of my life.
Introduction | 3
As I grew into my pre-teen years, probably a little more mature than most, I desired to have a relationship with a girl – any girl. I had felt so much love and care in my family, it was almost as if I wanted to share it. As many children who seek this type of attention, it does not come easy. I had heartbreak after heartbreak as a kid when I thought I loved a girl. I drew pictures, created tokens of appreciation, wrote love notes, but to no avail. I did not receive reciprocated feelings. My father always reminded me that there were many fish in the sea, much like a plentiful boundless buffet. But, honestly, my parents probably felt better knowing that I might never be in a relationship until I turned thirty.
By the end of grade school, and because of my awareness of the desire for love, I acquired another important, defining life lesson. I noticed families of friends in my parochial school had trouble at home. Rumors filled the school halls with hissing-whispers of yet another set of parents possibly divorcing. I did not know what this purported, if anything. When inquiring my mother about what divorce truly entailed, she snapped, “It’s a mortal sin.” This translated to me that couples who divorced were going to hell - quite a dramatic
realization, right? Because I viewed this as a religious statement, and as fact, I took it as law. It burned into my code, rooted into my understanding of life, as something my parents could never do because they were great people and deserved heaven.
MATURING RESPONSIBILITIES
Just as I was about to enter high school, my family’s dynamic changed. My father, a hardworking civil engineer, had a lifetime of layoffs that seemed to reoccur as frequent as the flu season. The most recent pink slip came from his office at Public Works in the city of Winooski, Vermont. This hardship could not have had come at a worse time as my parents just purchased their first home, setting the tone that paying the mortgage took precedent. Due to lack of available work in the area, my father made the difficult decision to work out of state as a civil engineer in Hooksett, New Hampshire. He visited on the weekends as often as he could, but there were many he missed. There was no question we noticed his absence.
re÷belief [ MFA Thesis Paper ]
Introduction | 4
Starting at a public high school, in my family’s current situation, created an odd tension within myself. Though I did well academically my first year, it was the first time I had to start fresh making new friends as though we moved to the other side of the world. I was worried about being accepted into a new culture – outside the comfort of my religion and former classmates. I continued seeking a relationship, but the love I desired turned more into an attention need. Love was competitively sought for in our malnourished home.
The drama and concerns in school competed with the drama at home. My father and mother often argued in front of us, during the few moments they both seemed to be home together; often yelling loud enough where I vacated the home to distract myself outside. From time to time, I ran away – not far though – filled with rage, naivety and
misunderstandings. I wanted them to fight about me and not each other. Occasionally, my brother and I would get into fights, not making it any easier on my mother to handle or deal with. This was just one of the unfortunate ways my siblings and I processed our tortuous feelings.
A SEVERE MISTAKE
One day, during a gloomy fall evening in Vermont, my brother and I were riding back home in my father’s car. He looked unhappy, pensive and drove like we were not in the car. The tires gripping against the broken-paved road occupied the white noise for most of the ride. Seemingly random, my father broke the silence suggesting how funny it was that my mother was hanging out more with the engineers at the airport hangar. Not thinking much about it, I retorted with a chuckle, “Maybe mom doesn’t love you anymore.” My brother responded, as expected, “You’re an idiot.” Then awkward silence quickly crept back into the car as I immediately regretted what I had said. In fact, I had no idea what and why I felt that was the appropriate response to my father’s concern. It came out of nowhere, feeling like a knee-jerk reaction. Within four hours of that statement, it was going to be the third most haunting memory of my entire life.
Once my father dropped us off, I stowed myself in my futon bed, under the comforter, agonizingly replaying what I had said to make sense of it. Hours passed as I lay in a kind of rigor mortis. I wanted to apologize to my father, but I had no idea how to or if I should just let it ride out.
mascara-Introduction | 5
streaming, tear-soaked face into the phone yelling. I quickly realized it was my almost-unrecognizable mother. Never in my life did I see her in a state like this. Paralyzed, I coward in my bed, peering just over the covers, as the situation grew worse.
Soon after my mother flew up the stairs in hysterics, coughing on her tears along the way, my father arrived home. She sprinted back down the stairs, meeting my father in the kitchen where furiously, flailing fists met his body. Yelling followed as they chased each through the house. Faster than I could comprehend what felt like a nuclear bomb hitting my house, my father left with a bag stuffed with clothes.
Just before I thought he was gone for good, the lights flipped on in my room and abruptly his large body was on hovering over mine. With his heavy pointed finger trembling in my face, he spat, “What happened tonight… is your fault!” And just like that, he evaporated from my sight. Instantaneously, I time traveled to a moment in memory when I was just outside a door of my mother’s doctor. I recalled joyously peering through a Highlight magazine, discovering lovely illustrations of anthropomorphized pigs, mice and cows in small cities and cars. My fascination was jarred just as my mother crossed the threshold of the doctor’s room into the children’s waiting area, tears marking her face of concern. I asked her what was wrong. She turned towards me, with a glassy, piercing stare, “He said you are what’s wrong with me.” We promptly left.
I was five years old when my mother seared this into my memory. I had never thought much of those words during this odd remarkable moment, until it was provoked to
anamnesis in bed when I was thirteen year old and confronted with a horrific cognizance: I just broke up my family. I was the one responsible for their failed marriage. These two moments jumped to the top of my terrifying recollections in life.
FROM DARKER TO ENLIGHTENED
re÷belief [ MFA Thesis Paper ]
Introduction | 6
During my high school years, the foundation that my parents once built for me as a child, crumbled. I stopped going to church. Faith seeped out of my body as I attempted to scientifically prove that the bible, everything I knew about the Catholic faith and teachings, was false. I wanted to prove that my parents were not going to hell. At least I hoped that they would not. They were good people; why would this happen to them? To my family? I worried that I could never have a loving relationship and feared if I ever did, it would not last.
When I entered college, I felt a sense of ownership in my life. It appeared that turning 18 gave me the epiphany that I was in control. It helped me with confidence, though I still had concerns for my family. It was also a time when I first felt free, like many other freshmen, to do what I desired. Though this constantly felt diminished when I reencountered the drama back at home. Luckily, I had a great friend my freshman year who distracted me and inevitably brought me on an amazing, unforeseeable journey that would change my life.
This friend, Phlip, who happened to be my roommate, introduced me to the idea of trying out for an annual play called Toys Take Over Christmas, which showed at the University of Vermont’s Royal Tyler Theater. He planned on heading out one evening to make the tryouts and practically dragged me with him. Upon entering the building where the meeting was called, I noticed a cute lady across the table that only introduced herself as, “Sign-in” – just enough to sink my interest. Luckily my eyes worked as her nametag read “Corinn”.
A FISH CHASING A FISH
Subsequently, I got a callback and eventually I was offered a small role in the production. I was thrilled to be part of something big. Even better, I felt that I could possibly find a romantic connection. I viewed Corinn chromatically: lovely, smart and distant like a rainbow. She was friendly, but never seemed to want to be friends. Of course, she was the stage manager and I assumed her manner was how a good theater production kept their actors in line. Being a silly prince in the play, I performed my role and sought ways to simply make her smile, and it was not easy.
Introduction | 7
actors who carelessly, or purposely, didn’t return them to their rightful place. In this case, Corinn was seeking the only missing prop.
Upon approaching me, as I was the only one sitting in the theater, she immediately asked accused, “Where’s the heart?” Through her marathon of chasing down actors, I deductively became the last to potentially scold. With a smirk on my face, I revealed the heart in the palm of my hand, “It’s been here waiting for you.” There was a pause of, “Did he just say that,” on her face. And, finally, she broke, snickered and blushed. Just like that, there was an opening, an opportunity – a connection.
She had jumpstarted my heart again. This old, rusted, ticking kit, stuffed into my hallowed chest, warmed every moment we spent with each other. This potential, long-term
relationship restored my confidence in love. She jumpstarted my faith in that I could love and be loved.
Thereafter, I sought Corinn out on a romantic chase before we interlocked in our first kiss. We became engaged a few years later, and, in a few more after that, we finally married. I worried that I’d rushed things, but I never felt happier. We were both happy. We are both happy.
A GIFT OF HUMANITY
Much like a dance, we were betrothed in a trusting relationship filled with honest expression and impulses of movement. These feelings and the occasional conflict showed that we appreciated our time with each other and that we could work issues out. When moments felt like we were spiraling away from each other, we trusted that somehow, through communication and action, we could bring ourselves back into the rhythm of love transcending space and time.
Despite our happiness, there was one thing I incessantly wrestled with in my conscience: could I ever have a child? Would I ever want kids? For me, the answer appeared to always have been yes. For Corinn, she was not so certain. Eventually, I too felt uncertain, but for more complex reasons.
re÷belief [ MFA Thesis Paper ]
Introduction | 8
families struggle in the same way. I did not want that to be a problem or a situation that I would want to impose on our marriage. Could we break this potential, tragic cycle? After all, I believed that my parents once loved and chased each other much like how Corinn and I had. We were much like them, but – kids or not – I had no desire to risk repeating the past.
Cyclical & Experimental Story Development
After watching John Canemaker’s The Moon and the Son: An Imagined Conversation2, and just before finalizing my thesis
idea, I realized I wanted to create a story that was personal. I desired to focus on something that troubled me through life and express it through the production of my thesis, something that Canemaker’s film did.
However, I wanted to get to the root of my story in a medium of mimicking the reoccurring memories that haunted me. This led me to choosing zoetropes as the primary medium to express the story.
Just knowing the medium of what I wanted to tell my story in was not enough. While zoetropes fit the idea of a memory replaying in my head repeatedly from time to time, I had difficulty in understanding how this could work. How could you tell a story in a medium that rotates
once per second? My research earlier on during my RIT studies pointed me to Eric Dyer, who has done just that.
Dyer’s work focused primarily on stories that worked in revolutionary ways. His works like
Copenhagen Cycles3 and Kinetic Sandwich4 spanned a spectrum of story narrative interpreted by
cyclical, visual animations to just pure experimentation of textures and colors that provide an experience. The latter was most intriguing as it sought repeatable patterns, which made the cyclical nature of it so fascinating.
1 Source: http://www.michaelspornanimation.com/splog/wp-content/I/moonandsun.jpg 2 A short, 2D animated film by John Canemaker, The Moon and the Son: An Imagined Conversation:
https://files.nyu.edu/jc7/public/press/press.html
[image:18.648.397.539.214.413.2]3 A short, paper sculpture (cinetrope) production by Eric Dyer: https://vimeo.com/17603523 4 A short, experimental film by Eric Dyer: https://vimeo.com/17615482
Introduction | 9
Figure 2: One of Copenhagen Cycle's zoetopes, created using paper cutouts.5
My challenge now was to combine a personal story that may not be as controlled as
Canemaker’s film, but not so freely interpreted as in Dyer’s works. In this case, I desired to make each zoetrope a contained memory, a point in history, which animated my story. Then, I planned on creating multiples of these memories, each being zoetropic, that would be filmed and edited together in a linking fashion. I decided to construct appropriate lengths and timing to focus on smaller sections of the overall larger zoetropes, cutting them together in a linear story, attempting to be careful not to show the entire zoetrope which could kill the ultimate enjoyment and secret of telling the story, unless it would be on purpose.
The major task would be to figure out how to tell a personal story about a single character when a zoetrope has repeating copies of characters to animate the story.
Why 3D Printed vs. Rendered Zoetropes
I struggled for a while to decide what would be best: should I render the film, or film the film? Rendering had it a huge advantage in cost. In fact, my production budget (see B-1) would have been much cheaper due to advantages of not paying for rendering in the same
5 Source:
re÷belief [ MFA Thesis Paper ]
Introduction | 10
way as one would for 3D Printed mistakes. The other advantage of rendering would have been to perfect much of my already experienced skillset in digital production (managing virtual cameras, digital texture and materials, animated movements, VFX, etc.). Also related to the known factor of rendering, it meant that my production pipeline would have been straightforward, understood and easily followed.
Despite how relatively easy it would have been to render these zoetropes, 3D Printing to me was new and exciting. One of the big advantages I saw was that very, very few people have done this before. But this was also a concern as there was no textbook to tell you how to do it. It also presented a new, problem-solving experience and challenge I embraced that could be applicable in a new realm of jobs in the future.
Most importantly, I realized in this artistic medium that 3D Printed zoetropes could appropriately and metaphorically represent a physical manifestation of my memories. The idea that these pieces could exist in reality suggests that they are factual. Virtual rendered objects have lost their spectacle over the years, no longer feeling real. It could be suggested that animated films are ephemeral and transient. Printed, physical objects suggest the known, real and factual in many ways. Of course there is a novelty to this medium, but for my story, it made sense.
EXPERIMENTAL INSPIRATION
Of course, much of my inspiration stemmed from Dyer’s works. One work in particular did utilize 3D Printing to tell an amazing story. Bellows March6 used 3D Printed pieces that were
hand painted, spun and filmed to tell a story of concertinas marching into battle, dying, and being reborn again just to be celebrated and marched into battle. Much of the filming focused on physical parts of each zoetrope to tell the story, using various levels of depth of field to focus on these parts of the zoetropes.
Introduction | 11
Figure 3: 3D Printed and hand painted "Volcano" from Bellows March.7
Bellows March alone proved that through clever editing and careful selection of printed animation, I could produce a successful filmed story of 3D Printed zoetropes. I just needed to create a sense of continuity through each zoetrope. This meant the character would need to be present in each zoetrope to tell the story and that distinct objects and motifs would need to exist in multiple zoetropes, but in ways that kept the story exciting and engaging.
SCULPTURE & ANIMATION
In addition to Eric Dyer’s work, I found inspiration from another artist, Gregory
Barsamian8, who told amazing stories in a single, stroboscopic zoetrope. Barsamian’s work
primarily focused on installations with a strobe – something not very conducive to filming due to the equivalent frames rates he needed to work in. Feral Fount9 was an example of an
installation I visited at the Museum of the Moving Image in Brooklyn, New York. As the curator at the museum describes:
7 Source: Eric Dyer
re÷belief [ MFA Thesis Paper ]
Introduction | 12 Feral Fount is a physical representation of a dream the artist had in which drops of water from his kitchen faucet transformed into a bomb, and then a paper airplane before crashing into his dishpan. The artwork is a stroboscopic zoetrope made up of a series of ninety-seven small sculptures, each slightly different from the preceding one. These sculptures function in the same way as the individual drawings in the frames of an animated film. The sculptures are mounted on a rotating armature. A strobe light flashes thirteen times per second, illuminating the sculptures. Because there are intervals of darkness between the flashes, we do not see a blur as the sculptures spin by, but perceive a 'moving image.' 10
[image:22.648.109.541.344.597.2]After experiencing Barsamian’s work, I realized I wanted my zoetropes to not only animate on screen, but also to have them stand out as complete memories in a non-staged method. I spent much time thinking about the design of each zoetrope to see how each could conform to a shape and space to express each thought. I did not want the zoetrope to feel like a staged prop, but more like a physical object that does not predominately focus on the animation and instead is designed for meaningful storytelling.
Figure 4: Example of The Feral Fount built in 1996.11
Also important to note: animation in the real world would be vastly different from virtual animation. By entering into a physical reality, the animation was transformed with a much
10 Curator’s statement: https://vimeo.com/18906121
11 Source:
Introduction | 13
higher restriction on what an animator can get away with in cheating the camera – a technique occasionally used to make movement work or look right for a scene. This technique, by default, must be embraced. Otherwise, it would be impossible for any animator to complete a project. This also meant to me that there would be much trial and error as the physical world has restrictions to size of materials and weight to be factored in sculptural art.
FILM VS. INSTALLATION
Another problem I encountered was the decision to make this a film vs. an installation. While it would work for both, it would demand two completely different paths to execute for my thesis project. After much deliberation, I realized a story told with an installation would not reach as wide of an audience, as I wanted. Film today, especially in the form of a virtual link, allows many to experience the story and the spectacle. The chances are that those I wanted to reach with my story might be least likely to travel to a studio or exhibition of and installation. The downside of a film-only project is that the format allows for varied viewing experiences, such as on television, laptops, iPhones, etc.; and, many of these experiences of the film do not provide a truly cinematic experience in a large screen setting. In consideration of this, I created a line in my budget for festival submissions so that the work could be projected in the optimal theater setting by film enthusiasts, and then I would follow up with an online release after a year’s time.
Additionally, after the release of the film, and depending on time and budget, I have also considered the possibility of installation as a secondary pursuit, post thesis.
Iterative Production Cycle
Though it would make sense to follow a more traditional pipeline for animation, a 3D Printed film that was experimental in nature meant that a different pipeline needed to be considered. Reason stems from the fact no one has really created a 3D Printed, zoetropic film before, or at least documented its process. Because of the need to do prototyping and research prior to creation of any content, it meant I would have time to consider how the production cycle would need to work.
re÷belief [ MFA Thesis Paper ]
Introduction | 14
zoetropes to adjust them relative to the entire story instead of just to their physical
standalone structures, since they had to relate in shape and story somehow. To help in this process, I considered a pipeline that:
Allowed focus on the animation of characters and objects
Referenced the animation to shape it into a sculptural piece
Allowed review of the sculpture by virtually spinning it for visual esthetics and storytelling strategies and restrictions
Output optimally for printing costs and physical restrictions
Print the resulting zoetrope in hopes for it to survive spinning and shipment
At any point during the process, I could easily revisit any of the above for corrections and adjustments
Because Autodesk’s’ Maya was my choice of poison, I built scene files to be modular and light so they could then be referenced into more complex scenes for animation and then zoetrope creation. I also decided to build several simple and complex MEL scripts to handle the creation of zoetropes, which could save a lot of time for review of the sculptural pieces. While general sketches and drawings could have been useful, I learned through an iterative design process (the process discussed above) that allowed for quicker design variations of the zoetropes to meet my expectations for the story.
Planned Production vs. Actual Production
Despite the originally proposed timeline of a one-year time frame and a budget of $9,305 (see C-1), new life events caused some changes and challenges.
A NUMBER OF 3D PRINTING SOLUTIONS
One of the big changes in my personal life during the production was my unexpected move from Rochester, New York, to North Bethesda, Maryland due to my wife, Corinn’s
company promoting her into an amazing job opportunity. While this beneficial and important to our lives, it caused a dramatic swing of expectations in production costs. Originally, the plan was to work with RIT’s Brinkman Lab12 to 3D Print all my zoetropes.
Introduction | 15
The Brinkman Lab had a ZCorp 650 full color printer utilizing an inexpensive “EBay”13
material for prototyping parts. These types of 3D Printing machines can vary greatly in the $50,000 to $100,000 price tag range, making it easily accessible for a student to use. At the time, it was the only printer on the market that allowed for a white powder printer material to be pigmented much like a standard desktop color printer, while also having a nice large printing volume. However, since the lab was student run with an irregular schedule, and because the printer was down periodically and backlogged with other machine shop printing projects, it was difficult for me to rely on this as a printing solution for production.
For a brief moment, during the end of September 2012, I considered purchasing one of Makerbot’s new Replicator 2X14 printers for just around $2800 so I could 3D Print all my
zoetropes from home. It was a supported machine allowing two printing materials to be extruded at the same time: A plastic material in one extruder (PLA), and a dissolvable material in the other extruder – much like a type of Elmer’s glue. The benefit of printing both at the same time for this additive printing process was to allow for complex geometries with overhangs to be supported with a secondary printing structure that could easily be removed post printing by placing it into water. The downsides to a 3D Printer like this – ones that extruded a PLA or ABS filament – were its printing errors in the form of
spaghetti-like slag that simply would not adhere properly due to temperature changes during printing and/or if a machine instruction was sent incorrectly.
Figure 5: MakerBot Replicator 2X Desktop 3D Printer with examples of dual extrusion models.15
While this 3D Printer seemed like the best possibility and alternative at the time, Superstorm Sandy16 ruined Makerbot’s production facility in Brooklyn, New York when it made landfall
13 The powder was only available through a shop on EBay citing it to be a special powder to be an alternative,
cheaper solution to 3D Systems supported and expensive material standard in all it’s ZCorp printers.
re÷belief [ MFA Thesis Paper ]
Introduction | 16
on October 29, 2012. Makerbot’s online purchasing site changed their turnaround time for their printers from a 6-week timeframe to an indefinite timeframe making this a dead-end plan. Needless to say, this forced me to seek another solution.
I considered building alternative printers varying from $300 to $1800 from online stores and groups pointing to parts that could be ordered online or at local electronics parts and Home Depot locations. Many of these printers were not as advanced in resolution of detail as Makerbot’s products, and were really meant for play and prototyping – not very conducive to a reliable need for quality output under a strict timeline. Also, the printing volume sizes of these printers ranged greatly and were smaller than those of Makerbot’s platforms.
LOCATING A 3D PRINTING SERVICE
With concerns of time, cost and quality of production, I began looking into services local to the East Coast to understand the cost benefits of working with a 3D Printing service. Online companies such as Shapeways17, Sculpteo18 and i.materialise19 allowed a consumer to
print in any printing material available to the market. These printing materials included polyamide, alumide, acrylic resins, ceramics, ABS, titanium, steel, brass, bronze, silver, gold, rubber, and sandstone (see Figure 6). These websites also conveniently allowed the ability for a content creator to upload their 3D model and to immediately obtain a cost quote after selecting one of these materials. Each material uses a different printer and process for production and because of this it also has varying costs, properties, printing resolutions and production timeline.
16 An unprecedentedly, powerful hurricane off the Atlantic Coast:
http://www.cnn.com/2013/07/13/world/americas/hurricane-sandy-fast-facts/
Introduction | 17
Figure 6: Material examples printable through Shapeways.20
Because I was considering a printing service rather than a desktop printer, I researched materials ranging from plastics and wood to sugar and recyclables in order to understand the pay-per-print costs through desktop 3D Printers. Makerbot’s filament ranged from $40 to $70 per pound of material in PLA, ABS and Dissolvable. Many other competitive sources reported similar prices. Another factor I started to realize was my cat’s fur and dust
interfering with printing quality at home using a desktop 3D Printer. This all factored into a concern of re-printing and support materials required to finish zoetrope outputs.
re÷belief [ MFA Thesis Paper ]
Introduction | 18
Typically, online printing services post their material costs and material considerations for public access. The costs were listed as dollar amounts per cubic inch or centimeter. So if you knew the volume of your object in cubic inches or cubic centimeters, you could easily estimate cost. As noted before, if I uploaded an OBJ file21 to a service online, it meant that
[image:28.648.110.533.231.497.2]the instant quote returned could provide crucial feedback on how to make adjustments to cut costs, if necessary. Some services, such as Shapeway’s site, also provided instant feedback on potential printing problems by outputting the model to screen with color-coding for references to how thick or thin the model is in certain areas (see Figure 7).
Figure 7: Example of wall fixing tool through Shapeways backend designer’s site.
Some online 3D Printing services also had hidden cost savings or penalties for printing. For example, if you were to print a 3D cube, there are several factors that determine price: the density, the overall size, and material of the object. If the cube were solid, the density would be at 100% since the density is calculated by putting a bounding box around the object and determining how much material would fill that space (see Figure 8). If it were hollow, the cube’s density would be far less, particularly in the situation when it was defined as a wireframe of 2mm thickness. In regards to size, typically discounts are given based on reaching a minimum volume of material, of say, 20 cubic centimeters – anything less than
Introduction | 19
this would be charged the regular price, and anything more than this would get a 10% discount.
Figure 8: Example polyamide pricing for cubes of varying densities.
re÷belief [ MFA Thesis Paper ]
Introduction | 20
After much consideration, I chose to prototype and produce my film through Shapeways’ because of their main company’s location and production facility being in the heart of New York City, their website was well designed for uploading and evaluating virtual goods, and their pricing system was the best in the industry. My hope at the time was to find a person whom I could talk to and get information that would help me produce these yet-to-be-created zoetropes. By working with someone local versus someone overseas, like the service i.materialise, I could personally pick up printed parts in case shipment would be impossible. I believed that human interaction through this process, versus a robot-like, impersonal approach, would be invaluable and crucial to completing this film.
However, this decision meant that prior budgeting costs would explode due to the higher costs of working directly with a business to print objects. The added costs were easily justified, however, since I did not have direct access to a reliable printer for creating vibrant, full-color 3D Prints. The added, crucial benefit came later when I realized that human workers, with much experience behind them, became part of the workflow when determining if a zoetrope could survive 3D Print manufacturing as well as shipping. Considering that I planned for very delicate and intricate designs, it was well worth the cost in time and quality.
INITIAL TIMELINE VS. ACTUAL TIMELINE
A few other factors that created lapses in my original timeline came mostly down to funding. When the RIT SOFA Faculty passed my thesis proposal, I was also nominated for a Princess Grace Award22. This award could have potentially brought in $25,000 to help in funding my
thesis. I also applied for a RIT College of Arts and Sciences Grant to help fund the thesis as well. Despite the award nomination and efforts to gain funding this way, I was never
granted either.
After the thesis proposal was accepted, I had the opportunity to study abroad in New Zealand for a period of time during the summer of 2012. This naturally took time away from my planned initial story development and the pre-production phase. What was amazing about this trip in particular was the fact that while at home, my wife was offered a promotion, but in two different locations in the U.S.: Seattle, Washington and Bethesda, Maryland. Without going into too much detail, and as noted before, Corinn eventually accepted the position in Bethesda, Maryland, with a start date of November 2012. Our lives
22 A prestigious grant in the Arts and Humanities offered to students who are nominated by their schools for
Introduction | 21
turned a bit upside down for a moment as the projected path now took a deviated turn causing concern for what might happen to our lives and my thesis production.
Once Corinn and I completed our journey to Bethesda, Maryland at the end of October 2012, we realized we were not putting away anything into our savings anymore since the DC Metro area has a cost of living more than twice what we had experienced in Rochester, New York. Because of my decision to print through Shapeways, it meant that I had to seek more funding beyond what was available in my savings. I also needed to look for work to both help pay for our new high living expenses and help fund my thesis film production.
I was offered an opportunity to work on a NASA Science on the Sphere project through the Imaging Research Center at the University of Maryland, Baltimore County in late February 2013. Because this was a fulltime effort, I could not focus on my thesis and I divided my production over a few months (see Table 2). Eventually, I finished the amazing NASA opportunity in July 2013 when my contract ended. This experience also put me in closer contact with Eric Dyer, who acted in an advisor-like role on my thesis. Despite the lapse in time, the NASA work tremendously helped to save the needed funds to complete my thesis and also furthered great new connections in the community.
Pre-Production | 22
Pre-Production
During pre-production, there were a few crucial items that needed to be solidified before starting the creation of the zoetropes. Aside from general zoetrope research, the main characters of the story needed to be fleshed out and then the environments would become my next focus. Since the creation of the zoetropes was an experimental procedural process, the foundation of the story and motifs needed to be established beforehand. And then, of course, I needed to make sure I could create a working prototype concept to wrap my head around for animating in the third dimension of a zoetrope to discover potential mechanical considerations before designing and spinning the sculptural pieces.
Character Concepts & Design
Abstracted from the backstory, the characters in the story are a young adult male and a young adult female. To save costs, the characters needed to be as small as possible, but easily understood and relatable in human form. To me this meant that arms and bodies would be disproportionately smaller than the head to allow for emotions to be conveyed, if desired. Since the printing aspects meant that the character’s eyes might never be discernible, I considered focusing on large body movements as the primary way of expressing emotion. My research led me to designs for the characters that resembled the ancient Easter Island statues, called the Moai.
The Moai have very distinct, monolithic features that make them very unique. They have a broad,
furrowed brow and angular faces that give them a strong countenance, and their large head and small torso exaggerate their proportions. These extraordinary statues are still puzzling to
23 Photo taken by Aurbina: http://en.wikipedia.org/wiki/File:Moai_Rano_raraku.jpg
Pre-Production | 23
archeologists as to their meaning and function in ancient Polynesian culture. They are seemingly eternal - almost as if they have been around since the existence of the island itself.
I decided to work with Gloria Arteaga, a talented conceptual artist and peer in the School of Film and Animation program, to aid me in the design of the main characters. Since the film idea stemmed from reoccurring memories, I wanted the characters designed in such a way that suggested human features, but did not show that they had any human senses other than maybe communication through feeling. This means that the eyes and mouths would be mask-like representations, without pupils and a mouth being able to open. The ears and noses would be purely representational. This approach also eliminated the difficulty of having to animate eyes and mouths in light of the potential precarious results when going through the printing process.
The initial sketches were to help with a variety of options in both design and understanding poses. Eventually a few were chosen that best represented the adult characters in my story, and Gloria made a few examples of the characters’ front, side and back views to help better comprehend their volume and silhouettes (see Figure 10). Originally, we thought an angular face and body would be a great representation and direct inspiration of the Moai (see Figure 11). However, after further review, we softened the face and body a bit to give it a more welcoming appeal, and we left some of the defining features inspired by the Moai (see Figure 12). Once this was completed, we developed an understanding of how the figures,
proportionally, would age over time from child to adult.
re÷belief [ MFA Thesis Paper ]
Pre-Production | 24
When it came to deciding color and textures, I chose to have the characters represented as nude bodies instead of clothed. A big reason for this was to not only have the characters understood easily, but also the idea that nakedness symbolized there was nothing to hide. Nakedness suggested vulnerability as well with a sense of truth and acceptance.
Story Strategies
To better understand the medium, I looked into why zoetropes would be the best
storytelling medium for this film. Breaking down the word zoetrope to its core construction, “zoe” is a Greek root translated as “life” and “tropos” means “turning”. “Trope” by definition also suggested metaphor, motifs and figurative expressions. Taking these variable correspondences into account, I wanted the zoetropes to represent a cyclical nature of something that reoccurs – both literally and figuratively. Since we are often reminded repeatedly of the past, zoetropes made the best sense to help focus the story.
Pre-Production | 25
After much consideration, each zoetrope represented a reoccurring recollection. Originally, 18 zoetropes were planned to tell the story. However, due to costs and time I needed to consolidate down to a much more reasonable number of zoetropes, and this resulted in cutting their numbers down to about half. This naturally forced me to condense the memories expressed by each zoetrope into much more meaningful representations, and to be highly selective in choosing the memories that would be important to telling the story through film.
Motif Choices
There were several storytelling motifs that were crucial to binding the zoetropes’ meanings together. Besides the characters that populate the film, the physical motifs also carry significant meanings. These motifs are the hearts, crosses, alphabet blocks and fish.
The hearts in the film were fairly obvious in representing love. Not only love in the sense between two people, but love that passes through generation after generation much like a memento. The heart in the film goes through stages of saturation and loss, just as the main character does. The heart also represents pieces of the self. Pieces that one feels like they are ripping from their chest to give to others. It has a sense of investment when performed in this way, which in turn can be taken away when
represented as a physical element.
Much like in my Roman Catholic upbringing, crosses signify the representation of religion. In this film, the use of the cross was to establish a sense of faith, and, much like the heart, it too would be a physical element that could be lost. In the story, faith would be built up through a foundation of love and play, which would eventually be represented by a protective-like cage. Later on, this dissolves into a pile of lost items to signify the nature of growing up over the years and questioning religion and faith.
Figure 13: 3D Printed Heart.
re÷belief [ MFA Thesis Paper ]
Pre-Production | 26
The idea behind the alphabet blocks was to establish a sense of play. Since they are easily recognizable and everyone growing up has most likely played with alphabet blocks. Much like how children use them to build
structures, they are meant to represent a sense of
foundation -- the importance of play in a child’s life. Play stems from a need to build a foundation of trust and understanding. In the film, the blocks become the foundation on which the child is able to grow in the film, but the blocks also crumble underneath the child when depression hits – the time in a person’s life where play no
longer seems to exist. This represents a foundation one once stands upon, physically, that crumbles beneath. This also could be interpreted as one becoming more aware of the world – less naïve – and entering adulthood, too.
Lastly, the fish symbolize a bit more personal view on life. They represent a sense of simplicity and an odd bit of wisdom that my father occasionally shared with me as a child, “There’s plenty fish in the sea.” Each fish in this film represents relationships and love interests. To help identify, in the end, my most important relationship I made it stand out in a chromatic way as something that would be differentiated in its look and unique
characteristics. This also meant that, at some point, the main character would have to realize he was a fish too, chasing after other fish.
Proof of Concept: Virtual Zoetrope Prototyping
The most important part of this film project, before even delving into the storytelling choices for each zoetrope, was to understand how a zoetrope works and how to build one. Historically, the first zoetrope functioned as a spinning contraption with sequential still images drawn at intervals on a strip of paper and mounted on the inside perimeter of a spinning drum (see Figure 17). What allowed one to see the illusion of movement, instead of a circular blur, were slits at intervals on the drum through which one looked through at a corresponding image on the rotating strip. The slits lined up perfectly with each image,
[image:36.648.396.539.76.218.2]Figure 15: 3D Printed Block.
Pre-Production | 27
acting as a shutter effect. During spinning, when looking through the slits, the images would animate.
Figure 17: Old Zoetrope example with replaceable animation strips.24
For filmmaking, the shutter in this case was inside the camera. The important
considerations that needed to be worked out were how many frames per second would the film be shot and how many figures could I fit on a rotating disc. This was to ensure proper syncing. The simple math suggested that filming at 24 frames per second, in progressive mode, would be ideal, which meant that one would essentially see 24 still figures on the disc.
I virtually prototyped a couple tests, within Autodesk Maya, to see what the effects of a disc rotating slightly faster or slower would be. I created a simple 24 frame animation cycle that I duplicated by 15° offset around a circular disc. Then I spun the zoetrope one revolution per second, with the virtual camera set at 24fps. If the zoetrope became off sync with the camera shutter, the perception of the imagery would appear to drift. If a figure was jumping forward in scene, being off sync by a single frame could make it appear that the character is attempting to catch up. Understanding this helped me in judging where this effect could be present in my scenes when recording, and where to pay attention to accuracy in revolutions.
Modeling, Texturing & Rigging Prep for Zoetropes | 28
Modeling, Texturing & Rigging Prep for Zoetropes
In order to create the zoetropes, I employed a strategy of creating a pipeline to make designing and animating the zoetropes easily adjustable, without having to worry about the process of re-creating what would not work. To start, the characters and environment objects where modeled, textured and rigged as separate scene files in Autodesk Maya. Once they were rigged and cleaned-up, they were referenced into another scene file to create the animation. Once those animation files were completed, the animated scene files were referenced into another, new scene file to be duplicated and manipulated into complex shapes and the final zoetrope designs.
Creating this pipeline for zoetrope creation allowed for consistency in look and permitted adjustments to be made anywhere within each zoetrope. Interesting to the nature of what zoetrope means, the iterative process of designing them within this film ended up itself becoming a cyclical cycle of creating and destroying.
Characters
The strategy in designing the male and female characters was to create models that would morph through their different ages – baby, child, teen and adult, as well as to morph from male to female. Doing so meant that one character file could allow for one rig setup with a simple swap of textures to differentiate the characters. This in turn allowed for easy updates and population in referenced files when changes were required.
Modeling, Texturing & Rigging Prep for Zoetropes | 29
Figure 18: Maya rig of Male Adult with Controls.
UV UNWRAPPING & TEXTURING
re÷belief [ MFA Thesis Paper ]
Modeling, Texturing & Rigging Prep for Zoetropes | 30
UV layouts to make sure that the pixel densities were optimized in areas where they were needed, such as the face and torso.
Figure 19: 3DCoat’s UV display shows high pixel density in red and low pixel density in blue.
Once the UV Unwrapping was completed, I exported the object as an OBJ and imported it back into Autodesk Maya to verify that the UV layout was imported properly. Typically, a weird anomaly happened where the each face UV was not part of the big islands – separated into individual UV faces, which required a quick fix to bind all the UV Vertices together. To verify that it looked right, I applied a grid-texture material to the character in Maya to verify that the distortion was not horrible.
Modeling, Texturing & Rigging Prep for Zoetropes | 31
Figure 20: Texture map with male adult colors on the left and female adult colors on the right.
RIGGING
Since the character needed to morph from male to female, in addition to different sizes and shapes for age, I started by creating a human IK/FK skeleton that would scale through morphing and would work for both human sexes. I made choices on controls typical to human, bipedal rigs using NURB curves and created extra controls on each to do curl fingers, switch from IK to FK, and to switch between facial morph targets.
Once the joint structures and rig were designed in Autodesk Maya, I then went into Mudbox to design the blendshapes for the geometry (see Figure 22). What made this rig a bit more unusual than film type
rigs is that the character’s head absolutely needed to be geometrically part of the entire body. This meant that I had to be careful of blendshape adjustments that may accidentally be painted to the other parts of the body. My strategy here though was to create all the blend
re÷belief [ MFA Thesis Paper ]
Modeling, Texturing & Rigging Prep for Zoetropes | 32
shape changes symmetrically and then break them up in Maya using a MEL tool I developed that would invert morph targets from one side to the other. This pipeline that I created made for easy changes to blend targets in the face and body when needed.
Figure 22: Mesh with texture within Mudbox showing layers of blendshape controls.
Modeling, Texturing & Rigging Prep for Zoetropes | 33
Figure 23: Blendshapes arranged in Maya to be bound to rig on far left.
Once the blendshapes for expressions and movements of the character were determined, I then went into developing a morph target for the female character to be part of the same mesh. I brought the male character into Mudbox and formed the male body into a female form, referenced from the concept design. Since I built in extra geometry for the chest and torso in the male, it made it easy to form the female shape for the breasts and waist. After the model target was adjusted, I brought it back into Maya and ran through a quick quality control check for collisions of blendshape targets to the character for gender, age and facial expressions.
After the character blendshapes were finalized, I bound the skeleton to the main body. Using smooth skinning in Maya, I then went through and painted skin weights, isolating areas of the body per joint at a time. I keyed the controls for the rig to move the joints in extreme positions to determine where skinning fixes needed to be made.
re÷belief [ MFA Thesis Paper ]
Modeling, Texturing & Rigging Prep for Zoetropes | 34
Figure 24: The same rig referenced twice to make both the female (left) and male (right).
Motifs & Environments
Much of the same concepts in the character creation process were followed for the motif designs. The objects were modeled and rigged through the same box-modeling strategy and, for more geometric objects, I skipped importing to Autodesk Mudbox and simply used Photoshop for texturing the 3D Objects. Geometrically, I needed to make choices to keep the polygon count to a minimum to allow for duplication of the objects not to exceed the triangle limits of what Shapeways (or any printer) would allow.
Modeling, Texturing & Rigging Prep for Zoetropes | 35
FISH RIG
Figure 25: Fish rig and controls.
re÷belief [ MFA Thesis Paper ]
[image:46.648.111.541.116.375.2]Modeling, Texturing & Rigging Prep for Zoetropes | 36
HOUSE RIG
Figure 26: House rig and controls.
Modeling, Texturing & Rigging Prep for Zoetropes | 37
FERN RIG
Figure 27: Fern rig and controls.
Interestingly, the fern rig was one of the most complex, yet simple rigs, to figure out. In the idea of the animation, the fern needed to unfurl from the form of a fiddlehead to a large frond and then back again. What made this difficult was the geometry of the frond needed to be incredibly simple and thin. The strategy here was to design the frond as a planar-flat design and very low-level poly, but with just enough to allow good deformation. Since this was to be printed without color, there was no need to add texture. However, it was
important to figure out the UV’s properly to optimize how Maya deformers were to apply to it. I created a simple deformer control setup where a bend deformer was applied to the width of the frond as well as its length. Then by moving the deformer handles and the curve attributes in a specific order, I could get the look of the frond rolling in and out. A
re÷belief [ MFA Thesis Paper ]
Modeling, Texturing & Rigging Prep for Zoetropes | 38
Test Prints in Various Materials
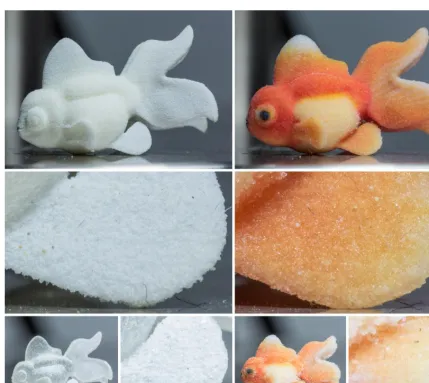
In order to make sure I was on the right path in designing these zoetropes, I needed to understand the process of 3D Printing for various materials. As noted before, I couldn’t find the right opportunity to use RIT’s facilities to do print tests, so I eventually resorted to working through Shapeways. In doing so, I had many materials to choose from with prices ranging greatly depending on the type of material. Looking to keep costs down, and to test a material’s attributes, I decided to 3D Print initially in three different materials initially: full-color sandstone, white sintered nylon plastic, and frosted detailed translucent acrylic.
Figure 28: Fish sizes in relation to inch side of ruler and a penny for visual reference.
Just for the print test, I decided to take the fish and pose it to exploit areas of thickness and color to test for details – particularly the fins. I printed in two different sizes to test for detail resolution. I tested the fish in two sizes for full-color sandstone (large and small), one large size print for the white nylon plastic and one small size for transparent acrylic.
Originally, I wanted to print in white nylon plastic in both large and small, but the minimum size restriction for Nylon was larger than the Sandstone and acrylic. The prices for the sandstone, plastic and acrylic materials were $0.75 per cm3, $1.50 per cm3, and $3.00 per cm3,
respectively.
Modeling, Texturing & Rigging Prep for Zoetropes | 39
[image:49.648.110.539.121.504.2]deeper shade. For all materials, the texture qualities varied greatly, with the sandstone being grainy and the acrylic being smooth.
Figure 29: Material Resolution - Nylon (upper left), Sandstone (right), Acrylic (bottom left).
re÷belief [ MFA Thesis Paper ]
Modeling, Texturing & Rigging Prep for Zoetropes | 40
After much consideration and deliberation with the resulted prints, and with the purpose of keeping the project within budget, I decided to plan on printing the zoetropes mostly in full-color sandstone to reduce time for painting by hand. The print volume for the sandstone material meant that I had to keep the zoetropes to a boundary of no more than 250mm x