MURDOCK
by-step tutorials, this all-in-one guide gets you up to speed quickly on the basics — and provides expanded
coverage of advanced techniques. With incisive insights into the next-generation enhancements to 3ds max,
16 pages of full-color examples, and a CD-ROM featuring exclusive plug-ins, it’s just what you need to take
your animations to the next level.
Shelving Category:
Graphics/Animation
Reader Level:
Beginning to Advanced
System Requirements:
PC running Windows 98 or later, Windows NT 4
or later. See the CD-ROM appendix for details
and complete system requirements.
ISBN 0-7645-3584-6
$49.99
USA
$74.99
Canada
£39.99
UK incl. VAT
3ds
m
ax
4
3ds
m
ax
4
Master
3D modeling,
rendering, and
animation techniques
Harness
the
latest 3ds max
enhancements, from
ActiveShade to Render
Elements
Extend
the program’s
functionality using
cool plug-ins
3
ds max
4
Kelly L. Murdock
™,!7IA7G4-fdfiea!:p;o;t;T;T
Exclusive plug-ins and more on
CD-ROM
JAM-PACKED
CD-ROM!
Exclusive plug-ins
PLUS
models, demos, and tutorials
w w w . h u n g r y m i n d s . c o m
C O M P R E H E N S I V E A U T H O R I T A T I V E W H A T Y O U N E E D
O N E H U N D R E D P E R C E N T
Jam-Packed CD-ROM!
•
Exclusive Furious Research plug-ins, including a Rainbow atmospheric effect and a Sketch render effect•
Sample 3D models from Viewpoint Database, Zygote Media, and more!•
Cool products including Rhino 3D demo and Poser 4 trial•
Complete tutorial files3
ds max
4
Begin
animating
today with a
Quick Start
tutorial!
Bible
*85555-AHCJIf
™ ™Inside, you’ll find complete coverage
of 3ds max 4
•
Get a hands-on introduction to 3ds max 4 with a Quick Start
animation project
•
Master the new features in 3ds max, from the enhanced modeling
features to improved Inverse Kinematics
•
Create sophisticated 3D models using NURBS, splines, patches,
meshes, and compound objects
•
Build intricate special effects using particle systems and Space Warps
•
Master the Expression Controller and other advanced animation tools
•
Simulate realistic materials and textures using the Material Editor
•
Decrease total rendering time using a network
•
Learn to program your own 3ds max plug-ins
™
Create and control
particle systems
3ds max
™
4 Bible
Kelly L. Murdock
Best-Selling Books • Digital Downloads • e-Books • Answer Networks • e-Newsletters • Branded Web Sites • e-Learning
New York, NY ◆Cleveland, OH ◆Indianapolis, IN
3ds max™4 Bible Published by
Hungry Minds, Inc.
909 Third Avenue New York, NY 10022 www.hungryminds.com
Copyright © 2001 Hungry Minds, Inc. All rights reserved. No part of this book, including interior design, cover design, and icons, may be reproduced or transmitted in any form, by any means (electronic, photocopying, recording, or otherwise) without the prior written permission of the publisher.
Library fo Contress Control Number: 2001091958 ISBN: 0-7645-3584-6
Printed in the United States of America 10 9 8 7 6 5 4 3 2 1
1B/RX/QX/QR/IN
Distributed in the United States by Hungry Minds, Inc.
Distributed by CDG Books Canada Inc. for Canada; by Transworld Publishers Limited in the United Kingdom; by IDG Norge Books for Norway; by IDG Sweden Books for Sweden; by IDG Books Australia Publishing Corporation Pty. Ltd. for Australia and New Zealand; by TransQuest Publishers Pte Ltd. for Singapore, Malaysia, Thailand, Indonesia, and Hong Kong; by Gotop Information Inc. for Taiwan; by ICG Muse, Inc. for Japan; by Intersoft for South Africa; by Eyrolles for France; by International Thomson Publishing for Germany, Austria, and Switzerland; by Distribuidora Cuspide for Argentina; by LR
International for Brazil; by Galileo Libros for Chile; by Ediciones ZETA S.C.R. Ltda. for Peru; by WS
Computer Publishing Corporation, Inc., for the Philippines; by Contemporanea de Ediciones for Venezuela; by Express Computer Distributors for the Caribbean and West Indies; by Micronesia Media Distributor, Inc. for Micronesia; by Chips
Computadoras S.A. de C.V. for Mexico; by Editorial Norma de Panama S.A. for Panama; by American Bookshops for Finland.
For general information on Hungry Minds’ products and services please contact our Customer Care department within the U.S. at 800-762-2974, outside the U.S. at 317-572-3993 or fax 317-572-4002.
For sales inquiries and reseller information, including discounts, premium and bulk quantity sales, and foreign-language translations, please contact our Customer Care department at 800-434-3422, fax 317-572-4002 or write to Hungry Minds, Inc., Attn: Customer Care Department, 10475 Crosspoint Boulevard, Indianapolis, IN 46256.
For information on licensing foreign or domestic rights, please contact our Sub-Rights Customer Care department at 212-884-5000.
For information on using Hungry Minds’ products and services in the classroom or for ordering examination copies, please contact our Educational Sales department at 800-434-2086 or fax 317-572-4005. For press review copies, author interviews, or other publicity information, please contact our Public Relations department at 317-572-3168 or fax 317-572-4168.
For authorization to photocopy items for corporate, personal, or educational use, please contact Copyright Clearance Center, 222 Rosewood Drive, Danvers, MA 01923, or fax 978-750-4470.
LIMIT OF LIABILITY/DISCLAIMER OF WARRANTY: THE PUBLISHER AND AUTHOR HAVE USED THEIR BEST EFFORTS IN PREPARING THIS BOOK. THE PUBLISHER AND AUTHOR MAKE NO REPRESENTATIONS OR WARRANTIES WITH RESPECT TO THE ACCURACY OR COMPLETENESS OF THE CONTENTS OF THIS BOOK AND SPECIFICALLY DISCLAIM ANY IMPLIED WARRANTIES OF MERCHANTABILITY OR FITNESS FOR A PARTICULAR PURPOSE. THERE ARE NO WARRANTIES WHICH EXTEND BEYOND THE DESCRIPTIONS CONTAINED IN THIS PARAGRAPH. NO WARRANTY MAY BE CREATED OR EXTENDED BY SALES REPRESENTATIVES OR WRITTEN SALES MATERIALS. THE ACCURACY AND COMPLETENESS OF THE INFORMATION PROVIDED HEREIN AND THE OPINIONS STATED HEREIN ARE NOT GUARANTEED OR WARRANTED TO PRODUCE ANY PARTICULAR RESULTS, AND THE ADVICE AND STRATEGIES CONTAINED HEREIN MAY NOT BE SUITABLE FOR EVERY INDIVIDUAL. NEITHER THE PUBLISHER NOR AUTHOR SHALL BE LIABLE FOR ANY LOSS OF PROFIT OR ANY OTHER COMMERCIAL DAMAGES, INCLUDING BUT NOT LIMITED TO SPECIAL, INCIDENTAL, CONSEQUENTIAL, OR OTHER DAMAGES. FULFILLMENT OF EACH COUPON OFFER IS THE SOLE RESPONSIBILITY OF THE OFFEROR.
Trademarks: 3ds max is a trademark or registered trademark of Autodesk, Inc. All other trademarks are the property of their respective owners. Hungry Minds, Inc. is not associated with any product or vendor mentioned in this book.
About the Author
Kelly Murdockhas been involved with more computer books than he cares to count — to the point that he avoids the computer book section of the bookstore, except for the graphics section, which still remains an obsession. His book credits include various Web, graphics, and multimedia titles, including the first edition of this book, the3ds max 4 Bible. Other major accomplishments include Master HTML and XHTML Visually, JavaScript Blueprints,and co-authoring the Illustrator 9 Bible JavaScript.Kelly also co-authored Laura Lemay’s Web Workshop: 3D Graphics and VRML 2at a time when we all thought VRML was going somewhere.
With a background in engineering and computer graphics, Kelly has been all over the 3D industry. He’s used high-level CAD workstations for product design and anal-ysis, completed several large-scale visualization projects, created 3D models for fea-ture films, worked as a freelance 3D artist, and even done some 3D programming.
Kelly’s been using 3D Studio on and off since version 3 for DOS. He is also the cre-ative force behind the children’s Web site, Animabets.com at www.animabets.com.
Credits
Acquisitions Editor
Tom Heine
Project Editor
Martin V. Minner
Technical Editor
Chris Murdock
Copy Editor
Paula Lowell
Project Coordinator
Regina Snyder
Graphics and Production Specialists
LeAndra Johnson Joyce Haughey Gabriele McCann Heather Pope Brian Torwelle Jeremey Unger Erin Zeltner
Quality Control Technicians
Carl Pierce Marianne Santy
Permissions Editor
Laura Moss
Media Development Specialist
Gregory Stephens
Media Development Coordinator
Marisa Pearman
Proofreading and Indexing
TECHBOOKS Production Services
Special Help
Creating beauty enlightens the soul. Creating humor increases joy.
Creating horror conjures sleeping demons. Creating pathos builds compassion. Creating innovation hastens the future.
Pure creation expands the emotions and makes us more than we are. It is the process of mimicking God.
To Angie, 2001
Preface
W
henever I withdrew to the computer room, my wife would say that I was off to my “fun and games.” I would flatly deny this accusation, saying that it was serious work that I was involved in. But later, when I emerged with a twinkle in my eye and excitedly asked her to take a look at my latest rendering, I knew that she was right. Working with 3D graphics is pure “fun and games.”My goal in writing this book was to take all my fun years of playing in 3D and boil them down into something that’s worthwhile for you — the reader. This goal was compounded by the fact that all you Max-heads out there are at different levels. Luckily, I was given enough leeway that I could include a little something for everyone.
The audience level for the book ranges from beginning to intermediate, with a smat-tering of advanced topics for the seasoned user. If you’re new to Max, then you’ll want to start at the beginning and move methodically through the book. If you’re relatively comfortable making your way around Max, then review the table of con-tents for sections that can enhance your fundamental base. If you’re a seasoned pro, then you’ll want to watch for coverage of the features new to Release 4.
If you’re so excited to be working with Max that you can’t decide where to start, then head straight for the Quick Start. The Quick Start is a single chapter-long tuto-rial that takes you through the creation of an entire scene and animation. This Quick Start was included in response to some feedback from readers of the first edi-tion who complained that they didn’t know where to start. For those of you who were too anxious to wade through a mountain of material before you could create something, this Quick Start is for you.
Another goal of this book is to make it a complete reference for Max. To achieve this goal, I’ve gone into painstaking detail on almost every feature in the basic core package, including coverage of every primitive, material and map type, modifier, and controller.
As this book has come together, I’ve tried to write the type of book that I’d like to read. I’ve tried to include a variety of different scenes that are infused with creativ-ity. It is my hope that these examples will not only teach you how to use the soft-ware, but provide a creative springboard for you in your own projects. After all, that’s what turns 3D graphics from work into “fun and games.”
What Is Max?
Max is coming of age. Now with the number 4 attached to its name, it is starting to show some maturity. Before we go any further, I should explain my naming conven-tion. The official name of the product in this release is 3ds max 4 with a lowercase “m,” but I will simply refer to it as Max with a capital “M.” This reference is a nick-name given to a piece of software that has become more familiar to me than the family pet (whose name is Pepper by the way). I have not been successful in train-ing Max to come when I call or sit, but it will on occasion play dead.
One way we humans develop our personalities is to incorporate desirable personal-ity traits from those around us. Max’s personalpersonal-ity is developing as well — every new release has incorporated a plethora of desirable new features. Many of these fea-tures come from the many additional plug-ins being developed to enhance Max. With Release 4, Max has adopted many features that were available as plug-ins for previous releases. Several new features have been magically assimilated into the core product, including the ActiveShade window and the Render elements. These additions make Max’s personality much more likable.
Other personality traits are gained by stretching our beings in new directions. Max and its developers have accomplished this feat as well, with such things as the overhauled Inverse Kinematics features and Parameter Wiring capabilities.
As Max grows up, it will continue to mature by adopting new features and inventing others.
About This Book
Let me paint a picture of the writing process. It starts with years of experience, which is followed by months of painstaking research. There were system crashes and personal catastrophes and the always present, ever-looming deadlines. I wrote into the early hours of the morning and during the late hours of the night — burning the candle at both ends and in the middle all at the same time. It was grueling and difficult, and spending all this time staring at the Max interface made me feel like . . . well . . . like an animator.
Sound familiar? This process actually isn’t much different from what 3D artists, modelers and animators do on a daily basis, and, like you, I find satisfaction in the finished product.
Tutorials aplenty
ix
Preface
a number of ways to make the information useable for all types of learners. That is why you’ll see detailed discussions of the various features along with tutorials that show these concepts in action.
The tutorials appear throughout the book and are clearly marked with the “Tutorial” label in front of the section title. They always include a series of logical steps, typically ending with a figure for you to study and compare. These tutorial examples are provided on the book’s CD-ROM to give you a first-hand look and a chance to get some hands-on experience.
I’ve attempted to “laser focus” all the tutorials down to one or two key concepts. This means that you probably will not want to place the results in your portfolio. For example, many of the early tutorials don’t have any materials applied because I felt that using materials before they’ve been explained would only confuse you.
I’ve attempted to think of and use examples that are diverse, unique, and interest-ing, while striving to make them simple, light, and easy to follow. I’m happy to report that every example in the book is included on the CD-ROM along with the models and textures required to complete the tutorial from scratch.
For the second edition, I’ve taken a different approach to the tutorials. Rather than making each tutorial start from scratch, I’ve decided to instead give you a starting point. This approach lets me “laser focus” the tutorials even more and with fewer, more relevant steps, you can learn and experience the concepts without the com-plexity. On the book’s CD-ROM, you will find the Max files that are referenced in Step 1 of most tutorials. The completed tutorial’s Max file is saved with the word finaltacked on the end. If you get lost midway through the tutorial, you can open the final resulting file and see for yourself how it is supposed to work.
I’ve put a lot of effort into this book, and I hope it helps you in your efforts. I pre-sent this book as a starting point. In each tutorial, I’ve purposely left all the creative spice out, leaving room for you to put it in — you’re the one with the vision.
How this book is organized
Many different aspects of 3D graphics exist, and in some larger production houses, you might be focused on only one specific area. However, for smaller organizations or the general hobbyist, you end up wearing all the hats — from modeler and light-ing director to animator and post-production compositor. This book is organized to cover all the various aspects of 3D graphics, regardless of the hat on your head.
The book is divided into the following parts:
✦Quick Start— This single chapter is an entire animation project presented in several focused tutorials. It is designed to whet your appetite and get you up to speed and producing animations immediately.
✦Part I: Getting Started with 3ds max 4— Whether it’s understanding the interface, working with the viewports or dealing with files, the chapters in this part will get you comfortable with the interface so you won’t get lost moving about this mammoth package.
✦Part II: Working with Objects— Max objects can include meshes, cameras, lights, Space Warps, and anything that can be viewed in a viewport. This part includes chapters on how to reference, select, clone, group, link, transform, and modify these various objects. It also includes a chapter on all the various modifiers.
✦Part III: Modeling— Max includes several different ways to model objects. This part includes chapters on working with spline shapes, meshes, patches, NURBS, and a variety of specialized compound objects like Lofts and Morphs.
✦Part IV: Materials and Maps— With all the various material and map types and parameters, understanding how to create just what you want can be diffi-cult. These chapters explain all the various types and how to use them.
✦Part V: Lights and Cameras— This part describes how to control lights and cameras as well as several lighting special effects and the camera utilities. There is also a chapter on using the Camera Matching and Camera Tracking utilities.
✦Part VI: Particle Systems and Space Warps— Particle systems can be used to create groups of thousands of particles, and Space Warps can add forces to a Max scene. Chapters in this part explain and provide examples of working with these two unique object types.
✦Part VII: Animation— To animate your scenes, you’ll want to learn about keyframing, the Track View, and controllers. I cover all of these topics here. I also cover expressions and dynamic simulations in this part.
✦Part VIII: Inverse Kinematics— I cover creating and working with bone sys-tems and give complete coverage of the various Inverse Kinematics methods in this part.
✦Part IX: Rendering and Post-Production— To produce the final output, you can render the scene or composite it in the Video Post dialog box, as described in this part. In addition, this part discusses environments, Render Elements, Render Effects, and network rendering.
✦Part X: Customizing Max— This part provides details on customizing the Max interface and environment. This part also includes a chapter on using Max’s scripting language — MAXScript.
xi
Preface
At the very end of this book, you’ll also find four appendixes that cover system figuration, Max keyboard shortcuts, plug-ins exclusive to this book, and the con-tents of the book’s CD-ROM.
Using the book’s icons
The following margin icons will help you get the most out of this book:
Note boxes highlight useful information that you should take into consideration.
Tips provide an additional bit of advice that will make a particular feature quicker or easier to use.
Cautions warn you of a potential problem before you make a mistake.
This icon highlights features that are new to Release 4.
Watch for this icon to learn where in another chapter you can go to find more information on a particular feature.
This icon points you toward related materials that are included on the book’s CD-ROM.
The book’s CD-ROM and exclusive plug-ins
Computer book CD-ROMs are sometimes just an afterthought that includes a hand-ful of examples and product demos. This book’s CD-ROM, however, is much more than that — its content was carefully selected to provide you with an additional resource that can supplement the book. Appendix D, “What’s on the CD-ROM?” sup-plies the details of the content on the CD-ROM.
The CD-ROM includes a large selection of 3D models that you can use in your pro-jects if you choose. Many of these models are used in the tutorials. The CD-ROM also includes the Max files for every tutorial.
On the CD-ROM Cross-Reference New Feature
Caution Tip Note
If you haven’t noticed yet, most of this book is printed in black and white. This can make seeing the details (and colors) of the figures difficult. The CD-ROM includes a complete searchable version of the book along with all the figures in color.
As a special bonus, the CD-ROM also includes several custom-built, exclusive plug-ins developed by Furious Research and Dave Brueck, one of this book’s contributing authors. To find out more about these plug-ins, see Appendix C, “Exclusive Bible Plug-Ins.”
Color insert pages
Acknowledgments
I
have a host of people to thank for their involvement in this major work. The order in which they are mentioned doesn’t necessarily represent the amount of work they did.Thanks to my family, Angela, Eric, and Thomas without whose support I wouldn’t get very far. I was recently playing a game with Eric and Thomas where we needed to guess the word on a card given some synonyms. Eric gave the hint that this is what Dad likes to do and Thomas immediately blurted out, “Work on the com-puter!,” so I guess I haven’t hidden my work from my boys. The funny part of the story was that the word on the card was “groove.” The moral of this story is that working long hours on the computer is okay as long as you know how to groove.
In the previous edition, the task at hand was too big for just me, so I shared the pain with two co-authors. But for this edition, I’ve decided to do all the updates solo (actually Dave was busy with a book of his own, so he also had better learn how to groove). I would still like to thank my former two co-authors, Dave Brueck and Sanford Kennedy, whose work, although overhauled, still maintains their spirits.
Dave deserves a second huge thanks for taking time from his busy schedule to recompile the Furious Research plug-ins for Release 4. These exclusive plug-ins by themselves make this book worth having.
Major thanks and choruses of gratitude go out to the editors at Hungry Minds: to Tom Heine for steering the ship during a few corporate tidal waves; to Colleen Dowling, Marti Paul, and Marty Minner, who project-managed this fast ball, curve ball, and screw ball all at once; to Paula Lowell for her excellent copy editing input and to Chris Murdock for taking on the technical editing of this monster while slay-ing some computer demons of his own. Additional thanks go out to Laura Moss and her co-workers in the media department for chasing down the required permissions for the CD-ROM content, and finally, to the entire staff at Hungry Minds who helped me on this journey.
The various people who work in the graphics industry are amazing in their willing-ness to help and support. I’d like to thank first of all David Marks and Jo-Ann Palmer and the entire Discreet beta team for getting me the product when I needed it and to Phillip Miller for taking time from his busy schedule to review sections of the text. I’d also like to thank the following individuals and companies for supplying software and models:
✦Steve Yatson at Creative Labs
✦Mark Madsen at Zygote Media
✦Robert Landsdale at Okino Computer Graphics
✦Robert McNeel at Robert McNeel and Associates
✦Lavina Larkey and Beau Perschall at Digimation
✦Hou Soon Ming at 3D Toon Shop
✦William Capozzi at Dedicated Digital
✦Marvin A. Lee II at 3D Paralex
Contents at a Glance
Preface . . . vii
Acknowledgments . . . xiii
Part I: Getting Started with 3ds max 4 . . . 1
Quick Start: Animating a Fighter Jet Fly-By . . . 3
Chapter 1: Exploring the Max Interface . . . 35
Chapter 2: Working with Viewports . . . 75
Chapter 3: Working with Files . . . 99
Part II: Working with Objects . . . 131
Chapter 4: Using Primitive Objects . . . 133
Chapter 5: Selecting Objects and Setting Object Properties . . . 163
Chapter 6: Cloning Objects and Creating Object Arrays . . . 187
Chapter 7: Grouping and Linking Objects . . . 209
Chapter 8: Transforming Objects . . . 231
Chapter 9: Using Modifiers . . . 265
Part III: Modeling. . . 317
Chapter 10: Modeling Basics and Miscellaneous Tools . . . 319
Chapter 11: Drawing and Using 2D Splines and Shapes . . . 333
Chapter 12: Working with Meshes . . . 373
Chapter 13: Creating Patches . . . 397
Chapter 14: Building Compound Objects . . . 415
Chapter 15: Working with NURBS . . . 463
Part IV: Materials and Maps . . . 487
Chapter 16: Exploring the Material Editor . . . 489
Chapter 17: Applying Materials . . . 511
Chapter 18: Using Maps . . . 545
Chapter 19: Working with Materials and Maps . . . 589
Part V: Lights and Cameras . . . 615
Chapter 20: Working with Lights . . . 617
Chapter 21: Controlling Cameras . . . 651
Chapter 22: Camera Matching and Tracking . . . 667
Part VI: Particle Systems and Space Warps . . . 685
Chapter 23: Creating and Controlling Particle Systems . . . 687
Part VII: Animation. . . 747
Chapter 25: Animation Basics . . . 749
Chapter 26: Working with the Track View . . . 769
Chapter 27: Restricting Movement with Constraints . . . 797
Chapter 28: Animating with Controllers . . . 811
Chapter 29: Using Expressions . . . 843
Chapter 30: Creating a Dynamic Simulation . . . 861
Part VIII: Inverse Kinematics . . . 883
Chapter 31: Working with Bones . . . 885
Chapter 32: Creating and Using Inverse Kinematics . . . 899
Part IX: Rendering and Post-Production . . . 921
Chapter 33: Rendering Basics . . . 923
Chapter 34: Working with Environments and Atmospheric Effects . . . 947
Chapter 35: Using Render Elements and Effects . . . 967
Chapter 36: Network Rendering . . . 999
Chapter 37: Post-Processing with the Video Post Interface . . . 1029
Part X: Customizing Max . . . 1055
Chapter 38: Customizing the Max Interface . . . 1057
Chapter 39: Using MAXScript . . . 1087
Part XI: Extending Max with Plug-Ins . . . 1127
Chapter 40: Using Third-Party Plug-Ins . . . 1129
Chapter 41: Creating Your Own Plug-Ins . . . 1139
Appendix A: Installing and Configuring 3ds max 4 . . . 1171
Appendix B: Max Keyboard Shortcuts . . . 1181
Appendix C: Exclusive Bible Plug-Ins . . . 1195
Appendix D: What’s on the CD-ROM? . . . 1207
Glossary . . . CD1-CD12 Index . . . 1211
Hungry Minds, Inc. End-User License Agreement. . . 1254
CD-ROM Installation Instructions . . . 1256
Contents
Preface . . . vii
Acknowledgments . . . xiii
Part I: Getting Started with 3ds max 4
1
Quick Start: Animating a Fighter Jet Fly-By . . . 3
The Speed of Jets . . . 4
Tutorial: Importing the Jet Model . . . 4
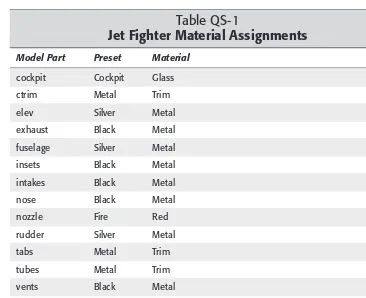
Tutorial: Applying Materials to the Jet Model . . . 6
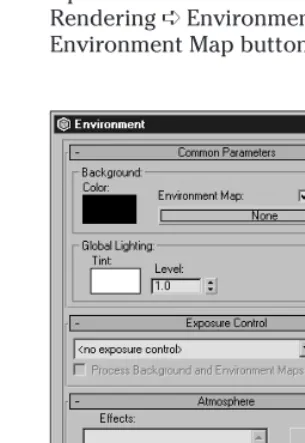
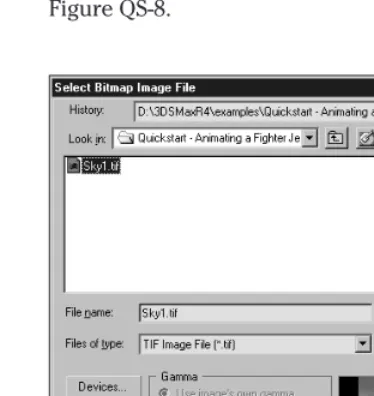
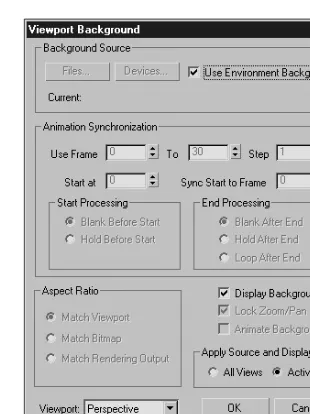
Tutorial: Positioning the Background Environment . . . 11
Tutorial: Adding a Building Model . . . 15
Tutorial: Working with Cameras and Lights . . . 17
Animating the Jet . . . 21
Tutorial: Creating an animation path . . . 21
Tutorial: Assigning a controller . . . 22
Tutorial: Adding a Smoke Trail . . . 26
Rendering the Final Animation . . . 29
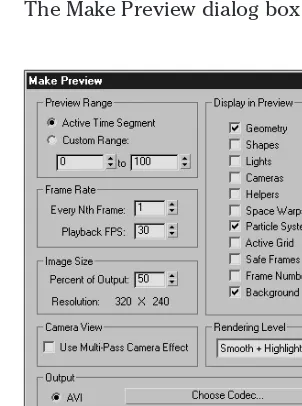
Tutorial: Creating a preview animation . . . 29
Tutorial: Rendering the final animation . . . 30
Chapter 1: Exploring the Max Interface . . . 35
The Interface Elements . . . 36
Using the Main Toolbar . . . 37
Using the Tab Panel . . . 40
Using the Command Panel . . . 41
Create panel . . . 42
Modify panel . . . 43
Hierarchy panel . . . 44
Motion panel . . . 45
Display panel . . . 46
Utilities panel . . . 46
Using the Menus . . . 48
The File menu . . . 48
The Edit menu . . . 52
The Tools menu . . . 54
The Group menu . . . 56
The Views menu . . . 56
The Create menu . . . 59
The Modifiers menu . . . 59
The Animation menu . . . 60
The Graph Editors menu . . . 61
The Rendering menu . . . 61
The Customize menu . . . 62
The MAXScript menu . . . 63
The Help menu . . . 64
Using the Additional Interface Controls . . . 65
Using the Time Controls . . . 65
Time Slider . . . 67
Track Bar . . . 67
Learning from the Status Bar and the Prompt Line . . . 67
MAXScript Listener . . . 69
Interacting with the Interface . . . 69
Right-click quadmenus . . . 69
Floating and docking panels . . . 70
Understanding the color cues . . . 71
Drag-and-drop features . . . 71
Controlling spinners . . . 72
Keyboard shortcuts . . . 72
Modeless and persistent dialog boxes . . . 72
Chapter 2: Working with Viewports . . . 75
Understanding 3D Space . . . 75
Orthographic views . . . 76
Perspective view . . . 77
Using the Viewport Navigation Controls . . . 77
Tutorial: Navigating the Active Viewport . . . 79
Configuring the Viewports . . . 81
Setting the viewport rendering method . . . 82
Altering the Viewport layout . . . 88
Using Safe Frames . . . 89
Understanding Adaptive Degradation . . . 91
Defining regions . . . 92
Selecting System Units . . . 94
Loading a Viewport Background . . . 94
Obtaining Background Images . . . 97
Chapter 3: Working with Files . . . 99
Working with Max Scene Files . . . 99
Saving files . . . 100
Opening files . . . 101
Merging files . . . 101
Archiving files . . . 102
File utilities . . . 102
Importing and Exporting . . . 105
Importing geometric objects . . . 105
Importing additional formats . . . 111
Exporting geometric objects . . . 114
xxi
Contents
Referencing External Objects . . . 119 Using XRef Scenes . . . 120 Using XRef Objects . . . 124 Tutorial: Using an XRef proxy . . . 126 XRef Objects in the Modifier Stack . . . 127 Configuring XRef paths . . . 128
Part II: Working With Objects
131
Chapter 4: Using Primitive Objects . . . 133
Creating Primitive Objects . . . 133 Using the Create panel . . . 134 Using the Create menu . . . 135 Naming objects and assigning colors . . . 136 Using different creation methods . . . 137 Using the Keyboard Entry rollout for precise dimensions . . . 139 Altering object parameters . . . 139 Tutorial: Exploring the Platonic solids . . . 140 Primitive Object Types . . . 141 Standard Primitives . . . 141 Extended Primitives . . . 150
Chapter 5: Selecting Objects and Setting Object Properties . . . 163
Selecting Objects . . . 164 Selection filters . . . 164 Select buttons . . . 165 Selecting with the Edit menu . . . 166 Selecting multiple objects . . . 168 Tutorial: Selecting objects . . . 168 Locking selection sets . . . 171 Using named selection sets . . . 171 Editing named selections . . . 172 Selecting by material . . . 173 Selecting objects in the Track View . . . 173 Selecting objects in the Schematic Views . . . 174 Setting Object Properties . . . 175 Viewing object information . . . 175 Setting rendering controls . . . 177 Enabling Motion Blur . . . 177 Setting Display properties . . . 178 Setting Bone properties . . . 179 Using the User-Defined panel . . . 180 Hiding and freezing objects . . . 180 Using the Display Floater dialog box . . . 181 Using the Display panel . . . 182 Tutorial: Playing hide and seek . . . 183
Chapter 6: Cloning Objects and Creating Object Arrays . . . 187
Cloning Objects . . . 187 Using the Clone command . . . 187 Using the Shift-clone method . . . 188 Tutorial: Cloning cows . . . 189 Understanding Cloning Options . . . 189 Working with copies, instances, and references . . . 189 Tutorial: Copied, instanced, and referenced teddy bears . . . 191 Creating Arrays of Objects . . . 192 Linear arrays . . . 193 Tutorial: Building a white picket fence . . . 194 Tutorial: Filling the survivalist’s pantry . . . 194 Circular arrays . . . 196 Tutorial: Building a Ferris wheel . . . 197 Spiral arrays . . . 198 Tutorial: Building a spiral staircase . . . 198 Cloning over Time . . . 200 Using the Snapshot command . . . 200 Tutorial: Following a mouse through a maze . . . 200 Mirroring Objects . . . 202 Using the Mirror command . . . 202 Tutorial: Mirroring an ant character . . . 202 Spacing Cloned Objects . . . 204 Using the Spacing tool . . . 204 Tutorial: Building a roller coaster . . . 204 Working with a Ring array . . . 206
Chapter 7: Grouping and Linking Objects . . . 209
xxiii
Contents
Working with Schematic View Nodes . . . 223 Rearranging nodes . . . 225 Node colors . . . 225 Renaming objects . . . 225 Changing the object color . . . 226 Deleting nodes . . . 226 Creating a hierarchy . . . 226 Copying materials between objects . . . 226 Copying and reordering modifiers . . . 226 Tutorial: Building an inverted solar system . . . 228
Chapter 8: Transforming Objects . . . 231
Moving, Rotating, and Scaling Objects . . . 231 Moving objects . . . 232 Rotating objects . . . 232 Scaling objects . . . 232 Transformation Tools . . . 233 Using the transform buttons . . . 233 Working with the Transform Gizmo . . . 234 Using the Transform Type-In dialog box . . . 235 Using status bar coordinate fields . . . 236 Understanding Transform Managers . . . 237 Understanding coordinate systems . . . 238 Tutorial: Exploring the coordinate systems . . . 239 Using a transform center . . . 241 Using Pivot Points . . . 242 Positioning pivot points . . . 242 Aligning pivot points . . . 243 Transform adjustments . . . 243 Tutorial: Exploring the Transform Centers . . . 244 Selecting Axis Constraints . . . 244 Locking axes . . . 246 Inheriting transformations . . . 247 Using the Link Inheritance utility . . . 247 Practicing Transformations . . . 247 Tutorial: Re-creating a chess game . . . 247 Tutorial: Setting the dining room table . . . 249 Tutorial: Building a snowman . . . 251 Using the Align Commands . . . 252 Aligning objects . . . 252 Aligning normals . . . 253 Tutorial: Creating a string of pearls . . . 254 Aligning to a view . . . 255 Tutorial: Building with pipes . . . 256 Using Grids . . . 257 The Home Grid . . . 257 Creating and activating new grids . . . 258 Using AutoGrid . . . 258 Tutorial: Building a multicolored caterpillar . . . 259
Using Snap Options . . . 260 Setting snap points . . . 261 Setting snap options . . . 262 Tutorial: Creating a lattice for a methane molecule . . . 263
Chapter 9: Using Modifiers . . . 265
Working with the Modifier Stack . . . 265 Applying modifiers . . . 265 Deleting modifiers . . . 267 Renaming modifiers . . . 267 Copying and pasting modifiers . . . 267 Reordering the Stack . . . 268 Tutorial: Learning the effect of Stack order . . . 268 Disabling modifiers . . . 269 Collapsing the Stack . . . 269 Using the Collapse utility . . . 270 Using Gizmo subobjects . . . 271 Tutorial: Transforming a gizmo . . . 271 Modifying subobjects . . . 271 Configuring modifier sets . . . 272 Exploring Modifier Types . . . 273 Selection modifiers . . . 274 Patch/Spline Editing modifiers . . . 275 Mesh Editing modifiers . . . 280 Animation modifiers . . . 285 UV coordinate modifiers . . . 291 Cache Tool modifiers . . . 293 Subdivision Surface modifiers . . . 293 Free Form Deformer modifiers . . . 295 Parametric Deformer modifiers . . . 298 Surface modifiers . . . 308 NURBS Editing modifiers . . . 309 Other modifiers . . . 309 World-Space modifiers . . . 311 Loft Objects versus Surface Tools . . . 313 Understanding the differences . . . 313 Tutorial: Modeling a vacuum hose . . . 313 Using Instanced Modifiers . . . 315
Part III: Modeling
317
Chapter 10: Modeling Basics and Miscellaneous Tools . . . 319
xxv
Contents
Working with Subobjects . . . 323 Soft Selection . . . 324 Applying modifiers to subobject selections . . . 325 Tutorial: Melting half an ice cream cone . . . 325 Low-Res Modeling . . . 326 The Polygon Counter utility . . . 326 The Level of Detail utility . . . 327 Tutorial: Creating an LOD Turtle . . . 327 Modeling Helpers . . . 329 Using Dummy and Point objects . . . 329 Measuring coordinate distances . . . 329 Tutorial: Testing the Pythagorean theorem . . . 330
Chapter 11: Drawing and Using 2D Splines and Shapes . . . 333
Drawing in 2D . . . 333 Working with shape primitives . . . 334 Tutorial: Viewing the interior of a heart . . . 342 Tutorial: Drawing a company logo . . . 343 Importing and Exporting Splines . . . 345 Tutorial: Importing vector drawings from Illustrator . . . 346 Tutorial: Exporting a Max-generated logo . . . 347 Editing Splines . . . 349 Making splines renderable . . . 349 Selecting spline subobjects . . . 349 Controlling spline geometry . . . 352 Editing vertices . . . 354 Editing segments . . . 359 Editing Spline subobjects . . . 361 Tutorial: Spinning a spider’s web . . . 366 Moving Splines to 3D . . . 367 Using the Shape Check utility . . . 367 Extruding splines . . . 368 Lathing splines . . . 369 Tutorial: Lathing a crucible . . . 369 Using Spline Boolean Operations . . . 370 Spline Boolean operators . . . 370 Tutorial: Routing a custom shelf . . . 371
Chapter 12: Working with Meshes . . . 373
Creating Editable Mesh and Poly Objects . . . 373 Converting objects . . . 374 Collapsing to a mesh object . . . 374 Applying the Edit Mesh modifier . . . 374 Editable Mesh verses Editable Poly Objects . . . 374 Editing Mesh and Poly Objects . . . 375 Editable Mesh and Poly subobjects modes . . . 375 Selection rollout . . . 376 Edit Geometry rollout . . . 377 Editing vertices . . . 377
Editing edges . . . 383 Editing Face, Border, Polygon, and Element subobjects . . . 386 Tutorial: Modeling a clown head . . . 391 Tutorial: Cleaning up imported meshes . . . 392 Tutorial: Building a Beveled Pyramid . . . 394
Chapter 13: Creating Patches . . . 397
Introducing Patch Grids . . . 397 Creating a patch grid . . . 397 Tutorial: Creating a checkerboard . . . 399 Editing Patches . . . 400 Editable patches versus the Edit Patch modifier . . . 400 Selecting Patch subobjects . . . 401 Editing vertices . . . 402 Editing edges . . . 407 Editing Patch and Element subobjects . . . 408 Relaxing a patch . . . 411 Tutorial: Modeling a shell . . . 411
Chapter 14: Building Compound Objects . . . 415
xxvii
Contents
Modeling with Boolean Objects . . . 439 Union . . . 439 Intersection . . . 439 Subtraction . . . 441 Cut . . . 441 Tips for working with Booleans . . . 443 Tutorial: Creating a Lincoln Log set . . . 444 Creating a Loft Object . . . 446 Using the Get Shape and Get Path buttons . . . 446 Controlling surface parameters . . . 447 Changing path parameters . . . 447 Setting skin parameters . . . 448 Tutorial: Designing a slip-proof hanger . . . 449 Deforming Loft objects . . . 450 The Deformation window interface . . . 450 Scale Deformation . . . 453 Twist Deformation . . . 453 Teeter Deformation . . . 454 Bevel Deformation . . . 454 Fit Deformation . . . 456 Modifying Loft subobjects . . . 457 Comparing shapes . . . 459 Editing Loft paths . . . 460 Tutorial: Creating drapes . . . 461
Chapter 15: Working with NURBS . . . 463
Creating NURBS Curves and Surfaces . . . 463 NURBS curves . . . 464 NURBS surfaces . . . 465 Converting objects to NURBS . . . 467 Editing NURBS . . . 468 NURBS rollouts . . . 468 The NURBS Creation Toolbox . . . 471 Using NURBS subobject editing tools . . . 475 Working with NURBS . . . 476 Lofting a NURBS surface . . . 476 Tutorial: Creating a U-Loft NURBS spoon . . . 476 Creating a UV Loft surface . . . 477 Lathing a NURBS surface . . . 478 Tutorial: Lathing a NURBS CV curve to create a vase . . . 479 Creating a 1- and 2-rail sweep surface . . . 480 Tutorial: Creating a flower stem . . . 480 Sculpting a rectangular NURBS surface . . . 480 Tutorial: Creating a NURBS leaf . . . 480 Tutorial: Sculpting a flower petal . . . 483
Part IV: Materials and Maps
487
Chapter 16: Exploring the Material Editor . . . 489
Understanding Material Properties . . . 489 Working with the Material Editor . . . 492 Using the Material Editor controls . . . 492 Using the sample slots . . . 496 Renaming materials . . . 500 Applying materials . . . 501 Setting Material Editor options . . . 502 Tutorial: Coloring Easter eggs . . . 503 Using the Material/Map Browser . . . 504 Working with additional material libraries . . . 505 Tutorial: Loading a material library . . . 506 Using the Material/Map Navigator . . . 507
Chapter 17: Applying Materials . . . 511
Using Standard Materials . . . 511 Using shading types . . . 511 Extended Parameters rollout . . . 517 SuperSampling . . . 519 Maps . . . 520 Dynamic Properties rollout . . . 521 Tutorial: Coloring a dolphin . . . 522 Using Compound Materials . . . 523 Blend . . . 524 Composite . . . 525 Double Sided . . . 526 Shellac . . . 526 Multi/Sub-Object . . . 526 Tutorial: Creating a patchwork quilt . . . 528 Morpher . . . 529 Top/Bottom . . . 530 Tutorial: Surfing the waves . . . 531 Using Raytrace Materials . . . 532 Raytrace Basic Parameters . . . 533 Extended Parameters rollout . . . 534 Raytracer Control rollout . . . 536 Additional rollouts . . . 539 Tutorial: Coming up roses . . . 540 Using Matte/Shadow Materials . . . 541 Matte/Shadow Basic Parameters rollout . . . 541 Tutorial: Ballooning in New York . . . 542
Chapter 18: Using Maps . . . 545
xxix
Contents
Compositor maps . . . 572 Color modifier maps . . . 575 Reflection and refraction maps . . . 578 The Maps Rollout . . . 583 Ambient mapping . . . 584 Diffuse mapping . . . 584 Diffuse Level mapping . . . 585 Roughness mapping . . . 585 Specular mapping . . . 585 Specular Level mapping . . . 585 Glossiness mapping . . . 585 Self-Illumination mapping . . . 585 Opacity mapping . . . 585 Filter color mapping . . . 586 Anisotropy mapping . . . 586 Orientation mapping . . . 586 Metalness mapping . . . 586 Bump mapping . . . 586 Reflection mapping . . . 586 Refraction mapping . . . 587 Displacement mapping . . . 587 Using the Map Path Utility . . . 587
Chapter 19: Working with Materials and Maps . . . 589
Building a New Material Library . . . 589 Combining Materials and Maps . . . 590 Tutorial: Creating space textures . . . 590 Tutorial: Aging objects for realism . . . 593 Animating Materials . . . 594 Tutorial: Dimming lights . . . 595 Using IFL files . . . 596 Generating IFL files with the IFL Manager Utility . . . 597 Tutorial: What’s on TV? . . . 597 Applying Multiple Materials . . . 599 Using material IDs . . . 599 Tutorial: Mapping die faces . . . 600 Material Modifiers . . . 601 Tutorial: Using the UVW Map modifier to apply decals . . . 601 Tutorial: Creating random marquee lights with the MaterialByElement
modifier . . . 603 Using the Unwrap UVW modifier . . . 604 Tutorial: Controlling the mapping of teddy bear’s head . . . 607 Painting vertices . . . 609 Tutorial: Marking heart tension . . . 610 Using Maps to Change Geometry . . . 611 Modeling with displacement maps . . . 611 Tutorial: Creating an alien landscape . . . 611 Removing Materials and Maps . . . 612
Part V: Lights and Cameras
615
Chapter 20: Working with Lights . . . 617
The Basics of Lighting . . . 617 Natural and artificial light . . . 617 A standard lighting method . . . 618 Shadows . . . 619 Understanding Light Types . . . 621 Default lighting . . . 621 Ambient light . . . 622 Omni light . . . 623 Spot light . . . 623 Direct light . . . 623 Creating and Positioning Light Objects . . . 623 Transforming lights . . . 624 Placing highlights . . . 625 Tutorial: Lighting the snowman’s face . . . 625 Viewing a Scene from a Light . . . 626 Light viewport controls . . . 626 Tutorial: Lighting a lamp . . . 628 Altering Light Parameters . . . 629 General parameters . . . 629 Attenuation parameters . . . 631 Spot and directional light parameters . . . 632 Projection maps . . . 633 Shadow parameters . . . 633 Manipulating Hotspot and Falloff cones . . . 635 Using the Light Lister . . . 635 Tutorial: Creating twinkling stars . . . 636 Using the Sunlight System . . . 637 Using the Compass helper . . . 637 Understanding azimuth and altitude . . . 638 Specifying date and time . . . 638 Specifying location . . . 639 Tutorial: Animating a day in 20 seconds . . . 639 Using Volume Lights . . . 640 Volume light parameters . . . 641 Tutorial: Showing car headlights . . . 642 Tutorial: Creating laser beams . . . 644 Using projector maps and raytraced shadows . . . 646 Tutorial: Projecting a trumpet image on a scene . . . 646 Tutorial: Creating a stained-glass window . . . 647
Chapter 21: Controlling Cameras . . . 651
xxxi
Contents
Tutorial: Setting up an Opponent’s View . . . 654 Controlling a Camera . . . 655 Aiming a Camera . . . 657 Tutorial: Watching a rocket . . . 657 Aligning cameras . . . 658 Tutorial: Seeing the snowman’s good side . . . 659 Setting Camera Parameters . . . 660 Lens settings and field of view . . . 660 Camera type and display options . . . 661 Environment ranges and clipping planes . . . 662 Multi-Pass effect . . . 663 Tutorial: Using a Multi-Pass effect camera . . . 663
Chapter 22: Camera Matching and Tracking . . . 667
Using the Camera Match Utility . . . 667 Setting Camera Match points . . . 668 Tutorial: Driving in Rome . . . 669 Using the Camera Tracker Utility . . . 672 Loading a movie file . . . 672 Working with trackers . . . 673 Using the tracker gizmo . . . 674 Stepping through frames . . . 675 Automating the tracking process . . . 676 Matching the camera . . . 677 Smoothing the camera motion . . . 678 Tutorial: Tracking a flyby camera’s motion . . . 678 Pinning objects . . . 681 Tutorial: Pinning a jet in front of the camera . . . 683
Part VI: Particle Systems and Space Warps
685
Chapter 23: Creating and Controlling Particle Systems . . . 687
Understanding the Various Particle Systems . . . 687 Creating a Particle System . . . 688 Using the Spray and Snow Particle System . . . 689 Tutorial: Creating Rain and Snow . . . 691 Using the Super Spray Particle System . . . 693 Super Spray basic parameters . . . 693 Particle Generation rollout . . . 694 Particle Type rollout . . . 695 Tutorial: Creating a fireworks fountain . . . 696 Tutorial: Adding spray to a spray can . . . 697 Rotation and Collision rollout . . . 701 Tutorial: Basketball shooting practice . . . 702 Object Motion Inheritance rollout . . . 704 Bubble Motion rollout . . . 704 Particle Spawn rollout . . . 705 Load/Save Presets rollout . . . 706
Using the Blizzard Particle System . . . 707 Using the PArray Particle System . . . 708 Tutorial: Magic Butterfly Wings . . . 709 Using the PCloud Particle System . . . 711 Using Particle System Maps . . . 712 Using the Particle Age map . . . 712 Using the Particle MBlur map . . . 712 Tutorial: Creating a fire-breathing dragon . . . 712
Chapter 24: Using Space Warps . . . 715
Creating and Binding Space Warps . . . 715 Creating a Space Warp . . . 715 Binding a Space Warp to an object . . . 716 Space Warp Types . . . 716 Forces . . . 716 Deflectors . . . 724 Geometric/Deformable . . . 729 Modifier-Based . . . 738 Working with Space Warps . . . 743 Tutorial: Shattering glass . . . 743 Tutorial: Exploding a Planet . . . 744
Part VII: Animation
747
Chapter 25: Animation Basics . . . 749
xxxiii
Contents
Chapter 26: Working with the Track View . . . 769
The Track View Interface . . . 769 Track View toolbar . . . 769 Tracks . . . 771 Status bar . . . 773 Track View Modes . . . 774 Edit keys mode . . . 774 Edit time mode . . . 776 Edit ranges mode . . . 777 Position ranges mode . . . 778 Function curves mode . . . 778 Working with Keys . . . 780 Adding and deleting keys . . . 780 Moving, sliding, and scaling keys . . . 780 Aligning keys . . . 781 Editing keys . . . 781 Using visibility tracks . . . 781 Using the Randomize Keys utility . . . 781 Editing Time . . . 782 Selecting time and the Select Keys by Time utility . . . 782 Deleting, cutting, copying, and pasting time . . . 782 Reversing, inserting, and scaling time . . . 783 Reducing keys . . . 783 Setting ranges . . . 783 Adjusting Function Curves . . . 783 Inserting new keys . . . 784 Moving keys . . . 784 Scaling keys and values . . . 784 Working with tangents . . . 784 Applying ease and multiplier curves . . . 785 Tutorial: Animating a hyper pogo stick . . . 786 Filtering Tracks . . . 789 Working with Controllers . . . 790 Using Out-of-Range Types . . . 790 Adding Note Tracks . . . 791 Synchronizing to a Sound Track . . . 792 Using the Sound Options dialog box . . . 793 Tutorial: Adding sound to an animation . . . 793
Chapter 27: Restricting Movement with Constraints . . . 797
Using Constraints . . . 797 Constraint Types . . . 798 Attachment constraint . . . 798 Tutorial: Attaching a sphere to a terrain . . . 798 Surface constraint . . . 799 Tutorial: Rolling a tire over a hill with the Surface Constraint . . . 800 Path constraint . . . 801
Tutorial: Creating a dragonfly flight path . . . 802 Position constraint . . . 803 Link constraint . . . 804 Tutorial: Skating a figure eight . . . 805 LookAt constraint . . . 806 Tutorial: Watching a dragonfly fly . . . 807 Orientation constraint . . . 809
Chapter 28: Animating with Controllers . . . 811
Understanding Controller Types . . . 811 Assigning Controllers . . . 812 Automatically assigned controllers . . . 812 Assigning controllers in the Motion panel . . . 813 Assigning controllers in Track View . . . 813 Setting Default Controllers . . . 814 Examining the Various Controllers . . . 814 Single transformation track controllers . . . 815 Multi-track transform controllers . . . 822 Special-purpose controllers . . . 826
Chapter 29: Using Expressions . . . 843
Variables, Operators, and Functions . . . 843 Variables . . . 843 Operators . . . 844 Functions . . . 846 Building Expressions . . . 847 Scalar return type . . . 847 Vector return type . . . 848 RGB return type . . . 848 Understanding the Expression Controller Interface . . . 849 Defining variables . . . 849 Building expressions . . . 850 Controlling Object Transformations . . . 852 Animating transforms with the Expression controller . . . 852 Controlling Parameters . . . 854 Animating parameters with the Expression controller . . . 854 Tutorial: Inflating a balloon . . . 855 Animating materials with the Expression controller . . . 857 Tutorial: Controlling a stoplight . . . 857
Chapter 30: Creating a Dynamic Simulation . . . 861
xxxv
Contents
Optimizing a simulation . . . 874 Tutorial: Bowling a strike . . . 875 Using the Flex Modifier . . . 876 Flex subobjects . . . 877 Setting flex strength . . . 877 Creating simple soft bodies . . . 878 Painting weights . . . 878 Adding Forces and Deflectors . . . 879 Manually creating springs . . . 880 Tutorial: Making a waving flag . . . 880
Part VIII: Inverse Kinematics
883
Chapter 31: Working with Bones . . . 885
Building a Bones System . . . 885 Assigning an IK Solver . . . 886 Setting bone parameters . . . 887 Refining bones . . . 888 Tutorial: Making a simple puppet using bones . . . 888 Making Objects into Bones . . . 890 Tutorial: Making a Linked Teddy Bear into a Bones System . . . 891 Using the Skin Modifier . . . 892 Skin subobjects . . . 892 Editing envelopes . . . 893 Painting weights . . . 895 Displaying features . . . 895 Tutorial: Applying the Skin modifier to a flamingo . . . 895 Using deformers . . . 896
Chapter 32: Creating and Using Inverse Kinematics . . . 899
Forward Versus Inverse Kinematics . . . 899 Creating an Inverse Kinematics System . . . 900 Building and linking a system . . . 900 Selecting a terminator . . . 901 Defining joint constraints . . . 902 Copying, pasting, and mirroring joints . . . 903 Binding objects . . . 903 Understanding precedence . . . 903 Tutorial: Building an extensible arm linkage . . . 904 Using the Various Inverse Kinematics Methods . . . 905 Interactive IK . . . 906 Applied IK . . . 908 Tutorial: Animating the arm linkage using Applied IK . . . 909 History-Independent (HI) IK solver . . . 911 History-Dependent (HD) IK solver . . . 915 Tutorial: Animating a spyglass with the HD IK solver . . . 917 IK Limb solver . . . 918 Tutorial: Animating a flamingo’s leg with the IK Limb solver . . . 919
Part IX: Rendering and Post-Production
921
Chapter 33: Rendering Basics . . . 923
Understanding the Max Renderers . . . 923 Previewing with ActiveShade . . . 924 Using the ActiveShade Floater . . . 925 Enabling ActiveShade in a viewport . . . 925 Working with Previews . . . 926 Creating previews . . . 926 Viewing previews . . . 929 Renaming previews . . . 929 Render Parameters . . . 929 Initiating a render job . . . 929 Common parameters . . . 931 Render elements . . . 934 Current renderers . . . 934 Scanline A-Buffer renderer . . . 934 Rendering Preferences . . . 937 Creating VUE Files . . . 938 Using the Virtual Frame Buffer . . . 939 Using the RAM Player . . . 941 Render Types . . . 943 Rendering Problems . . . 944
Chapter 34: Working with Environments and Atmospheric
Effects . . . 947
Creating an Environment . . . 947 Defining the rendered environment . . . 948 Adding atmospheric effects . . . 950 Setting exposure . . . 950 Tutorial: Creating a mystery with an environment map . . . 950 Using Atmospheric Apparatus Gizmos . . . 952 Creating Atmospheric Effects . . . 953 Using the Fire effect . . . 954 Tutorial: Creating the sun . . . 958 Tutorial: Creating clouds . . . 959 Using the Fog effect . . . 960 Using the Volume Fog effect . . . 963 Tutorial: Creating a swamp scene . . . 964 Using the Volume Light effect . . . 964
Chapter 35: Using Render Elements and Effects . . . 967
xxxvii
Contents
Render Effect Types . . . 971 Lens Effects . . . 971 Glow . . . 975 Ring . . . 982 Blur . . . 990 Brightness and Contrast . . . 992 Color Balance . . . 993 File Output . . . 994 Film Grain . . . 995 Motion Blur . . . 995 Depth of Field . . . 996
Chapter 36: Network Rendering . . . 999
Network Requirements . . . 1000 Setting up a Network Rendering System . . . 1002 Setting up the network . . . 1002 Tutorial: Locating TCP/IP and gathering IP addresses . . . 1003 Tutorial: Installing and configuring TCP/IP . . . 1005 Tutorial: Setting up Max on the networked computers . . . 1007 Configuring shared directories . . . 1008 Tutorial: Sharing directories . . . 1008 Tutorial: Choosing shared directories . . . 1012 Starting the Network Rendering System . . . 1012 Tutorial: Initializing the network rendering system . . . 1012 Tutorial: Completing your first network rendering job . . . 1014 Job assignment options . . . 1018 Configuring the Network Manager and Servers . . . 1019 The network manager settings . . . 1019 The network servers settings . . . 1021 Logging Errors . . . 1022 Using the Queue Manager . . . 1023 Jobs . . . 1024 Servers . . . 1025 Event Notification . . . 1026 Tutorial: Setting up Batch Rendering . . . 1027
Chapter 37: Post-Processing with the Video Post Interface . . . . 1029
Understanding Post-Production . . . 1029 Using the Video Post Dialog Box . . . 1030 The Video Post toolbar . . . 1030 The Video Post queue . . . 1032 The Video Post status bar . . . 1032 Working with Sequences . . . 1032 Adding and Editing Events . . . 1033 Adding an image input event . . . 1034 Adding scene events . . . 1035 Adding image filter events . . . 1037 Adding image layer events . . . 1042
Adobe Premiere Transition filter . . . 1042 Alpha compositor . . . 1043 Cross Fade Transition compositor . . . 1043 Pseudo Alpha compositor . . . 1043 Simple Additive compositor . . . 1043 Simple Wipe compositor . . . 1043 Adding external events . . . 1043 Using loop events . . . 1044 Adding an image output event . . . 1045 Working with Ranges . . . 1045 Working with Lens Effects Filters . . . 1046 Adding flares . . . 1047 Adding focus . . . 1047 Adding glow . . . 1048 Adding highlights . . . 1049 Tutorial: Adding backgrounds and filters using Video Post . . . 1050 Tutorial: Creating space backdrops . . . 1052
Part X: Customizing Max
1055
Chapter 38: Customizing the Max Interface . . . 1057
xxxix
Contents
Chapter 39: Using MAXScript . . . 1087
What Is MAXScript? . . . 1087 MAXScript Tools . . . 1088 The MAXScript menu . . . 1088 The MAXScript Utility rollout . . . 1089 Tutorial: Using the SphereArray script . . . 1090 The MAXScript Listener window . . . 1092 Tutorial: Talking to the MAXScript interpreter . . . 1093 MAXScript editor windows . . . 1095 The Macro Recorder . . . 1096 Tutorial: Recording a simple script . . . 1097 Visual MAXScript . . . 1099 Tutorial: Building a custom rollout with the Visual MAXScript
window . . . 1102 Types of Scripts . . . 1106 Macro scripts . . . 1106 Scripted utilities . . . 1106 Scripted right-click menus . . . 1106 Scripted mouse tools . . . 1106 Scripted plug-ins . . . 1107 Writing Your Own MAXScripts . . . 1107 Variables and data types . . . 1107 Tutorial: Using variables . . . 1109 Program flow and comments . . . 1111 Expressions . . . 1111 Conditions . . . 1113 Collections and arrays . . . 1114 Loops . . . 1115 Functions . . . 1117 Tutorial: Creating a school of fish . . . 1118
Part XI: Extending Max with Plug-Ins
1127
Chapter 40: Using Third-Party Plug-Ins . . . 1129
Locating Plug-Ins . . . 1129 Working with Plug-Ins . . . 1131 Installing plug-ins . . . 1131 Viewing installed plug-ins . . . 1132 Managing plug-ins . . . 1132 Plug-In Examples . . . 1134 Tutorial: Creating a fuzzy spider with Shag:Fur . . . 1134 Tutorial: Producing a cartoon rendering with Illustrate! . . . 1136
Chapter 41: Creating Your Own Plug-Ins . . . 1139
Max and Plug-Ins . . . 1139 Plug-In Requirements . . . 1140 Types of Plug-Ins . . . 1140
Setting up the Development Environment . . . 1142 Tutorial: Enabling Max SDK syntax highlighting . . . 1142 Tutorial: Loading a sample project . . . 1143 Tutorial: Setting project options . . . 1144 Creating Your First Plug-In . . . 1147 The goal . . . 1148 A look at the project files . . . 1148 Tutorial: Using the plug-in skeleton . . . 1151 Adding a new plug-in parameter . . . 1152 Tutorial: Debugging Plug-Ins . . . 1153 Finishing the Gear Plug-In . . . 1155 Capturing mouse input . . . 1155 Building an object’s mesh . . . 1158 Ideas for Enhancing Your Plug-In . . . 1168
Appendix A: Installing and Configuring 3ds max 4 . . . 1171
Appendix B: Max Keyboard Shortcuts . . . 1181
Appendix C: Exclusive Bible Plug-Ins . . . 1195
Appendix D: What’s on the CD-ROM? . . . 1207
Glossary . . . CD1–CD12
Getting Started
with 3ds max 4
✦
✦
✦
✦
In This Part
Quick Start
Animating a Fighter Jet Fly-By
Chapter 1
Exploring the Max Interface
Chapter 2
Working with Viewports
Chapter 3
Working with Files
✦
✦
✦
✦
P A R T
I
I
Quick Start:
Animating a
Fighter Jet
Fly-By
W
hen you first got your hands on 3ds max 4, you were probably focused on one goal — to create cool 3D images and animations. I know many of you bought Max to make money, claim a tax write-off, earn a way to Hollywood, or impress your girl or boyfriend, but I’ll just ignore those rea-sons for now. The goal is to create something cool.If you’ve perused this book’s Table of Contents or thumbed through its many pages, you’ve seen sections on modeling, NURBS, dynamics, and other topics. But if you’re like me, you don’t want to wade through tons of material before you have something to show off to mom (actually, if you’re like me, then you’ve opened straight to the special effects section, in which case you won’t be reading this).
The purpose of this Quick Start is to give you a taste of what Max can do. This soaring view of the software from 20,000 feet is intended to show you the big picture before you delve into the details. It exposes you to the most common modeling, material, and animation features and whets your appetite for the more in-depth chapters to follow.
This part of the book is intended for those new to the soft-ware. If you’re an experienced user, then your mom is no doubt already impressed with your work, so you can happily advance to whichever chapter appeals to you. (Forgive me for catering to the “newbie,” but we were all beginners once.)
✦
✦
✦
✦
In This Chapter
Introducing the Quick Start project
Importing the jet model
Applying materials to the jet model
Loading a
background image
Adding prop models, lights, and cameras
Animating the jet
Adding a smoke trail special effect
Rendering the final animation
✦
✦
✦
✦
The Speed of Jets
It happens every Fourth of July during the parade. You hear a rumble of approach-ing thunder off in the distance, and everyone’s gaze turns to the skies. Then quick as a flash, the fighter jets roar by and are gone. I always love the tingling rush that sweeps over my body as they disappear.
Animating in Max isn’t bound by reality. You can animate anything you can imagine, and I’ll get to the unbelievable soon enough, but for this Quick Start I’ve elected to work with an example that is based in reality. This example lets you play with a jet plane. The tasks to be completed include the following:
✦Find a digital model of a jet and load it into Max.
✦Apply materials to all the different parts of the plane.
✦Create a scene or environment to fly our jet around.
✦Include some props like buildings.
✦Set a camera to watch the jet’s motion.
✦Animate the jet’s motion.
✦Add a smoke trail special effect.
✦Render the final animation.
This Quick Start is divided into separate tutorials, with each tutorial containing a series of easy-to-follow steps. These steps are intended to show you the results of performing certain Max operations, but feel free to deviate from these steps to cre-ate your own results. Being creative and exploring the software is the best way to learn.
After each of the following tutorials, I saved the scene file. You can find these files on the book’s CD along with the examples in the Quickstart directory.
Tutorial: Importing the Jet Model
Accurately modeling an object such as a jet fighter can take many months of skilled work, which brings me to my first tip of modeling — don’t build it when it’s already been done for you. You can find many repositories of digital models — from Web sites to software dealers, to the CD in the back of this book. An untold number of models exist, covering almost any possible subject matter you could think of. The difficult part is wading through all the available models to find the exact model you need. The answer to this dilemma is not to be afraid to alter an existing model to fit your needs.
5
Quick Start
The F14A Tomcat and building models were created and provided by Viewpoint Datalabs.
Follow these steps to learn the easiest method for modeling:
1.Reset the Max interface by choosing File ➪Reset, and click Yes in the alert box that appears, asking whether you really want to reset.
2.Insert the CD-ROM from the back of the book, then choose File ➪Import. The Select File to Import dialog box appears.
3.In the Files of Type drop-down list, select 3DStudio Mesh. Locate the Chapter Examples/Quickstart directory on the CD-ROM, and select the file named F14A Tomcat1.3ds. Click OK.
The 3DS Import dialog box appears.
4.Select the Merge Objects with Current Scene option, check the Convert Units check box, and click OK.
The jet model appears at the center of each viewport. The viewportsare the sections of the interface that provide a view into the scene. The default view-ports include Top, Front, Left and Perspective.
5.Save the file by choosing File ➪Save As to open the Save File As dialog box, shown in Figure QS-1. Select a directory in the Save in field where you want to save the file, type Imported Fighter Jetin the File Name field, and click the Save button.
The name of the current file appears in the title bar of the Max window.
Figure QS-1: The File Save As dialog box lets you save files.
The imported jet appears as shown in Figure QS-2.
Note
Figure QS-2: The viewports display the fighter jet after being imported into Max.
Tutorial: Applying Materials to the Jet Model
Nice jet, huh? Try a quick smooth rendering in the ActiveShade window by choos-ing Renderchoos-ing ➪ActiveShade Floater to open the ActiveShade Floater and render the active viewport. Rendering the scene computes the effects of the lights, mate-rial, and environment into a single image. This process could take some time, depending on the complexity of the scene, but the ActiveShade window is a quick rendering window that lets you see the results of materials and lights. The results of the ActiveShade rendering show the jet model with simple materials on a black background, which doesn’t look very accurate. Well don’t worry; you’re just getting started. You can close the ActiveShade window by clicking the close icon in the upper-right corner of the window.
7
Quick Start
To apply materials to the model parts, follow these steps:
1.To assign materials, you must first select the model parts. Open the Select Objects dialog box, shown in Figure QS-3, by choosing Edit ➪Select By ➪ Name (or press the H key).
Notice that the pane on the left displays all the various parts that make up this model.
Figure QS-3: The Select Objects dialog box lists all the objects in the scene.
2.Double-click the part called “cockpit” in the left pane. Doing so selects the part and causes you to exit the dialog box at the same time. Alternatively, click its name, then click the Select button at the bottom of the dialog box. (You can clear any selections by clicking the None button.)
The jet canopy will be highlighted white in the viewports.
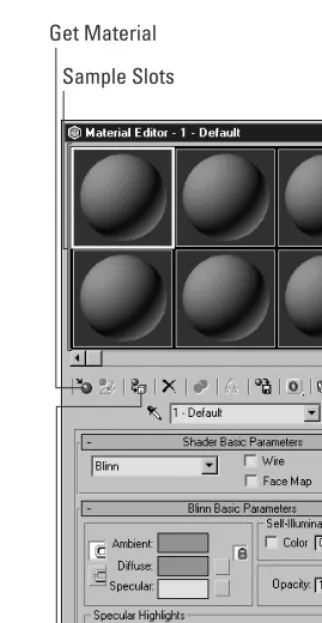
3.Open the Material Editor by choosing Rendering ➪Material Editor (or press-ing the M key).
The Material Editor, shown in Figure QS-4, allows you to create, edit, and apply materials to objects in the scene.
4.In the Material Editor, click the Get Material button (the small, leftmost icon button with an arrow pointing to a sphere).
The Material/Map Browser dialog box opens, as shown in Figure QS-5. In it, you can load a library of preset materials.
Figure QS-4: The Material Editor can create a vast assortment of materials.
5.In the Browse From section, select the Mtl Library radio button. Several File buttons appear.
6.Click the Open button to access the Open Material Library dialog box. Using this dialog box, locate and select the quickstart.mat file from the Quickstart directory on the CD-ROM.
7.For the selected cockpit object, select the Cockpit Glass material in the Material/Map Browser by double-clicking it.
The glass material loads into the first Material Editor sample slot. Using the material parameters that appear in the Material Editor under the sample slots, you can alter the material.
Get Material Sample Slots