O
PENS
TACKThe Chameleon Cloud Team and Gregor von Laszewski
O
PENS
TACK1 PREFACE
1.1 Disclaimer ☁
1.1.1 Acknowledgment 1.1.2 Extensions
2 CHAMELEON CLOUD
2.1 Chameleon Cloud Security Warning ☁ 2.2 Resources ☁
2.2.1 Outages
2.2.2 Account Creation 2.2.3 Join a Project 2.2.4 Usage Restriction
2.3 Chameleon Cloud Hardware ☁ 2.3.1 Standard Cloud Units 2.3.2 Network
2.3.3 Shared Storage
2.3.4 Heterogeneous Compute Hardware 2.4 Chameleon Cloud Charge Rates ☁
2.4.1 Service Units
2.4.2 Project Allocation Size
2.5 Getting Started on Chameleon Cloud ☁ 2.5.1 Step 1: Create a Chameleon account 2.5.2 Step 2: Create or join a project 2.5.3 Step 3: Start using Chameleon 2.6 OpenStack Virtual Machines ☁
2.6.1 Web Interface
2.6.1.1 Managing Virtual Machine Instances 2.6.1.2 Snapshots
2.6.1.3 Firewall (Access Security) 2.6.2 OpenStack REST Interfaces 2.6.3 Downloading and uploading data
2.7 Cloudmesh OpenStack Command Line Interface ☁ 2.7.1 Instalation of Cloudmesh Client
2.7.2 Floating IP Address
2.8.0.1 Creating OpenStack RC via the editor 2.8.0.2 Creating OpenStack RC via the GUI 2.8.1 CLI to Manage Virtual Machines 2.8.2 KeyPair Registration
2.8.3 Start a new VM instance 2.8.4 Floating IP Address
2.8.5 Termination of VM Instance
2.9 OpenStack Horizon Graphical User Interface ☁ 2.9.1 Configure resources
2.9.2 Interact with resources 2.9.2.1 Snapshot an instance 2.9.3 Use FPGAs
2.9.4 Next Step
2.10 OpenStack HEAT ☁
2.10.1 Supporting Complex Appliances 2.10.2 Chameleon Appliance Catalog 2.10.3 Deployment
2.10.4 Heat Template
2.10.5 Customizing an existing template 2.10.6 Writing a new template
2.10.6.1 Heat template version 2.10.6.2 Description
2.10.6.3 Resources 2.10.6.4 Parameters 2.10.6.5 Outputs
2.10.7 Sharing new complex appliances 2.10.8 Advanced topics
2.10.8.1 All-to-all information exchange 2.11 Openstack Bare Metal ☁
2.12 Chameleon Cloud Frequently Asked Questions ☁ 2.12.1 Appliances
2.12.1.1 What is an appliance?
2.12.1.2 What is the Appliance Catalog?
2.12.2 Bare Metal Troubleshooting
2.12.2.1 Why are my Bare Metal instances failing to launch? 2.12.3 OpenStack KVM Troubleshooting
2.12.3.1 Why are my OpenStack KVM instances failing to launch? 2.12.3.2 Why can I not ping or SSH to my instance?
1 PREFACE
Sat Nov 23 05:21:11 EST 2019 ☁
1.1 D
ISCLAIMER☁
This book has been generated with Cyberaide Bookmanager.
Bookmanager is a tool to create a publication from a number of sources on the internet. It is especially useful to create customized books, lecture notes, or handouts. Content is best integrated in markdown format as it is very fast to produce the output.
Bookmanager has been developed based on our experience over the last 3 years with a more sophisticated approach. Bookmanager takes the lessons from this approach and distributes a tool that can easily be used by others.
The following shields provide some information about it. Feel free to click on them.
pypi
pypi v0.2.28v0.2.28 LicenseLicense Apache 2.0Apache 2.0 pythonpython 3.73.7 formatformat wheelwheel statusstatus stablestable buildbuild unknownunknown
1.1.1 Acknowledgment
If you use bookmanager to produce a document you must include the following acknowledgement.
“This document was produced with Cyberaide Bookmanager developed by Gregor von Laszewski available at https://pypi.python.org/pypi/cyberaide-bookmanager. It is in the responsibility of the user to make sure an author acknowledgement section is included in your document. Copyright verification of content included in a book is responsibility of the book editor.”
The bibtex entry is
1.1.2 Extensions
We are happy to discuss with you bugs, issues and ideas for enhancements. Please use the convenient github issues at
https://github.com/cyberaide/bookmanager/issues
Please do not file with us issues that relate to an editors book. They will provide you with their own mechanism on how to correct their content.
title = {{Cyberaide Book Manager}}, howpublished = {pypi},
month = apr, year = 2019,
url={https://pypi.org/project/cyberaide-bookmanager/}
2 CHAMELEON CLOUD
2.1 C
HAMELEONC
LOUDS
ECURITYW
ARNING☁
Chameleon cloud promotes insecure use of ssh while suggesting passphrase less keys. This is very dangerous and wrong due to the fact that someone could gain access to your computer and if a password less key is stolen easy access to other systems can be achieved. Instead you must use whenever possible passphrases and use ssh agent and ssh add! The same best-practice security rules that you use on your laptop must apply on resources that you place in a cloud!
To show you this insecue practice, we quote from their Web page:
You will receive a message “Enter same passphrase again:” so just leave it blank and press enter.
This is clearly WRONG⚠
Hence do not use their advise that is mentioned in their documentation. Follow ours, and use a passphrase! If uncertain, discuss with us.
Chameleon cloud also promotes the use of putty on the clients connecting to windows which was for many years standard on Windows machines. However, there are now much better ways of using keys from the Windows command prompt as ssh, ssh-keygen and ssh-add are distributed with Windows 10 and can now be activited. Please use them instead of putty as they conform to best practices across all platforms and not just Windows as putty does. However, you still can use putty on Windows if you like, there is no security issue with putty as far as we know. Make sure you use it properly.
2.2 R
ESOURCES☁
other topics that we may not need to worry about. This mostly includes using chameleon cloud as a bare metal resource and appliances, which we typically will not use.
If you prefer you can also go to the Chameleon Web site using the following links. However we have improved some of the documentation found in this document. The links to Chameleons online resources are:
Web page Documentation News
About Log in Dashborad
Howevever, we have augmented some information and even provided corrections that are not covered on the Chameleon cloud Web Page. The information that overlap between the Web page and this material have bebeen copied and modified with permission from the Chameleoncloud team.
2.2.1 Outages
Any computer system may undergo maintenance. Before filing tickets with Chameleon cloud, make sure that the cloud is operational. Outages are posted at
https://www.chameleoncloud.org/user/outages/
2.2.2 Account Creation
The fist step to get access Chameleon cloud is to create a user account if you do not already have one. You can skip to the next section if you have a chameleon cloud account.
The register web page is available at:
https://www.chameleoncloud.org/user/register/
2.2.3 Join a Project
An active project is required to access compute resources. Each class has a particular project number that you will need to write down as you will use it to interact with the system. The information is given out by the instructor.
For the Fall 2019 516 related classes please use the following project number:
CH-819337
However, before you can access it, the instructor (in our class Dr. von Laszewski) needs to authorize you to use the project. For this you have filled out an account survey that you were pointed to in piazza. The most common errors we see are that students provide us with the wrong user name or have not applied for a chameleon account. Once the instructor has added you, you will be able to use VM’s on Chameleon cloud.
Note: If you use chameleon cloud for another class, please consult with your instructor and obtain a project number from them. You will have to let them know your chameleon user ID, so they can activate your account.
2.2.4 Usage Restriction
The pattern of the vms must follow:
any vm owned by gregor is allowed: *gregor* if it is owned by Gregor
any vm with the name NNN-firstname-i, where NNN is the last digit of your hid from class, firstname is your firstname and i is an integer.
2.3 C
HAMELEONC
LOUDH
ARDWARE☁
The Chameleon architecture consists of a set of standard cloud units (SCUs), each of which is a single rack with 42 compute nodes, 4 storage nodes attached to 128TB of local storage in configurable arrays, and an OpenFlow compliant network switch. In addition to the homogeneous SCUs, a variety of heterogeneous hardware types is available to experiment with alternative technologies. The testbed also includes a shared infrastructure with a persistent storage system accessible across the testbed, a top-level network gateway to allow access to public networks, and a set of management and provisioning servers to support user access, control, monitoring and configuration of the testbed. Chameleon is physically distributed between the Texas Advanced Computing Center (TACC) and the University of Chicago (UC) through 100Gbps Internet2 links, to allow users to examine the effects of a distributed cloud.
Hardware Summary
Standard Cloud Units (SCUs) Homogeneous Hardware Types Number of Nodes per Rack:
Local Storage per homogeneous SCU: 128TB (configurable)
Network Switch: OpenFlow Compliant
TACC/UC Distributed Cloud 100Gbps Internet2 links
As chameleon cloud updates their hardware we recommend to take a look at their hardware portal page. This page provides detailed information through their Chameleon cloud Resource Discovery Portal
utilize all 128 nodes connected via Infiniband. However FutureGrid is no longer active. If you need better network performance you can use SDSC’s comet that provides virtual clusters while the nodes are connected all to Infiniband. However, comet does not use OpenStack, but provides a very convenient command ine tool while leveraging cloudmesh.
2.3.1 Standard Cloud Units
Figure 1: Chameleon Cloud Racks
2.3.2 Network
Networking is changing rapidly, and the network fabric is as much a part of the research focus of Chameleon as the compute or storage. For the Chameleon network, every switch in the research network is a fully OpenFlow compliant programmable Dell S6000-ON switch. Each node connects to this network at 10 Gbps, and each unit uplinks with 40Gbps per rack to the Chameleon core network. The core switches (Dell S6000-ON) are connected by 40 Gbps Ethernet links, which connect to the backbone 100Gbps services at both UC and TACC. A Fourteen Data Rate (FDR) Infiniband network (56Gbps) is also deployed on one SCU to allow exploration of alternate networks.
2.3.3 Shared Storage
is persistent between experiments. The shared storage is comprised of four Dell R630 servers with 128 GiB of RAM, four MD3260 external drive arrays, and six MD3060e drive expansion chassis, populated by 600 6TB near line SAS drives. The system also includes a dozen PowerEdge R630 servers as management nodes to provide for login access to the resource, data staging, system monitoring, and hosting various OpenStack services.
2.3.4 Heterogeneous Compute Hardware
The heterogeneous hardware includes various technologies: GPU and FPGA accelerators, SSD and NVMe storage, low-power ARM, Atom, and Xeon systems-on-a-chip. With the exception of the low-power systems-on-a-chip, each of the additional nodes is a Dell PowerEdge R730 server with the same CPUs as the R630 servers in the SCUs.
The two storage hierarchy nodes have been designed to enable experiments using multiple layers of caching: they are configured with 512 GiB of memory, two Intel P3700 NVMe of 2 TB each, four Intel S3610 SSDs of 1.6 TB each, and four 15K SAS HDDs of 600 GB each.
The GPU offering consists of two K80 GPU nodes, two M40 GPU nodes, sixteen P100 GPU nodes. These nodes target experiments using accelerators to improve the performance of some algorithms, experiments with new visualization systems, and deep machine learning. Each K80 GPU node is upgraded with an NVIDIA Tesla K80 accelerator, consisting of two GK210 chips with 2496 cores each (4992 cores in total) and 24 GiB of GDDR5 memory. Each M40 node is upgraded with an NVIDIA Tesla M40 accelerator, consisting of a GM200 chip with 3072 cores and 12 GiB of GDDR5 memory. The P100 nodes have two GPU cards installed each, providing 32 P100 GPUs in total. The P100 GPUs utilize GP100 chips providing 3584 cores, with 16 GiB GDDR5 RAM in each card. In order to make it easy for users to get started with the GPU nodes, we have developed a CUDA appliance that includes NVIDIA drivers as well as the CUDA framework.
GPU Chip Cores per
GPU RAM per GPU GPU per node # of nodes
K80 210 2496 × 2 GDDR5 1 2
Tesla M40
GM
200 3072
12 GiB
GDDR5 1 2
Tesla
P100 GP100 3584
16 GiB
GDDR5 2 16
The four FPGA nodes have a Nallatech 385A board with an Altera Arria 10 1150 GX FPGA (up to 1.5 TFlops), 8 GiB DDR3 on-card memory, and dual QSFP 10/40 GbE support. The Chameleon FPGA User Guide provides details for conducting experiments on this hardware.
The low-power systems are comprised of 8 low power Xeon servers (HP ProLiant m710p with one 4-core Intel Xeon E3-1284L v4 processor), 8 Atom servers (HP ProLiant m300 with one 8-core Intel Avoton-based System on a Chip), and 24 ARM servers (HP ProLiant m400 with one 8-core AppliedMicro X-gene System on a Chip). These are all delivered in a single HP Moonshot 1500 chassis.
For more information on how you can reserve these nodes, see the heterogeneous hardware section of the bare metal user’s guide.
2.4 C
HAMELEONC
LOUDC
HARGER
ATES☁
It is important to fully understand the charge rates of your VM and storage use.
Chameleon has two types of limitations, introduced to promote fair resource usage to all:
Allocation:
Chameleon projects are limited to a per-project allocation currently set to 20,000 service units for 6 months. Allocations can be renewed or extended
Lease:
duration of 7 days. However, an active lease within 48 hours of its end time can be prolonged by up to 7 days from the moment of request if resources are available. To prolong a lease, click on the “Update Lease” button in the Reservations panel of the CHI OpenStack dashboard, and enter the additional duration requested in the “Prolong for” box including the unit suffix, e.g. “5d” for 5 days or “30m” for 30 minutes. If there is an advance reservation blocking your lease prolongation that could potentially be moved, you can interact through the users mailing list to coordinate with others users. Additionally, if you know from the start that your lease will require longer than a week and can justify it, you can contact Chameleon staff via the ticketing system to request a one-time exception to create a longer lease. The lease must be requested by the PI.
2.4.1 Service Units
Chameleon allocations can consist of several components of the system. Users can request allocation of individual compute nodes, storage servers, or complete Scalable Compute Units (SCUs) which contain compute servers, storage nodes, and an open flow switch.
Compute servers are allocated in Service Units (SUs), which equates to one hour of wall clock time on a single server (for virtual machines, an SU is 24 cores with up to 128GB of RAM). Note this unit differs from traditional HPC or cloud service units that are charged in core-hours; a Chameleon SU is a full server, as the type of experiments and performance measurements users may wish to do may be contaminated by sharing nodes.
Storage servers are also charged in SUs, at 2x the rate of compute servers (i.e., 1 hour allocation of 1 storage server == 2 SUs). SCUs are charged at the rate of 50 SUs per wall clock hour (42 compute servers, 4 storage nodes, plus one OpenFlow switch).
An allocation may make use of multiple SCUs, up to the size of the full testbed.
SUs are charged the same regardless of use case. Hence, whether asking for bare metal access, virtual machine access, or use of default images, the charge is the same — you are charged for the fraction of the resource your experiment occupies, regardless of the type of the experiment.
The basic principle for charging service units for Chameleon resources is to evaluate the amount of time a fraction of the resource is unavailable to other users. If a reservation is made through the portal for a particular date/time in the future, the user will be charged for this time regardless of whether the reservation is actually used, as the Chameleon scheduling system will have to drain the appropriate part of the system to satisfy the reservation, even if the nodes requested are not actually used. A reservation request may be cancelled in which case no charges will apply.
2.4.2 Project Allocation Size
Currently Chameleon is operating on a “soft allocation model” where each project, if approved, will receive a startup allocation of 20,000 SUs for six months that can be both recharged (i.e., more SUs can be added) and renewed (i.e., the duration can be extended) via submitting a renew/recharge request. This startup allocation value has been designed to respond to both PI needs (i.e., cover an amount of experimentation needed to obtain a significant result) and balance fairness to other users (it represents roughly 1% of testbed six months’ capacity). Requests for these startup projects will receive a fast track internal review (i.e., users can expect them to be approved within a few days).
A PI can apply for multiple projects/allocations; however, the number of held allocations will be taken into account during review.
As our understanding of user need grows we expect the Chameleon allocation model to evolve towards closer reflection of those needs in the form of more differentiated allocations that will allow us to give larger allocations to users for longer time.
to such students, as is customary also in other universities.
2.5 G
ETTINGS
TARTED ONC
HAMELEONC
LOUD☁
We describe how you can get access to chameleon cloud under the assumption that you are a student or a researcher that joins an existing project on Chameleon cloud. You will need to follow the following steps:
2.5.1 Step 1: Create a Chameleon account
To get started using Chameleon you will need to create a user account.
You will be asked to agree to the Chameleon terms and conditions which, among others, ask you to acknowledge the use of Chameleon in your publications.
Acknowledgement of support from the Chameleon project and the National Science Foundation should appear in any publication of material, whether copyrighted or not, that describes work which benefited from access to Chameleon cyberinfrastructure resources. The suggested acknowledgement is as follows: “Results presented in this paper were obtained using the Chameleon testbed supported by the National Science Foundation”.
As part of creating an account you may request PI status. However you are not a PI as you will be joining a project.
2.5.2 Step 2: Create or join a project
To use Chameleon, you will need to be associated with a project that is assigned an allocation. This means that you either need to
1. apply for a new project or
2. ask the PI of an existing Chameleon project to add you.
professor.
In case you need to do a project application typically consists of about one paragraph description of the intended research and takes one business day to process.
Enrolling you into an existing research or class project depends on the time availability of the project lead or professor of your class. It is important that you communicate your chameleon cloud account name to the project lead so they can easily add you. Make sure you really give them only your chameleon account name and potentially your organizational e-mail, Firstname, and Lastname so they can check you are eligible to get access.
Indiana University students that take the e516 and e616 classes will have to fill out a google form in which they communicate the chameleon cloud name. You can already apply for an account name, but do not apply for a project. If you nevertheless apply for a project, we will hear from the chameloen cloud administrators. As they do not like taht because you have not followed the chameleon cloud project policies you will receive a grade deduction for the class.
2.5.3 Step 3: Start using Chameleon
Now that you have enrolled and once you are added to the project by your project lead you can start using chameleon cloud. However be reminded that you ought to shut down the resources/VMs whenever they are not in use to avoid unnecessary charging. Remember the project has limited time on chameleon and any unused time will be charged against the project.
Chameleon provides two types of resources with links to their respective users guides next:
Bare Metal User Guide will tell you how to use Chameleon bare metal resources which provide strong isolation and allow you maximum control (reboot to new operating system, reboot the kernel, etc.)
Chameleon’s OpenStack KVM cloud which is a multi-tenant environment providing weak performance isolation.
If you have any questions or encounter any problems, you can check out our User FAQ, or submit a ticket.
As part of the classes you will need to first pass a cloud security drivers licence test. The test is designed so that you think about gaining access to a VM securely and how to properly secure the VM. Once passed, access is typically provided by midterm time. You are not allowed to constantly run VM’s and must shut them down if not in use. You will get point deductions if we detect you do not obey by this rule. We have access to log files about your VM usage.
2.6 O
PENS
TACKV
IRTUALM
ACHINES☁
OpenStack is an Infrastructure as a Service (IaaS) platform that allows you to create and manage virtual environments. Chameleon provides an installation of OpenStack version 2015.1 (Kilo) using the KVM virtualization technology.
Since the KVM hypervisor is used on this cloud, any virtual machines you upload must be compatible with KVM.
This section provides basic information about how to use the OpenStack web interface and provides some information specific to using OpenStack KVM on Chameleon.
2.6.1 Web Interface
An easy way to use OpenStack KVM on Chameleon is via the OpenStack web interface also known as Horizon. You log into the web interface using your Chameleon username and password. If you change your Chameleon password in the portal, that change will propagate to the OpenStack KVM interface in about 5 minutes. See Figure 2
Figure 2: Chameleon login
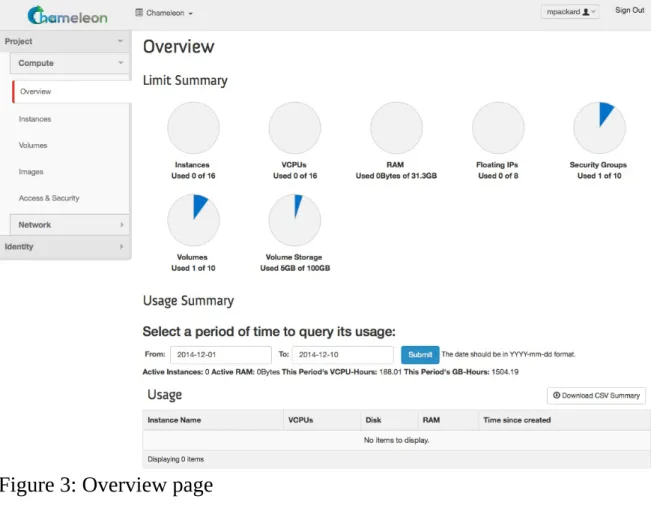
Figure 3: Overview page
2.6.1.1 Managing Virtual Machine Instances
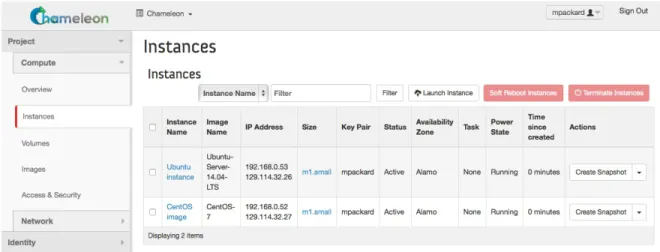
Figure 4: Virtual Machine instances
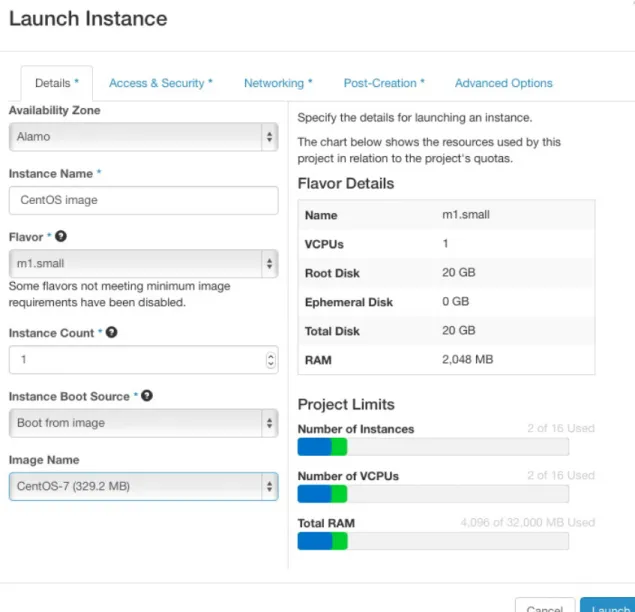
The Instances page also lets you create new virtual machines by using the ‘Launch Instance’ button in the upper-right. When you click this button, a dialog window pops up. In the first ‘Details’ tab, you select the ‘Instance Boot Source’ of the instance, which is either an ‘Image’, a ‘Snapshot’ (an image created from a running virtual machine), or a ‘Volume’ (a persistent virtual disk that can be attached to a virtual machine). If you select ‘Boot from image’, the Image Name dropdown presents a list of virtual machine images that we have provided, that other Chameleon users have uploaded and made public, or images that you have uploaded for yourself. If you select ‘Boot from snapshot’, the Instance Snapshot dropdown presents a list of virtual machine images that you have created from your running virtual machines.
Figure 5: Launcher window
Figure 6: Access window
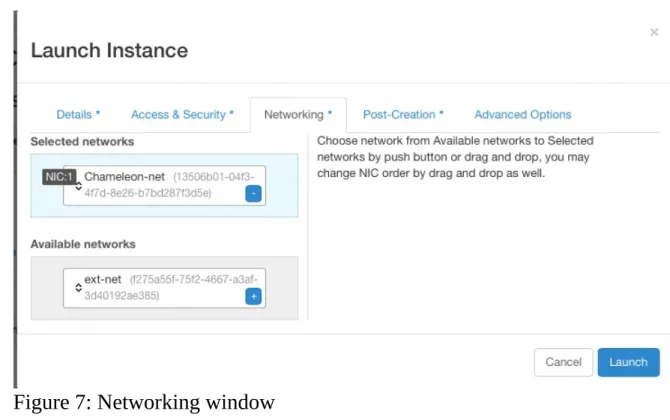
Next is ‘Networking’, where you select which network should be associated with the instance. Click the + next to your your project’s private network (PROJECT_NAME-net), not ext-net. See Figure 7
Figure 7: Networking window
If you would like to assign a public IP address to your VM, you can do that while it is booting up. Click on the dropdown under Actions and choose Associate Floating IP. Choose an IP from the IP Address menu and click Associate. If there are no addresses available, click the + and follow the prompts to add one. See Figure 8
Figure 8: Floating IP window
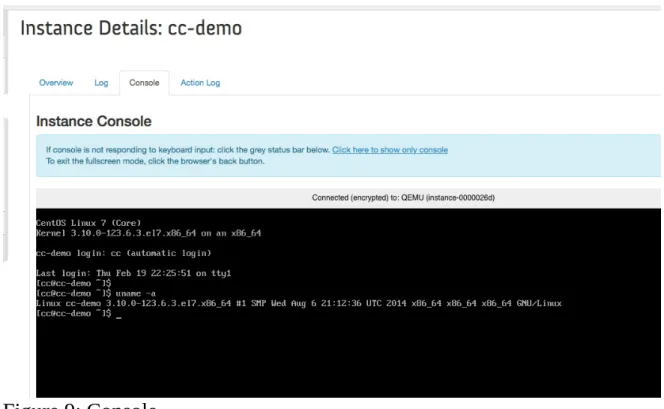
OpenStack injects your SSH key into the VM and you can use the corresponding private SSH key to log in to the VM. You will need to use the public IP assigned to your VM to connect from outside of Chameleon, or connect through an existing instance that both a public and private IP.
Note that the images we provide do not allow SSH into the root account. For root access, SSH into the instance as user ‘cc’ and then use the sudo command to become root.
Figure 9: Console
2.6.1.2 Snapshots
The instance list page shown previously has an option ‘Create Snapshot’ that allows you to save a copy of the disk contents of a running virtual machine. This allows you to start new virtual machines in the future that are identical to this one and is an easy way to save any changes you make to a running virtual machine.
2.6.1.3 Firewall (Access Security)
Each project has control over their own firewall settings for their instances. At minimum you’ll probably want to allow SSH access so you can reach your instances.
Figure 10: Security groups
To edit a security group, click on “Edit Rules”. This opens a page showing the existing rules in the security group. See Figure 11
Figure 11: Editing a security group
Figure 12: Add a security group
2.6.2 OpenStack REST Interfaces
The OpenStack REST Interfaces are supported on Chameleon over secure HTTP connections. You can download your OpenStack credentials file from the web interface via the “Access & Security” link in the left of any page and then click on the “API Access” link on the top.
You can then install the OpenStack command line clients following these instructions. If using pip, we recommend setting up a virtualenv.
2.6.3 Downloading and uploading data
You can use the OpenStack command line clients to download data from and upload data to Chameleon clouds. Configure your environment by following the “OpenStack REST Interfaces” previous section, then use the following commands:
glance image-download to download images and snapshots from Glance glance image-create to upload images and snapshots to Glance
cinder upload-to-image to convert a Cinder volume to a Glance image
cinder create [--image-id <image-id>] [--image <image>] to create a Cinder volume from a Glance image
2.7 C
LOUDMESHO
PENS
TACKC
OMMANDL
INEI
NTERFACE☁
OpenStack on Chameleon delivers KVM based compute resources to provision virtual machines. It provides various image types on which we can deploy tools and software needed for the class and projects. We will you through the basic steps of getting access to OpenStack Chameleon cloud under the class allocation. Next, we will introduce you the cloudmesh command line tools which you can use in your projects. Naturally using the GUI for your projects is not sufficient as setting up your environment will need steps to be executed by hand which is not sufficient. It is a goal of this class that you create your environment in a reproducible fashion via scripts. Hence, although the Web interface called OpenStack Horizon is initially attractive, we should make sure to move on to the commandline interfaces. Furthermore, it is often difficult to resolve technical issues as the command line tools generate full debugging messages in case of issues and copy and past into help windows is much easier and efficient than copy and past incomplete screenshots.
One important factor for using cloudmesh shell is that it not only works for chameleon cloud but also for AWS and Azure. We are hoping to add Google also which is already in our preliminary code.
2.7.1 Instalation of Cloudmesh Client
We discuss how to install cloudmesh in the [Cloudmesh manual] [https://cloudmesh.github.io/cloudmesh-manual/installation/install.html]
We assume that your public key is located at ~/.ssh/id_rsa.pub
We assume you have the file ~/.cloudmesh/cloudmesh.yaml that is created during the instalation process. Please also make sure that the file ~/.cloudmesh/names.yaml Is properly configured for the class. Typically it will look like
Where NNN is the last three gigits from your hid that we place in github and for accountname, please chose your chameleon account name. If you are not taking any of our classes and you do not have a github directory that we created for you, please use
instead. Whenever you start a new vm, the counter of the vm gets increased, guranteeing a unique virtual machine name across all colaborators and your own virtual machines.
We also assume you have called the command
and are running the MongoDB cloudmesh service which you can check with
Once you install cloudmesh you need to modify the ~/.cloudmesh/cloudmesh.yaml file to add your username and password. Make sure to properly protect this file as discussed in the manual.
To add the username and password, you can use an editor, or execute on the commandline with the commands
path: /Users/grey/.cloudmesh/name.yaml schema: NNN-accountname-{counter}
counter: 1
path: /Users/grey/.cloudmesh/name.yaml schema: accountname-{counter}
counter: 1
cms init
$ cms admin mongo status
They will change the values in the yaml file at
cloudmesh.cloud.chameleon.credentials.
Next test out if you can see some images with
You will see a table similar to
To see the flavors or sizes, you can use
Which will return something like
Cloudmesh reads the preset variables in the cloudmesh.yaml file to start new virtual machines. To see them you can look at the yaml file or use the command
To start a VM simply use
You will see something similar to cms image list --refresh
+---+---+---+---+---+---+ | Name | Size (Bytes) | MinDisk (GB) | MinRam (MB) | Status | Driver | +---+---+---+---+---+---+ | CC-Ubuntu18.04 | 982843392 | 0 | 0 | ACTIVE | openstack | | CC-Ubuntu16.04 | 844759040 | 0 | 0 | ACTIVE | openstack | | CC-Ubuntu18.04-20190822 | 982056960 | 0 | 0 | ACTIVE | openstack | | CC-Ubuntu16.04-20190822 | 844824576 | 0 | 0 | ACTIVE | openstack | ...
cms flavor list flavor --refresh
+---+---+---+---+ | Name | VCPUS | RAM | Disk | +---+---+---+---+ | m1.tiny | 1 | 512 | 1 | | m1.small | 1 | 2048 | 20 | | m1.medium | 2 | 4096 | 40 | | m1.large | 4 | 8192 | 80 | | m1.xlarge | 8 | 16384 | 160 | | storage.medium | 1 | 4096 | 2048 | | m1.xxlarge | 8 | 32768 | 160 | | m1.xxxlarge | 16 | 32768 | 160 | +---+---+---+---+
$ cms config get chameleon.default
cms vm boot
# ---# Create Server
#
Name: benchmark-gregor-vm-684 User: cc
To log into the vm you can use
To set a different vm, you could use the command line parameters that you can find out with
but in case you always want to use the same parameters it is much mor conveneint to use our config set command with
On chameleon cloud images with CC are cameleon cloud santioned images. They include some monitoring extensions and use the username cc for login.
2.7.2 Floating IP Address
We have configured cloudmesh to automatically assign a floating ip address so you can use that to log into the vm.
to view it, you can use the command
To delete the vm simply say
2.8 O
PENS
TACKC
OMMANDL
INEI
NTERFACE☁
OpenStack itself provides a new integrated openstack commandline client. This client can use configuration file that allows us to interact with the cloud while using the stored passsword and username.
Size: m1.small Public: True Key: gregor location: None timeout: 360 secgroup: default group: cloudmesh groups: ['cloudmesh']
cms ssh
cms vm help
$ cms config set cloud.chameleon.default.size=CC-Ubuntu18.04 $ cms config set cloud.chameleon.default.image=m1.small $ cms config set cloud.chameleon.default.username=cc
$ cms vm list --refresh
However, we recommend that you just use the cloudmesh shell documented in Section 2.7 as it not only allows you to interact with chamelon cloud, but also with AWS and Azure and infuture also Google cloud.
2.8.0.1 Creating OpenStack RC via the editor
The easiest way is to create this file by hand while copying the following lines into the file ~/.cloudmesh/chameleon/cc-openrc.sh. Make sure that you place the file in a location you easily be found:
The easiest way is to download a template from pur book with
The ‘cc-openrc.sh’ looks as follows:
Please make sur to replace <put your chameleon cloud username here> with your chameleon cloud username. Now whenever you need top access chameleon cloud you can use the command
To simplify the configuration and documentation, we have included two shell environment variables. The first one is CC_PROJECT, that specifies the project number. The second one is a prefix that you will use for VMS and keys as we are using a shared project. This way we can see which VMS and which keys have been uploaded and keep the names of them unique.
$ mkdir -p ~/.cloudmesh/chameleon
$ wget https://raw.githubusercontent.com/cloudmesh/book/master/examples/chameleon/cc-openrc.sh -O ~/.cloudmesh/chameleon/cc-openrc.sh
#!/bin/bash
export CC_PROJECTID="CH-819337"
export CC_PREFIX="albert-111" # repalce with your username and hid number
export OS_AUTH_URL=https://openstack.tacc.chameleoncloud.org:5000/v2.0
# With Keystone you pass the keystone password.
echo "Please enter your OpenStack Password: " read -sr OS_PASSWORD_INPUT
export OS_PASSWORD=$OS_PASSWORD_INPUT
export OS_TENANT_ID=$CC_PROJECTID
export OS_TENANT_NAME=$CC_PROJECTID
export OS_PROJECT_NAME=$CC_PROJECTID
export OS_USERNAME="<put your chameleon cloud username here>" export OS_REGION_NAME="RegionOne"
if [ -z "$OS_REGION_NAME" ]; then unset OS_REGION_NAME; fi
2.8.0.2 Creating OpenStack RC via the GUI
In case you do not want to use the commandline option to obtain an RC sample, you can obtain the OpenStack RC file with the OpenStack Dashboard.
https://openstack.tacc.chameleoncloud.org/dashboard
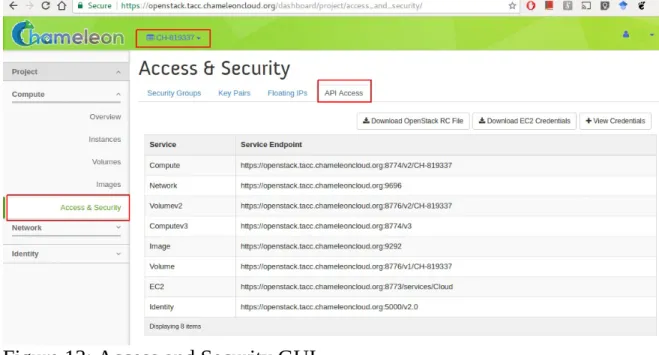
Login and chose your project number for this project. Confirm your project number and find Access & Security on the left menu. The Access & Security page has tabs and choose API Access to download credentials on a local machine. Click Download OpenStack RC File to download CH-$PROJECTID-openrc.sh file on your machine (see Figure 13). Every time you use nova command line tools, the file should be loaded on your terminal.
Figure 13: Access and Security GUI
Just as in the previous section please add the following to your openrc.sh file while adapting it appropriately.
$ export CC_PROJECT=CH-819337 $ export CC_PREFIX=111-albert
$ mkdir -p ~/.cloudmesh/chameleon
$ mv ~/Downloads/CH-$CC_PROJECT-openrc.sh ~/.cloudmesh/chameleon/cc-openrc.sh
Once you source the file, you can use nova command line tools without sourcing it again. The environment variables are enabled while your terminal is alive. In case you have not stored the original RC file in the Downloads folder, please copy it from that location instead.
2.8.1 CLI to Manage Virtual Machines
OpenStack provides a commandline tool called nova to manage virtual machines. To install it please use the command
Now you can look at the many options this command provides with
You will see an output similar to
with ist pages and pages long information. Please study it.
To list the images say
You will see an output similar to
To list the flavors you can use the command
which will result in an output similar to $ pip install python-openstackclient
$ openstack help
openstack [--version] [-v | -q] [--log-file LOG_FILE] [-h] [--debug] ...
openstack image list
+---+---+---+---+ | ID | Name | Status | Server | +---+---+---+---+ | be46bd5a-c4a5-4495-ad30-35618... | CC-C7-autologin | ACTIVE | | | 1fe5138b-300b-4b30-8d22-e7287... | CC-CentOS7 | ACTIVE | | ...
$ openstack flavor list
2.8.2 KeyPair Registration
⚠ This should be substituted by the openstack command
Once you have completed the installation of nova, you also need to register a ssh keypair with openstack to be able to log into the virtual machines that you start. To register your public key, use:
Once you register your key, you can confirm if your key registration has been successful by listing the keys:
You will see an output similar to:
2.8.3 Start a new VM instance
To start new instances you can use the nova boot command. It will start a VM instance. You can use some parameters to specify which base image and a server size we will use with a name. We use CC-Ubuntu16.04 base image in this section which is an official Ubuntu 16.04 image provided by Chameleon project.
where the 01 indicates the instance number. Note that we will be terminating and deleting any VM in our project that does not follow this naming convention.
To list all servers you can use the command | 7 | m1.xxlarge | 32768 | 160 | 0 | 8 | True | | 8 | m1.xxxlarge | 32768 | 160 | 0 | 16 | True | +----+---+---+---+---+---+---+
$ openstack keypair create --public-key ~/.ssh/id_rsa.pub ${CC_PREFIX}-key
$ openstack keypair list
+---+---+ | Name | Fingerprint | +---+---+ | $CC_PREFIX-key | cf:04:06:aa:8b:76:af:77:aa:0a:b5:87:ff:0f:ba:97 | +---+---+
$ openstack server create \ --image CC-Ubuntu16.04 \ --key-name ${CC_PREFIX}-key \ --flavor m1.small \
${CC_PREFIX}-01
2.8.4 Floating IP Address
If your new VM instance is up and running, it needs an external ip address which is also called floating IP address. A floating IP allows you to get access to this VM from the internet. Note that chameleon has a limited number of floating IP addresses and it is best to return them if not in use. If chameleon runs out of floating IP addresses, please submit a ticket to chameleon. However in many cases the VM may only need a an internal IP address as a default. In case you need to access others, you could even tunnel all connections through a single floating IP. naturally this would limit data transfers in and out of chameleon, but is a recommended way to deal with limited floating IPs.
Let us showcase how to associate a floating IP address and access it via SSH.
Now we have a IP address to assign to a VM instance. In this section, we will associate 129.114.111.37 to our albert-111-01 VM instance by:
Once you completed this step, you are now able to SSH into your VM instance. Confirm ACTIVE state in your VM to get access.
where 111 is the number from your hid and 01 is the instance number
Note that cc is login name your VM if you start a VM with the official Chameleon cloud image.
2.8.5 Termination of VM Instance
If you completed your work on your VM instance, you have to terminate your VM and release a floating IP address associated with. For example, we terminate nova floating-ip-create ext-net
+---+---+---+---+---+ | Id | IP | Server Id | Fixed IP | Pool | +---+---+---+---+---+ | 13dc309e- ... | 129.114.111.37 | - | - | ext-net | +---+---+---+---+---+
$ nova floating-ip-associate albert-111-01 129.114.111.37
| f19e1... | albert-111-01 | ACTIVE | - | Running | $CC_PROJECT-net= | | | | | | 192.168.0.13, | | | | | | 129.114.111.37 |
our first instance and the IP address by:
Please note that when using delete you will delete the VM. In case you still need to use it use stop and to restart it use start instead.
2.9 O
PENS
TACKH
ORIZONG
RAPHICALU
SERI
NTERFACE☁
Horizon, Starting a VM
2.9.1 Configure resources
Once your lease is started, you are almost ready to start an instance. But first, you need to make sure that you will be able to connect to it by setting up a key pair. This only has to be done once per user per project.
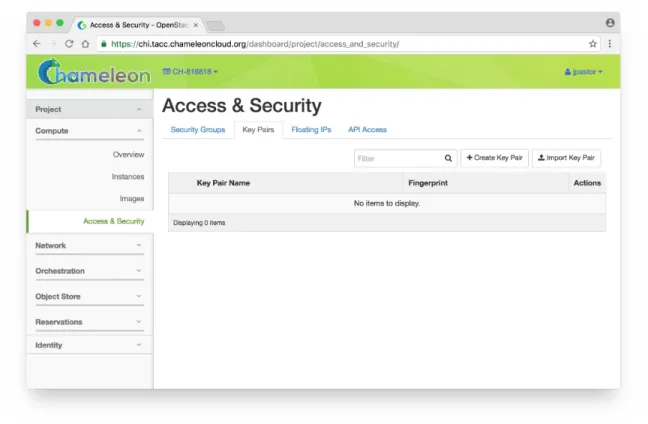
Go to Project > Compute > Access & Security, then select the Key Pairs tab. See Figure 14
$ nova delete $CC_PREFIX-01
Figure 14: Key Pairs Tab
Here you can either ask OpenStack to create an SSH key pair for you (via the “Create Key” Pair button), or, if you already have an SSH key pair on your machine and are happy to use it, click on “Import Key Pair”.
Figure 15: Public Key
Figure 16: Import key pair
For those already familiar with OpenStack, note that Security Groups are not functional on bare-metal. All instances ports are open to the Internet and any security group rule you add will not be respected.
Figure 17: VM Instances
Figure 18: Launch a VM
Figure 19: Status Window (a)
Figure 20: Status Window (b)
At this point the instance might still be booting: it might take a minute or two to actually be accessible on the network and accept SSH connections. In the meantime, you can attach a floating IP to the instance. Click on the “Associate Floating IP” button. You should get a screen like this one: Figure 21
Figure 21: Floating IP
by default and click on the blue Allocate IP button. See Figure 22
Figure 22: Allocate the IP
You will be returned to the previous window. The correct value for “Port to be associated” should already be selected, so you only have to click on “Associate”. See Figure 23
Figure 23: Associate the IP
Figure 24: Status of the IP Association
2.9.2 Interact with resources
Now you should be able to connect to the instance via SSH using the cc account. In a terminal, type ssh cc@floating_ip, in our example this would be
SSH will probably tell you:
Type yes and press Enter. You should arrive to a prompt like this one:
[cc@my-first-instance ~]$
If you notice SSH errors such as connection refused, password requests, or failures to accept your key, it is likely that the physical node is still going through the boot process. In that case, please wait before retrying. Also make sure that you use the cc account. If after 10 minutes you still cannot connect to the machine, please open a ticket with our help desk.
You can now check whether the resource matches its known description in the $ ssh [email protected]
The authenticity of host }130.202.88.241
resource registry. For this, simply run: sudo cc-checks -v
Figure 25: cc-check program
The cc-checks program prints the result of each check in green if it is successful and red if it failed.
You can now run your experiment directly on the machine via SSH. You can run commands with root privileges by prefixing them with sudo. To completely switch user and become root, use the sudo su - root command.
2.9.2.1 Snapshot an instance
All instances in Chameleon, whether KVM or bare-metal, are running off disk images. The content of these disk images can be snapshotted at any point in time, which allows you to save your work and launch new instances from updated images later.
While OpenStack KVM has built-in support for snapshotting in the Horizon web interface and via the command line, bare-metal instances require a more complex process. To make this process easier, we developed the cc-snapshot tool, which implements snapshotting a bare-metal instance from command line and uploads it to Glance, so that it can be immediately used to boot a new bare-metal instance. The snapshot images created with this tool are whole disk images.
For ease of use, cc-snapshot has been installed in all the appliances supported by the Chameleon project. If you would like to use it in a different setting, it can be downloaded and installed from the github repository.
Once cc-snapshot is installed, to make a snapshot of a bare-metal instance, run the following command from inside the instance:
sudo cc-snapshot <snapshot_name>
You can verify that it has been uploaded to Glance by running the following command:
glance image-list
interested in more detail about image management, please refer to our image management guide.
2.9.3 Use FPGAs
Consult the dedicated page if you would like to use the FPGAs available on Chameleon.
2.9.4 Next Step
Now that you have created some resources, it is time to interact with them! You will find instructions to the next step by visiting the following link:
Monitor resources and collect results
2.10 O
PENS
TACKHEAT
☁
Deploying an MPI cluster, an OpenStack installation, or any other type of cluster in which nodes can take on multiple roles can be complex: you have to provision potentially hundreds of nodes, configure them to take on various roles, and make them share information that is generated or assigned only at deployment time, such as hostnames, IP addresses, or security keys. When you want to run a different experiment later you have to redo all this work. When you want to reproduce the experiment, or allow somebody else to reproduce it, you have to take very precise notes and pay great attention to their execution.
To help solve this problem and facilitate reproducibility and sharing, the Chameleon team configured a tool that allows you to deploy complex clusters with “one click”. This tool requires not just a simple image (i.e., appliance) but also a document, called a template, that contains the information needed to orchestrate the deployment and configuration of such clusters. We call this image + template combination complex appliance because it consists of more than just the image (i.e., appliance).
2.10.1 Supporting Complex Appliances
want to deploy but also on how many nodes you want to deploy that image, what roles the deployed instances should boot into (such as e.g., head node and worker node in a cluster), what information from a specific instance should be passed to another instance in that complex appliance, and what scripts should be executed on boot so that this information is properly used for configuring the “one click” cluster. For example, a Network File System (NFS) appliance that we will use as an example in this guide, might specify deployment on three nodes, out of which one will be configured as head node and others as worker nodes, the information passed between the images will be hostname of the head node, and the scripts executed on the worker nodes on boot will put that hostname in the fstab file. As you can tell from this description, images used for complex appliances are typically configured such that they can be booted into any role required on the one-click cluster we are booting; in this case the image will have both the software for NFS server node and client node.
Since complex appliances in Chameleon are currently implemented using the OpenStack Heat orchestration service, we will be using OpenStack terminology and features to work with them. The templates described previously are YAML files using the Heat Orchestration Template (HOT) format (Heat also supports the AWS CloudFormation template format, but this is not covered here). A deployed complex appliance is referred to as a “stack” – just as a deployed single appliance is typically referred to as an “instance”. This guide will tell you all you need to know in order to use and configure complex appliances on Chameleon; if you would like to know more about Heat, please refer to its official documentation.
2.10.2 Chameleon Appliance Catalog
Figure 26: NFS file share
2.10.3 Deployment
We will explain how to launch a complex appliance based on our NFS share appliance. To launch a complex appliance, you only need to follow these steps:
1. Create a lease: use the OpenStack web interface (choose between CHI@UC or CHI@TACC) to create a lease. To launch our NFS appliance, reserve at least three compute nodes (the strict minimum is two nodes but we will use three in this example and later ones).
2. Go to the Appliance Catalog and identify the appliance you want to launch. In our case you can go straight to the NFS share appliance; click on it to open its details page. You will see a “Launch” button and a “Get Template” button. Follow the “Get Template” link and copy its url to the clipboard – you will need it in the following steps.
3. Click on the “Launch Complex Appliance at CHI@TACC” or “Launch Complex Appliance at CHI@UC” button depending on where your reservation was created.
This will take you to the Stacks page within the Orchestration menu. This page will show the current list of stacks, with controls to manage them and create new ones. Since we have not launched any yet, this list will be empty for now.
Click on Launch Stack on the top right. A window will pop up like in Figure 27.
Figure 27: Select Template
We will deploy the NFS appliance described earlier; it will consist of a server node and two client nodes. Change the template source field to URL, and paste the URL of the NFS share template (if you do not have it in your clipboard anymore you will need to go back to the appliance and get it by clicking on “Get template” again).
Do not change the environment source settings, and click “Next”.
Figure 28: Launch NFS Stack
Your stack should be in status “Create In Progress” for several minutes while it first launches the NFS server instance, followed by the NFS client instances. As in Figure 29.
Figure 29: Create in Progress
Figure 30: Create Complete
You can click on the stack name to get more details, including a visualization of the deployed resources, as pictured in Figure 31. The single machine inside a circle represents the NFS server instance. The rack of machine represents the group of NFS client instances (in this case, a group composed of two instances). The server’s floating IP (the public IP assigned to a resource) is represented by an IP in a circle; an IP in a circle is also used to represent the association of the IP with the NFS server instance (not the greatest idea to use the same symbol for both the IP and the association – we agree but cannot do much about it at the moment). Blow off some steam by dragging the visualization across the screen, it can be rather fun!
Figure 31: Stack Visualization
it (as per the visualization given previously) but you can connect to it via the server node with the client’s private IP (connect to the server with ssh -A to enable the SSH agent forwarding after loading your key to your SSH agent with ssh-add
<path-to-your-key>).
You can find out the information about the IPs and other things if you click the “Overview” tab and look in the “Outputs” section. Under the “Resources” tab you will see the resources described previously (the server, clients, server’s public/floating IP, and its the association) and information about them. In the “Events” tab you will see information about the history of the deployment so far. In Template you will see the template that was used to deploy this stack.
2.10.4 Heat Template
The NFS share appliance deploys:
an NFS server instance, that exports the directory /exports/example to any instance running on Chameleon bare-metal,
one or several NFS client instances, which configure /etc/fstab to mount this NFS share to /mnt (and can subsequently read from and write to it).
This template is reproduced further next, and includes inline comments starting with the # character. There are three main sections:
resources, parameters, outputs.
The resources section is the most important part of the template: it defines which OpenStack resources to create and configure. Inside this section you can see four resources defined:
nfs_server_floating_ip nfs_server
nfs_server_ip_association nfs_clients
public network. It is not attached to any instance yet.
The second resource, nfs_server, creates the NFS server instance (an instance is defined with the type OS::Nova::Server in Heat). It is a bare-metal instance (flavor:
baremetal) using the CC-CentOS7 image and connected to the private network named sharednet1. We set the keypair to use the value of the parameter defined earlier, using the get_param function. Similarly, the reservation to use is passed to the scheduler. Finally, a user-data script is given to the instance, which configures it as an NFS server exporting /exports/example to Chameleon instances.
The nfs_server_ip_association resource associates the floating IP created earlier with the NFS server instance.
Finally, the nfs_clients resource defines a resource group containing instance configured to be NFS clients and mount the directory exported by the NFS server defined earlier. The IP of the NFS server is gathered using the get_attr function, and placed into user-data using the str_replace function.
Parameters all have the same data structure: each one has a name (key_name or
reservation_id in this case), a data type (number or string), a comment field called description, optionally a default value, and a list of constraints (in this case only one per parameter). Constraints tell Heat to match a parameter to a specific type of OpenStack resource. Complex appliances on Chameleon require users to customize at least the key pair name and reservation ID, and will generally provide additional parameters to customize other properties of the cluster, such as its size, as in this example.
Outputs are declared similarly to parameters: they each have a name, an optional description, and a value. They allow to return information from the stack to the user.
# This describes what is deployed by this template.
description: NFS server and clients deployed with Heat on Chameleon
# This defines the minimum Heat version required by this template.
heat_template_version: 2015-10-15
# The resources section defines what OpenStack resources are to be deployed and # how they should be configured.
resources:
nfs_server_floating_ip: type: OS::Nova::FloatingIP properties:
nfs_server:
type: OS::Nova::Server properties:
flavor: baremetal image: CC-CentOS7
key_name: { get_param: key_name } networks:
- network: sharednet1
scheduler_hints: { reservation: { get_param: reservation_id } } user_data: |
#!/bin/bash
yum install -y nfs-utils mkdir -p /exports/example chown -R cc:cc /exports
echo '/exports/example 10.140.80.0/22(rw,async) 10.40.0.0/23(rw,async)' >> /etc/exports systemctl enable rpcbind && systemctl start rpcbind
systemctl enable nfs-server && systemctl start nfs-server
nfs_server_ip_association:
type: OS::Nova::FloatingIPAssociation properties:
floating_ip: { get_resource: nfs_server_floating_ip } server_id: { get_resource: nfs_server }
nfs_clients:
type: OS::Heat::ResourceGroup properties:
count: { get_param: nfs_client_count } resource_def:
type: OS::Nova::Server properties:
flavor: baremetal image: CC-CentOS7
key_name: { get_param: key_name } networks:
- network: sharednet1
scheduler_hints: { reservation: { get_param: reservation_id } } user_data:
str_replace: template: | #!/bin/bash
yum install -y nfs-utils
echo "$nfs_server_ip:/exports/example /mnt/ nfs" > /etc/fstab mount -a
params:
$nfs_server_ip: { get_attr: [nfs_server, first_address] }
# The parameters section gathers configuration from the user.
parameters: nfs_client_count: type: number
description: Number of NFS client instances default: 1
constraints:
- range: { min: 1 }
description: There must be at least one client. key_name:
type: string
description: Name of a KeyPair to enable SSH access to the instance default: default
constraints:
- custom_constraint: nova.keypair reservation_id:
type: string
description: ID of the Blazar reservation to use for launching instances. constraints:
- custom_constraint: blazar.reservation
outputs: server_ip:
description: Public IP address of the NFS server value: { get_attr: [nfs_server_floating_ip, ip] } client_ips:
2.10.5 Customizing an existing template
Customizing an existing template is a good way to start developing your own. We will use a simpler template than the previous example to start with: it is the Hello World complex appliance.
First, delete the stack you launched, because we will need all three nodes to be free. To do this, go back to the Project > Orchestration > Stacks page, select your stack, and then click on the red “Delete Stacks” button. You will be asked to confirm, so click on the blue “Delete Stacks” button. As the following picture: Figure 32.
Figure 32: Delete Stacks
The template for the Hello World complex appliance is reproduced next. It is similar to the NFS share appliance, except that it deploys only a single client. You can see that it has four resources defined:
nfs_server_floating_ip nfs_server
nfs_server_ip_association nfs_client
The nfs_client instance mounts the NFS directory shared by the nfs_server instance, just like in our earlier example.
# This describes what is deployed by this template.
description: NFS server and client deployed with Heat on Chameleon
# This defines the minimum Heat version required by this template.
heat_template_version: 2015-10-15
# The resources section defines what OpenStack resources are to be deployed and # how they should be configured.
resources:
nfs_server_floating_ip: type: OS::Nova::FloatingIP properties:
Download this template from the Hello World complex appliance details page to your local machine, and open it in your favorite text editor.
We will customize the template to add a second NFS client by creating a new resource called another_nfs_client. Add the following text to your template inside the resources section. Make sure to respect the level of indentation, which is important in YAML.
nfs_server:
type: OS::Nova::Server properties:
flavor: baremetal image: CC-CentOS7
key_name: { get_param: key_name } networks:
- network: sharednet1
scheduler_hints: { reservation: { get_param: reservation_id } } user_data: |
#!/bin/bash
yum install -y nfs-utils mkdir -p /exports/example chown -R cc:cc /exports
echo '/exports/example 10.140.80.0/22(rw,async) 10.40.0.0/23(rw,async)' >> /etc/exports systemctl enable rpcbind && systemctl start rpcbind
systemctl enable nfs-server && systemctl start nfs-server
nfs_server_ip_association:
type: OS::Nova::FloatingIPAssociation properties:
floating_ip: { get_resource: nfs_server_floating_ip } server_id: { get_resource: nfs_server }
nfs_client:
type: OS::Nova::Server properties:
flavor: baremetal image: CC-CentOS7
key_name: { get_param: key_name } networks:
- network: sharednet1
scheduler_hints: { reservation: { get_param: reservation_id } } user_data:
str_replace: template: | #!/bin/bash
yum install -y nfs-utils
echo "$nfs_server_ip:/exports/example /mnt/ nfs" > /etc/fstab mount -a
params:
$nfs_server_ip: { get_attr: [nfs_server, first_address] }
# The parameters section gathers configuration from the user.
parameters: key_name: type: string
description: Name of a KeyPair to enable SSH access to the instance default: default
constraints:
- custom_constraint: nova.keypair reservation_id:
type: string
description: ID of the Blazar reservation to use for launching instances. constraints:
- custom_constraint: blazar.reservation
another_nfs_client: type: OS::Nova::Server properties:
Now, launch a new stack with this template. Since the customized template is only on your computer and cannot be addressed by a URL, use the “Direct Input” method instead and copy/paste the content of the customized template. The resulting topology view is shown in Figure 33, as you can see, the two client instances are shown separately since each one is defined as a separate resource in the template.
Figure 33: NFS with Two Clients
You may have realized already that while adding just one additional client instance was easy, launching more of them would require to copy / paste blocks of YAML many times while ensuring that the total count is correct. This would be easy to get wrong, especially when dealing with tens or hundreds of instances.
key_name: { get_param: key_name } networks:
- network: sharednet1
scheduler_hints: { reservation: { get_param: reservation_id } } user_data:
str_replace: template: | #!/bin/bash
yum install -y nfs-utils
echo "$nfs_server_ip:/exports/example /mnt/ nfs" > /etc/fstab mount -a
params:
So instead, we leverage another construct from Heat: resource groups. Resource groups allow to define one kind of resource and request it to be created any number of times.
Remove the nfs_client and another_client resources from your customized template, and replace them with the following:
A resource group is configured with a properties field, containing the definition of the resource to launch (resource_def) and the number of resources to launch (count). Once launched, you will notice that the topology view groups all client instances under a single Resource Group icon. We use the same resource_def than when defining separate instances earlier.
Another way we can customize this template is by adding outputs to the template. Outputs allow a Heat template to return data to the user. This can be useful to return values like IP addresses or credentials that the user must know to use the system.
We will create an output returning the floating IP address used by the NFS server. We define an outputs section, and one output with the name server_ip and a description. The value of the output is gathered using the get_attr function which obtains the IP address of the server instance.
You can get outputs in the “Overview” tab of the Stack Details page. If you want nfs_clients: type: OS::Heat::ResourceGroup properties: count: 2 resource_def: type: OS::Nova::Server properties: flavor: baremetal image: CC-CentOS7
key_name: { get_param: key_name } networks:
- network: sharednet1
scheduler_hints: { reservation: { get_param: reservation_id } } user_data:
str_replace: template: | #!/bin/bash
yum install -y nfs-utils
echo "$nfs_server_ip:/exports/example /mnt/ nfs" > /etc/fstab mount -a
params:
$nfs_server_ip: { get_attr: [nfs_server, first_address] }
outputs: server_ip:
to use the command line, install python-heatclient and use the heat output-list and heat
output-show commands, or get a full list in the information returned by heat stack-show.
Multiple outputs can be defined in the outputs section. Each of them needs to have a unique name. For example, we can add another output to list the private IPs assigned to client instances:
The image: Figure 34, shows the resulting outputs as viewed from the web interface. Of course IP addresses will be specific to each deployment.
Figure 34: Outputs
Finally, we can add a new parameter to replace the hardcoded number of client instances by a value passed to the template. Add the following text to the parameters section:
Inside the resource group definition, change count: 2 to count: { get_param: nfs_client_count } to retrieve and use the parameter we just defined. When you launch this template, you will see that an additional parameter allows you to define the number of client instances, like in the NFS share appliance.
At this stage, we have fully recreated the NFS share appliance starting from the client_ips:
description: Private IP addresses of the NFS clients value: { get_attr: [nfs_clients, first_address] }
nfs_client_count: type: number
description: Number of NFS client instances default: 1
constraints:
- range: { min: 1 }