NetBeans IDE Field
Guide
Copyright© 2005 Sun Microsystems, Inc. All rights reserved.
Table of Contents
Downloading the IDE...1
Installing the IDE...2
Setting a Proxy...3
First NetBeans IDE Project...3
Trying Out NetBeans IDE With Sample Code...7
Download, Installation, and
First Project
This chapter provides the basic information that you need to get NetBeans IDE running on your system and then runs you through creation of a very simple project to get you started. Additional basic information follows in Chapter 2: NetBeans IDE Fundamentals.
Downloading the IDE
You can download NetBeans IDE from the netbeans.org Web site or NetBeans IDE the java.sun.com site. Visit http://www.netbeans.org/downloads/index.html for a list of and links to all downloads.
NetBeans IDE 4.1 is available in the following distributions:
• The basic IDE distribution. This distribution includes support for developing general Java libraries, rich client applications, Web applications, and
enterprise tier applications. You can get this distribution as an installer (for Microsoft Windows, Solaris, Linux, and Mac OS systems) or as an archive distribution (zip file or tar file).
because you do not need it for the applications you are developing).
• The basic IDE distribution bundled with the Sun Java System Application Server Platform Edition.
This is the most convenient download if you want to immediately start developing and deploying applications to an application server (and you do not yet have the Sun Java System Application server).
• The basic IDE distribution bundled with J2SE JDK 5.0.
This is a convenient download if you do not already have the JDK installed on your system. Both the JDK and the IDE are installed at the same time. However, this bundle might not contain the very latest update version of the JDK or IDE.
NetBeans IDE Tip
Having just the Java Runtime Environment (JRE) installed on your system is not sufficient for running NetBeans IDE. You need to have the JDK, which includes a copy of the JRE. The IDE relies on development tools provided by the JDK, such as the javac compiler, and takes advantage of other parts of that download, such as JDK sources that it includes. You can to to http://java.sun.com/j2se/index.jsp to find and download the latest version of the JDK.
In addition, there are the following optional add-on installers for NetBeans IDE:
• NetBeans Mobility Pack. This installer adds support for developing applications based on J2ME technology for mobile devices.
• NetBeans Profiler. This pack adds the ability to profile your application's performance using dynamic bytecode instrumentation.
As the name add-on implies, these installers only work if you have a compatible version of NetBeans IDE already installed on your system.
Installing the IDE
Installing the IDE is simple and is basically composed of these steps:
1. Make sure that you have a suitable JDK version installed on your system. For NetBeans IDE 4.1, the JDK version must be 1.4.2 or higher. If you do not have a suitable JDK version on your system, install that first or download a JDK/NetBeans IDE bundle.
2. If you are running on the Solaris or Linux operating systems, changing the permissions on the installer file to make it executable (if necessary).
3. Double-clicking the installer (or, on Solaris or Linux, launching the installer from the command line) and then stepping through the installer wizard. If you download one of the bundle distributions, the bundled products are unified by a single installer.
That's pretty much all you have to do. The installer guides you through selecting a JDK on your system to run the IDE on and (optionally) creates desktop icons and Start menu items to launch the IDE from.
See Chapter 7, Configuring your Environment for J2EE Development for information for information on setting up the Sun Java Application System server.
Setting a Proxy
Periodically, it is useful for the IDE to have a Web connection. The IDE periodically checks the Web to see if new or updated modules are available. Also, some IDE functions such as Validate XML might rely on resources on the Web. In addition, some Help menu items are links to documentation on the Web.
If you work behind a firewall, you might need to configure the IDE to use a proxy for HTTP connections to the Web. The IDE attempts to use your system's proxy. If that does not work, you can set the proxy manually.
To manually set a proxy in the IDE: 1. Choose Tools | Setup Wizard.
2. In the Web Proxy section of the wizard page, select the Use HTTP Proxy radio button and fill in values for the proxy host and port.
First NetBeans IDE Project
Once you have started the IDE, you are presented with a “welcome” window and some other empty windows. To help you make the IDE come alive, this section provides a quick run-through of setting up, compiling, and running a “Hello World” project.
To set up the project:
1. Choose File | New Project.
2. In the New Project wizard, expand the General node, select Java Application, and click Next (as shown in Figure 1-1)
Figure 1-1
New Project Wizard, Choose Project page
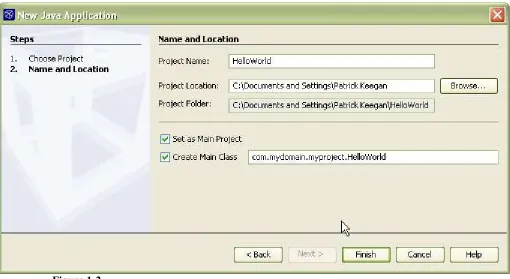
4. In the Name and Location page of the wizard, type HelloWorld as the project name.
5. In the Create Main Class field, change helloworld.Main to
[image:4.612.52.562.212.491.2]com.mydomain.myproject.HelloWorld. (When you enter a fully-qualified class name in this field, the IDE generates directories for each level of the package structure.)
Figure 1-2
New Project Wizard, Choose Project page 6. Click Finish.
Once you have finished the wizard, the IDE will run a scan of the classpath that has been set for the project to enable features such as code completion to work.
The following windows then get populated:
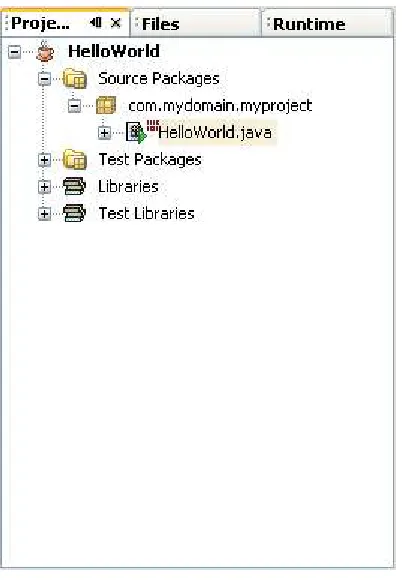
• The Projects window, which provides access to your sources, any tests you might have, and your classpath (represented through the Libraries and Test Libraries nodes).
Figure 1-3
Projects window with nodes for the HelloWorld project
• The Navigator window, which provides an easy way for you to view and access members of the currently selected class.
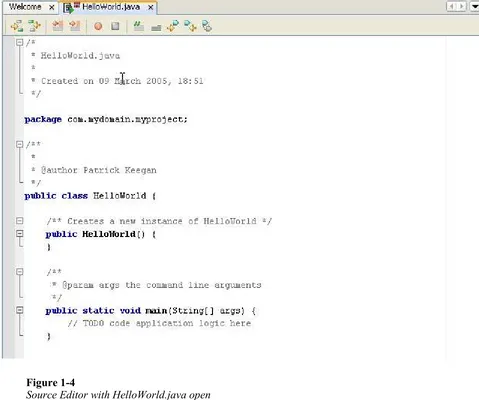
Figure 1-4
Source Editor with HelloWorld.java open
To modify, build, and run the project:
1. In the Source Editor, click within the main method at the end of the line that reads // TODO code application logic here.
2. Press the Enter key and then type the following line: System.out.println("Hello World!"); 3. Press Ctrl-S to save the application.
4. Press F11 (or choose Build | Build Main Project) to compile and package the application. This command triggers an Ant script that the IDE has generated and maintained for the project.
The Output window opens and displays the output from the Ant script as it runs through its targets.
Figure 1-5
Output Window showing successful building of HelloWorld project
5. Press F6 (or choose Run | Run Main Project) to run the project.
The Output window should display a combination of Ant output and the “Hello World!” message from your application.
Figure 1-6
Output Window showing the successful running of the HelloWorld project.
With that, you have created and run an application in the IDE. You can now move on to the next chapter to get a broader overview of the IDE. Or you can skip ahead to Chapter 3 to cut straight to the details of creating and customizing projects.
Trying Out NetBeans IDE With Sample Code
If you want to check out the features of NetBeans IDE on working code without touching your existing projects or you just want to see what a working project looks like in the IDE, you can open one of the sample projects that come with the IDE.
When you create a sample project, the sample code is copied into a directory of your choosing and all necessary project metadata is generated.
To create a sample project:
1. Choose File | New Project.
2. In the New Project wizard, expand the Samples folder and choose a template from one of the categories and click Next.
The General category contains a simple J2SE application.
The Web category contains several examples designed to run on the Tomcat server.
The BluePrints Solutions category contains examples of useful design patterns for J2EE applications. These examples accompany the BluePrints Solution Catalog that is available from the help menu and which provides documentation for these design patterns in a
If you have the Mobility Modules installed, a Mobility category also appears and includes samples from the J2ME Wireless Toolkit. 3. Press Ctrl-S to save the application.
4. On the Name and Location page of the wizard, check the generated values for name and location of the project and change them, if you wish. Then click Finish.
Once you have created a new sample project, you can view its source code and project structure and build and run that application within the IDE.