Beginning PHP4
Wankyu Choi
Allan Kent
Chris Lea
Ganesh Prasad
Beginning PHP4
© 2000 Wrox Press
All rights reserved. No part of this book may be reproduced, stored in a retrieval system or transmitted in any form or by any means, without the prior written permission of the publisher, except in the case of brief
quotations embodied in critical articles or reviews.
The author and publisher have made every effort in the preparation of this book to ensure the accuracy of the information. However, the information contained in this book is sold without warranty, either express or implied. Neither the authors, Wrox Press nor its dealers or distributors will be held liable for any damages
Trademark Acknowledgements
Wrox has endeavored to provide trademark information about all the companies and products mentioned in this book by the appropriate use of capitals. However, Wrox cannot guarantee the accuracy of this information.
Credits
Authors Technical Reviewers
Wankyu Choi Luis Argerich
Allan Kent Darren Beale
Chris Lea Mark Fehrenbacher
Ganesh Prasad Dario Ferreira Gomes
Chris Ullman Chris Harshman
Andrew Hill
Contributing Authors Mark Mamone
Jon Blank Jurgen Prins
Sean Cazzell Mark Roedel
Bart Ssyszka
Additional Material Rick Stones
Simon Cozens Travis Swicegood
John Kauffman Kevin Yank
Dan Squier
Production Manager Technical Architect Laurent Lafon James Hart
Production Project Co-Ordinator Technical Editors Pip Wonson
David Mercer
Christian Peak Figures/Illustrations
Dan Squier Shabnam Hussain
About the Authors
Wankyu Choi
Wankyu holds a Master's degree in English/Korean interpretation and translation from the Graduate School of Translation & Interpretation. He is the president/CEO of NeoQuest Communications, Inc. running a PHP-powered English language education portal (http://www.neoqst.com) in the Republic of Korea. He is independently working on an open source PHP project called NeoBoard (http://www.neoboard.net), a feature-rich web discussion board.
I'd like to thank my parents for their encouragement and guidance, the dedicated staff at Wrox and technical reviewers for all their hard work, the staff at NeoQuest for their support while working on the book, and last but not the least, my wife, Yonsuk Song for her patience and love for this particular computer nerd.
Allan Kent
Allan has been programming seriously for the last 7 years and other than the single blemish when he achieved a Diploma in Cobol programming, is entirely self-taught. He started his career working at the local University and now runs his own company. Allan lives in Cape Town, South Africa with his girlfriend and 5 cats.
Chris Lea
Chris is one of the co-founders of Lucid Designs (http://www.luciddesigns.com), a Venice, CA based web design and development firm. He received a BS in Physics with Highest Honors and Distinction from UNC-CH in 1997, and has been hacking away with lots of (mostly open source) software since then. During his tenure with Lucid, he has worked on a wide variety of web site development projects ranging from the entertainment industry to the financial sector. When he's not staring at his monitor, you can usually find him swing dancing somewhere in the Los Angeles area. For more information, you can always check out his personal site at http://www.chrislea.com/.
Ganesh Prasad
Chris Ullman
Chris Ullman is a Computer Science graduate who came to Wrox five years ago, when 14.4 modems were the hottest Internet technology and Netscape Navigator 2.0 was a groundbreaking innovation. Since then he's applied his knowledge of HTML, server-side web technologies, Java, and Visual Basic to developing, editing, and authoring books. When not trying to reconstruct the guts of his own PC or trying to write extra chapters in a hurry, he can be found either playing keyboards in psychedelic band, The Bee men, tutoring his cats in the way of eating peacefully from their own food bowl and not the one next to theirs, or hoping against hope that this is the year his favorite soccer team, Birmingham City, can manage to end their exile from the Premier League.
Thanks to James and Sarah B for getting me involved on this project and Christian, David, and Dan for deciphering, organizing, and improving my work, and most importantly thanks to my wife Kate, for being there.
Jon Blank
Jon Blank has been a part of the Linux world since before "Linux" was a buzzword, and has been
programming (much to the detriment of his social life) in various languages for the better part of his life. He came to the PHP world by way of Perl, and came to Perl by way of The Web Union, an experimental Web hosting provider for students and non-profit organizations that he runs in his spare time. He currently lives in the New York City area, where he is trying to craft a stable career in a field where tempting offers are always around the corner. He doesn't think he'll succeed.
Table of Contents
Introduction
1
Why PHP4? 2
The Prompt 2
What Do I Need To Use This Book? 3
PHP4 Resources 4
Conventions 4
Downloading the Source Code 5
Support & Errata 5
Online Forums at p2p.wrox.com 6
Checking the Errata Online at www.wrox.com 6
Wrox Developer's Membership 6
Finding Errata on the Web Site 8
Adding Errata and Obtaining e-Mail Support 9
Chapter 2: Writing PHP Programs
39
An Example PHP Program 40
Viewing a Web Page 44
Client-Server 44
Internet Protocols 44
The HTTP Protocol 45
The HTTP Request 46
The HTTP Response 48
Where PHP Comes Into This 49
Server-Side Scripting 50
Identifying a PHP Script 51
Caching 51
Variables 52
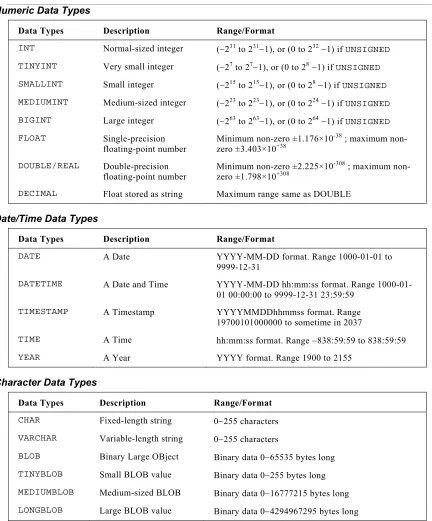
Data Types 55
String Data Type 55
Numeric Data Types 58
Constants 63
The Define Keyword 64
Initialization 64
Conversions 65
Type Casting 67
gettype and settype 67
isset, unset, and empty 68
Environment Variables 68
Summary 69
Chapter 3: Getting Data from the Client
71
Web Forms 72
The FORM Tag 72
Attributes of FORM 72
Boolean operators 112
Multiple Conditions – else and elseif 127
Nesting If Statements 129
Switch Statements 135
Form Validation 140
Summary 144
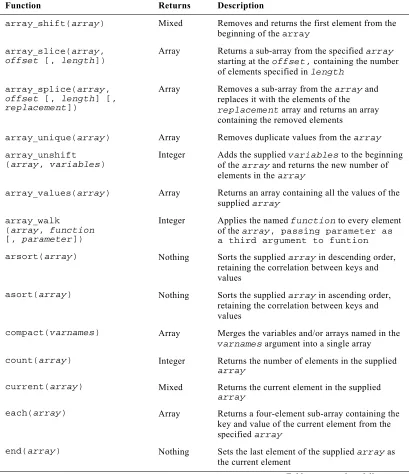
Chapter 5: Loops and Arrays
147
Loops 148
while Loops 148
do while Loops 155
for Loops 159
Arrays 165
Initialization of Arrays 165
Iterating Through an Array 167
Iterating Through Non-Sequential Arrays 172
Iterating Through String-Indexed Arrays 176
Sorting Arrays 177
sort() 177
asort() 178
rsort() and arsort() 179
ksort() 179
Miscellaneous Array Functions 180
array_push() and array_pop() 180
Implode and Explode 180
HTTP_GET_VARS and HTTP_POST_VARS 182
Multi-dimensional Arrays 182
Practical Demonstration of Arrays 183
New Loop and Array Features in PHP4 188
Array Multisorting 188
foreach Loops 189
Include Files 218
Common Uses of Include Files 221
Summary 224
Chapter 7: Handling and Avoiding Errors
227
Error Handling in PHP 228
Insecure Information 228
Unsightly Web Pages 228
Invisible Error Messages 228
Error Types 229
Syntax Errors 229
Logical Errors 232
Runtime Errors 232
Unexpected Output Errors 235
Errors In the Program Assumptions 235
Good Coding Practice 236
Indent Your Code 237
Comment Your Code 237
Use Functions 238
Use Include Files 239
Use Sensible Variable Names 239
Trying to Break your Code 240
More Form Validation 241
Thinking Like Your Users 241
Protection From Mischievous or Malicious Users 242
Receiving Input from Users 243
Regular Expressions 243
Patterns 243
Special Characters 244
Debugging PHP Script 255
PHP4 Sessions 288
Chapter 9: Objects
295
Object-Oriented Terminology 296
Using Pre-Defined Classes 297
Why Use Objects? 300
Giving the Calculator a Memory 304
Exploring Our Simple Class Further 307
Passing By Value And By Reference 307
Creating Classes Of Our Own 311
Creating a Class From Scratch 311
Extending an Existing Class 314
A Useful Object 317
Summary 321
Chapter 10: File and Directory Handling
323
Working with Files 324
Opening and Closing Files 325
Reading and Writing to Files 327
Reading and Writing Characters in Files 331
Reading Entire Files 333
Random Access to File Data 335
Getting Information on Files 339
Time-related Properties 340
Ownership and Permissions 342
Splitting the Name and Path from a File 347
Copying, Renaming and Deleting Files 347
Building a Text Editor 350
Working with Directories 358
Other Directory Functions 359
Traversing a Directory Hierarchy 361
Creating a Directory Navigator 363
Setting Up The Root Account 387
Introduction to SQL 388
Data Types 388
Indexes and Keys 390
Queries 391
A Quick Play with MySQL 393
Running the MySQL Client 393
Selecting a Database to Use 394
Taking a Peek at Data in a Database 394
Manipulating Data in a Database 396
Using GRANT and REVOKE commands 398
GRANT 398
REVOKE 399
Summing Up 399
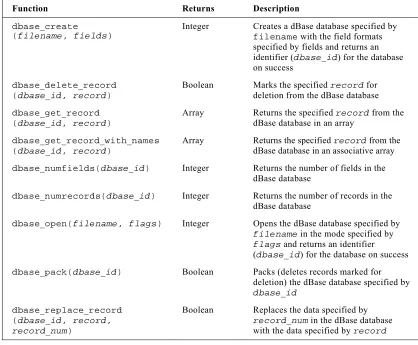
PHP MySQL Connectivity 400
Basic Connection Functions 400
Handling Server Errors 403
Creating Databases and Tables from MySQL 407
Creating the Sample Database and Tables with PHP 411
Altering Tables 415
Inserting Data Into a Table 417
Escaping Quotes 418
Populating our Database Tables 419
Resources 421
Summary 421
Chapter 12: Retrieving Data from MySQL Using PHP
423
Retrieving Data Using PHP 423
SQL Statements for Retrieving Data 426
Server Functions 426
Retrieving Fields 427
Limiting the Number of Results Returned 428
Getting Information on Database Tables 458
Creating a User Registration Script 468
Creating an Access Logger Script 474
Creating a User Manager 482
Resources 491
Summary 491
Chapter 14: XML
493
What is XML? 493
XML Document Structure 496
Well-Formed XML 496
DTDs 499
Event Driven Parsing 501
Parsing the Example File 502
Parsing an External File 508
Summary 512
Chapter 15: e-Mail Handling
515
Sending e-mails in PHP 515
Anatomy of an e-Mail 518
Handling Attachments 525
Anatomy of e-Mail Revisited 525
Content-type 526
Content-transfer-encoding 527
Practical Application 566
Interactive Maps 566
Getting Started 567
Creating the database 568
Adding data 568
Testing our data 569
Building a Framework 573
Drawing the Layout 574
Further Interactivity 579
Showing the Shop Detail 581
Advanced Graphics Manipulation 585
A Stylized Map 585
Palette Limitations 589
Summary 591
Chapter 17: Case Study – A URL Directory Manager
593
Introducing the URL Directory Manager 593
Designing the Directory Manager 594
User Requirements 594
Users vs Administrators 595
User Authentication 596
User Interface 596
Data Storage 596
Connecting to the Database 597
Database Schema 597
Database Tables 600
Other Design Considerations 601
Code Layout 601
Security Issues 601
Directory Functions 602
Code Implementation 604
Common Code – php_directory.inc 604
delete_category() 654
update_db() 655
view_new() 657
edit_new_form() 660
edit_new() 662
delete_url() 664
top_menu() 665
User Feedback 667
Summary 667
Appendix A: ODBC
669
What is ODBC? 669
What ODBC Isn't 670
PHP and ODBC 674
Connecting to a Data Source 674
Executing SQL commands 674
Handling Query Results 675
Appendix B: PHP Functions
683
Apache-Specific Functions 683
Array Functions 683
Aspell Functions 687
Calendar Functions 687
Class/Object Functions 688
Error Handling and Logging Functions 712
Filesystem Functions 713
Forms Data Format Functions 716
Function Handling Functions 717
HTTP Functions 718
Image Functions 718
Mail Functions 722
Mathematical Functions 722
Miscellaneous Functions 724
Network Functions 725
Output Control Functions 726
PHP Options and Information 727
POSIX Functions 728
Program Execution Functions 730
Pspell Functions 730
Perl-Compatible Regular Expression Functions 731
Regular Expression Functions (POSIX Extended) 732
Session Handling Functions 733
String Functions 734
URL Functions 738
Variable Functions 739
WDDX Functions 740
XML Parser Functions 740
Introduction
PHP4 is the latest incarnation of PHP – the "PHP Hypertext Preprocessor". It's a programming language for building dynamic, interactive web sites, originally devised by Rasmus Lerdorf way back in 1994. Since then it's been through a great many changes, and has been adopted by web programmers all around the world. So what exactly is it?
In technical terms, PHP4 is a cross-platform, HTML-embedded, server-side web scripting language. Let's take a moment to define these terms:
❑ Cross-platform
You can run most PHP4 code, without alteration, on computers running many different operating systems. A PHP4 script that runs on Linux will generally run on Windows as well.
❑ HTML-embedded
PHP4 code is written in files containing a mixture of PHP instructions and HTML code.
Pure HTML documents, for all their versatility, are little more than static arrangements of text and pictures, albeit nicely presented ones; but the majority of sites you can find on the Web aren't static, but dynamic, even
interactive. They show you a list of sites containing words that you've specified, present you with the latest news, even greet you by name when you log on. They allow you to interact, and present different web pages according to your choices.
You can't build a web site like that using raw HTML, and that's where PHP4 comes in. So what sort of things can we do with it? Well, we can program sites that will:
❑ Present data from a wide variety of different sources, such as databases, or files
❑ Incorporate interactive elements, such as search facilities, message boards, and straw-polls
❑ Allow the user to perform actions, such as sending e-mail, or buying something
In other words, PHP4 can be used to write the kind of web sites which anyone familiar with the Web uses every day. From e-commerce sites, to search engines, to information portals, most major web sites on the Internet incorporate some or all of these sorts of programming. In the course of this book, we'll be using it to build, among other things:
❑ A browser-based text editor, which lets us create and edit files on the web server from our web browser
❑ A web site for a shopping mall, which allows us to search for stores which sell a certain item, and displays the stores on a map
❑ An online word game
❑ A directory-based web search engine, which allows people to search all the web sites in the directory, or find web sites by navigating through a hierarchical topic structure
❑ A mailing-list service, which allows users to subscribe to different mailing lists, and allows the list administrators to then send out e-mails to the subscribers
So, PHP4 can be used for a diverse range of applications, from utilities like the text editor, to powerful web sites such as the shopping mall and directory examples. In this book, we're going to try and equip you with the necessary knowledge to build any kind of web site you want using PHP4. You'll learn some useful coding techniques along the way, and we'll hopefully give you some ideas that you can incorporate into your own applications.
graphical environment like Windows or X, you may not be familiar with using the command line interface, or "shell". Before these graphical environments came into common use, users had to start a new program not by finding its icon and clicking on it, but by typing its name. The "shell" is the program that takes the name from you – the "shell prompt" (or just "prompt") refers specifically to the text that prompts you to enter a new program name, and more generally to working with the shell instead of using a graphical interface. Some people still find working with the shell much easier, and many sophisticated shells have been developed to simplify common tasks.
To get to a prompt in Windows, look for Command Prompt or DOS Prompt in the Start Menu. UNIX users should look for a program called something like console, terminal, konsole, xterm, eterm, or kterm. You'll then usually be faced with a black screen with a small amount of text on it that says various things like:
$ % C:\> # bash$
For the purposes of this book, however, we'll use a prompt that looks like this:
>
We'll show text for you to enter in bold, and the text the computer generates in a lighter typeface, like this:
> mysqlshow +---+ | Databases | +---+ | mysql | | test | +---+
PHP4 Resources
Your first stop for information should be the official PHP site, which you can find at www.php.net. This not only features news, downloads, and complete documentation (including user feedback), but it also features a complete searchable index of all the above.
PHP4 is based on the Zend scripting engine, owned by Zend Technologies, whose site can be found at
www.zend.com. Here you'll find information specific to PHP4, as well as articles, case studies, and news about the different uses PHP4 is currently being put to in business environments.
Another very useful resource is the www.phpbuilder.com site, a community-driven forum for PHP programmers. It's a good place for useful tips and tutorials, and generally finding out what's happening in the PHP programming community.
Conventions
We have used various styles of text and layout in the book to help differentiate between different kinds of information. Here are examples of the styles we use and an explanation of what they mean:
Try It Out – A 'Try It Out' Example
'Try It Out' is our way of presenting a practical example.
How It Works
Then the 'How It Works' section explains what's going on.
Advice, hints and background information come in an indented, italicized font like this.
Important bits of information that you shouldn't ignore come in boxes like this!
Sometimes you'll see code in a mixture of styles, like this:
$fp = fopen("./data.txt", "r");
if(!$fp) die ("Cannot open the file");
This is meant to draw your attention to code that's new, or relevant to the surrounding discussion (in the gray box), whilst showing it in the context of the code you've seen before (on the white background).
Where we show text to be entered at a command prompt, this will be shown as follows:
> mysqlshow
Any output will be shown in the same font, only lighter:
+---+ | Databases | +---+ | mysql | | test | +---+
Downloading the Source Code
As you work through the examples in this book, you might decide that you prefer to type all the code in by hand. Many readers prefer this because it's a good way to get familiar with the coding techniques that are being used.
Whether you want to type the code in or not, we have made all the source code for this book available at our web site, at the following address:
http://www.wrox.com
In this section we'll look at how to:
❑ Enroll in the peer to peer forums at p2p.wrox.com
❑ Post and check for errata on our main site, www.wrox.com
❑ e-mail technical support a query or feedback on our books in general
Between these three support procedures, you should get an answer to your problem in no time at all.
Online Forums at p2p.wrox.com
Join the PHP mailing list for author and peer support. Our system provides Programmer to Programmer™ support on mailing lists, forums and newsgroups all in addition to our one-to-one e-mail system, which we'll look at in a minute. Be confident that your query is not just being examined by a support professional, but by the many Wrox authors and other industry experts present on our mailing lists.
Checking the Errata Online at www.wrox.com
The following section will take you step by step through the process of posting errata to our web site to get that help. The sections that follow, therefore, are:
❑ Wrox Developer's Membership
❑ Finding a list of existing errata on the web site
❑ Adding your own errata to the existing list
❑ What happens to your errata once you've posted it (why doesn't it appear immediately)?
There is also a section covering how to e-mail a question for technical support. This comprises:
❑ What your e-mail should include
❑ What happens to your e-mail once it has been received by us
Type in your password once again and click Log On. The following page allows you to change your details if you need to, but now you're logged on, you have access to all the source code downloads and errata for the entire Wrox range of books.
Finding Errata on the Web Site
Before you send in a query, you might be able to save time by finding the answer to your problem on our web site: http:\\www.wrox.com.
Each book we publish has its own page and its own errata sheet. You can get to any book's page by clicking on Support from the top navigation bar.
Adding Errata and Obtaining e-Mail Support
If you wish to point out errata to put up on the website, or directly query a problem in the book page with an expert who knows the book in detail then e-mail [email protected] with the title of the book and the last four numbers of the ISBN in the subject field. A typical e-mail should include the following things:
The Authors
Finally, in the unlikely event that the editor can't answer your problem, s/he will forward the request to the author. We try to protect the authors' time, since they are busy professionals with wide ranging commitments. However, we are quite happy to forward specific requests to them. All Wrox authors help with the support on their books. They'll mail the customer and the editor with their response, and again all readers should benefit.
What We Can't Answer
Obviously with an ever-growing range of books and an ever-changing technology base, there is an increasing volume of data requiring support. While we endeavor to answer all questions about the book, we can't answer bugs in your own programs that you've adapted from our code. So, while you might have loved the chapters on file handling, don't expect too much sympathy if you cripple your company with a routine which deletes the contents of your hard drive. But do tell us if you're especially pleased with a routine you developed with our help.
How to Tell Us Exactly What You Think
We understand that errors can destroy the enjoyment of a book and can cause many wasted and frustrated hours, so we seek to minimize the distress that they can cause.
Installation
To run the code in this book you will need at least the following software:
Server software
❑ A PHP-compatible web server ❑ PHP4
❑ For most of the examples from Chapter 11 onwards, a relational database system
Client software
❑ A web browser❑ A text editor, such as Notepad, Emacs, vi, BBEdit, and so on.
As well as a web server and PHP4, we'll also need a database system for some of our examples. One of the most powerful uses for web scripting tools, such as PHP4, is to present information stored in a database to people accessing them across the Web. All the examples presented in Chapter 11 onwards, which use databases, are written to work with the popular free database system, MySQL. There's information in Appendix A on how to convert the information presented for MySQL to apply to ODBC databases, which might be of interest to Windows users who would prefer to be able to play with their databases using a visual tool such as Microsoft Access. Versions of most of the database code presented in the book, converted for use with ODBC, will be available as part of the code download for the book at http://www.wrox.com/.
However, on either Windows or Linux, installing MySQL is relatively painless, and you'll find it much easier to run the examples if you simply install MySQL. Full instructions are included at the start of Chapter 11.
In this chapter, then, we'll explain how to set up the most basic development environment which you'll need to run all of the examples in this book.
What If It All Goes Wrong?
The README and INSTALL files which are included in most PHP downloads, as well as the PHP manual at
http://www.php.net/manual/, provide detailed information which may be more up to date than the information here, which covers the PHP 4.0.2 release.
Where Do I Start?
There are three main installation paths to choose from, and it should be fairly easy to work out which one you need to follow. It simply depends which operating system you're using:
❑ Installing PHP4 with Microsoft Personal Web Server on Windows 95 or 98
❑ Installing PHP4 with Microsoft Internet Information Server on Windows NT4 or 2000 ❑ Installing PHP4 with the Apache Web Server on Linux (or another UNIX)
Installing PHP4 on Windows 95 and 98
First of all, let's install Microsoft Personal Web Server (PWS). It should be noted PWS is really only suitable for running your development machine on – it's not up to the job of running a real web site. However, it provides a convenient and inexpensive development environment for pre-Windows 2000 machines, without the need for powerful hardware. One of the main drawbacks of PWS is that it can be awkward to install and get up and running correctly. Let's try and get over this by following these steps:
Obtaining PWS
The version of PWS you need to install is version 4.0, which was first released in NT 4 Option Pack of Dec 1997 as part of IIS 4.0. It is available from several sources, as follows.
Visual InterDev
Microsoft's Visual InterDev version 6.0 includes PWS. It can be installed at the time VID is set up or can be installed afterwards as an option from a custom set-up.
Windows 98
The Windows 98 CD contains an installer for PWS. Most people who have installed PWS from the Windows 98 CD onto a Windows 98 installation seem to have fewer problems then those who use other sources.
FrontPage
FrontPage, FrontPage 97 and FrontPage 98 included PWS, although in different flavors.
The early releases of FrontPage had a program named HTTPD which was sold as Front Page Server. The functionality was the same as PWS, but it was an entirely different set of code. As far as we are aware, it's not possible to run PHP under this server.
FrontPage 97 contained PWS 1.0, and FrontPage 98 contains PWS 4.0, the current incarnation of PWS.
Download
98, you do so before attempting to install PWS.
Installing From NT Option Pack Onto Windows 95
This is the best option for Windows 95. However, keep in mind that a much higher percentage of users have had problems with PWS on Windows 95 then PWS on Windows 98. If you are considering upgrading to Windows 98 we suggest you do it prior to installing PWS.
1.
Close all applications.2.
Download Windows NT Option Pack for Windows 95 fromhttp://www.microsoft.com/ntserver/nts/downloads/recommended/NT4OptPk/. You'll find the link at the bottom of the web page.
3.
Select option 1 of the download options, and then on the next page select the operating system you are running on. On the next page click on download.exe for the site nearest to you.6.
Choose to download only, as, if the install option quits halfway through, it can mess up your machine's configuration.7.
Click Next and choose x86: Windows 95 for the operating system and click Next.8.
Choose the Typical Installation and click Next.9.
Choose a location on your hard drive of where to download the pack to, and click Next.10.
Choose a location from where to download the pack.11.
Accept the verification certificate that appears and then the option pack will download.12.
Finally go to the location where you saved it, and run the newly downloaded setup.exe.Installing From The Windows 98 CD Onto Windows 98
This is the safest option for installing PWS, but is only possible if using Windows 98. The steps are as follows:
For most users, the typical install will work fine. If you choose to do a custom install, then ensure that at least the following components are selected:
C:\Inetpub\wwwroot, you should remember to substitute it with the path we used here.
Installing PHP4 Alongside PWS
Now you've installed PWS, and your computer has rebooted, let's get PHP4 installed. First of all you need to download it. While you would normally obtain the latest version of PHP4 from http://www.php.net/,
unfortunately the version of PHP distributed via that site is only a basic installation, and doesn't support all the features we need. Instead, we recommend you go to http://php4win.de/, and download their latest, non-development, stable release. You'll end up with a ZIP file, which you should save somewhere on your hard drive. Create a folder for your PHP software to live in – somewhere like C:\php is good – and unzip the file you downloaded into this directory.
Now, this directory contains several sub-directories, and a few text files. Also, a program file called
php.exe, which we won't actually be using, and a library file called php4ts.dll. To start off, you need to copy this .dll to your C:\Windows\System directory. Now open up the dlls subdirectory, and copy all
contains a large number of files whose names begin with php_ and end with .dll.
The next section tells PHP which extensions to load. You should put semi-colons at the beginning of all the lines which load extensions we don't need – the semi-colons mean that PHP will ignore the directive on that line. You can put semi-colons before all of them, except before extension=php_gd.dll, so that you have text like this:
;extension=php_filepro.dll extension=php_gd.dll ;extension=php_dbm.dll ;extension=php_mssql.dll
This means you will have access to the functionality of the GD library, which allows us to generate images using PHP programs. We'll look at how in Chapter 16. You should now save your modified php.ini file.
Now, also in Notepad, you need to create a new file, and enter the following text:
REGEDIT4
[HKEY_LOCAL_MACHINE\SYSTEM\CurrentControlSet\Services\w3svc\parameters\Script Map] ".php"="C:\\php\\sapi\\php4isapi.dll"
Note that this script is included in the code download for this book from http://www.wrox.com/, and is called PWS-php4.reg.
If you didn't unzip the download into C:\php, you need to edit this so it knows where your
php4isapi.dll file is. If you unzipped the download into E:\Stuff\php4, then the location will be E:\Stuff\php4\sapi\php4isapi.dll. Because of the way the file will be interpreted, you should double up all the backslashes, and insert the path in the file where it says
C:\\php\\sapi\\php4isapi.dll. For example:
have a screen like this:
Now, you have configured PWS to run PHP4 programs. You need to restart your computer to get PWS to load the PHP4 component.
The root directory of your web server is, unless you configured it differently, C:\Inetpub\wwwroot. Remember this – it's important. You can now skip on to the Testing Your Installation section later in the chapter.
Installing PHP4 on Windows NT and 2000
On either Windows NT or 2000, we'll be using Internet Information Server, which is Microsoft's industrial strength web server. An NT or 2000 machine running IIS is actually a suitable environment for running a production web server, although you should make sure you know what you're doing if you're planning on setting up any computer as a server on the public Internet – security should be your biggest concern. IIS running on a Windows NT or 2000-powered desktop computer is also a perfectly good development environment.
Some versions of Windows 2000 (specifically the three server versions – Server, Advanced Server and Datacenter) come with IIS 5.0 installed by default. Unless you elected not to install the web server when you installed one of these operating systems, you are already equipped with IIS.
3.
Choose to download only, as, if the install option quits halfway through, it can mess up your machine's configuration. After some initialization the Option Pack installation wizard will run.4.
The first screen of the wizard is a splash screen that describes the features that can be installed. Click Next and you'll be presented with the licensing agreement. If you agree with the licensing of the Windows NT 4.0 Option Pack, then click Accept and then Next. Now you'll be offered the three types of installation: Minimum, Typical and Custom:6.
You do not want to install the FrontPage 98 Server Extensions, so uncheck the FrontPage 98 Server Extensions option.At this point you should have as a minimum the following options checked:
❑ Internet Information Server (IIS)
❑ Microsoft Management Console ❑ NT Option Pack Common Files
7.
Click Next to continue the installation, and you'll be presented with the folder locations for web and FTP publishing, and the folder location for the application files. The defaults are fine:❑ The WWW service root is C:\Inetpub\wwwroot
❑ The FTP service root is C:\Inetpub\ftproot
8.
Click Next and the installation will proceed. It may take several minutes depending on the speed of your machine, but you'll be presented with a progress bar so that you can monitor the installation and estimate when it might complete.Installing Internet Information Server 5.0 on Windows 2000
IIS 5.0 is located on the Windows 2000 installation CD, so you'll need access to this CD to install the server. Have it ready, but don't put it into the CD-ROM drive yet.
1.
Go to the control panel (Start | Settings | Control Panel) and select the Add/Remove Programs icon. The following dialog will appear, displaying a list of your currently installed programs:2.
Locate the Internet Information Services (IIS) entry in the dialog, and note the check box that appears to its left. Unless you installed Windows 2000 Professional via a custom install and specifically requested IIS, it's most likely that the check box will be unchecked (as shown above). If you installed Windows 2000 Server, the chances are it is already checked.a.
If the checkbox is cleared, then place a check in the check box and click on Next to install Internet Information Services 5.0. You should be prompted to place your Windows 2000 installation disk into your CD-ROM drive. It will take a few minutes to complete. Then go to Step 4.For the purposes of this installation, make sure all the check boxes in this dialog are checked; then click on OK to return to the previous dialog.
Installing PHP4 Alongside IIS
If you've followed the instructions so far, you'll now find that IIS's Web Services start up automatically as soon as your installation is complete, and thereafter whenever you boot up Windows – so you don't need to run any further startup programs, or click on any short-cuts as you would to start up Word or Excel.
Now you need to download PHP4. While you would normally obtain the latest version of PHP4 from
extension_dir = C:\php\extensions ; directory in which the loadable extensions (modules) reside
Now, make sure that this path is the correct path to the extensions directory of the unzipped PHP4 installation. If it isn't, change it to point to the right place. (The extensions directory is the one which contains a large number of files whose names begin with php_ and end with .dll.
The next section tells PHP which extensions to load. You should put semi-colons at the beginning of all the lines which load extensions we don't need – the semi-colons mean that PHP will ignore the directive on that line. You can put semi-colons before all of them, except before extension=php_gd.dll, so that you have text like this:
;extension=php_filepro.dll extension=php_gd.dll ;extension=php_dbm.dll ;extension=php_mssql.dll
This means you will have access to the functionality of the GD library, which allows us to generate images using PHP programs. We'll look at how in Chapter 16. You should now save your modified php.ini file.
Now you need to start up your Internet Services Manager. On Windows NT, you should find it under
create a new filter called PHP. The folder of PHP files we downloaded contains a PHP ISAPI filter in the sapi directory, called php4isapi.dll. Put in the correct path for your php4isapi.dll file (if you've been following our instructions to the letter, it will be C:\php\sapi\php4isapi.dll).
Now we need to completely restart IIS. The best way to completely shut down IIS and bring it up again is to bring up a command prompt, and enter the following commands:
> net stop iisadmin
The following services are dependent on the IIS Admin Service service. Stopping the IIS Admin Service service will also stop these services.
World Wide Web Publishing Service Simple Mail Transport Protocol (SMTP) FTP Publishing Service
Do you want to continue this operation? (Y/N) [N]: y The World Wide Web Publishing Service service is stopping.
The World Wide Web Publishing Service service was stopped successfully.
The Simple Mail Transport Protocol (SMTP) service is stopping.
The Simple Mail Transport Protocol (SMTP) service was stopped successfully.
The FTP Publishing Service service is stopping.
The FTP Publishing Service service was stopped successfully.
The IIS Admin Service service is stopping...
The IIS Admin Service service was stopped successfully.
> net start w3svc
The World Wide Web Publishing Service service is starting....
The World Wide Web Publishing Service service was started successfully.
>
Provided the message at the end reports that the World Wide Web Publishing service was started successfully, you now have PHP4 installed. Remember your web site's root directory: it should be
C:\Inetpub\wwwroot, if you've installed IIS exactly the way we showed you. You can proceed to the
Testing Your Installation section later in the chapter.
Choosing Your Installation Method
As with other open source software, PHP and Apache give us the option of downloading the source code (which, in both cases, is written in the C programming language), and compiling the programs ourselves. If that sounds daunting (it's not actually as scary as it sounds), you can obtain pre-compiled versions in one of two forms. Binary downloads are pre-compiled versions of the software, which typically come with installation scripts to put all the required pieces into the necessary parts of our file system. Binary packages are available for systems which have a software package management system, like the Red Hat Package Manager (RPM) for Linux, and are the easiest to install. Here's a quick overview of the three methods:
Installation Method Advantages Disadvantages Source Most flexible solution for custom
installations. Additional tests and examples are included in the source distribution.
Needs to be compiled. Slightly more difficult than the other options. Harder to remove once it's been done.
Binary (compiled) No need to mess around with trying to compile the server. Takes less time to install.
Less flexible than doing an installation from source.
Binary RPMs Fastest and easiest installation method. Very easy to uninstall or upgrade later.
Must be using an RPM based Linux distribution such as Red Hat. Least flexible installation method.
In this chapter, we're going to explain how to obtain and install the components we need using RPMs.
Abbreviation Compatible with
i386 PCs based on Intel and 100% compatible processors – Intel 80386, 486, Pentium, Pentium II, Pentium III, and Celeron, AMD 5x86, K-series and Athlon, Cyrix 6x86
i586 PCs based on Intel Pentium and 100% compatible processors – Intel Pentium II, III, Celeron, AMD K-Series and Athlon, Cyrix 6x86
PPC Computers built around Motorola PowerPC (and compatible) chips, such as Apple's Power Macs, G3s, G4s, and iMacs. You can still only use the RPMs on Macintosh hardware with Linux installed, though.
alpha Servers and workstations running the Compaq Digital 64 bit Alpha processor
sparc Servers and workstations running the processors which use the 64 bit SPARC architecture, such as Sun Microsystems' UltraSPARC.
m68k Computers built around Motorola's older 68000 series processors, such as Amigas, and older Apple Macintoshes, for which various Linux ports exist.
Refer to your distribution's manual if you want to use the graphical installation tools that come with your specific distribution. These differ widely, so we can't cover all of them here. However, any RPM based system can be controlled using the rpm command-line tool, so we will explain how to install the required components using this interface.
Which Packages Do We Need?
The RPM packages you will need are:
❑ zlib
❑ libpng
❑ libjpeg
❑ gd
❑ gd-devel
❑ apache
As you can see, if the package is installed, it gives us a random-looking string. If it isn't installed, we get a helpful error message. The random looking string actually tells us which version of the software we installed using the package (1.1.3 in this case), which release of the package this is (we have the sixth public release installed), and the architecture for which the RPM was compiled (Intel 386 compatible, which is just as well, since we've got this package installed on a Pentium III).
Note down which of the packages you have already got, and which versions they are (the version number is more important than the release number).
Only a few of our packages have to be of a minimum version. We need gd and gd-devel to be at least version 1.8 to provide support for the graphics formats we need. apache should be version 1.3.12 if you can get it, although 1.3.6 or newer should be fine. mod_php4, obviously, needs to be version four point
something. The current version at time of going to press was 4.0.2.
You should now try to locate suitably up-to-date versions of all the packages which you don't have already, or have old versions for. As we suggested, try your install CDs, your distributor's web site, and
www.rpmfind.net.
Having obtained sufficiently current versions of all the packages, you can install them. The command for upgrading an existing installation, or installing a package which has never been installed before, is exactly the same. Navigate your command prompt to the location of the files on CD, or the directory into which you downloaded the RPMs. As root, type:
> rpm -Uh libpng-1.0.5-3-i386.rpm ############################
Substituting in the name of the package file you downloaded for each package you need to upgrade or install. The line of # signs extends across the screen as each installation progresses.
If you install the packages in the order we listed them above, you should find that all the prerequisite files are installed in the necessary order.
> rpm -ql apache | grep /htdocs$ /usr/local/apache/htdocs
Obviously, the path returned may differ. For example, on a freshly installed SuSE 7 Linux system, the result is:
> rpm -ql apache | grep /htdocs$ /usr/local/httpd/htdocs
The htdocs directory is the web server's root directory. Note down this location, as you'll be needing it later. Now you'll need to locate Apache's configuration file. Use the following variation on the previous command:
> rpm -ql apache | grep /httpd.conf$ /usr/local/apache/conf/httpd.conf
Again, different systems will use different paths. Our SuSE 7 system does this:
> rpm -ql apache | grep /httpd.conf$ /etc/httpd/httpd.conf
Gathering Information
Now, you'll need to know the host name of your machine. Normally it appears in your command prompt, which might be something like:
myhost:~# root@myhost:~ >
or similar. In both of these, the host name is myhost. Alternatively, type the following command to find out what your computer thinks it's called:
> echo $HOSTNAME myhost
LoadModule php4_module /usr/local/apache/lib/libphp4.so
If there isn't such a line, we'll need to add one. First, let's find out where the PHP RPM put our libphp4.so file:
> rpm -ql php | grep /libphp4.so$ /usr/local/apache/lib/libphp4.so
This information is going to be necessary to tell Apache how to run PHP scripts. Back in the Apache configuration file, httpd.conf, we need to add the instruction to load PHP4. Let's put it before any of the other LoadModule lines, using the path we obtained from the rpm command:
LoadModule php4_module /usr/local/apache/lib/libphp4.so
Now that Apache knows how to load PHP4, we need to activate it. There's a section further down the file consisting of a lot of lines beginning AddModule. We need to add the following to the top of it:
Addmodule mod_php4.c
Finally, now Apache knows what to do with a PHP program, we need to tell it how to recognize one. Further down the document, you'll find some directives that begin AddType. To the end of these, add the following line:
AddType application/x-httpd-php .php
This tells Apache that all files that end in .php are PHP programs. Finally, search back up the file for a line like:
> rpm -ql apache | grep /apachectl$ /usr/local/apache/bin/apachectl
If that doesn't work, you might find a program called rcapache instead.
> rpm -ql apache | grep / rcapache $
/usr/sbin/rcapache
Use the full path of either of these programs in place of apachectl to restart Apache, with a command like one of these:
> /usr/local/apache/bin/apachectl restart > /usr/sbin/rcapache restart
If all's well, Apache will start up, and you can move on to testing your installation.
Testing Your Installation
Okay, now we've got PHP4 and our web server up and running, we can test our installation. Recall that we told you to remember your web server's root directory? This is where you'll need it. The root directory of a web server is the directory the web server looks in for files. For example, when you go to a web site and type in a URL like http://www.wrox.com/mypage.html the web server is going to look in its root directory for a file called mypage.html. If it finds such a file, it will then send the contents of that file back to you. Similarly, if you asked for http://www.wrox.com/somewhere/mypage.html, the web server looks in its root directory for a directory called somewhere, and then looks in this directory for a file called mypage.html. So, you might get the file /usr/local/apache/htdocs/somewhere/mypage.html if your request was served by an Apache server with a default configuration, or
C:\Inetpub\wwwroot\somewhere\mypage.html if it was served by IIS or PWS.
We need to be aware of this because the web server applies the same logic to PHP programs. We save our PHP programs as files which end .php, in the directory structure under the web server's root directory – the same place it looks for web pages. So, for example, if we saved a file called myprogram.php in the
www.wrox.com web server's root directory, that program would be run when we called up
http://www.wrox.com/myprogram.php in our browser.
> echo %COMPUTERNAME%
On UNIX:
> echo $HOSTNAME
Try using this name in a web browser on a networked machine, and you should see the same web page you got when you connected to localhost. For example, if your machine name was mycomputer, you could type
http://mycomputer/ into a web browser, and hopefully find yourself viewing web pages served from your newly installed web server.
Note that IIS provides a different page by default for users connecting from the same computer as the web server than it does for people who connect from networked computers.
Now, we're ready to write our first PHP program, and test it out.
Try it Out – Is Our PHP4-Powered Web Server Working?
1.
Open up a text editor – any program which creates plain text files will do. Notepad is ideal on Windows; you could use vi or emacs on a UNIX machine, if you're used to either of their interfaces. Alternatively, most Linux distributions come with a selection of good quality graphical text editors. Try Gnotepad+, which comes with GNOME (type gnp at a command prompt), or KEdit, which comes with KDE (kedit at the command prompt).2.
Enter the following text, exactly as it appears here, into a blank text file.<?php phpinfo(); ?>
5.
We're ready to connect to our web server. Bring up your web browser on the web server machine, and type in http://localhost/phpinfo.php to its address bar. As we've said, that should make the browser connect to the web server, and the web server look in the default directory for a program called phpinfo.php. If all goes to plan, you should soon see the following screen in your browser.If so, congratulations – PHP4 is up and running on your web server. You're now ready to move on to the rest of the book. If not, then you shouldn't panic.
❑ Go back and double-check that you followed the instructions correctly. It's easy enough to miss out
one crucial step.
❑ Try to narrow down the problem to work out what the cause is. Is it your web server? Is PHP set up
Writing PHP Programs
In the first chapter, we introduced PHP and went through the decidedly non-trivial process of installing it on your web server, and getting PHP itself up and running. What we didn't do in any detail is look at an example of PHP code in action, other than to test that our installation was functioning correctly. The first thing that we will look at in this chapter is how to write a very basic PHP page and get it functioning on our web server, while answering questions about how it works and what the code is doing. Once we've worked through this, we'll examine the role of the web server and find out, in greater detail, how PHP actually works.
Once we've established, at a fairly basic level, what goes on under the hood of PHP, we will take a look at some of the principal building blocks of the language, and how we can use PHP to store information in our web pages. Every programming language requires a mechanism for storing information and attaching it to an identifier, which you can then reference for later use. For example, how do you store dates, such as a set of people's birthdays? How can you come back to that list and know which date matches which birthday? This is done in PHP, and in most programming languages, by using the concept of variables. The final part of the chapter will be spent looking at variables and how we can use them to perform mathematical operations, or simple manipulations of text.
The itinerary for this chapter is:
❑ Write and examine a very short PHP program
An Example PHP Program
This chapter starts with almost the simplest one line example possible – we aim to demonstrate that PHP pages are a mixtures of three things, namely text, HTML code, and PHP script. Pages containing PHP script are different from pages that contain only HTML, and in order to identify them to the PHP engine, they are saved with the .php suffix
(or something similar) on the web server and are executed by the PHP engine running on the server.
The .php suffix is something that is dependent on your particular configuration of PHP. If you
wanted to, when setting up PHP, you could change it to almost anything, even something like
.groovysuffix. In this book we will be using the suffix .php in lower case only.
The results of this are returned to the browser in HTML. We'll see more on this shortly, but let's get started on an example.
Try It Out – First Example Program
1.
Open your web page editor of choice and type the following in:<HTML> <BODY>
The date at the moment is <?php echo gmdate("M d Y"); ?>
</BODY> </HTML>
2.
Save this as example1.php in the document root (on UNIX systems) or root directory (onWindows systems) of your web server.
3.
Next, open up your browser of choice, type in the full URL of your web server and web page, mine would be http://chrisu/example1.php. You should see something similar to theThe Different Types of Code
As we said before this example, we are aiming first and foremost to demonstrate the three different types of code used on this page. So let's look at the code we just typed in, and assign it into each of the three categories:
<HTML> <BODY>
The date at the moment is <?php echo gmdate("M d Y"); ?>
</BODY> </HTML>
The code with the clear background isn't really code at all; it's just plain text. There's really nothing more to say about it.
The code with the dark gray background is PHP script. The PHP script denoted by angled brackets, and question marks as well. So, anytime you see a portion of code that starts with <?php and ?> tags you know that everything
inside must be PHP script.
As you can see from the results output to the browser, the three types of content quite happily co-exist in the web page, despite the fact that the PHP script must be processed by the web server (which may be on a different machine from your browser).
How the Code Works
Having established the nature of the different types of code on the page, we've so far neglected to explain what the one line of PHP code in the program does. So let's rectify that now – the only actual PHP script in the page was the following:
echo gmdate("M d Y");
Three things are going on here. Firstly, the word echo() is a PHP command, which takes whatever is fed into it
and displays it on the web page. So if we had the line:
echo "Hello world";
you would see the words Hello world on the screen when you browsed that web page. However, you may have noticed that in our example the date appeared on the screen, yet we only fed the functiongmdate("M d Y") to
the echo() command – this is the second thing that is going on, and we'll look at it in a moment.
15/8/00 09-30AM
or
Tuesday 15th August
These are both valid formats of today's date, yet PHP has no idea which version you want it to use, or whether you want it to use an entirely different version altogether. So, you need to tell it what to do, and that's exactly what the section in parentheses and quotation marks after gmdate() does. We specify that we want the month first, followed by the day
and then the year. The fact that we use upper case and lower case D's, M's, and Y's is also significant. PHP attaches different meanings to each as shown in the table that follows:
Option Result
a Displays "am" or "pm".
A Displays "AM" or "PM".
d Gives the day of the month, 2 digits with leading zeros; that is, "01" to "31".
D Shows day of the week, textual, 3 letters; for example, "Fri".
F Displays month, textual, long; for example, "January".
h Shows the hour, 12-hour format; that is, "01" to "12".
H Shows the hour, 24-hour format; that is,"00" to "23".
g Shows the hour, 12-hour format without leading zeros; that is,"1" to "12".
G Shows the hour, 24-hour format without leading zeros; that is, "0" to "23".
i Displays the minutes; that is,"00" to "59".
j Gives the day of the month without leading zeros; that is,"1" to "31".
l Gives the day of the week, textual, long; for example, "Friday".
L Boolean for whether it is a leap year; that is,"0" or "1".
m Shows the month; that is,"01" to "12".
Y Displays the year, 4 digits; for example, "1999". y Displays the year, 2 digits; for example, "99".
z Shows the day of the year; that is,"0" to "365".
Z Gives the timezone offset in seconds (that is,"-43200" to "43200").
As you can see, this is quite a comprehensive list. Once again, we're not going to reproduce a table every time we want to outline the workings of a new PHP function, so you will need to refer to the appendices. Equally, we could have changed our previous example to:
echo gmDate("D");
This would display:
Tue
Alternatively, we could have changed it to:
echo gmDate("d m Y");
We leave this last example as an exercise to the reader to workout what will be displayed. Now we have a better understanding of what the code is actually doing, we can move on…
Viewing a Web Page
Let's step back from our example, and take an overhead view of what's going on with our web page between writing it and viewing it. When we installed PHP in Chapter 1, the installation was broken down into stages because we installed several different pieces of software.
the term client-server is an oversimplification of the process – it's quite an abstract description of a physical process. To understand what is going on in greater detail, we need to briefly discuss the workings of the Internet itself.
Internet Protocols
We won't go through the entire history of the Internet here; the important point is that it is a network of interconnected nodes. The Internet is designed to carry information from one place to another. It uses a suite of networking protocols (known as TCP/IP) to transfer information around the.
A networking protocol is simply a method of describing information packets so that they can be sent down your telephone-, cable-, or T1-line from node to node, until they reach their intended
destination.
One advantage of the TCP/IP protocol is that it can re-route information very quickly if a particular node or route is broken or slow. When the user tells the browser to fetch a web page, the browser parcels up this instruction using a protocol called the Transmission Control Protocol (or TCP). TCP is a transport protocol, which provides a reliable transmission format for the instruction. It ensures that the entire message is packaged up correctly for transmission (and also that it is correctly unpacked and put back together after it reaches its destination). The networking protocol TCP/IP is a method of describing your information packets so that they can be sent down a telephone line, cable, or T1-line from node to node.
Before the parcels of data are sent out across the network, they need to be addressed. So a second protocol called
HyperText Transfer Protocol (or HTTP) puts an address label on it, so that TCP/IP knows where to direct the information. HTTP is the protocol used by the World Wide Web in the transfer of information from one machine to another – when you see a URL prefixed with http://, you know that the internet protocol being used is
HTTP. You can think of TCP/IP as the postal service that does the routing and transfer, while HTTP is the stamp and address on the letter (data) to ensure it gets there.
The message passed from the browser to the web server is known as an HTTP request. When the web server receives this request, it checks its stores to find the appropriate page. If the web server finds the page, it parcels up the HTML contained within (using TCP), addresses these parcels to the browser (using HTTP), and sends them back across the network. If the web server cannot find the requested page, it issues a page containing an error message (in this case, the dreaded Error 404: Page Not Found) – and it parcels up and dispatches that page to the browser. The message sent from the web server to the browser is called the HTTP response.
Browser
Web Server
HTTP Request (http://web site)
HTTP Response
Web Page
The HTTP Protocol
There is still quite a lot of technical detail missing here, so let's dig further down and look more closely at exactly how HTTP works. When a request for a web page is sent to the server, this request contains more than just the desired URL. There is a lot of extra information that is sent as part of the request. This is also true of the response – the server sends extra information back to the browser. It's these different types of information that we'll look at in this next section.
A lot of the information that is passed within the HTTP message is generated automatically, and the user doesn't have to deal with it directly, so you don't need to worry about transmitting such information yourself. While you don't have to worry about creating this information yourself, you should be aware that this extra information is being passed between machines as part of the HTTP request and HTTP response – because the PHP script that we write can allow us to have a direct effect on the exact content of this information.
Request
Get/HTTP/1.1 Host: www.wrox.com
Header
User-agent: mozilla (x11;I;Linux 2.0.32 i586) Accept: */*
Date: Wed, 13 Sep 2000 09:10:44 GMT
Body
(empty)
Response
HTTP/1.1 200 OK
Header
Server: Apache/1.3 (unix) (suse/linux) PHP/4.0.2 Date: Wed, 13 Sep 2000 09:10:46 GMT
PHP Page PHP Processor HTML Page Browser
HTTP Request Web Server
Fetch Page Interpret Script HTTP Response Run PHP Processor Body <HTML> . . . </HTML>
We can see that the HTTP request and HTTP response have broadly similar structures, and that there is information common to both that is sent as part of the HTTP header. There are other pieces of information that can only be known to either the browser or the server, and are only sent as part of either the request or response, so it makes sense to examine their constituent parts in greater detail.
The HTTP Request
The browser sends the HTTP request to the web server and it contains the following:
The Request Line
The first line of every HTTP request is the request line, which contains three pieces of information:
❑ An HTTP command known as a method
❑ The path from the server to the resource that the client is requesting