(will be inserted by the editor)
An Intelligent Process Model: Predicting Springback in
Single Point Incremental Forming
Muhamad S. Khan · Frans Coenen · Clare Dixon · Subhieh El-Salhi · Mariluz Penalva · Asun Rivero
the date of receipt and acceptance should be inserted later
Abstract This paper proposes an Intelligent Process Model (IPM), founded on the concept of data mining, for predicting springback in the context of sheet metal forming, in particular, Single Point Incremental Form-ing (SPIF). A limitation with the SPIF process is that the application of the process results in geometric de-viations, which means that the resulting shape is not necessarily the desired shape. Errors are introduced in a non-linear manner for a variety of reasons, but a con-tributor is the geometry of the desired shape. A Local Geometry Matrix (LGM) representation is used that allows the capture of local geometries in such a way that they are suited to input to a classifier generator. It is demonstrated that a rule based classifier can be used to train the classifier and generate a classification model. The resulting model can then be used to predict errors with respect to new shapes so that some correc-tion strategy can be applied. The reported evaluacorrec-tion of the proposed IPM indicates that very promising re-sults can be obtained with regard to reducing the shape deviations due to springback.
Keywords Single Point Incremental Forming· Data Mining·Springback Correction
M. S. Khan·F. Coenen·C. Dixon·S. El-Salhi
Department of Computer Science, University of Liv-erpool, LivLiv-erpool, U.K. (tel: (+44) 151 795 4280, fax: (+44) 151 795 4235) E-mail: [email protected], [email protected], [email protected], [email protected]
M. Penalva·A. Rivero
Tecnalia, Parque Tecnol´ogico, San Sebasti´an, Spain E-mail: [email protected], [email protected]
1 Introduction
Single Point Incremental Forming (SPIF) is a sheet metal forming process that involves a local and pro-gressive pressing out of the desired shape on a clamped sheet by a round-headed forming tool which follows a continuous path. Flexibility in sheet metal forming has attracted interest in recent years due to the shrinking of the product life cycle, increased demand and cus-tomisation requests [1, 8, 23]. SPIF offers full flexibility since the use of dedicated tooling, required with many sheet metal forming operations, isn’t necessary. How-ever one disadvantage is that the operation time is typ-ically high. Nevertheless, SPIF may still be of use for low volume series, can help increase the flexibility of any forming process in the design and industrialisa-tion phases by providing realistic prototypes and can be used in combination with other forming processes, for instance, to produce part details.
Material springback is a phenomenon common to any sheet metal forming process that leads to the geo-metric inaccuracy of the resulting shape. In SPIF the increase in geometric deviations from the design shape because of the absence of tooling is the key deterrent from the widespread industrialisation take up of the process [17].
numeri-cal predictions is much affected by the value of material data. In this sense, the reliability of the estimated data is not fully evident yet due to the cyclic nature of de-formation in SPIF. As a result, and despite significant research efforts to date, the application of FEA to pre-dict shape geometric deviations caused by springback is still very limited. In terms of empirical practices, some guidelines have been proposed [5, 26, 3, 2] aiming to increase the geometric accuracy.
Dedicated CAM tools [28, 30, 24] have been pro-posed which aim to improve not only the geometric accuracy but also other quality aspects as well as the process time-efficiency. However the gained accuracy is insufficient to meet typical design requirements high-lighting the need for a tool that enables the prediction and compensation for shape deviations due to spring-back.
Multivariate Adaptive Regression Splines (MARS) models are proposed in [6] to predict the springback in SPIF. MARS models are based on statistical regres-sion techniques, and are generated and trained by first identifying different geometric features such as planes, surfaces, borders and ribs in a shape geometry using mesh techniques. Individual STL files are generated for each feature comprising coordinate values, process pa-rameters and errors between the desired shape and the formed part. Regression models for each STL are then generated and trained using STL files and a new tool path is generated. Using regression models the authors have shown improvements in the formed part using a corrected tool path. The focus on features relates to our approach in that we represent geometries as records capturing local surfaces but without the need to explic-itly determine specific features.
There has also been reported work on dynamic tool path correction in the context of laser guided tools. For example, initial work in [10] concluded that it was im-portant to have an on-line monitoring system during laser forming able to predict and correct distortion due to springback. In [7] an iterative, laser forming pro-cess was developed aimed at correcting distortion in aluminium parts. However, SPIF requires that the tool path is specified in advance rather than as the process develops.
As an alternative, a data mining approach can be considered. Data mining techniques have been previ-ously applied to sheet metal forming, in particular Neu-ral Networks [27, 22, 9, 16, 21, 25, 29]. NeuNeu-ral networks are mostly used in classification problems but their op-eration is complex, resource intensive, and difficult to understand because of their “black box” nature. Sev-eral training cycles are typically required to obtain an optimal structure of the network, such as the number
of neuron layers in the network and the number of neu-rons in each layer [16]. In [27, 29] neural networks are applied to predict springback based on factors such as thickness, lubrication, material properties etc and com-pared to FEM models. The application of neural net-works in [21] reduced the number of finite element sim-ulations necessary and could be applied to multi-stage process planning. Manabe et al [25] developed a control system for deep drawing using a combination of neural networks and plasticity theory by identifying process parameters e.g. material properties and lubricant. In [22] a neural network with a stepped binder force tra-jectory was used to control springback angle and max-imum principal strain in a simulated channel forming process.
Rule based learning techniques have also been adopted by researchers, for example in [32, 33] where rule based systems were used to extract knowledge from a FEM model. This work was directed at the effect of the na-ture of the material (rather than local geometry), and various process parameters to study their reaction on springback.
However, there has been very little reported work on the use of data mining techniques to address the SPIF springback problem as formulated in this paper. The advocated approach is not only concerned with ex-tracting knowledge from sheet metal forming data, but also with data representation and the generation of clas-sification models that can be used to predict and ap-ply springback errors in order to minimise their effect. What distinguishes the proposed IPM from the previ-ous work is the way in which it operates using local ge-ometries to predict local springback values. The central idea exposed in this paper is that if the springback effect can be predicted and quantified, a suitable correction can be applied to the CAD model so that an alterna-tive tool path can be defined that takes into consider-ation the likely effects of the springback phenomenon. To this end an Intelligent Process Model (IPM) is pro-posed that allows for the correction of CAD models in order to minimise, the springback effect. The cen-tral element of the IPM is a classifier which, given a specific local geometry definition, can predict the likely magnitude and direction of the associated springback. These predictions then can be used for generating a corrected CAD model that leads to a geometry with minimal shape deviations due to springback. Thus, the main contribution of this paper is the development of a classifier-based IPM and its application to, and evalu-ation on, two new geometries. The key features of this approach are provided below.
geom-etry. Here we use a Local Geometry Matrix repre-sentation. For a point on the surface this describes the local surface in relation to neighbouring points. By using this representation many different local geometries can be described. Other representations have also been developed (see for example [12, 13]). 2. The development of a classifier that predicts spring-back with a high level of accuracy based on data mining techniques and these representations. Data mining techniques have the ability to detect pat-terns based on complex phenomena that do not need to be expressed explicitly.
3. The use of classifiers that allow the generation of rules so that the validity of rules can, if necessary, be verified.
4. The construction of an IPM that both predicts the springback errors in new shapes and applies correc-tions to generate (corrected) co-ordinate clouds. The rest of this paper is structured as follows. Sec-tion 2 describes the applicaSec-tion domain. SecSec-tion 3 in-troduces the Intelligent Process Model (IPM). The cor-rected cloud geometry is described in Section 4 and evaluation of the IPM is presented in Section 5. Finally conclusions are presented in Section 6.
2 Application Domain
To act as an application focus, and for evaluation pur-poses, the two square pyramidal geometries shown in Figures 1 and 2 were specifically designed. One of the geometries shown in Figure 1 corresponds to a simple non-symmetric pyramid (Benchmark Pyramid) whereas the other one in Figure 2 (Modified Pyramid) is an evo-lution of the first geometry where the edges have been smoothed.
Fig. 1 SPIF Manufactured Square based Benchmark Pyra-mid
Fig. 2 SPIF Manufactured Square based Modified Pyramid
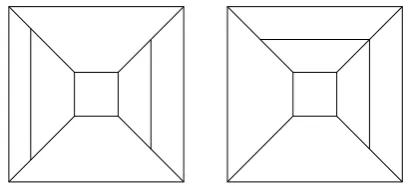
The key differences between the shapes are described below and a schematic provided in Figure 3. By a side wall having an “inward bulge” we mean the side wall of the pyramid is made up of two flat surfaces that meet where the angle between them is greater than 180◦ on theinside of the shape. By a side wall having an “out-ward bulge” we mean the side wall of the pyramid is made up of two flat surfaces that meet where the an-gle between them is less than 180◦ on theinsideof the shape.
– The edges of the Modified Pyramid have a smooth curve between the adjacent surfaces whereas the Benchmark Pyramid has sharper edges (see Fig-ures 1 and 2).
– The Benchmark Pyramid has two flat side walls fac-ingeach other and two side wallsfacingeach other one with an inward bulge and one with an outward bulge (see Figures 3 and 4).
– The Modified Pyramid has two adjacentside walls with an “inward bulge” and two adjacentflat sides (see Figures 3 and 5).
Fig. 3 Schematic of Benchmark (left) and Modified (right) Pyramids
[image:3.595.314.536.73.250.2] [image:3.595.62.261.560.719.2] [image:3.595.313.518.587.680.2]Pyramid Width Length Height
Benchmark 195 195 43
[image:4.595.324.511.82.234.2]Modified 190 190 42
Table 1 Geometric Data for the Two Test Pyramids(mm)
Pyramid is a simple test geometry with varying surface slopes, whereas the Modified Pyramid, is a hybrid be-tween a real aeronautic part and the Benchmark Pyra-mid.
Non-symmetric parts show a geometric distortion higher than symmetric ones since residual stresses lead-ing to distortion cannot be compensated. The edge smooth-ing of the second geometry is closer to geometric fea-tures typical in aeronautical components where geomet-ric accuracy is a major concern. The material used in both cases was DC04 stamping steel sheets of 1.0mm thickness. The dimension of the sheets was 185 x 185 mm. Figures 1 and 2 show the studied geometries once they had been manufactured and unclamped.
The SPIF experiments were carried out in an AMINO DLNC-RB forming machine. A round-headed forming tool with a 20.0mm diameter was used The programmed process parameters were a 4.0m/min feed rate and a 0.8mm tool step down.
The two produced parts were scanned using the op-tical 3D measurement system ATOS by GOM. For each part their complete upper face (formed area plus sur-rounding non-deformed flange) was digitised and matched to the equivalent area of the CAD model. The three holes near the centre of each geometry were used to help align the measured data to the coordinate system of the CAD model. Finally, both the CAD and the digi-tised areas were converted to coordinate cloud where the surfaces are represented by a cloud of points defined by three orthogonal coordinatesx,yandz. The clouds comprised 250,847 points for the Benchmark Pyramid pyramid and 565,817 points for the Modified Pyramid. Figures 4 and 5 present 3D views of the two geometries generated using coordinate clouds extracted from the CAD model of the shapes.
3 Intelligent Process Model
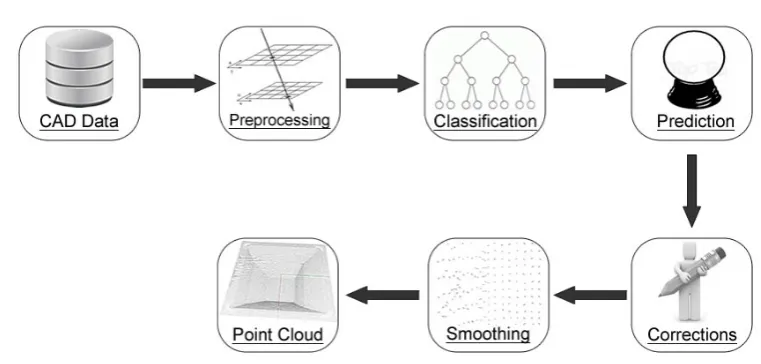
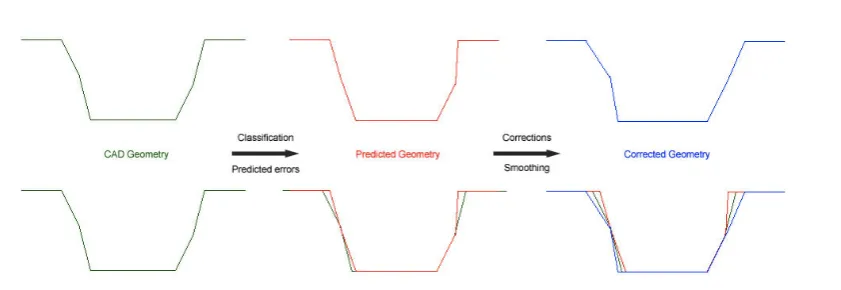
The proposed Intelligent Process Model (IPM) is a gen-eralised classification based model for the generation of corrected coordinate clouds to predict springback. A schematic describing the operation of the IPM is pre-sented in Figure 6.
From Figure 6 the IPM model operates as follows. 1. Input a CAD generated coordinate cloud.
Fig. 4 Coordinate cloud for Benchmark Pyramid
Fig. 5 Coordinate cloud for Modified Pyramid
2. Pre-process the coordinate cloud to produce an in-put data set. The necessary pre-processing is de-scribed in further detail in the Section 3.1 below. 3. After pre-processing, the data is passed to the
clas-sification module where the classifier is applied to each record (representing a grid square) in the data set to predict the associated springback error (see Section 3.2 for detail).
4. The predicted springback is then applied to the CAD cloud and a modified CAD shape P is produced (Section 3.3).
5. The predicted cloud is then used to generate a cor-rected cloudC (described in Section 3.4).
6. Smoothing is applied to the corrected cloudCso as minimise gaps and bandings, in order to produce a smooth corrected cloud that can be translated into a CAD tool path for manufacturing (described in Section 3.5).
[image:4.595.59.249.86.122.2] [image:4.595.322.508.270.415.2]Fig. 6 Intelligent Process Model (IPM)
produced. In [19] the notion of a Local Geometry Ma-trix (LGM) (see Section 3.1.3) was introduced to rep-resent the input data with reference to the shape of local neighbourhoods. It was demonstrated that suffi-ciently robust classifiers can be generated, at least with respect to similar styles of shape. This work was ex-tended to other representations, for example a Local Distance Measure (LDM) which involves the distance from the nearest edge in the shape and combinations of LGM and LDM [12]. Also a Point Series representation was developed [13] where the slope of each neighbouring region is represented as a sequence of points. Good clas-sifiers were produced based on these representations.
3.1 Data Pre-processing and Representation Generation
The generation of training and test data for the classi-fication process requires pre-labelled data, thus a geo-metric representation of the input data that includes a representation of the errors between the input and the resultant cloud data. The following sub-sections briefly explain the data pre-processing techniques used for the data representation.
3.1.1 Grid Representation
As already noted above, the inputs to the proposed IPM are an input coordinate cloud Cin and an
out-put coordinate cloudCout. Each coordinate cloud
com-prises a set ofN,hx, y, zicoordinate triples, such that
x, y, z∈R. The number of coordinates per cm2 (within thex, yplane) in each coordinate cloud varies between 120 points per cm2 to 20 points per cm2depending on
how the data is generated/collected.
TheCincoordinate cloud is obtained from the CAD
model. Thus, it represents the part design geometry. The Cout coordinate cloud is obtained from the
scan-ning of the produced part and it represents its real ge-ometry. Both coordinate clouds have been registered to the same reference origin and orientation, as described above.
j
d
d x
y
i
Fig. 7 Coordinate cloud points associated with a grid point (grid spacing =d)
We first cast Cin into a (discrete) grid
[image:5.595.95.476.104.286.2] [image:5.595.323.506.505.675.2]ahxi, yiicoordinate value pair. This produces a
“repre-sentative” point for each grid square reducing the num-ber of data records. The numnum-ber of grid lines is defined by some grid spacing d. Each coordinate pair hxi, yii
in the grid has az value calculated by averaging thez values associated with the part of the input coordinate cloud contained in thed×dgrid square centred on the point hxi, yii (Figure 7). We then cast theCout
coor-dinate cloud into the same grid format so that we end up with two grids,GinandGout, describing the before
and after surfaces.
3.1.2 Springback Measurement
A simple mechanism for establishing the degree of spring-back (e) at a particular grid point is simply to measure the difference between the z values in Gin and Gout.
However, a more accurate measure is to determine the length of the surface normal from each grid point in Ginto the point where it intersects Gout (Figure 8).
e
Before Shape After Shape e e
e
e
Fig. 8 Cross section at a grid line showing springback error calculation between a before and after shape
The distance between any two three dimensional points can be calculated using the Euclidean distance formula:
d=p(x2−x1)2+ (y2−y1)2+ (z2−z1)2 (1)
However, the application of (1) first requires knowledge of the x, y, z coordinates of the point where the nor-mal intersectsGout. With respect to the work described
in this paper we have used the line plane intersection method [11] to determine the length of the normal be-tween two surfaces. Using this approach we find the nor-mal to a plane by calculating the cross product of two orthogonal vectors contained within the plane. Once we have the normal we can calculate the equation for the line that includes the start and end points of the nor-mal and then determine the point at which this line cutsGout. We can then calculate the length of the
nor-mal separating the two planes. The process is as follows (with reference to Figure 9).
4
Set of four normals
p
p
p
p p
0
1
2 3
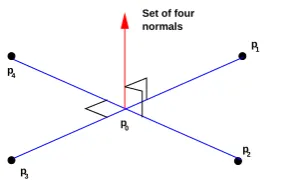
Fig. 9 Error calculation using the line plane intersection method
1. For each grid point in Gin first identify the four
neighbouring grid points in the x and y planes as shown in Figure 9 (except at edges and corners where three and two neighbouring grid points will be iden-tified respectively).
2. Define a set of four vectorsV =
{v1, . . . v4}={hp0, p1i,hp0, p2i,hp0, p3i,hp0, p4i}each
described in terms of itsx, y, zdistance fromp0(the
origin of the vector system).
3. Using the four vectors, four surface normals can be calculated, N = {n1. . . n4} by determining the
cross product between each pair of vectors:v1×v2,
v2 ×v3, v3×v4, v4×v1. Note that to validate a
surface normalnithe dot product of one of its
asso-ciated vectorsvj andni must be equal to zero (i.e.
ni·vj = 0).
4. For each normaln1, . . . n4 calculate the local plane
equation inGinthat includesp0(thus using, in turn,
points{p1, p0, p2},{p2, p0, p3},{p3, p0, p4},{p4, p0, p1}.
The plane equation is given by equation (2).
ax+by+cz+d= 0 (2)
5. For each plane equation identified in step 4 deter-mine the parametric equations (a set of equations which describe the x, y and z coordinates of the graph of some line in a plane) [11] of the surface normal as a straight line according to the identities given in equation (3)
x=a+it y=b+jt z=c+kt
(3)
where t is a constant, a, band c are the x, y, z co-ordinates for the point p0 and i, j and k are the
normal components. The constanttis calculated by substituting the parametric equations in (2) forx, y andz.
[image:6.595.349.493.85.177.2] [image:6.595.54.256.368.453.2]7. We then use the coordinates for each of the four points of intersection and p0 to calculate the
Eu-clidean distance (the error) between p0 and each
intersection point to give four error values E = {e1, . . . , e4}.
8. We then assign each error a direction (negative or positive) based on the direction of the springback. If springback is inwards, a negative direction is as-signed to the error, otherwise a positive direction is assigned.
9. We now have four error values for each grid point (except at the corners and edges where we will have two or three respectively), we then find theoverall erroresimply by selecting the least error. The rea-son for selecting the least error is that it gives us the nearest point to the before surface.
On completion of the process our input grid Gin will
comprise a set ofhx, y, zicoordinates describing the N grid points, each with an associated springback (error) valuee.
3.1.3 Surface Representation (Local Geometry Matrix)
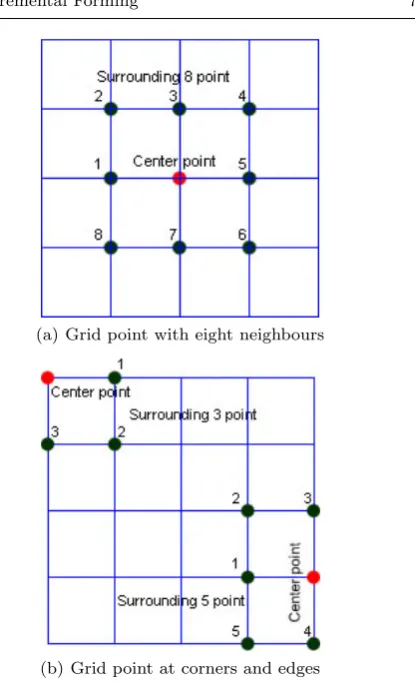
In this section we describe how local geometries are rep-resented using the concept of a Local Geometry Matrix (LGM) (see [19]). From the foregoing it has already been noted that the value of eis influenced by the na-ture of the geometry of the desired surface (shape). We can model this according to the change in thez value of the eight grid points surrounding each grid point as shown in Figure 10(a). Of course along the edges and at the corners of the grid we will have fewer neighbouring grid points as shown in Figure 10(b).
Thus we generatenrecords (wherenis the number of grid points) each comprising eight z values and, in the case of the training data required for classifier gen-eration (see Subsection 3.2.2), an associatedevalue.
We, then coarsen thez values (to produce a more generic definition) by describing them using qualita-tive labels taken from a setLto describe the nature of the slope in each of the eight neighbouring directions. Therefore we can describe |L|8 different local
geome-tries if we take orientation into consideration. Thus if we have a label set, {negative, level, positive} we can describe 38= 6561 different local geometries. Note that this gives an idea of how many different local geome-tries are possible. This would obviously be higher with a larger label set. Given a particular shape there may only be a fraction of these possible different local ge-ometries actually generated and by no means is this number required.
(a) Grid point with eight neighbours
[image:7.595.326.534.71.417.2](b) Grid point at corners and edges
Fig. 10 LGM: Centre point and the neighbouring points
3.2 Classification
The proposed IPM model uses a classifier for prediction purposes. A classifier is piece of software that is typi-cally trained using pre-labelled training data, so as to predict some value (called a class label) to be associ-ated with previously unseen data. It is thus important to use an appropriate classifier generation mechanism so as to maximise prediction accuracy. Once generated the classifier can be applied.
3.2.1 Training data
With respect to the work presented in this paper the training data is presented in tabular form where each record comprises a tuple of the formhx1, . . . , xn, e1. . . emi,
where x1 to xn are values associated with a set of
at-tributes I ={i1, . . . , in} (there is a one to one
corre-spondence between values and attributes), and e1 to
em are a set of class labels E. The values for the
at-tributesIandE are binary, 1 (exists) and 0 (does not exist). Note that because we can have only class label per record only one value in the set{e1. . . em} can be
are grid centre points, I is a set of rangedz difference (slope) values andEis a set of potential ranged spring-back values. The size of I is equal to 8× |L|, where L is the set of qualitative labels associated with the slope values (as described in Subsection 3.1.3 above). The value 8 is used because each grid centre point, ac-cording to the proposed LGM representation, can have up to eight neighbours.
3.2.2 Classifier Generation
In the work described here relating to the IPM we favour a classifier that generates classification rules. Rule based classifiers offer two principal advantages:
1. Rule representations are intuitive; they are simple to interpret and understand.
2. Because of the above the validity of rules can be easily verified by domain experts.
Classification rules are then of the form: X →e
whereX is a set of binary values associated with some subset of I and e∈ E. Such rules may be interpreted as “ifX exists in a given record then the record should have the class labele associated with it”. An example rule, withL={negative, level, positive}, might be:
{positive, negative, positive, level, negative, negative, negative, level} →negative
The purpose of a rule based classifier generator is to produce a set of rules of the above form from a given training set. There are a number of techniques that can be adopted but for the work presented in this paper a decision tree classifier was adopted from which classifi-cation rules can be easily extracted. This technique was adopted because from previous research work [20] and extended results from [19] it was concluded that, for the CAD datasets, decision tree based classifiers produced the most effective outcomes when compared to other kinds of classifier generator.
3.2.3 Classifier Application
Once we have generated our desired classifier we need to incorporate it into the IPM, so it can be applied to unseen data, i.e. a new shape S so that we can predict S0. To do this, the coordinate cloud describingS must be expressed in terms of its components in the same manner as that used to define the training data used to generate the classifier. Thus the coordinate cloud forS
must be expressed as a grid using the same value ofd (the grid size) and the same label set|L|as that which was used to generate the classifier. Errors are predicted, using a classifier comprised of a set of classification rules generated as described above, and then the corrected cloud is produced by applying the predicted errors in the reverse direction to the input cloud.
3.3 Predicted Shape
Once the classifier has predicted the errors at each point of the grid, the errors can be applied to the CAD shape. Recall that each grid cell features a normal from its cen-tre point, and also that the predicted springback errors for each point feature both direction and magnitude. Errors can thus be applied accordingly.
3.4 Corrected Shape
The corrected shape is generated by applying correc-tions to the CAD shape by reversing the predicted er-rors in the direction of the normal. For this work we use a correction factor of 1.0. Other authors have applied different correction factors. For example, the effects of different correction factors (1.0, 0.7 and 0.5) were con-sidered in [18] and in [15] a correction factor of 0.7 is used. It would be interesting to investigate alternative correction factors, for example using a constant factor over the shape or even using data mining techniques to propose different correction factors dependent on lo-cal geometries. However this remains as part of future work.
The method can be applied in parts showing both underforming and overforming areas. The only limita-tion concerns overformed areas located near where the sheet is clamped. This appears in designs with very low wall angles at the edges of the geometry and occurs due to plastic deflection of the sheet under the tool action. Although the error could be predicted by the classifier and the correction estimated, producing a convex fea-ture from a flat sheet and a downwards moving forming tool is not possible.
Fig. 11 Corrected cloud generation process and comparison
can be observed), and (iii) the corrected, predicted and CAD shapes superimposed over one another.
3.5 Smoothing
After the correction process has been completed, the generated corrected shape may contain gaps and band-ings due to the processing that has taken place e.g. using representative points and discrete label sets, and also due to the nonlinear nature of the springback pre-diction. The smoothing applied uses values from the springback errors for the current point and the eight neighbouring points (as shown in Figure 10) which are then averaged. Smoothing is applied to the predicted errors to minimise any bands or gaps before generating the corrected coordinate cloud for input to the SPIF process.
4 Converting the Corrected Cloud to a CAD Geometry
Once a corrected cloud has been generated as described in Section 3, it can be processed and converted to a CAD geometry so that the part can be manufactured using an SPIF machine. The conversion process is as follows.
1. Import the corrected cloud into a software system that allows for the creation of surfaces from point clouds and additional smoothing. For our experi-ments, reverse engineering software from the optical surface measurement system GOM ATOS was used. 2. Create a polygon mesh (polygonisation), based on the initial point cloud so it can be read by CAD or CAM software.
3. Regularise the generated polygon mesh so as to re-generate it with more homogeneous sizes of the tri-angles in general and higher density in areas of stronger curvature.
4. Manually repair individual defects in the polygon mesh through visual inspection.
5. Apply additional smoothing of the final polygon mesh. 6. Compare the smoothed surface to the original
poly-gon mesh to ensure that the surface optimisation caused no changes to the macroscopic geometry. 7. Export the smoothed polygon surface in a format
compatible with CAD/CAM software. In the evalu-ation described later in this paper the STL-file for-mat was used.
The three main stages of the process of generat-ing and optimisgenerat-ing a surface based on the initial point cloud are shown in Figure 12. Using the CAD-files based on the optimised surfaces it was possible to conduct CNC-Programming for the forming processes in the CAD/CAM software for a new series of experiments.
5 Evaluation
For evaluation of the IPM, two corrected coordinate clouds were produced and manufactured. The two clouds were for two different geometries, (i) the Benchmark Pyramid and (ii) the Modified Pyramid. The corrected coordinate clouds were imported into the CAD/CAM-Software and surfaces from the point mesh were gen-erated. Afterwards the surfaces had to be smoothed in order to achieve a suitable and stable tool-path for the forming operation. With this programmed tool-path, new parts were produced with SPIF using the same process parameters as were used to fabricateCout. The
ac-Fig. 12 Initial point cloud (left); Created polygon mesh based on the initial point cloud (middle); Optimised and smoothed surface (right)
cording to the corrected coordinate cloud produced by the proposed IPM.
Two parts/geometries were manufactured based on the IPM corrected tool path and compared to the origi-nally manufactured parts (using the original CAD gen-erated tool path without springback correction). The nature of the newly formed parts was captured using the GOM-ATOS System, and the resulting digital ge-ometry referenced to the original desired shape so that an evaluation of the geometrical and dimensional ac-curacy could be conducted. The outcomes from this comparison are described in the following sub-sections. The required rule based classifiers were generated using training data obtained from previous attempts to gen-erate the Benchmark and Modified pyramids (data also used for comparison purposes later in this section).
5.1 Geometry Comparison
[image:10.595.54.524.77.169.2]Recall that two different geometries, the Benchmark and the Modified pyramids, were fabricated using the SPIF process based on the corrected clouds as described above. The new geometries were compared to the pre-vious geometries formed using the uncorrected CAD cloud data.
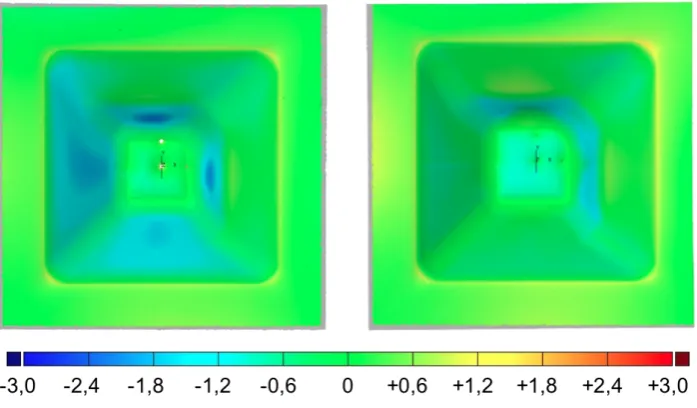
Figure 13 shows the Benchmark pyramid formed using the original CAD cloud data and the corrected CAD cloud data respectively. A scale is given from -3.0mm (dark blue) to +-3.0mm (dark red) to represent the magnitude of the shape deviation that occurred in the formed parts. From the figures it can be observed that the shape deviation is reduced with respect to the part formed using the corrected CAD cloud. Table 2 shows a statistical comparison between the two parts using data from Figure 13. The maximum, minimum and mean geometrical deviations are given in the table. It is clear from the data in Table 2 that the shape devi-ation has been reduced as a result of applicdevi-ation of the proposed IPM.
Figure 14 shows the Modified pyramid formed using the original CAD cloud data and the corrected CAD cloud data respectively. Again a scale is given from
-Benchmark CAD Cloud Corrected Cloud
Pyramid Geometry Geometry
Maximum (mm) +3.24 + 2.15
Minimum (mm) -2.39 -2.33
Mean (mm) -0.24 -0.06
[image:10.595.301.530.220.285.2]Std. Deviation (mm) 0.89 0.74
Table 2 Benchmark pyramid surface comparison
3.0mm (dark blue) to +3.0mm (dark red) to represent the magnitude of the shape deviation occurring in the formed parts. From the figures it can again be observed that shape deviation is reduced in the part formed from the corrected CAD cloud compared to that formed us-ing the original CAD data, thus confirmus-ing the effec-tiveness of the proposed IPM.
Table 3 presents some statistical data comparing the two parts given in Figure 14. Again the maximum, min-imum and the mean geometrical deviation is presented. Although the maximum shape deviation is slightly in-creased, by looking at the minimum and the mean shape deviation, it is clear that the overall shape deviation is reduced in the part formed using the corrected coordi-nate cloud.
Modified CAD Cloud Corrected Cloud
Pyramid Geometry Geometry
Maximum (mm) +1.22 + 1.27
Minimum (mm) -2.17 -1.56
Mean (mm) -0.30 -0.04
Std. Deviation (mm) 0.60 0.48
Table 3 Modified pyramid surface comparison
[image:10.595.303.530.571.635.2]Fig. 13 Benchmark Pyramid manufactured using CAD cloud data (left); corrected cloud data(right); scale in millimeters
Fig. 14 Modified Pyramid manufactured using CAD cloud (left); corrected cloud data (right); scale in millimeters
5.2 IPM Processing Times
The overall processing time either to generate the clas-sifier or process a new cloud given a clasclas-sifier is less than 10 seconds. We provide a breakdown below for the Benchmark pyramid. The timings for the Modi-fied Pyramid are similar. The IPM software was run on an Apple Mac computer, running Mac OS X Ver-sion 10.7.5, 2.66 GHz Intel Core i7 processor and 8GB of RAM. The run time is shown in Table 4.
Classifier Generation Run Time (secs)
Error calculation 6.2
Error smoothing 0.4
Rule generation 1.2
Predictions
Error prediction 1.9
Generating corrected cloud 6.4
Table 4 Timing for Processes in the IPM
6 Conclusion
[image:11.595.317.515.582.656.2]sheet metal forming incurred using SPIF. A Local Ge-ometry Matrix (LGM) representation was proposed that allows the capture of local 3-D surface geometries in such a way that classifier generators can be effectively applied. The resulting classifier was integrated into the proposed IPM. The IPM was designed to:
– predict errors with respect to new surfaces to be manufactured;
– apply corrections to the original CAD cloud; – conduct appropriate smoothing to the corrected CAD
cloud.
The corrected cloud is ready for use in the definition of a new corrected tool path that takes the springback effect into consideration. The operation of the proposed IPM has been fully described. The paper also presented an evaluation of the operation of the proposed IPM, using two fabricated parts that strongly indicates that the IPM can be successfully used to generate corrected tool paths. This was illustrated by reporting on exper-iments that compared the quality of parts fabricated using uncorrected tool paths with those fabricated us-ing corrected tool paths. The timus-ings to generate the classifier or to apply the IPM to a new part were less than 10 seconds.
Future work includes further development and anal-ysis of the IPM. It is anticipated that improvements can be made such as generalisation of the model to differ-ent materials, metal thickness and other shapes. For example, we are currently applying the IPM to differ-ent geometries including those with curved surfaces and different materials including titanium and Inconel. Re-garding correction factors, as mentioned in Section 3.4, we intend to investigate the use of correction factors when applying the corrections, for example, using a data mining approach to associate different factors with different parts of the shape. Additionally, an iterative version of the IPM that keeps predicting and apply-ing corrections until they are within a certain tolerance range (or a certain number of iterations has been car-ried out) has been proposed and needs further analysis.
Acknowledgements The research leading to the results pre-sented in this paper has received funding from the European Union Seventh Framework Programme (FP7/2007-2013) un-der grant agreement number 266208. The authors would like to thank their project partners, in particular, David Bailly from RWTH-IBF (Germany) for his support in the manufac-ture and analysis of the test geometries.
References
1. Allwood JM, Utsunomiya H (2006) A survey of flexible forming processes in Japan.
Interna-tional Journal of Machine Tools and Manufacture 46(15):1939–1960
2. Ambrogio G, Costantino I, De Napoli L, Filice L, Fratini L, Muzzupappa M (2004) Influence of some relevant process parameters on the dimensional ac-curacy in incremental forming: a numerical and ex-perimental investigation. Journal of Materials Pro-cessing Technology 153-154:501–507
3. Ambrogio G, De Napoli L, Filice L (2009) A novel approach based on multiple back-drawing incre-mental forming to reduce geometry deviation. In-ternational Journal of Material Forming 2(1):9–12 4. Bambach M (2010) A geometric model of the
kinematics of incremental sheet forming for the prediction of membrane strains and sheet thick-ness. Journal of Materials Processing Technology 210(12):1562–1573
5. Bambach M, Araghi BT, Hirt G (2009) Strategies to improve the geometric accuracy in asymmetric single point incremental forming. Production Engi-neering Research and Development 3(2):145–156 6. Behera AK, Verbert J, Lauwers B, Duflou JR
(2013) Tool path compensation strategies for single point incremental sheet forming using multivariate adaptive regression splines. Computer-Aided De-sign 45(3):575–590
7. Dearden G, Edwardson SP, Abed E, Bartkowiak K, Watkins KG (2006) Correction of distortion and design shape in aluminium structures using laser forming. In: 25th International Congress on Appli-cations of Lasers and Electro Optics (ICALEO), pp 813–817
8. Dirikolu MH, Akdemir E (2004) Computer aided modelling of flexible forming processes. Journal of Materials Processing Technology 148(3):376–381 9. Dunston S, Ranjithan S, Bernold E (1996) Neural
network model for the automated control of spring-back in rebars. IEEE Expert: Intelligent Systems and Their Applications 11(4):45–49
10. Edwardson SP, Watkins KG, Dearden G, Magee J (2001) Generation of 3D shapes using a laser forming technique. In: Proceedings of International Congress on Applications of Lasers and Electro Op-tics ICALEO, pp 2–5
11. Egerton PA, Hall W (1998) Computer graphics: Mathematical first steps. Simon and Schuster In-ternational
13. El-Salhi S, Coenen F, Dixon C, Khan MS (2013) Predicting Features in Complex 3D Surfaces Us-ing a Point Series Representation: A Case Study in Sheet Metal Forming. In: Advanced Data Min-ing and Applications, SprMin-inger, LNCS, vol 8346, pp 505–516
14. Hadoush A, van den Boogaard AH (2012) Effi-cient implicit simulation of incremental sheet form-ing. International Journal for Numerical Methods in Engineering 90(5):597–612
15. Hirt G, Kopp R, Ames J, Bambach M (2004) Forming strategies and Process Modelling for CNC Incremental Sheet Forming. CIRP Annals-Manufacturing Technology 53(1):203–206
16. Inamdar M, Date PP, Narasimhan K, Maiti SK, Singh UP (2000) Development of an articial neural network to predict springback in Air Vee bending. International Journal of Advanced Manufacturing Technology 16(5):376–381
17. Jeswiet J, Geiger M, Engel U, Kleiner M, Schikorra M, Duflou J, Neugebauer R, Bariani P, Bruschi S (2008) Metal forming since 2000. CIRP Journal of Manufacturing Science and Technology 1:2–17 18. Junk S, Hirt G, Chouvalova I (2003) Forming
strategies and tools in incremental sheet forming. In: Proceedings of the 10th International Confer-ence on Sheet Metal (SHEMET), pp 57–64 19. Khan MS, Coenen F, Dixon C, El-Salhi S (2012)
Classification based 3-D surface analysis: Pre-dicting springback in sheet metal forming. Jour-nal of Theoretical and Applied Computer Science 6(2):45–59
20. Khan MS, Coenen F, Dixon C, El-Salhi S (2012) Finding correlations between 3-D surfaces: A study in asymmetric incremental sheet forming. In: Proc. Machine Learning and Data Mining in Pattern Recognition (MLDM’12), Springer LNAI 7376, pp 336–379
21. Kim DJ, Kim BM (2000) Application of neural net-work and FEM for metal forming processes. Inter-national Journal of Machine Tools and Manufac-ture 40(6):911–925
22. Kinsey B, Cao J, Solla S (2000) Consistent and minimal springback using a stepped binder force trajectory and neural network control. Jour-nal of Engineering Materials and Technology 122(1113):113–118
23. Li RJ, Li MZ, Qiu NJ, Cai ZY (2014) Surface flexible rolling for three-dimensional sheet metal parts. Journal of Materials Processing Technology 214(2):380–389
24. Lu B, Chen J, Ou H, Cao J (2013) Feature-based tool path generation approach for incremental sheet
forming process. Journal of Materials Processing Technology 213:1221–1223
25. Manabe K, Yang M, Yoshihara S (1998) Artifi-cial intelligence identification of process parameters and adaptive control system for deep drawing pro-cess. Journal of Materials Processing Technology 80-81:421–426
26. Micari F, Ambrogio G, Filice L (2007) Shape and dimensional accuracy in single point incremental forming: State of the art and future trends. Journal of Materials Processing Technology 191(1-3):390– 395
27. Pathak KK, Panthi S, Ramakrishnan N (2005) Ap-plication of neural network in sheet metal bending process. Defence Science Journal 55(2):125–131 28. Rauch M, Hascoet J, Hamman J, Plenel Y (2009)
Tool path programming optimization for incremen-tal sheet forming application. Computer Aided De-sign 41:877–85
29. Ruffini R, Cao J (1998) Using neural network for springback minimization in a channel forming process. Journal of Materials and Manufacturing 107(5):65–73
30. Skjoedt M, Hancock MH, Bay N (2007) Creating helical tool paths for single point incremental form-ing. Key Engineering Materials 344:583–590 31. Thibaud S, Ben Hmida R, Richard F, Mal´ecot P
(2012) A fully parametric toolbox for the simula-tion of single point incremental sheet forming pro-cess: Numerical feasibility and experimental vali-dation. Simulation Modelling Practice and Theory 29:32–43
32. Yin J, Li D (2004) Knowledge discovery from finite element simulation data. In: Proceedings of 2004 International Conference on Machine Learning and Cybernetics, pp 1335–1340