AdvancED Flash
Interface Design
Lead Editor Chris Mills Technical Reviewer Sean McSharry Editorial Board Steve Anglin Ewan Buckingham Gary Cornell Jason Gilmore Jonathan Gennick Jonathan Hassell James Huddleston Chris Mills Matthew Moodie Dominic Shakeshaft Jim Sumser Kier Thomas Matt Wade Project Manager Elizabeth Seymour
Copy Edit Manager Nicole LeClerc
Copy Editors
Ami Knox, Marilyn Smith
Assistant Production Director Kari Brooks-Copony
Production Editor Kelly Winquist
Compositor and Artist Kinetic Publishing Services, LLC
Proofreaders
Kim Burton, Elizabeth Berry
Indexer Toma Mulligan
Cover Image Designer Bruce Tang
Interior and Cover Designer Kurt Krames
Manufacturing Director Tom Debolski
AdvancED Flash Interface Design
Copyright © 2006 by Michael Kemper, Guido Rosso, and Brian Monnone
All rights reserved. No part of this work may be reproduced or transmitted in any form or by any means, electronic or mechanical, including photocopying, recording, or by any information storage or retrieval system,
without the prior written permission of the copyright owner and the publisher.
ISBN-13 (pbk): 978-1-59059-555-8
ISBN-10 (pbk): 1-59059-555-6
Printed and bound in the United States of America 9 8 7 6 5 4 3 2 1
Trademarked names may appear in this book. Rather than use a trademark symbol with every occurrence of a trademarked name, we use the names only in an editorial fashion and to the benefit
of the trademark owner, with no intention of infringement of the trademark.
Distributed to the book trade worldwide by Springer-Verlag New York, Inc., 233 Spring Street, 6th Floor, New York, NY 10013. Phone 1-800-SPRINGER, fax 201-348-4505,
e-mail [email protected], or visit www.springeronline.com.
For information on translations, please contact Apress directly at 2560 Ninth Street, Suite 219, Berkeley, CA 94710. Phone 510-549-5930, fax 510-549-5939, e-mail [email protected], or visit www.apress.com.
The information in this book is distributed on an “as is” basis, without warranty. Although every precaution has been taken in the preparation of this work, neither the author(s) nor Apress shall have any liability to any person or entity with respect to any loss or
damage caused or alleged to be caused directly or indirectly by the information contained in this work.
The source code for this book is freely available to readers at www.friendsofed.comin the Downloads section.
I am encouraged to take on endeavors like this book in great part
due to my family’s pride in me; for that I am forever grateful.
—Michael Kemper
Family and friends are all we really have. To my wife, Julie, and two
daughters, Madison and Lauren, and to my parents, Joe, Gabrielle,
David, Cheryl, and Robert: I am honored to call you all my family
About the Authors
. . .xiii
About the Technical Reviewer
. . .xiv
About the Cover Image Designer
. . .xv
Acknowledgments
. . .xvi
Introduction
. . .xvii
Chapter 1 Flash Overview
. . .3
Chapter 2 Creating Usable and Innovative Experiences
. . .15
Chapter 3 Interface Designers’ Guide to Color
. . .33
Chapter 4 Planning Your Interface Design
. . .61
Chapter 5 Vector Drawing and Effects in Flash and Illustrator
. . . .71
Chapter 6 Understanding the Timeline and Layers
. . .95
Chapter 7 Working with 3D Vectors
. . .113
Chapter 8 Using Video in Flash
. . .135
Chapter 9 Photoshop Techniques
. . .175
Chapter 10 Moving from Photoshop to Flash and
Effective PNGs
. . .235
Chapter 11 Creating Animated Effects
. . .255
Chapter 12 Flash Textures
. . .291
Chapter 13 Photo Editing in Photoshop and Flash. . .
305
Chapter 14 Finishing Off Your Site
. . .337
Index
. . .345
About the Authors
. . .xiii
About the Technical Reviewer
. . .xiv
About the Cover Image Designer
. . .xv
Acknowledgments
. . .xvi
Introduction
. . .xvii
Chapter 1 Flash Overview
. . .3
Why Flash?. . . 4
From the user perspective . . . 4
From the creator perspective . . . 4
Ease of use . . . 5
Animation . . . 6
Video integration . . . 8
Browser autonomy . . . 8
Browser embedding . . . 9
Benefits of vector graphics over raster graphics . . . 10
Summary . . . 11
Chapter 2 Creating Usable and Innovative Experiences
. . .15
Creative direction . . . 15
Design layers. . . 16
Purpose . . . 16
Style . . . 17
Structure . . . 17
Craftsmanship . . . 18
Surface . . . 19
Critiques. . . 19
The experience. . . 20
Metaphors . . . 20
Tangible metaphors. . . 21
Conceptual metaphors. . . 22
Physical metaphors . . . 23
Narrative in Flash . . . 24
Interactive animation . . . 26
Benefits of animation. . . 26
Components for interaction. . . 26
Emerging interactions. . . 27
Summary . . . 31
Chapter 3 Interface Designers’ Guide to Color
. . .33
Basic color theory . . . 34
Selecting color. . . 35
Monochromatic. . . 37
Analogous . . . 37
Complementary . . . 38
Split complement . . . 38
Triadic . . . 38
Tetrad . . . 39
Color on the computer. . . 39
Color modes . . . 40
Gamma . . . 41
Nuts and bolts . . . 41
Color systems . . . 43
Hexadecimal color . . . 43
Other web palettes . . . 44
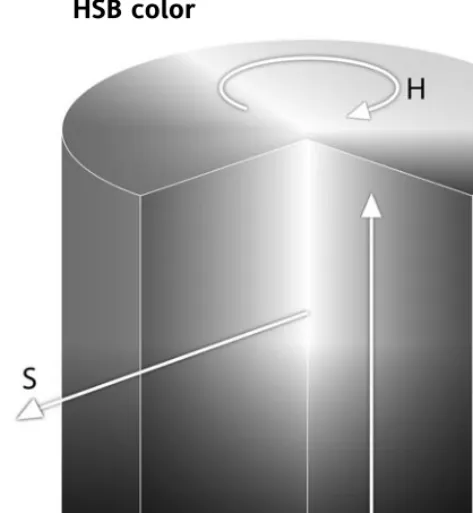
HSL color . . . 44
HSB color . . . 45
LAB color . . . 45
Communicating with color. . . 46
Color symbolism. . . 47
Color psychology . . . 48
Color strategy . . . 49
Design tools and techniques. . . 50
Using Flash color palettes . . . 50
Applying color using ActionScript . . . 56
Summary . . . 57
Chapter 4 Planning Your Interface Design
. . .61
Initial information . . . 61
Structure planning. . . 63
Wireframing and prototyping . . . 64
What is prototyping? . . . 66
Using your space efficiently . . . 67
Text spacing . . . 67
Interface padding . . . 68
Uniformity. . . 69
Summary . . . 69 CONTENTS
Chapter 5 Vector Drawing and Effects in Flash and Illustrator
. . . .71
Pros and cons: Illustrator and Flash. . . 72
Making it pop . . . 73
Creating button graphics using Illustrator. . . 73
Creating inlays using Illustrator . . . 78
Creating indents using Illustrator . . . 80
Technical drawing in Illustrator . . . 82
Photo illustration using Illustrator. . . 82
Interface layout design in Illustrator . . . 87
Moving from Illustrator to Flash . . . 88
Exporting SWF graphics from Illustrator. . . 88
Importing SWF graphics created in Illustrator . . . 90
Summary . . . 93
Chapter 6 Understanding the Timeline and Layers
. . .95
Anatomy of the timeline . . . 96
A layering example: the gel pill . . . 100
Creating the layers. . . 100
Drawing the pill body . . . 101
Adding the bottom highlight . . . 101
Adding the top highlight . . . 103
Creating a translucent shadow . . . 104
Adding text . . . 104
Blending modes. . . 106
Masks . . . 108
Motion guides . . . 109
Summary . . . 110
Chapter 7 Working with 3D Vectors
. . .113
Working with real 3D assets. . . 114
Working with semirealistic 3D assets . . . 114
User icon . . . 115
The base shape. . . 115
The bottom highlight . . . 116
Depth with inner glow . . . 117
Adding gloss . . . 118
Domain icon . . . 119
Creating the shadow . . . 119
Creating the orb . . . 119
Outer glow . . . 120
Inner glow . . . 121
Stars . . . 121
Adding gloss . . . 122
Statistics icon. . . 122
The base shape. . . 122
3D graphics using Illustrator and Flash. . . 124
Creating a 3D vector graphic. . . 124
Summary. . . 133
Chapter 8 Using Video in Flash
. . .135
Video content for Flash . . . 136
Shooting video content for the Web: A basic guide . . . 136
Equipment basics . . . 137
Shooting and editing basics . . . 140
Final Cut Pro basics . . . 142
Batch-capturing video. . . 142
Editing basics . . . 145
Exporting your sequence . . . 148
Bringing video content into Flash . . . 150
Formats and compression. . . 150
Encoding the video . . . 151
Using video in Flash . . . 157
Bitstreaming video. . . 159
Embedding video . . . 163
Summary. . . 168
Glossary . . . 169
Chapter 9 Photoshop Techniques
. . .175
Photoshop overview . . . 176
Setting up your file. . . 178
Creating the background . . . 181
Light source. . . 181
Background depth. . . 185
Foundation shapes . . . 185
Foundation base. . . 185
Foundation borders . . . 187
Background shadows . . . 188
Experimenting with colors. . . 192
Adding the logo . . . 192
Creating the interface layers . . . 194
Visor shape . . . 195
Body highlights . . . 198
The visor top group . . . 203
Visor shading. . . 204
Seam . . . 206
Adding gloss . . . 208
The visor inset shape . . . 211
Creating the secondary navigation area . . . 212
Adding details to the visor . . . 215
Creating the primary navigation . . . 217
Visor Top group and Primary Nav. . . 218
Adding a highlight . . . 221
Navigation bar shadow . . . 222 CONTENTS
Adding details to the logo. . . 224
Cloud pictures . . . 224
Light rays . . . 225
Creating the content containers. . . 225
Main content area . . . 225
Content background . . . 225
Content top . . . 227
Content borders . . . 229
Left column content area. . . 230
Content and buttons. . . 231
Mouseover states. . . 231
Moving from Photoshop to Flash . . . 232
Summary . . . 232
Chapter 10 Moving from Photoshop to Flash and
Effective PNGs
. . .235
Preparing the files . . . 236
The background . . . 237
The logo . . . 238
The logo rays . . . 240
The Flash file . . . 240
Navigation bar tutorial. . . 242
Re-creating in vector. . . 242
Masking the navigation bar. . . 246
Adding details . . . 248
Animating the navigation bar . . . 249
Logo tutorial. . . 249
Animating the logo . . . 249
Animating the rays . . . 250
Exporting vector objects to create raster assets. . . 251
Summary . . . 253
Chapter 11 Creating Animated Effects
. . .255
Cause, effect, and timing . . . 256
Realistic car. . . 256
Cartoon car . . . 257
Depth . . . 257
Implying speed . . . 258
Motion blur. . . 258
Faking motion blur . . . 258
Animation style. . . 259
Frame rate. . . 259
Animation effects . . . 260
Elasticity. . . 260
Bounce . . . 263
ActionScript animation techniques . . . 267
Setting up the movie . . . 267
Scripting animation . . . 267
Deconstructing interactive animation. . . 269
Setting up the animation . . . 269
Animating the menu . . . 274
Setting up the icon. . . 284
Animating the icon. . . 285
Scripting the interaction. . . 287
Summary. . . 288
Chapter 12 Flash Textures
. . .291
Creating texture with displacement maps . . . 291
Still images . . . 292
Animated images . . . 297
Summary . . . 303
Chapter 13 Photo Editing in Photoshop and Flash. . .
305
Working with bitmapped images. . . 306
Scaling down our image size. . . 307
Straightening up our lighthouse . . . 307
Removing our image background . . . 310
Color-correcting our image . . . 317
Images in Flash . . . 324
Exploring blend modes . . . 329
Filters . . . 331
Summary . . . 335
Chapter 14 Finishing Off Your Site
. . .337
Optimization. . . 337
The Bandwidth Profiler . . . 338
Compressing assets . . . 338
Publishing . . . 339
Embedding in HTML. . . 339
Detecting Flash. . . 340
QA testing. . . 340
Launching and post launch . . . 341
Maintenance . . . 341
Source files. . . 342
Continue analyzing . . . 342
Usability testing . . . 342
Summary. . . 343
Index
. . .345
CONTENTSMichael Kemper has managed and deployed interactive, video, and
animation projects in every industry vertical for some of the world’s largest companies. He has been recognized by eDesign magazine and has received numerous Addy Awards and Art Directors Club awards for interactive design and animation. Michael owns a creative consul-tancy (www.feedyourimage.com) in San Francisco, California, where he focuses on motion graphics and experience design for digital media. When he isn’t working on client engagements, he spends much of his free time reading graphic novels and practicing digital photography.
A computer enthusiast his whole life, Guido Rosso started designing professionally at the height of the dot-com boom. Surviving the crash unscathed, he and his twin brother (Luigi Rosso) opened RealitySlip Srl (www.realityslip.com), a design and development company based in Rome, Italy. They have since broadened their portfolio to include award-winning web design, application development, and video game projects for companies around the world. Guido’s work has been fea-tured in PC Gamer, American Design Awards, The FWA: Favourite Website Awards, and numerous other publications, and awarded final-ist for Macromedia MAX.
Brian Monnone is more than simply a Flash artist. He is a technologist
with a love for great design, motion graphics, and music. Currently, he is a Senior Interactive Designer at nFusion Group in Austin, Texas. His role with nFusion includes creating dynamic Flash demos, videos, and sound design.
His future plans include filmmaking. Becoming a filmmaker has been a lifelong passion for Brian, and until that day comes he’ll continue to create unique multimedia. Visit his website: www.monnone.com.
xiv
Sean McSharry is a Flash developer of seven years who firmly believes that Flash developers should
be as comfortable with design as they are with coding, and he practices what he preaches. “Flash is about bringing everything together into one platform and using the best coding practices, the best design practices, the best video production techniques, etc., to do it.” He has worked on projects for some of the world's most influential companies. Sean has a passion for digital video and has been combining this with his Flash skills over the last couple of years to create much Flash video work, recently doing work in the emerging Flash/IPTV broadcasting market. When he's not Flashing, he can be found pursuing his other passions: golf; snowboarding; Pilates; herpetology; and, of course, his wife, Mary, and their two sons, Aston and Jack.
Bruce Tang is a freelance web designer, visual programmer, and author from Hong Kong. His main
creative interest is generating stunning visual effects using Flash or Processing.
Bruce has been an avid Flash user since Flash 4, when he began using Flash to create games, web-sites, and other multimedia content. After several years of ActionScripting, he found himself increasingly drawn toward visual programming and computational art. He likes to integrate math and physics into his work, simulating 3D and other real-life experiences onscreen. His first Flash book was published in October 2005. Bruce’s folio, featuring Flash and Processing pieces, can be found at www.betaruce.com, and his blog at www.betaruce.com/blog.
The cover image uses a high-resolution Henon phase diagram generated by Bruce with Processing, which he feels is an ideal tool for such experiments. Henon is a strange attractor created by iterat-ing through some equations to calculate the coordinates of millions of points. The points are then plotted with an assigned color.
xn+1= xncos(a) - (yn- xnp) sin(a)
yn+1= xnsin(a) + (yn- xnp) cos(a)
xvi
Coming together is a beginning. Keeping together is progress. Working together is success. —Henry Ford
I have accomplished and learned so much from teams staffed with extremely creative, talented, and smart people. This book is a tribute to their lasting impressions on me. Many years ago I joined a team of profoundly creative free-thinkers: Tim Roessler and Anne Alden gave me that opportunity, and thanks to Hugh Graham, Daniel Weinshenker, Jeff Berting, Jeff Ingram, Todd Straka, Jen Thomas, Tara Kelley, Brad Johnson, Amy Morawa, and several others, I got a taste of what my days would be filled with for many years to come. On another team, Michael Stevens gave me the freedom to express myself as a lead designer and Creative Director; Kam Rope, “The Doctor” Andrew Jones, Suzanne Keen, Julie Jagger, Shum Pratts, Nick Hill, and Tom Flanagan are still some of my most enduring friends from that experience and also among the most talented and creative people I know. Currently I have the honor of working with the Metaliq, San Francisco, team comprised of Beau Ambur, Danny Riddell, Mike Lucaccini, Eric Anderson, the Rosso brothers, as well as the Grant Skinner group. Every day with this team is an adventure, and I am honored to be involved in their groundbreaking interactive endeavors. Although we weren’t on any team to speak of, Ali Mills and Amanda Thomason offered advice and recommendations during my writing process that was encouraging and valuable.
Of course, I owe a special thanks to Guido Rosso for involving me in this project and to Chris Mills along with the friends of Ed team for their hard work and advice.
—Michael Kemper Thank you, Luigi, for writing the “ActionScript animation techniques” section in Chapter 11! Thank you, Michael, for stepping into this project. It’s largely thanks to your efforts and dedication that we managed to finish this book.
—Guido Rosso The most important things to me are my wife, Julie, and my two daughters, Madison and Lauren: to you, I want to give very special thanks for always being by my side. I must be the luckiest person alive to have the most beautiful and caring family. I’m especially thankful to Julie for all the countless hours she has had to put up with me sitting in front of the computer working. She has been nothing less than extremely supportive of my endeavors, and I thank her for that. She is the best wife a guy can have. I would also like to thank my parents, Joe, Gabrielle, David, Cheryl, and Robert, for really believing in me and being proud to call me Son. It means the world to me.
Beyond that, my work is second most important. New media is fun, exciting, and different. I’m in this business because of that. Do I have a mission statement? Sure I do: “To create more smiles and laugh way too often.” Secondly, “I’m just a guy that wants to make some cool stuff.”
—Brian Monnone
Flash began primarily as an animation tool for designers. Most marketing people shunned the tech-nology because of low plug-in adoption rates. Clients disapproved because of their narrow per-spective on usability. Flash wasn’t even an afterthought to most developers. And everyone else considered Flash to be the next-level GIF animation—if they had heard of it at all. Things have cer-tainly changed in the industry and with Flash itself. Designers can achieve advanced motion graph-ics and interface design treatments akin to what is seen in movies and on television. Flash has a 98% install base. More clients recognize the potential success of doing something innovative and differ-ent using Flash. Developers can use Flash to create robust on-demand applications that rival any other application platform. And everyone else utilizes Flash to enjoy everything from websites, chat, music, and video across a wide range of connection speeds and platforms.
For a while, emphasis has been placed on getting application developers to migrate over to the Flash platform and use it to create their applications. During that transition, the perception of Flash has morphed, and we designers have been turning into “creative developers” as we picked up these new programming skills. This latest version of Flash has reactivated its base: designers. Those design-ers who stuck in there and believed in the Flash platform have earned front-row seats for the next evolution of the Internet—and this time it is very much influenced by Flash-based design and tech-nologies. Newer users who have the skills and talent for creating unique digital experiences will mul-tiply and fuel the flames of innovation in this field. Adobe’s purchase of Macromedia is but one indication as to how integrated Flash will become not only to the general Internet audience, but also to the products and workflow of professional designers and developers everywhere. Now Flash is becoming the all-in-one creation tool designers and developers alike have wanted for years. This book is for design educators, students, and industry professionals who have experience with Flash and want to elevate their work to be more meaningful and memorable. It is for designers who want to jumpstart their knowledge of the program and get inspired for their own Flash projects. And it’s for developers who are searching for reference material on creating attractive interfaces for their applications. Within the following pages you will be exposed to fresh ideas for interactivity and interface design, learn tried-and-true workflow techniques for maximum efficiency, and gain insight into the new and powerful design features of the latest release. For the more advanced users, it will be a primer for important new features of the application, as well as offer professional insight on how to best implement them. And for every level of designer, it will break down sought-after visual effects for multimedia interface design into comprehensive, easy-to-follow steps.
—Michael Kemper
Layout conventions
To keep this book as clear and easy to follow as possible, the following text conventions are used throughout: Code and URLs are presented in fixed-width font.
User interface elements (menu names, dialog box options, palette names, etc.) appear in this screen text font. Menu commands are written in the form Menu ➤Submenu ➤Submenu.
Where we want to draw your attention to something, we’ve highlighted it like this:
Sometimes code won’t fit on a single line in a book. Where this happens, we use an arrow like this: ➥.
This is a very, very long section of code that should be written all on the same ➥
line without a break.
Ahem, don’t say we didn’t warn you.
INTRODUCTION
Chapter 1
Believe it or not, many people still harbor serious concerns about integrating Flash into their web strategy. Countless implementations of poorly created Flash intros, confusing Flash interfaces, and long download times have taught far too many users, and prospective clients, to fear the Flash experience. Despite this misconception, Flash is perhaps the most flexible technology for creating interactive experiences. This flexibility can be a Flash designer’s greatest asset and also his worse liability. Flash is the only tool that gives designers total control over audio, video, animation, and lightweight graphics for the Web—which means the possibilities of a designed experience are endless. Flash has groundbreaking new features that enable designers to not only craft tasteful motion design sequences, but also integrate animation that supports the content in an inspiring and meaningful way. Flash is now a widely accepted application development tool, which means usability standards have been developed and adapted for the Flash experience. Plus, when optimized correctly, Flash sites cache and load much faster (up to 5 or 10 times faster) than an equal-sized HTML site.
And that’s where this book comes in. On the pages that follow are innumerable tech-niques from experienced interactive designers for creating professional Flash sites that look fantastic and work like a charm. With this new volume in your Flash knowl-edge arsenal, you’ll help the haters embrace Flash for what it is today, instead of what it has often been in the past.
FLASH OVERVIEW
4
CHAPTER 1
Why Flash?
Flash is a tool for those who want to expand the idea of a website into a web experience. HTML does offer some options that are better alternatives to that of Flash for certain target audiences. For instance, it is often going to be a good idea to use an HTML display option for a text-heavy site or in the case where accessibility for users with visual impairments is a concern. But exceptions to this rule and many other conventional standards are always emerging. Go to linkdup.com or thefwa.com on any day and see for yourself that the ingenuity and creativity of the Flash community are constantly pushing the boundaries and solving the problems of Flash experiences.
From the user perspective
As much as Flash can hinder usability, it can also enhance it. With the right combination of Flash com-ponent sets, object-oriented programming, and design production, and understanding on the part of the designer, any Flash project can be far more intuitive than its HTML-based counterparts.
We can all remember at least one time we visited a Flash site and thought, “Wow.” But we might be hard pressed to reflect on the same feeling with regard to a non-Flash site. This is because tasteful Flash sites are more meaningful to the user when compared to other sites of the same caliber. The “sit-back” viewing experience is just as valuable as the “lean-forward” clicking experience, and Flash makes them both happen simultaneously.
Nobody likes to wait. Regardless of whether it’s in a line at the post office (what’s that?) or in the com-fort of your home office, all of us, and the users we design for, would rather be doing anything else. Once again, Flash saves the day. Not only do vector-based graphics in Flash download quicker than conventional bitmap graphics on HTML-based sites, but it is also easy to send and receive data and content in a Flash interface without page refreshes in the browser window. Combine these factors with the way Flash has revolutionized the delivery of rich media content, and you get less waiting regard-less of the type of online experience.
Gone are the days of hasty plug-in downloads and installs. FlashPlayer has an auto-update feature, which means it is painless and happens instantly. FlashPlayer is also ubiquitous across all measurable platforms. It has the highest adoption rate of any software platform to date. This ensures that your users see your site just as you intended it.
From the creator perspective
New tools in Flash make it extremely easy to perform complicated tasks. For non-ActionScript users, the Script Assistant is back to help with programming. Filters and blend modes mean less time opti-mizing bitmaps to work in Flash and more time to tweak the visual styling of your designs.
FLASH OVERVIEW
Figure 1-1. This image was completely created from scratch with only the vector tools available in Flash. It looks as sharp as any bitmap counterpart, yet its file size is only 8 kilobytes as a result of its mathematical creation.
Using Flash as a vehicle to distribute rich media content like MP3s and video has also gotten extremely simple. Designers no longer have to toil over using third-party compression tools or creating and scripting UI buttons for control over media. Flash provides everything necessary to get you up and running with little upfront knowledge.
All of this and more is discussed in the following pages. Flash has given you the tool to enhance your design and development work, and now we will add to your know-how by sharing tips and tricks on new Flash features as well as tried-and-true methods for creating your best work ever.
Ease of use
6
CHAPTER 1
Vector art requires less CPU power to view than comparable raster images. The file size of vector images will always be smaller than comparable raster images.
Since Flash is vector based, it is easy to modify your vector graphics right in Flash without hassling with external editing and reimporting.
You can apply nondestructive filters and blend modes to vector art in Flash to attain bitmap quality dithering and gradations without the bitmap file size.
Vector art can be scaled infinitely up in size without losing detail or quality.
Even if you use an external application like Illustrator to generate your graphics, the importing process is seamless.
One of the most exclusive features of Flash vector graphics is the ability to navigate through them by clicking fills or strokes. With this ability, it becomes second nature to surf through massive groups of many different vector shapes to select the portion you want to edit. By double-clicking a stroke, you can select all adjoining strokes of the same style. To further add to the intuitive interface, Flash allows you to then click anywhere on a stroke or fill edge and drag it into a Bezier curve. This allows for very quick-and-smooth tracking of curves when creating base shapes for complex objects. By using the Pen
tool and clicking a rough angular shape of the intended object, you can then quickly drag each edge into curves to create anything from simple shapes to complex masks.
By its very nature, the idea of having dynamic fills and strokes on all of the vector objects is a bril-liantly quick and easy one to take advantage of. Never is the appearance of any vector object beyond your ability to change drastically with a simple click or two of the mouse. This is incredibly handy when performing fast color or style changes to a portion or the whole of a sites’ interface.
Gradients in Flash are simple to use, as well. They do add more CPU strain for the viewer, but vector-based gradients are still far easier to process than comparable PNGs or JPGs. Flash gradients are also editable at any time after initial creation right in the Flash environment, all with a simple drag or click. In complex situations, it is effortless to change the angles of a multitude of different gradients to alter a lighting scheme in a design.
Another great little Flash drawing feature is the ability to subtract shapes from one another. By drop-ping a circle into the middle of a square of a different fill style, it is easy to remove the circle or delete it and leave a square with a hole in it. This is admittedly a rudimentary example, but it becomes impor-tant when using Flash as a drawing tool. Flash is also fine-tuned for having exact pixel-shaped objects and placement if you know how to go about it the right way. When used correctly, it is simple to set a series of meticulous proportions and dimensions throughout your vector artwork, thus rendering them very smooth and defined.
Animation
FLASH OVERVIEW with each. There are four completely different ways to animate objects in Flash, motion tweening, shape tweening, cell animation, and ActionScript animation, and each option has its own set of rules that govern what can be done with it.
Motion tweening is the easiest way to animate things in Flash. Any object, whether it’s a movie clip,
graphic, or button, can be animated with a motion tween. Motion tweening simply moves an object from point A to point B while allowing for a variety of property changes along the way. Flash is great in that it will automatically calculate these changes and employ them on your object for you. Everything from height and width to color and location can be changed automatically with the click of a button. This provides for extremely precise command over objects in your timeline. Later in the book, we will demonstrate motion theory and high-end motion tween effects, and you will learn how to create them yourself.
Unlike motion tweening, with shape tweening you cannot animate movie clips, graphics, or buttons. Instead, you have complete control over the shape and fill style of a raw vector object from point A to point B. This type of animation is well known and very useful in transforming one vector shape into another, but it also has a variety of other important uses. For instance, shape tweens are helpful in creating pulsating light effects or changes in gradient backgrounds. You cannot apply filter effects or blend modes to shape tweens unless they are nested in a movie clip. In the later chapters of this book, we will show you how to do amazing things you probably never thought you could do with a shape tween.
Cell animation is the most traditional type of animation, historically speaking. Flash designers seldom
use it. For the purposes of interface design, using timeline and ActionScript tweening is far more prac-tical because it requires less production work and takes less time. But there are instances where cre-ating something frame by frame is beneficial in order to achieve a unique effect for a transition or button rollover. Flash does have a handy onion-skinning feature, which improves the designer’s work-flow for creating frame-by-frame animations. And, of course, it is still the foundation for cartooning in Flash, as well. Flash does very well when animating things frame by frame and actually can perform as good or better with these types of animations than with either form of tweening. It seems to affect the CPU much less when you use cell animation instead of tweens for large shapes and images. In fact, some of the more complex and stunning effects we will show you later in the book are done by this method.
ActionScript animation is very different from using the other timeline-based methods. It requires
8
CHAPTER 1
Video integration
This is a very important time for online video and Flash. There is no other way to have video brought into a website and made to look a part of the interface and/or design without using Flash to do it. Flash has a great number of ways to seamlessly integrate video into interactive experiences. Designers have many new options for Flash/video integration, and users have the ability to view that video con-tent now more than ever before. It has become simple to integrate video into buttons and transitions, and use it as a main content focus in Flash. Thanks to the VP6 Flash compression tool shipped with Flash 8 and the built-in Flash Video Import Wizard, video is going to become a fundamental content platform for Flash experiences and the Internet as a whole. This, of course, is something we all want to participate in, and with this book you can get started or enhance your existing knowledge base. We will show you everything you need to know to begin creating and deploying video online using Flash.
Browser autonomy
One of the great things about using Flash is that it’s supported by all the most popular browsers these days, and it looks exactly the same on each one. This makes Flash an ideal tool for applications or websites that require complex functionality. It might be possible to create this complex functionality in one specific browser with complex DHTML, JavaScript, and specific components or extensions, but it will require at least a lot of additional coding to get such functionality to work with all browsers on all platforms, and you might end up discovering that it just can’t be done. Therefore, using Flash means that you don’t have to spend countless hours tweaking HTML and CSS code, creating hacks, coding browser-specific functions, and finding workarounds to make your site look and behave the same on every browser and platform. With the exception of a few JavaScript integration issues (which we’ll cover later in the book), you have a guarantee that anything you create will most likely work flawlessly on all browsers.
Does this mean you need only create and test the site on your computer? No! You should always test your site on all major browsers and platforms. Furthermore, you should test your site with older and newer computers in multiple platforms.
FLASH OVERVIEW
Browser embedding
So how do you get Flash to work in your website? After creating your work in Flash, you need to export it into a SWF file. This is a proprietary file format that Flash uses to efficiently store your movie. Newer versions of Flash also compress the file data with the zlib compression library (essentially the same compression as gzip and Zip files), which helps minimize file size and bandwidth usage even further. You should never link your site directly to a SWF file. To correctly display a Flash movie in a browser, you need to create an HTML file that contains the tags that tell your browser to load the Flash player. To do this, you need to add <OBJECT>and <EMBED>codes to your HTML code. The <OBJECT>tag dis-plays your Flash file in Internet Explorer (IE) on Windows, while the <EMBED>tag displays your Flash file in Netscape, Mozilla, Firefox, Safari, and IE Mac.
Following is an example of the HTML code required to include Flash in an HTML file. Change
myMovie.swfto the relative location of your SWF file. Remember to also customize the height and width parameters to match your movie.
<OBJECT classid="clsid:D27CDB6E-AE6D-11cf-96B8-444553540000" codebase="http://download.macromedia.com/pub/shockwave/cabs/ flash/swflash.cab#version=6,0,40,0"
WIDTH="100" HEIGHT="100" id="myMovie.swf"> <PARAM NAME=movie VALUE=" myMovie.swf "> <PARAM NAME=quality VALUE=high>
<PARAM NAME=bgcolor VALUE=#FFFFFF>
<EMBED src="/support/flash/ts/documents/myFlashMovie.swf" quality=high bgcolor=#FFFFFF WIDTH="100" HEIGHT="100"
NAME="myMovieName" ALIGN="" TYPE="application/x-shockwave-flash" PLUGINSPAGE="http://www.macromedia.com/go/getflashplayer" /> </OBJECT>
10
CHAPTER 1
You can customize or add several properties to this code. All required attributes are included in the preceding code; however, you can add additional parameters and attributes to customize the context (right-click) menu of your movie, to make the background of your movie transparent, and to pass variables to Flash. We’ll cover these and other attributes in later chapters, but the important thing to understand now is that these need to be included in both the <OBJECT>and <EMBED>tags, as the tags are mutually exclusive. If the <OBJECT>tag fails, the browser refers to the <EMBED>tag, therefore any attributes that were specified in the <OBJECT>tag (using <PARAM>) are no longer valid and need to be specified as an attribute of the <EMBED>tag.
Benefits of vector graphics over raster graphics
In today’s computer design world, artists can create graphics using raster (defined by pixels) or vector (defined by point-to-point math). In this part of the chapter, we’ll cover the differences between the two and their respective advantages and disadvantages.
Raster graphics are what we generally associate with traditional computer design using Photoshop and bitmap images. A bitmap is made up of a grid of pixels, as you can see in Figure 1-2. Each one of these individual pixels can be one color.
The problem with raster graphics is that they become jagged as you scale them. The larger you make them, the more jagged they appear. Flash compensates for this by anti-aliasing, which is a technique used to make edges appear smoother. Anti-aliasing applies subtle transitions to pictures around their edges. This is not ideal for Flash, especially if you’re doing a lot of scaling effects, unless you’re specif-ically going for that particular look. If you’re going for a smooth look, then vector is the way to go. Vector graphics are created using math, particularly geometry. Let’s say we wanted to create a blue circle on a white background. The creation of this circle in either the raster or vector art method is pretty much the same. You use the Circle tool to click your center point and then drag to get the desired size and shape. The underlying difference between vector and raster is in how the objects are actually rendered by your computer. Instead of recording the color data for each pixel as in raster images, vector uses math to simply dictate the center point and the radius of the circle. The computer then calculates the shape of the circle using just these few bits of information. As we have seen, raster images need to record data for each individual pixel, which will give you vast file sizes in many cases. In the case of a raster blue circle, the file size will increase as the physical size of the object increases. In the vector example, the object can be scaled to oblivion, and it will still retain the same tiny file size, as it only needs the geometric data to render it.
We will go in depth into the various pros and cons of the two formats later on in this book. For now, it is important that you have a basic understanding of their differences so that you appreciate the unique power Flash has with its tools. Knowing the strengths of vector will most definitely empower you to create richer and more practical website designs as you grow as a designer.
FLASH OVERVIEW
Summary
Flash is easily the most impressive and important rich media tool available for the Web today. Understanding all its strengths and weaknesses will vastly increase your ability to sell its use to your potential clients, and as a result increase your confidence as a designer. Let’s imagine a future board-room meeting with a prospective client.
[image:30.612.84.443.53.364.2]After you hear the question “Why Flash?” disperse into the heavily vented boardroom air, you’ll watch as its asker leans back in defiance, palpably waiting for your response. This is where you will feel free to paraphrase from this chapter. The principles discussed in the upcoming text should arm you with more than enough information to turn the question around on its head. Flash isn’t good for every-thing. But in the high-impact, low-cost, fast-paced, modern business world, it is the champion of the present and the near future of web design.
Following is a list of lessons you’ve learned in this chapter:
Flash is an easy-to-use program that has so many benefits, it takes this whole book just to men-tion a few of them.
Increased ease of object manipulation with the tools in Flash makes it very good not just for animating and interaction, but also for conception and graphic creation.
Animation is the number one sales point of Flash. No other program on earth is as vast in its ability to grant seamless animation and dynamic content into your website.
Flash can easily integrate video to create large but practical multimedia experiences for your clients. It is important to know the right times and the wrong times to use video, as it does add considerable file size.
Flash is a plug-in, and as a result it will display exactly the same across different browser types, unlike HTML. There are a few exceptions to this rule, but they are minor and we will touch on them later.
Knowing the difference between vector and raster is as important to a Flash designer as know-ing the difference between up and down. Vector can greatly decrease file size and exponen-tially increase the animation options available to you while creating your site.
Vector art is mathematically based and will remain just as sharp even if scaled to 1 million times the size of its original. Just don’t expect to find a monitor big enough to display that size yet.
12
Chapter 2
Designing interactive experiences in Flash is such a fast-paced profession that it is subject to an abundance of superfluous visual trends, which usually look dated shortly after they are published online (if not before). Another challenge to design-ing Flash interfaces is creatdesign-ing somethdesign-ing that is intuitive enough for the user to learn and navigate. This is demanding because we have so many options that making the appropriate choices often means practicing self-restraint.
In this chapter, you will learn concepts and theories to help you find successful design solutions for Flash. You can depend on this chapter for that next inspiration to help you create something appropriate and innovative. It will also give you some ver-biage to assist you in selling your Flash-based ideas to your clients.
Creative direction
First, let’s characterize some ingredients of a successful interface design. Just about every project comes about by using the basic research, plan, design, develop, and deploy process. It doesn’t really matter if you are a mechanic, a chef, or a web designer. Chances are, if you are a seasoned professional, you are familiar with and use some variety of this process on each of your projects. The part of the interface designer, especially when designing for a Flash solution, is an integral role during
CREATING USABLE AND
INNOVATIVE EXPERIENCES
16
CHAPTER 2
Figure 2-1. You can think of the structure of your creation as a cake, with each element represented by a layer in the cake.
Design layers
Think of the structure of your creation as a delicious cake, as illustrated in Figure 2-1. Each element is represented by another layer in the cake. The icing and decoration might look fantastic on the surface, but without all of the good stuff inside, it would be hollow—and no one wants to eat a hollow cake!
Now let’s look at each of these layers in your design, starting with the innermost one.
Purpose
As advanced designers, we want our designs to be part of the solution, not simply decoration for con-tent and functionality. The first step in this process starts by understanding the project’s purpose. What will the content be? What are the business or nonbusiness objectives? Who will be using it? What is the desired path or action a user should take? Understanding a project’s purpose will help you come up with the best solutions for your interface when time is a commodity in short supply. Compiling all of this information into a creative/design brief is a good exercise for understanding the project’s purpose. Creating a creative/design brief will also provide the nondesigner members of your team with a deliverable that helps them understand the creative decisions you will make during the project. The following is an example of what you might include in a creative/design brief:
Audience: Consider to whom the design is supposed to appeal. Use age, sex, ethnicity, income,
hobbies, or anything else that is relevant.
Technical considerations: Determine which plug-ins will be needed. Are there special
consid-erations for style sheets? How much content is anticipated and in what format?
CREATING USABLE AND INNOVATIVE EXPERIENCES
Positioning: Clearly state in one sentence the message the users of the project will get.
Describe how the design will support this message.
Tone: List keywords that express the atmosphere of the interface. For example, clean, natural,
modern, classy, and so on.
Imagery: Describe the types of images, photos, illustrations, typography, and colors you
pro-pose to use on the project. Describe how this imagery supports your tone.
Desired actions: Decide which actions the user needs to take while visiting the interface to
complete the objectives.
Flushing out all of these ideas and putting them on paper will help you point to something later on during the project to help you justify your design decisions should they come under scrutiny. It also serves as a basic road map to use when trying to come up with ideas during your design phase. Using a creative/design brief gives everyone an opportunity to put in their two cents about what they expect the project to include. This gives you a good idea about how to design for the project and makes it easier for everyone else on the team to support your creative decisions, since they can see their input being implemented in the design.
The foundation of your soon-to-be-successful project is its purpose. So do a little research and know your subject.
Style
In how many other jobs do you get to be an integral part of a music label one week, a blockbuster movie promotion the next, and a modern furniture company the week after that? Truly one of the things to absolutely love about being a creative professional is that the job is also a vehicle to learn about so many subject matters. The job of the designer is to place those subject matters in their proper context. We communicate messages by using the visual vocabulary of our project’s genre. We determine if a design is exciting, relaxing, fun, sad, scary, and so on.
For example, for a ski resort client, one of your assignments might be to create a Flash site that appeals to families looking for winter vacations, and another assignment might be to create something that encourages college students to apply for part-time jobs as ski instructors or lift operators. Aside from the related subject matter of winter activities, these are very different audiences that would require very different styles.
Designers understand how to appeal to an audience of BMX enthusiasts, as well as to consumers of high-fashion apparel. In other words, the style must make sense for the subject matter.
Structure
By nature, most interface designers are multimedia mavericks. We bend, twist, and combine text, ani-mation, video, and sound into interactive experiences. And what better medium for all of these dif-ferent media types to converge than in Flash?
Figure 2-2. This interface is designed to be interactive as well as autoplay.
of different ways to integrate search functionality with Flash interfaces, and all of those decisions impact design and animation.
Consider designing a map-based search that shows ski lifts and lodging accommodations vs. a drop-down menu interface that sorts available job schedules. The impact is obvious to an interface designer. Always remember that the best interfaces are intuitive and look good at the same time.
To the advanced interface designer, there are very few limits to what technology or interaction we can design on any given project. It is the appropriate use of these tools that challenges us.
Craftsmanship
It takes a natural problem solver to take on a complicated medium like the Web and tame it enough to craft a quality experience. Many tools are available for interface designers, but it is the practical knowledge designers bring to the table that carries the key ideas and goals through to fruition. Ironically, sometimes the best test of craftsmanship is whether or not the user noticed it. The most polished and intuitive interfaces are transparent to the point that the user doesn’t even think about whether anything is misplaced or accidental. Through testing, failure, and determination, the advanced designer practices a heightened level of craftsmanship that allows everything else to shine as bright as it can. This aspect of interface design is probably the most frustrating because of all of the options we have for constructing a project. Fine-tuning how those options fit together isn’t always the same on a per-project basis, which makes each solution unique.
For example, when I designed the streaming media showcase for VitalStream, shown in Figure 2-2, the assignment was to seamlessly integrate video controls and video sorting/preview options into a branded interface. The challenge of designing these types of elements and interactions is that they need to be intuitive enough for most users to notice and understand but cannot overpower the con-tent itself.
18
CREATING USABLE AND INNOVATIVE EXPERIENCES The craftsmanship of a project is apparent in all of the tiny details. High-quality design and craftsman-ship cannot carry an interactive experience alone, but they can most certainly single-handedly destroy its effectiveness.
Surface
The surface of your design is the first superficial exposure a user has to the work, and it is where everything comes together or falls apart. To the trained eye, the surface of a project shows the pro-duction value and the effort that went into the project.
If the designer didn’t take the time and effort to explore all of the necessary building blocks leading up to the surface, it will be obvious, and the whole experience will most likely lack the consistency and continuity that are expected from advanced designers. If all of the fundamentals were given proper consideration, the typical user won’t notice at all. Ironically, this is the reaction you want. It shows that you have created an intuitive design solution—one that doesn’t require any second guessing. It’s a somewhat thankless job, but you still get the satisfaction of knowing that what you’ve accomplished provides the perfect solution for the client, and hopefully you enjoyed creating it as well.
From the surface perspective, all of the elements that create the experience should be present in the design. Consistency and attention to detail will prevail over corner-cutting production techniques on the surface of any interface design.
Critiques
Generally, an interface design is deconstructed in team critiques during the design and development process. This is a good exercise for getting professional feedback from people who understand the project. It is important for those participating in a critique to constantly approach the design from what they perceive the perspective of the target audience to be. Critiques can provide a valuable opportunity to deconstruct the user from many different perspectives, and this usually improves your design. Anyone who has experienced the critique can tell you that it can be the best or worst thing to happen to a design. At worst, it can be a design-by-committee session, where your design will get ripped apart and put back together inappropriately. At best, it is a pleasant gathering where everyone on your team congratulates you for finding the perfect solution and gives you meaningful feedback on how to improve the concept.
In most cases, the work generally speaks for itself, and an impartial jury of your peers is the best place for it to succeed or fail. But critiques don’t exist to simply showcase the work; they are supposed to make it better. The level of purpose, style, structure, craftsmanship, and surface should be analyzed in these sessions. Here are some general guidelines for critiquing an interface:
Does the design make a clear statement that supports the content and goals of the project? (This addresses the purpose layer.)
Does the style make sense for the subject matter? (Obviously, this is about the style layer.) Is the important content easy to get to and is the design intuitive? (This relates to the structure layer.)
Many designers succeed by seeking criticism more than praise. If you are stuck on a design for what-ever reason, show it to someone on your team who knows the project and get her critique. If you don’t have that luxury, show it to anyone who will give you his opinion. Generally, if you get an “I think it’s perfect” type of reaction, disregard it and move on to the next person. Get a consensus. Working through criticisms will most likely guide you to a better solution.
The experience
Interface designers generally must consider many aspects of a project beyond simply the way it looks. They also need to create how the interface feels. Using metaphors, visual/animated narratives, and consistent interactions can also add to the “feeling” of your interface design.
The goal of every interface should be to extend the user identity to include the experience you cre-ated. This means that the interface should completely absorb the users, as if they were playing a game or driving a car. A successful interactive experience usually happens in four steps:
Departure: The user is sent to a website, uses a kiosk, or is given a CD-ROM. The first
impres-sion is made from the surface of your design.
Discovery: The user is exposed to the surface of the experience and interacts with it. At this
point, all of the elements of your interface design will intrigue the user into digging deeper into the experience. He can identify with the style, and the structure is intuitive.
Point of no return: The user is hooked. He has found something of interest in the content and is
actively interacting with your interface to learn more. At this point, your surface design is second-ary to the content, but the structure of the navigation and content is what is keeping your user engaged. The craftsmanship of your work is imperative to maintaining this successful experience.
Realization: The user has made a personal connection with the material. He has found
mean-ing in the content and hopefully accomplished the task at hand. Later, when thinkmean-ing about the material, the user will most likely first visualize the interface as a point of reference.
Flash is the best tool for creating these types of immersive interactive experiences because it gives designers a fundamental tool for making broadband-type interactions accessible to broad audiences. As interface designers, we can create animation- and video-based experiences for kiosks and CD-ROMs, as well as for a majority of websites. Flash interface designers have the freedom to choose the context of content based on how it will be the most meaningful. This flexibility makes interactive experiences in general more meaningful for everyone.
Metaphors
The vernacular of Interface design largely consists of metaphors designers have taken from real-life objects. Using metaphors can be a risky business, as they can easily be overimplemented or too cute to be effective. Perhaps in the future, metaphors will be less relevant and the use of them will be more sentimental. But for the foreseeable future, metaphors are a practical tool for solving design problems. Three main types of metaphors are used successfully in interface design:
Tangible: These types of metaphors are usually seen on interactive elements in the form of
textures, bevels, drop shadows, and so on, but they can also include using real-world bitmap textures throughout an interface.
20
Figure 2-3. An interface that uses a tangible metaphor
CREATING USABLE AND INNOVATIVE EXPERIENCES
Conceptual: These are very common in navigation as icons, such as a printer to indicate
print-able content or a clock to indicate a block of time. Using conceptual metaphors is extremely helpful when you don’t have room on a button label to fully explain the button’s purpose.
Physical: These metaphors imply a sense of place, such as a map or a house as the structure of
the experience. Physical metaphors are most common in game interfaces, but more and more Flash interface designers are using them successfully for all types of experiences.
Let’s take a closer look at each of these types of metaphors.
Tangible metaphors
Most browser or operating system scrollbars emulate something tangible. They look like something you can literally grab onto and move inside a track. Designers have harnessed bevels, gradients, drop shadows, textures, and so on to indicate interactive elements so that they are more intuitive for a broader audience. This phenomenon may be due to the fact that using a screen to accomplish tasks is still relatively new when you compare it to something like a typewriter or printed materials. Users seem to intuitively comprehend these types of tangible cues more than flat shapes. As a result, the use of this metaphorical technique has become a convention of interface design. The book you hold in your hands is chock-full of helpful lessons for pulling off similar techniques.
You can find inspiration from many types of tangible objects you interact with all the time: car dash-boards, kitchen appliances, stereo receivers, cameras . . . you name it. If you look around, you will find that your world is packed with toggles, switches, push buttons, scroll wheels, knobs, levers, and other objects for you to emulate in your interfaces.
Conceptual metaphors
The best interface designers make it a point to immerse themselves in as many different types of media and entertainment forms as possible—movies, magazines, video games, theater, architecture, and so on. You will never have to create something in a vacuum if you take advantage of these resources. Many Flash designers use visual techniques that have been adapted from these other types of media. This is especially true with transitions between content and navigation sets. You may have seen plenty of “Flashturbation” in the form of website transitions. But if they are done graciously, transitions can assist in extending the user-based identity to your interface.
A plethora of styles and effects implemented in film and television also work well in Flash. In fact, some broadcast designers use Flash as an animation tool to generate basic animations for segments in network television. Taking
animation and type con-cepts from other forms of media and combining them with your own ideas is a great technique for creat-ing transitions in Flash. It is this type of innovation that has made Flash what it is today.
Figure 2-4 shows an exam-ple of an interface I cre-ated for a DVD release of a movie about backroom
Figure 2-4. An interface that uses a conceptual metaphor
22
gamblers in Las Vegas. The transitions between screens are video footage I edited and cropped using the footage I received from the studio that made the film. Every time the user moves into a new sec-tion, she gets a preview of a scene from the movie with a transparent overlay of cards being shuffled and dealt. In this way, the interface itself becomes a trailer as the user navigates through it, and the transitions maintain continuity with the content of the site. I used conceptual metaphors throughout the experience, formatting pictures in the photo gallery as playing cards, animating them as if they were being dealt, and playing a card flip sound as they loaded.
Other conceptual metaphors include icons and pictograms, where you visually encapsulate a complete idea into something as small as 20 ✕ 20 pixels, as illustrated in Figure 2-5. These are especially appropriate in designing data visualizations.
Thanks to the innovations with ActionScript, Flash is now one of the most robust development tools for creating Rich Internet
Applications (RIA). This has created a market for reporting dashboards of all types that include many different kinds of charts and graphs. Thoughtfully designed icons and pictograms enhance these dash-boards greatly.
The reporting dashboard can be the most challenging type of project to design because of the many factors to consider. Not only are you charged with creating a consistent virtual identity and visual lan-guage that are easy to understand, but your designs must also have continuity with the data being pre-sented. This requires a solid understanding of what is being reported, as well as how the data is being used. Sometimes, the simplest of sites require this type of design as well. Using a clock icon to indicate time or a television screen icon to indicate video are common applications for this type of metaphor.
Physical metaphors
Another common interface design strategy is the implication of a physical place. Your interface design could be a house with many rooms for the user to navigate through, a map with interactive regions containing the content, a book in which the user actually turns pages to view content, a card table for a poker game, and so on.
It is helpful to use physical metaphors when designing games. As an example, the interface I designed for a Flash Texas Hold’em game, shown in Figure 2-6, has a tabletop, cards, chips, and even other play-ers present. This enhances the play experience much more than just having card graphics and buttons. When using this tactic, you can have a lot of fun creating the ambiance and considering the architec-ture of a place. But physical metaphors can be difficult to execute successfully for a few fundamental reasons. When creating a virtual “model” of a real or imaginary place, there seems to be no end to how far you can carry the metaphor. This can be a huge task to design, especially if you are modeling a real place. At some point, you will have to decide when the metaphor ceases to be effective and integrate other intuitive Interface elements for navigation and content.
Designing an interface based on physical metaphors is especially challenging if the navigation struc-ture needs to be fluid or dynamic. Many projects need to allow for growth in the fustruc-ture. This is a huge challenge for most Flash interface designers. Oftentimes, when designing an interface based on a defined space, making navigational changes after the implementation can get overly complicated. So know your content and plan for change.
CREATING USABLE AND INNOVATIVE EXPERIENCES
24
CHAPTER 2
Figure 2-6. An interface that uses a physical metaphor
If metaphors are implemented tastefully, using them in your interface designs can greatly enhance the user’s experience by making the interface easier to use and learn, and generally making the experi-ence more memorable.
Narrative in Flash
There are many reasons for distilling ideas into graphic and animated form in Flash. Most of them involve engaging the user on an instinctual level and using the powerful multimedia features in Flash to create a memorable interface.
In most Flash interfaces, it’s much better to use multimedia rather than long spans of body copy because it’s usually a real pain to read text on the screen. Most people who read content from online sources print it out because it’s easier on the eyes.
One issue designers are constantly running into is the scrolling problem. Many times, you need to cre-ate a scrolling text box inside your Flash site to accommodcre-ate long blocks of copy. Unfortuncre-ately, your entire interface is most likely inside a browser window that, if resized, will also contain a scrollbar. Double scrollbars are widely accepted as unusable, not to mention a huge eyesore.
A good reason for using animation or video in Flash instead of long blocks of copy is because they can be universal, and text can’t. Using visual language can transcend any language barrier.
CREATING USABLE AND INNOVATIVE EXPERIENCES those instances where your content is a prime candidate for creating a multimedia experience com-plete with animation, sound, and video, there really is no other choice than Flash.