SANS Institute
InfoSec Reading Room
This paper is from the SANS Institute Reading Room site. Reposting is not permitted without express written permission.
Utilizing "AutoRuns" To Catch Malware
Malware likes to survive- detect its survival attempts today! How do you know what is scheduled to start automatically on your Windows systems? Learn how to utilize freely available utilities to monitor the areas of a Windows system that malware may use to survive the boot sequence. In this paper, we will discuss how to monitor areas on a Windows system that are used to start processes at boot up and logon. We will look at scripting to automate the use of these utilities to monitor what is set to run automatically ...
Copyright SANS Institute
Author Retains Full Rights
Key fingerprint = AF19 FA27 2F94 998D FDB5 DE3D F8B5 06E4 A169 4E46
Utilizing “AutoRuns” To Catch Malware
What wants to auto-run on your Windows system today?
Author: Jim McMillan, [email protected] Advisor: Pedro Bueno
Accepted: <DATE>
Abstract
Key fingerprint = AF19 FA27 2F94 998D FDB5 DE3D F8B5 06E4 A169 4E46
1. Introduction
“Malware is a set of instructions that run on your computer and make your system do something that an attacker wants it to do”. (Skoudis, 2004) It can perform a number of undesirable tasks on your computer. Malware is often referred to as malicious code because its programming intent is usually for something malicious. In his book, “Malware: Fighting Malicious Code”, Ed Skoudis writes, “The malicious code doesn’t have your best interests in mind.” (Skoudis, 2004).
With many people and companies analyzing malware over the years, we have observed this fact about malware. It has been used to satisfy the agendas of criminals at the expense of many law abiding citizens and businesses. From the number of anti-virus and anti-spyware products available, we can safely say there is a high demand from consumers to protect themselves from malware. Many people and businesses just plainly do not want to have malware on their computers.
Motivation for the malware creator is primarily for financial gain. In a 2005 article, Information Week reported “more than 70 percent of virus writers are now writing spyware under contract, one more piece of evidence that hacking has evolved from mischievous hobby to money-making criminal venture”. (Keizer, 2005) Malware authors have been financially motivated for many years.
The indication of financial motivation continues on into the decade. In an article from the 13th IEEE International Symposium on Pacific Rim Dependable Computing it is stated, “All these recent financial-motivated malware programs, after successfully
infiltrating a machine, need to stay running on the infected machine for a long time and therefore must survive a system rebooted. This can be achieved by one of the following two ways: 1. by registering as an OS auto-start extension such as an NT service, a tray icon in Windows, or a Unix daemon/cron job; or 2. as an extension to an existing
application that is either automatically run (such as the shell in Windows), or popular and commonly run by users (such as a Web browser).” (Dai, & Kuo, 2008)
Key fingerprint = AF19 FA27 2F94 998D FDB5 DE3D F8B5 06E4 A169 4E46
possibility of fame, in today's climate their motivation is almost always financial.” (Debrosse, 2009) This is an indication that more malware authors are realizing the potential of their code to make money, which many people consider more important than the fame.
On the VirusList.com website, it is claimed that “Malware appears in any given environment when the following criteria are met: 1) The operating system is widely used, 2) reasonably high-quality documentation is available and 3) the targeted system is insecure or has a number of documented vulnerabilities.” (Kaspersky Lab) For this reason, we are going to look at malware as it pertains to Microsoft Windows operating systems and applications that run on Windows.
Key fingerprint = AF19 FA27 2F94 998D FDB5 DE3D F8B5 06E4 A169 4E46
2. Detect malware initialized by auto-run techniques
2.1. Windows system startup
The Windows system startup is a complicated process that is difficult to explain in detail. The intent of this section is to familiarize ourselves with some portions of the startup process, not to learn the entire process in detail. If we use Google to search the Internet for information on the Windows system startup, we will find very little detail on the process from start to finish. In fact, even a search of Microsoft’s site will turn up very little conclusive results.
In the book “Windows Internals, Fifth Edition” there are 28 pages that discuss the steps of the Windows startup. In those 28 pages, there about as many references back to process in chapters 3-7 and many references to various registry entries involved in the boot process. Toward the end of the authors’ discussion, they state “In addition to the Userinit and Shell registry values in Winlogon’s key, there are many other registry locations and directories that default system components check and process for automatic process startup during the boot and logon processes.” (Russinovich, & Solomon, 2009)
If asked what we think the system is doing when it starts up, we would probably answer with a few common items. We would probably agree on things like the loading of hardware device drivers. Drivers for things we use to interface with the operating system to accomplish tasks, things like the mouse, keyboard, display and printers. Which is exactly right, all of these devices load drivers as part of the Windows system startup.
For example, on the root level of a Windows XP system partition there is a hidden file called boot.ini. This file is used to provide a boot menu at system startup and can be configured with certain boot options to tell the system how to boot. If we consider adding the /BOOTLOG option as described at
Key fingerprint = AF19 FA27 2F94 998D FDB5 DE3D F8B5 06E4 A169 4E46
HKLM\System\CurrentControlSet\ Services, we will find entries that contain the parameters for these drivers, as well as other drivers and services.
On The Microsoft TechNet website there is an article titled “System and Startup” by Paul Sanna. The article discusses some key registry locations, in addition to the Services registry keys. The article is on an older version of Windows, however, these registry locations still apply on today’s versions of Windows. Sanna writes, “When Windows 2000 starts, a number of programs launch in the protected system context. To see the applications that launch for the operating system, open the Registry and inspect this entry.
Root Key: HKEY_LOCAL_MACHINE
Key: SOFTWARE\Microsoft\Windows NT\CurrentVersion\Winlogon
A handful of Registry entries control the applications and services that run at startup. It's useful to know where to find this list should you need to debug some problem at startup. The following list of keys show you where the run information is stored: HKLM \SOFTWARE \Microsoft \Windows \CurrentVersion \Run
HKLM \SOFTWARE \Microsoft \Windows \CurrentVersion \RunOnce HKCU \Software \Microsoft \Windows \CurrentVersion \Run
HKCU \Software \Microsoft \Windows \CurrentVersion \Runonce” (Sanna, 2001) If we run the System Configuration Utility, Msconfig.exe, built into most Windows Operating Systems, we can view and edit some of these services and
applications that run at system startup. However, due to many discussions that refer to the Autoruns Utility instead of the System Configuration Utility, we will not be
discussing the System Configuration Utility in detail. It is only mentioned because it is built into Windows operating systems and readily available for limited use. If you would like more information on the System Configuration Utility, please visit URL
http://support.microsoft.com/kb/310560.
Key fingerprint = AF19 FA27 2F94 998D FDB5 DE3D F8B5 06E4 A169 4E46
As we venture into malware survival techniques and then on to a look at the Autoruns Utility, you will soon see that malware has a lot of opportunity to hide in the Windows startup process.
2.2. Malware survival techniques
2.2.1. How does malware survive the Windows boot process?
Since today’s malware has financial motives driving its existence, it naturally makes sense that malware wants to live and thrive. Whether it is some sort of fake security software pestering us to make a purchase, some ransom demanding software or an elusive botnet agent awaiting commands, they all need a way to survive a power cycle. What better way to ensure survival than utilizing features of the OS that will assure
automatic execution during the startup process?
In his book, “The Art of Computer Virus Research and Defense”, Peter Szor discusses this point in a section on Viruses in Kernel Mode referring to the Windows NT Infis virus. He states, “The virus installs the proper Registry key to allow itself to load on next system startup: HKEY_LOCAL_MACHINE\SYSTEM\CurrentControlSet\
Services\inf”. (Szor, 2005) An example of how an older virus uses the registry to ensure its survival.
Yet today, if you browse through malware characteristics on any anti-virus vendor’s web site, you will find that much of the Windows related malware uses
Windows startup processes to survive. To affirm this point, let’s look at a few pieces of malware via the McAfee Avert Labs Threat Library (http://vil.nai.com/vil/default.aspx). The three pieces we will look at are: W32/Koobface.worm, W32/Conficker.worm, and Generic Rootkit.dt.dr.
Name: W32/Koobface.worm (http://vil.nai.com/vil/content/v_148955.htm) Type: Virus
SubType: Win32
Discovery Date: 08/03/2008 Related autorun characteristics:
The following registry keys are added:
•HKEY_LOCAL_MACHINE\SOFTWARE\Microsoft\Active Setup\Installed Components\Intelli Mouse Pro Version 2.0B\StubPath: "%WinDir%
Key fingerprint = AF19 FA27 2F94 998D FDB5 DE3D F8B5 06E4 A169 4E46
•HKEY_LOCAL_MACHINE\SOFTWARE\Microsoft\Windows\CurrentVersion\ RunOnce\*Intelli Mouse Pro Version 2.0B*: "%WinDir% \System32\splm\ ncsjapi32.exe"
•HKEY_USERS\Software\Microsoft\Windows\CurrentVersion\Explorer\Advanced\ Hidden: "2"
•HKEY_USERS\Software\Microsoft\Windows\CurrentVersion\Run\Intelli Mouse Pro Version 2.0B: "%WinDir% \System32\splm\ncsjapi32.exe"
•HKEY_USERS\Software\Microsoft\Windows\CurrentVersion\RunOnce\*Intelli Mouse Pro Version 2.0B*: "%WinDir% \System32\splm\ncsjapi32.exe"
Name: W32/Conficker.worm (http://vil.nai.com/vil/content/v_153464.htm) Type: Virus
SubType: Worm
Discovery Date: 11/24/2008 Related autorun characteristics:
When executed, the worm copies itself using a random name to the %Sysdir% folder. (Where %Sysdir% is the Windows system folder; e.g. C:\Windows\System32)
It modifies the following registry key to create a randomly-named service on the affected system:
•HKEY_LOCAL_MACHINE\SYSTEM\CurrentControlSet\Services\{random}\Paramete rs\"ServiceDll" = "Path to worm"
•HKEY_LOCAL_MACHINE\SYSTEM\CurrentControlSet\Services\{random}\"ImageP ath" = %SystemRoot%\system32\svchost.exe -k netsvcs
Name: Generic Rootkit.dt.dr (http://vil.nai.com/vil/content/v_241386.htm) Type: Trojan
SubType: Dropper
Discovery Date: 11/10/2009 Related autorun characteristics:
The malware then creates the following registry entries to ensure its execution as a Windows service when the infected machine reboots:
•HKEY_Local_Machine\System\CurrentControlSet\Services\zacypxeepnjv7 ImagePath = "%System%\Drivers\[Random file name].sys"
DisplayName = "[Random filename]"
Key fingerprint = AF19 FA27 2F94 998D FDB5 DE3D F8B5 06E4 A169 4E46
2.3. The Autoruns Utility
Autoruns is one of the many great Windows utilities created by Mark Russinovich and Bryce Cogswell of Windows Sysinternals. “This utility, which has the most
comprehensive knowledge of auto-starting locations of any startup monitor, shows you what programs are configured to run during system bootup or login, and shows you the entries in the order Windows processes them. These programs include ones in your startup folder, Run, RunOnce, and other Registry keys.” (Russinovich, & Cogswell, 2009)
Autoruns can be very beneficial in hunting down the malware that uses Windows startup areas to initialize. The information produced by Autoruns can be somewhat overwhelming at first, especially the first time you see it run. There are a surprisingly large number of processes that start during the Windows initialization process.
The Autoruns utility download includes a set of programs we will discuss, a GUI version (autoruns.exe) and a command line version (autorunsc.exe). We will take a look at both applications, but will quickly realize the benefits of the command line version as we get into our monitoring process. You can download the Autoruns Utility from Microsoft at http://technet.microsoft.com/en-us/sysinternals/bb963902.aspx. Step-by-step instructions for installation and configuration of the process we are going to build, including Autoruns, can be found in the Appendix (Section 4).
2.3.1. The Autoruns GUI interface
Key fingerprint = AF19 FA27 2F94 998D FDB5 DE3D F8B5 06E4 A169 4E46
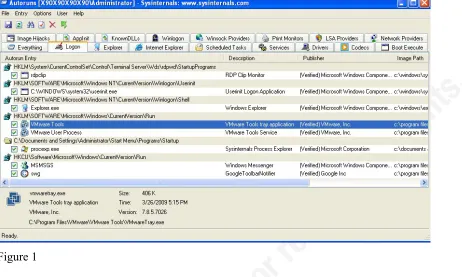
Figure 1
It gives several tabs to view results for each auto-run area, including one tab to see everything. In Figure 1, the Logon tab is selected and shows all auto-run entries that get processed when a user logs on. As you can see, Autoruns.exe shows us a lot of information about the processes that are configured to run when Windows starts.
By default Autoruns.exe scans the auto-run areas for the computer and the user that is logged on to the computer. Autoruns displays the entry location/entry name (Autorun Entry), the description obtained from the file properties (Description), the signing publisher obtained from the file properties (Publisher) and the path to the file (Image Path). There is also a check box that gives us the ability to directly enable or disable entries from within Autoruns.exe.
By selecting an item in the list, we can obtain further information about that item. The additional information is displayed in the information pane at the bottom of the Autoruns window. In Figure 1, we can see the additional information available about the VMware Tools entry that is selected. This information includes some of the file
[image:10.612.93.555.76.353.2]
Key fingerprint = AF19 FA27 2F94 998D FDB5 DE3D F8B5 06E4 A169 4E46
Through the menu bar or a right-click context menu, we can perform certain actions on the selected entry or apply different options to simplify the view. Some actions that can be performed include:
• Delete – will delete the entry location. The entry in the registry will be
deleted, not the file on disk where the entry pointed. If the entry location is a file path, whatever the path points to will be deleted.
• Copy – will copy the information of the selected entry to the clipboard in
tab delimited format.
• Jump to – will open Regedit to the location of the selected entry.
• Search Online – will open a web browser and perform a web search for the
process selected with the default browser.
• Process Explorer – will open Sysinternals Process Explorer to the process
of the selected entry. The Process Explorer application needs to be running or in the environment path. More information on Process Explorer can be obtained at http://technet.microsoft.com/en-us/sysinternals/bb896653.aspx.
• Properties – will open the properties page for the file in the Image Path.
As we mentioned, there are also some options available to refine the view. Those options include:
• Include Empty Locations – Autoruns will not show entries for the
locations that do not contain any information. If you would like to see these entries, enable this option.
• Hide Microsoft and Windows Entries – will hide entries that are
associated with Microsoft products. This should be combined with the Verify Code Signatures option to prevent hiding files with invalid signatures.
• Hide Windows Entries – will hide the entries that are associated with the
Windows OS. This should be combined with the Verify Code Signatures option to prevent hiding files with invalid signatures.
• Verify Code Signatures – will attempt to verify the publishers signature (if
available) to make sure it is signed with a valid signing certificate. This option has been turned on in Figure 1.
Key fingerprint = AF19 FA27 2F94 998D FDB5 DE3D F8B5 06E4 A169 4E46
a system that may be infected with malware and determine if anything looks amiss. But wait there is more; Autoruns has a command line version.
2.3.2. The AUTORUNSC command line interface
The Autoruns command line program, Autorunsc.exe, is capable of providing the same information as the GUI program. This gives us an ideal situation to expand the GUI’s functionality and usefulness by providing us a means to automate and control desired output. Like when you need to analyze the auto-run output from a remote computer, a capability not found in the GUI version.
Autorunsc.exe gives us several options to control the information it can retrieve. Figure 2 shows the options that are available to us.
Figure 2
Key fingerprint = AF19 FA27 2F94 998D FDB5 DE3D F8B5 06E4 A169 4E46
couple of tabs combined into one option. The Services and Drivers tabs get combined under the “-s” option, whereas the Winsock Providers and Network Providers tabs get combined under the “-n” option. You will also notice a few options to control format of the output and the amount of output.
The “-m” option allows you to reduce the output to non-Microsoft entries, leaving you with all of the third party entries. The “-v” option allows you to verify the
publisher’s signatures for applications that are digitally signed. Remember to use the “-v” option anytime you use the “-m” option. This will protect against programs
masquerading as Microsoft programs.
The formatting options provide some convenient functionality as well. The “-c” option allows us to save output in comma separated format. This is a very useful option, especially when you are dealing with a remote computer. You can redirect output to a file and then load the output file into a spreadsheet. This will allow you to utilize sorting and searching features for faster analysis. It also proves to be nice when trying to detect changes, which we will discuss later.
Key fingerprint = AF19 FA27 2F94 998D FDB5 DE3D F8B5 06E4 A169 4E46
Figure 3
Key fingerprint = AF19 FA27 2F94 998D FDB5 DE3D F8B5 06E4 A169 4E46
2.4. Using Autorunsc Output to detect malware
2.4.1. Theory behind the process
The idea behind detecting malware with Autoruns is to detect changes in the auto-run areas of a Windows system over time. Change detection is accomplished by
comparing a current snapshot image to a previous snapshot image and then analyzing the differences. The changes will hopefully be minimal and will allow for quick detection of something that looks out of place.
The process involves coming up with a schedule as to when to make snapshots, compare snapshots and rotate the snapshot images. At the scheduled time, the process will run and take a new snapshot of the auto-run areas. Once the new snapshot is made it will compare it to an older snapshot, probably the previous one. If you run a very tight change control process, you may compare to a baseline image. In the process we discuss later, we will be rotating the snapshots.
As far as the frequency of the process, the time period between snapshot comparisons can vary from system to system due to varying threat levels. You really have to determine what time period is best for you. Comparing snapshots once a day for the light computer user may be enough. For heavy Internet and e-mail usage, you may want to schedule a task to run more than once a day. The frequency all depends on your exposure to threats, other defenses/mitigations in place and your overall paranoia level.
2.4.2. Creating a snapshot of the auto-run areas
To create a snapshot of the auto-run areas we will be using the command line utility and redirect the output to a file. The GUI version has a compare function built in to it. However, for our automation techniques later on, we are going to stick with the command line application, Autorunsc.exe, for now.
Key fingerprint = AF19 FA27 2F94 998D FDB5 DE3D F8B5 06E4 A169 4E46
option if we would like to minimize the output included in the snapshot, but we will leave it out so we can identify any changes to Microsoft entries.
We want our output to be in CSV format for a couple of good reasons. First, all the information about a single entry is on a single line of output. This will make the job of comparing the same entries in one snapshot to another snapshot easy. Since the output for an entry will remain the same as long as nothing changes, we will not be alerted to the entry. We will cover snapshot comparison in detail in the next section. Secondly, this format will make it convenient to import the data into a spreadsheet or database for analysis or other tasks.
When deciding what we want to see, we will want everything that our Windows system will attempt to start when it boots. By analyzing everything, we will be alerted to changes in any files that get modified. This includes system files that may have been modified by the installation of a service pack or, in worst case, by infection of malicious code.
Remember that we have hashes of the files in our output, so we can detect when an existing entry gets changed. When software updates are applied, it is often that a filename, path and registry entry gets reused. If the entry location, entry, description, image path, publisher and launch string doesn’t change, how will we be alerted? Easy- if a file’s content changes, so does the hash of the file. If a hash changes, so will the entry in our output. Bottom line, if a file’s content is modified, we will be alerted.
In our command, we are adding the option to verify digital signatures of the publishers to help prioritize our analysis of changes. If the digital signature of a file is verified successfully, chances are pretty high that it is valid. This gives us the
opportunity to focus on the other changes that have no digital signatures or unverifiable ones.
Key fingerprint = AF19 FA27 2F94 998D FDB5 DE3D F8B5 06E4 A169 4E46
with command line redirection operators, you can find more information on them on Microsoft’s web site at URL: http://technet.microsoft.com/en-us/library/bb490982.aspx.
2.4.3. Comparing two snapshots
Comparing snapshots and analyzing the differences, or changes, between two snapshots over a period of time will be what helps us catch malware activity. However, before we can compare two snapshots, we need to have two snapshots. To discuss snapshot comparison, it would be most beneficial to discuss an example where the snapshots have some differences.
For our example, we will install the Google Toolbar between running our snapshots. Snapshot files contain a lot of information, everything that starts
automatically, so we will not be looking at the contents of these files directly. We have already looked at a subset of what the files contain when we were discussing the
Autoruns utility. At this time, we will be interested in looking at the differences between the two snapshot files.
Key fingerprint = AF19 FA27 2F94 998D FDB5 DE3D F8B5 06E4 A169 4E46
Figure 4
Next, we will install the Google Toolbar. We are not going to discuss the install in detail. That is outside the scope of this paper. We will just go to Google’s site, navigate to the download page, download the installer and install it. Of course we will virus scan the downloaded installer prior to executing it.
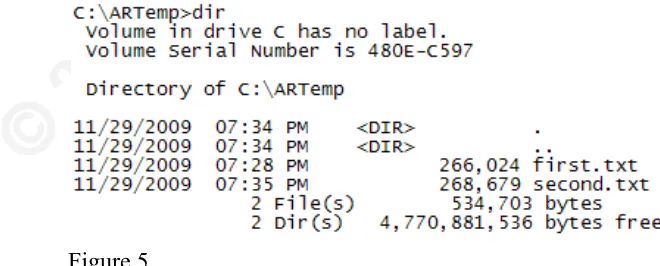
[image:18.612.56.386.569.702.2]After the install is complete, we will issue our command to create another snapshot file to compare to our previous snapshot. To do this, let’s issue our command again as seen in Figure 5. This time we created another file called second.txt. You will notice the second.txt file is slightly larger than the first.txt file. What has changed?
Key fingerprint = AF19 FA27 2F94 998D FDB5 DE3D F8B5 06E4 A169 4E46
To find out, we need to do a comparison of the snapshot files, first.txt and second.txt. How do we do this without manually comparing line by line?
One option would be to use the Windows built-in file comparison utility, fc.exe. However, using this utility presents us with a couple of challenges. First, the utility’s output is not ideal to use within a script for parsing of the results, as we will do later. Secondly, we are trying to monitor for malware attempting to hide on our system. If the malware cloaks itself from the built-in Windows commands, how can we detect it?
To overcome these challenges, we will discuss using the diff.exe command from DiffUtils for Windows. Diff will give us output of the differences in our two files that is easy to parse. It will also provide us with programs and libraries that are separate from the Windows operating system. However, before we get into the actual file comparison, let’s take a quick look at what Diff is and how to get it.
Diff started out as a GNU utility for Linux. According to GNU.org, “Computer users often find occasion to ask how two files differ. Perhaps one file is a newer version of the other file. Or maybe the two files started out as identical copies but were changed by different people. You can use the diff command to show differences between two files, or each corresponding file in two directories. diff outputs differences between files line by line in any of several formats, selectable by command line options. This set of differences is often called a ‘diff’ or ‘patch’. For files that are identical, diff normally produces no output; for binary (non-text) files, diff normally reports only that they are different.” (Free Software Foundation, 2008)
To run diff.exe on Windows we need to get the DiffUtils for Windows package and the Dependency files from SourceForge. Download these files and extract them according to the instructions in the Appendix, section 4.3. While we are downloading the files, we will grab the documentation file to have for future reference.
Key fingerprint = AF19 FA27 2F94 998D FDB5 DE3D F8B5 06E4 A169 4E46
Figure 6
Our output shows us that the Google Toolbar adds six entries to our auto-run areas. We know this because of the six entries that diff.exe found in second.txt file that were not in first.txt file. Notice each additional entry is prefixed by a “>” symbol. If we think about the order of the input files on the command line, the “>” symbol can be considered a pointer to the file where the entry appears. Thus, second.txt would have these entries in comparison to first.txt. The rest of the files entries are the same, hence no display of the entries. If there had been an entry in first.txt that was not in second.txt, the “<” symbol would have appeared before the entry.
Key fingerprint = AF19 FA27 2F94 998D FDB5 DE3D F8B5 06E4 A169 4E46
second.txt. The concept behind the “<” and “>” symbols is all we need to understand. If you would like more information on diff.exe output, please refer to the documentation file we downloaded from SourceForge.
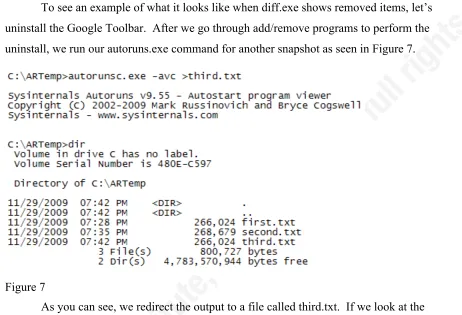
[image:21.612.85.547.140.455.2]To see an example of what it looks like when diff.exe shows removed items, let’s uninstall the Google Toolbar. After we go through add/remove programs to perform the uninstall, we run our autoruns.exe command for another snapshot as seen in Figure 7.
Figure 7
As you can see, we redirect the output to a file called third.txt. If we look at the file size in the directory listing, the size of third.txt is now the same as first.txt. This would possibly indicate that the uninstall process removed the six entries it added during the install.
Key fingerprint = AF19 FA27 2F94 998D FDB5 DE3D F8B5 06E4 A169 4E46
Figure 8
Our output indicates the six items listed were removed from third.txt. The “<” symbol indicates they were in the second.txt file and no longer in the third.txt file. If we compare the items from this output to the output after our install, we can see the same items that were added (“>”) after the install were deleted (“<”) after the uninstall.
As we progress from here, we should keep our file order in our diff.exe command constant, such as “diff.exe {previous snapshot} {current snapshot}”. By doing so we can consider lines starting with “>” as additions and lines starting with “<” as deletions.
Key fingerprint = AF19 FA27 2F94 998D FDB5 DE3D F8B5 06E4 A169 4E46
2.5. Bringing it all together with scripting techniques
2.5.1. Scripting Autorunsc and Diff
Now that we have covered the basic concept of making and comparing snapshots of Windows auto-run areas, let’s talk a little about automating the process. Continuing to do this as a manual process would be too inefficient and tedious, especially on a system where not many changes are expected. If we have empty reports day after day, we may become complacent and stop running the process on a regular basis. What we need to do now is put these commands to work in a script.
We have created and used two commands from the command prompt, one to dump all auto-run information and another to compare snapshots of this information. We need to consider how we would go through the whole process of running our commands while maintaining a current snapshot and the previous snapshot we need for a historical comparison. To start building our automated process, let’s put the process together in the logic we would process our tasks.
When working out our automation logic we should be thinking along the lines of having the following tasks:
• Initialize constants and variables – this will be the first part of our script that
will initialize any variables and constants we want to use. This will include working paths, filenames, etc.
• Make current snapshot – this is where we will issue the Autorunsc.exe
command to make our current snapshot. We will redirect the output to a snapshot file so we can compare it to an older snapshot file.
• Compare snapshots – in this section we will issue the diff.exe command to
compare our snapshots. At this point, you may be wondering “where is this older snapshot we are comparing to our current snapshot?” We will cover file handling coming up shortly.
• Build report – here is where we will parse the results of our diff.exe command
and add the information we want to our report.
Key fingerprint = AF19 FA27 2F94 998D FDB5 DE3D F8B5 06E4 A169 4E46
Before we start discussing a script to accomplish these tasks, there are a few other considerations that we need to think about. As mentioned earlier, what about file
handling? How do we manage the files we are creating so we have that previous
snapshot? We also need to think a little about report logic. What exactly do we want to see in the report? What about error handling? What types of errors can we account for and capture in our script to make future troubleshooting easier.
File Handling: In our script, we are relying on two snapshots to help us detect malware infections. One of the current auto-run state and one from a previous state at some point in time. To have a previous snapshot, what better to use than the last snapshot we made for our current snapshot? Which brings us to a file management decision- do we want to manage files before the current snapshot is made or afterwards?
To make this decision, let’s look at a snapshot rotation method where the current snapshot becomes the previous snapshot. We already know we need two snapshots to do a comparison. Let’s call the files snap.curr (current snapshot) and snap.last (previous snapshot). If we want to set up our files for the next run, we will want to replace the previous snapshot with the current snapshot. We will also want to delete the current snapshot file to prepare for our new snapshot file. To accomplish this we can delete the snap.last file and then rename snap.curr to snap.last.
We have two options for the timing of this file preparation step. We can perform it either at the start or the end of our script. One thing to consider in the decision of where to make the rotation is snapshot retention. If we rotate the two files at the end of the script, we lose our previous snapshot right away and are only left with the current one (now named as the previous). If we rotate them at the start of the script, we retain our two snapshots until the next time the script executes. Retaining the snapshots for as long as possible will be beneficial if any investigation of the snapshots is required due to a report entry. For this reason, we will be rotating the files at the start of our script.
Key fingerprint = AF19 FA27 2F94 998D FDB5 DE3D F8B5 06E4 A169 4E46
it is missing we should create one so our diff command will have two files to work with. By making this check we will cover both situations, a first run and a run where the file is missing.
This is the most basic file handling that needs to be accomplished. You can become as elaborate as you need with snapshot history. It’s just a matter of translating your desires into the script.
Report Logic: While building the report from your difference file you need to consider what is important for you to see. Our script will report any addition or deletion entry. However, this may be too much information in some environments. Once again, you can make the report as elaborate or as simple as needed for your environment. There may be times when there are no changes between snapshots, so you may not want to display a report at all. The “what” and “when” is completely up to you. We will be discussing report examples later in an effort to make the decisions easier. Refining the process over time will be a common task.
Error handling: Our script in this paper has some basic error handling built in to it. The error handling in our script is for assuring the necessary folder structure is in place. You should consider what other errors may arise in your environment and add/remove whatever error handling you desire.
Environments vary from place to place, so should the script included in this paper. You should take the script and customize it to your needs. However, if you feel this is beyond your ability, the script can be implemented as-is.
There are a wide variety of scripting languages and programming styles. This script is basic and can be rewritten in your preferred language and style. However, in our analysis we will be looking at a VBScript implementation.
2.5.2. Complete working VBScript
Key fingerprint = AF19 FA27 2F94 998D FDB5 DE3D F8B5 06E4 A169 4E46
Appendix, sections 4.2 and 4.3. Finally we will need to copy the VBScript, in Appendix section 4.4, into a file called ARCheck-SA.vbs or whatever you wish to call it.
We should probably use a name that has some meaning when we see it.
ARCheck-SA means “Auto-Run Checker-Stand-Alone”. The “.vbs” file extension will associate the file with the Windows Scripting Host, which is important. You should not deviate from this unless you are an advanced user and know what you are doing.
When we discussed our automation logic we defined several tasks that were needed to accomplish the process we are creating. We touched on five main tasks: define variables, make snapshot, compare snapshots, build report and display report. Then we discussed tasks for file and error handling. If you look at our script in the appendix, you can pull out the following six tasks we will discuss while explaining the script.
1. Variables – look for comment “Set up variables and constants”
At the start of our script we define several variables and constants. We assign default, or starting, values to these variables. Throughout our script you will see naming conventions used for our variables and constants. These naming conventions are used so we can help identify what type of data may be stored in the variable. The following list of three character variable prefixes describes the value types stored in our variables:
• boo – Boolean variable for TRUE or FALSE values. • int – Integer variable to hold numeric values.
• str – String variable to hold string data.
• obj – Object variable to hold a reference to a system object. Examples of
objects used are: System information objects to pull host and user names; File System objects to access files on a file system; and Shell objects to run our commands.
The constants and variables in the script are explained in the Appendix, section 4.5.
Key fingerprint = AF19 FA27 2F94 998D FDB5 DE3D F8B5 06E4 A169 4E46
After we get our variables and constants configured, we can start with our file management portion of the script. While performing file management, the script starts performing some error checking on the folder structure it requires. Our script relies on a certain folder structure to be in place to write temp files, manage our snapshot files and save our report files.
The first thing our script does in the file handling section is to check to see if the strOutputPath exists. If it doesn’t exist, the script will attempt to create the folder. At this point, our error handling kicks in and checks to see if the folder creation was
successful. If it was not successful, we call the ErrHandler procedure passing it the error number, a description of “Output Path” and the strOutputPath variable. The procedure will display an error and the script will exit.
Once we make sure the strOutputPath is establish, we do the same check on the strReportPath. If it doesn’t exist, we attempt to create the path and check for creation errors. If there was an error, we once again call the ErrHandler procedure passing it the error number, a description of “Report Path” and the strReportPath variable. The procedure will display an error and the script will exit.
Once we know our folder structure is in place, we prepare the snapshot files by performing the file rotation as we discussed in the file handling logic. We delete the previous snapshot file (strPreviousFile). Then we move the old current snapshot file (strCurrentFile) to make it the previous snapshot (strPreviousFile). Or if the file is missing, we create an empty previous snapshot file to compare with the current snapshot we are about to make.
3. Make snapshot – look for comment “Make snapshot”
Key fingerprint = AF19 FA27 2F94 998D FDB5 DE3D F8B5 06E4 A169 4E46
One caveat we in the script, that we haven’t discussed yet, is the added (and undocumented) command line parameter “/accepteula”. This parameter will prevent a first time use license agreement from being display and waiting for the user to accept the agreement. If we do not use this command line option, it may prevent our script from running and ultimately detecting malware.
4. Compare snapshots – look for comment “Compare snapshots”
Now that we have made a new snapshot, we are ready to compare the snapshots and make a difference file for our report building task. We once again set the
strCommand variable with the diff.exe command we created. The RunCommand procedure is called and passed the strCommand variable, the window style of 0 (zero) to run as a hidden window and the booWait variable to have the script wait for the program to complete before continuing.
5. Build report – look for comment “Build Report”
The report building task can now process our difference file and we can build a list of entries to report. In this task we build the report header, parse the difference file creating the report body and then write the report body to the report file.
The first part of this task opens an object to the report file for writing the report of our findings. Once the file is open a header is written to the file based on the information we have collected from the system. This information includes hostname, username, version number, a notice if there is no previous history, the time the report ran and the report filename.
After we build the header, we open an object to read the difference file. We parse the difference file line by line, or entry by entry, storing the entry in the strOutput
Key fingerprint = AF19 FA27 2F94 998D FDB5 DE3D F8B5 06E4 A169 4E46
Finally the script writes the strAdditions variable to our report file. Unless there are no entries to report, in which it will write an entry saying there are “No deletions to report.” This is followed by a similar process for the strDeletions variable.
6. Display report – look for comment “Display Report”
During the report building process we used a boolean variable called booChanges to track if changes were discovered. If there were any additions or deletions detected in the difference file this variable was set to TRUE. If no additions or deletions were detected then this variable was set to FALSE.
The strCommand variable is set to run notepad.exe with our report file as input. If the booChanges variable is set to TRUE then the script calls the RunCommand procedure. The procedure is passed the strCommand variable, a 7 for window style (normal window in the background) and the booNoWait variable. The 7 to open notepad.exe in the background is to prevent interruption of anything the user may be working on. The booNoWait variable is to have the script continue and complete without waiting on the user to close the notepad program.
Just a few more small tasks to clean up our system resources
After the report is built and displayed, there are a couple more items the script does before exiting. The script cleans up the difference file that we do not need to keep by deleting the file located in the variable strDiffFile. It closes the system objects it had open and then calls the ExitScript procedure to end the processing.
Extra Code found at the end of the script: Procedures
At the end of the script you will find the scripting for the procedures used by the script. There are three of them; ErrHandler, ExitScript and RunCommand.
Key fingerprint = AF19 FA27 2F94 998D FDB5 DE3D F8B5 06E4 A169 4E46
was being used when the error occurred. The procedure uses this information to display an error message and then it calls the ExitScript procedure.
The ExitScript procedure does just what its name indicates. It causes the script to terminate. It first frees the open file system object (objFSO), then it calls the WSH quit command to terminate the script gracefully.
The RunCommand procedure also does just what its name indicates. It runs a command, stored in the strCmd variable, which is passed to the procedure when called. In addition to the command, the procedure is passed two other variables; intWinStyle and booWaitDone. The intWinStyle variable defines the style of the window to run the command. Our script uses two styles; 0 - hidden and 7 - normal window in background. The booWaitDone variable is a boolean variable that determines if script processing waits for the command to finish or not.
2.6. Change detection
2.6.1. Detecting a change
After running this script regularly over a period of time we will start seeing various reports being generated. Obviously, the reports that tell us “No changes were detected…” are the reports we like to see. However, this will not always be the case. We will see reports that have changes that are normal due to software installations, updates or uninstallations. We will see reports alerting us of changes because items a user may modify, such as their Startup folder or Scheduled Tasks. Unfortunately, we may also see reports that are due to malware activity.
As time goes by, hopefully we all will get better at understanding what is causing the reports to be generated. For now, let’s discuss some of the items we may see in our reports. Then we will move into some of the things that can be done to help determine what is going on.
Key fingerprint = AF19 FA27 2F94 998D FDB5 DE3D F8B5 06E4 A169 4E46
starting with a “<” symbol will be a deletion. The report is designed to keep additions grouped together in one section and deletions in another.
Install/Uninstall Example:
For the first example, we will revisit our Google Toolbar install and uninstall that we discussed earlier. If you look back at the output from the diff command we used in Figure 6, which we used to compare snapshots around our Google Toolbar install, you will see the second entry of output is the same as you see in Figure 9.
Figure 9
Our general analysis by reading the entry in Figure 9, as ordered, tells us:
• The entry is an additional auto-run entry as the “>” symbol indicates • The Entry Location is "HKLM\SOFTWARE\Microsoft\Windows\Current
Version\Run"
• The Entry is called "Google Quick Search Box" • The entry’s status is “enabled”
• It has a Description of "Google Quick Search Box"
• The Publisher is “Google Inc.” and the digital signature was “(Not Verified)” • The application location, or Image Path, is:
“c:\program files\google\quick search box\googlequicksearchbox.exe".
• The application, or Launch String, that gets executed is:
"C:\Program Files\Google\Quick Search Box\GoogleQuickSearchBox.exe /autorun"
• Finally, Autoruns gives us the three hashs (MD5,SHA-1,SHA-256) for the
application “googlequicksearchbox.exe”: “5d24868cac87dcd70c5b71101d39b0de”
“f5a95f9ec0bf4e3cff92579f65e9bbe512fc3a20”
“6a58ccd257ec133dcc72b245913dc96aaa8ff03269a51e68bc16de1e7451eb13”
Key fingerprint = AF19 FA27 2F94 998D FDB5 DE3D F8B5 06E4 A169 4E46
difference in the uninstall output is at the start of the entry. In the uninstall results, we see the “<” symbol which tells us that the entry was a deletion.
Figure 10
Upgrade Example:
Considering how the reports look for installing and uninstalling software, how do you think the reports for updating software will look? If you are thinking there will be an addition entry and a deletion entry, you are correct. When software gets updated, you will often see coinciding entries as in Figure 11. There will be one entry that removes the old program information and another entry that adds the new program information.
Figure 11
In the report output, we see two entries that look very similar to one another. This output comes from a comparison of snapshots made before and after an update to the Adobe Reader Software. After analyzing the output of these two entries, we can deduce the following:
• The starting symbols (“>” and “<”) indicate one is an addition and one is a deletion. • The location, entry, status, description, publisher, image path and launch path are
identical for both entries.
• The application’s hash values (MD5, SHA-1 and SHA-256) are different from one
Key fingerprint = AF19 FA27 2F94 998D FDB5 DE3D F8B5 06E4 A169 4E46
In this software update example, the path to the application remained the same. Some applications may show a different path for the updated install, especially if the version of the application is used in the path. The path may change for other reasons as well, such as a user defined installation location.
Be careful not to just dismiss these types of entries as upgrades. Due to the nature of parasitic viruses, the hash may change because malware modified the file. If an
unexpected entry appears, be sure you scrutinize it thoroughly using the methods we talk about a little later.
Start Folder Example:
In Figure 12, we see how a report entry will look if a user creates an entry in their Startup folder. You will see in this example that user Jim created a URL shortcut in his User Profile startup folder.
Figure 12
From the output we can determine:
• The starting symbol (“>”) indicates this is an addition.
• The location “C:\Users\jim\AppData\Roaming\Microsoft\Windows\Start
Menu\Programs\Startup” tells us this is the start menu for a user profile on a
Windows Vista or 7 system. On an XP system the folder would be “C:\Documents and Settings\jim\Start Menu\Programs\Startup”.
• The entry is named “SANS Internet Storm Center.url”.
• The image path and launch string is “C:\Users\jim\AppData\Roaming\Microsoft
\Windows\Start Menu\Programs\Startup\SANS Internet Storm Center.url” which could tell us this entry is a URL shortcut.
Key fingerprint = AF19 FA27 2F94 998D FDB5 DE3D F8B5 06E4 A169 4E46
a bad approach! To determine what this shortcut does, we would have to investigate the shortcut itself.
Scheduled Task Example:
In Figure 13, we see an example of what you will see in a report when a new Scheduled Task is created. In this example, a task called “ARCheck” was created to run “c:\ARCheck\ARCheck-SA.vbs”. From this point we could go investigate the Scheduled Tasks on the system to see what the VBScript will do when it runs.
Figure 13
Malware Infection Example:
In this example, figure 14, we see what an entry in our report would resemble if it detects malware. With malware entries there is not very much commonality from one report to another. Often with the entry you will see something that stands out, but not always.
Figure 14
Some malware writers try very hard to make their malicious code look like it is suppose to be there. They use official looking names, like “Security Tool” or “AntiVirus 2009”. This is where our investigation process is important, especially for entries we do not know. We will discuss investigation and research after we discuss one more report item.
Unsigned Microsoft DLL Example:
Key fingerprint = AF19 FA27 2F94 998D FDB5 DE3D F8B5 06E4 A169 4E46
Figure 15
Sometimes we will run across files from Microsoft, or other vendors, that are not signed. This may occur when the files are from an older software implementation. The more current the software is, the more likely it will have files that are signed.
However, we will need to research these entries (covered in the next section). At this point we do not know why the entry is “Not Verified”. It could be that Microsoft didn’t sign the file, the file is signed with a fake certificate or the file has been modified by malware.
Other examples:
There are also times we will see “orphaned” entries in our reports. What do we mean by “orphaned” entries? Well, from time to time we will see entries that have an image path that is reporting “File not found: {file system path}”. There are a few situations where this can occur.
One situation where this can happen is when the user account running the script does not have permissions to the location of the image path. At times you will need to check the image path with an account that has appropriate permissions to see if the file actually exists. Sometimes the file may no longer exist because it was deleted, by a user or an application.
When an application gets uninstalled, not all of the uninstall programs remove all of the registry entries, causing registry rot. At times you may find these entries in your report after an application uninstall. If you do, you may have to manually delete the registry entry. However, be very cautious when doing so. Manually editing the registry can cause many problems for a Windows system. If you decide to edit the registry, always consider backing it up first.
Key fingerprint = AF19 FA27 2F94 998D FDB5 DE3D F8B5 06E4 A169 4E46
(application program interfaces). Some really evil pieces of malware put hooks into the Windows processes that retrieve file, registry and process information. These hooks are used to sanitize the information that Windows is reporting back to the requesting
program. So when Autoruns requests file information about an entry, the Windows processes, influenced by the malware, may report that a file doesn’t exist even when it does. At that point Autoruns doesn’t think the file exists and tells us “file not found”.
The last situation we are going to discuss is when anti-virus software detects and removes a piece of malware. When anti-virus software detects a piece of malware it can often remove the executables the malware has planted on the system. Unfortunately, anti-virus software often leaves registry entries that were created by the malware infection. In Figure 16, we can see entries from a computer that was infected with malware and then caught and removed by anti-virus software.
Figure 16
These entries appeared in an initial report from the previously infected computer. If this hadn’t been the initial report, our process would have caught the virus shortly after the infection had occurred. The investigation into these files proved the files no longer existed and the “File not found” message was not due to permissions or malware trickery.
How do we know these files were part of a previous malware infection? Other than knowing from experience, we can research these entries using trusted Internet resources.
2.6.2. How can I research items found in my reports?
Key fingerprint = AF19 FA27 2F94 998D FDB5 DE3D F8B5 06E4 A169 4E46
We will discuss two decent options for malware research: ThreatExpert.com and VirusTotal.
“ThreatExpert is an advanced automated threat analysis system designed to analyze and report the behavior of computer viruses, worms, trojans, adware, spyware, and other security-related risks in a fully automated mode.
In only a few minutes ThreatExpert can process a sample and generate a highly detailed threat report with the level of technical detail that matches or exceeds antivirus industry standards such as those normally found in online virus encyclopedias.”
(ThreatExpert Ltd, 2009)
A search at the ThreatExpert web site for the files in Figure 16, seres.exe and svcst.exe, indicates the files are mostly identified as a threat. This is handy information to know in our investigation. It may prompt us to research further on the malware in which ThreatExpert indicates these files are associated. Researching your anti-virus software’s website and working with the vendor may be a good idea.
Unfortunately in the example in Figure 16, the files were really gone and not available for further investigation. But be aware that some malware files mask their existence from being detected. Just because the report tells you “File not found” doesn’t mean the file doesn’t exist.
Key fingerprint = AF19 FA27 2F94 998D FDB5 DE3D F8B5 06E4 A169 4E46
Figure 17
Here we see two new entries under the Run registry entry. One called
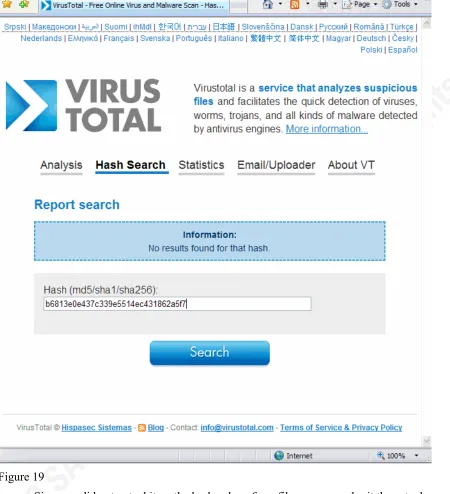
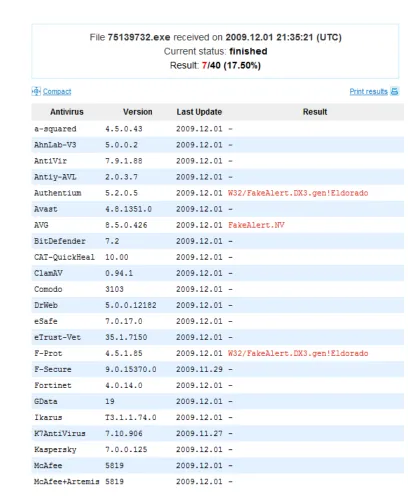
[image:38.612.59.528.457.676.2]“06529123” and the other called “75139732”, both being enabled. Neither of them have a publisher, so they are not digitally signed. The executables for each are found in the All Users profile. These files should have our curiosity running wild. Programmers usually give their programs descriptive names and signing executable files is becoming very standard these days (unfortunately not standard enough). But still, the naming convention is not very descriptive which stands out. It almost seems like random naming, which is common in malware detection avoidance techniques. A search for the file names on ThreatExpert.com returns nothing, as seen in Figure 18.
Figure 18
Key fingerprint = AF19 FA27 2F94 998D FDB5 DE3D F8B5 06E4 A169 4E46
and facilitates the quick detection of viruses, worms, trojans, and all kinds of malware detected by antivirus engines.“ (VirusTotal)
VirusTotal utilizes antivirus engines from about 40 different companies. Queries can be performed via a web interface in two manners: 1) by submitting a file directly, or 2) via a hash search. The hash search queries a database of hashes created from other files submitted to VirusTotal. If you submit a file to VirusTotal, the file properties, including hashes, will be stored in VirusTotal’s database. The file, if not already in the database, will then be scanned by over 40 different malware products (commercial and open source). If the file is in the database, you can view the previous results or have it rescanned.
Remember, hashes are used to verify that no changes have been made to a file. Hashes are based on file content. If you change the contents of a file, the hash of the file will change as well. If a hash of one file matches the hash of another file (regardless of filename), there is a very high probability that the files are identical.
[image:40.612.92.542.77.571.2]
Key fingerprint = AF19 FA27 2F94 998D FDB5 DE3D F8B5 06E4 A169 4E46
Figure 19
[image:41.612.92.500.156.652.2]
Key fingerprint = AF19 FA27 2F94 998D FDB5 DE3D F8B5 06E4 A169 4E46
Figure 20
Key fingerprint = AF19 FA27 2F94 998D FDB5 DE3D F8B5 06E4 A169 4E46
programs to your anti-virus vendors and/or other security sites such as TheatExpert and SANS Internet Storm Center (http://isc.sans.org).
VirusTotal offers a couple other options for submitting files that may be of interest. They have a small piece of software called VirusTotal Uploader that you can install on a computer. Then there is an option to make submissions via e-mail.
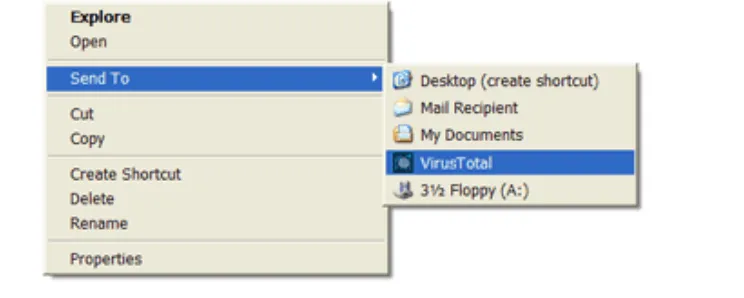
[image:42.612.127.499.317.466.2]The Uploader program adds functionality to the “Send To” feature. After it is installed you can right click on a file, choose “Send To” and there will be a new option called VirusTotal, as seen in Figure 21. After selecting VirusTotal, the program will check the hash and either: 1) Open a browser to the hash results page or 2) Send the file and open the browser to the submission results page.
Figure 21
The option to submit via e-mail allows you to send a file and receive an e-mail response of the results. All you need to do is send an e-mail to [email protected] with a subject of SCAN and the file to scan as an attachment. Once the file is scanned, the results will be e-mail back to you. Information on these options can be found at
http://www.virustotal.com/metodos.html.
Key fingerprint = AF19 FA27 2F94 998D FDB5 DE3D F8B5 06E4 A169 4E46
2.7. Advanced deployment considerations
2.7.1. Running in a small environment
When running this process in a SOHO type network environment, you may want to take further considerations into account. The environment may get to large to manage this process and analysis on a computer to computer basis. Some of the things you may want to consider include running from a central location, storing reports in a central location and adding some other mechanism for delivering the report.
If you have a computer or server that is accessible by other computers that run this process, consider setting up a shared location to use. By creating a network share, you can have computers run this process from a centralized location. When you need to update the process, you would only need to do so in one location. Not to mention that a central location would guarantee all of your computers are running the same process.
You could also use this shared location to save the report data. Our script includes the host name and date/time stamp in the report name. By modifying the script slightly, you could add additional functionality to write reports to a central location. This would make it easier for you to review the reports, or perform other tasks such as
searching all of the reports for a particular thing (such as a hash of a know piece of malware).
When running this process on several computers, using the Notepad application may not be the best way to deliver the report. You may just want to rely on someone to look at the reports on a regular basis. Or maybe you want to code in some logic to deliver reports by e-mail. You could even do both, count on someone to review reports regularly and e-mail certain reports based on some predefined content.
2.7.2. Running in a medium to large environment
As the environment increases to a medium to large size, so does the complexity of this process. As we get into environments that have many computers spread across
Key fingerprint = AF19 FA27 2F94 998D FDB5 DE3D F8B5 06E4 A169 4E46
When we start dealing with computers at various geographical locations, we should consider processing boundaries by geographical site. Creating multiple centralized areas, one per site, for our script to run and process can help reduce the failures that may occur when using a remote server. By creating a centralized point at each site, you can also customize the script for the particular location.
In larger environments we may run into a broader mix of applications, each having various update processes. Incorporating this process into your change
management program could allow you to utilize a white-listing approach to minimize the number of entries on a report. If you make a list of known MD5, SHA-1 or SHA-256 hashes, you can compare the hash to an entry prior to writing it to the report. If you have matching hashes you know the change is authorized by your change management
program, so you don’t really need to see these entries in a report.
Another thing you could do is add other scripts into the mix to improve the overall process. You could possibly write a script that would traverse the reports looking for a certain item to see if any reports have it. For instance you could search for the hash of a newly discovered piece of malware. Or maybe you want to see how many users have registry entries (HKCU) with executables (.EXE) that auto-start. You can write scripts to archive older reports to keep the file system cleaned up. There are many things that can be scripted to make our jobs easier.
One other thing that can be scripted is deployment of the script. You can use many different tools that are common in a corporate environment. Things such as group policy, login scripts and software deployment tools are some options.
There is no end to the possibilities of functionality you could add to the process. Environments vary tremendously and this process can be customized for each of those environments. So take this script as a start and add to it as you see fit.
2.7.3. Run after malware alerts