w w w . s y n g r e s s . c o m
Syngress is committed to publishing high-quality books for IT Professionals and deliv-ering those books in media and formats that fit the demands of our customers. We are also committed to extending the utility of the book you purchase via additional mate-rials available from our Web site.
SOLUTIONS WEB SITE
To register your book, visit www.syngress.com/solutions. Once registered, you can access our [email protected] Web pages. There you may find an assortment of value-added features such as free e-books related to the topic of this book, URLs of related Web sites, FAQs from the book, corrections, and any updates from the author(s).
ULTIMATE CDs
Our Ultimate CD product line offers our readers budget-conscious compilations of some of our best-selling backlist titles in Adobe PDF form. These CDs are the perfect way to extend your reference library on key topics pertaining to your area of expertise, including Cisco Engineering, Microsoft Windows System Administration, CyberCrime Investigation, Open Source Security, and Firewall Configuration, to name a few.
DOWNLOADABLE E-BOOKS
For readers who can’t wait for hard copy, we offer most of our titles in downloadable Adobe PDF form. These e-books are often available weeks before hard copies, and are priced affordably.
SYNGRESS OUTLET
Our outlet store at syngress.com features overstocked, out-of-print, or slightly hurt books at significant savings.
SITE LICENSING
Syngress has a well-established program for site licensing our e-books onto servers in corporations, educational institutions, and large organizations. Contact us at [email protected] for more information.
CUSTOM PUBLISHING
Many organizations welcome the ability to combine parts of multiple Syngress books, as well as their own content, into a single volume for their own internal use. Contact us at [email protected] for more information.
Raven Alder
Josh Burke
Chad Keefer
Angela Orebaugh
Larry Pesce
Eric S. Seagren
How to Cheat at
“Makers”) of this book (“the Work”) do not guarantee or warrant the results to be obtained from the Work. There is no guarantee of any kind, expressed or implied, regarding the Work or its contents.The Work is sold AS IS and WITHOUT WARRANTY.You may have other legal rights, which vary from state to state.
In no event will Makers be liable to you for damages, including any loss of profits, lost savings, or other incidental or consequential damages arising out from the Work or its contents. Because some states do not allow the exclusion or limitation of liability for consequential or incidental damages, the above limitation may not apply to you.
You should always use reasonable care, including backup and other appropriate precautions, when working with computers, networks, data, and files.
Syngress Media®, Syngress®, “Career Advancement Through Skill Enhancement®,” “Ask the Author UPDATE®,” and “Hack Proofing®,” are registered trademarks of Elsevier, Inc. “Syngress:The Definition of a Serious Security Library”™, “Mission Critical™,” and “The Only Way to Stop a Hacker is to Think Like One™”are trademarks of Elsevier, Inc. Brands and product names mentioned in this book are trademarks or service marks of their respective companies.
KEY SERIAL NUMBER
001 HJIRTCV764
002 PO9873D5FG
003 829KM8NJH2
004 BPOQ48722D
005 CVPLQ6WQ23
006 VBP965T5T5
007 HJJJ863WD3E
008 2987GVTWMK
009 629MP5SDJT
010 IMWQ295T6T
PUBLISHED BY Syngress Publishing, Inc. Elsevier, Inc.
30 Corporate Drive Burlington, MA 01803
How to Cheat at Configuring Open Source Security Tools
Copyright © 2007 by Elsevier, Inc. All rights reserved. Printed in the United States of America. Except as permitted under the Copyright Act of 1976, no part of this publication may be reproduced or distributed in any form or by any means, or stored in a database or retrieval system, without the prior written permission of the publisher, with the exception that the program listings may be entered, stored, and executed in a computer system, but they may not be reproduced for publication.
Printed in the United States of America 1 2 3 4 5 6 7 8 9 0
ISBN-10: 1-59749-170-5 ISBN-13: 978-1-59749-170-9
Publisher: Amorette Pedersen Acquisitions Editor: Andrew Williams Page Layout and Art: Patricia Lupien Cover Designer: Michael Kavish Indexer: Richard Carlson
v
Contributing Authors
Raven Alder
is a Senior Security Engineer for IOActive, a consulting firm
specializing in network security design and implementation. She specializes
in scalable enterprise-level security, with an emphasis on defense in depth.
She designs large-scale firewall and IDS systems, and then performs
vulner-ability assessments and penetration tests to make sure they are performing
optimally. In her copious spare time, she teaches network security for
LinuxChix.org and checks cryptographic vulnerabilities for the Open
Source Vulnerability Database. Raven lives in Seattle, WA. Raven was a
contributor to
Nessus Network Auditing
(Syngress Publishing, ISBN:
1-931836-08-6).
Josh Burke
(CISSP) is an independent information security consultant in
Seattle, Washington. He has held positions in networking, systems, and
secu-rity over the past seven years in the technology, financial, and media sectors.
A graduate of the business school at the University of Washington, Josh
concentrates on balancing technical and business needs for companies in the
many areas of information security. He also promotes an inclusive, positive
security philosophy for companies, which encourages communicating the
merits and reasons for security policies, rather than educating only on what
the policies forbid.
Josh is an expert in open-source security applications such as Snort,
Ethereal, and Nessus. His research interests include improving the security
and resilience of the Domain Name System (DNS) and the Network Time
Protocol (NTP). He also enjoys reading about the mathematics and history
of cryptography, but afterward often knows less about the subject than
when he started.
vi
extensively with the federal government and in a wide range of commercial
industries to redefine and sharpen the current perception of security. He has
also been a lead architect in this space, overseeing initiatives to redesign and
build many security infrastructures. Chad holds a B.S. in Computer Science
from the University of Maryland. He currently lives in Annapolis, MD with
his wife and daughter.
Angela Orebaugh
is an industry-recognized security technology visionary
and scientist, with over 12 years hands-on experience. She currently
per-forms leading-edge security consulting and works in research and
develop-ment to advance the state of the art in information systems security. Angela
currently participates in several security initiatives for the National Institute
of Standards and Technology (NIST). She is the lead scientist for the
National Vulnerability Database and author of several NIST Special
Publications on security technologies. Angela has over a decade of
experi-ence in information technology, with a focus on perimeter defense, secure
network design, vulnerability discovery, penetration testing, and intrusion
detection systems. She has a Masters in Computer Science, and is currently
pursuing her Ph.D. with a concentration in Information Security at George
Mason University. Angela is the author of the Syngress best seller
Ethereal
Packet Sniffing
(ISBN: 1932266828). She has also co-authored the
Snort
Cookbook and Intrusion Prevention and Active Response: Deploying Network and
Host IPS
(Syngress; ISBN: 193226647X). Angela is a researcher, writer, and
speaker for SANS Institute and faculty for The Institute for Applied
Network Security and George Mason University. Angela has a wealth of
knowledge from industry, academia, and government from her consulting
experience with prominent Fortune 500 companies, the Department of
Defense, dot-com startups, and universities. She is a frequently invited
speaker at a variety of conferences and security events.
vii
Larry Pesce
(CCNA, GCFA Silver, GAWN Silver) is the Manager for
Information Services Security at Care New England, a mid-sized healthcare
organization in New England. In the last 13 years in the computer industry,
Larry has become a jack of all trades; PC repair, Network Engineering, Web
Design, Non-Linear Audio and Video production, and Computer Security.
Larry is also gainfully employed as a Penetration Tester / Ethical Hacker
with Defensive Intuition, a Rhode Island-based security consulting
com-pany. A graduate of Roger Williams University in Compute Information
Systems, Larry is currently exploring his options for graduate education.
In addition to his industry experience, Larry is also a Security
Evangelist for the PaulDotCom Security Weekly podcast at
www.pauldotcom.com. Larry is currently completing a work with his
PaulDotCom Security Weekly co-host, Paul Asadoorian on hacking the
Linksys WRT54G. More of Larry’s writing, guides, and rants can be found
on his blog at www.haxorthematrix.com.
Eric S. Seagren
(CISA, CISSP-ISSAP, SCNP, CCNA, CNE-4, MCP+I,
MCSE-NT) has 10 years of experience in the computer industry, with the
last eight years spent in the financial services industry working for a
Fortune 100 company. Eric started his computer career working on Novell
servers and performing general network troubleshooting for a small
Houston-based company. Since he has been working in the financial
ser-vices industry, his position and responsibilities have advanced steadily. His
duties have included server administration, disaster recovery responsibilities,
business continuity coordinator,Y2K remediation, network vulnerability
assessment, and risk management responsibilities. He has spent the last few
years as an IT architect and risk analyst, designing and evaluating secure,
scalable, and redundant networks.
Eric has worked on several books as a contributing author or technical
editor.These include
Hardening Network Security
(McGraw-Hill),
Hardening
Network Infrastructure
(McGraw-Hill),
Hacking Exposed: Cisco Networks
(McGraw-Hill),
Configuring Check Point NGX VPN-1/FireWall-1
(Syngress),
ix
Contents
Chapter 1 Testing and Auditing Your Systems . . . 1
Introduction . . . .2
Taking Inventory . . . .2
Locating and Identifying Systems . . . .2
Nmap . . . .4
Super Scanner . . . .9
Angry IP Scanner . . . .12
Scanline . . . .12
Special-Purpose Enumerators . . . .15
Locating Wireless Systems . . . .16
Network Stumbler . . . .17
Documentation . . . .19
Network Topology Maps . . . .20
Access Request Forms . . . .21
Business Continuity and Disaster Recovery Plans . . . .22
IT Security Policies / Standards / Procedures . . . .22
Vulnerability Scanning . . . .23
Nessus . . . .23
Running Nessus on Windows . . . .24
Running Nessus on Linux . . . .26
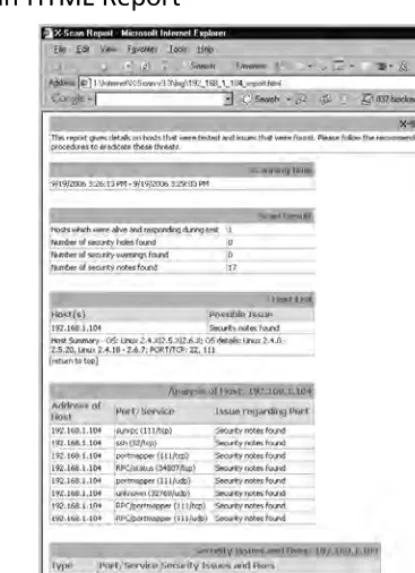
X-Scan . . . .29
Microsoft Baseline Security Analyzer . . . .32
OSSTMM . . . .34
Summary . . . .36
Solutions Fast Track . . . .36
Frequently Asked Questions . . . .37
Chapter 2 Protecting Your Perimeter . . . 39
Introduction . . . .40
Firewall Types . . . .40
Firewall Architectures . . . .41
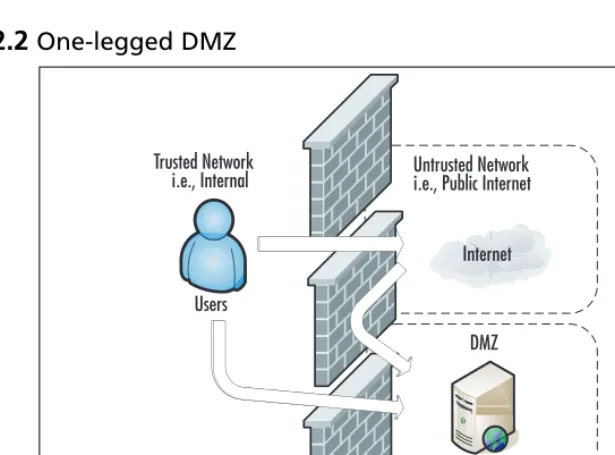
Screened Subnet . . . .42
One-Legged . . . .43
True DMZ . . . .44
Implementing Firewalls . . . .45
Hardware versus Software Firewalls . . . .45
Configuring netfilter . . . .46
Choosing a Linux Version . . . .46
Choosing Installation Media . . . .46
Linux Firewall Operation . . . .48
Configuration Examples . . . .53
GUIs . . . .62
Smoothwall . . . .78
Configuring Windows Firewall . . . .85
Providing Secure Remote Access . . . .85
Providing VPN Access . . . .86
Using Windows as a VPN Concentrator . . . .87
iPIG . . . .90
Providing a Remote Desktop . . . .101
Windows Terminal Services . . . .101
VNC . . . .104
Using the X Window System . . . .109
Providing a Remote Shell . . . .113
Using Secure Shell . . . .114
Using a Secure Shell GUI Client . . . .115
Summary . . . .117
Solutions Fast Track . . . .117
Frequently Asked Questions . . . .119
Chapter 3 Protecting Network Resources . . . 121
Introduction . . . .122
Performing Basic Hardening . . . .122
Defining Policy . . . .122
Access Controls . . . .124
Authentication . . . .124
Authorization . . . .124
Auditing . . . .125
Hardening Windows Systems . . . .125
General Hardening Steps . . . .125
Users and Groups . . . .127
File-Level Access Controls . . . .131
Additional Steps . . . .135
Using Microsoft Group Policy Objects . . . .135
Account Lockout Policy . . . .139
Audit Policy . . . .140
User Rights Assignment . . . .140
Hardening Linux Systems . . . .142
General Hardening Steps . . . .143
Users and Groups . . . .143
File-Level Access Controls . . . .145
Using the Bastille Hardening Script . . . .148
Using SELinux . . . .149
Hardening Infrastructure Devices . . . .151
Patching Systems . . . .152
Patching Windows Systems . . . .152
Patching Linux Systems . . . .154
Personal Firewalls . . . .154
Windows Firewall . . . .155
Netfilter Firewall . . . .160
Configuring TCP Wrappers . . . .160
Providing Antivirus and Antispyware Protection . . . .161
Antivirus Software . . . .161
Clam AntiVirus . . . .162
Using Online Virus Scanners . . . .166
Antispyware Software . . . .167
Microsoft Windows Defender . . . .167
Microsoft Malicious Software Removal Tool . . . .170
Encrypting Sensitive Data . . . .170
EFS . . . .171
Summary . . . .176
Solutions Fast Track . . . .176
Frequently Asked Questions . . . .178
Chapter 4 Introducing Snort . . . 181
How an IDS Works . . . .183
What Will an IDS Do for Me? . . . .184
What Won’t an IDS Do for Me? . . . .185
Where Snort Fits . . . .185
Snort System Requirements . . . .186
Hardware . . . .186
Operating System . . . .187
Other Software . . . .187
Exploring Snort’s Features . . . .188
Packet Sniffer . . . .189
Preprocessor . . . .190
Detection Engine . . . .190
Alerting/Logging Component . . . .192
Using Snort on Your Network . . . .195
Snort’s Uses . . . .196
Using Snort as a Packet Sniffer and Logger . . . .196
Using Snort as an NIDS . . . .201
Snort and Your Network Architecture . . . .201
Snort and Switched Networks . . . .204
Pitfalls When Running Snort . . . .206
False Alerts . . . .207
Upgrading Snort . . . .207
Security Considerations with Snort . . . .207
Snort Is Susceptible to Attacks . . . .208
Securing Your Snort System . . . .209
Summary . . . .210
Solutions Fast Track . . . .210
Frequently Asked Questions . . . .211
Chapter 5 Installing Snort 2.6 . . . 213
Introduction . . . .214
Choosing the Right OS . . . .214
Performance . . . .215
The Operating System and the CPU . . . .215
The Operating System and the NIC . . . .218
Stability . . . .219
Security . . . .219
Support . . . .219
Cost . . . .220
Stripping It Down . . . .220
Removing Nonessential Items . . . .222
Debian Linux . . . .222
CentOS . . . .223
Gentoo . . . .224
The BSDs . . . .225
OpenBSD . . . .225
Windows . . . .228
Bootable Snort Distros . . . .228
The Network Security Toolkit As a Snort Sensor . . . .229
Hardware Platform Considerations . . . .230
The CPU . . . .230
Memory . . . .230
Memory’s Influence on System Performance . . . .231
Virtual Memory . . . .232
The System Bus . . . .232
PCI . . . .232
PCI-Express . . . .233
Theoretical Peak Bandwidth . . . .233
Dual vs. Single Bus . . . .234
The NIC . . . .234
Disk Drives . . . .235
Installing Snort . . . .235
Prework . . . .236
Installing pcap . . . .236
Installing/Preparing Databases . . . .236
Time Synchronization (NTP) . . . .238
Installing from Source . . . .238
Benefits and Costs . . . .238
Compile-Time Options . . . .240
Installing Binaries . . . .240
Apt-get . . . .241
RPM . . . .241
Windows . . . .241
Hardening . . . .242
General Principles . . . .242
Configuring Snort . . . .243
The snort.conf File . . . .243
Variables . . . .244
Using Variables in snort.conf and in Rules . . . .244
Command-Line Switches . . . .245
Configuration Directives . . . .248
Snort.conf –dynamic-*Options . . . .248
Ruletype . . . .248
Plug-In Configuration . . . .248
Preprocessors . . . .249
Output Plug-Ins . . . .251
Included Files . . . .251
Rules Files . . . .251
sid-msg.map . . . .252
threshold.conf . . . .252
gen-msg.map . . . .253
classification.config . . . .253
Thresholding and Suppression . . . .254
Testing Snort . . . .254
Testing within Organizations . . . .255
Small Organizations . . . .256
Large Organizations . . . .257
Maintaining Snort . . . .257
Updating Rules . . . .258
How Can Updating Be Easy? . . . .259
Updating Snort . . . .259
Upgrading Snort . . . .259
Monitoring Your Snort Sensor . . . .259
Summary . . . .260
Solutions Fast Track . . . .260
Frequently Asked Questions . . . .262
Chapter 6 Configuring Snort and Add-Ons . . . 263
Placing Your NIDS . . . .264
Configuring Snort on a Windows System . . . .266
Installing Snort . . . .266
Configuring Snort Options . . . .269
Configuring IDS Policy Manager . . . .274
Configuring Snort on a Linux System . . . .280
Configuring Snort Options . . . .280
Using a GUI Front-End for Snort . . . .284
Basic Analysis and Security Engine . . . .284
Other Snort Add-Ons . . . .291
Using Oinkmaster . . . .291
Additional Research . . . .293
Demonstrating Effectiveness . . . .293
Summary . . . .294
Solutions Fast Track . . . .295
Frequently Asked Questions . . . .296
Chapter 7 Introducing Wireshark: Network Protocol Analyzer . . . 297
Introduction . . . .298
What is Wireshark? . . . .298
History of Wireshark . . . .299
Compatibility . . . .300
Supported Protocols . . . .301
Wireshark’s User Interface . . . .303
Filters . . . .305
Great Resources . . . .309
Supporting Programs . . . .310
Tshark . . . .310
Editcap . . . .312
Mergecap . . . .313
Text2pcap . . . .314
Using Wireshark in Your Network Architecture . . . .315
Using Wireshark for Network Troubleshooting . . . .317
Using Wireshark for System Administration . . . .320
Checking for Network Connectivity . . . .320
Checking for Application Network Availability . . . .321
Scenario 1: SYN no SYN+ACK . . . .321
Scenario 2: SYN immediate response RST . . . .321
Scenario 3: SYN SYN+ACK ACK . . . .322
Connection Closed . . . .322
Using Wireshark for Security Administration . . . .322
Detecting Internet Relay Chat Activity . . . .322
Wireshark As a Network Intrusion Detection System . . . .323
Wireshark as a Detector for Proprietary Information Transmission . . . .323
Securing Ethereal . . . .323
Optimizing Wireshark . . . .324
Network Link Speed . . . .324
Minimizing Wireshark Extras . . . .324
CPU . . . .324
Memory . . . .324
Advanced Sniffing Techniques . . . .325
Dsniff . . . .325
Ettercap . . . .327
MITM Attacks . . . .327
Cracking . . . .327
Switch Tricks . . . .327
ARP Spoofing . . . .327
MAC Flooding . . . .328
Routing Games . . . .328
Using Encryption . . . .328
SSH . . . .329
SSL . . . .329
Pretty Good Protection and Secure/ Multipurpose Internet Mail Extensions . . . .329
Switching . . . .330
Employing Detection Techniques . . . .330
Local Detection . . . .330
DNS Lookups . . . .331
Latency . . . .331
Driver Bugs . . . .331
NetMon . . . .331
Summary . . . .332
Solutions Fast Track . . . .332
Frequently Asked Questions . . . .334
Chapter 8 Getting and Installing Wireshark . . . 337
Introduction . . . .338
Getting Wireshark . . . .338
Platforms and System Requirements . . . .339
Packet Capture Drivers . . . .340
Installing libpcap . . . .341
Installing libpcap Using the RPMs . . . .341
Installing libpcap from the Source Files . . . .343
Installing WinPcap . . . .345
Installing Wireshark on Windows . . . .346
Installing Wireshark on Linux . . . .347
Installing Wireshark from the RPMs . . . .347
Installing Wireshark on Mac OSX . . . .349
Installing Wireshark on Mac OSX from Source . . . .349
Installing Wireshark on Mac OSX Using DarwinPorts . . . .353
Installing Wireshark on Mac OSX Using Fink . . . .354
Installing Wireshark from Source . . . .355
Enabling and Disabling Features via configure . . . .358
Summary . . . .360
Solutions Fast Track . . . .360
Frequently Asked Questions . . . .362
Chapter 9 Using Wireshark . . . 363
Introduction . . . .364
Getting Started with Wireshark . . . .364
Exploring the Main Window . . . .365
Summary Window . . . .366
Protocol Tree Window . . . .367
Data View Window . . . .369
Other Window Components . . . .371
Filter Bar . . . .371
Information Field . . . .373
Display Information Field . . . .373
Exploring the Menus . . . .373
File . . . .373
Open . . . .374
Save As . . . .376
Print . . . .376
Edit . . . .381
Find Packet . . . .382
Preferences . . . .384
View . . . .385
Time Display Information . . . .387
Auto Scroll in Live Capture . . . .387
Apply Color Filters . . . .388
Show Packet in New Window . . . .391
Go . . . .392
Go To Packet . . . .393
Capture . . . .393
Capture Interfaces . . . .394
Capture Options . . . .396
Edit Capture Filter List . . . .402
Analyze . . . .403
Edit Display Filter List . . . .405
“Apply as Filter” and “Prepare a Filter” Submenus . . . .407
Enabled Protocols . . . .409
Decode As . . . .410
Decode As: Show . . . .411
Follow TCP Stream and Follow SSL Stream . . . .412
Expert Info and Expert Info Composite . . . .413
Statistics . . . .413
Summary . . . .416
Protocol Hierarchy . . . .416
TCP Stream Graph Submenu . . . .418
Help . . . .428
Contents . . . .429
Supported Protocols . . . .430
Manual Pages Submenu . . . .431
Wireshark Online Submenu . . . .432
About Wireshark . . . .433
Pop-up Menus . . . .433
Summary Window Pop-up Menu . . . .433
Protocol Tree Window Pop-up Menu . . . .435
Data View Window Pop-up Menu . . . .436
Using Command-line Options . . . .437
Capture and File Options . . . .437
Filter Options . . . .438
Other Options . . . .438
Summary . . . .439
Solutions Fast Track . . . .439
Frequently Asked Questions . . . .440
Chapter 10 Network Reporting and Troubleshooting with other Tools . . . 443
Introduction . . . .444
Reporting on Bandwidth Usage and Other Metrics . . . .444
Collecting Data for Analysis . . . .445
Understanding SNMP . . . .447
Configuring Multi Router Traffic Grapher . . . .448
Configuring MZL & Novatech TrafficStatistic . . . .451
Configuring PRTG Traffic Grapher . . . .453
Configuring ntop . . . .459
Enabling SNMP On Windows Hosts . . . .464
Enabling SNMP on Linux Hosts . . . .466
Troubleshooting Network Problems from the Command Line . . . .468
Using a Command-Line Sniffer . . . .469
ngSniff . . . .470
Tcpdump . . . .471
Additional Troubleshooting Tools . . . .472
Netcat . . . .472
Tracetcp . . . .473
Netstat . . . .473
Summary . . . .474
Solutions Fast Track . . . .475
Frequently Asked Questions . . . .476
Chapter 11 Wireless Monitoring and Intrusion Detection . . . 477
Introduction . . . .478
Designing for Detection . . . .478
Starting with a Closed Network . . . .479
Ruling Out Environmental Obstacles . . . .479
Ruling Out Interference . . . .480
Defensive Monitoring Considerations . . . .480
Availability and Connectivity . . . .481
Interference and Noise . . . .481
Signal Strength . . . .482
Detecting a Denial of Service . . . .482
Monitoring for Performance . . . .483
Knowing the Baseline . . . .483
Monitoring Tools of the Trade . . . .483
Intrusion Detection Strategies . . . .485
Integrated Security Monitoring . . . .486
Watching for Unauthorized Traffic and Protocols . . . .487
Unauthorized MAC Addresses . . . .488
Popular Monitoring Products . . . .488
Signatures . . . .490
Conducting Vulnerability Assessments . . . .491
Incident Response and Handling . . . .494
Policies and Procedures . . . .495
Reactive Measures . . . .495
Reporting . . . .495
Cleanup . . . .496
Prevention . . . .496
Conducting Site Surveys for Rogue Access Points . . . .497
The Rogue Placement . . . .497
The Well-intentioned Employee . . . .497
The Social Engineer . . . .497
Tracking Rogue Access Points . . . .498
Summary . . . .501
Solutions Fast Track . . . .502
Designing for Detection . . . .502
Defensive Monitoring Considerations . . . .502
Intrusion Detection Strategies . . . .502
Conducting Vulnerability Assessments . . . .502
Incident Response and Handling . . . .502
Conducting Site Surveys for Rogue Access Points . . . .503
Frequently Asked Questions . . . .503
1
Testing
and Auditing
Your Systems
Solutions in this chapter:
■
Taking Inventory
■
Vulnerability Scanning
■
OSSTMM
Chapter 1
Summary
Solutions Fast Track
Introduction
Sooner or later you will need to identify all the systems on your network. Despite the most stringent of usage policies, sometimes undocumented systems may be added to the network. Sometimes these systems are “test” systems that were never decommissioned. At other times you may find “rogue” sys-tems whose mere presence on the network violates policy.There may be instances where the system is managed by a third party as part of a vendor’s service offering.The value of a full network dis-covery is even more apparent if you are dealing with an environment that you are not familiar with, such as a newly acquired company, or if you are new to your position. If the network has few enough hosts, this task isn’t much of a challenge. If the network is large, or spread across multiple locations, and visiting them all isn’t practical, an automated discovery may be much more practical. We will look at some generic discovery/scanning tools, as well as some that are targeted at specific services.
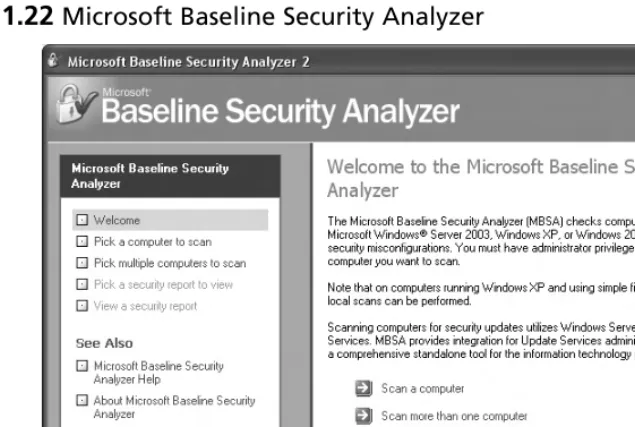
After you have identified all the systems on your network, the next logical step is to determine the security posture of those systems. Several automated security scanning tools are available that can check for a large list of known vulnerabilities and can make this task easier. We will demonstrate the configuration and operation of some automated vulnerability scanners. We will also discuss the Microsoft Baseline Security Analyzer, which simply checks a Microsoft system and reports on any known security issues it finds. Finally, there are some formalized security testing methodologies that you can use to assess the security of a system, beyond simply running a vulnerability scanner.
Taking Inventory
In a perfect world, you would have 100 percent accurate and complete documentation encompassing every system that is connected to the corporate network. No one with access to the network would ever connect a system to the network without all the proper documentation and approvals to do so. Well, we all know “perfect” doesn’t exist. Perhaps you have a specific reason to do the network dis-covery, or maybe not. A periodic discovery is a good idea anyway, even if you don’t have any specific reason to do one. It can provide assurance that policies are being followed when you can successfully produce documented approval for all devices on your network. A host inventory can also demonstrate that your documentation matches the true state of the network and that routers and switches are where they are supposed to be. Given the fact that systems can be very hard to locate physically, espe-cially given the increasingly smaller size of wireless access points, a network-based discovery is often more fruitful than a physical one.
Locating and Identifying Systems
TCP port 21, and it responds with HTML headers, you could probably conclude that the system is running a Web server on the port normally used for FTP.You can inspect the DHCP scope on the DHCP servers in an attempt to identify a system that is not authorized to be on the network. Wireless systems can be identified relatively easily due to the fact that they must transmit a signal in order to communicate. Depending on the size of the network, you may even be able to take an inventory of the ports used on switches and routers, or for those with a lot of time on their hands, by cross-referencing the ARP tables of the switches with a list of known hosts. In 99% of the cases, however, a simple ping scan of all the network IP addresses combined with a TCP and UDP scan of a few key ports will provide a very good inventory of the hosts on the network.
T
IPA well-secured network will hinder exactly the types of inventory-building activities you will be performing. The same techniques that stop a hacker from mapping out your network will also hinder you as an admin. If you are not able to see the results you are expecting, remember that firewalls, VLANs, IPsec, and other security mea-sures may skew your results.
After you have identified the systems that exist on your network, the next step is more time con-suming: determining wherethe system is physically located. In some cases, maybe you don’t need to, particularly if they are authorized systems, or if you can identify a means to contact the person responsible for the system in order to make the system “legal.” If you do find a rogue system, how-ever, you will want to see where it is located and perform other information-gathering steps in an attempt to get it removed from the network or complete the needed procedures for the system to have authorized access to the network. Sometimes this process is relatively simple, such as when the system is using a host-naming convention that tells you its location and maybe even the server role, such as DALLASWEB01.somecompany.com. In other cases you may need to use the IP address and tracerouteto track down the physical location based on the subnet combined with a good network map (we’ll go over an example in the next few paragraphs). In the case of a wireless system (host or access point), locating the rogue system can be particularly challenging.
Remember that a network device inventory is a living document. It will take time to perform an IP scan, track down any devices that you weren’t familiar with, and verify network access approval or seek approval for all devices. By the time you’re finished, it will probably be time to start the process over. Because the network is rarely a static entity, this type of discovery should be performed on a regular schedule.You may have local policies that dictate how frequently the discovery should be. If these policies are not present, you should develop a process and make it a part of your normal busi-ness operations. In this way, rogue systems can be located in a minimal amount of time and you can minimize any security risk that these systems may pose.
Ultimately you will want to customize the documentation to your business needs. Perhaps deploying biometric authentication is a priority, in which case you might want to include a column indicating which devices have fingerprint scanners attached to them.
Nmap
Nmap is the most widely used general purpose network scanner. It is available from
http://insecure.org/nmap/ for both Windows, Linux, MAC OS X, Sun Solaris, and several other operating systems.The operation of Nmap is largely the same whether you are running it on Windows on Linux.The most notable exception is that you will need the Windows packet capture driver, WinPcap, if you are running Nmap on Windows.
N
OTEThe latest version of Nmap supports raw sockets, which means that if you are using Windows 2000, Windows XP, or Windows 2003 Server, you don’t need the WinPcap drivers. For older versions of Windows you will still need WinPcap.
Nmap can scan for open ports using a variety of standardized TCP packet options, as well as using some of the options in non-standard ways.There are a large number of command-line options, which can sometimes appear confusing, but the Nmap documentation and support on the Internet are both very good. Periodically, a GUI front end will come and go, but currently there are no Windows front ends for Nmap being actively developed. NmapFE is a GUI front end for Linux and it is actively maintained by the creator of Nmap.The GUI has the benefit of enabling you to check boxes for various options instead of requiring you to know a more complex command-line syntax.
T
IPBe aware of the underlying network topology that you are working with. If you are scanning a host on the other side of a firewall it will likely severely alter your results. In some cases, even an ISP will filter out certain ports. Although this prevents those ports from being available over the Internet, they might still be available locally, and possibly still pose a security risk.
a consideration, but if you are scanning a large number of hosts, or ports, the difference in scan times can be significant.
Let’s go through some examples of how you could make use of Nmap. Let’s suppose you want to do an initial scan of your entire company network. If your company is using the private address space 192.168.0.0 or some portion thereof, you could scan the entire class B network, sending only a ping to see if the system is “alive” with the following command line.
nmap -v -sP 192.168.0.0/16
This would perform the most basic type of scan, which is a ping scan only, as specified by the use of the –sP option.You can see more information by using the –v option, which tells Nmap to be more verbose; in most cases you will find the extra information informative.This option can also be used multiple times for even more information, so –v, and –vv are both valid. Because it is fairly common for a personal firewall to block ping attempts, you may have better luck if you run the scan without the –sP option. If you don’t specify a scan type, Nmap will default to a TCP SYN scan (same as –sS).The normal TCP three-way handshake consists of the initiating system sending a packet with the SYN bit set.The target host responds with a packet with the SYN and ACK bit set.The original system then sends an ACK packet back to the target. In this fashion a TCP session is estab-lished, which is followed by the desired communications.The SYN scan (-sS) will send the initial SYN packet, but when the target hose replies with a SYN ACK, Nmap never completes the three-way handshake to fully establish the session.This method is so fast and efficient that it is the default scanning method Nmap uses.
If you do not specify which TCP portsto scan, Nmap will scan all TCP ports defined in the nmap-servicesfile, which at the time of this writing is 1680 of the most common ports. So let’s suppose during your ping scan of the entire network a system was identified that you didn’t recognize (192.168.1.106) and you want to find out more about it. After the ping scan you could perform an Nmap scan with no options and see which of the most commons ports are open.The output of nmap 192.168.1.106, being a typical single-host scan with no other options specified, is shown in Figure 1.1.
Figure 1.1
Nmap ResultsC:\Apps\Nmap>nmap 192.168.1.106
Starting Nmap 4.11 ( http://www.insecure.org/nmap ) at 2006-09-17 14:54 Central Standard Time
Interesting ports on 192.168.1.106: Not shown: 1676 closed ports
PORT STATE SERVICE 135/tcp open msrpc 139/tcp open netbios-ssn 445/tcp open microsoft-ds 5101/tcp open admdog
MAC Address: 00:08:02:32:8A:4C (Compaq Computer)
From these results you can see that the system has TCP ports 135, 139, and 445 open, most likely indicating a Windows host. Just to confirm your suspicions, you could use Nmap’s operating system fingerprinting feature. Any given system on the network was likely programmed slightly differently, resulting in slightly different ways of responding to network traffic. Nmap can use these subtle differ-ences in responses (such as TCP ISN (initial sequence number) sampling,TCP options support and ordering, IPID (IP ID) sampling, and the initial window size) as clues and compare them to Nmap’s nmap-os-fingerprint database. If it finds a match in the database, there is a good probability that the actual OS can accurately be identified. An example of the OS fingerprinting in action is shown in Figure 1.2 using the –O option.
Figure 1.2
Nmap OS FingerprintingI:\HackApps\Nmap>nmap 192.168.1.106 -O
Starting Nmap 4.11 ( http://www.insecure.org/nmap ) at 2006-09-17 15:00 Central Standard Time
Interesting ports on 192.168.1.106: Not shown: 1676 closed ports
PORT STATE SERVICE 135/tcp open msrpc 139/tcp open netbios-ssn 445/tcp open microsoft-ds 5101/tcp open admdog
MAC Address: 00:08:02:32:8A:4C (Compaq Computer) Device type: general purpose
Running: Microsoft Windows 2003/.NET|NT/2K/XP OS details: Microsoft Windows 2003 Server or XP SP2
Nmap finished: 1 IP address (1 host up) scanned in 2.813 seconds
Nmap identified the system as either Windows 2003 Server or Windows XP with service pack 2. Further, you may notice that Nmap has identified the system as a Compaq based on the MAC address. With all this information you have a pretty good idea of what type of system this rogue PC is.The next step would likely be to find out where it is physically located. Assuming you don’t recog-nize the subnet as belonging to a specific location,traceroutewill use ICMP to try to trace each router between you and the target host. An example of tracerouteoutput is shown in Figure 1.3.
Figure 1.3
Traceroute OutputI:\HackApps\Nmap>tracert 192.168.1.106
1 2 ms 2 ms 2 ms 192.168.102.1
2 11 ms 14 ms 10 ms 10.10.10.1
3 12 ms 10 ms 11 ms router1.houston.your-co.com [10.10.20.1] 4 14 ms 12 ms 12 ms router2.austin.your-co.com [10.10.30.1] 5 14 ms 10 ms 13 ms router3.dallas.your-co.com [10.10.40.1] 6 20 ms 18 ms 17 ms router4.orlando.your-co.com [192.168.2.1]
7 19 ms 20 ms 17 ms 192.168.1.106
Trace complete.
T
IPDifferent systems may have different commands to do the same thing. For example, on Windows systems the traceroutecommand is tracert, while on Linux systems it is
traceroute.
I have edited the actual IP addresses and host names but you can try the traceroutecommand to a few hosts in your network. Because it is very common to include some indication of the geographic location in the naming convention for routers, often this will tell you where the host is located. In Figure 1.3, hop #6 would lead me to believe the host was in Orlando, Florida. Assuming you had a managedswitch in Orlando, you could then Telnet to the switch (in this example a cisco 2900XL switch) and view the table of MAC addresses. Referring to our previous Nmap scan, we know the MAC address of our mystery system is 00:08:02:32:8A:4c, so we can use the following command to filter the MAC table to show only the MAC address we are interested in:
SWITCH#Show mac | incl 0008.0232.8A4C
0008.0232.8A4C Dynamic 1 FastEthernet0/2
Table 1.1
Nmap OptionsNmap is a good general purpose scanner that can perform a wide variety of scans.The available output formats can be very useful if you should need to provide reports of your scan results.You could even schedule a scan and have the output written to a file in XML, which you could then dis-tribute via e-mail or view on a Web site. Figure 1.4 shows part of the XML output of a sample scan of 192.168.1.100.
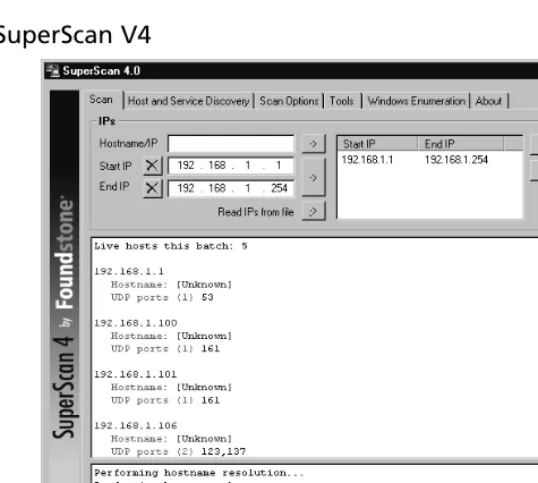
Super Scanner
[image:27.612.145.414.171.412.2]Sometimes you want something simpler than Nmap, or maybe you want to use something that doesn’t require the WinPcap drivers to be installed in order to run it on Windows. SuperScanner doesn’t require the WinPcap drivers and doesn’t even require a setup program. All you need to do is download the program from www.foundstone.com/resources/proddesc/superscan.htm, extract the executable from the Zip file, and run it.The latest version (version 4) will run on Windows 2000 and Windows XP.The main window is shown in Figure 1.5 with some results from systems it found.
Figure 1.5
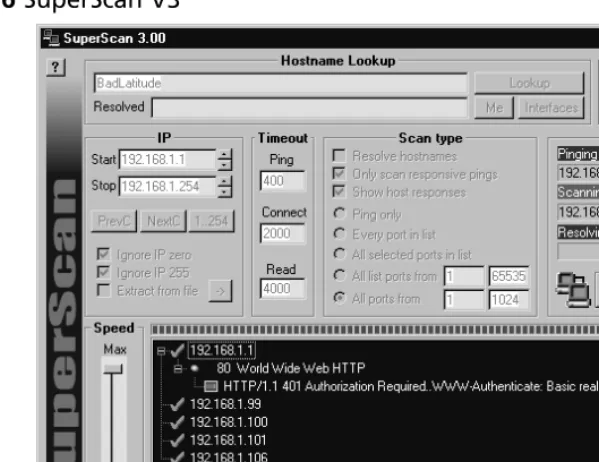
SuperScan V4Figure 1.6
SuperScan V3As you can see, the interfaces between version 3 and version 4 are substantially different.The button used to start the scan is actually a little more clearly labeled in versions prior to version four. When you click the start scan button, the scan will commence.The scan could take some time if you have a large number of hosts or ports to check.There will be a small plus next to systems that have open (i.e., listening) ports.You can expand the plus symbol and see a list of open ports. Expanding the next plus will show any responses the scanner received when connecting to that port.
SuperScan version 4 offers more control over the scanning options that are used, but the biggest difference between version 3 and version 4 is the enumeration options available for Windows hosts. Let’s take a minute to talk about the Windows enumeration SuperScan 4 can do, and special purpose enumeration tools in general. A definition of enumerate is “to make a concise list of the relevant points.” We can refine that definition to fit in a network security context as “building a list of objects or data points pertaining to a given network host.”This could include things like running services and applications, file shares that are accessible, users and groups on a host, and so on. When it comes to Windows hosts, there is a lot of information gathering that you can do and lists that can be gener-ated. For example, if you wanted to enumerate all the shared folders on a single host, you could use the following command:
net view \\192.168.1.108
Shared resources at \\192.168.1.108
Share name Type Used as Comment
---SharedDocs Disk
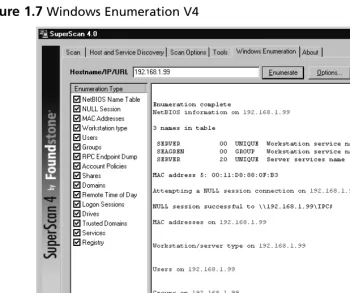
Many similar processes are automated for you by SuperScan. When you select the Windows Enumeration tab (shown in Figure 1.7), you are presented with various checks you can perform in the left pane. After you choose the option you wish to use, click Enumerateand the results will populate in the right pane.
Figure 1.7
Windows Enumeration V4The process of enumerating the shares can be done for all hosts on the entire subnet instead of a single host by checking the Shares check box on the Windows Enumeration tab, and is just one of the enumeration options SuperScan can use. By default SuperScan will perform all of the enumer-ation using no credentials, but if you click Options on the Windows Enumeration tab, you can enter specific account information that should be used for the connections.The NetBIOS Name Table enumeration type is the same information you would get by using nbtstat –A 192.168.1.108. This shows the NetBIOS machine name (which can be different than the host name, though it rarely is), and the workgroup/domain the machine belongs to. Depending on how securely the system has been configured, you may be able to get a lot of information from these enumeration techniques. If the system is very secure you will get very little information. In general these checks carry little risk to the target system but as is always the case, if a service disruption is not acceptable, you should avoid running these types of checks because there is always somerisk involved.
special network drivers. Because SuperScan doesn’t require any installation per se, and makes no changes to the registry, it can be very useful to have on a pen drive or shared network drive.This type of low-footprint tool can be very useful at times.
Angry IP Scanner
A final GUI scanner that is rapidly on the rise in popularity is Angry IP Scanner
(www.angryziber.com/ipscan/). It lies somewhere between SuperScan 3 and 4 in functionality and does not require any installation. Angry IP Scanner also has the advantage that it does not need the WinPcap drivers. Although Angry IP Scanner uses a deceptively simple interface (shown in Figure 1.8), it packs a lot of features into its small file size.
Figure 1.8
Angry IP ScannerIf you select an IP by highlighting it, and then navigate to Commands | Open Computer, you are presented with a list of handy Windows options such as In Explorer, Web Browser, Ping,Telnet, and Traceroute.There are two interesting features of Angry IP Scanner: it is an open source project and it is the only scanner covered that supports being run from the command line in additionto run-ning from a GUI interface.
Scanline
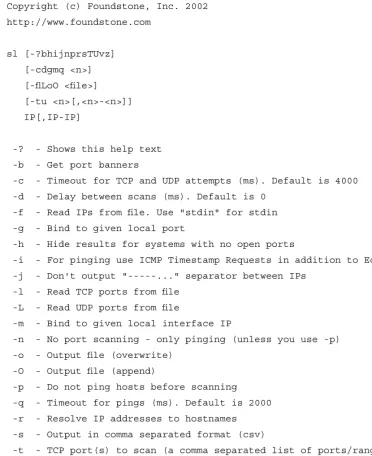
If you happen to be looking for something even morelightweight, there is an excellent product avail-able. Scanline, which is also available from Foundstone in their free tools section
Figure 1.9
Scanline HelpC:\Pers\Apps\Scanline>sl ScanLine (TM) 1.01
Copyright (c) Foundstone, Inc. 2002 http://www.foundstone.com
sl [-?bhijnprsTUvz] [-cdgmq <n>] [-flLoO <file>] [-tu <n>[,<n>-<n>]] IP[,IP-IP]
-? - Shows this help text -b - Get port banners
-c - Timeout for TCP and UDP attempts (ms). Default is 4000 -d - Delay between scans (ms). Default is 0
-f - Read IPs from file. Use "stdin" for stdin -g - Bind to given local port
-h - Hide results for systems with no open ports
-i - For pinging use ICMP Timestamp Requests in addition to Echo Requests -j - Don't output "---..." separator between IPs
-l - Read TCP ports from file -L - Read UDP ports from file
-m - Bind to given local interface IP
-n - No port scanning - only pinging (unless you use -p) -o - Output file (overwrite)
-O - Output file (append)
-p - Do not ping hosts before scanning -q - Timeout for pings (ms). Default is 2000 -r - Resolve IP addresses to hostnames -s - Output in comma separated format (csv)
-t - TCP port(s) to scan (a comma separated list of ports/ranges) -T - Use internal list of TCP ports
-u - UDP port(s) to scan (a comma separated list of ports/ranges) -U - Use internal list of UDP ports
-v - Verbose mode
-z - Randomize IP and port scan order
This example would scan TCP ports 80, 100, 101...200 and 443 on all IP addresses from 10.0.0.1 to 10.0.1.200 inclusive, grabbing banners from those ports and hiding hosts that had no open ports.
The same scan we performed earlier of the 192.168.1.0 network could be performed with the following command line:
Sl 192.168.1.1-254 –n
The –n options tells Scanline to ping only and not to do a port scan. If you simply specify an IP address or range, with no other options, Scanline will scan its internal list of default ports.This
behavior is the same as Nmap.The Scanline list of default ports currently includes the following ports.
UDP ports
7 9 11 53 67-69 111 123 135 137 138 161 191 192 256 260 407 445 500 514 520 1009 1024 1025 1027 1028 1030 1033 1034 1035 1037 1041 1058 1060 1091 1352 1434 1645 1646 1812 1813 1900 1978 2002 2049 2140 2161 2301 2365 2493 2631 2967 3179 3327 3456 4045 4156 4296 4469 4802 5631 5632 11487 31337
32768-32790 43981 TCP ports
7 9 11 13 15 19 21 22 23 25 43 49 53 66-68 70 79 80 81 88 89 98 109 110 111 113 118 119 135 139 143 150 156 179 256-259 264 389 396 427 443 445 457 465 512-515 524 540 563 587 593 636 691 799 900-901 1024-1031 1080 1100 1214 1243 1313 1352 1433 1494 1498 1521 1524-1525 1529 1541 1542 1720 1723 1745 1755 1813 1944 2000 2001 2003 2049 2080 2140 2301 2447 2766 2779 2869 2998 3128 3268 3300 3306 3372 3389 4000 4001 4002 4045 4321 4444 4665 4899 5000 5222 5556 5631 5632 5678 5800 5801 5802 5900 5901 6000 6112 6346 6347 6588 6666-6667 7000 7001 7002 7070 7100 7777 7947 8000 8001 8010 8080-8081 8100 8383 8888 9090 10000 12345 20034 27374 30821 32768-32790
The entire help file, or manual, is located on the same Foundstone page where you download Scanline.The sample output shown in Figure 1.10 shows the results of a simple scan using the fol-lowing syntax: sl 192.168.1.115.
Figure 1.10
Scanline ResultsC:\Pers\Apps\Scanline>sl 192.168.1.115 ScanLine (TM) 1.01
Copyright (c) Foundstone, Inc. 2002 http://www.foundstone.com
Scan of 1 IP started at Wed Aug 30 21:17:06 2006
---192.168.1.115
Responds with ICMP unreachable: Yes TCP ports: 22 135 139 427 1025 UDP ports: 137 138 500
---Scan finished at Wed Aug 30 21:17:14 2006
1 IP and 267 ports scanned in 0 hours 0 mins 8.34 secs
Special-Purpose Enumerators
The scanning utilities we have discussed have been general purpose scanners even if some included spe-cialized enumeration techniques. Although SuperScan 4 includes some special Windows enumeration options, previous version of SuperScan, Nmap, and Scanline do not. In some cases you may want to scan for very specific responses. One example would be to scan for machines infected with the Back Orifice Trojan (BOPing) or to scan for SNMP-enabled devices (via SNScan). Nbtscan gathers NetBIOS information on a network for all devices. Both BOPing and SNScan are available from Foundstone, but there are many more examples of special purpose enumerators available on the Internet.The intended purpose of these special enumerating scanners may vary from legitimate security tools to scanning for systems to launch denial of service attacks from. As is always the case, use caution when downloading such tools from the Internet and research the source of the tool to ensure that you are not introducing a Trojan or virus into your environment.The general purpose scanners are usually intended for finding responsive systems and determining what ports they are listening on only.
Are You 0wned?
A Word of Caution
Perhaps you have been fortunate enough, or cautious enough, to never have down-loaded any malicious software accidentally. One thing you will discover when searching for security software on the Internet is that it is precisely security software that is most often a security risk. Countless Internet sites like to offer up security tools to discover Trojans (or even more commonly, supposedly control the Trojans), to clean a virus, or otherwise protect you when in fact the programs you are downloading are infected with a virus, Trojan, or other malicious software. You must exercise extreme caution when scouring the Internet for security tools or you will become the next victim of unscrupulous people.
My advice is to only download your security tools from the major security researchers. In this way you can be fairly sure that the software will only do what it’s
supposed to, without any hidden payload. There may be times when you simply cannot find what you are looking for from one of the most mainstream security sites, in these cases you may have to visit some less-well-known sites. In these instances I would recommend downloading the software to an isolated test system and only run-ning the software after extensively testing it with a variety of anti-virus and anti-spy-ware programs. These steps should help minimize the chances of falling prey to malicious software.
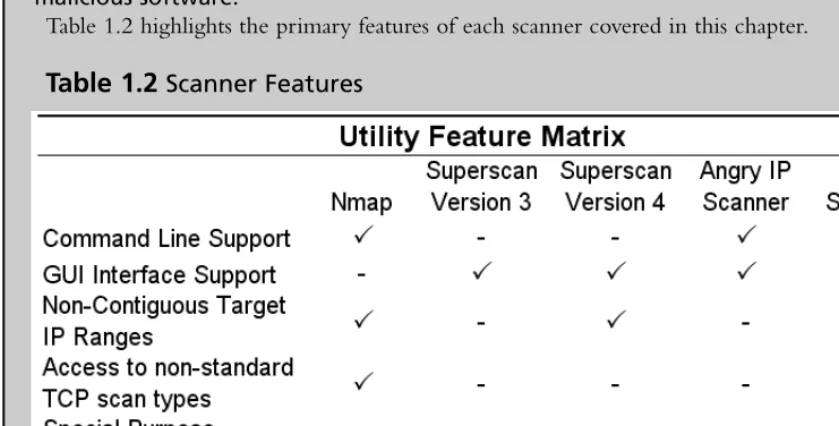
[image:34.612.53.473.155.368.2]Table 1.2 highlights the primary features of each scanner covered in this chapter.
Table 1.2
Scanner FeaturesLocating Wireless Systems
Some of the most difficult systems to locate are ones with no physical connection to the network, such as systems that rely on wireless connectivity.There are many reasons for doing a wireless site survey. If your company uses wireless technology you will probably want to learn what the effective network coverage is. Perhaps you don’t want the building across the street to be able to use your wireless access point. On the flip side, you could perform a site survey to map out where your cov-erage is weak and needs to be redesigned. Or perhaps an employee has installed a wireless access point or repeater and such “rogue” devices are not permitted according to your company policy. If any of these are true you will want to identify that the device exists, and, if necessary, attempt to locate the physical device. Physically locating the system is more of an art than a science. A tional antenna and a little triangulation can help you get pretty close to a wireless device. A direc-tional antenna can have as small as a 15-degree reception arc and when it comes to triangulating, the smaller the reception arc, the better.
older technique in which you use a modem to dial large blocks of telephone numbers to see if any computers answer the call, which is called war dialing. With the ever-increasing portability and wire-less access points becoming so cheap and prolific, you no longer need a car to locate them. Simply walking around with your laptop looking for wireless signals has become known as war walking.There are Web sites, and groups of people, who make it a pastime to locate unsecured (i.e. publicly acces-sible) wireless access points and map them so that others will know where to find free wireless access. This is one such Web site www.wigle.net/gps/gps/Map/onlinemap/?state=TX&s=Show+State where if you zoom in enough, it shows the individual SSIDs of the wireless access point.
Also, see Chapter 7 for more information on wireless monitoring and intrusion detection.
Network Stumbler
NetStumbler, which is short for Network Stumbler (www.netstumbler.com), is a tool to detect wire-less using 802.11a, 802.11b, and 802.11g. In addition to simply passively listening for indications of wireless devices, NetStumbler will send out various types of traffic in an attempt to solicit additional information from the device. In practice, NetStumbler is very easy to use.The only real concern is making sure you are using a wireless card that NetStumbler supports. Although there are no guaran-tees, typically sticking with cards that use the Lucent Orinoco chipset, or Cisco cards will provide good performance and compatible hardware. Senao also offers a higher power card with excellent sensitivity that I have used myself very successfully. Unfortunately, there is no comprehensive list of supported cards so a little research before buying can really pay off here.The NetStumbler site does contain some useful information on supported cards, though. When you start up NetStumbler you will see a screen similar to the one shown in Figure 1.11.
If everything is working properly, NetStumbler will start up in scanning mode and hopefully produce a list of detected devices. If you aren’t getting any results and think you should be, navigate to Device at the top of the window and see if the proper network card is selected.You can change the selected card without stopping the scanning.The number of results you get will vary greatly depending on the quality of the wireless card and antenna you use.
A little research on the Internet can help you choose a good wireless network card.The Seattle Wireless (www.seattlewireless.net) Web site has many excellent articles that can help you make an informed decision.You will need to choose which wireless card to get, whether or not you want to use an external antenna (versus the standard built-in antennas) and if so, whether you want to use an omni-directional antenna or a directional one. If you are going to be trying to triangulate to find the devices in question, a directional antenna will make the job much easier. Also, remember when making your hardware selection that signal loss is the enemy, and for each connector between the antenna and the wireless device you are sacrificing some small amount of signal clarity. Because of this, having the proper connector on your antenna is preferable to using a “pigtail” as an adapter cable between the antenna and the wireless device.
T
IPWhen trying to triangulate the location of a given wireless device, bear in mind that wireless signals can be reflected off nearby objects, such as buildings. So you might get a stronger signal from a wireless access point in the room next door from the direction of the building across the street. This could happen if the walls between you and the wireless device were very well insulated and the building across the street was particularly well suited to reflecting the wireless signal.
Many wireless card manufacturers also offer a utility to monitor the signal strength of an access point.These will often show a graph of the signal strength and or signal quality.Their utilities gener-ally require you to be associated with the access point in question, however, so their use as a war walking utility will be limited. NetStumbler packs a lot of information on its results page.The general quality of the signal is indicated by the color of the circle on the left (green is good, yellow not so good).The circles with a lock symbol indicate that the wireless device is using some form of encryp-tion.The type of encryption is shown in the Encryption column. If NetStumbler detects an access point (green or yellow circle) but is no longer receiving any signal from the device, the circle will change to gray.The device could be gray due to ambient conditions such as whether causing a weak signal to no longer be detected, or the device could have been simply turned off.
One feature you might find yourself searching for is a way to tell NetStumbler to connect to a given wireless device. Don’t look too hard because NetStumbler does not include this feature.To connect to any of the access points you discover, you will need to use the operating system utilities or another software program. Boingo is one such program for Windows (www.boingo.com). While it is not at all full featured, and it is not very good at displaying accurate signal strength, you can high-light an AP and click Connect and it will attempt to connect for you. Another tool of note is Airsnort, which can be used to passively collect encrypted packets and eventually decrypt the keys used for wireless communications.
W
ARNINGRemember to use sound judgment when dealing with wireless devices. After con-necting, the owner of the device could be sniffing all of your traffic, looking for vul-nerabilities to exploit, or blatantly attacking your system. Once connected, you should not make any additional connections through that wireless device or you could expose your credentials to whoever controls the access point. Even initiating an encrypted connection to a trusted device throughthe device would be ill advised because they could be acting as a man in the middle and intercept your credentials. None of these warnings even touch on the potential legal ramifications of using another’s wireless bandwidth. The legality of such activities may vary from one locality to another. For this reason you should seek the legal guidance of your employer before connecting to an unknown wireless device.
Documentation
Documentation is frequently one of the most overlooked aspects of network engineering and design. Most people don’t like to generate network diagrams and related documents. Many IT staff consider documentation a poor use of their time and would rather spend it doing “real” work.The fact is there are a lot of reasons why you need to have this documentation, and it is important that the doc-umentation remain accurate and up to date.The types of docdoc-umentation that is important will vary based on your specific business needs, but the following list represents some of the most important types of documentation from a security perspective.
■ Network Topology Maps
■ Access Request Forms
■ Business Continuity and Disaster Recovery Plans
■ IT Security Policies / Standards / Procedures
critical documentation.This could include not being able to access your business continuity plan, net-work diagrams, and other critical documents.Typically, copies of the documentation should be printed out and stored in a safe location offsite, possibly at the same location where you store your offsite data backups.
Network Topology Maps
Most people are probably familiar with network topology maps or network diagrams.The idea is to show a graphical representation of how the various network components are connected. Oftentimes this type of documentation is generated when the initial network is installed but it is not maintained like it should be. An inaccurate network map can actually cause more problems than not having one at all, because someone may assume things are configured one way, when in fact they are configured differently. Accurate network diagrams are critical.Their real value is apparent when there are prob-lems and you need to troubleshoot the network. When you don’t know how things are put together, any problem solving has to be preceded with an information-gathering exercise that only adds unneeded delays.
Or maybe the network is small enough that you know every device that is connected to it like you know the back of your hand, and you don’t need a diagram.This might work adequately most of the time but if you ever have to bring in outside help, they probably don’t know the network as well as you do, and now you have to pay for the consultant’s time just to learn how things work, before they can even begin to do the work you actually hired them to do. In this situation the lack of accurate documentation is costing you or your company real dollars, not only to pay for the out-side help to learn the lay of the land, but possibly in lost revenue while the solution is delayed. These costs can get outrageous quickly if you’re not careful and these are the sort of things manage-ment will take notice of.
Yet another situation where quality documentation can really be valuable is for an audit.There are the obvious types of audits, Sarbanes-Oxley, SAS70, and related types of business audits.You might not be impacted by these types of regulations and requirements.There are other audit-like scenarios that may affect you. If you are looking to partner with another business entity in such as fashion that it will require network connectivity between the two entities, the other business partner will likely require documentation related to your network infrastructure.They will want to review it to make sure it is a secure configuration. If you cannot provide them with the documentation they requested it could impede the business venture, again causing a loss of revenue.
Okay, so I’ve harped on the value of good network maps enough.The next question is what exactly constitutes “good” network maps? At its most basic form, simply having all the important data in one place and it being accurate is all that is required. Beyond that, there are other characteristics that are nice to have, such as consistency. A consistent look and feel will go a long way for being able to quickly look at the diagram and understand the information it contains.This could mean a consis-tent set of icons or symbols, and consisconsis-tent placement of key information, like who the document owner is, and version information. While different people generating the diagrams will have a stylistic impact on their work, if these get too disparate you can end up having a lot of difficulty sorting out one document from another.
so on. Each type of diagram has its place. A physical diagram is generally of more use when it comes time to troubleshoot a connectivity issue, while a logical diagram often is clearer for nontechnical staff, such as project managers and upper management.To some degree it may just come down to personal preferences; neither type is “wrong,” and either or both types may be appropriate depending on your needs. When it comes to the aesthetics of documentation consistency will likely prove to be an asset. An example of the same diagram in both a logical and physical view is shown in Figure 1.12.
Figure 1.12
Logical and Physical Sample DiagramAccess Request Forms
Another key piece of documentation is the access request form.You will want documentation to demonstrate that a user formally requested access to the network, or a particular network resource, such as a server.This documentation will also serve as a record for who approved the recourse, and
Internet Remote
Office 1 RemoteOffice 2
Web Server Database Server Firewall Firewall Internet 1 2 HTTP SSL SQL Web Server DMZ DMZ 192.168.1.29 192.168.1.250 192.168.1.251 1.2.3.4 ser 1/0
ser 1/0 ser 1/1
1.2.3.5 1.2.3.6
10.1.1.0 10.1.12.0
10.1.1.250 Fe 1/110.1.12.250 Fe 1/1
Cisco ASA 5520
Cisco ASA5520 10.1.99.250
10.1.99.100 Fe 1/24 Fe 1/1 Fe 0/1 Fe 1/24 Fe 1/1 Fe 1/2
Logical Diagram Physical Diagram
for how long.This type of documentation will most often be useful for audits, to demonstrate which systems and users have approved access to use the network.This category can also include the signed IT security policy (which may be a requirement to approve network access). Either of these could be important if HR needs to follow up on a matter of network usage policy breach. As with the net-work diagrams, these types of documents could be useful for demonstrating best practices and instilling confidence in potential business partners.
Business Continuity and Disaster Recovery Plans
While not purely a network security document, there are many security considerations surrounding business continuity (BC) and disaster recovery (DR) plans. For one, they will typically contain a log of highly sensitive information in the plans themselves. For this reason, access to these documents should be limited to only those personnel who require access.This documentation will also serve as your first guide to walk through the processes that are outlined, and the infrastructure that is in place, and to look for any security risks. Oftentimes people neglect to secure their DR servers or leave backup tapes containing sensitive information laying around without securing them. In the end, this documentation will hopefully never be useful or needed, but if it is, these are the documents that can make or break a company after a disaster occurs.
IT Security Policies / Standards / Procedures
Because this subject is the cause of much confusion, it’s worth summarizing what each of these types of documents should contain.
■ Policies Policies are broad statements that are general in nature.These documents should not change often. For example, a policy statement could be “data classified as confidential or higher must be encrypted when traversing an untrusted network.”These documents rarely contain sensitive information, and one company’s policies will often look very much like another’s.
■ Standards These specify what method should be used to conform to policy.They are
more specific than policies. An example of a standard would be “acceptable encryption pro-tocols are 3DES, AES(128), and AES(256).”The information in standards may be useful to a hacker, such as what encryption you are using, but this information is typically of marginal value.
■ Procedures Procedures are the most detailed documents. A procedure outlines exactly
how to perform a given activity.These are very specific and include exact instructions such as “click here” or “run this program using these options.” Because of the level of detail, pro-cedures often make use of numbered steps and include specifics such as IP addresses and possible access accounts and passwords. While not every process will have procedures written for it, these documents often contain highly sensitive information and should be safeguarded appropriately.