From the authors
™
1 YEAR UPGRADE
BUYER PROTECTION PLAN
From the authors
Protect Your Solaris Network from Attack
• Complete Coverage of Solaris 8 C2 and Trusted Solaris 8
• Hundreds of Damage & Defense,Tools & Traps, and Notes from the
Underground Sidebars, Security Alerts, and FAQs
• Step-by-Step Instructions for Making the Most of Solaris 8 Security
Enhancements
Wyman Miles Ed Mitchell F. William Lynch
s o l u t i o n s @ s y n g r e s s . c o m
With more than 1,500,000 copies of our MCSE, MCSD, CompTIA, and Cisco study guides in print, we continue to look for ways we can better serve the information needs of our readers. One way we do that is by listening.
Readers like yourself have been telling us they want an Internet-based ser-vice that would extend and enhance the value of our books. Based on reader feedback and our own strategic plan, we have created a Web site that we hope will exceed your expectations.
[email protected] is an interactive treasure trove of useful
infor-mation focusing on our book topics and related technologies. The site offers the following features:
■ One-year warranty against content obsolescence due to vendor product upgrades. You can access online updates for any affected chapters.
■ “Ask the Author”™ customer query forms that enable you to post questions to our authors and editors.
■ Exclusive monthly mailings in which our experts provide answers to reader queries and clear explanations of complex material.
■ Regularly updated links to sites specially selected by our editors for readers desiring additional reliable information on key topics.
Best of all, the book you’re now holding is your key to this amazing site. Just go to www.syngress.com/solutions, and keep this book handy when you register to verify your purchase.
Thank you for giving us the opportunity to serve your needs. And be sure to let us know if there’s anything else we can do to help you get the maximum value from your investment. We’re listening.
Wyman Miles
Ed Mitchell
F. William Lynch
Randy Cook
Technical Editor™
1 YEAR UPGRADE
Syngress Publishing, Inc., the author(s), and any person or firm involved in the writing, editing, or
production (collectively “Makers”) of this book (“the Work”) do not guarantee or warrant the results to be obtained from the Work.
There is no guarantee of any kind, expressed or implied, regarding the Work or its contents.The Work is sold AS IS and WITHOUT WARRANTY. You may have other legal rights, which vary from state to state. In no event will Makers be liable to you for damages, including any loss of profits, lost savings, or other incidental or consequential damages arising out from the Work or its contents. Because some states do not allow the exclusion or limitation of liability for consequential or incidental damages, the above limitation may not apply to you.
You should always use reasonable care, including backup and other appropriate precautions, when working with computers, networks, data, and files.
Syngress Media®, Syngress®, and “Career Advancement Through Skill Enhancement®,” are registered trademarks of Syngress Media, Inc. “Ask the Author UPDATE™,” “Mission Critical™,”“Hack Proofing™,” and “The Only Way to Stop a Hacker is to Think Like One™” are trademarks of Syngress Publishing, Inc. Brands and product names mentioned in this book are trademarks or service marks of their respective companies.
KEY SERIAL NUMBER
001 EAFRET4KDG 002 23PVFDAT5Q 003 VZPE43GHBA 004 MNFT6Y456F 005 QL3R3BNM65 006 KMXV94367H 007 NSE4T63M5A 008 P3JR9DF9GD 009 XP93QNFTY6 010 VK495YDR45 PUBLISHED BY Syngress Publishing, Inc. 800 Hingham Street Rockland, MA 02370
Hack Proofing Sun Solaris 8
Copyright © 2001 by Syngress Publishing, Inc. All rights reserved. Printed in the United States of America. Except as permitted under the Copyright Act of 1976, no part of this publication may be reproduced or distributed in any form or by any means, or stored in a database or retrieval system, without the prior written permission of the publisher, with the exception that the program listings may be entered, stored, and executed in a computer system, but they may not be reproduced for publication.
Printed in the United States of America 1 2 3 4 5 6 7 8 9 0
ISBN: 1-928994-44-X
Technical Editor: Randy Cook Freelance Editorial Manager: Maribeth Corona-Evans Technical Reviewer: Ryan Ordway Cover Designer: Michael Kavish
Co-Publisher: Richard Kristof Page Layout and Art by: Shannon Tozier
Acquisitions Editor: Catherine B. Nolan Copy Editors: Alexandra Kent and Darlene Bordwell Developmental Editor: Jonathan Babcock Indexer: Claire A. Splan
v
Acknowledgments
v
We would like to acknowledge the following people for their kindness and support in making this book possible.
Richard Kristof and Duncan Anderson of Global Knowledge, for their generous access to the IT industry’s best courses, instructors, and training facilities.
Ralph Troupe, Rhonda St. John, and the team at Callisma for their invaluable insight into the challenges of designing, deploying, and supporting world-class enterprise networks.
Karen Cross, Lance Tilford, Meaghan Cunningham, Kim Wylie, Harry Kirchner, Kevin Votel, Kent Anderson, and Frida Yara of Publishers Group West for sharing their incredible marketing experience and expertise.
Mary Ging, Caroline Hird, Simon Beale, Caroline Wheeler,Victoria Fuller, Jonathan Bunkell, and Klaus Beran of Harcourt International for making certain that our vision remains worldwide in scope.
Anneke Baeten and Annabel Dent of Harcourt Australia for all their help.
David Buckland,Wendi Wong, Daniel Loh, Marie Chieng, Lucy Chong, Leslie Lim, Audrey Gan, and Joseph Chan of Transquest Publishers for the enthusiasm with which they receive our books.
Kwon Sung June at Acorn Publishing for his support.
vii
Contributors
Hal Flynnis a Threat Analyst at SecurityFocus, the leading provider of Security Intelligence Services for Business. Hal functions as a Senior Analyst, performing research and analysis of vulnerabilities, malicious code, and network attacks. He provides the SecurityFocus team with UNIX and network expertise. He is also the manager of the UNIX Focus Area and moderator of the Focus-Sun, Focus-Linux, Focus-BSD, and Focus-GeneralUnix mailing lists.
Hal has worked the field in jobs as varied as the Senior Systems and Network Administrator of an Internet Service Provider, to contracting the United States Defense Information Systems Agency, to Enterprise-level consulting for Sprint. He is also a proud veteran of the United States Navy Hospital Corps, having served a tour with the 2nd Marine Division at Camp Lejeune, NC as a Fleet Marine Force Corpsman. Hal is mobile, living between sunny Phoenix, AZ and wintry Calgary, Alberta, Canada. Rooted in the South, he currently calls Montgomery, AL home.
Ido Dubrawsky(CCNA, SCSA) is a Network Security Engineer and a member of Cisco’s Secure Consulting Services in Austin,TX. He cur-rently conducts security posture assessments for clients as well as provides technical consulting for security design reviews. His strengths include Cisco routers and switches, PIX firewall, Solaris systems, and freeware intrusion detection systems. Ido holds a bachelor’s and a master’s degree from the University of Texas at Austin and is a member of USENIX and SAGE. He has written several articles covering Solaris security and net-work security for Sysadmin magazine as well as SecurityFocus.com. He lives in Austin,TX with his family.
viii
generalist, with a strong background in system administration, Internet application development, intrusion detection and prevention, and penetra-tion testing. Drew’s background includes a consulting posipenetra-tion with Fiderus, serving as a Security Architect with AT&T and as a Technical Team Lead with IBM. Drew has a bachelor’s degree from the University of South Florida and is also a member of American MENSA. Drew cur-rently lives in Suffolk,VA with his wife Kym and daughters Cailyn and Delaney.
Mike Lickeyis a Senior Engineer for IPC Technologies in Richmond, VA. He has 20 years experience in systems administration working with the real-time production server environment, specializing in critical up-time systems. He has worked for IPC Technologies for almost ten years, providing broad support for all platforms. As a consultant, he has worked almost exclusively with Fortune 100 companies working with multiple systems and networking architectures. He has extensive experience with system security starting in 1985 when he got his first systems administra-tion posiadministra-tion. Mike has lived in Richmond with his wife Deborah for almost 25 years. He received his bachelor’s degree in English from Virginia Commonwealth University.
ix
Edward Mitchellis the Network Operations Manager for ADC Telecommunication’s Enhanced Services Division in San Jose, CA. He oversees a large multi-platform UNIX environment with a Cisco-based infrastructure and is responsible for all aspects of network and system security. Prior to ADC, Edward spent time with the State of California as an independent consultant for a variety of network security projects. Edward also provides security and disaster recovery consulting services for a variety of clients and actively participates in various incident response teams and events. He currently resides in California’s Central Valley and appreciates the patience and understanding his wife displayed during his contribution to this book.
x
Technical Editor and Contributor
Randy Cook(SCSA) is a Senior UNIX System Administrator with Sapphire Technologies. He is currently assigned to one of the largest man-ufacturing and scientific facilities in the world where he provides system security and administration support. He works with a wide variety of UNIX distributions in a high-threat environment. Randy was the co-author and technical editor of the Sun Certified System Administrator for
Solaris 8.0 Study Guide (ISBN: 0-07-212369-9) and has written technical
articles for industry publications. He has also hosted a syndicated radio program, Technically News, which provides news and information for IT professionals.
Ryan Ordway is a UNIX Systems Administrator for @Once, Inc., a one-to-one eMessaging company that provides highly customized and person-alized e-mail to customers of their clients based on interests they have expressed.While not maintaining their network of 110+ Sun servers and troubleshooting network problems, Ryan spends time with his family, Stacy and Andrew, in Vancouver,WA.
Contents
xi
Foreword xxi
Chapter 1 Introducing Solaris Security:
Evaluating Your Risk 1
Introduction 2 Exposing Default Solaris Security Levels 2 Altering Default Permissions 2 Making Services Available after Installation 4 Using Solaris as an FTP Server 4 Using Telnet to Access a Solaris System 5 Working with Default Environmental Settings 7 Evaluating Current Solaris Security Configurations 9 Evaluating Network Services 9 Evaluating Network Processes 11 Monitoring Solaris Systems 14
Using the sdtprocess and sdtperfmeter
Applications 14 Monitoring Solaris Logfiles 16 Monitoring the Access Logs 16 Monitoring the sulog 17 Validating the System Logs 17
Testing Security 18
Testing Passwords 18
Testing File Permissions 20 Securing against Physical Inspections 21
Securing OpenBoot 21
Documenting Security Procedures and
Configurations 22
Exposing Default Solaris Security Levels
■ Consider changing the
umask in /etc/profile from the default value of 022 to something more restrictive, such as 027.
■ Replace insecure
cleartext daemons, such as FTP, Telnet, and the Berkeley r-commands, with a secure replacement like SSH or OpenSSH.
■ Create Authorized Use
Documenting Security Procedures 22 Documenting System Configurations 24 Obtaining Disk Usage Information 24 Gathering System Information with vmstat 25 Summary 27
Solutions Fast Track 28
Frequently Asked Questions 30
Chapter 2 Securing Solaris with
the Bundled Security Tools 33
Introduction 34
The Orange Book 35
Choosing Solaris 8 C2 Security 38
Configuring Auditing 40
Managing the Audit Log 42 Understanding Auditing Classifications 43
Configuring Auditing 44
Extracting and Analyzing Auditing Data 45 Choosing Trusted Solaris 8 47 Using Trusted Solaris 8’s B1-Level Security 48 Understanding the Concept of Mandatory
Access Control 50
Administrative Labels 53 Auditing and Analyzing Trusted Solaris 8 54 Solaris 8 Security Enhancements 55 Using SunScreen Secure Net 55 Utilizing SunScreen SKIP 56 Utilizing SKIP’s VPN Capabilities 56 Using the Solaris Security Toolkit 58
Working with the Solaris Security
Toolkit’s System Files 58
Using OpenSSH 59
Summary 61
Solutions Fast Track 61
Frequently Asked Questions 63
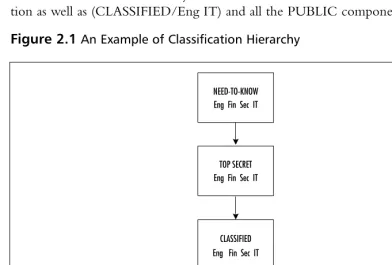
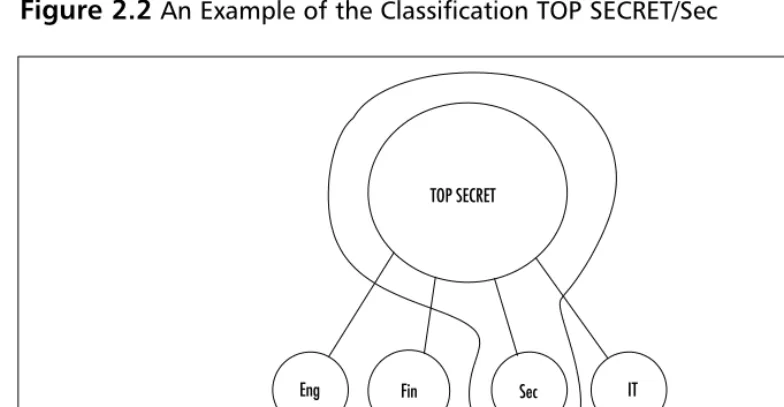
An Example of
Classification Hierarchy
NEED-TO-KNOW Eng Fin Sec IT
TOP SECRET Eng Fin Sec IT
CLASSIFIED Eng Fin Sec IT
Chapter 3 Securing Solaris with Freeware
Security Tools 67
Introduction 68 Detecting Vulnerabilities with Portscanning 71 Advanced Portscanning 76 Discovering Unauthorized Systems Using
IP Scanning 77
Using the arp Command on Solaris 79 Detecting Unusual Traffic with Network
Traffic Monitoring 81
Using Snoop 82
Using Snort 83
Using a Dedicated Sniffer 86
Using Sudo 88
Summary 93
Solutions Fast Track 94
Frequently Asked Questions 96
Chapter 4 Securing Your Users 99
Introduction 100 Creating Secure Group Memberships 101 Role-Based Access Control 103 Understanding Solaris User Authentication 104 Authenticating Users with NIS and NIS+ 107 Authenticating Users with Kerberos 109 Authenticating Users with the Pluggable
Authentication Modules 115 Summary 122
Solutions Fast Track 122
Frequently Asked Questions 125
Chapter 5 Securing Your Files 127
Introduction 128 Establishing Permissions and Ownership 129 Access Control Lists 132 Role-Based Access Control 135
/etc/user_attr
-user:qualifier:res1:res2:attr 136
Detecting Unusual Traffic with Network Traffic Monitoring
■ Snoop, a built-in
Solaris utility, is a powerful network tool for real-time
monitoring of network activity for short periods of time.
■ A dedicated sniffer/IDS
system like Snort is the best way to get current and historically
/etc/security/auth_attr - authname:res1:res2:short_desc:long_ desc:attr 137 /etc/security/prof_attr - profname:res1:res2:desc:attr 137 /etc/security/exec_attr - name:policy:type:res1:res2:id:attr 137 Changing Default Settings 138
Using NFS 142
Share and Share Alike 143 Locking Down FTP Services 145
Using Samba 147
Monitoring and Auditing File Systems 151 Summary 154
Solutions Fast Track 154
Frequently Asked Questions 156
Chapter 6 Securing Your Network 159
Introduction 160 Configuring Solaris as a DHCP Server 160 Using the dhcpmgr GUI Configuration Tool 161 Using the dhcpconfig Command-Line Tool 170 Securing DNS Services on Solaris 173
Using BIND 174
Setting Up a chroot Jail for BIND 174 Securing Zone Transfers in BIND 8 180 Configuring Solaris to Provide Anonymous
FTP Services 181
Using X-Server Services Securely 182 Using Host-Based Authentication 183 Using User-Based Authentication 183 Using X-Windows Securely with SSH 186 Using Remote Commands 187 Using Built-In Remote Access Methods 187 Using SSH for Remote Access 189
Enabling Password Free Logins with
Watching Packets with Snoop
Here are a few examples of when you may want to use snoop:
■ To verify that DHCP
requests are being received and answered by the DHCP server
■ To identify the source
of denial of service (DoS) attacks
■ To determine what
Web sites your users are visiting
■ To identify the source
address of a suspected intruder
■ To locate any
SSH 191 Summary 193
Solutions Fast Track 194
Frequently Asked Questions 195
Chapter 7 Providing Secure Web
and Mail Services 199
Introduction 200 Configuring the Security Features of an
Apache Web Server 201
Limiting CGI Threats 203 Using Virtual Hosts 206 Monitoring Web Page Usage and Activity 206 Configuring the Security Features of Sendmail 209 Stopping the Relay-Host Threat 213 Tracking Attachments 215 Summary 218
Solutions Fast Track 218
Frequently Asked Questions 220
Chapter 8 Configuring Solaris as a
Secure Router and Firewall 223
Introduction 224 Configuring Solaris as a Secure Router 224 Reasoning and Rationale 225
Routing Conditions 225
The S30network.sh Script 226 The S69inet Script 227 Configuring for Routing 229 A Seven-Point Checklist 229 Security Optimization 233 Security Implications 233 Minimal Installation 233
Minimal Services 234
Minimal Users 235
Minimal Dynamic Information 235 Minimal Cleartext Communication 235
Answers to Your Frequently Asked Questions
Q:What is the best way
to filter traffic handled by sendmail for virii?
A:There are several tools
Unconfiguring Solaris Routing 236 A Three-Point Checklist 236
Routing IP Version 6 237
Configuration Files 238
The hostname6.interface File 238 The ndpd.conf File 239
The ipnodes File 241
The nsswitch.conf File 242
IPv6 Programs 242
The in.ndpd Program 242 The in.ripngd Program 243 The ifconfig Command 244 IPv6 Router Procedure 245 Stopping IPv6 Routing 246 Method 1: Rebooting the System 246 Method 2: Not Rebooting the System 246
IP Version 6 Hosts 247
Automatic Configuration 247 Manual Configuration 248
The ipnodes File 248
DNS 248 Configuring Solaris as a Secure Gateway 250 Configuring Solaris as a Firewall 250 General Firewall Theory 251 General Firewall Design 252
SunScreen Lite 253
IP Filter 254
Using NAT 254
Guarding Internet Access with Snort 255 Snort Configuration File 256
Snort Log Analysis 257
Summary 259
Solutions Fast Track 261
Frequently Asked Questions 263
Steps to Ensure the System Isn’t Routing Traffic
1. Check for the /etc/ notrouter file. If it does not exist, create it.
2. Check the value of ip_forwarding in the IP kernel module after the system has been rebooted.
Chapter 9 Using Squid on Solaris 265
Introduction 266 The Default Settings of a Squid Installation 266
Configuring Squid 266
The http_port Tag 267
The cache_dir Tag 267
Access Control Lists 269
Configuring SNMP 271
Configuring the cachemgr.cgi Utility 272 New in Squid 2.4—Help for IE Users! 274 Configuring Access to Squid Services 274 The Basics of Basic-Auth 274 Access Control for Users 275 Access Control Lifetime 276 Configuring Proxy Clients 277
Exercise 9.1 Configuring Netscape
Navigator 277 Exercise 9.2 Configuring Lynx 278 Exercise 9.3 Configuring Internet
Explorer 279 Automatic Proxy Configuration 279 Excluding Access to Restricted Web Sites 281 Filtering Content by URL 281 Filtering by Destination Domain 282 Filtering by MIME Type 282 Filtering by Content-Length Header 283 Summary 284
Solutions Fast Track 284
Frequently Asked Questions 286
Chapter 10 Dissecting Hacks 287
Introduction 288 Securing against Denial of Service Hacks 288
Ping of Death 289
Syn Flood 290
E-Mail Flood 294
Configuring Squid Services
Q:Can I force Squid to
send certain requests directly to an Internet site, without using the cache? My own Web servers are local and don't need caching.
A:You can use the
Securing against Buffer Overflow Hacks 295 Buffer Overflow against a Web Server 302 Buffer Overflow against an FTP Server 305 Securing against Brute Force Hacks 306 Defending against Password Crackers 308 Securing against Trojan Horse Hacks 309 Defending against Rootkits 309 Defusing Logic Bombs 311 Securing cron Jobs 311 Defending against PATH and Command
Substitution 313 Securing against IP Spoofing 314 Securing Your .rhosts File 316 MAC Address Spoofing 316 Summary 318
Solutions Fast Track 319
Frequently Asked Questions 321
Chapter 11 Detecting and Denying Hacks 325
Introduction 326 Monitoring for Hacker Activity 326
Using Tripwire 326
The Tripwire Global Settings 328 Tripwire E-Mail Settings 330 Tripwire’s Monitored Files 331 Using Shell Scripts to Alert Systems
Administrators 335 Monitoring Running Processes 335 Monitoring CPU Activity 337 Putting It All Together 338 What to Do Once You’ve Detected a Hack 340
What’s a Honeypot? 340
How to Build a Honeypot on a Sun
System 340 Commercial Honeypots for Solaris 343 Monitoring Solaris Log Files 346 Solaris Log Files to Review 347
Securing against Brute Force Hacks
Like other System VR4 UNIX operating systems, Solaris keeps account information in two files:
■ A globally readable
/etc/passwd file containing noncritical data such as the account name, default shell, user ID, and group ID.
■ An /etc/shadow file for
Didn’t You Used to Be Called utmp? 347 The /var/adm/messages File 347 The /var/adm/lastlog File 349
The /etc Files 349
Creating Daily Reports 350 A State-of-the-System Report 350
Headline News 351
The Sports Page 351
Local Events 352
Start the Presses! 353 Summary 357
Solutions Fast Track 358
Frequently Asked Questions 359
Hack Proofing Sun
Solaris 8 Fast Track 361
Index 381
Creating Daily Reports
There are many excellent ways to automate the process of reviewing log files. One very popular application is called
swatch. This application
gets its name from the term simple watcher and
filter. It was written in Perl
Many years ago, my father decided to put a birdfeeder in our backyard. It was great. From our breakfast table we could see all kinds of birds visiting our yard. However, it soon became the official hangout for the local squirrel population.The squirrels would eat all of the birdfeed and chase the birds away. My brothers and I thought the squirrels were every bit as interesting as the birds, but not my father. He referred to them as “acrobatic vermin” and they soon became the focus of a major family pro-ject.The project’s goal was to design a birdfeeder that was easily accessible by birds but impossible to reach by squirrels. On the surface it sounded easy enough. How hard could it be to outwit some goofy squirrels? At least that’s what my brothers and I thought when our father first explained the project to us. It would be fun for us to work on together.We discussed ideas, drew plans, built and tested our designs.We worked on it all Summer. Our birdfeeders ranged from the simple to the absurd. Each design worked temporarily, but eventually the squirrels would figure out a way around our defenses. Each time, our adversaries outwitted us. Still to this day, when we get together, our conversation will invariably turn to a design idea one of us had for the Ultimate Squirrel-Proof Birdfeeder.The project could continue forever for one simple reason: It can’t be done.
When I first got involved with computer security, I kept thinking about the Ultimate Squirrel-Proof Birdfeeder.The reason our designs ultimately failed each time was actually very simple.The more challenging we made our design the more cunning our squirrels had to be in order to defeat it. In essence, we were seeing Darwinian theory in action. Our efforts were helping breed a smarter, craftier squirrel. I still have this recurring nightmare that I walk into an office for a technical interview and there’s a squirrel sitting behind the desk.
This scenario is very similar to the challenges we face in computer security. How can we provide easy access to resources by the authorized users and still deny unau-thorized access?
xxi
Luckily, as Solaris System Administrators, we have some excellent tools available to us. Sun Microsystems has spent a great deal of effort in designing Solaris to be both stable and secure.This book is your reference guide for not only securing your Solaris systems, but also for securing the environment in which they operate. It is not designed to be an introduction to UNIX or a primer on Solaris System
Adminstration, but rather a reference guide for experienced Solaris sysadmins who need to make sure their systems are secure.
Starting with Chapter 1, we attempt to level the playing field between you and your systems. It begins by discussing how to evaluate your current security scheme. One thing a hacker will always take advantage of is a sysadmin’s complaceny.We start by going over the default settings you will find on a newly installed Solaris 8 system.We also go over the basics of testing, monitoring, and documenting security procedures.
Next, in Chapter 2, we cover the standard security tools available from Sun Microsystems.This includes an overview of Sun’s BSM product and a look at the fea-tures of Sun’s Trusted Solaris 8.
In Chapter 3, we introduce third-party security tools which are commonly used to secure and monitor Solaris systems.This chapter not only recommends some valu-able tools to have on hand but where to get them and how to configure them for maximum effectiveness.
We begin discussing how to protect our resources in Chapters 4 and 5. First, by covering how users are authenticated on a Solaris system.Then by discussing how to configure file permissions and commonly used protocols such as FTP and NFS to transfer information safely among our authenticated users.
Once we have our systems secure, we need to explore our options for providing secure network services. Network users today need access to resources both on your local network and on the Internet. Opening this door can be a tremendous headache for a sysadmin. A major portion of this book is devoted to providing secure access on both sides of your router. Chapter 6 expands our focus to how Solaris 8 operates securely in a networked environment by providing DNS and DHCP services to net-work clients. In Chapter 7, we learn how to configure a secure Web and e-mail server. In Chapter 8, we narrow our networking focus by concentrating on how to configure Solaris to be a router and provide firewalling services. Chapter 9 is totally devoted to providing information on the configuration of the security features of Squid, one of the most popular apps for providing Web access to users.
what tools hackers commonly use to circumvent our security.We cover the most pop-ular methods of attack, such as Distributed Denial of Service, Ping of Death, and the much-hated buffer overflow exploit.We discuss how they are used, what to be on the lookout for and how to configure our Solaris systems to prevent their use against us.
Finally, in Chapter 11 we cover what we can do to prepare for that day when hackers make it passed our main defenses.This chapter covers the configuration of a Solaris Honeypot system using freeware or commercial products.With a well-designed Honeypot system and some luck, we can lure our intruders away from our real systems. If designed correctly, it can tie up an intruder while collecting informa-tion on them.We can use this data later to plug the gaps they used to get in. Our final chapter also covers the use of a popular file monitoring tool called Tripwire which takes a snapshot of our systems and alerts us when key files have been altered.
This book comes full circle. From describing the need for improved and consis-tent security to learning what to do when our efforts fail.
Our Ultimate Squirrel-Proof Birdfeeder Project failed for the same reason that many security plans fail. Squirrels, like many hackers, are very curious, very single-minded, and have a lot of time on their hands.They also tend to work together. Eventually we figured out how to defeat them.We found that by monitoring their efforts and changing our designs in response we were able to build our Ultimate Squirrel-Proof Bird Feeder.The key is that’s it’s not one design, but an ever-changing design.The same holds true for designing your Ultimate Hack-Proofing Solaris Plan. It’s not something you do once and ignore. It takes constant reviewing, monitoring, and improving. Using the information in this book you will be able to keep your resources secure provided you understand the importance of one simple truth:The hackers are out there and they want your sunflower seeds.
Introducing Solaris
Security: Evaluating
Your Risk
Solutions in this chapter:
■ Exposing Default Solaris Security Levels ■ Evaluating Current Solaris Security
Configurations
■ Monitoring Solaris Systems ■ Testing Security
■ Securing against Physical Inspections ■ Documenting Security Procedures
and Configurations
; Summary
; Solutions Fast Track
; Frequently Asked Questions
Chapter 1
Introduction
Default installations of almost any operating system are prime targets for hackers, and Solaris is no exception.These installations are usually devoid of any vendor patches, may be running system daemons with more privilege than necessary, and are likely to use insecure protocols.This chapter is designed to get you to begin thinking about Solaris in terms of security by examining the shortcomings of the default Solaris installation, as well as the tools available for monitoring the system.
Most intrusions will result in your Solaris systems displaying uncharacteristic activity, therefore it is important to learn to use Solaris’s built-in monitoring tools effectively, both in command-line and GUI modes. Effective use of monitoring tools transcends mere detection of hacker activity, however, by providing valuable information that will help you to detect system bottlenecks and aid in capacity planning as well. For these reasons, this chapter will teach you techniques you can use to monitor Solaris effectively.
System documentation is another all-too-often-overlooked method of increasing a Solaris system’s security. Documentation results in a paper trail that will help you determine whether any of your systems are lagging in their security maintenance.This chapter will introduce you to the system documentation that should be developed and how to develop this documentation.
A default Solaris installation exhibits a number of security deficiencies in many areas.This chapter will help you identify and eliminate these areas of weak-ness by learning to think the way an attacker would.
Exposing Default Solaris Security Levels
Solaris’s installation routine has a number of configurable options that allow you to perform all manner of configuration tasks, from setting up the network to selecting additional software to be installed.The set-up program, however, focuses primarily on the installation of the Solaris operating environment, not on config-uring security. As a result, you are left to secure the system on your own.
In this section, we will identify and discuss the default security configuration on a newly installed Solaris system. Areas where weaknesses might exist, such as clear text protocol authentication, will be noted.
Altering Default Permissions
access, or simply mode. A mode consists of three octal numbers that specify user,
group, and other access permissions for the file or directory. Each of these num-bers may range from 0 to 7. Read access is specified by 4, write access by 2, and execute access by 1.These permissions can be combined such that a mode of 5 specifies read and execute access.
Default permissions of the UFS file system are controlled by the umask set-ting, which specifies the permissions inherited by new objects.These permissions are the octal complements of the numerical values used in the chmod com-mand. For example, umask mode of 027 gives permissions equivalent to chmod mode of 750, or full permissions to the owner, read and execute permissions to the group and no access to everyone else. Each user’s umask setting is controlled by the value set in /etc/profile, which is 022 by default. Be aware that /etc/pro-file settings may be overridden by settings in the skeleton /etc/pro-files located in
/etc/skel.Table 1.1 summarizes the common mode and umask permissions.
Table 1.1Common Mode and Umask Permissions
Permission Mode Setting Umask Setting
No Access 0 7
Execute Access 1 6
Write Access 2 5
Read Access 4 3
Full Control 7 0
For most organizations, the default umask of 022 may not be acceptable, as its loose restrictions allow anyone on the system to read files generated by other users.This certainly isn’t desirable in the case of certain application system accounts, such as an Oracle account, whose home directories may contain sensitive data.
Making Services Available after Installation
Many system daemons are installed by default on a stock Solaris installation, but some will require minor adjustments to run in a more secured mode.There are other daemons, such as Apache, that are not installed by default but may be desir-able to run.This section will describe how to tweak some of the stock system services, as well as how to configure Apache for simple tasks.
Using Solaris as an FTP Server
Occasions often arise where files need to be transferred from one system to another, and File Transfer Protocol (FTP) has become the customary way to copy files between systems. Although Solaris includes by default a complete FTP ser-vices facility, its use is not recommended because FTP is a cleartext protocol that can easily be subverted by hackers using commonly available sniffing tools. Secure copy (SCP), described in Chapter 6, is a more preferable form of file transfer because the data is encrypted as well as the passwords and commands.There are, however, instances in which FTP services are a necessary function, so this section will discuss how to use Solaris’s FTP functionality as securely as possible.
Access to the FTP server can be restricted using the /etc/ftpusers file. Any user account listed in this file will not be authorized to use Solaris’s FTP services. Solaris 8 lists the superuser account and many of the system accounts in this file by default.The most secure way to control FTP access is to list all system and user accounts in /etc/ftpusers and then remove only the accounts that require access to FTP services. If there is no need for FTP access, it should be disabled completely by commenting out the FTP service in /etc/inetd.conf.
S
ECURITYA
LERT!
Using Telnet to Access a Solaris System
Perhaps even more common than FTP access is Telnet access, which allows users to connect to the system remotely and execute commands as if they were on the system console. Unfortunately the Telnet protocol, like the FTP protocol, is a cleartext protocol that allows passwords to be easily sniffed from the network. In addition to passwords, a user’s entire session can be sniffed from the network, allowing others to remotely “watch over the user’s shoulder.” Because of this, you should seriously consider replacing Telnet access with an encrypted protocol such as SSH, as described in Chapter 6. Barring that, this section will discuss how the Solaris Telnet server is operated.
The Telnet daemon is typically operated from inetd, the Internet super-server, which launches Telnet daemon sessions as necessary. A Solaris installation will activate the Telnet server by default, but it can be disabled by commenting out the following entry for Telnet in /etc/inetd.conf:
telnet stream tcp6 nowait root /usr/sbin/in.telnetd in.telnetd
From this entry we can determine that Telnet supports IPv6 and is accessible from a Transmission Control Protocol (TCP) stream. Specifying nowait status allows multiple Telnet sessions to run concurrently.Telnet service is run as root using the system binary /usr/sbin/in.telnetd as a Telnet daemon program.
You may notice that root logins are by default not allowed via the Telnet server.This default security setting prevents brute force attacks on the root account from succeeding by denying all root logins, regardless of whether the password supplied is valid or not. Enabling root logins via Telnet is not recom-mended because it opens the system to brute force attacks on the root password and allows the root password to be sniffed from the wire. If absolutely necessary, root Telnet logins can be enabled by commenting out the CONSOLE section of /etc/default/login.
Using dsniff to Capture Passwords
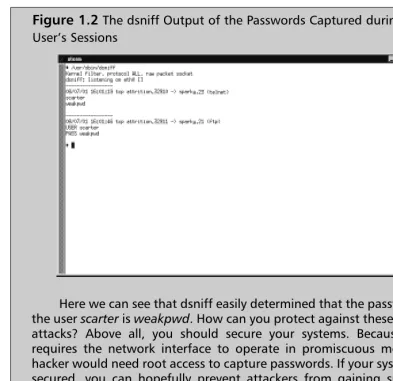
You may be wondering just why I keep complaining about the insecurity of cleartext protocols such as FTP and Telnet. After all, how easy can it be to decode this binary information off the wire? Actually, it’s very easy, thanks (or no thanks, depending on your point of view) to a freely avail-able tool called dsniff. The homepage for dsniff is www.monkey.org/ ~dugsong/dsniff/ and Solaris binary packages are available at www.sunfreeware.com/programlistsparc8.html#dsniff. You can use dsniff to capture login and password combinations and other data from just about any cleartext protocol, including FTP, Telnet, SMTP, HTTP, POP, poppass, NNTP, IMAP, SNMP, LDAP, Rlogin, RIP, OSPF, PPTP MS-CHAP, NFS, YP/NIS, SOCKS, X11, CVS, IRC, AIM, ICQ, Napster, PostgreSQL, Meeting Maker, Citrix ICA, Symantec pcAnywhere, NAI Sniffer, Microsoft SMB, Oracle SQL*Net, Sybase, and Microsoft SQL. In this example, I will show how FTP and Telnet passwords are captured, though the other protocols are just as easy to violate. Figure 1.1 shows the actual login sessions from the user’s perspective. Note that the user is completely unaware that his passwords have been sniffed. Figure 1.2 is the dsniff output of the passwords captured during the user’s sessions.
Notes from the Underground…
Working with Default Environmental Settings
Depending on the interactive shell used, various global configuration files can affect the security of a user’s environment. For Bourne-based shells such as /bin/sh, /bin/ksh, and /bin/bash (if installed) the global configuration file for user environments is /etc/profile.These environment settings are evaluated before the user’s local settings ($HOME/.profile) for Bourne-derivative shells, and may be overridden by the local user settings.While we have already discussed making modifications to the umask setting in this file, there are a few minor security tweaks that you may wish to implement.
[image:32.612.80.473.61.442.2]Here we can see that dsniff easily determined that the password for the user scarter is weakpwd. How can you protect against these types of attacks? Above all, you should secure your systems. Because dsniff requires the network interface to operate in promiscuous mode, the hacker would need root access to capture passwords. If your systems are secured, you can hopefully prevent attackers from gaining superuser status. Using an entirely switched network also alleviates a large portion of the risk, since the hacker can sniff only one host at a time from each compromised host.
It is a good security practice to implement the use of Authorized Use banners in /etc/motd and /etc/issue, and forcing /etc/profile to display /etc/motd at login time.The default /etc/profile allows users to circumvent the display of /etc/motd, so you should comment out this part of /etc/profile. A sample Authorized Use banner appears in the following Security Alert sidebar.
You should also consider changing the default path variables set in /etc/skel/local.profile.This skeleton directory is only used when creating accounts, so existing accounts should have their $HOME/.profile modified to match. In this file, the default path is “/usr/bin:/usr/ucb/:/etc:.”.The trailing period signifies an instruction to attempt to locate binaries in the current working directory if they are not found in /usr/bin or /usr/ucb. A favorite scheme of hackers is to create a misspelled command trojan that executes arbi-trary commands. For example, if a hacker obtains write access to root’s home directory, he could create a script named “mroe” that performs “rm -rf /” as a denial of service attack.This attack would be triggered when the superuser mistypes “mroe” for “more.” For ordinary users, this is only marginally insecure because any trojans would likely affect only the individual user. For the superuser, however, these types of trojans could wreak severe havoc on the system.
S
ECURITYA
LERT!
The following is an example of an abbreviated Authorized Use banner, in use by the Department of Energy. Your legal department should approve any Authorized Use banners before implementation. This particular example is from www.cio.anl.gov/warning.html:
WARNING
Federal US Government computer AUTHORIZED USE ONLY. Users have no explicit/implicit expectation of privacy. All files may be intercepted, monitored, recorded, copied, audited, inspected, dis-closed to authorized law enforcement officials, domestic or for-eign. Unauthorized improper use of system may result in
Evaluating Current Solaris
Security Configurations
When hardening a default Solaris installation, it is crucial to examine services running both on the network and on the local host itself.Your goal during the host-hardening process should always be to disable as many noncritical services as possible, because each service or daemon increases the risk of the system being compromised.This section will identify the plethora of services running on a default Solaris installation, and show you how to disable those which may be unnecessary for your installation.
Evaluating Network Services
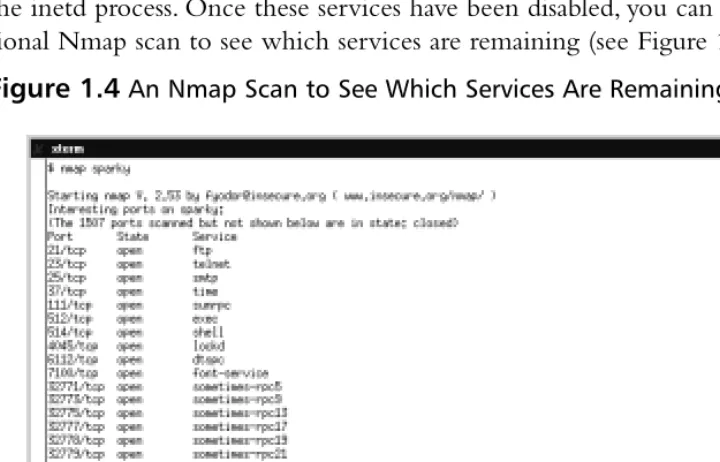
We’ll begin examining our default Solaris system from the network, using the commonly available port scanner known as Nmap, written by Fyodor. Nmap is available at no charge from www.insecure.org/nmap, and it is probably the most full-featured and widely used port scanner in existence. Detailed instructions on the intricacies of Nmap are beyond the scope of this section, but interested readers will find complete documentation distributed along with the tool itself. Ports have been written for most widely used UNIX variants, including Solaris. Figure 1.3 details an Nmap scan of a default Solaris host from a Linux-based host. (Scanning from a Solaris host would yield an identical output.)
As you can see, Solaris includes a great number of open ports and available network services by default, many of which can be disabled to enhance system security. Most of these daemons are run from inetd, and can be disabled by com-menting out the corresponding section in /etc/inetd.conf. Unless you have an explicit need for them, the following services can be disabled without impact to your system:
■ Echo ■ Discard ■ Daytime ■ Chargen ■ Finger
■ Login (mostly duplicates exec and shell) ■ Printer
■ UUCP
[image:35.612.77.437.379.610.2]After commenting out these services in /etc/inetd.conf, don’t forget to restart the inetd process. Once these services have been disabled, you can run an addi-tional Nmap scan to see which services are remaining (see Figure 1.4).
Many of the services remaining can be replaced through the use of Secure Shell (SSH). SSH is an encrypted protocol that allows for secure authentication, interactive logins and file transfers.There are also ways to configure secure shell to act as a wrapper for nearly any protocol or service.Without additional config-uration, SSH can replace services such as:
■ Telnet ■ FTP
■ Exec (rexec) ■ Shell (rsh)
Once network access is tightened, we can concentrate on tightening the internal security of our default Solaris install.
Evaluating Network Processes
An excellent method of improving the security on your Solaris system is to examine all of the processes running by default to see what might be modified to run with less privilege and what can be shut off completely. Figure 1.5 is a screenshot of all processes running on a default installation of Solaris. Let’s examine these processes more closely.
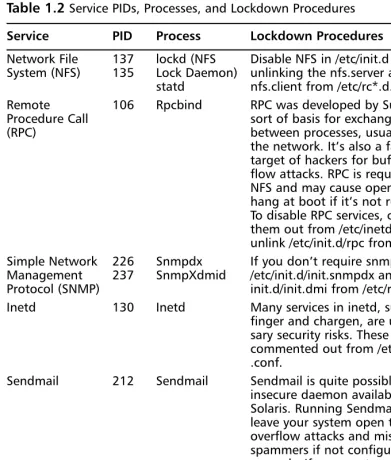
Starting from the top of the list, we can see a number of processes and dae-mons that can be shut down if not in use.Table 1.2 describes the services run-ning according to this ps output, what processes and IDs are attributed to these services, and how these services can be disabled, if desired.
Table 1.2Service PIDs, Processes, and Lockdown Procedures
Service PID Process Lockdown Procedures
Network File 137 lockd (NFS Disable NFS in /etc/init.d by System (NFS) 135 Lock Daemon) unlinking the nfs.server and
statd nfs.client from /etc/rc*.d.
Remote 106 Rpcbind RPC was developed by Sun as a Procedure Call sort of basis for exchanging data
(RPC) between processes, usually over
the network. It’s also a favorite target of hackers for buffer over-flow attacks. RPC is required for NFS and may cause openwin to hang at boot if it’s not running. To disable RPC services, comment them out from /etc/inetd.conf and unlink /etc/init.d/rpc from /etc/rc*.d. Simple Network 226 Snmpdx If you don’t require snmp, unlink Management 237 SnmpXdmid /etc/init.d/init.snmpdx and /etc/ Protocol (SNMP) init.d/init.dmi from /etc/rc*.d. Inetd 130 Inetd Many services in inetd, such as
finger and chargen, are unneces-sary security risks. These should be commented out from /etc/inetd .conf.
Sendmail 212 Sendmail Sendmail is quite possibly the most insecure daemon available on Solaris. Running Sendmail will leave your system open to buffer overflow attacks and misuse by spammers if not configured
Applying Security Patches
Security patches are a key defense for your Solaris systems. Since Sun distributes updated security patches on an ongoing basis, continuous vigilance is required on the part of the system administrator to ensure that all critical security patches have been installed on all systems. This sidebar is dedicated to describing how the patch administration system works, as well as showing you where to find Sun’s security updates.
The current patch revision level can be determined by issuing the command showrev -p, which will return “No patches are installed” for a default installation. If at all possible, systems need to be patched with the most current Sun recommended security patches before the system is connected to the Internet. Ideally, you should download patches on another (already patched) system and transfer them to the new system via whatever secure means are available.
Patches are obtained from Sun via the Sunsolve distribution center, located at http://sunsolve.sun.com. To download the most current Sun recommended security patches, go to http://sunsolve.sun.com/pub-cgi/ show.pl?target=patches/patch-license&nav=pub-patches and accept the license agreement. The page that follows will list downloads for all versions and architectures of the Solaris operating system; choose the one that matches your system to be patched.
Once the patch cluster is downloaded, transfer it to the unpatched server using whatever secure means of transfer available, and use the unzip command to decompress the patch cluster. Change into the direc-tory that has the same name as the patch cluster you downloaded and execute the install_cluster script as root. The patch cluster you down-loaded will now be installed automatically. The patching process gener-ally takes at least two hours, and it is recommended that you allow the system to sit idle while the patch cluster is applied. Note that using the patch cluster on systems without much free disk space in the /var parti-tion is not recommended. At the end of the patching process, a reboot will be required. After rebooting, the showrev -p command should list all of the patches applied to the system.
Patches can also be applied on an individual basis, if necessary. Use the Sunsolve patchfinder at http://sunsolve.sun.com/pub-cgi/show .pl?target=patches/patch-access to search for individual patches by the patch ID number. Individual patches should be saved to the
Monitoring Solaris Systems
Monitoring Solaris systems is absolutely essential, because unless you’re paying careful attention, you may never know if one of your systems has been cracked. Of course, monitoring is a beneficial administrative practice that reaches far beyond its security aspects. For example, appropriate monitoring can identify per-formance bottlenecks that may have been missed by other means, especially if these bottlenecks are periodic instead of constant. System performance and system message log output are Key areas to monitor. In addition to examining the security-related logfiles, this section is devoted to examining system perfor-mance using the default tools available to the operating system. However, if you find the default tools inadequate for monitoring the historical system perfor-mance of your servers, you may be interested in my own open source monitoring tools, MRTG-PME, discussed in Chapter 3.
Using the sdtprocess and
sdtperfmeter Applications
Even the default installation of Solaris has a variety of little-known monitoring applications. Probably the most useful of these are Process Manager and the Performance Meter. Extensive usage guides for each of these tools are available in the Sun Answerbook Solaris Common Desktop Environment: User’s Guide.While we won’t attempt to duplicate Sun’s existing step-by-step documentation, this section will introduce you to these tools.
Sun’s Process Manager is roughly a graphical equivalent of the ps command, designed for more novice users who may not be familiar with all of the com-mand-line switches for ps. Process Manager isn’t in the default path for the super-user or regular accounts, so you will need to launch it directly from /usr/dt/ bin/sdtprocess.You can easily sort system processes, as well by filtering them for certain strings (ps -ef equivalent). Figure 1.6 illustrates Process Manager filtered for viewing-only processes owned by root.
Snapshots of the current process listing can be taken and saved for future ref-erence using the logging feature of Process Manager.To log data from Process Manager, select Sample | Save As from the menus followed by Sample |
Startand Sample | Stop to set the collection interval. Historical performance data can be invaluable, whether its source was an output of ps or a logfile from Process Manager. Many intrusions cause anomaly processes to run, which ordi-narily would not be running on your system. If the intruder hasn’t covered his tracks by installing a trojan ps binary, you can compare the processes of an intruded system with a historical process listing in order to determine what actions the intruder is taking.This same methodology can be used to some extent for troubleshooting failing applications. By decreasing the sample window size and logging processes during the application’s failure, you can spot clues that may help to explain why an application is failing.
Another useful GUI monitoring tool that ships with Solaris is the Performance Meter, which can be executed as /usr/dt/bin/sdtperfmeter.You may be familiar with this application from CDE, as it registers CPU and Disk activity on the front panel.What you may not know is that the Performance Meter is not limited to merely CPU and Disk activity; it can also display load, paging, context, job swaps, and network activity such as interrupts, collisions, packet throughput and errors. There isn’t much to the Performance Meter as far as configuration is concerned, and about all you can change are the colors used by the monitor and the threshold
at which the colors change. However, Performance Meter also contains a logging feature that can log significantly different metrics than Process Manager, which would be useful for the same reasons already discussed. Figure 1.7 is an example of the Performance Meter monitoring CPU activity, packet throughput, and memory paging.
Monitoring Solaris Logfiles
Chief among a Solaris administrator’s arsenal of security tools are the system log-files, especially those that record access to the system.These logs can be invaluable for tracking the system usage of intruders who have not yet been able to access the superuser account. Once an intruder gains superuser access to the system, though, you can no longer trust these logs, as the intruder has probably modified them to cover his tracks. An inexperienced hacker, not knowing how to cover his tracks, may even delete these logs altogether. For these reasons we will also briefly discuss how to verify the integrity of these logfiles.
Monitoring the Access Logs
Solaris can log up to three types of system access, but only two of them are avail-able by default.Typically, a system administrator who wants to check the system logins will use either the who or the last commands.The last command will list all system access, time of access, and point of access for all accounts on the system, as well as listing system reboots.The who command is similar, but it will list only the users currently logged into the system, along with their origin and login time. Both of the logfiles for last and who commands are the binary logs (as opposed to ASCII).They are /var/adm/wtmpx and /var/adm/utmpx, respectively.
Failed logins can also be logged on Solaris, but this ability is not enabled by default.To begin recording failed login attempts, create the file /var/adm/ loginlog. Make sure the user “root” and the group “sys” own this file, and change the permissions to mode 600.Then restart the syslog daemon.Your Solaris system should begin logging failed login attempts when one account receives five or more failures.
Monitoring the sulog
Logging user account activity and failed login attempts may assist you in catching intruders at the early stages of attack, but the logfile you really want to watch is /var/adm/sulog.This logfile tracks both successes and failures of anyone attempting to use the su command, as well as which accounts they are trying to su to. A good security practice includes running a periodic cron job that informs administrators of any nonadministrative account attempts to use su to become the super user. Even better, restrict execute access of the su binary to only accounts in the sysadmin group (GID=14). Note that the second method is only effective if your users do not have a legitimate need to use the su command to become another user, which may not include root. For example, one of your DBAs may require the ability to su to the oracle user.
Validating the System Logs
What happens if unauthorized personnel gain access to the root account? How can the logs be trusted at that point? Well, by default it means they really can’t. With the default Solaris tools, the best you can do is configure a centralized host-hardened syslog server to provide remote logging for all of your critical Solaris systems. As long as the syslog server isn’t cracked, you can generally trust its logs.
However, using a central syslog server is an incomplete solution at best. Once the intruder has root access, he can easily stop the logging daemon altogether. Or, since syslog uses the UDP protocol, the intruder could flood the loghost with packets as a denial of service attack that masks his other attacks.
Deciphering /var/adm/messages Information
Login information is only part of the information recorded by your Solaris system. Generalized information about the overall state of the system’s health and other security issues can usually be found in /var/adm/messages. Monitoring this file either manually or through a logcheck program is advantageous because it provides advance warning of many common problems. A failing disk drive, for example, will usually note that certain disk sectors could not be read days or even weeks before the drive fails completely.
Testing Security
From a user perspective, perhaps the most important areas to be concerned with are choice of passwords and file access permissions. Not every intruder’s goal is to obtain root access to your Solaris system; some may only be information thieves, attempting to pilfer proprietary data from your company. Data theft can often be accomplished by merely gaining access to certain user accounts. Information that is confidential yet widely available within your company is only protected by the weakest user’s password.
Of course, there are times when ordinarily trustworthy users might abuse your Solaris systems as well. Employees who wouldn’t dream of stealing your company’s proprietary information may not think twice about trying to access your company’s human resources records as a means of carrying out some sort of revenge against a rival coworker.Your Solaris systems should be solid enough to guard against atypical threats like these as well as curious external hackers.This section is thus dedicated to helping you test the security of your Solaris systems.
Testing Passwords
Table 1.3Guidelines for User Password Selections
Excellent Password Choices Poor Password Choices
Use at least 8 characters. Use 6 characters or less.
Use a combination of uppercase, Use some combination of the user or lowercase, numerics and user’s family member’s name, birthday, punctuation. or telephone number.
Use an uncommon misspelling of Are based on dictionary words for a common word. English or any other common language. Use embedded words such as Include pop culture references such “diCOLAet” for diet cola. as actors’ or characters’ names for
television shows.
Use interleaved words such as Use published password examples, “DcIoElTa” for diet cola. such as any sample passwords listed
in this table.
Because Solaris uses shadowed passwords by default, administrators of Solaris systems have a number of options available for use in their password policies.The following line is a sample of an /etc/shadow entry using the default password configurations, followed by a field listing of the /etc/shadow file:
scarter:TAcRZSaPcoq02:11541::::::
username:password:lastchg: min:max:warn: inactive:expire:flag
By default Solaris only tracks the time at which the password was last changed, which is a UNIX datetime format that specifies the number of days between January 1, 1970 and the day the password was last changed.The com-mands most often used for password management are passwd useradd and usermod.Table 1.4 describes the fields unused by the example and the switches used by common commands to manipulate these fields.
Table 1.4Switches Used by Common Commands to Manipulate the Unused Fields
Passwd Useradd Usermod
Field Switch Switch Switch Description
max -x N/A N/A Maximum number of days that a password is valid. After this date the password must be changed or the account will be locked. warn -w N/A N/A Number of days before
expira-tion that a user will be warned of password expiration.
Inactive N/A -f -f Number of days an account can remain unused before it is auto-matically locked.
Expire N/A -e -e Absolute date at which an account will automatically be locked, regardless of account use.
As a final note, you may also wish to periodically audit your user’s passwords by using a password cracking program such as John the Ripper (available from www.openwall.com/john/) to audit the passwords of your users. For strict, sensi-tive organizations, cracked passwords discovered by account audit often result in disciplinary actions.Therefore before using John the Ripper or any similar hacking tools, such as dsniff, be certain that you have authorization to use them. Otherwise you may be the one facing disciplinary actions.
Testing File Permissions
Enforcing proper password procedures may keep others from accessing your users’ accounts, but not necessarily their files. Users may not realize that any files with access modes greater than 755 are dangerous.These files could be exploited to trick the user into running trojan applications, or worse, to write .rhosts files in the user’s home directory. If your Solaris system allows use of the Berkeley r-commands (rsh, rexec, rlogin) then another user could exploit the bad per-missions on the .rhosts file (or another file) to gain access to the original user’s login.You should consider periodically checking the access modes on all data files and home directories. Improper access modes can easily be identified using the command find /export/home -perm -755 -print, which will print a listing of any files with permissions less restrictive than 755.
Table 1.4Continued
Passwd Useradd Usermod
Securing against Physical Inspections
If the physical security at your location is lax, then it is conceivable that unautho-rized personnel might obtain physical access to your Solaris system. An intruder with physical access to a Solaris server without a secured programmable read-only memory (PROM) is only moments away from root access. After all, they only need to boot from the CD into single user mode and change the password for the superuser account, or add a new superuser-equivalent account. Fortunately, the OpenBoot PROM on SPARC machines contain features that make it very diffi-cult for an unauthorized individual to gain access to the raw system.
Any system can be hacked when the attacker has physical access for a long enough period of time. Even a secured OpenBoot PROM will not stop someone from opening your server’s case (with a hacksaw and crowbar if necessary) and removing the disk drives. Once the disk drives are removed they can easily be mounted in another system for data theft or other misuse.Therefore, your loca-tion’s physical security should be great enough to deter the forcible opening or removal of your servers.
Securing OpenBoot
Like most modern PC BIOSes you can specify that a password is required to access some or all of the configuration functions in the OpenBoot PROM. Access is restricted to the security modes identified in Table 1.5.
Table 1.5Security Modes for Access to Configuration Functions in the OpenBoot PROM
Security Mode Description
None This is the default mode, wherein access is not restricted to PROM operation in any way.
Command The commands boot and go are unrestricted, but only for booting from the default partition. All other access requires a password.
Full Only the go command is unrestricted. All other access requires a password.
To set the security mode, use the eeprom command: eeprom
security-mode=MODE, where MODE is either none, command, or full. Once the
mode has been set, the OpenBoot password can be set using the command
Finally, you can set a banner similar to the operating system banner using the eeprom command eeprom oem-banner=BANNER, where BANNER is a text string (in quotes).Then, use the command eeprom oem-banner?=true to enable the banner.
Documenting Security
Procedures and Configurations
Documentation is one of the more often overlooked aspects of security and system administration in general. Ideally, documentation should provide a paper trail that explains system configurations, patch levels, etc. in such a manner that the information can be easily absorbed by someone with little or no prior knowledge of the organization’s layout. However, this ideal may be somewhat unrealistic, and it usually suffices to record security procedures and configurations in such a manner that others in your group who are familiar with the general layout will understand them.
Keep in mind that the primary goal of documentation is always to reduce losses to your organization resulting from unforeseen circumstances, such as the sudden loss of one of the senior Solaris administrators. Documentation will also assist in restoring a server to its functional state should a rebuild become neces-sary. If your organization has a large number of Solaris servers, any of which may exist in unique configurations, it becomes impossible to remember the specific details of each machine’s configuration without proper documentation.With that in mind, this section will discuss some methods you can use for documenting your organization’s environment.
Documenting Security Procedures
Documenting security procedures is very similar to documenting administrative work performed on your Solaris system. Exactly what needs to be documented and the granularity of documentation can be very site-specific, but at the min-imum your system documentation should include the following:
■ The fully qualified domain name (FQDN) of the system ■ The date the system was brought into service
■ What functions the system provides, such as mail service, DHCP
service, etc.
■ System changelog
Ideally, when any changes are made to the system they are listed in the changelog as entries that include the date the change was made, who made the change, and some brief details about the change.That way, if you notice any changes to the system that have not been logged in the system journal, you can begin an investigation to determine the source of the unauthorized changes.
One scheme for implementing administration practices like these is to track all of the above information in a single hand-edited file, /var/adm/hostname .journal, such as the sample journal shown in Figure 1.8. For simplicity, you could also symlink this file as /var/adm/journal so that it isn’t necessary to remember the system’s hostname when checking the administrative log.This file should also be backed up frequently.
The journal file may include sensitive information, so take care to ensure that only administrators have access to the file. It should be owned by the user root and the sysadmin group and have an access mode of 660.You may also want to consider encrypting this file with pgp or gpg to prevent unauthorized users from gaining information in the event of a compromise of the root account or any of the sysadmin accounts.
Documenting System Configurations
Some telltale signs of unusual activity on your Solaris system are sudden, unex-plained increases in resource utilization. For example, if an intruder is attempting to compile additional hacking tools, the use of the compiler will drastically increase CPU utilization for the duration of that process. If these tools are com-plex, such as the vulnerability assessment tool Nessus, the compile time duration may be significantly long to warrant investigation. Clearly, not all increases in resource utilization are the result of system intruders, but they may still warrant investigation.
When investigating mysterious spikes in resource utilization, it’s important to have baseline data for comparison.Your baseline data should also be somewhat dynamic, which is to say that what’s happening on your Solaris systems today is probably somewhat different than what the system was doing a year or two ago. Baseline data should be recaptured at periodic intervals appropriate for your site, especially when systems take on extended functionality such as adding another network service.
Obtaining Disk Usage Information
Free space is an important asset on your Solaris system. Intruders may attempt to subvert this resource by turning your Solaris system into a server for pirated music and software at your expense. Not only is your organization liable for this unauthorized distribution, but it also costs your organization money: bandwidth isn’t free, and once the intruder distributes connection information to your server, your site’s bandwidth is likely to be throttled, preventing your employees and partners from accessing your systems for production use.
Attackers might also fill up your free disk space as a means of denial of ser-vice. For example, some intruders may attempt to cover their tracks by filling your /var file system with bogus information. Once /var is full no more system logs can be written, and the attacker can do whatever he wishes without fear of his attacks being logged. For all of these reasons, it’s important to keep tabs on the usage of each of your Solaris server’s file systems.
the command df -k /var would display the free, used and total disk space in kilobytes for only the /var file system.
Gathering System Information with vmstat
Probably the most valuable tool for gathering system resource information is
vmstat. In fact, you will more likely use vmstat than sdtprocess (discussed earlier in
this chapter) to gather resource utilization because vmstat (combined with awk) lends itself easily to data collection scripting.This section will serve as a brief introduction to performance analysis with vmstat by identifying the more impor-tant metrics it collects. Usually vmstat takes two arguments when invoked, the first being the collection interval in seconds and the second being the number of collections to take. If the second argument is omitted, data collection will run indefinitely. Figure 1.9 gives a sample vmstat output of 20 samples collected at five-second intervals.
At first glance, you may notice that the very first line of numbers stands sig-nificantly different from all other collections.This is because the initial line is an average of each metric since the system was booted; it should generally be disre-garded unless your system has significant uptime (more than 30 days).
CPU load must be determined by examining utilization and the process run queue.The last three columns of output provide information on CPU utilization, where “us” refers to userland processes, “sy” refers to system processes and “id”