Corporate Headquarters Cisco Systems, Inc. 170 West Tasman Drive San Jose, CA 95134-1706 USA
http://www.cisco.com Tel: 408 526-4000
THE SOFTWARE LICENSE AND LIMITED WARRANTY FOR THE ACCOMPANYING PRODUCT ARE SET FORTH IN THE INFORMATION PACKET THAT SHIPPED WITH THE PRODUCT AND ARE INCORPORATED HEREIN BY THIS REFERENCE. IF YOU ARE UNABLE TO LOCATE THE SOFTWARE LICENSE OR LIMITED WARRANTY, CONTACT YOUR CISCO REPRESENTATIVE FOR A COPY.
The Cisco implementation of TCP header compression is an adaptation of a program developed by the University of California, Berkeley (UCB) as part of UCB’s public domain version of the UNIX operating system. All rights reserved. Copyright © 1981, Regents of the University of California. NOTWITHSTANDING ANY OTHER WARRANTY HEREIN, ALL DOCUMENT FILES AND SOFTWARE OF THESE SUPPLIERS ARE PROVIDED “AS IS” WITH ALL FAULTS. CISCO AND THE ABOVE-NAMED SUPPLIERS DISCLAIM ALL WARRANTIES, EXPRESSED OR IMPLIED, INCLUDING, WITHOUT LIMITATION, THOSE OF MERCHANTABILITY, FITNESS FOR A PARTICULAR PURPOSE AND NONINFRINGEMENT OR ARISING FROM A COURSE OF DEALING, USAGE, OR TRADE PRACTICE.
IN NO EVENT SHALL CISCO OR ITS SUPPLIERS BE LIABLE FOR ANY INDIRECT, SPECIAL, CONSEQUENTIAL, OR INCIDENTAL DAMAGES, INCLUDING, WITHOUT LIMITATION, LOST PROFITS OR LOSS OR DAMAGE TO DATA ARISING OUT OF THE USE OR INABILITY TO USE THIS MANUAL, EVEN IF CISCO OR ITS SUPPLIERS HAVE BEEN ADVISED OF THE POSSIBILITY OF SUCH DAMAGES.
CCIP, the Cisco Powered Network mark, the Cisco Systems Verified logo, Cisco Unity, Fast Step, Follow Me Browsing, FormShare, Internet Quotient, iQ Breakthrough, iQ Expertise, iQ FastTrack, the iQ Logo, iQ Net Readiness Scorecard, Networking Academy, ScriptShare, SMARTnet, TransPath, and Voice LAN are trademarks of Cisco Systems, Inc.; Changing the Way We Work, Live, Play, and Learn, Discover All That’s Possible, The Fastest Way to Increase Your Internet Quotient, and iQuick Study are service marks of Cisco Systems, Inc.; and Aironet, ASIST, BPX, Catalyst, CCDA, CCDP, CCIE, CCNA, CCNP, Cisco, the Cisco Certified Internetwork Expert logo, Cisco IOS, the Cisco IOS logo, Cisco Press, Cisco Systems, Cisco Systems Capital, the Cisco Systems logo, Empowering the Internet Generation, Enterprise/Solver, EtherChannel, EtherSwitch, GigaStack, IOS, IP/TV, LightStream, MGX, MICA, the Networkers logo, Network Registrar, Packet, PIX, Post-Routing, Pre-Routing, RateMUX, Registrar, SlideCast, StrataView Plus, Stratm, SwitchProbe, TeleRouter, and VCO are registered trademarks of Cisco Systems, Inc. and/or its affiliates in the U.S. and certain other countries.
All other trademarks mentioned in this document or Web site are the property of their respective owners. The use of the word partner does not imply a partnership relationship between Cisco and any other company. (0201R)
Cisco IP SoftPhone User Guide
C O N T E N T S
Preface
ix
Purpose
ix
Audience
x
Organization
x
Related Documentation
xi
System Requirements
xi
Conventions
xii
Cisco Connection Online
xiv
Documentation CD-ROM
xv
C H A P T E R 1
Cisco IP SoftPhone Overview
1-1
Cisco IP SoftPhone as a Stand-alone Phone
1-3
Cisco IP SoftPhone to Control a Cisco IP Phone
1-4
Cisco IP SoftPhone in Languages Other Than English
1-4
Online Dialing and Directories
1-5
Alphanumeric Translation
1-5
Tracking Calls
1-6
Audio Conference
1-6
Desktop Collaboration with Virtual Conference Room
1-7
Whiteboarding
1-7
Application and Document Sharing
1-8
Chat
1-9
Support for Cisco Emergency Responder
1-10
Network Components
1-10
System Requirements
1-11
Standards Support
1-13
C H A P T E R 2
How to Install and Start Cisco IP SoftPhone
2-1
How to Install Cisco IP SoftPhone
2-2
Install from a Web Page
2-2
Install from a Self-extracting Executable
2-4
Install From a CD-ROM
2-6
How to Start Cisco IP SoftPhone
2-10
How to Exit Cisco IP SoftPhone
2-11
C H A P T E R 3
How to Use Cisco IP SoftPhone
3-1
How to Select Lines to Control
3-2
Select Your Cisco IP SoftPhone Line
3-3
How to Use the Main Dialing Window
3-4
Use the Icon Bar
3-8
Use the Context-Sensitive Button Bar
3-9
Use Line Buttons
3-11
Change the Display
3-11
Adjust Volume Controls
3-12
Adjust the Speaker Volume
3-13
Adjust the Microphone Volume
3-14
How to Place a Call
3-15
How to Answer a Call
3-19
Redirect an Incoming Call
3-20
Send an Incoming Call to Voice Mail
3-20
Ignore an Incoming Call
3-20
Answer a Call Automatically
3-21
How to Place a Call on Hold
3-22
How to Transfer a Call
3-22
Perform a Consult Transfer
3-22
Perform a Direct Transfer
3-23
How to Use Voice Mail
3-23
Configure Your Voice Mailbox
3-24
Check Voice Mail
3-25
Forward All Calls to Voice Mail
3-26
How to Start an Audio Conference
3-27
Add Participants to a Conference
3-28
Leave a Conference
3-28
How to Play .wav Files with Cisco IP SoftPhone
3-29
Use Auto-Greet Mode
3-29
Play a .wav File to a Caller
3-30
Stop a .wav File During a Call
3-30
How to Use the Dialing Directories
3-31
How to Configure Directory Settings
3-38
Add a Directory
3-38
Remove a Directory
3-40
Edit a Directory
3-40
How to Configure Dialing Rules
3-41
How to Configure Audio Settings
3-43
Adjust Your Volume Settings
3-44
Configure Your Voice Settings
3-45
Configure Advanced Voice Settings
3-47
Change the Jitter Buffer Size
3-47
Configure Frequency Processing
3-47
Choose Your Ringer Settings
3-50
Set Network Audio Settings
3-51
Configure Network Audio Settings
3-52
How to Configure Advanced Settings
3-54
C H A P T E R 4
How to Use Virtual Conference Room
4-1
How to Verify Settings
4-1
How to Use the Roster
4-3
How to Use the Application Sharing Window
4-4
Start a Document Sharing Session
4-5
Transfer Control of a Document
4-7
Request Control of a Document
4-8
End a Document Sharing Session
4-8
How to Start a Whiteboard Session
4-8
End a Whiteboard Session
4-10
A P P E N D I X A
How to Troubleshoot
A-1
Frequently Asked Questions (FAQs)
A-1
When I Start Cisco IP SoftPhone, Why Don’t I See Any Lines to Control?
A-2
Verify the Cisco IP SoftPhone Configuration
A-3
Verify the Cisco TSP Configuration
A-4
Restart the Telephony Service
A-6
Verify Network Connectivity
A-7
I Can See a Line But When I Try To Open it, Cisco IP SoftPhone Displays a
'Could not open address' Error.
A-7
Restart VPN Client
A-8
Why Does the Audio Sound Jittery and Broken?
A-9
Why Do I Get One-way Audio?
A-10
Determine Your Type of Sound Card: Full-duplex vs. Half-duplex
A-11
Why Do I Get a “Could Not Initialize Audio Error” When I Start
Cisco IP SoftPhone?
A-12
How to Find and Change the IP Address for the Cisco CallManager
A-12
Determine Which Cisco CallManager the Cisco IP SoftPhone Uses
A-13
Change the Cisco CalIManager IP Address Configured for the
Cisco IP SoftPhone
A-15
How to Adjust the Audio Settings
A-16
How to Diagnose Problems with Collaboration
A-17
Preface
This preface describes the purpose, audience, organization, and conventions of this guide, and provides information on how to obtain related documentation.
The preface covers these topics:
• Purpose, page ix
• Audience, page x
• Organization, page x
• Related Documentation, page xi
• System Requirements, page xi
• Conventions, page xii
• Cisco Connection Online, page xiv
• Documentation CD-ROM, page xv
Purpose
The Cisco IP SoftPhone User Guide provides instructions for installing, configuring, and using the Cisco IP SoftPhone. It will help you to:
• Understand the Cisco IP SoftPhone components and features
• Install and configure the Cisco IP SoftPhone on your Windows PC
Audience
The Cisco IP SoftPhone User Guide is written for computer users who will use their desktop PC to make and receive phone calls, use desktop collaboration, and/or control a Cisco IP Phone.
Organization
This guide is organized as follows:
Chapter Description
Chapter 1 “Cisco IP SoftPhone Overview”
Describes the features, components, and system requirements for Cisco IP SoftPhone
Chapter 2 “How to Install and Start Cisco IP SoftPhone”
Describes how to install and start Cisco IP SoftPhone
Chapter 3 “How to Use Cisco IP SoftPhone”
Describes how to use Cisco IP SoftPhone to place, receive, and control calls from your desktop PC
Chapter 4 “How to Use Virtual Conference Room”
Describes how to use the desktop collaboration features of Cisco IP SoftPhone
Appendix A “How to Troubleshoot”
Related Documentation
Refer to the following documents for further information about
Cisco IP SoftPhone and the Cisco CallManager. These documents can also be found online at www.cisco.com/univercd/cc/td/doc/product/voice/.
• Cisco IP SoftPhone Administration Guide
• Cisco IP SoftPhone Quick Start Guide
• Cisco IP SoftPhone Release Notes
• Cisco CallManager System Guide
System Requirements
You can install Cisco IP SoftPhone on the following English, French, German and Japanese versions of Microsoft Windows:
• Windows 95
• Windows 98 SE
• Windows ME
• Windows NT 4.0 with Service Pack 4 or later
• Windows 2000
Conventions
This document uses the following conventions:
Convention Description
boldface font Commands and keywords are in boldface.
italic font Arguments for which you supply values are in italics.
[ ] Elements in square brackets are optional.
{ x | y | z } Alternative keywords are grouped in braces and separated by vertical bars.
[ x | y | z ] Optional alternative keywords are grouped in brackets and separated by vertical bars.
string A nonquoted set of characters. Do not use quotation
marks around the string or the string will include the quotation marks.
screen font Terminal sessions and information the system displays are in screen font.
boldface screen font
Information you must enter is in boldface screen font.
italic screen font Arguments for which you supply values are in italic screen font.
This pointer highlights an important line of text
in an example.
^ The symbol ^ represents the key labeled Control—for
example, the key combination ^D in a screen display means hold down the Control key while you press the D key.
Notes use the following conventions:
Note Means reader take note. Notes contain helpful suggestions or references to material not covered in the publication.
Timesavers use the following conventions:
Timesaver Means the described action saves time. You can save time by performing the
action described in the paragraph.
Tips use the following conventions:
Tip Meansthe following are useful tips.
Cautions use the following conventions:
Caution Means reader be careful. In this situation, you might do something that could
result in equipment damage or loss of data.
Warnings use the following conventions:
Warning This warning symbol means danger. You are in a situation that could cause
Cisco Connection Online
Cisco Connection Online (CCO) is Cisco Systems’ primary, real-time support channel. Maintenance customers and partners can self-register on CCO to obtain additional information and services.
Available 24 hours a day, 7 days a week, CCO provides a wealth of standard and value-added services to Cisco’s customers and business partners. CCO services include product information, product documentation, software updates, release notes, technical tips, the Bug Navigator, configuration notes, brochures, descriptions of service offerings, and download access to public and authorized files.
CCO serves a wide variety of users through two interfaces that are updated and enhanced simultaneously: a character-based version and a multimedia version that resides on the World Wide Web (WWW). The character-based CCO supports Zmodem, Kermit, Xmodem, FTP, and Internet e-mail, and it is excellent for quick access to information over lower bandwidths. The WWW version of CCO provides richly formatted documents with photographs, figures, graphics, and video, as well as hyperlinks to related information.
You can access CCO in the following ways:
• WWW: http://www.cisco.com
• WWW: http://www-europe.cisco.com
• WWW: http://www-china.cisco.com
• Telnet: cco.cisco.com
• Modem: From North America, 408 526-8070; from Europe,
33 1 64 46 40 82. Use the following terminal settings: VT100 emulation; databits: 8; parity: none; stop bits: 1; and connection rates up to 28.8 kbps.
For a copy of CCO’s Frequently Asked Questions (FAQ), contact
[email protected]. For additional information, contact [email protected].
Documentation CD-ROM
Cisco documentation and additional literature are available in a CD-ROM package, which ships with your product. The Documentation CD-ROM, a member of the Cisco Connection Family, is updated monthly. Therefore, it might be more current than printed documentation. To order additional copies of the Documentation CD-ROM, contact your local sales representative or call customer service. The CD-ROM package is available as a single package or as an annual subscription. You can also access Cisco documentation on the World Wide Web at http://www.cisco.com, http://www-china.cisco.com, or
http://www-europe.cisco.com.
If you are reading Cisco product documentation on the World Wide Web, you can submit comments electronically. Click Feedback in the toolbar and select
Documentation. After you complete the form, click Submit to send it to Cisco.
C H A P T E R
1
Cisco IP SoftPhone Overview
Cisco IP SoftPhone is a desktop application that turns your computer into a full-feature telephone with the added advantages of call tracking, desktop collaboration, and one-click dialing from online directories. You can also use Cisco IP SoftPhone in tandem with a Cisco IP Phone to place, receive and control calls from your desktop PC. All features are functional in both modes of operation. Cisco IP SoftPhone can also be used to control phones on supported analog lines.
These sections introduce you to the features, components, and system requirements for Cisco IP SoftPhone:
• Cisco IP SoftPhone as a Stand-alone Phone, page 1-3
• Cisco IP SoftPhone to Control a Cisco IP Phone, page 1-4
• Cisco IP SoftPhone in Languages Other Than English, page 1-4
• Online Dialing and Directories, page 1-5
• Tracking Calls, page 1-6
• Audio Conference, page 1-6
• Desktop Collaboration with Virtual Conference Room, page 1-7
• Voice Mail Integration, page 1-10
• Support for Cisco Emergency Responder, page 1-10
• Network Components, page 1-10
• System Requirements, page 1-11
Figure 1-1 shows the main components of the Cisco IP SoftPhone.
Figure 1-1 Cisco IP SoftPhone
1 Icon bar 2 Line(s) display 3 Line buttons 4 Call blocks
5 Context-sensitive button bar 6 OffHook soft key 7 Redial soft key
73031
1
6 7
2
3
4
Cisco IP SoftPhone as a Stand-alone Phone
You can use Cisco IP SoftPhone as a stand-alone phone to place and receive all calls through your computer rather than your Cisco IP Phone. In this mode, the media stream is terminated by your computer. This means that your computer “rings” when you have an incoming call and you must use a computer headset or computer handset to speak and listen during a call. The volume controls on the Cisco IP SoftPhone user interface control the microphone and speaker volume.
When you use Cisco IP SoftPhone as a stand-alone phone, you can take your phone extension with you and receive calls wherever you are connected to the corporate network. For example, when you are on a business trip, you can use Cisco IP SoftPhone to place and receive calls and check voice mail while online.
To use Cisco IP SoftPhone as a stand-alone phone, your PC must have a full-duplex sound card or device with the proper drivers installed, and a computer headset or computer handset. Use of the PC’s speakers is not recommended as it may introduce echo.
Related Topics
• Cisco IP SoftPhone to Control a Cisco IP Phone, page 1-4
Cisco IP SoftPhone to Control a Cisco IP Phone
You can use Cisco IP SoftPhone in tandem with a Cisco IP Phone to give you the flexibility to control calls from your computer or from your Cisco IP Phone. Both devices reflect the same current call state.
For example, you can pick up the Cisco IP Phone handset to accept an incoming call and use the Cisco IP SoftPhone application to place the call on hold. Both the Cisco IP Phone and the Cisco IP SoftPhone reflect the fact that the call is on hold.
In this mode, the Cisco IP Phone terminates the media stream. This means that the Cisco IP Phone rings when you have an incoming call and you need to use the telephone handset to speak and listen during a call. The volume controls on the Cisco IP Phone control the microphone and speaker volume, rather than the volume controls provided with Cisco IP SoftPhone.
Related Topics
• Cisco IP SoftPhone as a Stand-alone Phone, page 1-3
• Select Your Cisco IP SoftPhone Line, page 3-3
Cisco IP SoftPhone in Languages Other Than English
You have the flexibility to use Cisco IP SoftPhone in various languages, such as English, French, German, Japanese, Chinese, and Korean.
During installation, you can select the language in which you would like to run Cisco IP SoftPhone. As a result, text in the Cisco IP SoftPhone graphical user interface and dialog boxes appears in the language of your choice. When you run Cisco IP SoftPhone, you can switch to another language at any time.
Related Topic
Online Dialing and Directories
Cisco IP SoftPhone enables you to place phone calls using directory servers, web pages, and your computer keyboard. It integrates with the directory service used by the Cisco CallManager, allowing you to place calls by dragging a name from the corporate directory to the dialing window. To setup a conference call, simply drag names from the directory into the dialing window.
To add names to your personal directory, drag an active call into the directory. Cisco IP SoftPhone automatically adds the caller ID to your directory.
Related Topics
• Alphanumeric Translation, page 1-5
• How to Use the Dialing Directories, page 3-31
• Dial from the Online Directories, page 3-17
Alphanumeric Translation
Tracking Calls
Whenever you place or receive a call, Cisco IP SoftPhone displays the caller address, caller name, and phone number for the duration of the call.
Cisco IP SoftPhone also logs this information to a call log. The call log keeps track of which line placed or received the call, the duration of the call, the type of call and how the call ended.
You can view the call log at any time to see an up-to-date history of your calls. You can place a call to any call log entry (with a phone number) or clear all entries in the call log.
Related Topic
• How to Use the Call Log, page 3-36
Audio Conference
To initiate a conference call with Cisco IP SoftPhone, you simply click the conference button and drag a directory entry onto the active call block.
Cisco IP SoftPhone provides full audio conferencing capabilities, with up to six participants in a conference call. It supports full-duplex audio so people can speak simultaneously.
Once you establish a conference call, you may add participants at any time. As participants are invited to join the conference, the Roster updates to show the current list of participants.
Related Topics
• How to Start an Audio Conference, page 3-27
• Add Participants to a Conference, page 3-28
• Leave a Conference, page 3-28
Desktop Collaboration with Virtual Conference
Room
Cisco IP SoftPhone includes a desktop collaboration utility called Virtual Conference Room. You can use Virtual Conference Room to create online meetings where all parties can be heard and any party can share a document, application, or whiteboard, with other participants. Only one computer must have the program, and any participant can be given control of the document.
Additionally, you can integrate with Microsoft NetMeeting for video and other modes of collaboration.
These sections describe the Virtual Conference Room desktop collaboration features of Cisco IP SoftPhone:
• Whiteboarding, page 1-7
• Application and Document Sharing, page 1-8
• Chat, page 1-9
• Video Collaboration, page 1-9
Related Topics
• Chapter 4, “How to Use Virtual Conference Room”
Whiteboarding
The Virtual Conference Room whiteboard application allows everyone in a call or audio conference to draw and type simultaneously on a shared screen. When you press the whiteboard button, a whiteboard appears on the PC screen for each conference call participant. The whiteboard application includes tools you can use to add and delete whiteboard pages, draw shapes, type text, and emphasize an item with a highlighter or remote pointer.
Related Topics
• How to Verify Settings, page 4-1
• How to Use the Roster, page 4-3
• How to Start a Whiteboard Session, page 4-8
• End a Whiteboard Session, page 4-10
• Remove Whiteboard Synchronization, page 4-10
Application and Document Sharing
The Virtual Conference Room application and document sharing feature allows meeting participants to view and work on files simultaneously. For example, you may want several people to work on the same Microsoft Word document. You can open the document on your computer, share it, and then everyone can provide their comments directly in the document. Only the person who opened the file must have the program, in this case, Microsoft Word, on their computer. Other participants do not need to have access to the program; they can work on the document without it. All meeting participants can share programs during a meeting. The shared programs of each participant appear in separate shared program windows on the other participants’ desktops.
Related Topics
• How to Verify Settings, page 4-1
• How to Use the Roster, page 4-3
• How to Use the Application Sharing Window, page 4-4
• Start a Document Sharing Session, page 4-5
• Transfer Control of a Document, page 4-7
• Request Control of a Document, page 4-8
Chat
Cisco IP SoftPhone integrates with the Microsoft NetMeeting chat application. This allows you to send a text message to all or selected participants in an audio or video call. Chat is useful in a group meeting because everyone can “talk” to each other simultaneously. In an audio or video connection, only two people can talk at a time.
Related Topic
• How to Send a Chat Message, page 4-11
Video Collaboration
Cisco IP SoftPhone integrates with Microsoft NetMeeting so you can conduct video meetings. Even if you are unable to transmit video, you can still receive video calls in the NetMeeting video window.
If you choose to use video or prefer the NetMeeting interface, you must disable Virtual Conference Room. See “How to Prepare for a Video Collaboration Session” section on page 4-12 for instructions on how to disable Virtual Conference Room. After you disable Virtual Conference Room, Cisco IP SoftPhone uses the NetMeeting user interface to place calls.
See the Microsoft NetMeeting online help and documentation for details on how to use the video collaboration features of NetMeeting.
Related Topic
Voice Mail Integration
Cisco IP SoftPhone integrates with your voice mail system. It can transfer calls or place calls directly into a voice mailbox. When you have a voice mail message, the messages icon in the Cisco IP SoftPhone icon bar turns red until you check your messages. To dial your voice mailbox, simply click on the voice mail message icon.
Related Topics
• How to Use Voice Mail, page 3-23
• Send an Incoming Call to Voice Mail, page 3-20
Support for Cisco Emergency
Responder
Cisco IP SoftPhone 1.2 includes support for the Cisco Emergency Responder service. Cisco Emergency Responder (CER) provides 911 dispatchers with your caller information such as phone number and location. You can operate
Cisco IP SoftPhone with CER if you have Cisco CallManager 3.2 or Cisco CallManager 3.1 and your system administrator has configured Cisco CallManager for CER. To find out whether you have the CER service, contact your system administrator.
Network Components
Cisco IP SoftPhone uses the services of the Cisco CallManager to route calls through an IP telephony network. The Cisco CallManager is an open and industry-standard call processing system which integrates traditional PBX functionality with a corporate IP network. Cisco CallManager manages the components of the IP telephony system, the phones, access gateways, and the resources necessary for such features as call conferencing and route planning.
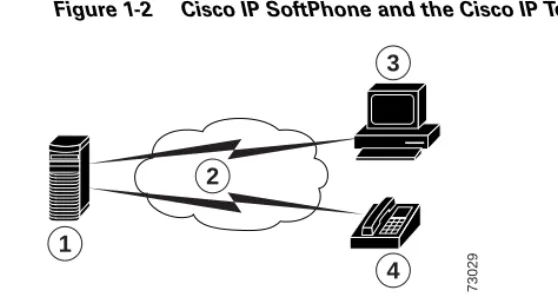
Figure 1-2 shows a diagram of the network components required for Cisco IP SoftPhone.
Figure 1-2 Cisco IP SoftPhone and the Cisco IP Telephony Network
[image:27.595.35.479.396.524.2]System Requirements
Table 1-1 lists the system and network requirements necessary to install and use Cisco IP SoftPhone on your PC.
1 Cisco CallManager server 2 IP network
3 PC running Cisco IP SoftPhone 4 Cisco IP Phone
73029
1
2
3
4
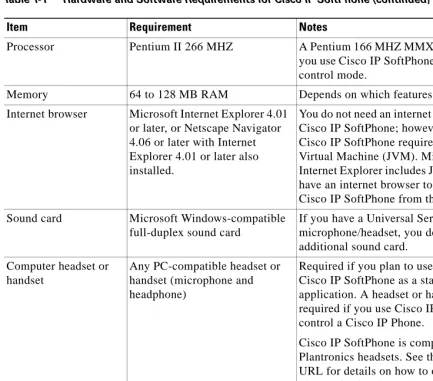
Table 1-1 Hardware and Software Requirements for Cisco IP SoftPhone
Item Requirement Notes
Operating system Microsoft Windows 95, Windows 98 SE (Second Edition), Windows NT 4.0 with Service Pack 4 or later,
Windows 2000 or Windows XP.
Cisco IP SoftPhone supports multiple languages.
Free disk space 40 MB
Temporary disk space 60 MB 20 MB is used only for installation (TEMP
Processor Pentium II 266 MHZ A Pentium 166 MHZ MMX is sufficient if you use Cisco IP SoftPhone only in phone control mode.
Memory 64 to 128 MB RAM Depends on which features are active.
Internet browser Microsoft Internet Explorer 4.01 or later, or Netscape Navigator 4.06 or later with Internet Explorer 4.01 or later also installed.
You do not need an internet browser to use Cisco IP SoftPhone; however,
Cisco IP SoftPhone requires the Java Virtual Machine (JVM). Microsoft Internet Explorer includes JVM. You must have an internet browser to install Cisco IP SoftPhone from the web.
Sound card Microsoft Windows-compatible
full-duplex sound card
If you have a Universal Serial Bus (USB) microphone/headset, you do not need an additional sound card.
Computer headset or handset
Any PC-compatible headset or handset (microphone and headphone)
Required if you plan to use
Cisco IP SoftPhone as a stand-alone application. A headset or handset is not required if you use Cisco IP SoftPhone to control a Cisco IP Phone.
Cisco IP SoftPhone is compatible with Plantronics headsets. See the following URL for details on how to obtain a Plantronics headset:
http://cisco.getheadsets.com
Microsoft NetMeeting client application
Version 3.01 Required if you plan to use desktop
[image:28.595.39.473.89.470.2]collaboration. The Cisco IP SoftPhone installation includes NetMeeting 3.01.
Table 1-1 Hardware and Software Requirements for Cisco IP SoftPhone (continued)
Standards Support
Cisco IP SoftPhone supports the following networking and telephony standards:
• Telephony Application Programming Interface (TAPI) compliant
• T.120 via networking integration
• H.323
C H A P T E R
2
How to Install and Start
Cisco IP SoftPhone
You can install the Cisco IP SoftPhone from a web page within your company’s intranet. If you do not have Internet access or are otherwise unable to install from the web page, you can download a self-extracting executable and run the installation locally. Alternatively, you can install Cisco IP SoftPhone from a CD-ROM.
The installation is quick and easy and requires little configuration. Your system administrator can pre-set the configuration information in administrator customization files so you can install and use Cisco IP SoftPhone right away.
The following sections help you to prepare for, install, start and exit Cisco IP SoftPhone:
• How to Install Cisco IP SoftPhone, page 2-2
• How to Start Cisco IP SoftPhone, page 2-10
How to Install Cisco IP SoftPhone
Use one of the following procedures to install the Cisco IP SoftPhone. Choose the procedure based on how your system administrator has set up Cisco IP SoftPhone on your network.
• Install from a Web Page, page 2-2
• Install from a Self-extracting Executable, page 2-4
• Install From a CD-ROM, page 2-6
Install from a Web Page
Use this procedure to install Cisco IP SoftPhone from an intranet web page.
Note You can only use this procedure if you Cisco IP SoftPhone administrator has created a “one-click install” option on your web server.
Before You Begin
• Install Microsoft Internet Explorer 4.01 or later.
• You can download this browser from the Microsoft web site at http://www.microsoft.com/windows/ie/
• Obtain the following information from your network or system administrator:
– The URL for the Cisco IP SoftPhone installation files
– The username and password configured for you on the Cisco CallManager
Procedure
Step 1 Open a web browser and go to the URL where the Cisco IP SoftPhone installation
files reside.
Step 2 For use with Netscape Communicator, click Grant in the Java Security window.
Step 5 Read the software authenticity verification and click Next to begin the installation.
Step 6 If this is your first installation of Cisco IP SoftPhone:
a. Click Next in the Welcome screen to begin the installation.
b. Read the software license agreement and then click Yes to accept the terms of the agreement.
c. Choose a destination to install Cisco IP SoftPhone and then click Next.
If are upgrading to a newer version of Cisco IP SoftPhone, choose Upgrade to a
Newer Version and click Next in the Welcome screen.
Step 7 In the Local TSP Configuration screen, enter your username and password and
then click Next.
Note The username and password you configure for Cisco IP SoftPhone must exactly match your Cisco CallManager username and password.
Step 8 If this is your first installation of Cisco IP SoftPhone, select a Program Folder for
the icons.
By default, the Installer adds icons to a folder called Cisco IP SoftPhone.
Step 9 Click Next and follow the instructions on the screen.
Step 10 In the Install Wizard Complete dialog window, choose whether you want to
restart your computer now or later, and click Finish to complete the installation.
Install from a Self-extracting Executable
Use this procedure to install Cisco IP SoftPhone from a self-extracting executable. This installation procedure allows you to download
Cisco IP SoftPhone to your local drive and install the program at a later time.
Before You Begin
• Install Microsoft Internet Explorer 4.01 or later.
• You can download this browser from the Microsoft web site at http://www.microsoft.com/windows/ie/
• Obtain the following information from your network or system administrator:
– The URL for the Cisco IP SoftPhone installation files
– The username and password configured for you on the Cisco CallManager
Procedure
Step 1 Open a web browser and go to the URL where the Cisco IP SoftPhone installation
files reside.
Step 2 For use with Netscape Communicator, click Grant in the Java Security window.
Step 3 Click the language in which you wish to install Cisco IP SoftPhone.
Step 4 Click download the Cisco IP SoftPhone installation.
The Cisco IP SoftPhone download instructions window appears with the URL where the Cisco IP SoftPhone customization files reside.
Step 5 Make a note of the URL which you must provide in Step 13.
Step 6 Click Cisco IP SoftPhone to download the self-extracting executable.
Step 7 In the File download window, choose either to Run this program from its
current location or Save this program to disk and then click OK.
If you select Run this program from its current location, skip to Step 10.
Step 8 Choose a destination to which you want to download the installation files and
Step 9 In the Download complete window, choose one of the following procedures:
• Click Open to launch CiscoIPSoftPhoneSetup.exe and begin the installation.
• Click Open Folder and launch CiscoIPSoftPhoneSetup.exe from the folder.
• Click Close to launch CiscoIPSoftPhoneSetup.exe at a later time.
Step 10 The Setup Language dialog box appears.
Choose the language in which you would like the installation screens to appear and click OK.
Step 11 Choose the destination to which you want to download the installation files and
click Save.
Step 12 If this is your first installation of Cisco IP SoftPhone:
a. Click Next in the Welcome screen to begin the installation.
b. Read the software license agreement and then click Yes to accept the terms of the agreement.
c. Choose a destination to which you want to install Cisco IP SoftPhone and then click Next.
If this is an upgrade to a new version of Cisco IP SoftPhone, choose Upgrade to
a Newer Version and click Next in the Welcome screen.
Step 13 In the Setup window, specify the URL where the customization files reside.
Caution If you do not specify the correct URL, you will not receive customization files
such as Microsoft NetMeeting 3.01, Cisco TSP and Cisco IP SoftPhone settings. You need these files to run Cisco IP SoftPhone.
Step 14 In the Local TSP Configuration screen, enter your username and password.
Note The username and password you configure for Cisco IP SoftPhone must exactly match your Cisco CallManager username and password.
Step 16 If this is your first installation of Cisco IP SoftPhone, select a Program Folder to which you want the Installer to add icons.
By default, the Installer adds icons to a folder called Cisco IP SoftPhone.
Step 17 Follow the instructions on the screen.
Step 18 In the Install Wizard Complete dialog window, choose whether you want to
restart your computer now or later, and click Finish to complete the installation.
You must restart your computer before you can use Cisco IP SoftPhone.
Install From a CD-ROM
Use this procedure to install Cisco IP SoftPhone from a CD-ROM.
Before You Begin
• Install Microsoft Internet Explorer 4.01 or later.
You can download this browser from the Microsoft web site at http://www.microsoft.com/windows/ie/
• Obtain the following information from your network or system administrator:
– The username and password configured for you on the Cisco CallManager
– The location of the customization files (if any) for the Cisco IP SoftPhone installation
For Cisco CallManager 3.1 and later, also obtain the following information from your network or system administrator:
• The primary and backup CTI Manager IP addresses of the Cisco CallManager server you use
• Whether the Cisco Emergency Responder service is configured on the Cisco CallManager
• If Cisco Emergency Responder is configured, the primary and backup server URLs for Cisco IP SoftPhone
Note For more information about the Cisco Emergency Responder service, refer to the
“Support for Cisco Emergency Responder” section on page 1-10.
For Cisco CallManager 3.0, also obtain the following information from your network or system administrator:
• The IP address of the Cisco CallManager server you use.
Procedure
Step 1 Insert the installation CD-ROM and run Launch.exe to start the
Cisco IP SoftPhone installation.
Step 2 In the Demonstration Language window, select the language in which you want
to view the installation windows and click OK.
Step 3 Click Install Products.
Step 4 Click the Cisco IP SoftPhone button.
The Setup Language dialog box appears.
Step 5 Choose the language in which you want to install Cisco IP SoftPhone from the
drop-down menu and click OK.
The InstallShield wizard launches and prepares for the installation.
Step 6 Click Next in the welcome screen to begin the installation.
Step 7 Read the software license agreement and then click Yes to accept the terms of the
agreement.
Step 8 Choose a destination to which you want to install Cisco IP SoftPhone and then
By default, the installation program installs Cisco IP SoftPhone in the following directory:
C:\...\Cisco Systems\Cisco IP SoftPhone
Step 9 To use customization files:
• Enter the URL where the customization files reside and click Next.
If you do not plan to use customization files:
• Leave the URL field blank and click Back.
A question box asks whether you want to download and import the customization files.
• Click No.
Step 10 If Cisco Emergency Responder is configured on the Cisco CallManager:
• Click Yes in the question box:
Do you wish to configure the SoftPhone for Emergency Responder Support?
• Enter the URLs for the primary and backup Cisco Emergency Responder servers and click Next.
If Cisco Emergency Responder is not configured on the Cisco CallManager:
• Click No.
Step 11 In the Cisco IP SoftPhone Setup screen, choose your Cisco CallManager version
Step 12 Use one of the following procedures to configure the Local TSP:
For Cisco CallManager 3.1 and later:
a. Enter your username and password in the Local TSP Configuration screen.
Note The username and password you configure for Cisco IP SoftPhone must exactly match your Cisco CallManager username and password.
b. If you do not plan to use customization files, enter the primary and backup CTI Manager IP addresses for the Cisco CallManager.
For Cisco CallManager 3.0:
a. Enter your username and password in the Local TSP Configuration screen.
Note The username and password you configure for Cisco IP SoftPhone must exactly match your Cisco CallManager username and password.
b. If you are do not plan to use customization files, enter the IP address for the Cisco CallManager.
Step 13 Click Next.
Step 14 Select a Program folder to which you want the Installer to add icons.
By default, the Installer adds icons to a folder called Cisco IP SoftPhone.
Step 15 Follow the instructions on the screen.
Step 16 In the Install Wizard Complete dialog window, choose whether you want to
restart your computer now or later, and click Finish to complete the installation.
How to Start Cisco IP SoftPhone
Perform the following steps to start your Cisco IP SoftPhone.
Caution If you are using VPN software, be sure to launch it and verify that it is working
before you start Cisco IP SoftPhone.
Procedure
Step 1 From the Windows Start menu, choose Programs > Cisco IP SoftPhone >
Cisco IP SoftPhone.
The first time you start Cisco IP SoftPhone, the Microsoft NetMeeting
configuration program may display a window followed by the Cisco IP SoftPhone Line Selection window. On subsequent sessions, the main dialing window opens.
Step 2 In the Microsoft NetMeeting configuration window, follow the instructions on the
screen to tune audio parameters and specify user information for your system.
Note You do not see this window if you have previously configured Microsoft NetMeeting.
Caution The collaboration features of Cisco IP SoftPhone will not work unless you
configure settings for Microsoft NetMeeting.
Step 3 In the select lines window, click on the line(s) you want to control and click OK.
Note If there are no lines displayed in the line selection window, refer to the
Related Topics
• How to Exit Cisco IP SoftPhone, page 2-11
• How to Select Lines to Control, page 3-2
• Select Your Cisco IP SoftPhone Line, page 3-3
• When I Start Cisco IP SoftPhone, Why Don’t I See Any Lines to Control?, page A-2
How to Exit Cisco IP SoftPhone
To exit Cisco IP SoftPhone, use one of the following procedures:
• Click your right mouse button and select Exit from the floating menu.
• Click the x in the upper right corner of the main dialing window.
C H A P T E R
3
How to Use Cisco IP SoftPhone
The following sections describe how to use the Cisco IP SoftPhone application to place, receive, and control calls from your PC:
• How to Select Lines to Control, page 3-2
• How to Use the Main Dialing Window, page 3-4
• How to Place a Call, page 3-15
• How to End a Call, page 3-18
• How to Answer a Call, page 3-19
• How to Place a Call on Hold, page 3-22
• How to Transfer a Call, page 3-22
• How to Use Voice Mail, page 3-23
• How to Start an Audio Conference, page 3-27
• How to Play .wav Files with Cisco IP SoftPhone, page 3-29
• How to Use the Dialing Directories, page 3-31
• How to Use the Call Log, page 3-36
• How to Set Call Control Options, page 3-37
• How to Configure Directory Settings, page 3-38
• How to Configure Dialing Rules, page 3-41
• How to Configure Audio Settings, page 3-43
How to Select Lines to Control
The first time you launch Cisco IP Phone, a dialog box appears for you to select the line(s) your system administrator has assigned to you on the
Cisco CallManager. Or, you can use this procedure to select the line(s).
Procedure
Step 1 Click the Settings toolbar icon.
Step 2 Click the Advanced tab in the Settings dialog window.
Step 3 Click Select Lines... on the Advanced tab.
Step 4 Select the line(s) you want to control in the line selection dialog window.
Each line that you select must have a unique phone number. You cannot control multiple lines that share the same phone number.
Note If there are no lines displayed in the line selection window, see “When I Start Cisco IP SoftPhone, Why Don’t I See Any Lines to Control?” section on page A-2.
Step 5 Close the Settings dialog window.
When the lines connect, the main dialing window displays.
Related Topics
• Cisco IP SoftPhone as a Stand-alone Phone, page 1-3
• Cisco IP SoftPhone to Control a Cisco IP Phone, page 1-4
• Select Your Cisco IP SoftPhone Line, page 3-3
• Use Line Buttons, page 3-11
Select Your Cisco IP SoftPhone Line
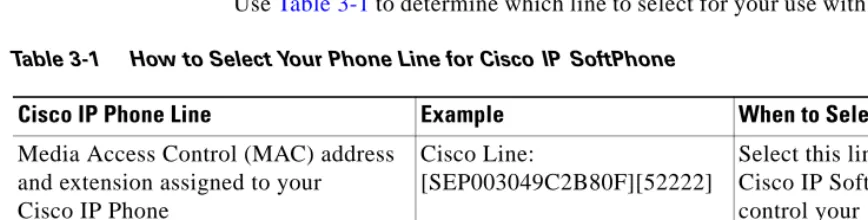
If you have multiple lines configured for you on the Cisco CallManager, you may see two types of entries in the Select Lines window:
• An entry with the Media Access Control (MAC address and extension assigned to your Cisco IP Phone, for example,
Cisco Line: [SEP003049C2B80F][52222]
• An entry with the device name and extension assigned to your Cisco IP Phone or Cisco IP SoftPhone, for example,
Cisco Line: [CTIPJSmith][52222]
Use Table 3-1 to determine which line to select for your use with Cisco IP Phone.
Note If you have multiple lines with the same extension configured for you on the Cisco CallManager, you can control only one of those lines at a time with Cisco IP SoftPhone.
[image:45.595.37.471.271.381.2]Note Cisco IP SoftPhone can also be used to control phones on supported analog lines. If you are using an analog line, your line displays like the MAC address.
Table 3-1 How to Select Your Phone Line for CiscoIP SoftPhone
Cisco IP Phone Line Example When to Select
Media Access Control (MAC) address and extension assigned to your Cisco IP Phone
Cisco Line:
[SEP003049C2B80F][52222]
Select this line to use Cisco IP SoftPhone to control your
Cisco IP Phone.
Device name and extension assigned to your Cisco IP Phone
Cisco Line:
[CTIPJSmith][52222]
Related Topics
• Cisco IP SoftPhone as a Stand-alone Phone, page 1-3
• Cisco IP SoftPhone to Control a Cisco IP Phone, page 1-4
• How to Select Lines to Control, page 3-2
• Use Line Buttons, page 3-11
• Why Does the Audio Sound Jittery and Broken?, page A-9
How to Use the Main Dialing Window
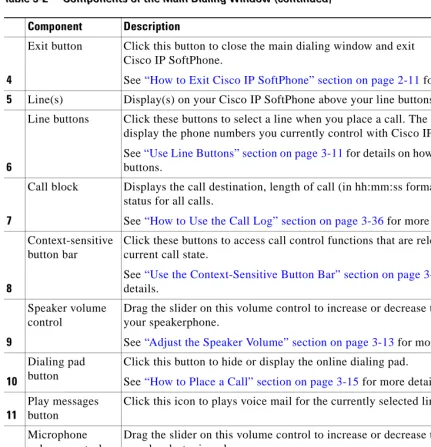
The main dialing window, shown in Figure 3-1, contains call blocks, icons, and buttons you can use to answer, place, and control calls.
Table 3-2 defines components of the main dialing window. These sections describe how to use the controls in the main dialing window:
• Use the Icon Bar, page 3-8
• Use the Context-Sensitive Button Bar, page 3-9
• Use Line Buttons, page 3-11
Figure 3-1 Main Dialing Window
Table 3-2 Components of the Main Dialing Window
Component Description
1 Handset Click the handset to go off-hook, depending on the current call state.
2
Dialing box This is where you enter phone numbers when you place a call.
See “How to Place a Call” section on page 3-15 for details on how to use the dialing box.
3
Icon bar Click these icons to access your voice mailbox, dialing directories, configuration settings, call log, Virtual Conference Room, keypad, volume controls, and online help.
See “Use the Icon Bar” section on page 3-8 for more details.
73030
1
2 3
4
7
8
9
13 14
16
10
11
12
9 6
15
5
4
Exit button Click this button to close the main dialing window and exit Cisco IP SoftPhone.
See “How to Exit Cisco IP SoftPhone” section on page 2-11 for more details.
5 Line(s) Display(s) on your Cisco IP SoftPhone above your line buttons.
6
Line buttons Click these buttons to select a line when you place a call. The line buttons display the phone numbers you currently control with Cisco IP SoftPhone.
See “Use Line Buttons” section on page 3-11 for details on how to use the line buttons.
7
Call block Displays the call destination, length of call (in hh:mm:ss format) and call status for all calls.
See “How to Use the Call Log” section on page 3-36 for more details.
8
Context-sensitive button bar
Click these buttons to access call control functions that are relevant to the current call state.
See “Use the Context-Sensitive Button Bar” section on page 3-9 for more details.
9
Speaker volume control
Drag the slider on this volume control to increase or decrease the volume of your speakerphone.
See “Adjust the Speaker Volume” section on page 3-13 for more details.
10
Dialing pad button
Click this button to hide or display the online dialing pad.
See “How to Place a Call” section on page 3-15 for more details.
11
Play messages button
Click this icon to plays voice mail for the currently selected line.
12
Microphone volume control
Drag the slider on this volume control to increase or decrease the volume of your headset microphone.
See “Adjust the Microphone Volume” section on page 3-14 for more details.
13
Microphone mute button or icon
Click this button to mute the microphone. The person on the line cannot hear what you say.
[image:48.595.39.471.90.537.2]See “Adjust the Microphone Volume” section on page 3-14 for more details.
Table 3-2 Components of the Main Dialing Window (continued)
14
Online dialing pad
Click the buttons in the online dialing pad to dial telephone numbers.
See “Dial from the Online Keypad” section on page 3-17 for more details.
15
Microphone volume control
Drag the slider on this volume control to increase or decrease the volume of your headset microphone.
See “Adjust the Microphone Volume” section on page 3-14 for more details.
16
Handset button Click this button to hide or display the handset image.
See “Use the Icon Bar” section on page 3-8 for more details.
17
OffHook soft key Part of the Context-sensitive button bar.
See “Use the Context-Sensitive Button Bar” section on page 3-9 for more details.
18
Redial soft key Part of the Context-sensitive button bar.
[image:49.595.35.468.89.314.2]See “Use the Context-Sensitive Button Bar” section on page 3-9 for more details.
Table 3-2 Components of the Main Dialing Window (continued)
Use the Icon Bar
Table 3-3 describes the icons in the Cisco IP SoftPhone icon bar.
Table 3-3 Cisco IP SoftPhone Icons
Icon Description
Voice Messages
Turns red when you have a voice mail message. Also provides access to your voice mailbox.
See “How to Use Voice Mail” section on page 3-23 for more details.
Dialing Directories
Displays the dialing directories available for use with Cisco IP SoftPhone.
See “How to Use the Dialing Directories” section on page 3-31 for more details.
Settings
Displays the Settings dialog window to select lines, edit the dialing directories, change audio configurations and change collaboration settings.
For more details, see:
• “How to Set Call Control Options” section on page 3-37;
• “How to Configure Directory Settings” section on page 3-38
• ’“How to Configure Dialing Rules” section on page 3-41;
• “How to Configure Audio Settings” section on page 3-43
• “How to Configure Advanced Settings” section on page 3-54
Collaboration
Invokes a desktop collaboration session to use Virtual Conference Room.
See Chapter 4, “How to Use Virtual Conference Room” for more details.
Call Log
Displays the Call Log with a history of the calls you placed or received. You can place a call to an entry in the Call Log. You can also delete all entries in the Call Log.
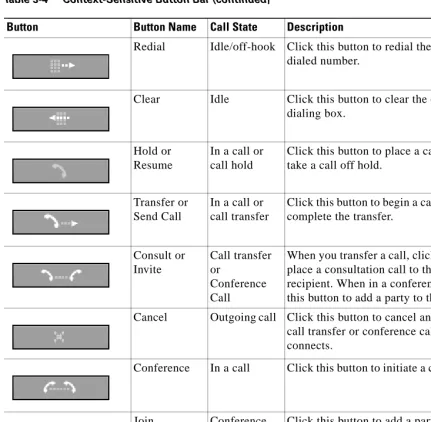
Use the Context-Sensitive Button Bar
[image:51.595.33.470.84.273.2]The context-sensitive button bar and button names change, depending on the current call state.
Table 3-4 describes the buttons in the context-sensitive button bar. Keypad
Displays or hides the online keypad to dial phone numbers.
See “Dial from the Online Keypad” section on page 3-17 for more details.
Volume Settings
Displays controls to adjust the speaker, microphone, ring, and wave file volume.
See the “Adjust Volume Controls” section on page 3-12 for more details
Help
Displays the online help system for Cisco IP SoftPhone.
Table 3-3 Cisco IP SoftPhone Icons (continued)
[image:51.595.36.468.394.542.2]Icon Description
Table 3-4 Context-Sensitive Button Bar
Button Button Name Call State Description
Off Hook or Answer
Idle or incoming call
Click this button to start or answer a call. It performs the same function as when you lift the receiver on a telephone.
End Call In a call Click this button to end or “hang up” a call.
Dial Idle Click this button to dial the number entered
Redial Idle/off-hook Click this button to redial the most recently dialed number.
Clear Idle Click this button to clear the entry in the
dialing box.
Hold or Resume
In a call or call hold
Click this button to place a call on hold or take a call off hold.
Transfer or Send Call
In a call or call transfer
Click this button to begin a call transfer or to complete the transfer.
Consult or Invite Call transfer or Conference Call
When you transfer a call, click this button to place a consultation call to the intended recipient. When in a conference call, click this button to add a party to the call.
Cancel Outgoing call Click this button to cancel an outgoing call, call transfer or conference call before it connects.
Conference In a call Click this button to initiate a conference call.
Join Conference
call
Click this button to add a party to a conference call.
[image:52.595.39.471.89.511.2]Redirect Incoming call Click this button to redirect an incoming call to another number without interacting with the caller.
Table 3-4 Context-Sensitive Button Bar (continued)
Voice mail Incoming call Click this button to automatically send an incoming call to voice mail without any interaction with the caller.
[image:53.595.38.467.91.190.2]Ignore Incoming call Click this button to ignore an incoming call. The call automatically disconnects without any interaction with the caller.
Table 3-4 Context-Sensitive Button Bar (continued)
Use Line Buttons
The line buttons in the main dialing window display the phone numbers of the lines you currently control with Cisco IP SoftPhone. When a Cisco IP Phone device terminates lines, a phone icon displays; when your computer (for example, stand-alone phone mode) terminates lines, a PC icon displays. If you have multiple phone lines assigned to you, press a line button to select the line you want to use for outgoing calls.
If the call arrives on a line other than the selected line, the focus automatically changes to the incoming call. To accept the call, click the Answer button. To accept the call on a Cisco IP Phone, lift the handset and press the appropriate line button.
Change the Display
When you first start the Cisco IP SoftPhone, the main dialing window appears in the full-view mode. The full-view mode includes a handset image and dialing pad to provide the familiar look and feel of a telephone. However, you do not need to use the handset and keypad to place and receive calls with Cisco IP SoftPhone. Once you are familiar with the Cisco IP SoftPhone interface, you can hide these features so the main dialing window takes up less space on your desktop.
Adjust Volume Controls
The speaker and microphone controls in the main dialing window adjust the volume of the currently active voice receiver: the computer headset, computer handset, or the computer speaker. You can also use the volume settings icon in the icon bar to adjust these settings, as well as to adjust the ring and .wav file volume.
Note The volume controls adjust the volume only if you use Cisco IP SoftPhone as a stand-alone phone. If you use Cisco IP SoftPhone to control an IP phone, use the ringer, speakerphone and handset volume controls on the Cisco IP Phone base to adjust the volume.
Related Topics
• Cisco IP SoftPhone as a Stand-alone Phone, page 1-3
• Cisco IP SoftPhone to Control a Cisco IP Phone, page 1-4
• Adjust the Speaker Volume, page 3-13
Adjust the Speaker Volume
If you are in full-view mode, use your mouse to drag the speaker volume controls to set the desired volume.
If you are not in full-view mode, click the volume control icon in the icon bar to access the volume controls. See Table 3-5 for a description of the volume controls. Use your mouse to drag the volume bars up and down to set the desired volume.
[image:56.595.131.472.221.390.2]To mute the speaker, click the Mute checkbox beneath the speaker volume control.
Table 3-5 Volume Controls
Volume Control Description
Speaker Volume Adjusts the volume of the computer speaker. Enable the checkbox below this column to mute the computer speaker.
Microphone Volume Adjusts the input sensitivity (volume) of the computer microphone. Enable the checkbox below this column to mute the computer microphone.
Ring Volume Adjusts the ring volume of the ringer (from an incoming call). Enable the checkbox below this column to mute the ringer.
Adjust the Microphone Volume
Use your mouse to drag the microphone volume controls to set the desired input sensitivity (volume) of the computer microphone or headset microphone. To mute the microphone, click the Mute button or icon. To locate the Mute button or icon, see Table 3-6. The button and icon turn red to indicate that the microphone is muted. To turn muting off, click the button or icon again.
To adjust the microphone volume, use the volume settings icon. Click the volume
settings icon in the icon bar to access the volume controls. Use your mouse to
drag the microphone volume bar up and down to set the desired volume. To mute the microphone, click the Mute checkbox beneath the microphone volume control.
Table 3-6 Mute Button and Icon
Button Location
In full-view mode, this Mute button is located below the Play messages button.
How to Place a Call
Procedure
Step 1 In the main dialing window, click the line button for the line you want to use.
The call block for that line displays.
Step 2 Dial the number you want to call in one of the following ways:
• Use your keyboard to type the number in the dialing box and press Enter.
• Enter the e-mail address or name (partial or full) for the person you want to call and press CTRL-K.
– To use this feature, you must have a directory entry for the recipient that includes their e-mail address and phone number or you must have an Cisco CallManager (LDAP) directory configured.
• Use your mouse to click the keys on the online keypad and click Dial.
See the “Dial from the Online Keypad” section on page 3-17 for more details.
• Drag the number from your Internet browser into the dialing box.
• Open a Cisco IP SoftPhone directory, click your mouse on the name of the person you want to dial and click Dial.
See the “Dial from the Online Directories” section on page 3-17 for more information.
• Click on the arrow next to the dialing box, select the number from the list of recently dialed numbers, and click Dial.
See the “Dial the Last Number Dialed” section on page 3-18 for more details.
• Copy the number from any Windows program, paste it into the dialing box, and click Dial.
• Drag a v-card file from your desktop into the dialing box.
[image:59.595.128.464.169.287.2]When the call connects, the context-sensitive button bar displays buttons that enable you to perform additional call functions. See Figure 3-2.
Figure 3-2 Call Options
Related Topics
• Dial from the Online Keypad, page 3-17
• Dial from the Online Directories, page 3-17
• Dial the Last Number Dialed, page 3-18
• How to End a Call, page 3-18
• How to Place a Call on Hold, page 3-22
• How to Transfer a Call, page 3-22
• How to Start an Audio Conference, page 3-27
Dial from the Online Keypad
To provide the familiar look and function of a telephone keypad,
Cisco IP SoftPhone includes an online keypad for you to dial calls. Simply click your mouse on the numbers you want to dial and then click the Dial button. Use of the online keypad is optional.
Procedure
Step 1 In the main dialing window, click the line button for the line you want to use.
Step 2 Click the Off Hook button or click on the handset image.
Step 3 If the online keypad is not open, click the keypad icon in the icon bar.
Step 4 Click on the telephone number digits in the keypad.
The call automatically connects once you enter the digits.
Dial from the Online Directories
With Cisco IP SoftPhone, you can focus on names rather than numbers and place calls through your public and personal online directories.
Procedure
Step 1 Click the Directories icon.
The Directories window opens.
Step 2 Select the desired directory from the drop-down list box.
The directory list displays the name, phone number, and e-mail address for each person in the directory.
Step 3 To place a call from the directory, you can do one of the following:
• Click on the name of the person you want to call and click Dial.
• Drag the name of the person you want to call from the directory to the dialing box.
Related Topic
• How to Use the Dialing Directories, page 3-31
Dial the Last Number Dialed
Click the Redial button to automatically redial the last number dialed. Or, to redial a recent called number, choose it from the destination drop-down list box and click the Dial button. Cisco IP SoftPhone keeps a list of the last 15 dialed numbers.
How to End a Call
Click the End Call button to disconnect a call.
How to Answer a Call
Click the Answer button to answer an incoming call.
When you have an incoming call, the context-sensitive button bar displays buttons that enable you to answer, redirect, send the call to voice mail, or ignore the call. See Figure 3-3. You can also configure Cisco IP SoftPhone to automatically answer the phone. See the “Answer a Call Automatically” section on page 3-21
for more details.
If you receive an incoming call while you are already in a call, click the Answer button to place the current call on hold and answer the incoming call. Otherwise, use any of the other calling options that are presented to you on the
context-sensitive button bar to handle the incoming call.
[image:62.595.132.462.296.390.2]Additionally, if you use Cisco IP SoftPhone to control a Cisco IP Phone, to answer an incoming call, simply pick up the handset or use any answering method supported by the physical phone.
Figure 3-3 Call Answer Options
Related Topics
• Redirect an Incoming Call, page 3-20
• Send an Incoming Call to Voice Mail, page 3-20
• Ignore an Incoming Call, page 3-20
• Answer a Call Automatically, page 3-21