this print for content only—size & color not accurate
spine = 0.79" 416 page count
BOOKS FOR PROFESSIONALS BY PROFESSIONALS
®Pro SharePoint 2003
Development Techniques
Dear Reader,
First of all, thanks for your interest in this book. We have been working with SharePoint technology since the beta release of SharePoint Portal Server 2001 and have seen the product evolve to SharePoint Products and Technologies 2003. Because we were awarded with the SharePoint Most Valuable Professional title, we were one of the first to work with that release, and we consider it to be a major improvement.
With the passing of time, new and interesting topics related to SharePoint products and technologies have arisen, and Pro SharePoint 2003 Development Techniquesis the first to cover them. This book discusses the landscape of SharePoint 2003 development today and beyond, integrating all of the new technologies that have already become or will soon become mainstream.
This book takes current technologies and applies them in a SharePoint context. This includes ASP.NET 2.0, SQL Server 2005, Reporting Services, InfoPath, and BizTalk 2006 support for SharePoint. Also covered is software fac-tories, a new software development paradigm that is gaining ground rapidly, and the DSL tools for Visual Studio .NET 2005. This book explains how to do the popular Ajax-style web development within web parts and discusses how to use Atlas in SharePoint environments.
This book also addresses how to develop SharePoint workflow applications with Windows Workflow Foundation technology and contains a very detailed discussion of SharePoint impersonation, elevation, and delegation techniques. You’ll also learn about domain-specific languages, the guidance automation toolkit, Web Services for Remote Portlets, and more.
We are glad you are interested in this book. We will consider the book to be successful if the contemporary development techniques presented here are able to assist you in your daily activities as a SharePoint developer. Enjoy the read! Nikander & Margriet Bruggeman
US $49.99 Shelve in .NET User level: Intermediate–Advanced
www.apress.com
SOURCE CODE ONLINE
Bruggeman
2Shar
ePoint
2003 Development
Te
chniques
THE EXPERT’S VOICE
®IN SHAREPOINT
Nikander Bruggeman
and
Margriet Bruggeman
Pro
SharePoint 2003
Development Techniques
CYAN MAGENTA YELLOW BLACK PANTONE 123 CVISBN 1-59059-761-3
9 781590 597613
5 4 9 9 9
6 89253 59761 3
Nikander Bruggeman and Margriet Bruggeman, coauthors of
Microsoft SharePoint Products and Technologies 2003 Resource Kit Developer’s Guide to the Windows SharePoint Services v3 Platform Microsoft Office SharePoint Portal Server 2007 Administrator’s Companion
Companion eBook Available
Learn how to apply contemporary development
techniques in SharePoint solutions
Companion eBook
See last page for details on $10 eBook version
RELATED TITLE
Pro SharePoint 2003
Development Techniques
■ ■ ■
Nikander Bruggeman and
Margriet Bruggeman
Pro SharePoint 2003 Development Techniques
Copyright © 2006 by Nikander Bruggeman and Margriet Bruggeman
All rights reserved. No part of this work may be reproduced or transmitted in any form or by any means, electronic or mechanical, including photocopying, recording, or by any information storage or retrieval system, without the prior written permission of the copyright owner and the publisher.
ISBN-13 (pbk): 978-1-59059-761-3 ISBN-10 (pbk): 1-59059-761-3
Printed and bound in the United States of America 9 8 7 6 5 4 3 2 1
Trademarked names may appear in this book. Rather than use a trademark symbol with every occurrence of a trademarked name, we use the names only in an editorial fashion and to the benefit of the trademark owner, with no intention of infringement of the trademark.
Lead Editor: Jonathan Hassell Technical Reviewer: Scot Hillier
Editorial Board: Steve Anglin, Ewan Buckingham, Gary Cornell, Jason Gilmore, Jonathan Gennick, Jonathan Hassell, James Huddleston, Chris Mills, Matthew Moodie, Dominic Shakeshaft, Jim Sumser, Keir Thomas, Matt Wade
Project Manager: Tracy Brown Collins Copy Edit Manager: Nicole Flores Copy Editor: Jennifer Whipple
Assistant Production Director: Kari Brooks-Copony Production Editor: Laura Cheu
Compositor: Susan Glinert Stevens Proofreader: Dan Shaw
Indexer: Michael Brinkman Artist: April Milne
Cover Designer: Kurt Krames
Manufacturing Director: Tom Debolski
Distributed to the book trade worldwide by Springer-Verlag New York, Inc., 233 Spring Street, 6th Floor, New York, NY 10013. Phone 1-800-SPRINGER, fax 201-348-4505, e-mail [email protected], or visit http://www.springeronline.com.
For information on translations, please contact Apress directly at 2560 Ninth Street, Suite 219, Berkeley, CA 94710. Phone 510-549-5930, fax 510-549-5939, e-mail [email protected], or visit http://www.apress.com. The information in this book is distributed on an “as is” basis, without warranty. Although every precaution has been taken in the preparation of this work, neither the author(s) nor Apress shall have any liability to any person or entity with respect to any loss or damage caused or alleged to be caused directly or indirectly by the information contained in this work.
The source code for this book is available to readers at http://www.apress.com in the Source Code/Download section.
iii
Contents at a Glance
About the Authors
. . . ixAbout the Technical Reviewer
. . . xiAcknowledgments
. . . xiiiIntroduction
. . . xv■
CHAPTER 1
Incorporating .NET 2.0 in SharePoint
. . . 1■
CHAPTER 2
Using Ajax and Atlas in Web Parts
. . . 35■
CHAPTER 3
SQL Server 2005 Reporting Services
. . . 93■
CHAPTER 4
Windows Workflow Foundation
. . . 143■
CHAPTER 5
Software Factories and Web Part Connections
. . . 175■
CHAPTER 6
Web Services for Remote Portlets
. . . 259■
CHAPTER 7
InfoPath
. . . 287■
CHAPTER 8
Impersonation and Elevation
. . . 329■
BIBLIOGRAPHY . . . 371
■
INDEX . . . 373
v
Contents
About the Authors
. . . ixAbout the Technical Reviewer
. . . xiAcknowledgments
. . . xiiiIntroduction
. . . xv■
CHAPTER 1
Incorporating .NET 2.0 in SharePoint
. . . 1SharePoint Products and Service Packs
. . . 1Installing Windows SharePoint Services and ASP.NET 2.0
. . . 2Data Stores
. . . 4How to Configure ASP.NET 2.0
. . . 5Things to Remember
. . . 8Creating Web Parts via Visual Studio .NET 2005
. . . 9Enhancing Development of Web Parts with the
Guidance Automation Toolkit
. . . 12Guidance Package Development
. . . 13Installing and Using the Web Part Library Template
. . . 13Guidance Automation Toolkit
. . . 21Creation of the Web Part Library Template
. . . 22ASP.NET 2.0 Server Controls
. . . 29The FileUpload Control
. . . 30The BulletedList Control
. . . 31The Wizard Control
. . . 32Summary
. . . 34■
CHAPTER 2
Using Ajax and Atlas in Web Parts
. . . 35What Are Ajax and Atlas?
. . . 35Ajax Frameworks for ASP.NET
. . . 39Creating Web Services in Windows SharePoint Services
. . . 40vi ■C O N T E N T S
JavaScript in Web Parts
. . . 47The Content Editor Web Part
. . . 47Web Part Tokens
. . . 47Rendering JavaScript Within a Web Part
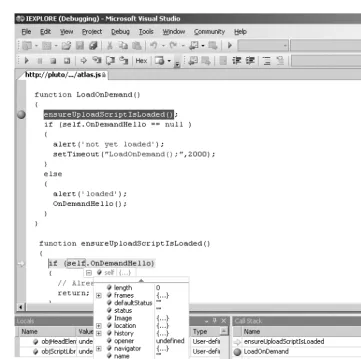
. . . 48JavaScript On-Demand Loading
. . . 50Debugging JavaScript
. . . 52Remote Calls Prior to Atlas
. . . 53Retrieving Data via XMLHttpRequest
. . . 53Web Service Behavior
. . . 56Web Service Message Types
. . . 57Plain Text
. . . 57HTML Response
. . . 58XML Message
. . . 58JSON Messages
. . . 58Installing Atlas
. . . 61Building a Performance Counter Web Part
. . . 61Building a Company Contact Web Part Using Atlas and JSON
. . . 73Building an Autocompletion Web Part
. . . 78Client-Side Connectable Web Parts and Atlas
. . . 83Summary
. . . 92■
CHAPTER 3
SQL Server 2005 Reporting Services
. . . 93Introducing Reporting Services
. . . 93Building a Report
. . . 95Viewing a Report
. . . 99Reporting Services Extensions
. . . 109Data Processing Extension Example
. . . 110Developing a Custom Data Extension
. . . 112Deployment of a Custom Data Extension
. . . 125Using the Custom Data Extension
. . . 127Delivering Extension Example
. . . 132SQL Server Report Pack for SharePoint Portal Server 2003
. . . 133Summary
. . . 141■C O N T E N T S vii
■
CHAPTER 4
Windows Workflow Foundation
. . . 143Getting to Know Windows Workflow Foundation
. . . 143Activities
. . . 144Components
. . . 147Workflow Styles
. . . 149Installing Windows Workflow Foundation
. . . 151Visual Studio 2005 Designer for Windows Workflow Foundation
. . . 152Creating a Simple Workflow
. . . 154Debugging a Workflow
. . . 158Creating an Activity
. . . 159Creating Workflows for SharePoint 2003
. . . 162Summary
. . . 174■
CHAPTER 5
Software Factories and Web Part Connections
. . . 175Introducing Software Factories
. . . 175Background on Domain-Specific Languages
. . . 176Components of a Software Factory
. . . 177Using DSL Tools
. . . 178Web Part Connections
. . . 179The Cell Interface Pair
. . . 181The Row Interface Pair
. . . 183The List Interface Pair
. . . 184The Filter Interface Pair
. . . 184The ParamsOut Interface Pair
. . . 184The ParamsIn Interface Pair
. . . 185What Else Do You Need to Know?
. . . 186Creating a Connectable Web Part
. . . 187Creating the Web Part Connection Language
. . . 197Installation of the DSL Toolkit for Visual Studio .NET 2005
. . . 197Creating a Domain Model
. . . 198Validation
. . . 223Text Templates
. . . 240Deploying the Web Part Connection Language
. . . 250Using the Web Part Connection Language
. . . 253Summary
. . . 257viii ■C O N T E N T S
■
CHAPTER 6
Web Services for Remote Portlets
. . . 259Getting to Know WSRP
. . . 259Approaches for User Interface Reuse
. . . 260Common WSRP Architectures
. . . 262WSRP Benefits and Drawbacks
. . . 264Delving Deeper into the WSRP Specification
. . . 267Configuring a WSRP Consumer for SharePoint 2003 Portals
. . . 277Implementing a WSRP Producer
. . . 280Summary
. . . 286■
CHAPTER 7
InfoPath
. . . 287InfoPath Walkthrough
. . . 287Supporting Multiple InfoPath Form Templates
. . . 292Data Binding with InfoPath
. . . 294Updating and Saving an InfoPath Form Programmatically
. . . 297Using a Submit Button
. . . 301Integration Between InfoPath, SharePoint, and
BizTalk Server 2006
. . . 304Message Processing Overview
. . . 305Windows SharePoint Services Adapter Overview
. . . 306Working with the Windows SharePoint Services Adapter
. . . 308Summary
. . . 327■
CHAPTER 8
Impersonation and Elevation
. . . 329LogonUser
. . . 329Encrypting Sensitive Data via DPAPI
. . . 337Using the SecureString Class
. . . 338Storing Sensitive Information in an Encrypted Way
. . . 338Single Sign-On
. . . 339RevertToSelf
. . . 344Creating a New AppDomain
. . . 347Enterprise Services COM+ Component
. . . 352Queued Components
. . . 358Delegation
. . . 366Summary
. . . 369■
BIBLIOGRAPHY . . . 371
■
INDEX
. . . 373ix
About the Authors
■NIKANDER BRUGGEMAN started his career building web sites using HTML,
CGI, and Perl. Later, when JavaScript 1.0 was released, he built numerous web sites based on LiveWire technology while working for a Netscape-oriented company. Nikander then moved to a company that special-izes in Microsoft technology. Currently, Nikander is an independent consultant, specializing in building .NET applications using the latest Microsoft technology. His current work includes software design, development, consulting, and training, and he has worked for compa-nies such as Universal Music, Arvato-Bertelsmann, Coca-Cola, Shell, Intel, and Sara Lee/DE. He was given the prestigious Most Valuable Professional (MVP) award from Microsoft for his work on the SharePoint Portal Server platform. Nikander has coauthored several other SharePoint books and has written numerous articles. He lives in the heart of Amsterdam, and when not developing software or writing about it, he loves to watch sports and movies. Nikander can be reached via [email protected].
■MARGRIET BRUGGEMAN began her professional career as a quality
assurance engineer. She then became a software developer, architect, consultant, and trainer. Margriet is an independent consultant special-izing in building .NET applications using the latest Microsoft technology. She has worked for companies such as Interpay, Ericsson, Ford, Corus, Interpolis, and SNS Reaal. Margriet has written numerous articles, coauthored multiple SharePoint books, and was awarded the prestig-ious Most Valuable Professional (MVP) award from Microsoft for her work on the SharePoint Portal Server platform. Margriet is very fond of animals, and when not busy doing IT-related activities, she can be found near dogs, cats, horses, rabbits, birds, and other fuzzy creatures. Margriet can be reached via [email protected].
xi
About the Technical Reviewer
■SCOT HILLIER is an independent consultant and Microsoft Most Valuable Professional focused on creating solutions for information workers with SharePoint, Office, and related .NET technologies. He is the author of eight books on Microsoft technologies, including Microsoft SharePoint:
Building Office 2003 Solutions and Advanced Windows SharePoint Services. Scot is also a former Microsoft regional director for Hartford,
Connecticut. When not writing about technology, Scot can often be found presenting to audiences ranging from developers to C-level executives. Scot is a former naval submarine officer and a graduate of the Virginia Military Institute. Scot can be reached at [email protected].
xiii
Acknowledgments
W
hen we reflect on the period in which we wrote this book, we both agree that it was a whole lot of work and a whole lot of fun. We did not have to do it all alone; so some thanks are in order. Firstly, we would like to thank everyone at Apress. Without their support, the book would not have been possible. Our special thanks go out to Jonathan Hassell, for his enthusiastic and quick responses, and Tracy Brown Collins, for bringing our project planning to the next level and speaking Dutch almost fluently. Nikander would like to thank his father and mother, Henk Bruggeman and Winie Bruggeman-Wuyster, for making him believe a lot can be accomplished if you truly want it. Margriet would like to thank her father, Adriaan van Vuuren, for his repeated offers of help that were much appreciated. Margriet deeply regrets that her mother, Maria van Vuuren-Licht, won’t be able to see this book. We know you would have been so proud.xv
Introduction
S
harePoint Products and Technologies 2003 has been around for a couple of years now. We like the product and have been working with SharePoint technology since the beta release of SharePoint Portal Server 2001. Lately, we had the feeling that there was room for a new book about SharePoint Products and Technologies 2003: a book that describes contemporary devel-opment techniques for doing SharePoint develdevel-opment. This book comes at a perfect time. It could not have been written one or two years earlier, because it describes brand-new technology; and in one or two more years SharePoint 2007 will hit the market and be slowly adopted by companies. The result of this thinking is the book you are holding in your hands.What Does This Book Cover?
This book discusses different contemporary development techniques for doing SharePoint development. Every chapter is independent of the other chapters, so you can read the book from cover to cover or in any other order you see fit, according to your personal interest. The following sections describe the contents of each chapter.
Chapter 1: Incorporating .NET 2.0 in SharePoint
As the .NET 2.0 Framework is an important part of most technologies discussed in this book, we start with a discussion of the integration between SharePoint Products and Technologies 2003 and .NET Framework 2.0. This chapter discusses how to install .NET Framework 2.0 on Windows SharePoint Services server, creating SharePoint web parts via Visual Studio .NET 2005, enhancing development with the Guidance Automation Toolkit (GAT), learning how to run Windows SharePoint Services in combination with SQL Server 2005, and learning how to use .NET 2.0 controls in web parts.
Chapter 2: Using Ajax and Atlas in Web Parts
Ajax is a framework for communicating client-side with servers in an asynchronous manner. Atlas is a framework to build rich web applications on top of ASP.NET 2.0. This enhances the user interface experience significantly, getting much closer to a Windows Form application experience. In this chapter we show the reader how to use client-side JavaScript in web parts using .NET 2.0. This chapter discusses different types of server responses: plain text, HTML, XML, and JSON. This chapter also explains how to incorporate Ajax and Atlas into web parts.
xvi ■I N T R O D U C T I O N
Chapter 3: SQL Server 2005 Reporting Services
Thischapter starts with a discussion of SQL Server 2005 Reporting Services. Then you will learn how to create a report using the Business Intelligence Development Studio. After that, you will learn which SharePoint Reporting web parts are available and how you should use them. This chapter takes a look at the architecture of Reporting extensions, taking a closer look at creating custom data extensions and delivering extensions. Finally, the chapter discusses what the SQL Server Report Pack for SharePoint Portal Server 2003 is and how you should use it.
Chapter 4: Windows Workflow Foundation
Creatingworkflows in SharePoint 2003 technology without the aid of third-party vendors has been quite difficult to do. Windows Workflow Foundation changes this. This chapter discusses what Windows Workflow Foundation is. Then it explains how to create workflows and custom activities using the Visual Studio 2005 Designer for Windows Workflow Foundation. The final part of the chapter is dedicated to showing you how to combine Windows Workflow Founda-tion and Windows SharePoint Services.
Chapter 5: Software Factories and Web Part Connections
In this chapter you will learn why software factories are an important contemporary trend in software architecture. The chapter teaches you how to build a domain-specific language for creating connectable web parts using the Visual Studio.NET 2005 DSL tools.
Chapter 6: Web Services for Remote Portlets
The Web Services for Remote Portlets (WSRP) protocol is a web services protocol for aggregating content and interactive web applications from remote sources. In this chapter, we discuss what WSRP is and how this specification can be of help in portal implementations. After that, we look deeper into the WSRP specification. Also, we explain how to configure a generic WSRP consumer web part in SharePoint and how to build WSRP producers.
Chapter 7: InfoPath
This chapter discusses the integration between SharePoint and InfoPath. It also discusses the integration between SharePoint, InfoPath, and BizTalk 2006. You will learn how to access data stored in a SharePoint list from within an InfoPath form and create and update InfoPath forms programmatically in a SharePoint form library.
Chapter 8: Impersonation and Elevation
Codeis executed under a given identity. There are several techniques available to do this. This chapter provides a detailed discussion of the impersonation, elevation, and delegation tech-niques that are at your disposal.
■I N T R O D U C T I O N xvii
Who Is This Book For?
This book is targeted to SharePoint Portal Server and Windows SharePoint Services developers who want to learn about the shape of the landscape of SharePoint 2003 development in 2006 and beyond, integrating a range of new .NET technologies that have already become or will soon become mainstream. The book will provide information and insight about contemporary development techniques that will help you in your daily activities as a SharePoint developer.
What Do You Need to Use This Book?
Each chapter discusses the requirements for testing the techniques and examples described in the chapter. In general, you will need to have access to Windows SharePoint Services, SharePoint Portal Server 2003, and Visual Studio .NET 2005.
Source Code
The code listings in this book can be downloaded from http://www.lcbridge.nl/download.
Bruggeman_761-3FRONT.fm Page xviii Tuesday, October 24, 2006 8:36 AM
1
■ ■ ■
C H A P T E R 1
Incorporating .NET 2.0
in SharePoint
M
icrosoft SharePoint Products and Technologies has been around for a couple of years now and has proven to be very useful for companies around the world that are implementing portal, team collaboration, or enterprise content management strategies.The development landscape has changed considerably since SharePoint Products and Technologies was introduced in 2003, largely influenced by the release of Microsoft .NET Framework 2.0. This chapter discusses how to incorporate the exciting new features of .NET 2.0 into SharePoint Products and Technologies.
First, the chapter discusses the service packs for Office SharePoint Portal Server 2003 and Windows SharePoint Services, the two products that make up SharePoint Products and Technologies. We cover installation of these as well as ASP.NET 2.0 and how to use data stores.
This chapter also discusses how to create web parts with Visual Studio .NET 2005 and extend your development possibilities with its Guidance Automation Toolkit (GAT).
To finish this chapter we will show you how to incorporate the new ASP.NET 2.0 server controls within web parts.
SharePoint Products and Service Packs
SharePoint Products and Technologies is made up of two different products: Office SharePoint Portal Server 2003 and Windows SharePoint Services. At the end of 2005, Microsoft released Service Pack 2.0, two service packs for SharePoint Portal Server 2003 and Windows SharePoint Services. These two service packs contain four new enhancements. The following three enhance-ments apply to both SharePoint Portal Server and Windows SharePoint Services:
• The ability to run on Microsoft Windows Server 64-bit versions: SharePoint Portal Server and Windows SharePoint Services both support being run in Windows on Windows 64 (WOW 64) 32-bit emulation mode on 64-bit versions of Windows, although there are no performance improvements. However, other applications and the operating system itself might be able to take advantage of the 64-bit server functionality.
2 C H A P T E R 1 ■ I N C O R P O R A T I N G . N E T 2 . 0 I N S H A R E P O I N T
• Use of SQL Server 2005: Microsoft SQL Server 2005 includes features such as extended XML support and integrated Common Language Runtime (CLR) support. Windows SharePoint Services and SharePoint Portal Server 2003 do not take advantage of that new functionality. However, there are general benefits to be gained in upgrading to SQL Server 2005, such as better performance.
• Improved extranet deployment options: In Windows SharePoint Services and SharePoint Portal Server some of the hyperlinks within web pages and e-mail messages are absolute URLs. Earlier releases of Windows SharePoint Services generated those absolute URLs by using the protocol scheme, host, and port of the web request that Windows SharePoint Services received, or by using the base URL of the site, which could prevent Windows SharePoint Services from supporting certain advanced extranet scenarios where a reverse proxy server is deployed in front of the server running Windows SharePoint Services. This is solved by the new service packs.
The fourth enhancement, support for the Microsoft .NET Framework 2.0 Common Language Runtime and ASP.NET 2.0, only applies to Windows SharePoint Services. SharePoint Portal Server 2003 (with or without Service Pack 2.0) will not support .NET Framework 2.0. The only kind of support you have in SharePoint Portal Server 2003 for .NET Framework 2.0 is the ability to call .NET 2.0 web services and redisplay pages that are written in ASP.NET 2.0. Developing web parts in Visual Studio .NET 2005 is only possible for Windows SharePoint Services with Service Pack 2.0 installed.
The support in Windows SharePoint Services for ASP.NET 2.0 does not include integration with the ASP.NET 2.0 web part Framework. If you deploy a web part that is built in ASP.NET 2.0 to a Windows SharePoint Services server, it will function as a normal web form control.
Although Windows SharePoint Services with Service Pack 2.0 runs on the new Common Language Runtime, it is not redesigned to take advantage of the new features of ASP.NET 2.0. For example, there is no support for master pages in Windows SharePoint Services. On the other hand, the new class libraries found in ASP.NET 2.0 can be used within custom SharePoint web parts.
After applying Windows SharePoint Services Service Pack 2.0, the SharePoint worker process can run in ASP.NET 2.0 mode, but you can also choose to run in ASP.NET 1.0 mode. You will only be able to use the new features and the security and performance enhancements of ASP.NET 2.0 when Windows SharePoint Services runs in ASP.NET 2.0 mode. You can run ASP.NET 1.x and 2.0 at the same time on a server if you are using different Windows SharePoint Services virtual servers. Windows SharePoint Services itself has the same functionality, regard-less of whether you are running on ASP.NET 2.0 or ASP.NET 1.x.
Installing Windows SharePoint Services
and ASP.NET 2.0
In this section, we show you how to install Windows SharePoint Services Service Pack 2 and ASP.NET 2.0.
As a starting point, every SharePoint server will have ASP.NET 1.1 installed on it. However, it is possible to run ASP.NET 1.1 and ASP.NET 2.0 side by side on the same server. There is an important limitation: if you install ASP.NET 2.0 on a server, you cannot install SharePoint Portal Server 2003 on that machine anymore. As a consequence, upgrading to ASP.NET 2.0 is
C H A P T E R 1 ■ I N C O R P O R A T I N G . N E T 2 . 0 I N S H A R E P O I N T 3
not an option for SharePoint Portal Server 2003, although it is an appealing option for Windows SharePoint Services. For Windows SharePoint Services installations, if you upgrade to ASP.NET 2.0 (and the .NET Framework 2.0, which is automatically upgraded when installing ASP.NET 2.0) you will be able to take advantage of the many improvements to the development framework and environment. Your code will also be able to take advantage of new security and performance enhancements.
In our experience the installation process works best if you start with a clean install of Windows Server 2003 R2. The R2 release is required; previous versions of Windows Server 2003 will not work. After installing Windows Server 2003 R2, the first thing to do is to install Internet Information Services (IIS). This can be done by going to Add or Remove Programs via the Control Panel and then choosing Add/Remove Windows Components. Make sure not to install FrontPage Server Extensions. Do not install ASP.NET at this time; otherwise the installation process will fail.
After installing IIS, you are ready to install ASP.NET 2.0. Go back to Add or Remove Programs and click Add/Remove Windows Components. Select Microsoft .NET Framework 2.0 and click Next to install.
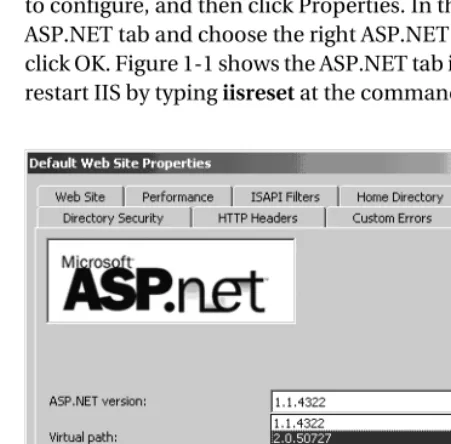
The next step is to configure IIS for ASP.NET 2.0. Go to the Internet Information Services Manager by typing inetmgr at the command prompt and right-click the virtual server you want to configure, and then click Properties. In the Default Web Site Properties window go to the ASP.NET tab and choose the right ASP.NET version (version 2.0) from the drop-down list and click OK. Figure 1-1 shows the ASP.NET tab in the Default Web Site Properties window. Finally, restart IIS by typing iisreset at the command prompt.
Figure 1-1. The ASP.NET tab of the Default Web Site Properties window
[image:22.612.62.288.338.560.2]4 C H A P T E R 1 ■ I N C O R P O R A T I N G . N E T 2 . 0 I N S H A R E P O I N T
Data Stores
There are three possible data stores to choose from when installing Windows SharePoint Services: Windows Microsoft SQL Server 2000 Desktop Engine (WMSDE), which has limitations but is free; SQL Server 2000; or SQL Server 2005. WMSDE is a special version of the Microsoft SQL Server Desktop Engine (MSDE) and is designed to be used by Windows components. It is not limited in the same way the MSDE is. In it, the maximum size limit and current connections limit have been removed. Nevertheless, WMSDE is still more limited than SQL Server 2000 and it is certainly more limited than SQL Server 2005. WMSDE does not support full-text search, can be managed locally but not remotely, cannot be used in a web farm scenario, and does not include the SQL Enterprise Manager tool.
Installing SharePoint Services When Using WMSDE
If you want to use WMSDE as the data store for Windows SharePoint Services, follow these steps:
1. Go to Start ➤ Administrative Tools ➤ Manage Your Server and click Add or Remove a Role.
2. Click Next.
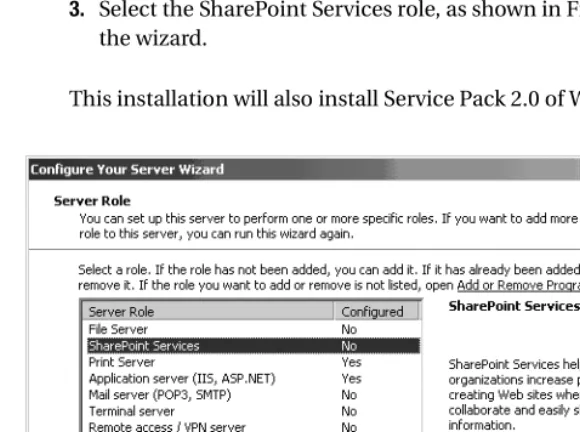
3. Select the SharePoint Services role, as shown in Figure 1-2, and follow the steps of the wizard.
This installation will also install Service Pack 2.0 of Windows SharePoint Services.
Figure 1-2. Choose SharePoint Services in the Configure Your Server Wizard.
[image:23.612.64.354.358.574.2]C H A P T E R 1 ■ I N C O R P O R A T I N G . N E T 2 . 0 I N S H A R E P O I N T 5
Installing SharePoint Services When Using SQL Server 2000 or SQL Server 2005
When using SQL Server 2000 or 2005 as the data store, you have to install Windows SharePoint Services in a different way. Via Add/Remove Windows Components, select Windows SharePoint Services as shown in Figure 1-3. This installation already contains Service Pack 2.
Figure 1-3. Select SharePoint Services in the Windows Components Wizard.
How to Configure ASP.NET 2.0
ASP.NET code runs at the trust level that is assigned to it. This trust level is determined by the code access security policy file specified in the web.config file. The Wss_minimaltrust.config file is an example of a code access security policy file, and it is the default policy file used in SharePoint Products and Technologies.
ASP.NET 2.0 implements a new security change that helps to lock down security for a virtual server in Internet Information Services 6.0. As a result of this security change, the permissions of web pages, web parts, and controls are limited to the intersection of the default ASP.NET permission set and the permission set currently granted by the trust level under which the code runs. The current trust level is defined in the web.config file of a SharePoint virtual server. Because this lockdown is incompatible with the security permission set required by Windows SharePoint Services, it must be disabled, which can be done via the web.config file of a SharePoint virtual server.
Another configuration requirement for ASP.NET 2.0 and Windows SharePoint Services is related to a new ASP.NET feature called event validation, which is responsible for monitoring callbacks to the ASP.NET infrastructure and making sure callback sources equal control targets. ASP.NET 2.0 event validation is not compatible with Windows SharePoint Services because some SharePoint pages use callbacks that are not associated to any particular control. This results in page execution errors, unless ASP.NET 2.0 event validation is turned off for any SharePoint-extended web application on a server.
6 C H A P T E R 1 ■ I N C O R P O R A T I N G . N E T 2 . 0 I N S H A R E P O I N T
The SharePoint stsadm.exe command line tool can be used to update the settings of the web.config file of a SharePoint virtual server so that ASP.NET 2.0 is compatible with Windows SharePoint Services. Use the following command:
stsadm –o upgrade –forceupgrade –url http://[MyVirtualServer]
When you use this command (which we will call the stsadm upgrade command from now on), you will see the pop-up window shown in Figure 1-4.
Figure 1-4. Pop-up window when the stsadm command is running
This command will update the web.config file that is located in the root folder of the virtual server. By default, this folder is [drive letter]:\inetpub\wwwroot. The upgrade operation will add the processRequestInApplicationTrust attribute to the <trust> element. Setting this attribute to false determines that the permission grant set is restricted to the permissions configured in the trust policy file. The following line of code shows an example of the trust level defined in a web.config file. In this case, the trust level is set to Full:
<trust level="Full" originUrl="" processRequestInApplicationTrust="false" />
The stsadm upgrade command will also add a namespaces section under the <pages> element. This section is new in .NET Framework 2.0. The <namespaces> element defines a collection of import directives to use during assembly precompilation. These are configured in the root web.config file. You can remove any of these namespaces from the collection by using the
<remove> element in the web.config file for an application. You must remove the System.Web. UI.WebControls.WebParts namespace because it is the ASP.NET web part namespace and it conflicts with the SharePoint web part class, which has the following namespace: Microsoft. SharePoint.WebPartPages.WebPart. The following code listing demonstrates how to remove the Microsoft.SharePoint.WebPartPages.WebPart namespace:
<namespaces>
<remove namespace="System.Web.UI.WebControls.WebParts" /> </namespaces>
C H A P T E R 1 ■ I N C O R P O R A T I N G . N E T 2 . 0 I N S H A R E P O I N T 7
Finally, the stsadm upgrade command will add an enableEventValidation attribute to the
<pages> element, which turns event validation off. The following code listing demonstrates how to disable event validation:
<pages enableSessionState="false" enableViewState="true" enableViewStateMac="true" ➥ validateRequest="false" enableEventValidation="false">
When you have followed these steps, you can make your own SharePoint site using ASP.NET 2.0. Figure 1-5 shows you the first screen of a SharePoint site.
Figure 1-5. The first screen of a default SharePoint site
If you fail to run the stsadm and you browse to a Windows SharePoint Services site on a server with ASP.NET 2.0 installed on it, you will see the error that is shown in Figure 1-6.
Figure 1-6. Error when running SharePoint site in ASP.NET 2.0 without running the
stsadm command
If you want to go back to using ASP.NET 1.x instead of ASP.NET 2.0, you have to run the exact same stsadm command again to remove the elements and attributes from the web.config file. If you forget to do this and run your SharePoint site in ASP.NET 1.x, you will get an error, as shown in Figure 1-7.
8 C H A P T E R 1 ■ I N C O R P O R A T I N G . N E T 2 . 0 I N S H A R E P O I N T
Figure 1-7. Error when running SharePoint site in ASP.NET 1.x without running the
stsadm command
Things to Remember
When your virtual server runs in ASP.NET 1.1 mode, you cannot call another assembly that is compiled in .NET 2.0. This is known as upstreaming. Downstreaming is possible; if your virtual server runs in ASP.NET 2.0, you can call another assembly that is compiled in .NET 1.x.
ASP.NET 2.0 web parts can be added to pages running in Windows SharePoint Services after Service Pack 2.0 is applied. They will not be treated as web parts; instead, they will be seen as standard web form controls. Out of the box, Windows SharePoint Services will not use any ASP.NET 2.0 constructs. It is not necessary to specify assembly redirection or runtime informa-tion for the ASP.NET 2.0 web part assemblies unless you want to deploy them. If you want to deploy web part packages that contain Common Language Runtime version 2.0–compiled web part assemblies, you will need to create a stsadm.exe.config file for stsadm.exe that specifies the following:
<?xml version="1.0" encoding="utf-8" ?> <configuration>
<startup>
<supportedRuntime version="v2.0.50727" /> <supportedRuntime version="v1.1.4322" /> </startup>
</configuration>
This config file has to be placed next to stsadm.exe. The default location is [drive letter]:\ Program Files\Common Files\Microsoft Shared\web server extensions\60\BIN. If you do not create this config file, you will get the following error message: “Version 1.1 is not a compatible version.”
C H A P T E R 1 ■ I N C O R P O R A T I N G . N E T 2 . 0 I N S H A R E P O I N T 9
Creating Web Parts via Visual Studio .NET 2005
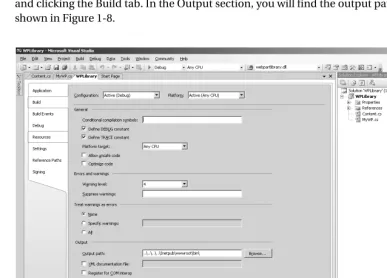
After installing ASP.NET 2.0 and Windows SharePoint Services, you can start creating web parts. Start by opening Visual Studio .NET 2005 and create a project that is based on the class library project template.First of all, you have to make sure that the dll that will be created when you compile your project will be placed in a bin folder under the root folder of your virtual server. If you do not have a bin folder under the root folder, you can create one yourself. By default, the location of the root folder will be [drive letter]\inetpub\wwwroot. Set the output path to the bin folder of the root folder of the SharePoint virtual server by right-clicking your project, choosing Properties, and clicking the Build tab. In the Output section, you will find the output path property, as shown in Figure 1-8.
Figure 1-8. Setting the output path property in Visual Studio .NET 2005
Before starting to code the web part, you also have to add references in your project to the System.Web and the Microsoft.SharePoint dlls. By default, you can find the Microsoft. SharePoint.dll on the following location: [drive letter]:\Program Files\Common Files\ Microsoft Shared\Web Server Extensions\60\ISAPI\.
[image:28.612.60.447.221.499.2]10 C H A P T E R 1 ■ I N C O R P O R A T I N G . N E T 2 . 0 I N S H A R E P O I N T
The following code example shows a list of all the imported namespaces. It also shows that the web part inherits from the Microsoft.SharePoint.WebPartPages.WebPart class, the base class for all SharePoint web parts. To prove we are indeed using .NET Framework 2.0, we have overridden the CreateChildControls() method and used generics (a new feature of .NET Framework 2.0) to print a Hello World message to the page. The following code listing contains the entire code for a web part that uses .NET 2.0 generics to print a Hello World message to a SharePoint page:
using System;
using System.Collections.Generic; using System.Text;
using System.Web.UI.HtmlControls; using System.Web.UI.WebControls;
using Microsoft.SharePoint.WebPartPages;
namespace LoisAndClark.WPLibrary {
public class MyWP : WebPart {
protected override void CreateChildControls() {
Content obj = new Content();
string str1 = obj.MyContent<string>("Hello World!"); this.Controls.Add(new System.Web.UI.LiteralControl(str1)); }
} }
The generic method shows that the SharePoint site is really running on .NET Framework 2.0. The code of the generic method looks like this:
public string MyContent<MyType>(MyType arg) {
return arg.ToString(); }
The next thing to do is to add the assembly to the SafeControls list in the web.config file. Doing this allows the web part to run within a SharePoint page.
<SafeControl Assembly="WPLibrary" Namespace="LoisandClark.WPLibrary" TypeName="*" ➥ Safe="True" />
There are two ways to import the web part in a SharePoint site: either you create a Description Web Part File (.dwp) file, or you browse to the web part gallery of your SharePoint site and upload the web part as a new web part. If the web part is not signed with a public key, the content of a .dwp file should look like this:
<?xml version="1.0" encoding="utf-8"?>
<WebPart xmlns="http://schemas.microsoft.com/WebPart/v2" > <Title>Title of Web Part</Title>
C H A P T E R 1 ■ I N C O R P O R A T I N G . N E T 2 . 0 I N S H A R E P O I N T 11
<Description>Description of Web Part</Description> <Assembly>Assembly</Assembly>
<TypeName>Namespace.Classname</TypeName> </WebPart>
After creating a .dwp file you can browse to a SharePoint site, click Modify Shared Page ➤
Add Web Parts ➤ Import. Browse to the .dwp file that is located on your computer and click Import.
The other way to import a web part in a SharePoint site is via the Web Part Gallery. The Web Part Gallery is only available on the top-level site administration page, which means that if you add a web part there, it will be available on all the subsites. The way to get there is to click Site Settings ➤ Go to Site Administration ➤ Manage Web Part Gallery. You can also go to the Web Part Gallery page by entering the following URL: http://[MyServerName]/_catalogs/wp/ Forms/AllItems.aspx. Then click New Web Part. This page will display all available web parts for this gallery, as shown in Figure 1-9.
Figure 1-9. The New Web Parts page of the Web Part Gallery
Click the check box next to your web part and then click Populate Gallery. Notice that the MyWP web part (previously selected in Figure 1-9) is listed in the Web Part Gallery in the form of a reference to its web part description file (MyWP.dwp). This is shown in Figure 1-10. If the web part is not shown, open a command prompt and type iisreset. Then check again.
12 C H A P T E R 1 ■ I N C O R P O R A T I N G . N E T 2 . 0 I N S H A R E P O I N T
Figure 1-10. The Web Part Gallery
Go back to your SharePoint site and click Modify Shared Page ➤ Add Web Parts ➤ Browse. You will find your web part in the Team Web Site Gallery. Now you can add your web part by dragging and dropping it onto the web part page. After you add your web part, you will have a SharePoint site running on .NET Framework 2.0 containing a web part created with Visual Studio .NET 2005.
Enhancing Development of Web Parts with the
Guidance Automation Toolkit
Creating a web part with Visual Studio .NET 2005 is more work than it used to be in the days of Visual Studio .NET 2003. If you create a web part with Visual Studio .NET 2003, you can use the web part template that can be downloaded from the Microsoft web site. This template is able to do the basic things needed to build web parts for you, thus saving you the effort of doing a boring bit of work. This is not the case with Visual Studio .NET 2005.
You can facilitate the development of web parts with the Guidance Automation Toolkit (GAT). The GAT is an extension to Visual Studio .NET 2005 that allows architects to automate the easy parts of development so that the developer can concentrate on the other parts. The GAT can be used to create assets that are developed in-house or by third parties, such as Microsoft. In the case of building a web part, the GAT can be used to build a package you can use as a template to start making web parts in Visual Studio .NET 2005. These packages are also known as guidance packages. We will show you how to use the GAT to create such a package.
C H A P T E R 1 ■ I N C O R P O R A T I N G . N E T 2 . 0 I N S H A R E P O I N T 13
Guidance Package Development
To help you with guidance package development, the GAT includes a Guidance Package Development Template. This template can be used to create a solution for guidance package development that includes the elements you need to create your own guidance package. The GAT is shipped with documentation that contains extensive information about the guidance package development process.
The web part library template can be downloaded from our web site: http://www. lcbridge.nl/download. The download is in the form of a Windows Installer file (.msi), which can be used to install a web part library template that can be used within Visual Studio .NET 2005.
In the previous section, we showed that you do not need a .dwp file to import a web part on a SharePoint site. However, if you want to strong-name your assembly you do need to create a .dwp file. Strong-named assemblies are explained later in this chapter in the “Installing and Using the Web Part Library Template” section.
We have created an item template that makes it possible to add a .dwp file to your web part library solution. If you want to use the web part library template, your computer needs to have the following software installed:
• Microsoft Windows SharePoint Services and Service Pack 2.0.
• Microsoft Visual Studio .NET 2005.
• Guidance Automation Extensions (GAX). This runtime component is required when running guidance packages. The Guidance Automation Extensions can be downloaded at http://msdn.microsoft.com/vstudio/teamsystem/Workshop/gat/download.aspx.
• Guidance Automation Toolkit. The GAT documentation says that you do not need GAT to use guidance packages, although in our experience this is not true. The current beta versions require it, even if you are not creating guidance packages but only using them.
Installing and Using the Web Part Library Template
In this section we show how to install and use the web part library template. Later on, we will discuss how to use GAT to create the web part library template itself and how to create a Windows Installer package for guidance packages. If you are only interested in using the web part library template to enhance the Visual Studio .NET 2005 web part development experience, this section contains all the information you need.
Download the WebPartLibrarySetup.msi file from our web site (http://www.lcbridge.nl/ download). You can install the web part library template by double-clicking the Windows Installer Package. Close all instances of Visual Studio .NET 2005 before installing the package. The Windows Installer package will install all assemblies related to the web part library template in a folder dedicated to the guidance package. The Guidance Automation Extensions do not support assemblies in the Global Assembly Cache (GAC) and will not load assemblies located in there, even if the assembly is explicitly referenced in the guidance package. Double-click the .msi file to install the package. This will open a pop-up window with welcome text, as shown in Figure 1-11.
14 C H A P T E R 1 ■ I N C O R P O R A T I N G . N E T 2 . 0 I N S H A R E P O I N T
■
Note To create the Windows Installer package that is used to install the web part library template, we
used the Technology Preview version of the Guidance Automation Toolkit because the official GAT was not released at the time of this writing.Figure 1-11. First step of the setup of the web part library template
Next, choose the folder where you want the template to be installed and click Next. See Figure 1-12.
Figure 1-12. Second step of the setup of the web part library template
C H A P T E R 1 ■ I N C O R P O R A T I N G . N E T 2 . 0 I N S H A R E P O I N T 15
Click Next to start the installation, as shown in Figure 1-13.
Figure 1-13. Last step of the setup of the web part library template
When the installation has succeeded, you will find the web part library template under Add and Remove Programs, as seen in Figure 1-14. This is the place where you can remove or repair the template. You cannot install two versions of the same guidance package at the same time. If you do attempt to install a guidance package with the same name as an existing guidance package, the Guidance Automation Extensions will throw an exception, informing you that you must uninstall the previous instance of the guidance package before installing the new one.
You will also find evidence of installing the web part library template in Visual Studio .NET 2005. Open Visual Studio .NET 2005 and choose File ➤ New ➤ Project. In the New Project window, you will see a new project type called Guidance Packages. Click Guidance Packages and underneath it you will find a package called WebPartLibrary. In the right window pane, you will see a template called WebPartLibrary Solution, as shown in Figure 1-15.
16 C H A P T E R 1 ■ I N C O R P O R A T I N G . N E T 2 . 0 I N S H A R E P O I N T
Figure 1-14. The Add and Remove Programs window
Figure 1-15. Choose a project in Visual Studio .NET 2005.
[image:35.612.62.391.350.575.2]C H A P T E R 1 ■ I N C O R P O R A T I N G . N E T 2 . 0 I N S H A R E P O I N T 17
Click WebPartLibrary Solution, fill in a location and a descriptive name, and click OK. This will start a wizard page where you will fill in a project name and the name of the class that will be created initially. Then click Finish, as shown in Figure 1-16.
Figure 1-16. Wizard page belonging to the project creation
A couple of things will be created at this point:
• A solution containing a properties directory with an assembly.info file
• A references directory containing the following references:
• System
• System.Data
• System.Web
• System.Xml
• Microsoft.SharePoint
• A class file called WebPart.cs
Figure 1-17 shows the new solution created with the help of the web part library template.
18 C H A P T E R 1 ■ I N C O R P O R A T I N G . N E T 2 . 0 I N S H A R E P O I N T
Figure 1-17. Web part library template in Visual Studio
The WebPart.cs class file contains the following code:
using System;
using System.ComponentModel; using System.Web.UI;
using System.Web.UI.WebControls; using System.Xml.Serialization; using Microsoft.SharePoint;
using Microsoft.SharePoint.Utilities; using Microsoft.SharePoint.WebPartPages;
namespace WebPartLibrarySolution1 {
[DefaultProperty("Text"),
ToolboxData("<{0}:Test runat=server></{0}:Test>"), XmlRoot(Namespace = "WebPartLibrarySolution1")] public class Test : WebPart
{
protected override void RenderWebPart(HtmlTextWriter output) {
C H A P T E R 1 ■ I N C O R P O R A T I N G . N E T 2 . 0 I N S H A R E P O I N T 19
string htmlcode = "Hello World";
output.Write(SPEncode.HtmlEncode(htmlcode)); }
} }
The class itself inherits from the Microsoft.SharePoint.WebPartPages.WebPart class, which makes it a web part that is suitable to be used within a SharePoint site.
There are two things left to do. First, check if the output path of the project is changed to the bin directory of the root folder of the virtual server. If this is not the case, change the output path. This makes testing the web part considerably easier. Otherwise you would have to copy the web part dll manually each time you compile. By default, the root folder is [drive letter]\ inetpub\wwwroot. If the bin folder does not exist, you have to create one yourself. Secondly, as shown in the following code listing, you need to add your assembly to the SafeControls list of the web.config file, which is also located at the root of the virtual server:
<SafeControl Assembly="MyWebPartLib" Namespace="MyWebPartLib" TypeName="*" ➥ Safe="True" />
Here, we are using a partially qualified assembly name, which is great for creating code examples. We could have chosen to use fully qualified names, a practice that is recommended for production code. Those names include the following information: assembly name, version number, culture (which is always set to neutral for code assemblies), and the developer iden-tity (a public key token).
Assemblies with fully qualified names are also known as strong-named assemblies. Strong-named assemblies make it easier to enforce security policies for assemblies, because you can assign security permissions based on developer identity. Another advantage is that strong names make creating unique assembly names easier, thus reducing chances for name conflicts. The content of a strong-named assembly cannot be tampered with after compilation, as strong-named assemblies contain a hash code representing the binary content of the assembly. This hash code is unique for every assembly, and the .NET CLR makes sure the hash code matches the assembly content during load time. If someone has tampered with your assembly after compilation, the hash code will not match the content and will not be loaded. A final advantage is that version policies are only applied to strong-named assemblies, not to assem-blies with partially qualified names. Strong names are mandatory for assemassem-blies that need to be installed in the GAC. The next code shows a SafeControl entry for a strong-named assembly:
<SafeControl Assembly="MyWebPartLib" Namespace="MyWebPartLib, ➥ Version=1.0.0.0, Culture=neutral, ➥
PublicKeyToken=71e9bce111e9429d" TypeName="*" ➥ Safe="True" />
If you want to register your web part on a SharePoint site via a web part description file, you can create one by right-clicking your project and choosing Add New Item. Under Categories, you will find a new category called WebPartLibrary. Click this category and choose the template called Web Part Dwp. Give the .dwp file a descriptive name and click Add. Figure 1-18 shows the Add New Item window.
You can also create a .dwp file by right-clicking your project and then choosing Web Part Dwp, as shown in Figure 1-19. This will open the Add New Item window as well.
20 C H A P T E R 1 ■ I N C O R P O R A T I N G . N E T 2 . 0 I N S H A R E P O I N T
Figure 1-18. The Add New Item window in Visual Studio .NET 2005
Figure 1-19. Add a new web part .dwp file by right-clicking your project.
C H A P T E R 1 ■ I N C O R P O R A T I N G . N E T 2 . 0 I N S H A R E P O I N T 21
This will start a wizard that collects information about the web part description file. The assembly name and namespace will have default values. You will only have to type the name of the class, a title for your web part, and a description. The title and description are shown on the SharePoint site page the web part is imported into. The wizard is shown in Figure 1-20.
Figure 1-20. The web part .dwp file wizard
At this point, you have created your first web part via the web part library template. Now you can start adding your own code to the web part.
Guidance Automation Toolkit
In the previous section, you saw how to install the web part library template. If you want to create your own guidance packages, you will need to install the GAT. In this section, we discuss the general concepts you need to be aware of before you can start using the GAT. First you have to install the Guidance Automation Extensions, which can be downloaded at the Microsoft MSDN web site: http://msdn.microsoft.com/vstudio/teamsystem/workshop/gat/. Next, you should install the GAT itself. In this book we used the June 2006 Technology Preview version.
The GAT contains a couple of elements that work together to provide the automation functionality. The elements are recipes, actions, text template transformation templates, wizards, and Visual Studio templates, described in the following list:
• Recipes: Recipes automate a series of activities that are performed by a developer. Recipes are very suitable to automate repetitive actions.
• Actions: Actions are the most fine-grained parts of a recipe. Each action is an atomic unit of work. The order in which actions are executed is determined by the recipe definition. Actions are able to accept input via arguments gathered by a recipe or output received from another action that has already been run by the recipe.
22 C H A P T E R 1 ■ I N C O R P O R A T I N G . N E T 2 . 0 I N S H A R E P O I N T
• Text template transformation templates (T4): T4 templates return a string that is inserted in the template output and contains a combination of text and scriptlets. Scriptlets are expressions written in VB.NET or C# that are interpreted when the text template trans-formation engine that is a part of the GAT runs a template. The outcome of a scriptlet is dynamic and is added to the template output. The text part of a template is always inserted unmodified in the template output. You can also use actions to generate text from a T4 template. The text template transformation engine is not just a part of the GAT; it is also included in the Domain Specific Language (DSL) Toolkit. We discuss the DSL Toolkit in detail in Chapter 5.
• Wizards: Recipes can be associated to wizards. A wizard contains one or more steps that are displayed as pages to guide the developer and to gather information used by a recipe. A wizard page contains one or more fields, where each field is associated to a recipe argument. Every field includes a type converter and a user interface (UI) type editor. The type converter validates the value of a field and converts the value from a user interface representation to a type representation. The UI type editor is used to render the user interface that collects the information.
A wizard typically provides the developer with a number of default values that are either set when the recipe reference is created or are obtained by the recipe framework. Regardless of the presence of default values, a developer always has to step through the entire wizard that shows the defaults to the developer. This gives the developer a chance to acknowledge the default values.
There are cases when it is not the responsibility of a developer to define or acknowledge a field value. Some fields are obtained by the framework or the wizard itself. This process is known as value propagation. Such fields are not shown in the wizard. If a field is required, the wizard framework will not allow access to later pages in the wizard via the wizard sidebar until all required fields contain data.
• Visual Studio .NET templates: In essence, a Visual Studio .NET template is nothing more than XML data that describes how to create Visual Studio solutions, projects, or items. Templates are unfolded by the Visual Studio template engine. Using the GAT, you can associate Visual Studio templates with recipes. This association means that when a template is unfolded, the wizard extension calls the recipe to let it collect parameter values, also known as arguments. The arguments are used to execute actions that may further transform solution items created by the template. Guidance packages can be managed via the Guidance Package Manager in Visual Studio .NET 2005. You can find the Guidance Package Manager via the Tools menu. Once a guidance package is installed and enabled for a particular solution, recipes can be executed to carry out the required tasks.
Creation of the Web Part Library Template
In this section, we explain how to use the GAT to create the web part library template that is discussed previously in the section “Installing and Using the Web Part Library Template.” The GAT contains a predefined solution for developing a guidance package, which we will use to create a web part library template.
C H A P T E R 1 ■ I N C O R P O R A T I N G . N E T 2 . 0 I N S H A R E P O I N T 23
The first step for building a web part library template is to create a new folder in the Templates ➤ Solutions ➤ Projects folder. We will call this folder WebPartLibrary. This folder will contain the following files: WebPart.cs, WebPartLibrary.csproj, and a WebPartLibrary. vstemplate file. It will also contain a folder named Properties, and that folder will contain the assembly.info file.
The WebPartLibrary.vstemplate file is a Visual Studio template that looks identical to a normal Visual Studio template except that it contains additional information used by the recipe framework. The template includes a <WizardExtension> element that specifies a class in the recipe framework that implements template extensions for the GAT. The following XML shows the content of our WebPartLibrary Visual Studio template:
<VSTemplate Version="2.0.0" Type="Project" ➥
xmlns="http://schemas.microsoft.com/developer/vstemplate/2005"> <TemplateData>
<Name>WebPart Library Project</Name>
<Description>WebPart class library project </Description>
<Icon Package="{FAE04EC1-301F-11d3-BF4B-00C04F79EFBC}" ID="4547" /> <ProjectType>CSharp</ProjectType>
<SortOrder>20</SortOrder>
<CreateNewFolder>false</CreateNewFolder> <DefaultName>ClassLibrary</DefaultName> <ProvideDefaultName>true</ProvideDefaultName> </TemplateData>
<TemplateContent>
<Project File="WebPartLibrary.csproj" ReplaceParameters="true">
<ProjectItem ReplaceParameters="true">Properties\AssemblyInfo.cs</ProjectItem> <ProjectItem ReplaceParameters="true">WebPart.cs</ProjectItem>
</Project> </TemplateContent> <WizardExtension> <Assembly>
Microsoft.Practices.RecipeFramework.VisualStudio, Version=1.0.51206.0, ➥ Culture=neutral, PublicKeyToken=b03f5f7f11d50a3a
</Assembly> <FullClassName>
Microsoft.Practices.RecipeFramework.VisualStudio.Templates.UnfoldTemplate </FullClassName>
</WizardExtension> </VSTemplate>
This XML is called a solution template. Solution templates are launched via the New
command on the File menu.
The next file of the package is the WebPartLibrary.csproj file. This is a project template that contains a project description. The template unfolds to a project in an existing solution. The project template will include references to other assemblies and will be responsible for creating any class files, the project file (.csproj), and the assembly.info file. The following XML shows the project template that can be used to create the web part library project:
24 C H A P T E R 1 ■ I N C O R P O R A T I N G . N E T 2 . 0 I N S H A R E P O I N T
<Project DefaultTargets="Build" ➥
xmlns="http://schemas.microsoft.com/developer/msbuild/2003"> <PropertyGroup>
<Configuration Condition=" '$(Configuration)' == '' ">Debug</Configuration> <Platform Condition=" '$(Platform)' == '' ">AnyCPU</Platform>
<ProductVersion>8.0.30703</ProductVersion> <SchemaVersion>2.0</SchemaVersion>
<ProjectGuid>$guid1$</ProjectGuid> <OutputType>Library</OutputType>
<AppDesignerFolder>Properties</AppDesignerFolder> <RootNamespace>$safeprojectname$</RootNamespace> <AssemblyName>$safeprojectname$</AssemblyName> </PropertyGroup>
<PropertyGroup Condition=" '$(Configuration)|$(Platform)' == 'Debug|AnyCPU' "> <DebugSymbols>true</DebugSymbols>
<DebugType>full</DebugType> <Optimize>false</Optimize>
<OutputPath>\inetpub\wwwroot\bin\</OutputPath> <DefineConstants>DEBUG;TRACE</DefineConstants> <ErrorReport>prompt</ErrorReport>
<WarningLevel>4</WarningLevel> </PropertyGroup>
<PropertyGroup Condition=" '$(Configuration)|$(Platform)' == 'Release|AnyCPU' "> <DebugType>pdbonly</DebugType>
<Optimize>true</Optimize>
<OutputPath>\inetpub\wwwroot\bin\</OutputPath> <DefineConstants>TRACE</DefineConstants> <ErrorReport>prompt</ErrorReport> <WarningLevel>4</WarningLevel> </PropertyGroup>
<ItemGroup>
<Reference Include="System"/> <Reference Include="System.Data"/> <Reference Include="System.Xml"/> <Reference Include="System.Web"/>
<Reference Include="Microsoft.SharePoint"/> </ItemGroup>
<ItemGroup>
<Compile Include="WebPart.cs" />
<Compile Include="Properties\AssemblyInfo.cs" /> </ItemGroup>
<Import Project="$(MSBuildBinPath)\Microsoft.CSHARP.Targets" /> </Project>
The WebPart.cs file that is created by the project template looks like this:
C H A P T E R 1 ■ I N C O R P O R A T I N G . N E T 2 . 0 I N S H A R E P O I N T 25
using System;
using System.ComponentModel; using System.Web.UI;
using System.Web.UI.WebControls; using System.Xml.Serialization; using Microsoft.SharePoint;
using Microsoft.SharePoint.Utilities; using Microsoft.SharePoint.WebPartPages;
namespace $safeprojectname$ {
[DefaultProperty("Text"),
ToolboxData("<{0}:$ClassName$ runat=server></{0}:$ClassName$>"), XmlRoot(Namespace = "$safeprojectname$")]
public class $ClassName$ : WebPart {
protected override void RenderWebPart(HtmlTextWriter output) {
string htmlcode = "Hello World";
output.Write(SPEncode.HtmlEncode(htmlcode)); }
} }
All arguments preceded by a $ will be replaced once the project is created. Some values are entered in the wizard by the developer, and some values will have dynamic values based on other values. For example, we have decided that the default namespace of a solution will be identical to the solution name. In the assembly.info file you will also find arguments that are preceded with $. You can look at the assembly.info code here:
using System.Reflection;
using System.Runtime.CompilerServices; using System.Runtime.InteropServices;
[assembly: AssemblyTitle("$projectname$")] [assembly: AssemblyDescription("")] [assembly: AssemblyConfiguration("")]
[assembly: AssemblyCompany("$registeredorganization$")] [assembly: AssemblyProduct("$projectname$")]
[assembly: AssemblyCopyright("Copyright © $registeredorganization$ $year$")] [assembly: AssemblyTrademark("")]
[assembly: AssemblyCulture("")] [assembly: Guid("$guid1$")]